
BBQ 1408 - Thermometer ADE - Free user manual and instructions
Find the device manual for free BBQ 1408 ADE in PDF.
| Brand | ADE |
| Model | BBQ 1408 |
| Product type | Wireless cooking thermometer |
| Use | Measurement of core temperature of food |
| Power supply (base station) | 2 AA batteries (R06) 1.5 V |
| Power supply (receiver) | 2 AAA batteries (R03) 1.5 V |
| Transmission range | Approximately 60 m (open area) |
| Radio frequency | 433.92 MHz |
| Max. transmission power | +10 dBm |
| Rated current (station) | 600 μA |
| Rated current (receiver) | 100 μA |
| Temperature range | -50 °C to 300 °C |
| Units of measurement | °C / °F (switchable) |
| Preset meat types | Beef, Lamb, Veal, Hamburger, Pork, Turkey, Chicken, Fish, PGM |
| Alarms | Audible beeps (station), tone or vibration (receiver) |
| Backlight | Yes, approximately 30 seconds |
| Cleaning | Wipe with a damp cloth, do not immerse or put in dishwasher |
| Safety | Dangerous probe tip, keep out of reach of children |
| Warranty | 2 years |
| Package contents | Base station, receiver with clip, probe with cable and cap, 4 batteries, instruction manual |
Frequently Asked Questions - BBQ 1408 ADE
User questions about BBQ 1408 ADE
0 question about this device. Answer the ones you know or ask your own.
Ask a new question about this device
Download the instructions for your Thermometer in PDF format for free! Find your manual BBQ 1408 - ADE and take your electronic device back in hand. On this page are published all the documents necessary for the use of your device. BBQ 1408 by ADE.
USER MANUAL BBQ 1408 ADE
Wireless Meat Thermometer |
22089 Hamburg, Germany
You have chosen to purchase a high-quality product from the ADE brand, which combines intelligent functions with an exceptional design. This thermometer helps you to check the perfect cooking point and the temperature for various types of meat, wines, and other comestibles. The many years of experience of the ADE brand ensure a high technical standard and proven quality.
We wish you much enjoyment and success.
Your ADE Team
Table of Contents
General information 28
Intended Use 29
Safety. 30
Start-up 34
Scope of delivery. 35
At a glance 36
Basic functions 38
Measure temperature. 41
Other functions 44
Cleaning. 44
Technical Data. 45
Declaration of Conformity. 46
Warranty 47
Disposal 48
About this manual

This operating manual describes how to safely use and care for your products.
Keep this operating manual in a safe place in case you would like to refer to it later. If you pass this item on to someone else, pass on this manual as well. Failure to observe the recommendations in this operating manual can lead to injuries or damage to your product.
Explanation of symbols

This symbol, combined with the word DANGER, warns against serious injury.

This symbol, combined with the word WARNING, warns against moderate and mild injuries.

This symbol, combined with the word NOTE, warns against material damage.

This symbol signifies additional information and general advice.
Intended Use
This roasting thermometer is intended for measuring the temperature or degree of cooking of food during roasting.
Other possible uses:
- BBQ thermometer
- Beverage thermometer for hot and cold beverages,
- Food thermometer (for soups, during baking, for baby food, etc.)
The item is intended for private household use and the quantities usually handled in that setting. The item is not suitable for commercial or semi-domestic use in employee kitchens in shops, offices, and other commercial areas, on agricultural estates, by customers in hotels, motels, or other residential facilities, or in bed-n-breakfasts.
The item is not suitable for measuring the body temperature of humans or animals.
The sensor tip presents a risk of injury!
Safety
This item is not intended for use by persons (including children) with limited physical, sensory, or intellectual abilities or lacking experience and/or knowledge, unless they are supervised by a responsible adult or have been instructed in the correct use of the item.
- Children must be supervised to make sure that they do not play with the item.
- Batteries, when swallowed, can be life-threatening. Thus, keep devices and batteries out of reach of small children. If a
battery is swallowed, medical assistance must be sought immediately.
DANGER for Children
- Keep packaging material and small parts away from children. Risk of choking if swallowed.
RISK of injuries
- Be careful when handling the thermometer. The sensor tip presents a risk of injury. Always put the protective cap on the sensor tip immediately after use.
RISK of fire/burning and/or explosion
- Risk of explosion if batteries are improperly replaced. Replace only with the same or equivalent battery type. Observe the "Technical Data".
-
Batteries must not be recharged, reactivated by other means, dismantled, thrown into fire, or short-circuited. Otherwise there is an increased risk of explosion and of leakage; furthermore, gases may escape.
-
Avoid contact of the battery fluid with skin, eyes, and mucosa. In case of contact, rinse the affected areas right away with plenty of clean water and consult a doctor immediately.
BEWARE of material damage
-
Do not immerse the roasting thermometer and/or radio receiver in water or other liquids. Both parts must not be put in the dishwasher for cleaning.
-
Protect the devices from strong shocks and vibrations.
-
Remove the batteries from both devices when they are depleted or when the item is not used for a long time. This prevents damage caused by leakage of battery acid.
-
When inserting and changing batteries, pay attention to the correct polarity (+/-) .
-
Do not expose batteries to extreme conditions, for example, by storing them on radiators or in direct sunlight. Increased risk of leakage!
-
Clean the battery and device contacts, as needed, before inserting the battery.
-
Only use batteries of the same type. Do not use different types or used and new batteries together.
- Do not make any modifications to the product. Only allow repairs to be carried out at a specialist workshop. Repairs carried out incorrectly can considerably endanger the user.
Start-up
- Open the battery compartment of the roasting thermometer and insert two R06 (AA) batteries as indicated at the bottom of the battery compartment. Observe the correct polarity (+/-) .
The display will light up and beeps will sound.
- Close the battery compartment again.
- Remove the belt clip from the back of the radio receiver.
- Open the battery compartment of the radio receiver and insert two R03 (AAA) batteries as indicated at the bottom of the battery compartment. Observe the correct polarity (+/-) .
The display will light up and beeps will sound or the radio receiver will vibrate.
- Close the battery compartment again and attach the belt clip.
- Plug the temperature sensor cable into the connection socket of the roasting thermometer.
The radio receiver will be connected to the base station (the roasting thermometer) shortly thereafter and both displays will
show the indoor temperature measured by the temperature sensor.
- Unwind the temperature sensor cable completely.
-
Remove the protective film from the display. Notes on changing the battery:
-
A battery change is necessary if the display shows nothing or an empty battery symbol is displayed (battery change indicator only for the roasting thermometer).
-
Only use the battery type specified in the "Technical Data".
Always replace all batteries. - Dispose of old batteries in an environmentally friendly manner, see "Disposal".
Scope of delivery
- Wireless roasting thermometer (= base station)
- Radio receiver with belt clip
- Temperature sensor with cable and protective cap
2 batteries R03 (AAA) / 1.5 V
2 batteries R06 (AA) / 1.5 V - Operating Manual
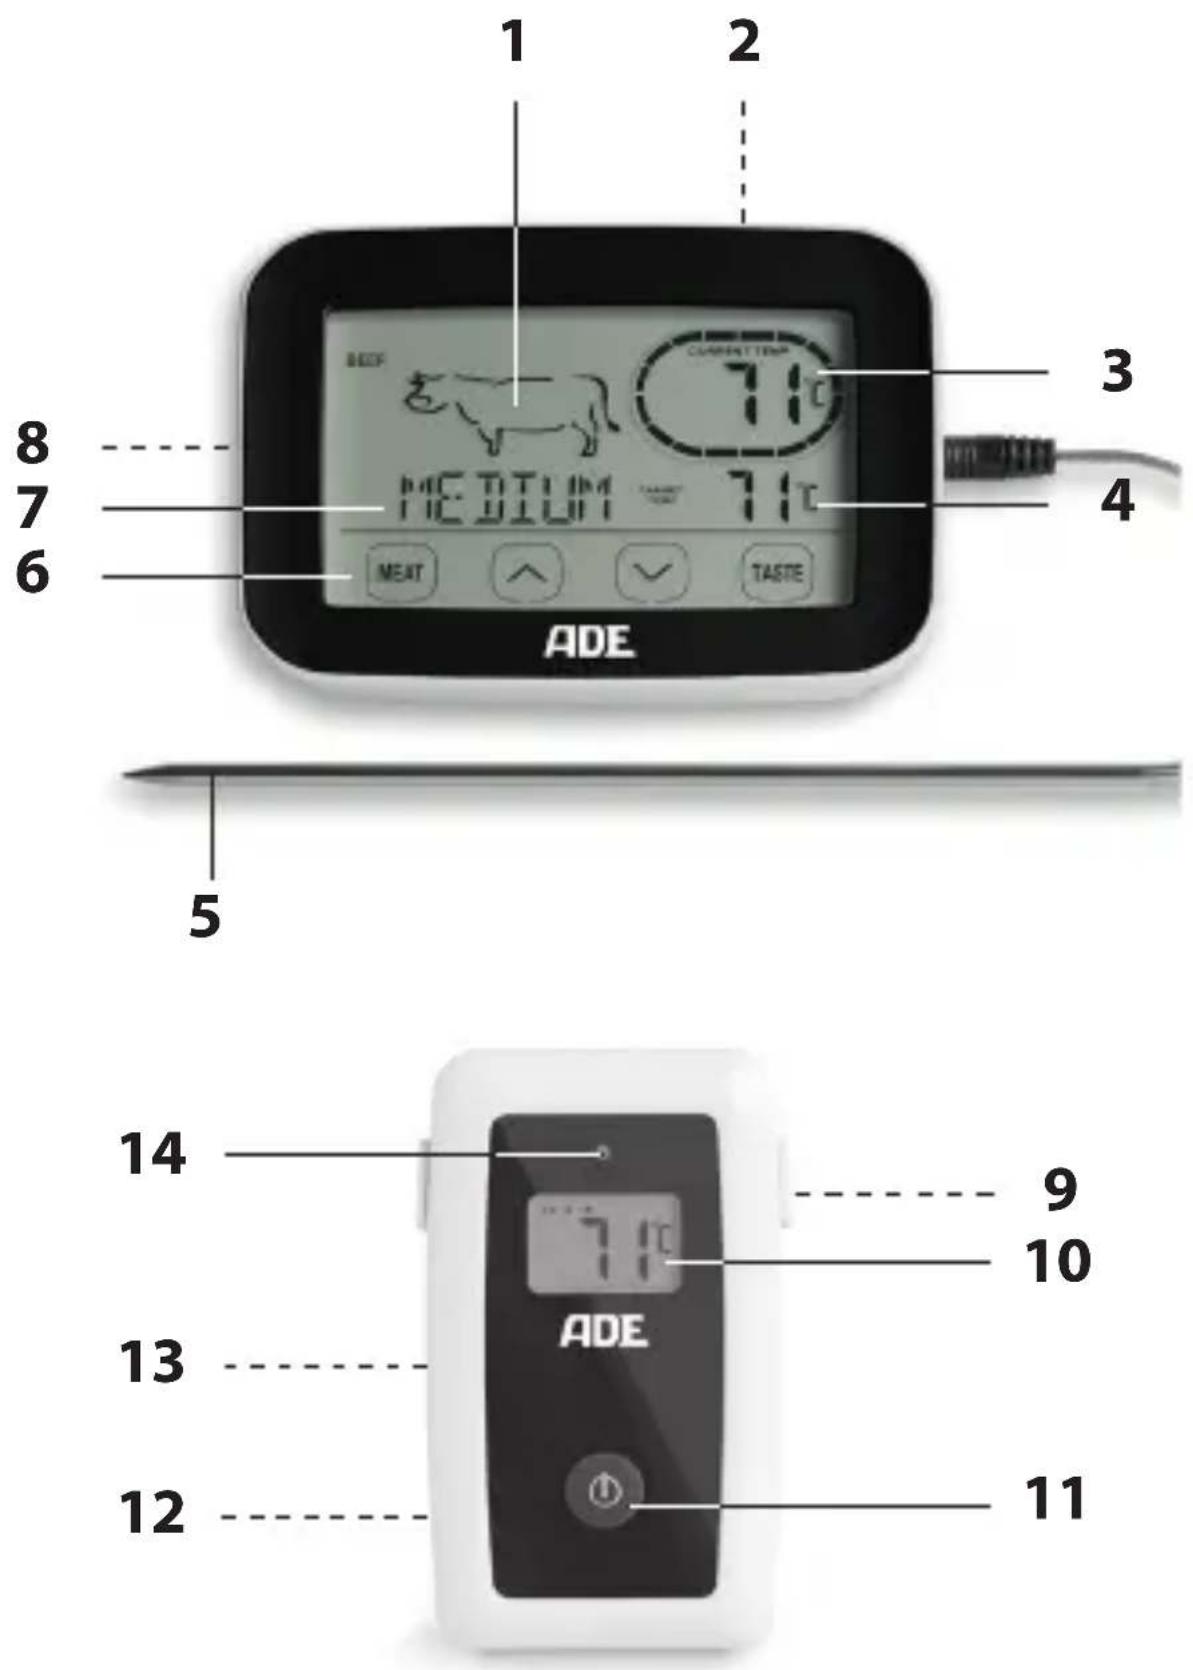
1 Chosen meat type
2 On/off switch roasting thermometer
3 Measured temperature
= current radio transmission
4 Set temperature
5 Temperature probe with cable
6 Operating buttons (see next page)
7 Chosen degree of doneness
8 Battery compartment (back), 2x R06 (AA)
9 Belt clip (back)
10 Display
11 On/off switch radio receiver
12 Selector switch for alarm type: Alarm sound or vibration (back)
13 Battery compartment (back), 2x R03 (AAA)
14 Radio control LED (lit during current radio transmission)
Operating buttons
Button Function

Choose meat type

Set temperature (increase)

Set temperature (decrease)

Set degree of doneness
Basic functions
Power on/off
-To switch both devices on or off, press and hold down the button for approx. 2 seconds.
Pay attention to the following:
- The roasting thermometer can also be used without the radio receiver.
If both devices are not used for approx. 30 minutes, they will turn off automatically.
- If the temperature does not change, the red radio control LED on the radio receiver will always light up after approx.
30 seconds. If the temperature changes by more than 1^ C , the receiver will receive a signal directly and the LED will flash.
Choose meat type and degree of doneness
- Switch on both devices.
- Press the button repeatedly to select the desired type of meat:
BEEF> LAMB > VEAL > HAMBURGER > PORK> TURKEY > CHICKEN> FISH> PGM

Select "PGM" if the desired type of meat is not included or an individual temperature is to be set.
- Press the TASTE button repeatedly to select the desired degree of doneness. It depends on the type of meat. If, for example, you have selected PORK, the following degrees of cooking can be selected:
WELL > M WELL > MEDIUM > M RARE. If you select CHICKEN, the only degree of doneness available is WELL.
The respective preset temperature of the degree of doneness is shown on the display next to "TARGETTEMP".
Setting individual temperature
- Press the button repeatedly to select "PGM".
- Use the and buttons to set the desired temperature (min. temp. -50 °C, max. temp. 300 °C)
- Finally, press
Setting the alarm type of the radio receiver
- Use the radio receiver selector switch to select the desired alarm type:
Bell symbol Alarm sound
Wave symbol Vibration

The alarm type of the roasting thermometer (beeps) is fixed and cannot be changed.

RISK of burns
-Food, oven, and other parts can be very hot. Burns risk! Protect yourself by, for example, using potholders.

ADVICE to prevent material damage
- The roasting thermometer and the radio receiver are not heat resistant. Do not leave them in the oven.
Advice on measuring
- Stick the sensor tip at least 1.5 ~cm deep into the thickest part of the meat. Do not take measurements directly on the bone.
If the measured temperature is equal to or greater than the set temperature, an alarm is triggered:
Roasting Thermometer: Beeps
- Radio receiver: Beeps or vibration alarm (depending on the setting)
In addition, "ALERT" will flash on the display and the CURRENT TEMP field will be highlighted flashing.
The meat has then finished cooking according to your chosen settings. As soon as the measured temperature drops below the set temperature, the alarm will be muted.
Measure temperature steadily (oven mode)
- Switch on both devices.
- Select the type of meat and the degree of doneness (see "Selecting the type of meat and the degree of doneness").
- Remove the protective cap from the sensor tip.
- Insert the sensor tip into the meat.
- Put food in the oven and set the appropriate oven temperature.
-
Lead the sensor cable to the outside and close the oven door. The cable adjusts itself to the seal of the oven door. CAUTION for sharp-edged frames and hinges. Do not store the roasting thermometer and radio receiver in the hot oven.
-
Put the roasting thermometer near the oven.
The temperature is now measured continuously and - if switched on - transmitted to the radio receiver. Maximum range: approx. 60 metres (open terrain).
Measure temperature selectively
- Switch on the roasting thermometer.
- Select the type of meat and the degree of doneness (see "Selecting the type of meat and the degree of doneness").
- Open the oven and remove the food.
- Remove the protective cap from the sensor tip.
- Insert the sensor tip into the food.
- After a few seconds, take the temperature reading on the display under CURRENT TEMP.
After use
- Pull the sensor tip out of the food and wipe it with a soft, damp cloth.
Attention! Burns risk!
- Put the protective cap on the sensor tip and switch off the device(s).
Illuminating the display
- Press any button to illuminate the display for approx. 30 seconds.
Change temperature measuring unit
- Open the battery compartment of the roasting thermometer.
Below the batteries is a small round switch (^ / ^) .
- Using the tip of a ballpoint pen or similar object, press on the switch to toggle between degrees Celsius (°C) and degrees Fahrenheit (°F).
- Close the battery compartment again.
Cleaning

RISK of injuries
- Be careful when handling the thermometer. The sensor tip presents a risk of injury.

ADVICE to prevent material damage
-
The roasting thermometer and the radio receiver are not waterproof. Do not clean them in the dishwasher.
-
Clean the roasting thermometer, radio receiver and sensor with a moistened soft cloth and, if necessary, some detergent.
- Wipe dry the roasting thermometer and radio receiver.
- Put the protective cap on the sensor tip.
Technical Data
Model: Roasting Thermometer
BBQ 1408
Batteries: Roasting Thermometer:
2x R06 (AA) / 1.5 V
Radio receiver:
2x R03 (AAA) / 1.5 V
Rated current: 600 A / 100 A
Radio receiver approx. 60 metres
range: (open terrain)
Transmission frequency: 433.92 MHz
Max. transmission power: +10 dBm
Distributor: Waagen-Schmitt GmbH
Hammer Steindamm 27-29
22089 Hamburg, Germany
Our products are constantly being developed and improved. For this reason, design and technical modifications are possible at any time.
Declaration of Conformity
Waagen-Schmitt GmbH hereby declares that the roasting thermometer BBQ 1408 complies with EU directives 2014/53/EU and 2011/65/EU.
The full text of the EU Declaration of Conformity is available at the following Internet address: www.ade-germany.de/doc
The declaration loses its validity if modifications have been made to the device without our approval.
Hamburg, February 2018
Waagen-Schmitt GmbH
Hammer Steindamm 27-29
22089 Hamburg, Germany

Warranty
Dear Valued Customer,
The company Waagen-Schmitt GmbH guarantees for 2 years from the purchase date the cost-free rectification of defects on the basis of material or fabrication errors through repair or exchange.
In the event of a warranty claim, please return the product with the proof of purchase (stipulating the reason for claim) to your dealer.
Disposing of the packaging

Dispose of the packaging with similar materials. Put cardboard with waste paper, films with recyclable materials.
Disposing of the product
Dispose of the product in accordance with the regulations that apply in your country.
Devices must not be disposed of in normal household waste
At the end of its life, the product must be disposed of in an appropriate way. In this way, valuable materials contained in the device will be recycled and the burden on the environment avoided. Hand in the old device at a collection point for electronic waste or at a recycling depot. For more information, contact your local waste disposal firm or your local administrative body.
Recyclable and disposable batteries do not belong in household waste
All batteries must be handed in at a collection point in your community, suburb, or at the retailer. Such batteries can thus be disposed of in an environmentally friendly way.
;Estimada/o cliente!
Chere cliente, cher client,
- Table of Contents
- About this manual
- Explanation of symbols
- This symbol signifies additional information and general advice.
- Intended Use
- The item is not suitable for measuring the body temperature of humans or animals.
- Safety
- battery is swallowed, medical assistance must be sought immediately.
- DANGER for Children
- RISK of injuries
- RISK of fire/burning and/or explosion
- BEWARE of material damage
- Start-up
- Scope of delivery
- Operating buttons
- Button Function
- Basic functions
- Power on/off
- Choose meat type and degree of doneness
- Setting individual temperature
- Setting the alarm type of the radio receiver
- RISK of burns
- Advice on measuring
- Measure temperature steadily (oven mode)
- Measure temperature selectively
- After use
- Attention! Burns risk!
- Illuminating the display
- Change temperature measuring unit
- Cleaning
- ADVICE to prevent material damage
- Technical Data
- Declaration of Conformity
- Warranty
- Disposing of the packaging
- Disposing of the product
- Devices must not be disposed of in normal household waste
- Recyclable and disposable batteries do not belong in household waste
- ;Estimada/o cliente!
Brand : ADE
Model : BBQ 1408
Category : Thermometer