
IWQ 121 - Heating AEG - Free user manual and instructions
Find the device manual for free IWQ 121 AEG in PDF.
User questions about IWQ 121 AEG
0 question about this device. Answer the ones you know or ask your own.
Ask a new question about this device
Download the instructions for your Heating in PDF format for free! Find your manual IWQ 121 - AEG and take your electronic device back in hand. On this page are published all the documents necessary for the use of your device. IWQ 121 by AEG.
USER MANUAL IWQ 121 AEG
Infrared wall mounted heater
Operation and installation 9
natural_image
Top-down view of a room with two wall-mounted devices and a central device, no text or symbols visible.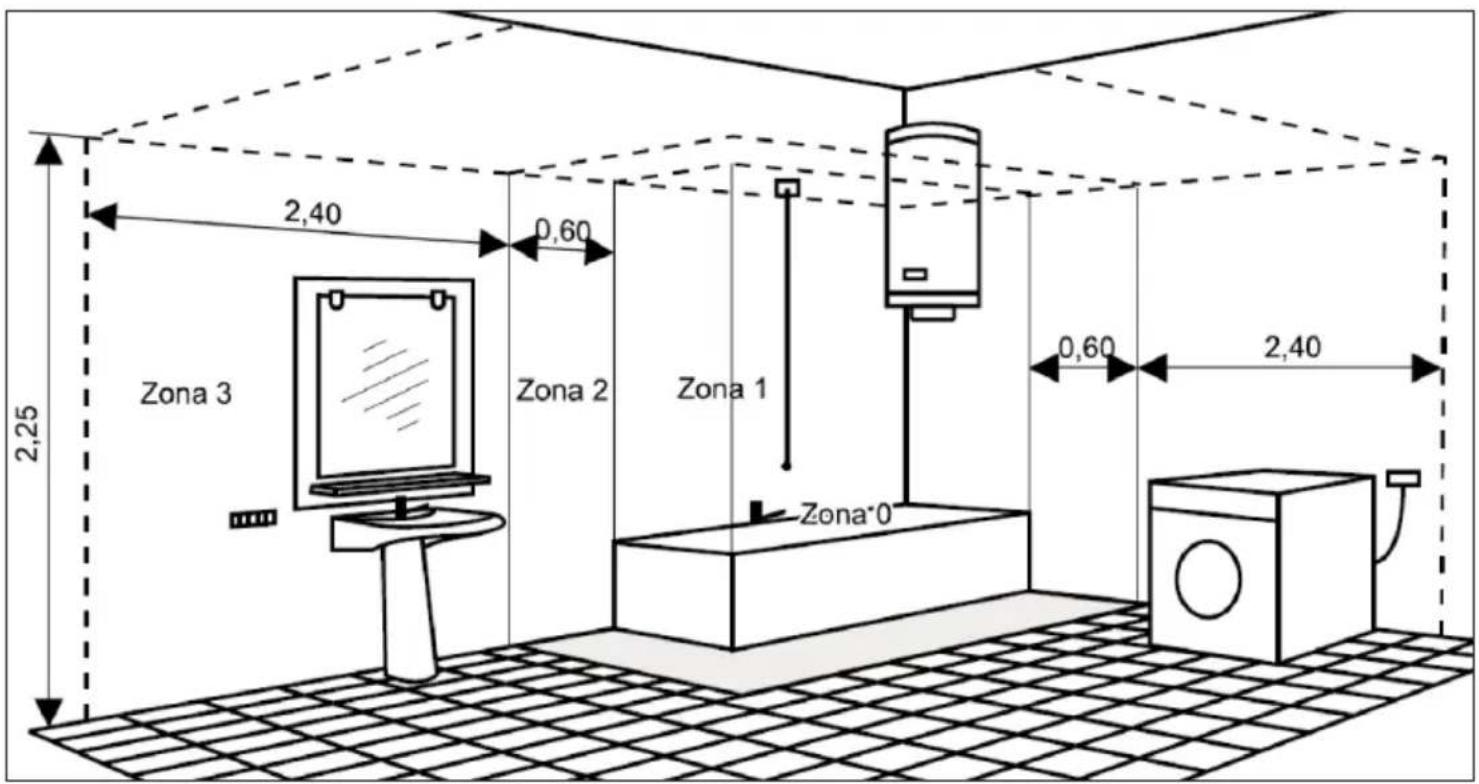
text_image
2,40 0,60 2,25 Zona 3 Zona 2 Zona 1 Zona 0 0,60 2,403

text_image
UP4 #5 #6

text_image
x 4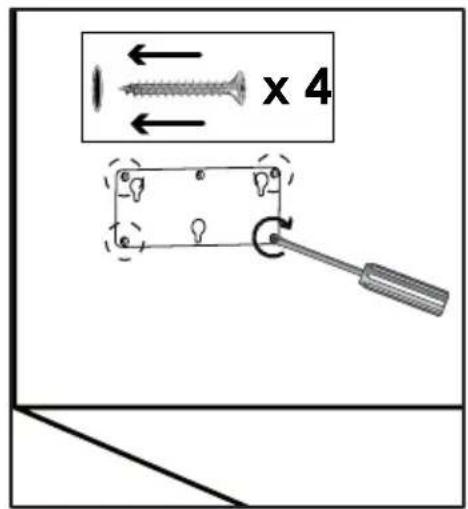
text_image
x 4
text_image
0° 1 40° 2 x 27

text_image
x 28
text_image
Diagram showing electrical wiring connections to a motor or electrical switch, with labeled components and wiring paths.9

text_image
x 210
text_image
Diagram illustrating electrical circuit components with labeled parts and directional arrows, including a car interior view.11
text_image
CLICK! CLICK! CLICK!12
text_image
OK!13
DEUTSCH
INSTALLATION AND OPERATING MANUAL
Before operating the heater, please read these instructions thoroughly to avoid damage and hazardous situations. Any use of this heater other than that stipulated in this instruction manual may cause fire, electric shock or injury, and voids all warranties.
Warranty does not apply to any defect, deterioration, loss, injury or damage caused by, or as a result of, the misuse or abuse of this heater. The rights dictated by State law are not prejudiced. None of the terms of this warranty are to be taken as excluding any conditions or warranties implied by State law, which cannot be excluded or modified.
Before any operation remove the packaging and check product integrity. In case of defects or damages do not try to repair it yourself but contact your dealer.
Do not let children play with the packaging and protect the environment by disposing of the packaging in accordance with the national regulations for waste processing.
Please retain these instructions in a safe place for future reference.
1) FOR YOUR SAFETY
- This appliance is intended for normal household use and not for use in commercial/industrial environment, in vehicles or on board ships or aircrafts.
- This appliance can be used by children aged from 8 years and above and persons with reduced physical, sensory or mental capabilities or lack of experience and knowledge if they have been given supervision or instruction concerning use of the appliance in a safe way and understand the hazards involved. Children shall not play with the appliance. Cleaning and user maintenance shall not be made by children without supervision.
- Children of less than 3 years should be kept away unless continuously supervised.
- Children aged from 3 years and less than 8 years shall only switch on/off the appliance provided that it has been placed or installed in its intended normal operating position and they have been given supervision or instruction concerning use of the appliance in a safe way and understand the hazards involved. Children aged from 3 years
and less than 8 years shall not plug in, regulate and clean the appliance or perform user maintenance.
- CAUTION: Some parts of this product can become very hot and cause burns. Particular attention has to be given where children and vulnerable people are present.
- Do not use this heater with a programmable switch, timer or any automatic switching device because of danger and/or fire hazard if the heater is covered or not correctly positioned.
- WARNING: the product is not equipped with a device to control the room temperature. Do not use the heating in small rooms when they are occupied by persons not capable of leaving the room on their own, unless constant supervision is provided by a person responsible for their safety.
- Make sure that your supply rating corresponds to what specified on the rating plate: 230V\~, 50Hz.
- This heater is water resistant to IPX4. It can therefore be used in bathrooms or other areas subject to humidity AS LONG AS IT IS NOT INSTALLED WITHIN THE PERIME-TER OF BATH TUBS OR SHOWERS. This means that it cannot be installed in the areas marked as VOLUME 1 in picture #3.
- During function, place the heater in a safe position:
- at least 1m far from inflammable objects or furnitures;
- leaving not less than 1m of free space in front of the heater;
- not located immediately below a socket-outlet.
- WARNING: In order to avoid overheating, do not cover the heater. Do not hang anything on the heater and do not cover it while it's working.
- Do not use the heater in rooms with explosive gas, while using inflammable solvents or varnish or glues or where inflammable materials are being used, such as wood block or PVC flooring is being laid or sealed.
- If the cordset is damaged and you have to change it, do not do the job yourselves! Take the product to an after sales authorised repair centre or to a person with similar skill and knowledge, in order to avoid any risk of danger.
- The appliance must be positioned so that the plug is always accessible.
- During commissioning of the appliance, the heating elements may briefly emit low levels of smoke and odour. This is non-hazardous. The smoke and odour will disperse within a few seconds.
Make sure that the room is adequately ventilated (with a partially open window, for example).
- The appliance is unsuitable for continuous operation.
Temporarily switch off the appliance after max. 10 hours of runtime and allow it to cool down.
2) Positioning
- The product must be installed respecting the minimum distances from ceiling, floor and objects at the sides indicated in picture #1.
- This infrared wall mounted heater is only suitable for mounting horizontally on a solid vertical wall. Never install it vertically or on the ceiling as indicated in picture #2.
- The product must not be mounted on any inflammable surface such as wood or plastic. Any inflammable materials must be at least 100 cm, away from the front face. This is also the minimum distance the user has to keep from the product because during use the front grille gets hot.
- Care should be taken to mount the appliance so that the product and the pull cord switch are out of the reach of children. If it is installed in a bathroom, it should be positioned so that it cannot be touched by anyone who is in the bath or in the shower.
- After use we recommend to leave the product cool down for at least 10 – 15 minutes before touching it.
3) Installation
We recommend to switch off the mains electricity supply before proceeding with the following steps.
- Fix the wall bracket using it as a template to drill holes for the rawplugs. Mind that the 3 holes which hang the unit should be in the position shown in #4, NOT upside down.
- The unit can be oriented in 2 positions.
- Horizontally
- Downwards
According to the orientation you prefer you have to fix the screws in position 1 if you want the unit to be horizontal, position 2 if you want the unit to be inclined downwards, as shown in #7.
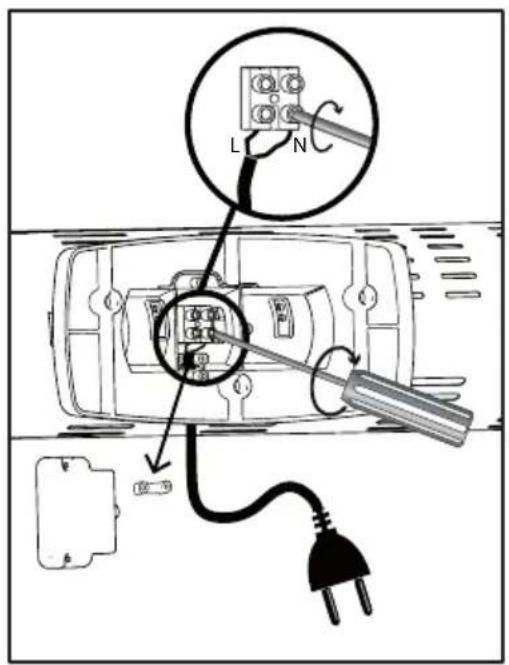
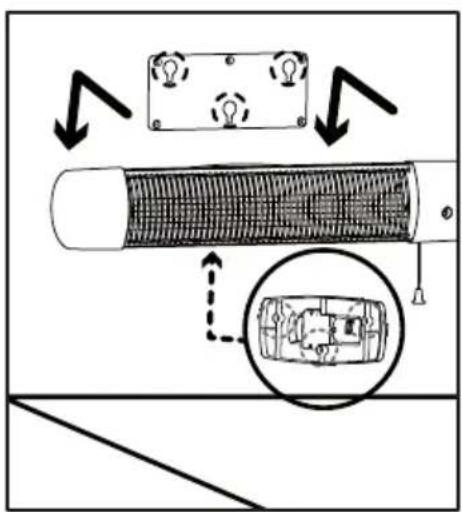
- Remove the back plastic cover from the unit, as shown in #8.
- Remove the strain relief, as shown in #9 and feed the electric lead in from behind through the round opening under the connection block and make connections according to #9. Connect the 2 phases to the connection block. The blue wire to the N pole, the brown wire to the L pole, L and N symbols are marked under the connection block.
- Secure the supply powercord fixing the strain relief.
- Fix again in position the back plastic cover, as shown in #10.
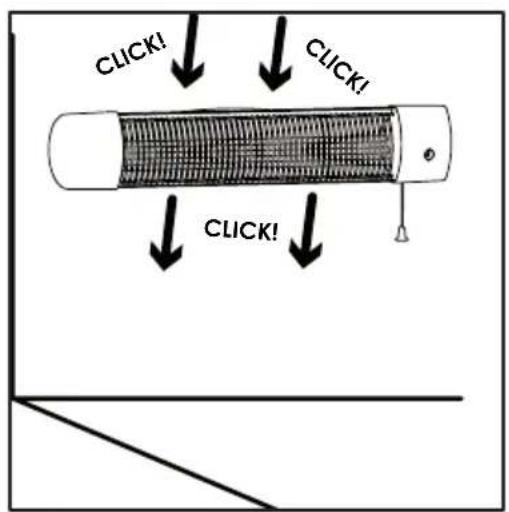
- Hang the heater to the wall bracket and pull it down to securely fix it to the bracket in the direction shown by the arrow, as in #11.
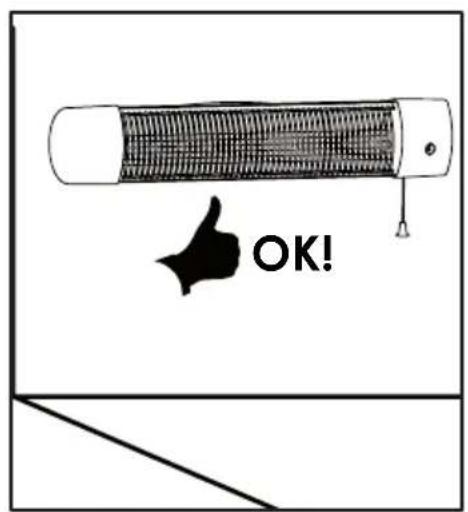
- Check that the unit is correctly fixed pulling it towards you; it shouldn't move.
4) Connection to the mains electricity supply
- This product has a double electrical insulation protection (class II) and therefore does not require an earth connection.
- The disconnection devices of the supply rating must enable the complete disconnection in case of the category of overvoltage III
- The appliance may only be connected to a 1/N/PE 230V AC 50 Hz supply. If the cordset is to be used we recommend to use a rubber coated one (type H05RR-F) with at least a 2 x 1 mm2 section.
- The safety precautions usual in the country of use and the regulations of the local electricity supply are to be observed. The appliance is fitted in the factory with an all-pole switch providing a contact break distance of ≥ 3 mm.
5) Operation
- Pulling the switch the product gets in function. You can see from the front viewing window the following symbols:
| Product rating 0 | I II III | |||
| 230V 1200W OFF | 600W 1200W X | |||
| 230V 1800W OFF | 600W 1200W 1800W |
6) Maintenance
- This product does not require any special maintenance.
- Clean the product with a dry cloth once every 6 months.
- If the product requires repairing, contact an authorised technical service centre.
- When replacing the power cable, use a 2x1,00mm2 H05RR-F HAR type. This operation must be performed by qualified personnel and never by the end user in order to avoid damaging the appliance and jeopardising personal safety.
7) Legal notice
Environment and recycling
Please help us to protect the environment by disposing of the packaging in accordance with the national regulations for waste processing.
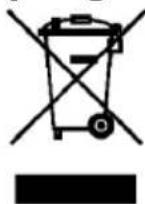
Recycling of obsolete appliances
Appliances with this label must not be disposed off with the general waste. They must be collected separately and disposed off according to local regulations.
FRANÇAIS
MANUEL D'INSTALLATION ET D'UTILISATION
Urzhumskaya street 4,
building 2
129343 Moscow
Tel. 0495 7753889
Fax 0495 7753887
Switzerland
STIEBEL ELTRON AG
Industrie West
Gass 8
5242 Lupfig
Tel. 056 4640-500
Fax 056 4640-501

