
NKE 153 - Heating AEG - Free user manual and instructions
Find the device manual for free NKE 153 AEG in PDF.
| Product type | Wall-mounted radiant convector |
| Brand | AEG |
| Model | NKE 153 |
| Nominal power | 1500 W |
| Electrical supply | 230 V ~ 50 Hz |
| Electrical class | II (double insulation) |
| Protection rating | IP24 (protected against water splashes) |
| Installation type | Wall mounting (bracket provided) |
| Operating modes | Comfort, Eco, Frost protection, Off |
| Temperature adjustment | Temperature knob with adjustable range |
| Programming | Via pilot wire (Comfort, Eco, Frost protection, Off commands) |
| Heating indicator | Indicator light showing operation |
| Locking | Possibility to lock knob and slider |
| Frost protection temperature | Approximately 7 °C |
| Minimum installation distances | Follow the diagrams in the manual (not provided here) |
| Maintenance | Dusting of grilles twice a year; internal check every 5 years |
| Cleaning | Damp cloth, without abrasive products |
| Warranty | 2 years (30 months max without proof of purchase) |
| Standards | NF, CE |
| Country of origin | France (manufacturer ATL International) |
Frequently Asked Questions - NKE 153 AEG
User questions about NKE 153 AEG
0 question about this device. Answer the ones you know or ask your own.
Ask a new question about this device
Download the instructions for your Heating in PDF format for free! Find your manual NKE 153 - AEG and take your electronic device back in hand. On this page are published all the documents necessary for the use of your device. NKE 153 by AEG.
USER MANUAL NKE 153 AEG
Thermal wave convector
Operation and installation 5
Caution very hot surface.
CAUTION: Portions of this product may become hot and cause burns. Pay particular attention to the presence of children and vulnerable people.
- Keep away from this unit child under 3 years unless they are under continuous surveillance.
- Children between 3 and 8 years must only turn on & off the unit as long as it has been installed in a normal position, that these children have supervision, have received instructions to use of the device safely and have understood the potential dangers. Children between 3 and 8 years must not connect, adjust or clean the appliance, or make the user maintenance.
- This device should not be used by unsupervised children under 8 years old and by people with physical, sensory or mental reduced capabilities and by persons with lack of experience or knowledge, unless they can benefit through a person responsible for their safety of prior instructions. Children must not play with the appliance. Cleaning and maintenance by the user must not be performed by unsupervised children.
- This device must be plugged or connected according to the rules and standards applicable by an authorized person.
- The instruction book of this product is available by contacting the after-sales service with the number indicate on the warranty part included in this manual service.
- If the power cable is damaged, it must be replaced by the manufacturer, its after sales service or similarly qualified persons in order to avoid any danger.

Caution: to avoid overheating and for safety reasons, do not cover the panel heater.

Devices with this symbol should not be disposed with household waste but must be collected separately and recycled. The collection and recycling of end of life must be made according to the provisions and local ordinances (DEEE 2002/96/CE).

The installation of the device in high altitude causes an increase of the temperature air outlet (about 10 °C per 1000 m elevation).
2. Installation
2.1 Where to install your heater?
- This equipment was designed to be installed in a residence. Please ask your distributor before using it for any other purpose.
- The panel heater should be installed according to normal trade practice and incompliance with legislation in the relevant country (NFC 15-100 for France).
- The equipment is class 2 and is protected against splashed water IP 24. The device can be installed in volume 2 of a bathroom (Figure 1). It's forbidden to install the device in the volume 1. The device is to be installed so that switches and other controls cannot be touched by a person in the bath or shower.
- Comply with the minimum clearance distances for positioning of the panel (Figure 2).
- The wall bracket allows keeping a free space behind the device to not disturb its regulation. The distance between the unit and the wall should not be obstructed.
2.2 Do not install the panel heater
- In a draught that might affect adjustment (for example, under a central mechanical ventilation unit etc...). Under a fixed power socket (Figure ③) or near curtains or other combustible materials.
- In a non-conform position.
- The air outlet grid and the control unit is visible in the upper part of the device. It is forbidden to install a vertical unit horizontally and vice versa (Figure 4).
2.3 How to install the panel heater?
2.3.1 Preparation
a. Release the appliance's hook-on bracket (Figure 5)
- We recommend that you place the panel heater flat, face down. Take a flat head screwdriver and lift the tab taking care not deform. While holding the tab lifted, push the locking bracket to the bottom of the unit to release the upper hooks. Rotate the attachment tab around the lower hooks and remove the attachment tab.
b. Fix the hook-on bracket (Figure 6)
- Place the bracket on the ground and against the wall and mark the drilling points A. These give the position of the bottom fasteners. Replace the brackets in alignment with the drilling point A to locate drilling points B. These give the position of the upper fasteners. In case of special support, use proper anchors. Position and screw the wall brackets.
2.3.2 Electrical connexion
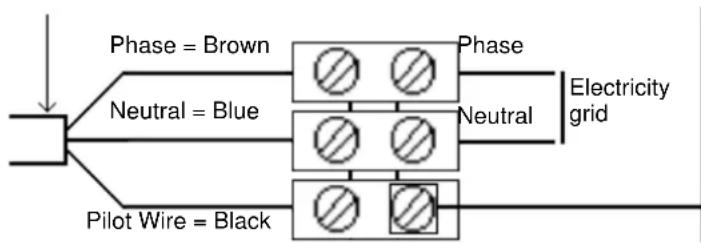
- The appliance should have a 230 V / 50Hz power supply. The panel heater must be connected to the mains by a 2-wire cable with plug or 3-wire cable (Brown= Phase, Blue = Neutral, Black = Pilot wire) by means of a connexion box. In humid
areas such as bathrooms and kitchens the power socket must be installed at least 25 cm above the floor. The installation should be fitted with a double pole break device with a break of at least 3 mm.
- Connection to earth is prohibited / Do not connect the pilot wire (black) to earth. If a master appliance or a slave appliance is protected by a 30mA differential (e.g. for bathroom) it is necessary to protect the power supply of the pilot wire on that differential, too.
| Commands Received | No signal | Complete alternation 230 V | Negative Half/alternation - 115V | Positive Half/alternation + 115V |
| Oscilloscope Ref/Neutral | ||||
| Mode obtained | CONFORT | ECO | ANTI - FREEZE | STOP HEATING LOAD SHEDDING |
Panel heater cable
flowchart
graph TD
    A["Power Grid"] --> B["Phase = Brown"]
    A --> C["Neutral = Blue"]
    A --> D["Pilot Wire = Black"]
    B --> E["Grid 1"]
    B --> F["Grid 2"]
    C --> G["Grid 3"]
    D --> H["Grid 4"]
    E --> I["Electricity grid"]
    F --> I
    G --> I
    H --> I

2.3.3 Wall mounted installation (Figure 7)
- Place the device inclined on the brackets C and rotates the device to place it on the brackets D. Lowering the device on the bracket. A click indicates that the device is attached and locked. To unlock the attachment tab, grab a screwdriver and push the tab (at the top left of the attachment tab behind the device) towards the wall. Lift the device while holding the tab with the screwdriver. Tilt it forward and remove it from the supports C.
3. Utilisation
3.1 How to fix the comfort mode? (Figure 8)
- The Comfort mode allows setting the desired temperature using the control knob.
- Put the switch H on ⚙, and then set the control knob I on the desired position, the heating indicator G lights if the ambient temperature is lower than desired one. Wait until the temperature stabilizes.
3.1.1 How to fix the Eco mode?
- ECO mode allows lowering the temperature of Comfort mode from 3 to
4°C during unoccupied periods of the room. It is recommended that this mode should be used if the room is unoccupied for more than 2 hours. Put the switch H on ECO and then set the control knob I to the desired position, the heating indicator G lights if the ambient temperature is lower than desired ECO temperature. Wait until the temperature stabilizes.
3.1.2 How to fix the Frost Free mode?
- It is the position of the switch that keeps the temperature at approximately 7^ C in the room during prolonged absence from the house (usually more than 24 hours). Put the switch H on ✉.
3.1.3 How to program your device in Comfort, ECO or Frost Free mode?
- Devices equipped with an electronic thermostat are able to receive orders. There are two solutions:
- By pilot wire (black wire) for devices without plug thanks to the system Chronopass or a wall pilot wire box
- By carrier current with an interface on each device in addition to a Chronopass system or a wall carrier current box.
3.1.4 How to lock the commands (Figure 9)?
It is possible to lock or limit the use of the control knob I and to lock the switch H to prevent manipulation. Lift the unit from the wall bracket. On the back of the thermostat, remove the pins J from their support:
- The K position allows locking the control knob.
- The L position allows limiting the utilisation of the control knob.
- The M position allows locking the H switch on the desired mode.
4. Recommendations for use
- There is no point in setting maximum heating; the room temperature will not rise any quicker. If you leave for several hours, remember to reduce the temperature.
- If you have several units in a room, let them operate simultaneously. This will give you a more uniform temperature without increasing electricity consumption. This also applies for an unoccupied room; it is more interesting to let the device operate on a lower setting than turn it off completely.
5. Maintenance
- To maintain performances of your unit, you should clean the upper and lower grids of the unit about twice a year using a vacuum cleaner or a brush.
- Have a professional check the inside of the unit every five years. Dirt may collect on the grids of the unit if the atmosphere is polluted. This phenomenon is due to the poor quality of the ambient air. In this case, it is recommended to check that the room is well ventilated (ventilation, air inlet, etc.), and that the air is clean. The unit will not be replaced under the guarantee because of this type of dirt. The unit casing should be cleaned with a damp cloth, never use abrasive products.
6. Trouble-Shooting
- The device does not heat: Make sure that the installation circuit breakers are switched on, or that the load shedder (if you have one) has not switched off the unit power supply. Check the air temperature in the room. For the device equipped, check that the programmer is in Comfort mode.
- The unit is permanently heating: Make sure that it is not in a draft and that the temperature setting has not been changed.
- The unit does not carry out programming orders (Device equipped): Make sure that the programming unit is being correctly used (refer to its user's manual) or that the Chronocarte is properly inserted in its housing and that it is operating normally (batteries). The device with electronic control is equipped with a microprocessor that can be distributed by some severe mains voltage disturbances (outside EC standards defining the disturbance protection level). If there are any problems (thermostat blocked, etc.) switch off the unit power supply (fuse, circuit breaker, etc.) for about 5 minutes to allow the unit to start again. If this phenomenon occurs frequently, control the power supply by your energy supplier.
- The device is very hot on the surface: It is normal that the device when working, the maximum surface temperature is limited in accordance with standards. However, if you believe that your radiator is still too hot, make sure the power is adapted to the surface of your room (we recommend 100W / m2) and the unit is not placed in a stream of air that would disrupt its regulation.
7. Warranty conditions
KEEP THIS DOCUMENT IN A SAFE PLACE
(This certificate should only be produced if you are making a complaint, attached with the invoice of the purchase)
- This guarantee is applicable for 2 years from the date of original purchase and shall be valid for no more than 30 months from the date of manufacture.
- The warranty covers the replacement and supply of accepted defective parts except damages and interest components.
- Labour costs, travel and transportation are under the responsibility of the user.
- Damage linked to an improper installation, to a supply network not complying with standards, to an abnormal using or to the non-compliance to the instructions of the manual are not covered by the warranty.
- Present this certificate only in case of claim with your distributor or installer attaching your invoice.
- The provisions of these warranty conditions are not exclusives of benefits for the purchaser of the legal guarantee for defects and hidden defects that apply in any case in terms of articles 1641 and following of the Civil Code.
DEALER STAMP
* This information is shown on the plate which can be seen on the left-side or behind the front grille of the unit
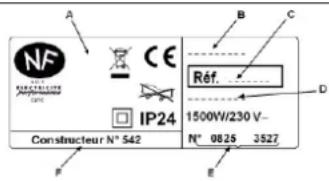
| Type of Device * | |
| Serial Number * | |
| Name and address of the customer * |
Mise en garde (FR)

The installation of the device in high altitude causes an increase of the temperature air outlet (about 10 °C per 1000 m elevation).
2. Installatie
| G | Controlelampje verwarming. It indicates the periods in which the resistance is working. With a stabilized temperature, it flashes and if the temperature is too high, it stops. |
| H | Schakelaar ⏻ |
| I | Wiertje om de temperatuur te regelen |
Urzhumskaya street 4,
building 2
129343 Moscow
Tel. 0495 7753889
Fax 0495 7753887
Switzerland
STIEBEL ELTRON AG
Industrie West
Gass 8
5242 Lupfig
Tel. 056 4640-500
Fax 056 4640-501
Irrtum und technische Änderungen vorbehalten! | Subject to errors and technical changes! | Sous réserve d'erreurs et de modifications techniques! | Onder voorbehoud van vergissingen en technische wijzigingen! | Salvo error o modificación técnica! | Rätt till misstag och tekniska ändringar förbehålls! | Excepto erro ou alteração técnica | Zastrzeżone zmiany techniczne i ewentualne błędy | Omyly a technické zmény jsou vyhrazeny! | A muszaki változtatások és tévedések jogát fenntartjuk! | Отсутствие ошибok ne гарантируется. Возможны технические изменения. | Chyby a technické zmeny sú vyhradené!


- Thermal wave convector
- Caution very hot surface.
- Installation
- Where to install your heater?
- Do not install the panel heater
- How to install the panel heater?
- Preparation
- a. Release the appliance's hook-on bracket (Figure 5)
- b. Fix the hook-on bracket (Figure 6)
- Electrical connexion
- Wall mounted installation (Figure 7)
- Utilisation
- How to fix the comfort mode? (Figure 8)
- How to fix the Eco mode?
- How to fix the Frost Free mode?
- How to program your device in Comfort, ECO or Frost Free mode?
- How to lock the commands (Figure 9)?
- Recommendations for use
- Maintenance
- Trouble-Shooting
- Warranty conditions
- KEEP THIS DOCUMENT IN A SAFE PLACE
- Mise en garde (FR)
- Installatie
- Switzerland
Brand : AEG
Model : NKE 153
Category : Heating