
RA 5589 - Heating AEG - Free user manual and instructions
Find the device manual for free RA 5589 AEG in PDF.
| Product type | Oil-filled radiator |
| Brand | AEG |
| Model | RA 5589 |
| Power | 2500 W (3 levels: high, medium, low) |
| Power supply | 220-240 V ~ 50 Hz |
| Net weight | 13.20 kg |
| Protection class | I |
| Number of fins | Not specified (estimated: 11-13 fins) |
| Dimensions (approx.) | Height: 65 cm, Width: 55 cm, Depth: 25 cm (estimation) |
| Display | Digital (temperature, modes, timer) |
| Adjustable thermostat | Yes, from 5°C to 35°C (approx.) |
| Timer | Automatic shut-off (AUTO OFF) and start (AUTO ON) timer from 1 to 24 hours |
| Anti-freeze function | Yes, maintains temperature above 5°C |
| Safety switch | Yes, automatic shut-off if tipped over |
| Overheating protection | Yes |
| Casters | 4 casters, easy assembly |
| Carrying handle | Yes |
| Cable length | Approximately 1.5 m (estimation) |
| Recommended area | Rooms of at least 5 m² |
| Maintenance | Clean with a soft dry cloth; do not use abrasive products |
| Oil | Special sealed oil, does not require refilling |
| Warranty | 2 years (standard) |
Frequently Asked Questions - RA 5589 AEG
User questions about RA 5589 AEG
0 question about this device. Answer the ones you know or ask your own.
Ask a new question about this device
Download the instructions for your Heating in PDF format for free! Find your manual RA 5589 - AEG and take your electronic device back in hand. On this page are published all the documents necessary for the use of your device. RA 5589 by AEG.
USER MANUAL RA 5589 AEG
natural_image
Three black and silver square heat exchanger units with digital displays, arranged in a row (no visible text or symbols)AEG
Overview of the Components ......Page 3
Instruction Manual......Page 29
Technical Specifications Page 32
Disposal - Meaning of the "Dustbin" Symbol ......Page 32
Język polski
Spis treści
Overview of the Components
natural_image
Technical line drawing of a mechanical assembly with no visible text or symbols
natural_image
Technical line drawing of a mechanical assembly with no visible text or symbols4 Deutsch
10 Bases para as rodas
Montagem das Rodas
ATENÇÃO:
General Safety Instructions
- Read the operating instructions carefully before putting the appliance into operation and keep the instructions including the warranty, the receipt and, if possible, the box with the internal packing. If you give this device to other people, please also pass on the operating instructions.
- The appliance is designed exclusively for private use and for the envisaged purpose. This appliance is not fit for commercial use.
Do not use it outdoors. Keep it away from sources of heat, direct sunlight, humidity (never dip it into any liquid) and sharp edges. Do not use the appliance with wet hands. If the appliance is humid or wet, unplug it immediately.
- When cleaning or putting it away, switch off the appliance and always pull out the plug from the socket (pull the plug itself, not the lead) if the appliance is not being used and remove the attached accessories.
- Do not operate the machine without supervision. If you leave the room you should always turn the device off. Remove the plug from the socket.
- Check the appliance and the cable for damage on a regular basis. Do not use the appliance if it is damaged.
- Do not try to repair the appliance on your own. Always contact an authorized technician. To avoid the exposure to danger, always have a faulty cable be replaced only by the manufacturer, by our customer service or by a qualified person and with a cable of the same type.
• Use only original spare parts. - Pay careful attention to the following "Special Safety Instructions".
Children and Frail Individuals
- In order to ensure your children's safety, please keep all packaging (plastic bags, boxes, polystyrene etc.) out of their reach.

WARNING!
Caution! Do not allow small children to play with the foil as there is a danger of suffocation!
- This device is not intended to be used by individuals (including children) who have restricted physical, sensory or mental abilities and/or insufficient knowledge and/or experience, unless they are supervised by an individual who is responsible for their safety or have received instructions on how to use the device.
Symbols in these Instructions for Use
Important information for your safety is specially marked. It is essential to comply with these instructions in order to avoid accidents and prevent damage to the machine:

WARNING:
This warns you of dangers to your health and indicates possible injury risks.

CAUTION:
This refers to possible hazards to the machine or other objects.

NOTE:
This highlights tips and information.
Special Safety Instructions for this Device
Symbols on the Product
On the products you will find symbols that indicate warnings or provide information:
WARNING:
In order to prevent overheating, the radiator must not be covered.
- This device becomes hot during use. In order to avoid burns, please ensure that it does not come into contact with the skin.
Pull the appliance by the handle. - This radiator is filled with an exact quantity of a special oil. Repairs where it becomes necessary to open the housing of the radiator may only be carried out by the manufacturer or an authorised service dealer. You should also contact the above if your radiator loses oil.
- Before disposing of the radiator drain the fuel oil and dispose of in a manner compliant with environmental protection regulations.
- Please keep a safety distance of at least 90 cm between all sides of the device and furniture and other objects.
- Under no circumstances may the radiator be used in rooms with explosive gas (e.g. petrol) or while work is being carried out with inflammable adhesives or solvents (e.g. when gluing or painting parquet, PVC etc).
- Special care must be taken when the radiator is used in the vicinity of children or when left unattended.
- Do not insert any objects into the radiator.
- Ensure that a safety distance is maintained between the power cord and the housing.
- In order to avoid overheating it is important that the air inlets and outlets are kept clear. Never suspend objects in front of or above the radiator.
- Do not use the radiator in the open air.
- This radiator is not suitable for use in bathrooms, washing rooms or rooms which are used in a similar manner. The radiator must never be placed in a position where it could fall into a bathtub or other water container.
- The radiator should not be placed directly below a mains power socket.
• The radiator should only be used in an upright position. - If the radiator should fall over, first remove the plug from the socket and allow the radiator to cool down before returning it to an upright position.
30 English
Intended Use
This appliance provides heating or additional heating for dry rooms in private residences.
- The rooms must have a floor area of 5 m ^2 or more.
- The rooms must be ventilated.
The appliance is intended for domestic use and in similar areas of application.
It may only be used in the manner described in this user manual. The appliance may not be used for commercial purposes.
Any other use is deemed not as intended and may lead to damage to property or even to personal injury.
The manufacturer assumes no liability for damage as a result of use other than the intended use.
Supplied Parts
1 Heater
2 Castor housing
4 Castors
2 Plate, U-shaped
2 Wing nuts
Unpacking the Appliance
- Remove the appliance from the packaging.
- Remove all packaging material such as plastic wrap, filler material, cable ties and cardboard packaging.
- Check that all supplied parts are included in the box.
i NOTE:
There may still be dust or production residues on the appliance. We recommend that you clean your appliance as described under "cleaning".
Description of Parts
1 Display
2 MODE button
3 °C/°F button
4 button
5 button
6 Button
7 Handle
8 Power switch
9 Power cord
10 Castor housing
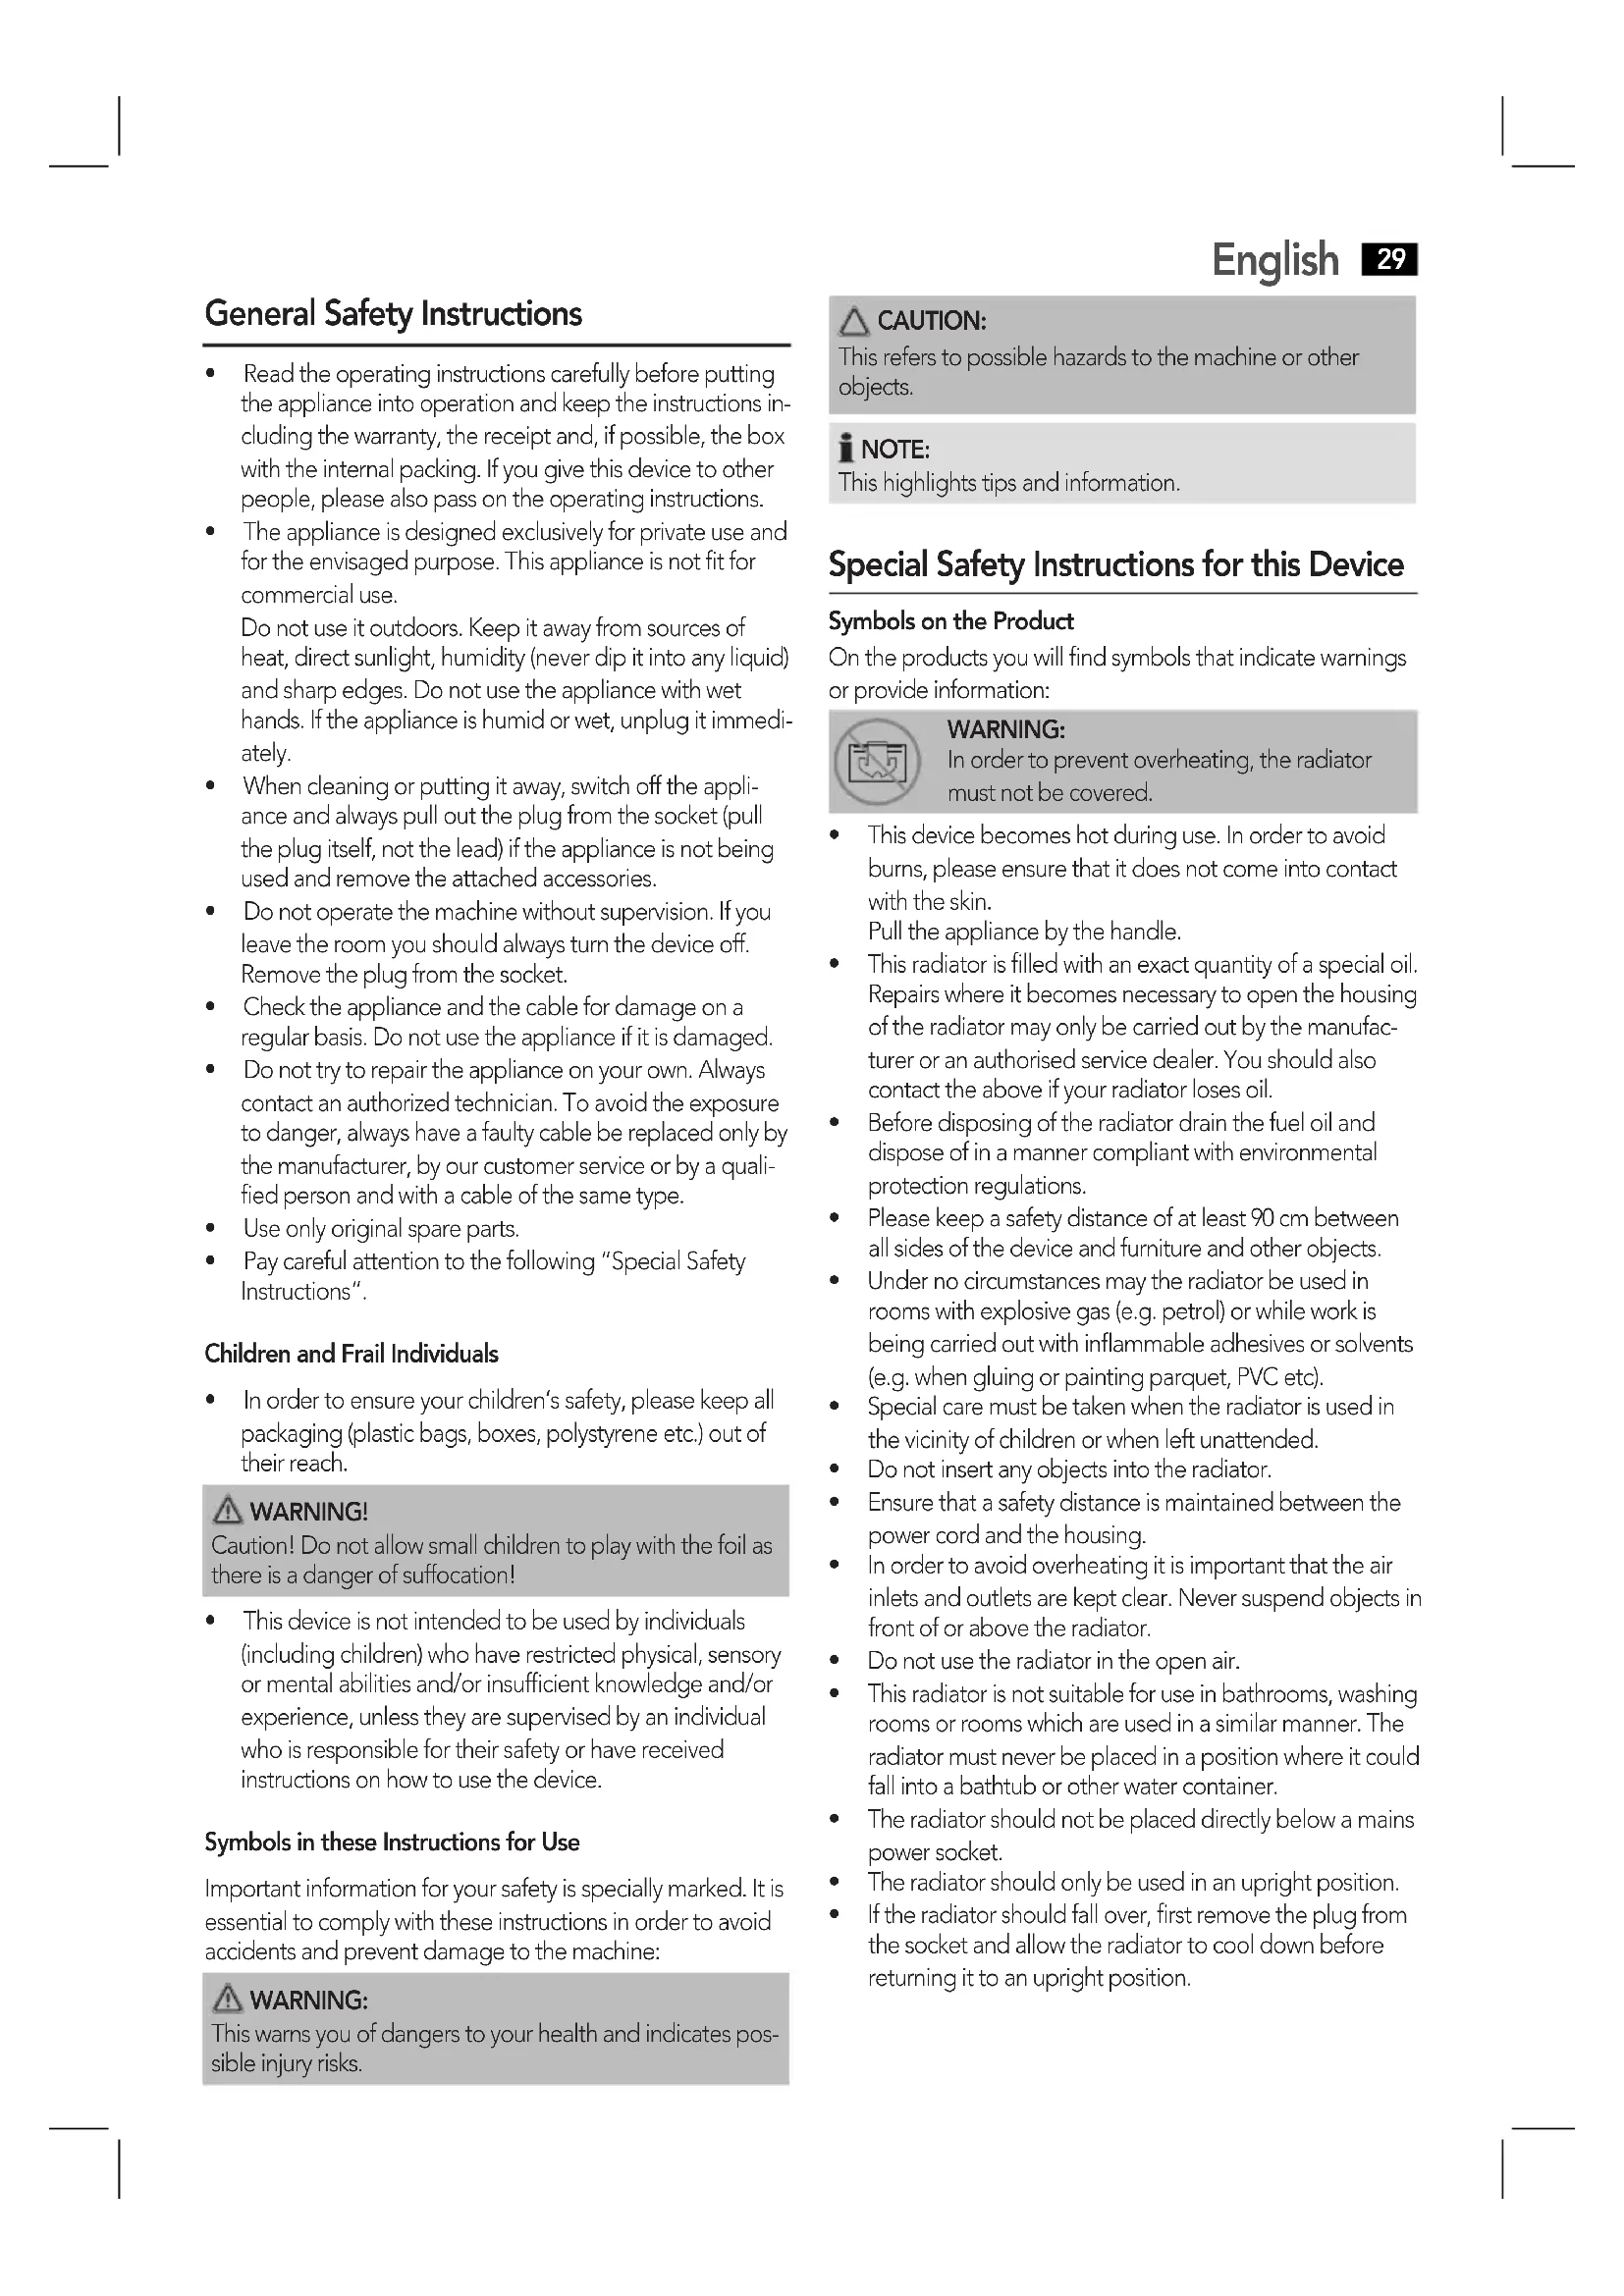
Assembling the Rollers
CAUTION:
Before the device is used for the first time the rollers have to be attached.
Please also see our illustration!
• Turn the radiator upside down.
i NOTE:
It is best to place a blanket underneath so that the housing is not damaged.
- Push the 4 castors onto the pins of the castor housing.
- Place the U-shaped brackets between the first and second and between the last and penultimate fin.
- Insert the ends of the brackets through the holes in the roller carriers.
- Attach the brackets with the wing nuts.
Instructions
• Unwind the cable completely.
Electrical connection
- Make sure that the iron voltage (see name plate) and the line voltage match.
- Switch the power switch to 0.
- Only connect the mains plug to a properly installed earthed socket 220-240 V\~, 50 Hz.
Connected Wattage
The three power levels of the devices are as follows:
$$ \mathrm{RA} 5 5 8 7 = 1 5 0 0 \mathrm{W} $$
$$ \mathrm{RA} 5 5 8 8 = 2 0 0 0 \mathrm{W} $$
$$ \mathrm{RA} 5 5 8 9 = 2 5 0 0 \mathrm{W} $$
With this connected load a separate supply line protected by a 16 A household circuit breaker is recommended.
CAUTION Overload:
- If you use extension leads, these should have a cable cross-section of at least 1.5 mm ^4 .
- Do not use any multiple sockets, as this device is too powerful.
- Do not connect other high power appliances to the same circuit.
Safety Switch
Your radiator has a safety switch which turns off the electricity as soon as the device falls over. The safety switch prevents dangerous situations caused by overheating.
CAUTION:
Always place the device in an upright position in order that it is stable and in order to prevent malfunctions.
WARNING:
The appliance may still remain hot after it has toppled over. Wait until it has cooled down.
i NOTE:
Switch the appliance on again using the button.
Levels/Heating Power
- Switch on the appliance with the power switch.
- Press the button
1 X for high power ()
2 X for medium power ()
3 X for low power ()
4 X and the appliance goes to Standby.

i NOTE:
- Select low power for e. g. a small room. If this is not sufficient, switch to the medium or high setting.
- The power settings are shown by symbols on the display.
Setting the temperature
- Switch the appliance on.
- Press the Button. The number "88" flashes on the display.
- Press the MODE button. The number 24°C or 75°F and a thermometer symbol appear on the display. The thermometer symbol flashes.
- Use the °C/°F button to select the temperature display in degrees Celsius or in degrees Fahrenheit.
- Use the "A" buttons to set the desired room temperature. The values can be read off the display.
i NOTE:
- The radiator will now warm up the room. The thermometer symbol flashes throughout.
- When the desired temperature is reached, the thermometer symbol stops flashing and is constantly lit.
- The thermometer symbol flashes again as soon as the radiator needs to be heated up again.
- Use the "+/−" buttons to change the desired room temperature at any time.
Program the Switch-off Timer (AUTO OFF)
Do you want to determine when the radiator should automatically switch off?
- Press the MODE button again as soon as you have set the temperature. "AUTO OFF" flashes on the display.
- Use the "A" buttons to set a time between 1 and 24 hours. The figure can be read off the display.
- After around 10 seconds, the "AUTO OFF" display stops flashing and is constantly lit. The radiator will switch off at the desired time.
English
Program the Switch-on Timer (AUTO ON)
Do you want to determine when the radiator should automatically switch on?
- Press the MODE button twice after you have set the temperature. "AUTO ON" flashes on the display.
- Use the "A" buttons to set a time between 1 and 24 hours. The figure can be read off the display.
- After around 10 seconds, the "AUTO ON" display stops flashing and is constantly lit. The radiator will switch on at the desired time.
i NOTE:
The "AUTO OFF" and "AUTO ON" functions cannot be combined.
Frost Guard Function
Are there rooms in your house which you would like to protect against frost? The radiator has a frost guard function.
- Connect the radiator to a 220-240 V\~, 50 Hz earthed socket.
- Switch on the power switch. The power indicator lights up, the display remains dark.
- If the temperature falls to below 5 °C, the radiator switches on at setting 3. The display lights up.
- As soon as the room has been warmed, the radiator switches back to Standby. The display switches off.
Shutting Down
- Press the button until the display switches off.
- Switch the power switch to "0". The power indicator switches off.
- Disconnect the plug from the mains.
Storage

WARNING:
Since the housing and metal parts become hot during operation, allow the appliance to cool before you put it away.
- Clean the appliance as described and allow it to dry completely. We recommend that you keep the appliance in the original packaging if you do not want to use it for long periods.
- Use the handle to pull the appliance. Do not pull on the cable!
• Always keep the appliance out of the reach of children in a well-ventilated and dry place.
Cord wind-up station for power cord
The power cord can be wound up on the front of the appliance.
32 English
Cleaning

WARNING:
- Always disconnect from the mains before cleaning and wait until the appliance has cooled down.
- Never immerse the appliance in water to clean it. This may lead to electrical shock or fire.

CAUTION:
• Do not use wire brushes or other abrasive materials.
• Do not use caustic or scouring agents.
• Wipe away dust with a dry cloth.
• Flecks can be removed with a suitably damp cloth.
Troubleshooting
| Problem Possible cause Remedy | ||
| The appliance does not work. | The appliance has no power supply. | Check the plug socket with another appliance. |
| Connect the mains plug correctly. | ||
| Check the main circuit breaker. | ||
| The appliance is faulty. | Contact our service center or a specialist. | |
| The radiator does not heat up. | The selected temperature is too low. | Select a higher temperature |
| You have accidentally programmed a switch-off time. | Switch the appliance on directly. | |
| The room does not become warm enough. | The room is too big. | Select a higher setting. |
Technical Specifications
Model:....RA 5587 / RA 5588 / RA 5589 Power supply:....220-240 V\~, 50 Hz Power consumption:....1500 W / 2000 W / 2500 W Protection class:....I Net weight:....9.25 kg / 11.10 kg / 13.20 kg
Subject to technical changes without prior notice!
This device has been tested according to all relevant current CE guidelines, such as electromagnetic compatibility and low voltage directives, and has been constructed in accordance with the latest safety regulations.

Disposal - Meaning of the "Dustbin" Symbol
Protect our environment: do not dispose of electrical equipment in the domestic waste.
Please return any electrical equipment that you will no longer use to the collection points provided for their disposal.
This helps avoid the potential effects of incorrect disposal on the environment and human health.
This will contribute to the recycling and other forms of reutilisation of electrical and electronic equipment.
Information concerning where the equipment can be disposed of can be obtained from your local authority.
