
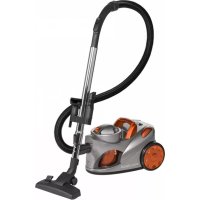
BS 958 CB - Vacuum Cleaner BOMANN - Free user manual and instructions
Find the device manual for free BS 958 CB BOMANN in PDF.

| Brand | Bomann |
| Model | BS 958 CB |
| Product type | Canister vacuum cleaner |
| Power supply | 220-240 V, 50/60 Hz |
| Rated power | 1800 W |
| Maximum power | 2300 W |
| Protection class | II |
| Net weight | 5,85 kg |
| Collection system | Bagless, transparent tank |
| Filter types | Motor protection filter, intake filter, exhaust filter |
| Included accessories | Parquet brush, turbo brush, brush head, crevice tool, upholstery nozzle, floor nozzle, telescopic tube |
| Power adjustment | Power variator (Min to Max) |
| Air regulator | Yes, on the handle |
| Cable length | Not specified (automatic cord rewinder) |
| Parking function | Yes, hook on the back |
| Filter maintenance | Wash with hot water without detergent, dry completely before reuse |
| Exhaust filter replacement | Every 6 months recommended |
| Use | Private use only |
| Safety | Do not vacuum liquids, hot ashes, or sharp objects |
Frequently Asked Questions - BS 958 CB BOMANN
User questions about BS 958 CB BOMANN
0 question about this device. Answer the ones you know or ask your own.
Ask a new question about this device
Download the instructions for your Vacuum Cleaner in PDF format for free! Find your manual BS 958 CB - BOMANN and take your electronic device back in hand. On this page are published all the documents necessary for the use of your device. BS 958 CB by BOMANN.
USER MANUAL BS 958 CB BOMANN
Overview of the Components.. 3
Instruction Manual Page 32
Technical Data.. 34
Guarantee 35
FRANÇAIS
JEZYK POLSKI
Sommaire
LiTe des differents elements de commande.. Page 3
General Safety Instructions
Read the operating instructions carefully before putting the appliance into operation and keep the instructions including the warranty, the receipt and, if possible, the box with the internal packing. If you give this device to other people, please also pass on the operating instructions.
- The appliance is designed exclusively for private use and for the envisaged purpose. This appliance is not fit for commercial use. Do not use it outdoors. Keep it away from sources of heat, direct sunlight, humidity (never dip it into any liquid) and sharp edges. Do not use the appliance with wet hands. If the appliance is humid or wet, unplug it immediately.
- When cleaning or putting it away, switch off the appliance and always pull out the plug from the socket (pull on the plug, not the cable) if the appliance is not being used and remove the attached accessories.
- Do not operate the machine without supervision. If you should leave the workplace, always switch the machine off or remove the plug from the socket (pull the plug itself, not the lead).
- Check the appliance and the cable for damage on a regular basis. Do not use the appliance if it is damaged.
- Do not try to repair the appliance on your own. Always contact an authorized technician. To avoid the exposure to danger, always have a faulty cable be replaced only by the manufacturer, by our customer service or by a qualified person and with a cable of the same type.
- Use only original spare parts.
- Pay careful attention to the following "Special Safety Instructions".
Children and Frail Individuals
- In order to ensure your children's safety, please keep all packaging (plastic bags, boxes, polystyrene etc.) out of their reach.

WARNING!
Caution! Do not allow small children to play with the foil as there is a danger of suffocation!
- In order to protect children or frail individuals from the hazards of electrical equipment, please ensure that this device is only used under supervision. This device is not a toy. Do not allow small children to play with it.
Special Safety Instructions
- Do not suck up liquids!
- Do not suck up hot ashes or pointed or sharp objects!
- Do not use the appliance in humid rooms!
- Never use without the filter. Check that the filter is inserted correctly!
- hair, clothing and body parts away from the vacuum nozzle during use!
- Keep the vacuum cleaner away from sources of heat like radiators, ovens, etc.!.
-
When the door is closed the cable must not be trapped or pulled along sharp edges or corners.
-
Do not roll over the cable with the vacuum cleaner.
- The device must not be used to vacuum up broken glass, small toys, needles, paper clips, hot ash, burning cigarette ends or matches etc.
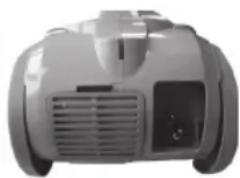
Overview of the Components
| 1 | Air | slide |
| 2 | Hose | connection |
| 3 | Vacuum power regulator | |
| 4 | Carrying | handle |
| 5 | Cable-winding | key |
| 6 | On/off | switch |
| 7 | Parking | assistance |
8 Cover of outlet filter
9 Button for releasing the new dust container
10 Dust container with motor protection filter
11 Hook on the suction tube
12 Floor nozzle
13 Telescopic suction tube
14 Accessory holder
Accessories
| 15 | Parquet | brush |
| 16 | Turbo | brush |
| 17 | Brush | nozzle |
| 18 | Crevice | nozzle |
| 19 | Upholstery | noz |
Start-up
- Insert the connection head of the suction hose into the hose connector until it locks in place. To do so, please press the buttons simultaneously. In order to release the hose again, please press the buttons once more on the connection head.
- Keep the buttons pressed down and then pull out the hose.
- Insert the vacuum tube into the handle if required.
Using the Appliance
- Fit on the accessory.
- Unwind the necessary length of cable and insert the plug in a duly installed 230V / 50Hz protective contact socket.
- Set the vacuum power with the vacuum power regulator (Min to Max).
- Vacuum at a steady speed. There is no need to exert pressure.
Attention: pay attention to the range that can be covered with the cable length.
Vacuum power regulator
Low vacuum power: For curtains and delicate fabrics Medium vacuum power: For long-pile velour carpets and textile ft ooring High vacuum power: For sturdy rugs and f oors
Cable winding device
Pull out the cable up to the maximum length indicated with the yellow mark. Never pull the cable out up to the red mark as the cable winding can be damaged. Said damages are not covered by the warranty.
Winding
Press the cable winding button and guide the cable. Hold the cable to avoid wrapping.
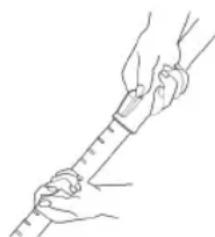
Telescope Vacuum Pipe
The height-adjustable vacuum pipe enables individual alignment to your height.
Unlock the coupling by pressing the key in the direction of the arrow.
Slide the vacuum pipe to the desired length. To lock the device, release the key until you hear it lock in place.
Nozzle accessories
Groove and brush nozzle:
For vacuuming upholstery, curtains and in corners and crevices etc.
Upholstery nozzle: For cleaning upholstery, curtains etc.
Floor nozzle: To clean carpets or smooth surfaces.
Smooth floors:
Press down the lever with the brush symbol , with your foot.
The brush is now visible.
Carpets:
Move the lever with your foot to the symbol.
Parquet brush: The floor nozzle is fitted with rollers for improved manoeuvrability. For large areas such as parquet, laminate or tiles etc.
Turbo brush: The floor nozzle is fitted with rollers for
improved manoeuvrability. The brush is equipped with a rotating and swivelling brush roller driven by the air current.
Removes ground-in dirt, animal hairs, threads and fl uff particularly thoroughly. The carpet pile is brushed up to look almost new.


Move the switch on the brush to Symbol A in order to increase the quantity of suction air. In the case of symbol (B) this is correspondingly less. This increases the suction power.
Please note that the turbo brush is not suitable for smooth floors, e.g. parquet, laminate etc. as the surface might be damaged.
Releasing the nozzles: Pull these off while turning slightly.
Air Slide
Open the air slide on the hose handle in order to regulate the airflow or to clear any particles sticking to the nozzle.
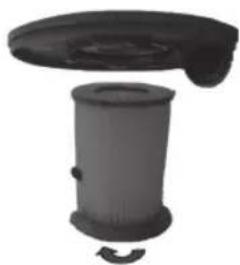
Filter
Your machine has three filter systems. The traditional dust bag system has been replaced by a transparent dust container. In this, coarse dirt particles and tiny particles fl oating in the air are swirled out of the suction air by the high speed of the air current.
It is therefore unnecessary to buy dust bags.
Once the dust level has reached the MAX mark on the dust container, or the suction power of the vacuum cleaner is reduced, please proceed as follows:
III. 1
III. 2
III. 3
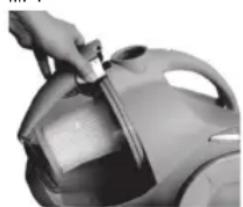
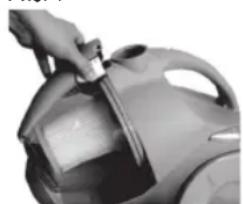
Emptying the Dust Container
- Press the button to release the dust container and remove it from the vacuum cleaner.
Pull the filter insert out carefully by the two retainers. Move the dust container to a vertical position if necessary. - Empty the contents of the dust container. Then put the fi iter insert back in position. Please ensure that the fi iter insert is reinstalled fi rmly in an upright position.
Attach the dust container again by locking it in position.
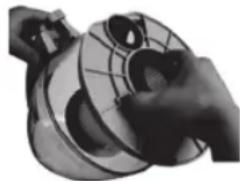
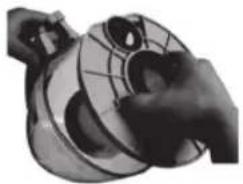
1. Motor Protective Filter (in the Dust Container)
Cleaning the Filter Element
- Press the button to release the dust container and then remove it (see illustration 1).
- Empty the contents of the dust container (see Illustration 2). Unlock the fi liter insert by turning it a short distance in a clockwise direction (see Illustration 3). In the second step the fi liter insert can be pulled out towards the bottom. Clean the motor protection fi liter by tapping and gently brushing out.
- Now replace the components.
- Attach the dust container again by locking it in position.
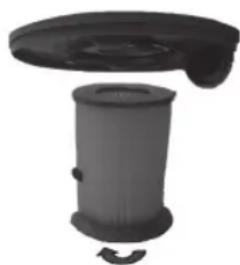
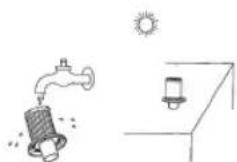
Every third time the dust container is emptied, or in the case of severe soiling, clean the fiiter by allowing water to flow through the fiiter fabric against the direction in which the vacuum cleaner blows. The dust container should only be reinserted when it is completely dry!
Now place this back in position once it has completely dried!
Caution: Never wash the fi liter in the washing machine, and please do not use a hairdryer to dry it.

III. 4
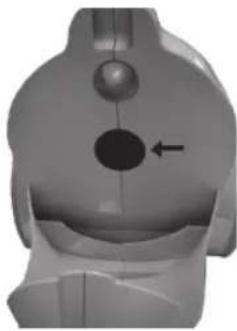
2. Inlet filter
The inlet fi liter is to be found in the dust fi liter compartment - see the arrow. Press the button to release the dust container and then remove it. Pull the fi liter out towards the front. Clean the inlet fi liter approximately every tenth time the dust container is emptied, or more frequently if necessary. Please ensure that the fi liter is always clean, as otherwise air circulation cannot be guaranteed. If necessary, the fi liter can also be washed in warm water without any additives. Place it back into place only once it is completely dry!

III.5
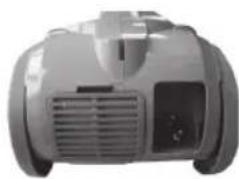
3. Outlet filter
The appliance is also equipped with an outlet fiiter. In order to ensure that the fi liter works correctly, we recommend that you replace it every six months. It is located on the rear part of your appliance behind a ventilation grid. Open the ventilation grille by pressing the lever on its side. Then pull the grille out towards the front. Remove the fi liter and clean as described above. Fit the fi liter back into place and close the ventilation grid by following the steps above in the opposite order.
Important note!
Cleaning may become necessary after a shorter time, depending on the conditions of use, e.g. when vacuuming fi ne dust. If the suction power of your vacuum cleaner diminishes please clean the fi iters as described. If the suction power suddenly diminishes during operation this may be due to the fi iters being locked.
Cleaning and storage
Cleaning
- Pull the plug out of the socket before cleaning!
- Clean the casing with a dry cloth.
- Clean the motor protection fi tter approximately every 3. time the vacuum cleaner is emptied. Clean the fi tter in hot water without additives. Put it back into place only once it is completely dry.
Storage
- Let the iron cool down completely.
- Wind the cable completely.
- Please position the device horizontally and insert the hook on the telescopic tube into the parking aid (7) on the back of the device.
Troubleshooting
The Device Does Not Work.
Remedy:
Check the connection to the mains.
Check the position of the switch.
The device does not suck up anything.
Possible Cause:
The dust container or the fi iters are dirty.
Remedy:
Empty or clean the components.
Possible Cause:
There is a foreign body in the suction tube or the nozzle.
Remedy:
Check the accessories for foreign bodies.
Noise development
The sound pressure level in the ear of an operator (LpA) was measured according to DIN EN ISO 3744. Sound pressure level detected: 78.0dB(A) no limit
Technical Data
Model: BS 958 CB
Power supply: 220-240 V, 50/60 Hz
Power consumption:
Pnom 1800W
Pmax 2300W
Protection class: II
Net weight: 5.85 kg
This device has been tested according to all relevant current CE guidelines, such as electromagnetic compatibility and low voltage directives, and has been constructed in accordance with the latest safety regulations.
Subject to technical changes without prior notice!
Guarantee
The device supplied by our company is covered by a 24-month guarantee starting on the date of purchase (receipt).
During the life of the guarantee any fault of the device or its accessories ascribable to material or manufacturing defects will be eliminated free of charge by repairing or, at our discretion, by replacing it. The guarantee services do not entail an extension of the life of the guarantee nor do they give rise to any right to a new guarantee!
Proof of the guarantee is provided by the proof of purchase. Without proof of purchase no free replacement or repair will be carried out.
If you wish to make a claim under the guarantee please return the entire machine in the original packaging to your dealer together with the receipt.
Defects to consumables or parts subject to wearing as well as cleaning, maintenance or the replacement of said parts are not covered by the guarantee and hence are to be paid!
The guarantee lapses in case of unauthorized tampering.
After the Expiry of the Guarantee
After the expiry of the guarantee repairs can be carried by the competent dealer or repair service against the payment of the ensuing costs.
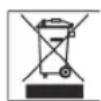
Meaning of the "Dustbin" Symbol
Protect our environment: do not dispose of electrical equipment in the domestic waste.
Please return any electrical equipment that you will no longer use to the collection points provided for their disposal.
This helps avoid the potential effects of incorrect disposal on the environment and human health.
This will contribute to the recycling and other forms of reutilisation of electrical and electronic equipment.
Information concerning where the equipment can be disposed of can be obtained from your local authority.
Regulator sily ssania
Niski stopien ssania: Do fi ranek, materialow delikatnych.
He npb3yIteb nbIeCOCOM dIydaIeHnBlaKHOI npnn nn KNDKCTe!
He IyIeocOte ropeuIy 30Jy, octpIe nn peKyuIne npedMeTb!
He npb3yTecb 3nEeKtpnp6opom BO BnaXhBIX nomeueHnX!
HnB KOem cnyae He pa6oTaTe 6e3 fNtpa. Tocne KaKdo CMehb fNtpa o83aTeIbHO npOBepbTe erO npabNbHyIO nocdky!
BoBpemraaboTbIdepKntePbIeocchHy Tpy6yHa pacctoHHNOT BONOC,0eKdbuacTeH TeNa!
-ДеркнTe nbineCoc Ha paCCToHnN OT nCTOuHnKOB TeTJIa TAKNX KaK:paDnAtoPbI,neHn N.T.D.
- Pπn 3aKpbBaHn nI Dεpπ KαβeB n Ε ΦΩJKeH 6bIb 3aKaT n nn HATnHy T Na OCTPBé Kpa nn yrbl.
- He Bo3nte nbilecoc no Ka6eIIO.
-Пиббор HeIb3Я ИСОЛБ3OBaT bIЯ c6Opa OСКОЛКOB CTeKla,MeIKNIX IrypuWeK,ИrI, CKepeNOK, rOpei 3OJIbI, rOpeiXnOKypKOB IIN CmUeK ITd.
O63op Detalee np6opa
1 Bo3dyuHa 3acNoHka
2Pa3bEmIINIOKJIIOUeHnIbIeCOCHOrO 1aHaHra
3 PeryIaTOp MOUHOCTN
4PyukaДЯпперноскN
5 KhoNka MexaHn3Ma CMATb
UHypa
6 BbIKIyateJIb BKJI/BbIKJI
7 MexaHn3M KpePneHn NpIeNcoCHoT py6bl
8KoHuyBbIyNcHOrOΦnIbTpa
9 KhoNka pa36bIOKINPOBKN KOHTeHepa
TbIeSc6OpHnKa
10 KOnTeHep-tnIeSc6OpHnK C 3aunTHbIM FInbTpO
MOTOPA
11 KpOuOK Ha BcAcBbAIOUeI TpyOke
12 LjEtka dnnnona
13 Teneckonuuecka Bcacbibaoua TaPy6Ka
14 DepeKaTeIb npHaIeJHIOCTeI
PnHaIeKHoCTN
15 甲tka nnapketa
16 Typ60uetka
17 Hacanka-üetka
18 电
19 CoIIO JINJ YNCTKINKaHei
PnoIroTOBka K pa6oTe
Bctabte coeHnHtIbHyIO rOIOBky nbIEcoCHOro IuaHaB BrHe3do,do MEXaHnueckOfIKCaunu,INr 3TOrHO HAKMITE OHOBPemEHNO o6e KOnKn. JIn CHrTnaIuaHa, HAKMnte 6paTHo Ha KOnKn y rHe3da.
-ДеркNTe KHONKHaKaTbIMN BbITAHTE NJIIECOCHbI WJahr.
- Pn HEO6xOIMOCTH BCTaBBte NbIeCOCHyTO Tpy6y BY pyKoRTky.
Popraok pa60tbc 3JeKtpnpn6Opom
- Hacaanthe Heo6xOIMyIO npHaJnEHHocTb.
- OTMOtaIte Ka6eIb Ha Heo6xOHNMyIO DInHy, BCTaBtceTeByIO BNky Bpo3EtKy C HAnpJKeHemCetn 230 B
50T4,OCHaueHHyU OYCTpoiCTBOM TOKOBO 3aunTbI UCTAHOBHeHHyIO B COOTBETCTBN C PpeINHcHnAMN,3aTEM BKIOHTe 3JIeKTPoPiNoOp,HaKaB Ha BkIIHOuAtelb BKJ/BlKJ.
3.ПиnomошпpepyntopayctahOBHTe Heo6xOIMyH MOuHocTb(MindoMax).
4.Пьлессбт ec paBHomepHOn cKopoCTbIO.ДaВиТь HET HeO6xOdMocTn.
BHHMaHHe: cIeIInTe 3a paAnyCOM 3axBaTa nbIeNocca, orpaHueHHoro dINHOIOTMOtaHHoro Ka6eIa!
Perynatop mouhoctn
Cnaabma MoHocb: dIa 3aHaBece, ToHKoMATEpnn
CpeHRA MOUHOCTb: INBA BJIIOPOBbIX IN TEKCTINbHBIX NOIOB C DIIHHbIM BOPCOM
Bolbwa MOnuHocTb: IaI rpy6bIX KOBPOB nNoIOB
Mexahm3cMaTbHaBHnCeTeBOrO uHypa
Iopkaanycta He BbITnBaTe CeTeBOH yyp daee JeHToI MetKN. HN B KOe m Cnyae He BbITnBaTe ero Do KpaCHOn MetKN, 3TO MOKET pINBecT N NOLOMKe MEXAHN3Ma CMatbIBaHH. PIOObHle NOLOMKn HE NonaDAHOT nOraPAHTHO.
CmTabiBaHne
HaKMITE Ha KHOIky MEXAHN3Ma CMAbIBaHnI NOMaJIeHbKy NOdABaIte Ka6eB. DepeKHe Ka6eB KpENKO BYKAX, YTO6bl npedTbPAITb erO XnectaHne.
TeneckonnueckanbIynecochna Tpyba
I3MeHHe DnHHb BCabBaIOuee Tpy6a No3BONrEt Bam noo6paTb yO6HyO dnn BaWero poCTa paObyIO BbICOTy.
Pa36bokpyte coeHHHeHne,HaKaB KhoNky B HappaBHeHH CTpeKN. Otperynpyte DNHy nbIeCOCH ty6bl. Dn PHKcaHH OTNCTNE KhoNky,do YeTK CblIIMMOrO UeJIka.
Conna-Hacaikn
Y3Koe conno n conno- 1eTka:
IydaJIeHnIbJINCMKIOI MeBEN,3aHaBeCeE,aTAKHe H3 TpydHOOCtYnHbIXYrNOB,UENEIHTI.
COnno DnA YnCTKn TkaHEn:
Iyanaenn npblnc MraKoMbeH, 3aHaBeCey T.D.
KobpI: IpeeknOHTe HoroBpyar Ha CmBON
Lietka napketa: JnIeKoro cKoJIbKeHnI eTka OchaueHa polnkam. JnI 6OJIbXIN NOOB: napKeTHbIX, INHOINMyMHbIX, KaΦeJIbHbIX I.T.I.
Typ6oetka:ДЯлгкого ckOLkHeHnIeTka Ochauheha polnkam. LcTeKa Ochauheha BpaaiaUIMMnCn KONEbIOUIMNcIeTkAMn-BaKam, KOtOpBie npIBOaTcraB DmIXeHne 3a CHT NOTOKa BO3dyxa.Oco60 TuaTeNbHO ydaJIaET BTOITaHbI MyCOP, UepCTb KINBOTbIX, HHTKn I CBaJIbWnCn BOC.PcTaKa OueHb XopoIo npOecbIAeT KObpyl. YCTaHOBITEpeKIIuOHaTeNb Ha UeTke Ha CNMBON A, TOrDa 6yJeT BCaCbIBaTbc8OJbWe BO3dyxa. Ha CNMBone (B) COOTBeTCTBeHNO MeHbWe. 3To yCNINBaET CIny BCacbBAHn. POnJaIyIcTa yUHTte, Typ6oetka He npEJaHa3NaYeHa dIra rnaIKnx nNoOB,TakHX KaN NapHET, NaMHAt N T.I., OHa MoHET NOBpeDnTB Hx NOBepXHOCTb.
ChTne conen: Iotryb c JERKIM npOBopaHbAHnEM.
Bo3duuHaHa 3acNoHka
IpynnpOBKn NOtOKa BO3Dyxa HIN DnOcBO6KDeHn COIIa OT npncocabwixxC K Hemy npdeMeTOB OTKpoTe BO3DyshyIO 3acNOHky, HaxoJauyOCH Ha pyKOrtKe.
ΦnIbTp
Пьлесoc ochaшис сисимо3-x крашно Фньтpoваня. Pacпрoctpанehная сисем ca pa3OBbIM Фньтposm заменha npo3paHnki KOHTeHep-пьлесборнк.Kpyнhar mMeikar nbIb OTФньтpoBbIBaETC,6nafoapra MoUHoi,3akpyeHHOH CTpye BO3dyxa.
OtnaaeT Heo6xOdMocCTb PnO6peTeHnMeUKOB nIyIIN.
EcnK KOHTeHep-NbIeC6OpHNK HAnOJIHINcRA Do MeTKM MAX NIM MOUHOCTb NbIeCocA yMeHbWlnAcB,TO NOCTyNaTe CNeDyUoMM 06pa30M:
Pnc.1
Onyctouthe KOHTeHepnbliec6opHHK
HaKMTe KHOKNy pa36IOKUPOBKN KOHTEHepa- nblIEc6OpHnKa N BbITaUNTe erO.
Pnc.2·OctopoHOBbTTAHTE
HbtpyOuHn 3nEmHT,
PndepKnBaer c06eHX
CToPOH.Pn HeoXoDMOCTH
NOCTaBbTe DnI 3TOI NOLeCOC
B BepTKaJIbHoE NOIOKeHHe.
YdaIte codepKHMoe
TbIeSc6OpHnka.3aTeM CHOBa
yCTAHOBITE FIOJIbTpUOuIN
3JEMENT. POJAnyIcTa,
CIEIte 3a TEM, YTObI
FIOJIbTpUOuIN 3JEMENT 6bln
PPOUHO N POBHO 3aKpeNHe
CHOBA yKpENITE TbIeSC6OpHnK
TAkIM O6pa3OM, YTO6bl 6bl
CbIWeH UeJIeK FIKCaTopa.
Pnc.3
1.3aunthbHΦnltpMOTOPa(Bbnlncopnke)
OuHCTKaΦHJIbTpTa
HaKMTe KHOKNy pa36nOKpOBKn KOHTeHepaTbIeC6OpHnKa N BtTaUNTeero (CMOTpn Pnc.1).
YdaJIte coepKHMoe
IbIe6OpHnka (CMOTPNHC. 2).CHIMITE C PHKCatopa
PHLTpyIOUIN 3JEMENT,
HEMHORIOBOPEHBYERO
HacOBONCTpeNKE (CMOTPN
Pc.3).Ha BTOPOM 3Tane
PHLTpyIOUIN 3JEMENT
MOKHOBByHHTB HAnpABLeHN
BHNI.PoOHCTNTe 3aUNTHBI
PHLTp MOTOPA,BbIKOLOTNIB
ERNO INPOUHCTNB MRAKOJ
KNCTOOKO.
BctabtbE BCE Detanu 6paTHo.
- Choba ykpennte nbinec6opnK TAKIM Oba3OM, YTObI 6bln CbIWeH UeJyE KfHKcaTopa.
Pocne KaKdoTpeBeyOChcKn
Hn npCnblHom 3arp3HeHH
npoMoIte FnBtpNoD npOTouHO
BOIOH, HApBaNB CtpyO BObl
npOTIB HApBaJIeHH BCaCbIBaHH
BO3dyxa.Pocne nonHoro
npocbixaHHFnhTpBaCTabBe
ero o6paTHo!
Bctabnre ero o6pato TOnbko nocne nonHoro BbcixaHn!
BHHMaHHe:
HnB KOem Cnyuae He MOHTe HnJbTp B CTnpaIbHO MaUNHe Hne cyuHTe ero noD fehOM.
Pnc.4
Pnc.5
2.BxoHNOHnBtp
BxOHOH FIOIbTp BHa HauTe B MeCTe KPeINHeNn bInec6OpHnKa, CMOTn CTpeKy. HaxMITE KONIKY pa36NOKropOBKN KOHTeHepa-NbIEc6OpHnKa H BYtaUHTe erO. BbHtE FIOIbTp B HAnpaBHeHH BnepEi. BxOHOH FIOIbTp Heo6XoDMNo PpOuHATb npIMEPHO NocLe KaJDoR 10OncyTOweHNKoTHeHepaNbIEc6OpHnKa IINu Chaue, eCNI 3TO Bb3bBAET Heo6XoDMOCtB. CNeIHTe 3a TEM, YTO6bI FIOIbTp 6bl BCERda YNCtBIM, INaue He 6yDet ObecneueHa CBO6oHnA UPKyIaHn BO3dyxa. PnH OEOxOIMOCtErO MOKHO npOMbTb B TENNo BOe, 6e3 Do6aBok. BCTabNHeTe erO o6paTHo ToJIbKO nocne NOHn IpocyuK!
3.BbInyckHNofHnIbTp
Kpome BCero 3neKTponpnpop
OCHAueh BbIyCKHbIM FnIbTpOM.
T06bl rapaHTPOBaTb
6e3OTKa3HyO paOToF pNtpa,
peKoMeHdyETc npOuHsATb ero
kaKdIbe 6 MeCAUEB. 3OT FnIbTp
HaxODNTc Ha 3adHe yACTn
np6opa 3a BEHTnIauHHO
peWetKO. OTKpoite
BEHTnAUHNOHYo peWetKY, HAKAB
Ha pbUar c6Oky ee. Nocne 3TOrO
BbITAHNE peWetKY Bnepei.
BbInbTe FnIBTp n IpouHCTnTE
ero, KaK 3TO yKe 6bilo ONcaHO.
BCTaBbTe FnIBTp o6paTHO n
3akpoITE BeHTnIAUHOHyo
peWetKY B O6paTHO
NOCJeIOBaTeJIbHOCTN.
IpoKaiynta yUHTte 3TN BaxHbIe npMmuHaHn!
HcTka qnIbTpMoKET cTaTb HeoXOJIMoN upe3 KopoTkoB Bpem, B 3aBNCIMOCtN OT YCIOBNI kCKnIyatauIN, HApPImepecNN COcatb OHeH MeJIkyIO IIIB.
Ecm MoHocb PbIeocca ocna, npOuHCTte FnIbTp, KaK 3To 6blno OINCAHO.
Ecnn MoHocb nbIeCoca BO BpempaobTb HeoKnDaHNOcnaBeet,30MOKeTbPiN3HaKOM 3aKyOpKnΦnIbTa.
UcTka HxpaHeHne
UncTHa
- PapeiHcTKoBbHbTe CeTeByIO BnIky n3 po3eKn!
- Pnpnte Koprncy cxyo Tprnkoi.
-ПрочиштеташтбийФильтмOTOPa nocle kaxdo3. YHCTKN MeuKa-NbIeNC6bOpNHka.PpOMTe FnIbTp B TeNIOB0de,6e3do6abOK.Pocne noJIHOro BbICbIXaHnB BCTaBbTe erO o6paTHo.
XpaHHeHne
JaTe yTOry NOJIHOCTbHO OCTbTb.
- PoinhoCTbO CMOTaIe Ka6eIb.
YCTaHOBnTe nblncoc BepTKaJIbHo N BCTaBbTe KpOK TeneckOnuYeCKo Tpy6b I NapKOBOuHoe PnpCnOCo6JeHne (7)Haero o6paTHoI CTopoHe.
YcTpaHHeHnCnPaBHOCTe
- Pn6op He yHKUHOHpyeT.
IOMOUB:
PpOBeBpTe NOkKnIOUChHe 3JIeKTPoPiTaHnI.
PpOBeBpe TIOLOXKeHnBEbIKIouaTeTlA.
- Pπb6op He nbIeocOHT.
Bo3mOHHa npHnHa:
3abnca KOthHeNep-tnleecbOpHKn nn Fmbltpbl.
POMOUB:
OnyctooHTe ern npouchntte Hnltbtpbl.
Bo3MOKHHa nnHHa:
B nbIeCOHOM IJIaHRe IIN COJIpe 3acTpRAIO HOpOdHOe TENo.
POMOUIb:
IpoKoHTpOJIpyuTe Hx Ha HAnuNe HnOpOdHbIX TeI.
TexHHueckne daHHbIe
Moelb: BS 958 CB
3JIeKTPoRITaHHe: 220-240B,50/60T
Notpe6IeMaM MOUHcTb:
P nom: 1800 BaTT
P max 2300baT
Klacc 3aunrbl: .. II
Bec HeTIO: 5,85 Kr
3To n3deneHne npoJIO BCE Heo6xOaMlbIe n AKTyAJIbHbIe npOBepKn, npEINHCaHbIe DInpeKTHBoi CE, K npIM. Ha 3NeKTPOMaHRHTHyO COBMecTUMOCtB u COOTBeTCTBHe TpeBOAHmK Hn3KOBOJbTHOH TEXHKe, OHO bIo TaKKe CCKHOpyPOBaHO N NOcTpoEO H C yueTom NocJeHNX TpeBOAHn IO TexHKe 6e3OnaNacHOCTH.
MbOCTaBnAem 3a C06oI npAO Ha TeXHnueckne HnMeHeHHa!
TapaHTHnHOe 683aTeNbCTBO
TapaHTnHbI cpoK Ha TeppHTOpu NPOccNcKo FedepaunnyCTaHaBnBaetcNOHMOUhIMn PpeCTaBHTeJAMn.
Kaccobbyuek RbnaTcra paHnHbIM TaHOHm. Be3 Hero HeBO3MOJKeH 6ecIaTHbI peMOHT HIN 3aMeHa 3dEInA.
B cnyae BO3HKNKOBHHN pnpTeH3n no rapaHTn, npedbRbTe n3deIne B NOHIOHOMPNEKTAuHN, C opHINHaJIbHOJ ynaKOBHOI n KACCObbIM YekOM TOpROBToTKe, npOdaBSeI 3TO n3dJIeNe.
DeΦeKtby n3HaWnBaembIX npHnAaIeXHoCTe HnTpyuNXcR DeTaeJ, a TaKHe YnCTKa, TeOxOcLyNkBaHne Hn 3aMeHa TpyuNXc R eTaeJ He NoJaIOT nOd rapaHTnIO, HnO3ToM y npoBodrca 3a OTdeIbHyO ONaTy!
TapaHTn TepReTc npB BCKpbITn H3JeJIa NocToPOHHMNIuamn.
Pocne rapaHTm
Iocne oKoHuaHnCpoka rapaHTnn,peMOHTn3deJnnpOn3BODNTc3aOnNAty,COOTBETCTByUOuMMMaCTepckmMnnnyHKtaMn cepBnCHOrO 06cLyXnBaHN.
BOMANN
C. Bomann GmbH
Heinrich-Horten-Str. 17 - 47906 Kempen
Tel.: 02152/8998-0·Fax: 0 2152/8998911
e-mail: mail@bomann.de · Internet: www.bomann.de
- FRANÇAIS
- JEZYK POLSKI
- Sommaire
- General Safety Instructions
- Children and Frail Individuals
- WARNING!
- Special Safety Instructions
- Start-up
- Using the Appliance
- Vacuum power regulator
- Cable winding device
- Winding
- Telescope Vacuum Pipe
- Nozzle accessories
- Air Slide
- Filter
- 1
- 2
- 3
- Emptying the Dust Container
- Motor Protective Filter (in the Dust Container)
- Cleaning the Filter Element
- Inlet filter
- Outlet filter
- Important note!
- Cleaning and storage
- Cleaning
- Storage
- Troubleshooting
- The Device Does Not Work.
- The device does not suck up anything.
- Noise development
- Technical Data
- Guarantee
- After the Expiry of the Guarantee
- Meaning of the "Dustbin" Symbol
- Regulator sily ssania
- O63op Detalee np6opa
- PnHaIeKHoCTN
- PnoIroTOBka K pa6oTe
- Popraok pa60tbc 3JeKtpnpn6Opom
- Perynatop mouhoctn
- Mexahm3cMaTbHaBHnCeTeBOrO uHypa
- CmTabiBaHne
- TeneckonnueckanbIynecochna Tpyba
- Conna-Hacaikn
- Bo3duuHaHa 3acNoHka
- ΦnIbTp
- Onyctouthe KOHTeHepnbliec6opHHK
- 1.3aunthbHΦnltpMOTOPa(Bbnlncopnke)
- OuHCTKaΦHJIbTpTa
- BHHMaHHe:
- 2.BxoHNOHnBtp
- 3.BbInyckHNofHnIbTp
- IpoKaiynta yUHTte 3TN BaxHbIe npMmuHaHn!
- UcTka HxpaHeHne
- UncTHa
- XpaHHeHne
- YcTpaHHeHnCnPaBHOCTe
- TexHHueckne daHHbIe
- TapaHTHnHOe 683aTeNbCTBO
- Pocne rapaHTm
- BOMANN
Brand : BOMANN
Model : BS 958 CB
Category : Vacuum Cleaner