
BS 987 CB - Vacuum Cleaner BOMANN - Free user manual and instructions
Find the device manual for free BS 987 CB BOMANN in PDF.

| Brand | Bomann |
| Model | BS 987 CB |
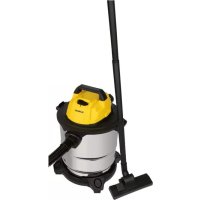
| Product type | Canister vacuum cleaner |
| Power supply | 220-240 V, 50 Hz |
| Rated power | 1200 W |
| Maximum power | 1700 W |
| Protection class | II |
| Suction power adjustment | Electronic speed control (low, medium, high) |
| Motor filter | Washable protection filter |
| Exhaust filter | Washable filter |
| Dust bag full indicator | Red indicator light |
| Suction hose | Telescopic, height adjustable |
| Floor nozzle | With brush selector for hard floors and carpets |
| 2-in-1 accessory | Crevice tool and brush integrated |
| Parking position | Yes, at the back and under the appliance |
| Power on | Foot switch |
| Use | Dry vacuuming only |
Frequently Asked Questions - BS 987 CB BOMANN
User questions about BS 987 CB BOMANN
0 question about this device. Answer the ones you know or ask your own.
Ask a new question about this device
Download the instructions for your Vacuum Cleaner in PDF format for free! Find your manual BS 987 CB - BOMANN and take your electronic device back in hand. On this page are published all the documents necessary for the use of your device. BS 987 CB by BOMANN.
USER MANUAL BS 987 CB BOMANN
Overview of the Components.. 3
7 Instruction Manual.. 25
Technical Data . 27
9 Guarantee
FRANÇAIS
JEZYK POLSKI
Sommaire
Listedesifferentéselementsdecommande.. Page3
Mode d'emploi.. 10
D-47906 Kempen/Germany

Limpe as componentes.
Causa possivel:
Sett inn ny stovsugerpose.
eller
Mulig arsak:
Filtrene er urene.
Tiltak:
Rengjor bestanddelene.
Mulig arsak:
Et fremmedlegeme sitter fast i slangen ell munnstykket.
Tiltak:
Sjekk tilbehoret for fremmedlegemer.
Tekniske data
Modell: BS 987 CB
Spenningsforsyning: 220-240 V, 50 Hz
Inngangsström:
Pnom 1200W
Pmax 1700W
General Safety Instructions
Read the operating instructions carefully before putting the appliance into operation and keep the instructions including the warranty, the receipt and, if possible, the box with the internal packing. If you give this device to other people, please also pass on the operating instructions.
- The appliance is designed exclusively for private use and for the envisaged purpose. This appliance is not fit for commercial use. Do not use it outdoors (except if it is designed to be used outdoors). Keep it away from sources of heat, direct sunlight, humidity (never dip it into any liquid) and sharp edges. Do not use the appliance with wet hands. If the appliance is humid or wet, unplug it immediately.
- When cleaning or putting it away, switch off the appliance and always pull out the plug from the socket (pull on the plug, not the cable) if the appliance is not being used and remove the attached accessories.
- Do not operate the machine without supervision. If you should leave the workplace, always switch the machine off or remove the plug from the socket (pull the plug itself, not the lead).
- Check the appliance and the cable for damage on a regular basis. Do not use the appliance if it is damaged.
- Do not try to repair the appliance on your own. Always contact an authorized technician. To avoid the exposure to danger, always have a faulty cable be replaced only by the manufacturer, by our customer service or by a qualified person and with a cable of the same type.
- Use only original spare parts.
- Pay careful attention to the following "Special Safety Instructions".
Children and Frail Individuals
- In order to ensure your children's safety, please keep all packaging (plastic bags, boxes, polystyrene etc.) out of their reach.
Caution! Do not allow small children to play with the foil as there is a danger of suffocation!
- In order to protect children or frail individuals from the hazards of electrical equipment, please ensure that this device is only used under supervision. This device is not a toy. Do not allow small children to play with it.
Special Safety Instructions
- Do not suck up liquids!
- Do not suck up hot ashes or pointed or sharp objects!
- Do not use the appliance in humid rooms!
- Never use without the filter. Check that the filter is inserted correctly!
- Hair, clothing and body parts away from the vacuum nozzle during use!
- Keep the vacuum cleaner away from sources of heat like radiators, ovens, etc.!.
Overview of the Components
1 Vacuum power regulator
| 2 | On/off | switch |
| 3 | Carrying | hand |
| 4 | Cable-winding |
5 Dust bag compartment
6 Dust bag fl ling dis
7 Handle for opening the dust bag compartment
8 Filter cover - Outlet filter
| 9 | Hose | connection |
| 10 | Vacuum | hose |
| 11 | Suction tube | |
| 12 | Air Slide | |
| 13 | Floor nozzle | |
| 14 | “2-in-1” nozzle | |
| (and brush nozzle) | ||
| 15 | Parking assistance | |
Not shown
Hook on the suction tube
Start-up
- Insert the connection head of the suction hose into the hose connector until it locks in place. To do so, please press the buttons simultaneously. In order to release the hose again, please press the buttons once more on the connection head.
- Keep the buttons pressed down and then pull out the hose.
- Insert the vacuum tube into the handle if required.
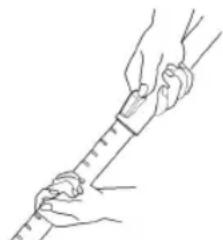
Telescope Vacuum Pipe
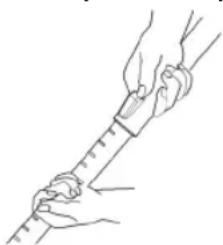
- The height-adjustable vacuum pipe enables individual alignment to your height.
- Unlock the coupling by pressing the key in the direction of the arrow.
- Slide the vacuum pipe to the desired length.
- To lock the device, release the key until you hear it lock in place.
Using the Appliance
- Unwind the length of cable you require.
- Insert the mains plug into a correctly installed 230V 50Hz power socket. Turn the vacuum cleaner on by pressing the on/off switch (2) down with your foot.
- Set the vacuum power with the vacuum power regulator (1).
- Vacuum at a steady speed. There is no need to exert pressure.
Attention: pay attention to the range that can be covered with the cable length.
Vacuum power regulator (1)
Low vacuum power: For curtains and delicate fabrics
Medium vacuum power: For long-pile velour carpets and textile flooring
High vacuum power: For sturdy rugs and floors
Cable winding device
Pull out the cable up to the maximum length indicated with the yellow mark. Never pull the cable out up to the red mark as the cable winding can be damaged. Said damages are not covered by the warranty.
Winding
Press the cable (4) winding button and guide the cable. Hold the cable to avoid wrapping.
Nozzle Attachment
| Crevice and jointed nozzle: | For vacuuming upholstery, curtains and in corners and crevices etc. “2-in-1” nozzle: When this is folded together it can be used as a groove nozzle. If you would like to use the brush nozzle, pull the brush section in the direction of the arrow until it locks in place. | |
| Floor nozzle: To clean | carpets or smooth surfaces. | |
| Smooth floors: | Press down the lever with the brush symbol with your foot. The brush is now visible. | |
| Carpets: | Press the lever In the opposite direction. The brushes are now retracted. | |
| Releasing the nozzles: | Pull these off while turning slightly. | |
Air Slide (12)
Open the air slide on the hose handle in order to regulate the airflow or to clear any particles sticking to the nozzle.
Dust bag replacement display (6)
Hold the hose up into air. If the display is red the bag is full. Please replace it.
Changing the dust bag
- Pull the plug out of the socket.
- Open the lid of the dust bag compartment by the handle (7) (the cover must click into place).
- Remove the bag by carefully pulling the clamp towards the front so that the bag becomes more accessible. Then remove the dust bag by pulling it upwards.
- Insert a new bag. Please ensure that the bag is located correctly in the guide mechanism. Then reinsert the retainer. Close the cover so that it snaps into place.
Filter
Motor protection fi Iter (inlet fi Iter)
The inlet filter is located in the dust bag compartment. The filter is located vertically in the rear section of the dust housing. Remove the filter by pulling upwards. Clean the engine protection filter after 10 dust bag changes. If necessary, the filter can also be washed in warm water without any additives. Place it back into place only once it is completely dry!
Outlet filter
The appliance is also equipped with an outlet fi liter. This fi liter is to be found under the fi liter cover (8).

- Press the lever on the underside of the ventilation grille upwards in order to open the ventilation grille.
- Then pull the grille out towards the front.
- Remove the filter and clean as described above.
- Please re-insert the filter correctly and close the ventilation grille (until it clicks in place).
Cleaning and storage
Cleaning
- Pull the plug out of the socket before cleaning!
- Clean the casing with a dry cloth.
Storage
- Let the iron cool down completely.
- Wind the cable completely.
- If you position the device horizontally: Please insert the hook of the foor nozzle into the parking assistant on the rear of the device.
- If you place the vacuum cleaner in a vertical position: Please hang the hook of the floor nozzle in the parking aid on the underside of the vacuum.
Troubleshooting
The Device Does Not Work.
Remedy:
Check the connection to the mains.
Check the position of the switch.
The device does not suck up anything.
Possible
Cause:
The suction power is set too low.
Remedy:
Check the position of the control switch.
Possible
Cause:
The dust bag is full.
Remedy:
Renew the dust bag.
or
Possible Cause:
The fi tters are dirty.
Remedy:
Clean the components.
Possible Cause:
There is a foreign body in the suction tube or the nozzle.
Remedy:
Check the accessories for foreign bodies.
Noise development
The sound pressure level in the ear of an operator (LpA) was measured according to DIN EN ISO 3744.
Sound pressure level detected: 80.0 dB(A) (no limit)
Technical Data
Model: BS 987 CB
Power supply: 220-240 V, 50 Hz
Power consumption:
P 1200W
P max. 1700 W
Protection class: II
This device has been tested according to all relevant current CE guidelines, such as electromagnetic compatibility and low voltage directives, and has been constructed in accordance with the latest safety regulations.
Subject to technical changes without prior notice!
Guarantee
The device supplied by our Company is covered by a 24 month guarantee starting on the date of purchase (receipt).
During the life of the guarantee any fault of the device or its accessories ascribable to material or manufacturing defects will be eliminated free of charge by repairing or, at our discretion, by replacing it. The guarantee services do not entail an extension of the life of the guarantee nor do they give rise to any right to a new guarantee!
Proof of the guarantee is provided by the proof of purchase.
Without proof of purchase no free replacement or repair will be carried out.
If you wish to make a claim under the guarantee please return the entire machine in the original packaging to your dealer together with the receipt.
Defects to consumables or parts subject to wearing as well as cleaning, maintenance or the replacement of said parts are not covered by the guarantee and hence are to be paid!
The guarantee lapses in case of unauthorized tampering.
After the expiry of the guarantee
After the expiry of the guarantee repairs can be carried by the competent dealer or repair service against the payment of the ensuing costs.

Meaning of the "Dustbin" Symbol
Protect our environment: do not dispose of electrical equipment in the domestic waste.
Please return any electrical equipment that you will no longer use to the collection points provided for their disposal.
This helps avoid the potential effects of incorrect disposal on the environment and human health.
This will contribute to the recycling and other forms of reutilisation of electrical and electronic equipment.
Information concerning where the equipment can be disposed of can be obtained from your local authority.
1 Regulator sily ssania
2 Wylacznik
Regulator sily ssania (1)
Niski stopien ssania: Do fi ranek, materialow delikat-nych.
BHHMaHHe! He no3BOLIeTe DeTm IrrpaTb C PONIN3TIeHOBOI PIIeHKo. OnaCHOct ydyuBaI
YTO6bI 3aunTb DeTeH IN DpynX NUI, HxKDaIOUnxCBy yxoJe n pncMOTpe, OT npaKeHn 3NeKTPOTOKOM, CneINTE 3a TEM, YTO6bI np6Op HE BKNHOuANC6e3 npcMOTpa. 3ToT np6Op-HeIrpyka.He donyckaJIte K Hemy Deten.
CneuNbHbIe yka3aHnI NO TexHnKe 6e3OnaCHOCTN
He noIb3yItec nbIeCOCOM dIydaIeHnBlaKHOI bIIIN nnXnKDIOCTe!
He nIeocOte ropeuO 30Jy, octpIe nn peKyuNe npEmdTe!
He npb3yItecb 3neKtpnpnbopom BO BnaXhbx nomeuhenx!
HnB KOem cnyae He pa6oTaTe 6e3 fNtpa. Iocne KaKdo CMehb fNtpa 063aTeIbHO npOBepbTe erO npabNbHyo nocdky!
BoBpempaobTbeepKntePbIeocchHytp6yHa pacctoHHNOTBOIOc,OeHdbuacteTea!
-Деркптпьлесoc ha pacctOTHHn OT nCTOCHKOB TEJIa TAKNX KaK: padHaTOpbl, Neu n T.D.
O63op detanei np6opa
1 PeryIaTOp MOUHOCTN 2 BbIKIOuOaTeIb BKJI/BbIKJI
3 Pukka IJnI nepehoockn
4 KhoNka MExaHn3Ma CmTaBbAHn
CETeBOrO LiHypa
5 OTeK dIa MeIka-nbIeSc6OpHnKa
6 HndnkaTOp HanoHHeHHa
MeIkaIbJIeScObHnKa
7 Pyka dIa OTkpblBaHnO TceKa nbIe6o
8 3aunTHa KpbIbIkaΦnIbTp a
BbIyckHoI ΦIbTp
9Pa3bemDnI NOKnHoueHHa
PbJIeCOCHOrO 1nHaHra
10 ⅡbJIeCoCHbI 7JIaHr
11 OTeck dIa MeShka-tnleec6opHnKa
12 Bo3ywna 3acnoHa
13 Tpy6a
14 Hacka,2B 1" (y3Koe cOIO n cOIO-ueTka)
15 MexaHn3M KpenneHH
Bε3 pncyHka
KpOcOK HbCacbIbAiooJey TpyKe
Poirotobka pa6ote
Bctabte coeHnHtIbHyIO roIobky nbIecOCHOro IHaIra B rHe3do,do MexaHnueckO fIKCaun,INIa 3TOrHO HAKMITE OHOBPemEHNO o6e KOnKn. INI CHRTNIAHra, HAKMNTe 6paTHo Ha KOnKn y rHe3da.
- DepKHTe KHOKN HaKaTbIMN BBITAHTE NJIIECOCHbI JnHaHr.
- Pn HEO6XoDmOCTN BCTaBbTe NblneCOCHyTO Tpy6y B pyKoRTky.
Teleckonuueckan pbinecocha Tpy6a
I3MeHHe DnHbI BcAcbBaIOUe Tpy6a N03BONrEt Bam noD6paT yOoHyIO DnB BaJero poCTa paOohyIO BlicOTy.
Pa36nokpyte coeHneHne, HauKAB KHOJky B HappaBHeHH CTpeJIKN.
Cdbnhte HIN pa3DbHbTe BCacbIBaIOUne Tpy6bI KaBam HJHKHO.
-ⅡIaФИKcaUHOTNcHTe KHOHKy,DOYETKO CbIbIMoRTOeNcKa.
Popraok pa6oTBc 3JeKtponpnpopom
1.OTMToaTe cTeBoi uHyp Ha Heo6xOdMyu dInHy.
2. BcTaBbTe BnIKy B po3eTKy C hAnpJKeHEm ceTn 230 B, 50 Tq, yCTaHOBHeHHyIO B COOTBETCTBN C npeDncaHnMn. BKIOHTb yCTpoIcTB BO BkiIOuATEJIem Bk./BkiI.(2), HkaBa HA KNaBnIy HorOi.
3.Пипимоши ретуларopa установite Heo6xOДмую MOUHOCt b(1).
4.Пьлессбт ec paBHomepHoi ckopoctbIO.ДaВИТь HeT HeO6xOДMоCTN.
BHHMaHHe: cIeIInTe 3a paAnyCOM 3axBaTaNbIeNcOca, ORpaHnueHHOrO DNINHOOTMOtaHHOrO KaBeHa!
PerynarTop MouHocTHn (1)
CnaabMa MoUHocb: 3aHaBceen, TOHKoMATEpnn
CpeHnRA MoUHOCTb: INB BENIOPOBbIX N TeKCTINbHbIX NOIOB C DNIHHbIM BOPCOM
- Pn60p He yHKUHOHNpyeT.
POMOUsb:
PpOBeBpTe noKJIIOUeHHe 3JIeKTPoNITaHnI.
IpoBepTe NIOJXeHHe BbIKHouaTeJIa.
- Pn60p He nblneocOHT.
Bo3MOXHHa npHnHa:
YCTaHOBHeHa CnIuKOM CnaBaJ MOUHOCtB.
HOMOUB:
IpoKoHTpOInpyuTe nIOJKeHnE peryIaTopa.
Bo3MOXHHa npuHHa:
MewoK-nbIeScbOpHnK HanoJIHHcR.
POMOLUb:
BCTaBbTe HOBbI MeUOK-PlJIeC6OpHnK.
HNN
Bo3MOKHHa npHnHa:
ΦnIbTpbl 3acOpnnncb.
HOMOUBI:
PpOuHCTnTe 3Tn DeTaTI.
Bo3MOKHHa npHnHa:
B nbinecochom 7laHre nIc conIe 3actpno Hopodhoe Teno.
POMOLIb:
PpokoHTpOInpyTe Hx Ha HnMnue HnOpOdbx TeI.
TexHnueeckne daHHbie
Moelb: BS 987 CB
3JIeKtpoMTaHHe: 220-240B,50T
TIpTe6JIReMaM MOUHOCtB.
P 1200baT
P max. 1700 BaT
Klacc 3aunrbl:
3To H3dJIeHHe IpOJIO BCE HeoXoIMMbIe n AkTyAJIbHbIe npOBepKn, IpEINHCaHHbIe DInpeKTHBOI CE, K npIM. Ha 3JIeKTPOMarHTHyO COBMeCTMOCtB n COOTBetCTBne Tpe6oBaHmK Hn3KOBoTbTHoT TEXHKe, OHO 6blIO TaKKe CCKHOpyuPobAoH NoCtpoEHO C yHTom NocJeHNx Tpe6oBaHm ITO TexHKe 6e3OnaNacOCTH.
Mbl octabnem 3a coboi npabo Ha texhneckne n3Mehenn!
TapaHTHnHOe 063aTeJbCTBO
TapaHTnHbI cpoK h Ta TeppntOpn PocnnckOeepaunnyCTaHaBnBaetcnoNtHomOuHbIMnpedctaBnTeMaM.
KaccobbyuekBnAeTcraapHnHbIM TaIOHom.Be3 Hero HeBO3MOxHEN6ecnIaTHbpeMOHTIN3aMeHaN3deJInA.
B cnyae Bo3NKHOBHKNH npTeH3n no rapaHTn, npeIbRbTE H3dJIe B noHOBKOMNKeTauu, C opHnHaJIbHOyNAKOBKn I KACCobBM YeKOM TOpROB ToUKe, npDaBwe 3To H3dJIeNe.
DepeKbI 3HaWnBaEMbIX npHnAaNKeHHoCTeIN nIpyuNXcB DeTanei, a TaKHe YnCTKa, TexOcbnyKnBaHne INI 3aMeHa TpyuNXC DeTanei He NoJaAOT nOraPapHTHO, I NO3ToMy npOBoDRTCa OTdEInbHyOnlnty!
TapaHTN TepaETc npBckpbITn H3dJIIN NOCTOPOHHIMNIIaMNI.
Pocne rapaHTM
Iocne OKOHaHnCpoka rapaHTnn,peMOHT n3dJInn npOnBDoNTcra 3a ONnATy, COOTBeTCTByOLOUMM MaCTepCKMN nnnyHKtAmn cepBnCHOrO O6cLyKnBaHN.
BOMANN
C. Bomann GmbH
Heinrich-Horten-Str. 17 - 47906 Kempen
Tel.: 02152/8998-0·Fax: 0 2152/8998911
e-mail: mail@bomann.de · Internet: www.bomann.de
- FRANÇAIS
- JEZYK POLSKI
- Sommaire
- Tekniske data
- General Safety Instructions
- Children and Frail Individuals
- Special Safety Instructions
- Overview of the Components
- Not shown
- Start-up
- Telescope Vacuum Pipe
- Using the Appliance
- Vacuum power regulator (1)
- Cable winding device
- Winding
- Air Slide (12)
- Dust bag replacement display (6)
- Changing the dust bag
- Filter
- Motor protection fi Iter (inlet fi Iter)
- Outlet filter
- Cleaning and storage
- Cleaning
- Storage
- Troubleshooting
- The Device Does Not Work.
- The device does not suck up anything.
- Noise development
- Technical Data
- Guarantee
- After the expiry of the guarantee
- Meaning of the "Dustbin" Symbol
- Regulator sily ssania (1)
- CneuNbHbIe yka3aHnI NO TexHnKe 6e3OnaCHOCTN
- O63op detanei np6opa
- Poirotobka pa6ote
- Teleckonuueckan pbinecocha Tpy6a
- Popraok pa6oTBc 3JeKtponpnpopom
- PerynarTop MouHocTHn (1)
- TexHnueeckne daHHbie
- TapaHTHnHOe 063aTeJbCTBO
- Pocne rapaHTM
- BOMANN
Brand : BOMANN
Model : BS 987 CB
Category : Vacuum Cleaner