USER MANUAL RAP1580 ROTEL
Surround Amplified Processor
HCTpyKcua nonb30BaTeJIa
Contents
Important Safety Instructions 4
Figure 1: Control and Connections 5
Figure 2: Remote Control 6
Figure 3: Amplifier And Subwoofer 7
Figure 4: Speaker Connection 8
Figure 5: Digital Audio and PC-USB Connections 9
Figure 6: Blu-Ray and Video Player Connections 9
Figure 7: Front USB Connections 10
Figure 8: CD Player Connections 10
Figure 9: Tuner Connections 11
Figure 10: Front HDMI Connections 11
Figure 11: Rear HDMI Connections 12
On-Screen Menus 13
About Rotel 14
Getting Started 14
Video Features 14
Audio Features 14
Surround Features 14
Other Features 14
Unpacking 14
Placement 14
Overview of Connections 15
Rear HDMI IN 1-7 Video Inputs 15
FrontHDMIN 15
HDMI Monitor Outputs 15
PHONO Input 15
TUNER Input 16
CD Input 16
BALANCED Input 16
MULTI Input 16
PREAMP Output 16
DIGITAL Inputs 16
PC-USB Input 16
Front USB Input [10] 16
Other Connections 16
AC Input 16
Master Power Switch 16
12V TRIGGER Output 16
REM IN Jack [21] 17
IR OUT Jacks 17
Rear USB Power Port 17
RS232 Connector 17
NETWORK Connector 17
Making Connections 17
Connecting Speakers 17
Connecting an External Amplifier 17
Connecting a Subwoofer 18
Connecting a DVD, Blu-ray, Cable, Satellite, Game Console and HDTV Tuner 18
Connecting a Blu-ray or DVD Player 18
Connecting a Monitor 18
Connecting a CD Player or XLR Source 18
Connecting a Tuner 18
Connecting an iPod/iphone 19
Front Panel Overview 19
Front Panel Display 19
IR Remote Sensor 19
Remote Control Overview 19
STANDBY and Power ON/OFF Buttons 19
VOLUME Knob and VOLUME UP/DOWN Buttons 19
DISPLAY (DISP) Button 19
MENU/SETUP Button 19
Navigation and ENTER Buttons 19
MUTEButton19
INPUT Buttons 19
SUR+ Buttons 118 19
Playback Control buttons 19
DIMButton ① 19
SUB,CTR,REAR Buttons 20
MEM Button 20
LIGHT Button 20
ASSISTIVE LIGHT 20
Automatic Surround Modes. 20
Manually Selecting Surround Modes 20
Digital Audio 20
Analog Stereo 20
Basic Operation 21
Selecting Inputs 21
USB/iPod Operation 21
iPod/iPhone Connection 21
Playback Control Buttons 21
Bluetooth. 21
Bluetooth Connection 21
Rear PC-USB 21
Rear PC-USB Connection 21
Setup 21
Navigation Buttons 21
Main Menu 22
Input Setup 22
Multi Input Setup 23
Configuring Audio. 23
Audio Configuration 23
Configuring Speakers and Audio 23
Speaker Configuration 24
Advanced Speaker Setup 24
Subwoofer Setup 25
Speaker Level Setup 25
Speaker and Delay/Distance Setup 26
Miscellaneous Settings 26
System Setup 26
Video Setup 27
PEQ Configuration 28
Troubleshooting 28
Specifications 30

CAUTION
RISK OF ELECTRIC SHOCK DO NOT OPEN

WARNING: SHOCK HAZARD-DO NOT OPEN
AVIS: RISQUE DE CHOC ÉLECTRIQUE-NE PAS OUVRIR

This symbol is to alert the user to the presence of uninsulated dangerous voltages inside the product's enclosure that may constitute a risk of electric shock.

This symbol is to alert the user to important operating and maintenance (service) instructions in this manual and literature accompanying the product.
APPLICABLE FOR USA, CANADA OR WHERE APPROVED FOR THE USAGE
CAUTION: TO PREVENT ELECTRIC SHOCK, MATCH WIDE BLADE OF PLUG TO WIDE SLOT. INSERT FULLY.
ATTENTION: POUR EVITER LES CHOCSE ELECTRIQUES, INTRODUIRE LA LAME LA PLUS LARGE DE LA FICHE DANS LA BORNE CORRESPONDANTE DE LA PRESE ET POUSSER JUSQU AU FOND.

Rotel products are designed to comply with international directives on the Restriction of Hazardous Substances (RoHS) in electrical and electronic equipment and the disposal of Waste Electrical and Electronic Equipment (WEEE). The crossed wheelie bin symbol indicates compliance and that the products must be appropriately recycled or processed in accordance with these directives.

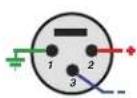
Pin Assignments
Balanced Audio (3 pole XLR):
Pin 1: Ground / Screen
Pin 2: In phase / +ve / Hot
Pin 3:Out of phase/-ve /Cold

Notice
The RS232 connection should be handled by authorized persons only.
WARNING: There are no user serviceable parts inside. Refer all servicing to qualified service personnel.
WARNING: To reduce the risk of fire or electric shock, do not expose the unit to moisture or water. Do not expose the unit to dripping or splashing. Do not place objects filled with liquids, such as vases, on the unit. Do not allow foreign objects to get into the enclosure. If the unit is exposed to moisture, or a foreign object gets into the enclosure, immediately disconnect the power cord from the wall. Take the unit to a qualified service person for inspection and necessary repairs.
Read these instructions.
Keep these instructions.
Heed all warnings.
Follow all instructions.
Do not use this apparatus near water.
Clean only with dry cloth.
Do not block any ventilation openings. Install in accordance with the manufacturer's instructions.
Do not install near any heat sources such as radiators, heat registers, stoves, or other apparatus (including amplifiers) that produce heat.
Do not defeat the safety purpose of the polarized or grounding-type plug. A polarized plug has two blades with one wider than the other. A grounding type plug has two blades and a third grounding prong. The wide blade or the third prong are provided for your safety. If the provided plug does not fit into your outlet, consult an electrician for replacement of the obsolete outlet.
Protect the power cord from being walked on or pinched particularly at plugs, convenience receptacles, and the point where they exit from the apparatus.
Only use attachments/accessories specified by the manufacturer.
Use only with the cart, stand, tripod, bracket, or table specified by the manufacturer, or sold with the apparatus. When a cart is used, use caution when moving the cart/apparatus combination to avoid injury from tip-over.

Unplug this apparatus during lightning storms or when unused for long periods of time.
Refer all servicing to qualified service personnel. Servicing is required when the apparatus has been damaged in any way, such as power-supply cord or plug is damaged, liquid has been spilled or objects have fallen into the apparatus, the apparatus has been exposed to rain or moisture, does not operate normally, or has been dropped.
The apparatus should be used in non tropical climate.
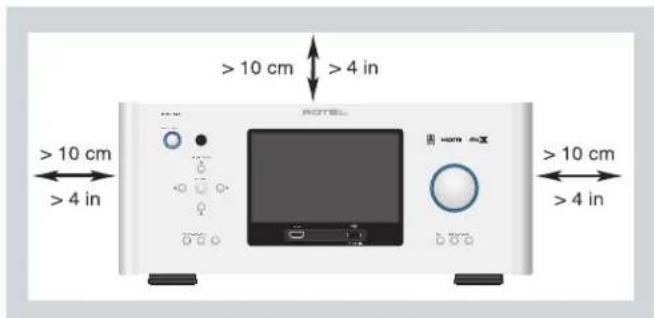
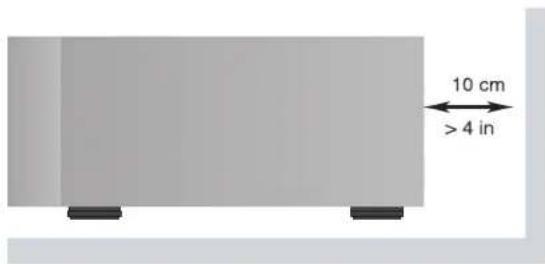
You must allow a minimum 10cm or 4 inches of unobstructed clearance around the unit.
WARNING: The rear panel power cord connector is the mains power disconnect device. The device must be located in an open area that allows access to the cord connector.
The unit must be connected to a power supply only of the type and voltage specified on the rear panel. (USA: 120 V/60Hz, EC: 230V/50Hz)
Connect the component to the power outlet only with the supplied power supply cable or an exact equivalent. Do not modify the supplied cable. Do not use extension cords.
The mains plug is the disconnect of the unit. In order to completely disconnect the unit from the supply mains, remove the main plug from the unit and the AC power outlet. This is the only way to completely remove mains power from the unit.
The main plug is used as the main disconnect device and should remain ready accessible.
Use Class 2 wiring for speaker connections to ensure proper installation and minimize the risk of electrical shock.
The batteries in remote control shall not be exposed to excessive heat such as sunshine, fire or the like. Batteries should be recycled or disposed as per state and local guidelines.
WARNING: The master power switch is located on the rear panel. The unit must allow unobstructed access to the main power switch.
This equipment has been tested and found to comply with the limits for a Class B digital device, pursuant to Part 15 of the FCC Rules. These limits are designed to provide reasonable protection against harmful interference in a residential installation. This equipment generates, uses and can radiate radio frequency energy and, if not installed and used in accordance with the instruction, may cause harmful interference to radio communications.
However, there is no guarantee that interference will not occur in a particular installation. If this equipment does cause harmful interference to radio or television reception, which can be determined by turning the equipment off and on, the user is encouraged to try to correct the interference by one or more of the following measures:
Reorient or relocate the receiving antenna.(TV, radio, etc.).
- Increase the separation between the equipment and receiver.
- Connect the equipment to an outlet on circuit different from that to which the receiver is connected.
- Consult the dealer or an experienced radio/TV technician for additional help.
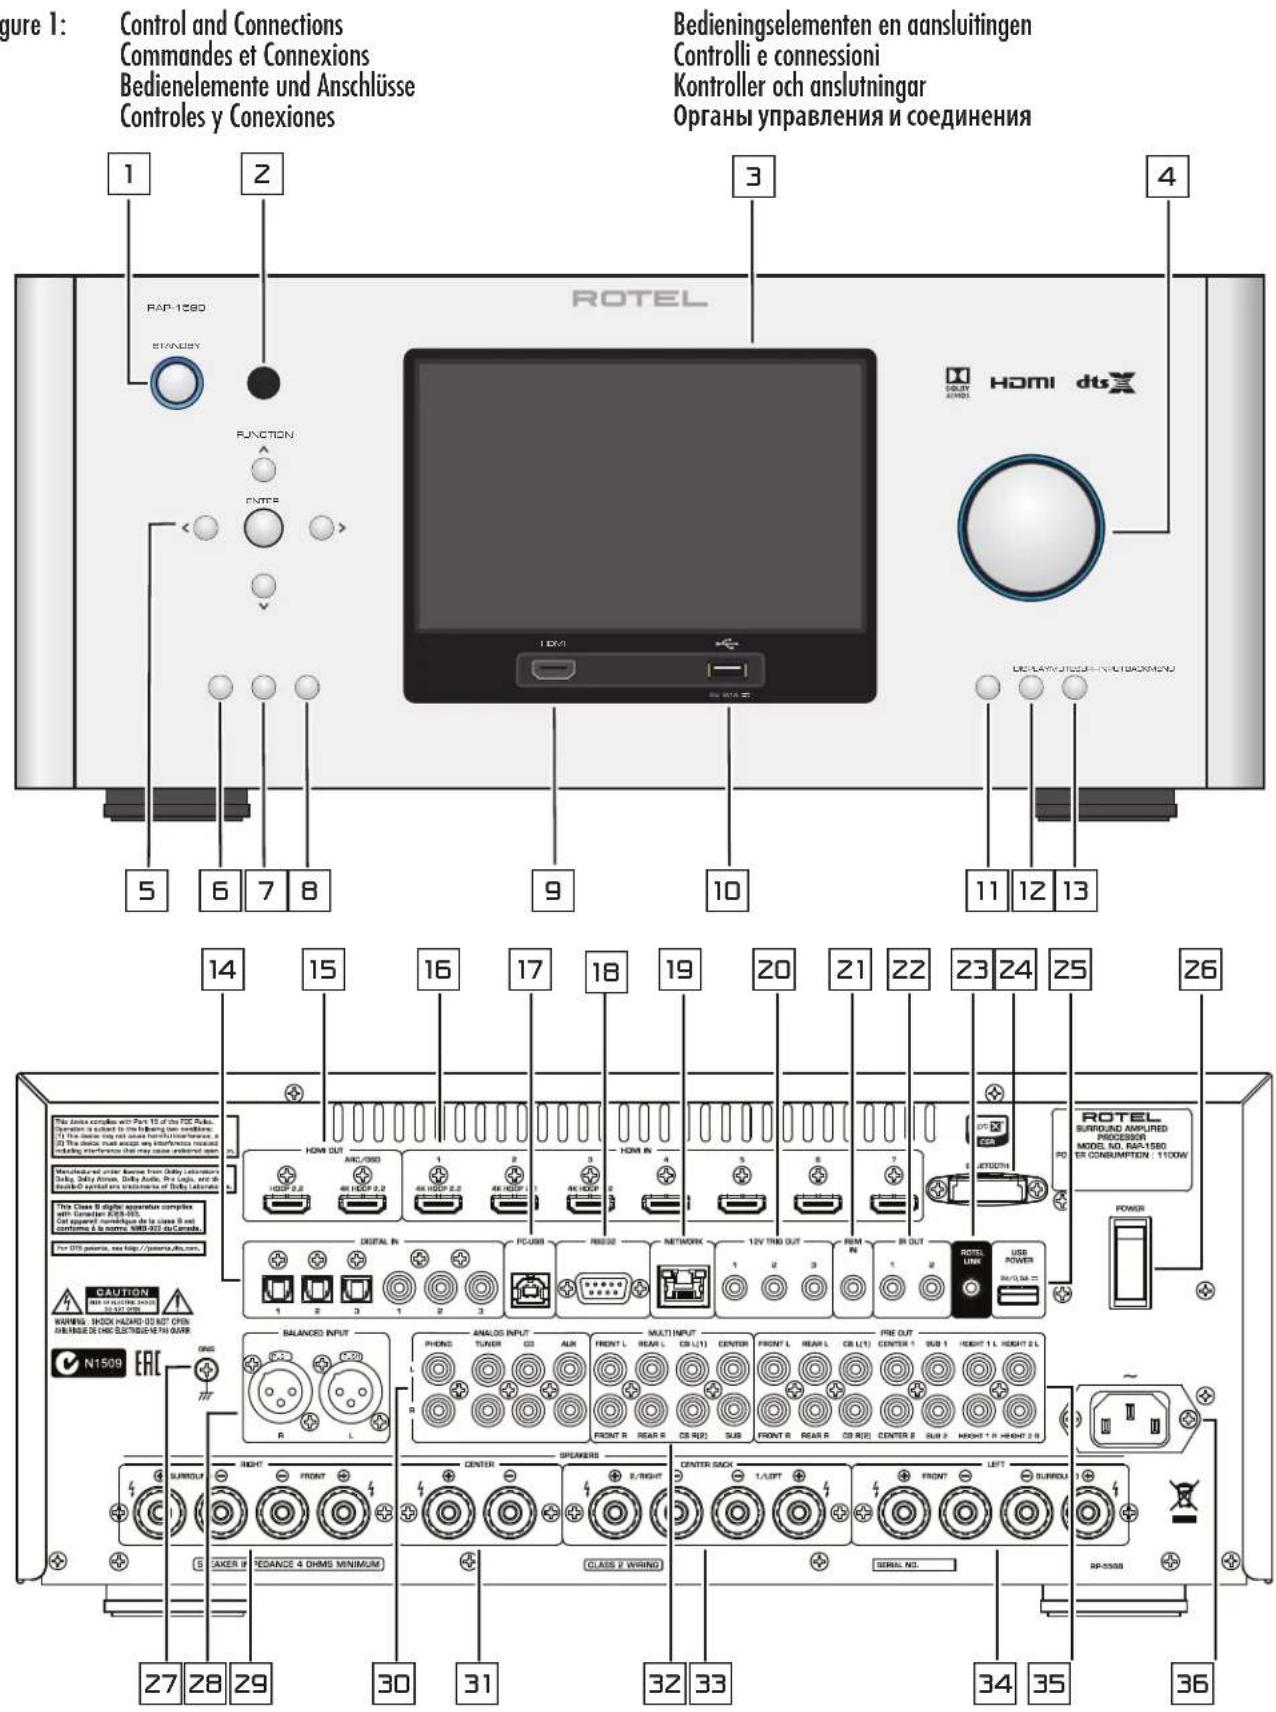
Figure 1: Control and Connections Commandes et Connexions Bedienelemente und Anschlisse Controles y Conexiones
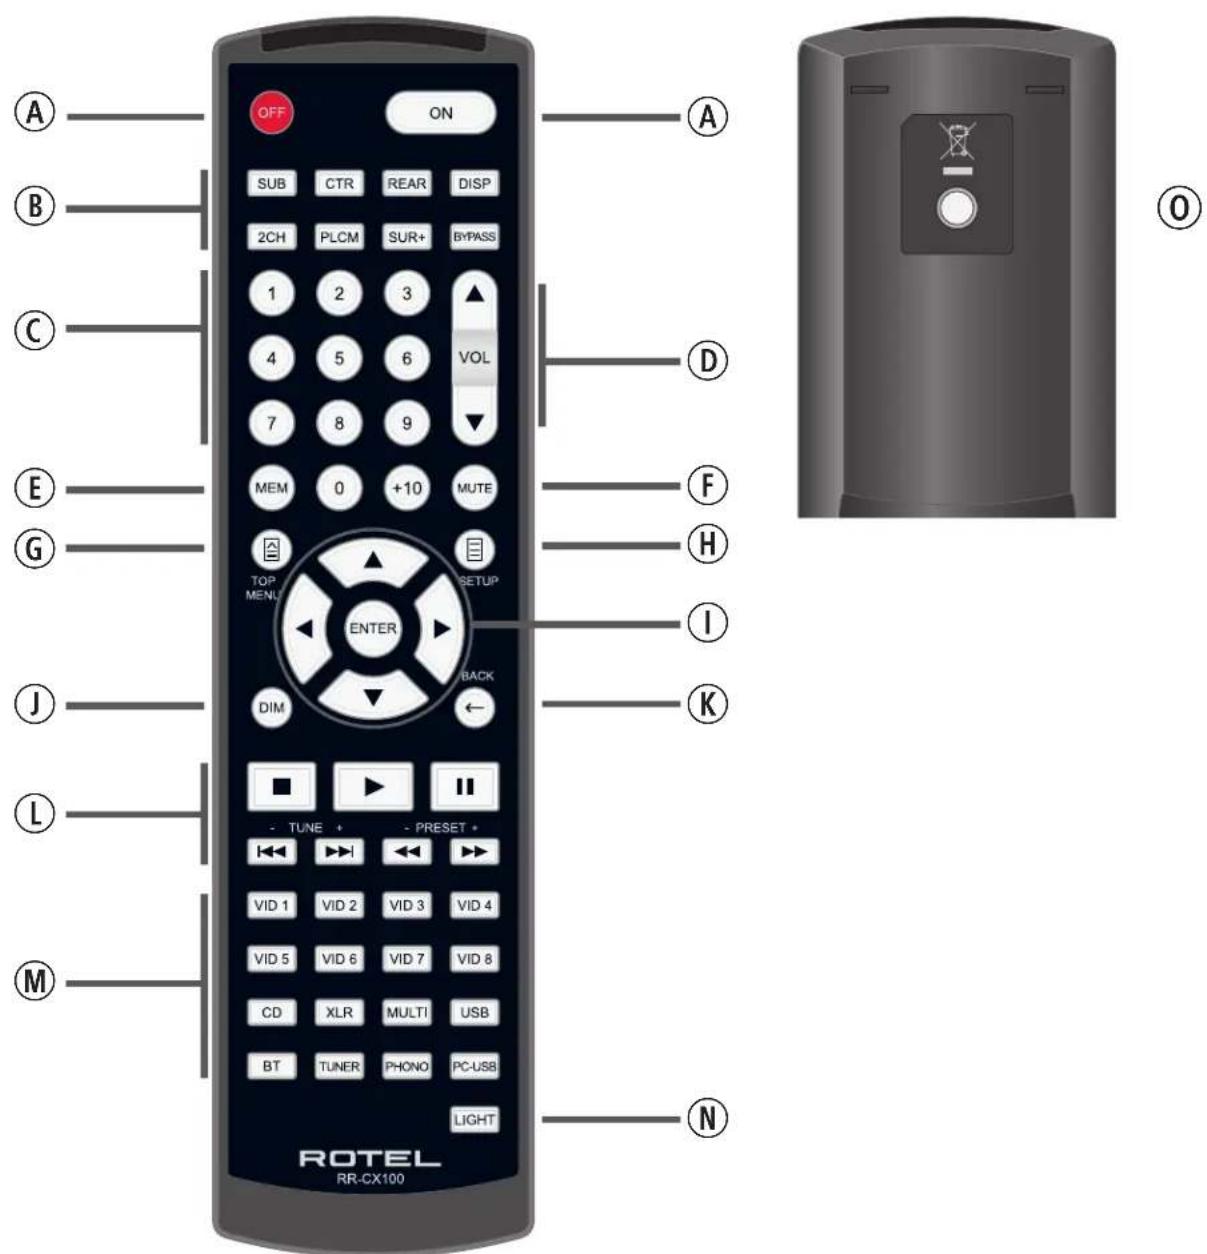
Figure 2: Remote Control Telecommande Fernbedienung Mando a Distancia
Afstandsbediening
Telecomando
Fjarrkontroll
Пиьт дuctанционно упраз车联网а.
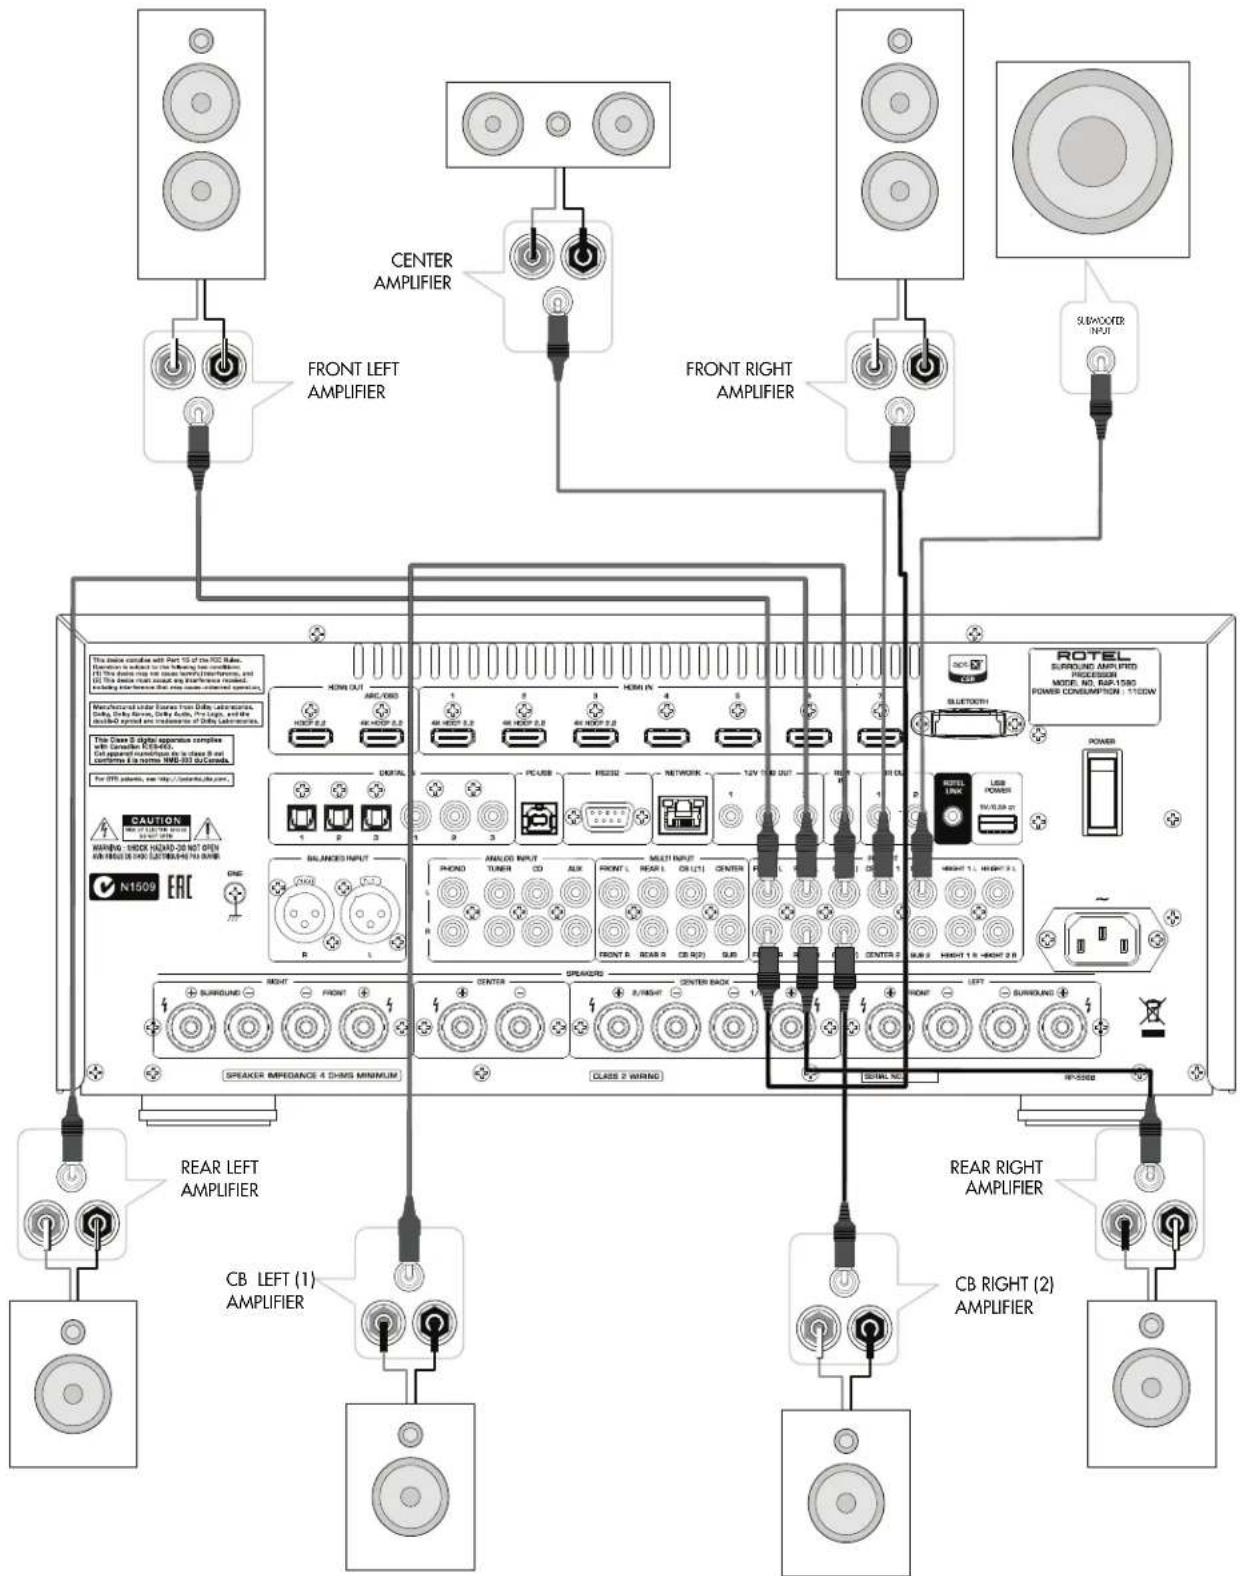
Figure 3: Amplifier And Subwoofer Amplificateurs et caissons de graves Verstärker und Subwoofer Amplificador y Subwoofer
Versterker en subwoofer
Collegamento di amplificatori e subwoofer
Förstärkare och subbas
Ycunntelb u ca6byφep
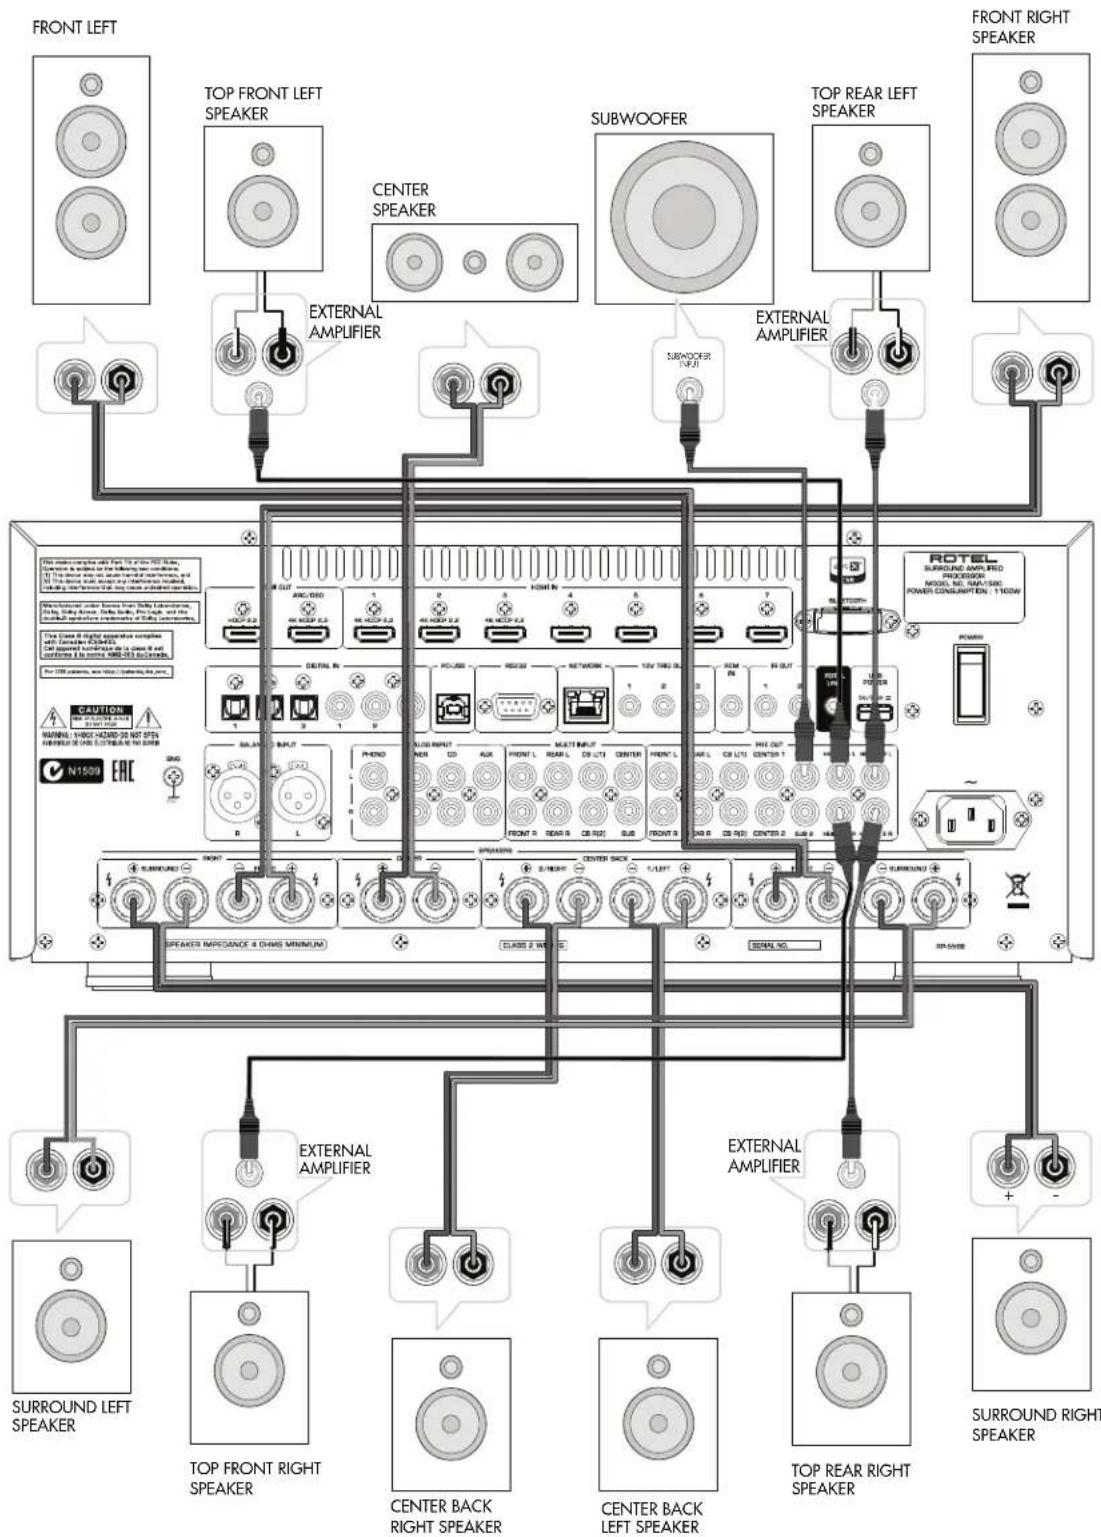
Figure 4: Speaker Connection Connexion de haut-parleur Laufsprecheranschluss Conexion de los altavoces
Luidspreker verbinding
Collegamento degli altoparlanti
Högtalaranslutning
Послкунецпгомкогороветая
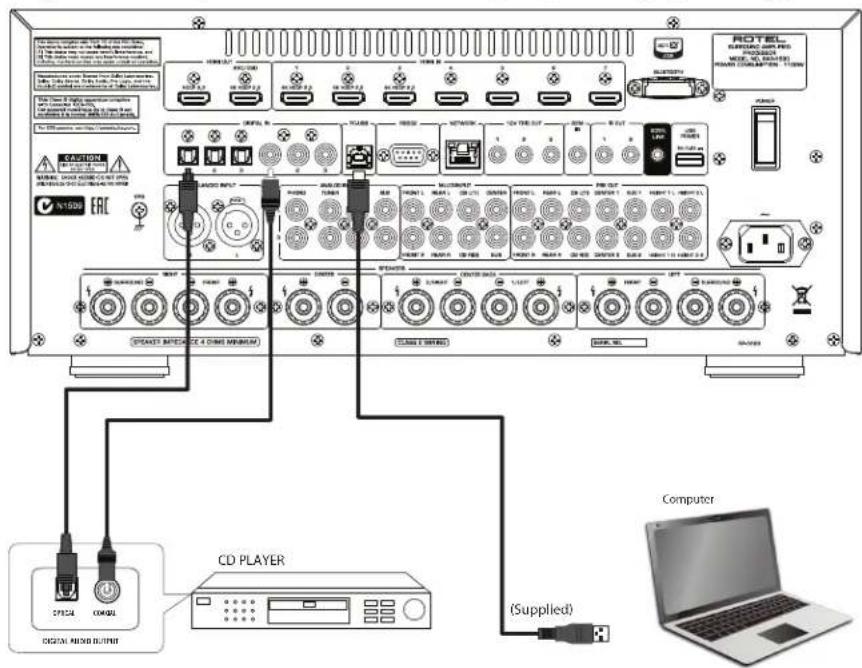
Figure 5: Digital Audio and PC-USB Connections Connexions audio numériques et PC-USB Digitale Audio und PC-USB verbindungen Conexiones Digitales de Audio y PC-USB
Digitale audio- en PC-USB-aansluitingen
Collegamenti audio digitale e PC-USB
Digitala ljud- och PC-USB-anslutningar
Побсядения чфPORо aydno n PC-USB
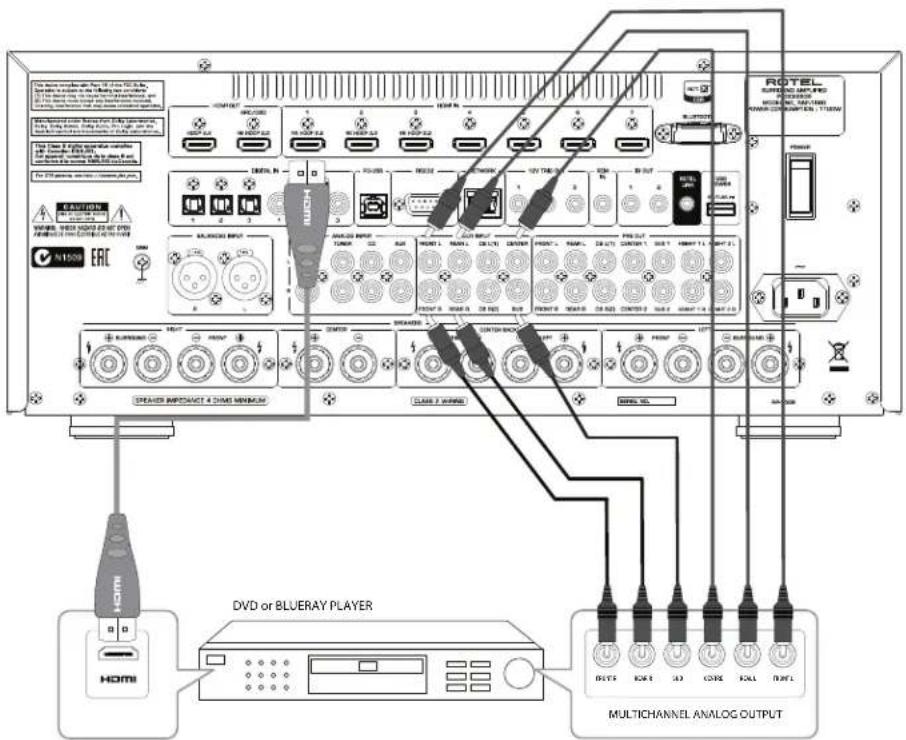
Figure 6: Blu-Ray and Video Player Connections Connexions à un lecteur Blu-Ray ou Video Anschlussdiagramm für Blu-Ray- und Video-Player Conexiones para Reproductor de Video o Blu-Ray
Aansluitingen voor een Blu-Ray of Video-speler
Collegamento dilettori Blu-Ray o Video
Blu-Ray-eller Video-spelare
IopknoueHn Blu-Ray nnn Bndeo nponrpbBaTeNa
Figure 7: Front USB Connections
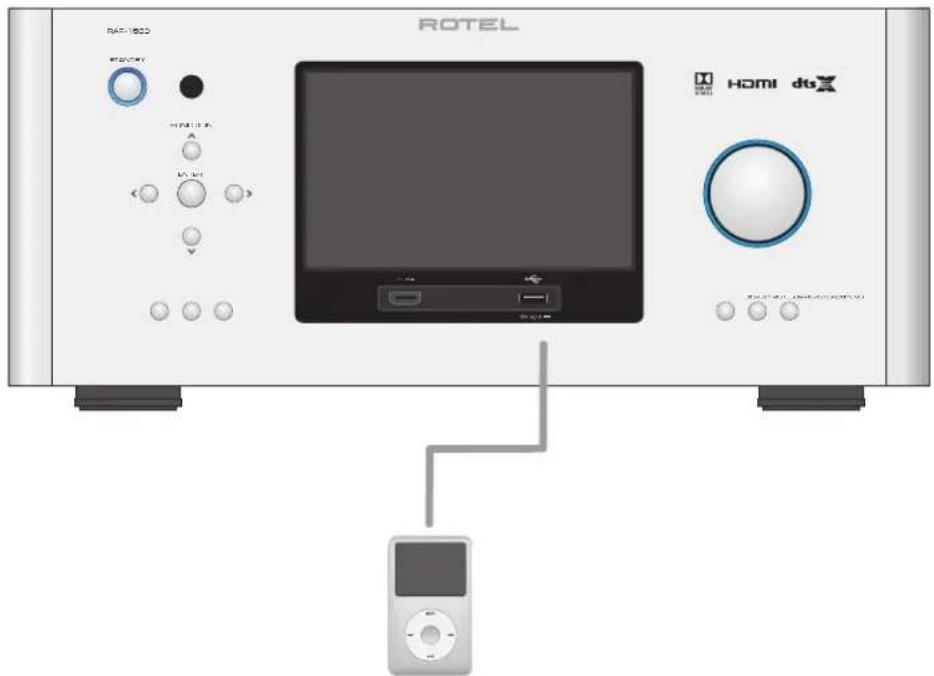
Figure 8: CD Player Connections
Figure 9: TunerConnections
Blu-ray Player or other digital source with HDMI output
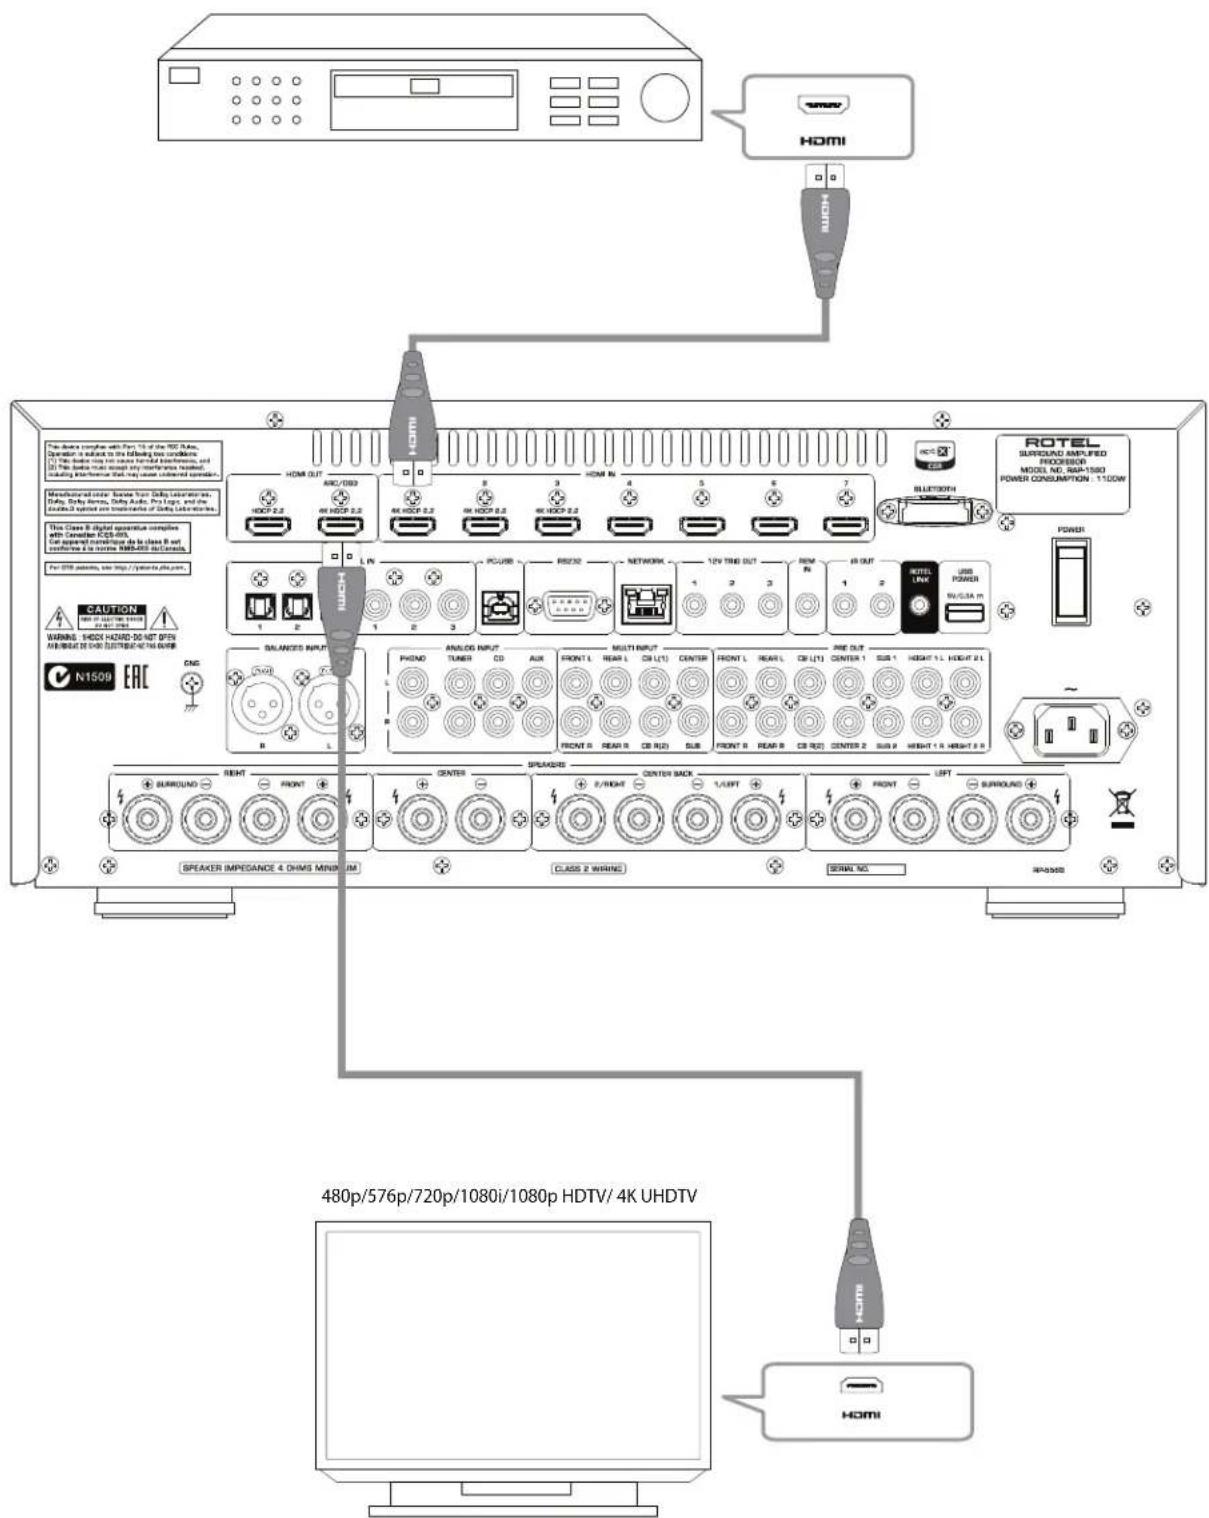
Figure 11: Rear HDMI Connections

On-Screen Menus Affichege des menus a I'ecran On-Screen-Menus Sistema de Menu en Pantalla
About Rotel
Our story began over 50 years ago. Over the decades, we have received hundreds of awards for our products and satisfied hundreds of thousands of people who take their entertainment seriously like you!
Rotel was founded by a family whose passionate interest in music led them to manufacture high-fidelity components of uncompromising quality. Through the years, that passion has remained undiminished and the family goal of providing exceptional value for audiophiles and music lovers, regardless of their budget, is shared by all Rotel employees.
Rotel's engineers work as a close team, listening to, and fine tuning, each new product until it reaches their exacting musical standards. They are free to choose components from around the world in order to make that product the best they can. You are likely to find capacitors from the United Kingdom and Germany, semiconductors from Japan or the United States, while toroidal power transformers are manufactured in Rotel's own factory.
We all have concerns about our environment. And, as more and more electronics are produced it is especially important for a manufacturer to do all it can to engineer products that have a minimum impact on the environment.
At Rotel, we are proud to do our part. We have reduced the lead content in our products by using special lead-free ROHS solder and components. Our engineers continually strive to improve power supply efficiency without compromise to quality. When in standby mode Rotel products use minimal power to meet global Standby Power Consumption requirements.
The Rotel factory is also doing their part to help the environment through constant improvements to product assembly methods for a cleaner and greener manufacturing processes.
All of us at Rotel thank you for buying this product. We are sure it will bring you many years of enjoyment.
Manufactured under license from Dolby Laboratories. Dolby, Pro Logic, and the double-D symbol are registered trademarks of Dolby Laboratories.
Manufactured under license under U.S. Patent #s: 5,451,942; 5,956,674; 5,974,380; 5,978,762; 6,226,616; 6,487,535; 7,212,8-72; 7,333,929; 7,392,195; 7,272,567 & other U.S. and worldwide patents issued & pending. DTS, DTS-HD and the Symbol are registered trademarks, & DTS-HD Master Audio, and the DTS logos are trademarks of DTS, Inc. Product includes software. © DTS, Inc. All Rights Reserved.
This item incorporates copy protection technology that is protected by U.S. patents and other intellectual property rights of Rovi Corporation. Reverse engineering and disassembly are prohibited.
Getting Started
Thank you for purchasing the Rotel RAP-1580 Surround Amplified Processor. The unit is a full-featured audio/video control center for analog and digital source components. It features digital processing for a wide range of formats including Dolby® Surround, Dolby® ATMOS and DTS® source material.
Video Features.
HDMI switching for digital video signals up to 4K.
- Accepts HDMI video input: 480i, 480p/576p, 720p, 1080i, 1080p, 1080p 24Hz, 4K.
- Outputs HDMI video (480i, 480p/576p, 720p, 1080i, 1080p, 1080p 24Hz, 4K) compatible with common HDMI displays and projectors.
Audio Features
- Rotel's Balanced Design Concept combines advanced circuit board layout, comprehensive parts evaluation, and extensive listening tests for superior sound and reliability.
- Analog bypass mode for pure 2 channel stereo with no digital processing.
- Digital and analog inputs including Coax, Optical, RCA and Balanced XLR.
- 7.1 Multi-Channel input from compatible source components.
Surround Features
Automatic Dolby and DTS surround decoding of all popular formats up to 7.1.4 channels.
- Surround modes for playback of multi channel audio on 2 channel and 3 channel systems.
- Audio Return Channel (ARC) allowing the audio from the TV to be processed by the RAP-1580 via HDMI.
Other Features
- User friendly ON-SCREEN DISPLAY (OSD) menu system with programmable labels for all inputs.
- Multi language support in OSD setup.
- Upgradable software to accommodate future updates through the rear Internet connection or front USB port.
- Assignable 12V trigger outputs for remote turn-on of power amplifier(s) and other components.
Unpacking
Remove the unit carefully from its packaging. Find the remote control and other accessories. Save the box as it will protect the product if you move or need to return it for maintenance.
Placement
Place the unit on a solid, level surface away from sunlight, heat, moisture, or vibration. Make sure that the shelf can support the weight of the unit.
Place the unit close to the other components in your system and, if possible, on its own shelf or with the optionally included rack ears. This will make initial connection, and subsequent system changes easier.
The unit can generate heat during normal operation. Do not block ventilation openings. Allow a minimum of 10cm or 4 inches of unobstructed space around the unit. If installed in a cabinet, make sure that there is adequate ventilation.
Do not stack other components or objects on top of the unit. Do not let any liquid fall into the cabinet.
Overview of Connections
NOTE: Do NOT plug any system component into an AC source until all connections have been properly made.
Each of the source components in the system are connected to the unit's inputs with a pair of standard RCA cables for analog audio, an HDMI video connection and an optional digital audio cable (coax or optical).
The outputs of the RAP-1580 can be sent up to 7 sets of speakers or sent to power amplifier(s) with standard RCA cables from the preamp audio outputs. Overhead channel outputs are also available via the RCA pre-outputs for connection to an external amplifier delivering up to 7.1.4 channels of audio. The video signal from the RAP-1580 is sent to the monitor using the HDMI connections.
In addition, the processor has MULTI INPUT connections for use with a source component that does its own surround decoding, remote IR receiver inputs and 12V trigger outputs.
NOTE: The S/PDIF digital audio interface standard specifies a 75 ohm impedance and all good digital cables adhere to this requirement. Do NOT substitute conventional audio interconnect cables for digital signals. Standard audio interconnects will pass these signals, but their limited bandwidth reduce performance.
When using analog audio connections ensure the Left and Right signals are attached to the proper RCA jacks. All RCA-type connections on this product follow these standard color codes:
Left channel audio: white RCA jack Right channel audio: red RCA jack
NOTE: Each source input must be properly configured using the INPUT SETUP menu of the OSD menu system. We recommend going to this menu after connecting all of the sources to configure it as desired. See Input Setup in the Setup section for more information.
These connections are used for connecting video signals to and from the unit. See the Making Connections section for specific instructions for each type of component on page 17.
HDMI inputs provide various digital video connections for use with components that have HDMI outputs. HDMI connections carry video signals in multiple formats including 3D, 1080p/24Hz, and 4K. The implementation of HDMI supports audio signals, or a separate audio connection from an HDMI component. Three HDMI inputs support 4K UHD HDCP 2.2 as labeled on the rear panel.
Front HDMI IN 9
The Video 8 input is located on the front panel for easier access. Use this HDMI connection for portable sources or devices that would not be permanently connected.
HDMI Monitor Outputs 15
The two HDMI outputs of the RAP-1580 send High Definition video signals to your TV monitor in parallel. The HDMI outputs can send video signals to a high-definition TV 2D (480p/576p, 720p, 1080i, 1080p or 4K) and 3D (up to 1080p/24Hz). One HDMI output will support 4K UHD HDCP 2.2 as labeled on the rear panel.
There are two HDMI outputs on the rear panel sending out the same video signal. The ARC/OSD output will send the On Screen Menu to your TV.
Of the two HDMI Outputs, only one HDMI output supports ARC (Audio Return Channel) and is labeled "ARC/OSD" above the HDMI connector. Please refer to the VIDEO SETUP menu section of this manual for more details on page 27.
Your TV may have more than one HDMI input. Not all HDMI inputs support ARC. Please use the ARC enabled HDMI input of your TV to use the ARC function on this product. ARC compatible inputs should be labeled with "ARC" next to the HDMI input connector.
Additional information for HDMI video outputs:
- All HDMI attached devices must be HDCP compatible to ensure proper display of the HDMI video signal.
- When Audio mode is set to "HDMI AUDIO OUTPUT ONLY", only the HDMI output labeled "ARC/OSD" can transmit audio to TV.
- Audio received over HDMI will be processed by this product and sent out via the RCA and speaker terminal outputs. To pass the audio signal to an attached TV the RAP-1580 must be set to "HDMI Audio Output Only" in the VIDEO SETUP menu in the OSD.
- When using both HDMI outputs simultaneously, both HDMI outputs will be set to the same resolution. This resolution will be the lower resolution of any attached monitor.
This Rotel processor provides both analog and digital audio connections.
A Left/Right pair of RCA analog audio inputs for connecting a phono player with a moving magnet cartridge. If the turntable has a "ground" wire, connect it to the screw terminal labeled "GND" to the left of the Digital inputs.
A Left/Right pair of RCA analog audio inputs for connecting a tuner.
A Left/Right pair of RCA analog audio inputs for connecting a CD player.
A Left/Right pair of Balanced XLR audio inputs for connecting a source component with Balanced XLR audio outputs.
A set of RCA inputs accepting up to 7.1 channels of analog signals from a source component capable of decoding multi channel audio. These inputs support FRONT L & R, CENTER, SUB, REAR L & R, and CENTER BACK L[1] & R[2].
These inputs bypass all digital processing in the RAP-1580 and are routed directly to the volume control and outputs.
PREAMP Output 35
A group of fourteen RCA analog audio outputs sends the RAP-1580's line level output signals to external amplifiers and powered subwoofer. These output levels are variable and adjusted by the RAP-1580's volume control. The fourteen connectors provide output for: FRONT L & R, REAR L & R, CENTER 1 & 2, CENTER BACK L(1) & R(2), SUBWOOFER 1 & 2, HEIGHT 1 L & R and HEIGHT 2 L & R.
The RAP-1580 accepts digital inputs from source components such as CD players, satellite TV tuners, and DVD players. The DSP in the RAP-1580 detects the sampling rate of the incoming signal and automatically adjusts. Sampling rates up to 192kHz are supported.
NOTE: Digital inputs support both 2 Channel Stereo and Multi Channel audio signals. When using the digital input with a Multi Channel audio signal the processor DSP will decode the incoming audio stream including Dolby or DTS.
There are six digital audio inputs on the rear panel, three coaxial and three optical. These digital inputs can be assigned to any of theVIDEO 1 - 8 input sources using the INPUT SETUP menu during the setup process. For example, you can assign the COAXIAL 1 digital input connector to theVIDEO 1 source and the OPTICAL 2 digital input to theVIDEO 3 source. By default, the source of the audio for inputs Video 1 - 8 is set to HDMI Audio.
At the factory the CD audio input is set to CD (analog RCA), but this can be changed to XLR, Coax 1 - 3, or Optical 1 - 3.
See Figure 5
Connect this input using the supplied USB cable to the USB socket of your computer.
The RAP-1580 supports both USB Audio Class 1.0 and USB Audio Class 2.0 modes. Windows computers do not require installation of a driver for USB Audio Class 1.0 and support playback of audio up to 96kHz sampling rates.
The Factory Default setting is USB Audio Class 2.0. To take advantage of USB Audio Class 2.0 audio playback supporting up to 192kHz sampling
rates you will need to install the Windows driver supplied on the CD included with the RAP-1580.
You can switch the RAP-1580 to USB Audio Class 1.0 playback mode with the following:
- Press MENU on the front panel to enter MAIN MENU and use Up/Down buttons to select the INPUT SETUP menu then press ENTER.
Use Left/Right buttons to select "PC-USB" as INPUT SOURCE and select "USB Audio 1.0" as AUDIO INPUT.
- Power cycle the RAP-1580 and reboot your PC after changing the USB Audio mode to ensure both units are properly configured.
Many audio playback applications do not support 192kHz sampling rate. Please confirm your audio player supports 192kHz audio and you have 192kHz audio files to properly playback this sample rate. Also, you may need to configure the audio driver in your PC to output 192kHz or your computer may "down sample" to a lower audio sample rate. For more information please refer to your audio player or operating system information.
NOTE: Upon successful installation of the driver, you may need to select the ROTEL audio driver from the audio/speaker setup of your computer.
See Figure 7
This connection will accept Apple devices such as iPod, iPad and iPhone. While connected, the iPod and iPhone displays remain active allowing search and play functions.
Other Connections
Your Rotel processor is configured at the factory for the proper AC line voltage in the country where you purchased it (USA: 120 volts/60Hz AC or CE: 230 volts/50 Hz AC). The AC line configuration is noted on a decal on the back of your unit. Plug the supplied cord into the AC INPUT receptacle on the back of the unit.
Master Power Switch 26
The large rocker switch on the rear panel is a master power switch. When it is in the OFF position, power to the unit is completely off. When it is in the ON position, the front panel STANDBY and remote control ON/OFF buttons can be used to activate the unit or put it into standby mode.
12V TRIGGER Output 20
Many Rotel amplifiers offer the option of turning them on and off using a 12 volt trigger. These three connections provide this 12 volt trigger signal from the processor. When the unit is activated, a 12 volt DC signal is sent from these jacks to the amplifiers to automatically turn them on. When the processor is put in STANDBY mode, the trigger signal is removed and the amplifiers automatically turn off.
To use the automatic trigger turn on feature, connect one of the RAP-1580's 12V TRIG OUT jacks to the 12 volt trigger input of a Rotel amplifier, using only the black 3.5mm trigger cable included with this unit or a Rotel
amplifier. Do not use any other cable for trigger connection. The +12V DC signal appears at the "tip" of the connector.
The 12V Trigger outputs are configured to turn on in various combinations only when specific input sources are activated. See the INPUT SETUP menus in the Setup section of this manual for details on page 22.
REM IN Jack 21
This 3.5mm mini-jack receives command codes from third-party IR remote receiver. These remote IR inputs can be used when the RAP-1580 front IR receiver cannot be reached by a sending remote control.
Consult your authorized Rotel dealer for more information on the REM IN jack.
The IR signals from the REM IN jack can be relayed to other source components using external IR emitters or hard-wired connections from the IR OUT jacks. See the following section for additional information.
IR OUT Jacks 22
The IR OUT 1 & 2 jacks send IR signals received at the REM IN jack to an infrared blaster or emitter placed in front of a source component's IR sensor. In addition, the IR OUT can be hard-wired to other Rotel products with a REM IN jack.
These outputs allow IR signals to be "delayed" through the RAP-1580 either directly to the IR receiver on the front panel or via the REM IN jack on the rear panel. This function provides easy control of other source components when their IR inputs are not accessible such as when they are installed in a rack system or in a cabinet.
See your authorized Rotel dealer for more information on IR emitters and repeater systems.
Rear USB Power Port Z5
The rear USB port provides 5V for charging or powering USB devices including streaming music players. This port does not allow playback of audio.
The port can be configured to remain powered even when the RAP-1580 is in standby mode through the front panel setup menu (See the Power Mode under the Power Option menu on page 27).
The Power Mode "Quick" option allows the attached streaming source to remain powered for use with the Signal Sense function for automatic power on/off control of the amplifier.
When configured to provide continuous power to the rear panel USB port the RAP-1580 will consume additional power even when in standby mode.
RS232 Connector 18
The RAP-1580 can be controlled via RS232 for integration with automation systems. The RS232 connector accepts a standard straight DB-9 Male-to-Female cable.
NETWORK Connector 19
The Network socket accepts standard RJ-45, CAT-5 cables. The network connection is not required for normal operation of this unit. This connection is for software updates or control from an automation system only.
For additional information on the connections, cabling, software, and operating codes for automation system control or software updates, contact your authorized Rotel dealer.
Making Connections
Connecting Speakers
See Figure 4
This Rotel RAP-1580 has built-in amplifiers to power up to seven speakers: normally, left/right front speakers, center channel speaker, left/right surround speakers, plus two center back speakers or two ceiling speakers. There are seven pairs of binding post connections (one pair for each speaker) which accept bare wire, spade lugs, or banana plug connectors (in some markets).
Speakers should have an impedance of 4 ohms or higher.
Each pair of connectors is color-coded for polarity: red for positive and black for negative. All speakers and all speaker wire is also marked for polarity. For proper performance, you must maintain this polarity at all speaker connections. Always connect the positive terminal of each speaker to the corresponding red speaker terminal on the receiver and the negative speaker terminal to the corresponding black connector on the receiver.
The connectors are labeled LEFT FRONT, RIGHT FRONT, LEFT SURROUND, RIGHT SURROUND, CENTER, CENTER BACK LEFT, CENTER BACK RIGHT.
Route the wires from the receiver to the speakers. Leave enough slack so you can move the components to allow access to the speaker connectors. If you are using banana plugs, connect them to the wires and then plug into the back of the binding posts. The collars of the binding posts should be screwed in all the way (clockwise). If you are using terminal lugs, connect them to the wires. If you are attaching bare wires directly to the binding posts, separate the wire conductors and strip back the insulation from the end of each conductor. Be careful not to cut into the wire strands. Unscrew the binding post collars. Place the twisted bare wire into the hole in the binding post. Turn the collars clockwise to clamp the connector lug or wire firmly in place.
For speaker connection information see Audio Configuration options in the RAP-1580 Setup Menu.
Be sure that no loose wire strands can touch adjacent wires or connectors. After you have connected the speakers, you need to configure the receiver for the size and style of speakers in your system and calibrate the relative volume levels of the speakers. See the Setup section of this manual.
Connecting an External Amplifier
See Figure 3
The RAP-1580 also has preamp RCA outputs for connections to external power amplifiers to drive up to 12 speakers in configurations from 5.1 to 7.1.4. In addition, there are two subwoofer outputs.
To connect amplifiers, connect an audio cable from each output jack to the input of the amplifier channel that will power the corresponding speaker. For example, connect the FRONT L output to the amplifier channel driving the front left speaker. There are two CENTER RCA jacks; use either jack for a single center channel, or both if you have two center channels. In six or seven channel systems, make one or two additional connections for Center Back channel(s). These jacks are labeled CB L[1] and CB L[2]. Use CB L[1] for a single center back channel. Ceiling or Top speakers should be connected to the Height 1 and Height 2 jacks.
For preamp output connection information see Audio Configuration options in the RAP-1580 Setup Menu on page 23.
After you have connected the preamp outputs, you need to configure the RAP-1580 for the size and style of speakers in your system and calibrate the relative volume levels of the speakers. See the Setup section of this manual on page 23.
Connecting a Subwoofer
To connect a powered subwoofer, connect a standard RCA audio cable from the jacks labeled SUB 1/SUB 2 to the input on the subwoofer's power amp. Both SUB outputs provide the same signal. Use either connection for a single subwoofer. Use both connections to connect two subwoofer.
After you have connected the subwoofer, you need to configure the unit to use the subwoofer and calibrate the relative volume level of the subwoofer. See the Speaker Level Setup section of this manual on page 25.
Connecting a DVD, Blu-ray, Cable, Satellite, Game Console and HDTV Tuner
See Figure 6 and 10
Source devices including Blu-ray, DVD, satellite, cable, etc. should be attached to the RAP-1580 using HDMI. Connect an HDMI cable from the output of the source to one of the HDMI inputs on the processor.
Digital audio connection: Depending on the setup of your system, you can also use the audio digital connections and assign them to the HDMI video inputs.
Connect the digital output of the source to any of the DIGITAL IN OPTICAL 1-3 or DIGITAL IN COAXIAL 1-3 inputs on the processor. An HDMI cable carries both digital video and digital audio signals; therefore, in most cases no separate digital audio connection needs to be made.
Use the INPUT SETUP screen to assign the audio digital input to the HDMI video input source used above.
Connecting a Blu-ray or DVD Player
In some cases DVD, SACD, and other external multichannel processors are connected to the processor by sending decoded analog audio signals using RCA cables. A player with HDMI outputs can send digital signals directly to the processor for decoding.
Analog Connections: To connect a Blu-ray or DVD player (or any device that decodes multi-channel audio) with analog connections, use audio RCA cables to connect the outputs of the player to the RCA jacks labeled MULTI INPUT on the RAP-1580. Make sure that you observe proper channel consistency, i.e. connect the right front channel to the FRONT R input, etc.
Depending on your system configuration, make six connections (FRONT L & R, SURROUND L & R, CENTER, and SUBWOOFER), seven connections (adding a CENTER BACK connection), or eight connections (adding two CENTER BACK connections).
The MULTI inputs are analog bypass inputs, passing signals directly to the Volume Control and preamp outputs, bypassing all of the digital processing.
HDMI digital connection: If the player has HDMI outputs, simply connect an HDMI cable from the output of the player to one of the HDMI inputs on the processor. This cable sends the video signal from the player along with a digital audio signal. Using HDMI for audio and video allows the multichannel decoding to be handled by the processor.
Connecting a Monitor
Connect one of the HDMI outputs of the RAP-1580 to the HDMI input of your TV monitor. The RAP-1580 has two HDMI outputs. Only one HDMI output will display the OSD and is ARC enabled. This output is labeled on the rear panel with ARC/OSD.
Connecting a CD Player or XLR Source
Digital audio connection: Connect the output of the CD player to any of the Analog CD, XLR, Optical or Coax digital inputs on the processor. Use the INPUT SETUP menu to assign the audio input to the CD (the default is CD).
Analogue audio connections:
Option 1: Connect the left and right analog outputs from the CD player to the AUDIO IN jacks labeled CD (left and right). This option uses the CD player's D/A converter. Depending on the selected DSP mode this connection method may require the analog signal to be converted to a digital signal for processing.
Option 2: If your CD Player (or another source) has XLR output connectors, you can use the XLR inputs on the RAP-1580 for this connection. Connect the left and right XLR outputs from the source to the jacks labeled BALANCED INPUT (left and right). This option uses the CD player's D/A converter. Depending on the selected DSP mode this connection method may require the analog signal to be converted to a digital signal for processing.
Although there are typically no video connections for a CD Player, the RAP-1580 can assign another video input to the CD or XLR input. The Video choices are HDMI 1-8 (Front), Last Video Source, or Off. HDMI 1 video input is assigned to CD and XLR as the default setting.
Connecting a Tuner
Digital audio connection: If using an HD Radio or other digital tuner, connect the digital output of the tuner to any one of the DIGITAL IN OPTICAL 1-3 or DIGITAL IN COAXIAL 1-3 inputs on the RAP-1580.
NOTE: The Tuner source by default does not allow the selection of a digital input. Please use VIDEO 1 - 8, if connecting a Tuner with a digital input.
Analog audio connection: If using an analog tuner, connect the left and right analog outputs from the tuner to the pair of audio input jacks labeled TUNER on the RAP-1580. Make sure that you connect the right channel to the R input jack and the left channel to the L input jack.
Although there are typically no video connections for a Tuner the RAP-1580 can assign another video input to the Tuner input. The Video choices are HDMI 1 - 8 (Front), Last Video Source, or Off. HDMI 1 video input is assigned to the Tuner input, as a default setting.
Connecting an iPod/iPhone
See Figure 7
Connect the iPod/Phone to the front USB socket.
NOTE: The audio inputs CD, PHONO, XLR, MULTI, USB, PC-USB, BLUETOOTH, and TUNER are set to HDMI 1 video input as the factory default. This can be changed to HDMI 1-8, Last Video Source, or Off.
Front Panel Overview
Front Panel Display
The Display on the front panel shows the complete OSD menu of the unit. When the OSD is not in use, the display shows the volume, DSP mode, source selected and type of audio mode the unit is in receiving or processing.
IR Remote Sensor Z
This sensor receives IR signals from the remote control. Do not block this sensor.
NOTE: The remainder of the buttons and controls on the front panel are described in the Overview of Buttons and Controls section.
Remote Control Overview
The RAP-1580 is supplied with an easy to use remote control RR-CX100. The RR-CX100 can be configured to use IR codeset 1 or IR codeset 2 in case the unit is conflicting with other Rotel models. Push and hold the TUNER button and 1 (or TUNER and 2 for codeset 2) at the same time and hold for approximately 5 seconds until the backlights on the remote control blink on then off then release both buttons. This sets the remote control to use codeset 1 (or codeset 2 if TUNER and 2 are held). The System menu in the OSD includes a configuration option to set the processor to either codeset 1 or codeset 2. The factory default for the remote and processor is codeset 1.
The RR-CX100 can also control an attached Rotel CD player. The CD player functions include Play, Stop, Pause, Track Forward, Track Back, Fast Forward, Fast Reverse. To activate these functions press the CD button on the remote. If the CD is attached to the XLR source input these functions can be activated by pressing the XLR button. To change the CD player functions to operate after pressing the XLR button press and hold the XLR and 1 button for 5 seconds until the backlight LEDs blink two times then release. To disable XLR sending the CD control functions press and hold the XLR and 0 button for 5 seconds until the backlight blinks.
The transport buttons will only operate for CD control after the CD or XLR button is pressed on the remote. If a different input is selected from the remote these buttons will no longer send the CD transport IR commands.
The front-panel STANDBY button and the remote control ON/OFF button activate or deactivate the unit. The rear panel master POWER switch must be on the ON position for the remote standby function to operate.
The VOLUME UP/DOWN buttons on the remote and the large rotary control on the front panel provide the master VOLUME control, adjusting the output level of all channels simultaneously from mute, 1 to 96.
Push this button to toggle between TFT and TV display mode.
The MENU/SETUP button displays the OSD setup screen on the front display and HDMI OSD enabled output. Push the MENU/SETUP button again to deactivate this menu. Use the navigation buttons Up/Down/Left/Right and ENTER on the remote control or front panel to access the various menus.
Push the MUTE button once to turn the sound off. An indication appears in the front panel and on the on-screen display if using HDMI inputs 4 to 8. Press the button again to restore the previous volume level.
The INPUT button on the front panel can be used to display the input source menu. The input source can be changed by selecting the desired source with the navigation buttons and pressing the ENTER button on the front panel. The remote control input buttons can change the source directly by pressing the desired source input.
The SUR + buttons on the remote control or front panel will display surround mode information of currently selected source. The default DSP mode can be configured in the Setup menu for each source. Press the SUR + button repeatedly to toggle through the available DSP modes.
DSP processing options vary depending on the selected source input type. Not all DSP options are available in analog or digital input modes.
Other buttons on the remote can directly access specific DSP modes.
2CH: Changes the audio mode to STEREO, DOWN MIX.
BYPASS: Bypass all DSP processing.
PLCM: Selects Dolby ATMOS surround mode.
These buttons provide basic control functions for iPod/USB AUDIO playback. Supported functions include Play, Stop, Pause, Next Track, Previous Track.
Use this button to dim the front panel display.
Adjustment made using the ① button is temporary only and not saved after power off.
These buttons can access the speaker setting and adjust the output level for speakers in the system. Use the Up and Down arrow buttons on the remote control to change values. This is only a temporary change. To make permanent adjustments, please access the SPEAKER LEVEL SETUP menu from the OSD.
This button does not operate with the RAP-1580 and is used only to control a Rotel tuner product for preset memory control.
Pushing this button turns on the back light of the remote control for easy operation in dimly lit rooms.
ASSISTIVE LIGHT
Push and hold on the LIGHT Button (N) for 3 seconds to turn on the assistive light. This light can be used to help locate objects in a dimly lit room such as a home theatre surrounding. The light will remain illuminated as long as the button is held.
Automatic Surround Modes
Decoding of digital sources connected is generally automatic with detection triggered by a "flag" embedded in the digital recording telling the processor what decoding format to use. For example, when a Dolby or DTS surround signal is detected, the processor activates the proper decoding.
The processor will recognize a digital signal with Dolby Surround encoding and activate Dolby® decoding. Additionally, you can configure a default surround mode for each input using the INPUT SETUP menu (see the Setup section of this manual). Combined with the auto-detection of Dolby Digital and DTS, this default surround setting makes operation of the processor's surround modes totally automatic.
For stereo inputs such as CD and Tuner, you could select BYPASS or STEREO mode as the default for 2-channel playback or a DSP mode if you prefer to hear music sources in surround sound.
NOTE: A digital signal coming into the processor will be recognized and properly decoded. However, on a Blu-ray with multiple soundtracks, you may need to configure the player for the desired signal and encoding type. For example, you may need to use the player's menu system to select the desired Dolby Digital or DTS soundtrack.
Manually Selecting Surround Modes
For users who prefer a more active role in setting surround modes, buttons on the remote and the front panel provide manual selection of surround modes that are not automatically detected or, in some cases, to override an automatic setting.
Manual settings available from the front panel and/or the remote control should be used when you want to play:
To change the surround mode press the SUR + button on the remote control or front panel to toggle through the available options. The 2CH button on the remote control will create a down mix of any multichannel signal to 2 channel stereo mode.
NOTE: Not all surround modes are available for all surround source formats. The input source signal will determine the available surround options that can be selected.
Digital Audio
You can play these recordings in Stereo, Dolby 3-Stereo, 5-CH Stereo, 7-CH, 9CH, 11CH Stereo, Dolby ATMOS Surround and Dolby Neural:X modes.
All of the bass management settings (speaker size, subwoofer, and crossover) are in effect with digital stereo inputs unless BYPASS mode is selected.
To change the surround mode press the SUR + button on the remote control or front panel control to toggle through the available surround options. The 2CH button on the remote control will create a down mix of any multichannel signal to 2 channel stereo mode.
NOTE: Not all surround modes are available for all surround source formats. The input source signal will determine the available surround options that can be selected.
Analog Stereo
This type of recording includes any conventional stereo signals from the processor's analog inputs, including analog audio from CD players, FM tuners, etc.
Analog stereo inputs require a choice about how the signal is routed through the processor. One option is the ANALOG BYPASS mode. In this mode, the stereo signal is routed directly to the volume control and the outputs. This mode is pure 2-channel stereo, bypassing all of the digital circuitry. None of the bass management features, speaker level settings, EQ settings, or delay settings is active. There is no subwoofer output. A full-range signal is sent directly to the front left and right speakers.
Alternatively, a DSP mode can be enabled, this converts the analog inputs to digital signals, passing them through the digital processors in the RAP-1580. This allows all of the features to be active including bass management settings, crossovers, subwoofer outputs, EQ settings, etc. There are several DSP modes available, including: Stereo, Dolby 3-Stereo, 5-CH Stereo, 7-CH Stereo, 9CH and 11CH Stereo, Dolby ATMOS Surround and Dolby Neural:X modes.
To change the DSP mode press the SUR + button on the remote control or front panel control to toggle through the available surround options.
NOTE: Not all surround modes are available for all surround source formats. The input source signal will determine the available surround options that can be selected.
Basic Operation
This section covers the basic operating controls of the RAP-1580 and the remote control.
You can select any of the source inputs for listening and/or watching:VIDEO 1-8, CD, PHONO, XLR, MULTI INPUT, USB, PC-USB, BLUETOOTH or TUNER.
The source inputs can be customized using the INPUT SETUP menu to assign which HDMI input to use as the video source. Video 1-8 inputs can also be configured to accept any analog and digital audio sources. The default of audio source is set to HDMI Audio.
When you have configured the source input, you can use the INPUT buttons to select the desired inputs:
- Press the INPUT buttons on the front panel [6] and use the navigation buttons to switch to the selected source input i.e. CD, Tuner, Video 1 etc. then press ENTER.
- Press the source input button on the remote control to select the desired source.
USB/iPod Operation
iPod/iPhone Connection
- An iPod/iPhone can be connected using the proper USB cable to the USB front socket of the RAP-1580.
- The iPod/iPhone will stream a digital music signal to the unit. Music selection and playback control can be made from the iPod/iPhone.
- The iPod/iPhone screen will remain active while connected to the unit.
Transport controls are available from the remote control during playback including play, stop/pause, next track, previous track.
Bluetooth
Bluetooth Connection
The Bluetooth feature allows you to stream music wireless from your Bluetooth enabled device, i.e. mobile phones. Select the BLUETOOTH (BT) input on the RAP-1580. From your device (mobile phones etc.) activate Bluetooth and allow it to search for other Bluetooth devices. Select "Rotel Bluetooth" and connect to it. Once connected you can start streaming music to the RAP-1580.
NOTE: The RAP-1580 Bluetooth is APTX compatible. This enables you to stream music at lossless CD quality.
NOTE: Some Bluetooth devices may require you to establish connection again with the RAP-1580 if the unit was powered off. If this occurs, please go through the above steps to re-connect.
Rear PC-USB
Reur PC-USB Connection
The rear USB socket labeled PC-USB accepts a type B USB plug. This input accepts PCM audio signals sent from your computer up to 24 bits/192kHz resolution.
Setup
The Rotel RAP-1580 features two types of information displays to help operate the system. The first consists of simple status displays that appear on the TV screen whenever primary settings (Volume, Input, etc.) are changed.
NOTE: On screen status displays are only available on HDMI inputs 4 to 8.
A more comprehensive ON-SCREEN DISPLAY (OSD) menu system is available at any time, for all inputs, by pressing the SETUP button on the remote or the MENU button on the front panel. These OSD menus guide you through the configuration and setup of the RAP-1580. The settings made in the configuration process are memorized as default settings and need not be made again for normal operation of the unit.
The OSD menus can be configured to display several different languages. The default English versions of all main menus are shown at the front of this manual. If your language is available, those menus will be shown in the instructions. If you would like to change from the default English language before proceeding, go to the instructions for the SYSTEM SETUP menu later in this manual. From this menu, you can change the language display.
The following remote control buttons are used to navigate the OSD menu system:
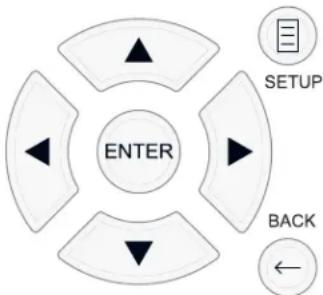
SETUP button: Press to display the MAIN MENU. If a menu is already visible, push this button to close the OSD and return to normal operation.
Up/Down buttons: Press to move up and down in the lists of menu items that appear on the OSD screens.
Left/Right buttons: Press to change the current settings for a selected menu item on OSD screens.
ENTER button: Press ENTER to confirm a setting.
BACK Button: Press BACK to go back to the previous menu.
Main Menu
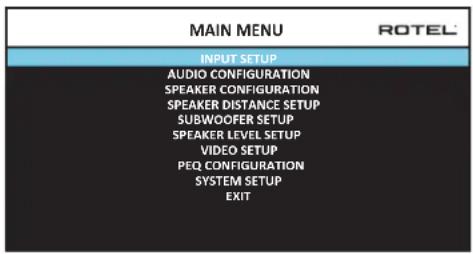
The MAIN MENU provides access to OSD screens for various configuration options. MAIN MENU is reached by pressing the SETUP button on the remote, or the MENU button on the front panel. To go to the desired menu, move the highlight using the Up/Down arrow buttons on the remote control or front panel and press the ENTER button on the remote control or front panel. Press the SETUP/MENU button again or select "EXIT" on the OSD to end setup and return to normal operation.
A key step in setting up the unit, is to configure each source input using the INPUT SETUP screens. Configuring the inputs allows you to set defaults for a number of settings including the type of input connector, the desired surround mode, custom labels that appear in the displays when a source is selected, and many more. The following OSD menus are used to configure the inputs.
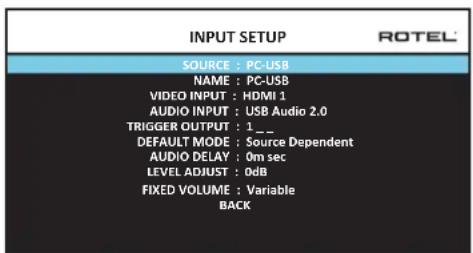
The INPUT SETUP menu configures the source inputs and is accessed from the MAIN menu. The screen provides the following options, selected by placing the highlight on the desired line using the Up/Down arrow buttons:
SOURCE: Changing this input allows you to select a specific input for configuring (CD, TUNER, VIDEO 1-8, USB, PC-USB, XLR, PHONO & MULTI INPUT, BLUETOOTH).
NAME: The name of the source can be customized. For example VIDEO1 can be named "TV" for easier reference. The default NAME is the same as the SOURCE. Place the highlight on this option and press ENTER on the remote control or front panel, it will then take you to the SOURCE NAME EDIT sub menu.
- Press the Left/Right arrow buttons on the remote control or front panel to change the first letter, scrolling through the list of available characters.
- Press the ENTER button on the remote control or front panel to confirm that letter and move to the next position.
- Repeat steps 1 and 2 until all eight characters have been completed. The final press of the ENTER button saves the new name. Or select
the button on the screen to confirm if you have less than eight characters to enter.
VIDEO INPUT: Selects the video source to be displayed on the TV monitor. Assign the input to a source component you have connected by selecting from HDMI 1-7 and HDMI Front. For audio only sources (such as a CD player), you would typically specify OFF so that no video is displayed. The video source can also be set to "Last Video Source" so when switching to the specified Video input the previous Video source is not changed. This feature is useful if you want to change only the audio and keep watching whatever was the last displayed video source.
AUDIO INPUT: Assigns a physical input connection for the source displayed in the first line of the menu. Options include Optical 1-3, Coax 1-3, HDMI Audio, Tuner, Multi Input, XLR, Phono, CD, Bluetooth, PC-USB, USB, ARC, AUX or Off.
NOTE: Optical, Coaxial, CD and XLR inputs can be assigned to the CD input source or Video 1-8. Audio input is not available to the XLR, PHONO, TUNER, MULTI INPUT, BLUETOOTH or USB input source.
When selecting the input source for "PC-USB", AUDIO INPUT can be changed to "USB Audio 1.0" or "USB Audio 2.0". USB Audio Class 2.0 may require installation of the PC driver. For more information please see PC-USB section in this manual.
TRIGGER OUTPUT: The RAP-1580 has three 12V trigger outputs (labeled 1 - 3) that supply a 12V DC signal to turn on other components as needed. This menu item turns on specific 12V trigger outputs whenever the indicated input source is selected. For example, configure the VIDEO 1 input to turn on the 12V trigger for your DVD player. Any combination of trigger outputs can be programmed for each source.
- Place the highlight on the option "TRIGGER OUTPUT" and press the ENTER button on the remote control or front panel.
- Press the Up/Down arrow buttons on the remote control or front panel to change the first position from blank to 1 (activating TRIGGER 1 for that source) and use the Left/Right arrow buttons to move to the next position.
- Repeat until all three positions are set as desired. The final press of the ENTER button confirms the selection.
NOTE: The 12V trigger output 1 is defaulted to be turned on for all input sources. You can turn it off by following the steps as above.
DEFAULT MODE: The DEFAULT MODE setting allows you to set a default audio mode for each source input. The default setting will be used unless the source material triggers automatic decoding of a particular type or unless the default setting is temporarily overridden by the front panel or remote surround mode buttons.
Options for the default surround modes are: Stereo, Dolby 3 Stereo, 5 channel Stereo, 7 channel Stereo, 9 channel Stereo, 11 channel Stereo, Dolby ATMOS Surround, DTS Neural:X, Analog Bypass (for analog input only) and Source Dependant.
NOTE: Most types of digital discs or source material are generally detected automatically and the proper decoding activated with no action or setting required.
Since Dolby and DTS sources are detected and decoded automatically, the default setting typically tells the unit how to process a 2-channel stereo signal. For example, you might have your CD input default to 2-channel stereo, DVD and game console inputs default to Dolby processing for surround material, and TUNER input default to 5 Channel Stereo mode.
In some cases, the default setting can be manually overridden by the SUR + button on the remote control or front panel, or 2CH,PLCM,BYPASS buttons on the remote control. See the Manually Selecting Surround Modes section of this manual for more information on which settings can be overridden.
AUDIO DELAY: Also known as "lip-sync" delay, this setting delays the audio signal for an input by the specified amount to match the video input. This feature can be useful when the video signal is delayed more than the audio signal.
The range of available settings is from 0 ms to 500 ms, in 10 ms steps. The setting is individually stored for each input and is the default Audio Delay each time that input is selected.
LEVEL ADJUST: Use this feature to set the volume level lower than the other inputs. This feature is useful for sources that are consistently higher in volume than other sources in the system.
Valid settings include: 0 -6 dB, in 0.5 dB steps.
FIXED VOLUME: Configures a Fixed Volume level for a specified input. To enable this feature, select the desired fixed volume level for USB, PC-USB, or Bluetooth. When enabled and the input with a Fixed Volume is selected, the Volume level will immediately be set to the specified level. Variable(disabled) is factory default.
Valid settings include: Variable, 1-96.
NOTE: The Volume knob on the front panel and Volume +/- buttons on the IR remote are disabled when the volume is Fixed. To disable this feature set the Fixed Volume level to "Variable".
Press the SETUP button on the remote control or MENU button on the front panel to exit the menu and return to normal operation.
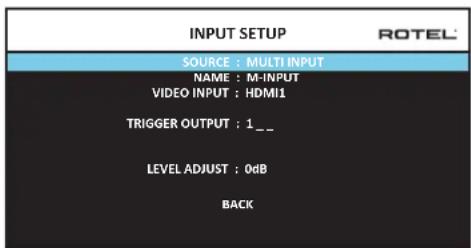
When the MULTI INPUT source is selected on the INPUT SETUP menu, the available options change to reflect the fact that these inputs are direct analog inputs and bypass the unit's digital processing. The AUDIO INPUT, DEFAULT MODE and AUDIO DELAY options are not available since these functions are processed digitally and not available to the MULTI INPUT source.
Configuring Audio
Audio Configuration
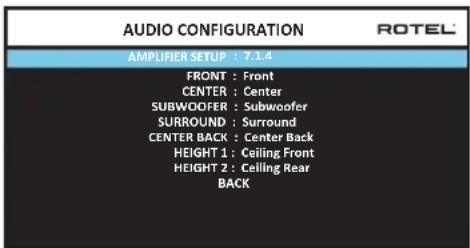
The AUDIO CONFIGURATION menu configures the amplifier and preamplifier RCA outputs. The screen provides options from 5.1 to 7.1.4 and an option for 5.1 with Bi-Amplification. After selecting the desired configuration the speaker outputs and preamplifier RCA output audio signals connections are displayed for up to 12 channels.
NOTE: Some outputs are only available via the preamplifier RCA outputs and require an external amplifier.
Configuring Speakers and Audio
This section of the setup process covers items concerning audio reproduction such as the number of speakers, bass management including subwoofer crossovers, establishing equal output levels for all channels, delay settings, and parametric EQ.
Understanding Speaker Configuration
Home theater systems vary in the number of speakers and the bass capabilities of those speakers. This processor offers surround modes tailored to systems with various numbers of speakers and bass management features which send bass information to the speaker(s) best able to handle it - subwoofer and/or large speakers. For optimum performance, you must tell the processor the number of speakers in your system and how bass should be distributed among them.
The following configuration instructions refer to LARGE and SMALL speakers, referring more to their desired bass configuration than their physical size. Specifically, use the LARGE setting for speakers that you want to play deep bass signals. Use the SMALL designation for speakers that would benefit from having their bass sent to more capable speakers. The bass management system redirects bass information away from all SMALL speakers and sends it to the LARGE speakers and/or the SUBWOOFER. It may be useful to think of LARGE as "full-range" and SMALL as "high-pass filtered."
- Five LARGE speakers and subwoofer: This system requires no bass redirection. All five speakers play the normal bass recorded in their respective channels. The subwoofer plays the normal channel bass. Meanwhile the normal bass places higher demands on the capabilities of the other speakers and the amplifiers driving them.
LARGE front, center, surround speakers, no subwoofer: The normal bass from the front, center, and surround channels is played in its respective speakers.
- All SMALL speakers and subwoofer: The normal bass from all channels is redirected to the subwoofer. The subwoofer handles ALL of the bass in the system. This configuration provides several benefits: deep bass
is played by the speaker most suited to do so, the main speakers may play louder with less distortion, and the need for amplifier power is reduced. This configuration should be used with bookshelf-size or smaller main speakers. It should also be considered in some cases with floorstanding front speakers. This configuration is advantageous when driving the system with moderate power amplifiers.
- LARGE front speakers, SMALL other speakers, and a subwoofer: The normal bass from the SMALL center and surround speakers is redirected to the LARGE front speakers and the subwoofer. The LARGE front speakers play their own normal bass plus the redirected bass from the SMALL speakers. The subwoofer plays the redirected bass from all of the other channels. This might be an appropriate configuration with a pair of very capable front speakers. A potential disadvantage with mixed LARGE and SMALL configurations is that the bass response may not be as consistent from channel to channel as it might be with the all SMALL configuration.
Speaker Configuration
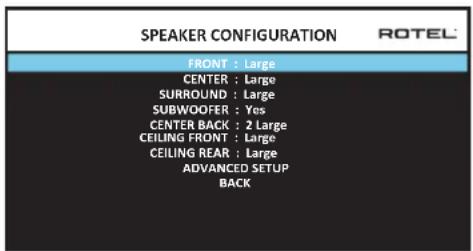
The SPEAKER CONFIGURATION menu is used to configure the RAP-1580 for use with your specific loudspeakers and to determine the bass management configuration as described in the previous overview. The menu is accessed from the MAIN menu. The Audio Configuration will determine which speakers are displayed in the Speaker Configuration menu.
The following speaker options are available:
FRONT SPEAKERS (Small/Large): Use the "Large" setting to have the front speakers play low bass (full-range). Use the "Small" setting to redirect normal bass away from these speakers to a subwoofer (high-pass filtered).
CENTER SPEAKER(S) (Large/Small/None): Select the "Large" setting (not available with SMALL front speakers) to have the center speaker play low bass (full-range). Select the "Small" setting if your center channel speaker has limited low frequency capability, or if you prefer that the bass be sent to the subwoofer (high-pass). Select the "None" setting if your system does not have a center channel speaker (the surround modes will automatically divide all center channel information equally between the two front speakers, creating a phantom center channel).
SURROUND SPEAKERS (Large/Small/None): Select the "Large" setting (not available with SMALL front speakers) to have the surround speakers play low bass (full-range). If your rear speakers have limited bass capability or if you would prefer that the bass go to a subwoofer, select the "Small" setting (high-pass). If your system has no rear surround speakers, select the "None" setting (surround channels are added to the front speakers so none of the recording is lost).
SUBWOOFER (Yes/Max/No): The "Yes" setting is the standard setting if your system has a subwoofer. If your system does not have a subwoofer, select
"No". Select the "Max" setting for maximum bass output with normal bass being duplicated by both the subwoofer and any LARGE speaker in the system.
CENTER BACK (1Large/1Small/2Large/2Small/None): Some systems have one or two additional center back surround speakers. Select the "Large" setting (not available with SMALL front and surround speakers) to have your center back speaker(s) play low bass. Use "1Large" if you have one center back speaker (6.1) or "2Large" (7.1) if you have two center back speakers (7.1). If your center back speakers have limited bass capability or if you would prefer that the bass go to a subwoofer, use the "Small" setting ("1Small" for one speaker, "2Small" for two speakers). If your system has no center back speakers, select the "None" setting.
CEILING FRONT (Large/Small/None): Select the "Large" setting (not available with SMALL front and surround speakers) to have your top front speakers play low bass. If you would prefer that the bass go to a subwoofer, use the "Small" setting.
CEILING REAR (Large/Small/None): Select the "Large" setting (not available with SMALL front, top front and surround speakers) to have your top rear speakers play low bass. If you would prefer that the bass go to a subwoofer, use the "Small" setting.
ADVANCED: Speaker configuration is generally a global setting for all surround modes and need only be done once. However, for special circumstances, the processor provides the option of setting the speaker configuration independently for each surround mode. Select the ADVANCED SETUP line on the menu and press ENTER to go to the ADVANCED SPEAKER SETUP menu described in the following section.
To change a setting on the SPEAKER CONFIGURATION menu, place the highlight on the desired line using the Up/Down arrow buttons and use the Left/Right arrow buttons to toggle through the available settings. To return to the MAIN menu, select "BACK" on the OSD and press the ENTER button, or press the BACK button. Press the SETUP/MENU button, or select "EXIT" on the OSD to exit setup and return to normal operation.
Advanced Speaker Setup
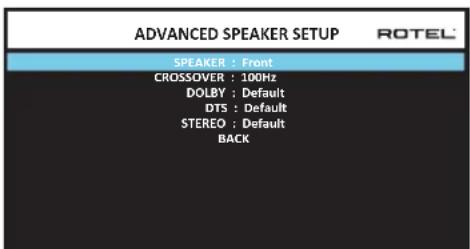
In most cases, the standard speaker configuration described above is a global setting and can be used for all surround modes. However, the processor provides the capability to customize these settings for three different modes: Dolby, DTS, and Stereo. In addition, the ADVANCED SPEAKER SETUP allows you to select a customized high-pass crossover frequency for the front, center, surround, surround back speakers.
NOTE: In most systems, the default settings on this menu will provide the most predictable results and most users will not need to change any settings. You should fully understand bass management and have a specific reason for needing a custom configuration before changing these settings. Otherwise, skip to the following topic, SUBWOOFER SETUP.
The available settings on the ADVANCED SPEAKER SETUP menu are as follows:
SPEAKER (Front/Center/Surround/Center back/Ceiling Front/Ceiling Rear/Subwoofer): Select the set of speakers to be configured with custom settings.
CROSSOVER (40Hz/50Hz/60Hz/70Hz/80Hz/90Hz/100Hz/120Hz/150Hz /200Hz/OFF): This setting for the high-pass and low-pass crossover point is only active for SMALL speakers settings and the subwoofer. When you first access the ADVANCED SPEAKER SETUP menu, the current crossover point will be shown on this line which is set to "100Hz" as the factory default. Change the value of this line only if you want the current speaker to have a different crossover point. This setting ONLY affects redirected bass.
NOTE: The "OFF" setting (available only for the subwoofer) sends a full-range signal to your subwoofer so that you can use its built-in low-pass filter.
NOTE: When a speaker is set to "Large" on the SPEAKER CONFIGURATION menu or on this menu, the crossover setting has no effect since, by definition, a LARGE speaker plays full-range with no bass redirection to the subwoofer and no crossover. In addition, the CROSSOVER setting is not available for the MULTI INPUT.
DOLBY (Default/Large/Small/None): Sets the current speaker (shown in the first line) to Large, Small, or None, overriding the setting from the SPEAKER SETUP menu. If you want to use the speaker size setting set in the SPEAKER SETUP menu, select "Default". The "None" setting is not available for FRONT speakers.
DTS (Default/Large/Small/None): The same options described for Dolby above, except these settings ONLY take effect with DTS decoding.
STEREO (Default/Large/Small/None): The same options described for Dolby above, except these settings ONLY take effect in STEREO surround mode.
For the subwoofer, the above selections for DOLBY, DTS and Stereo modes become "Yes/No/Default". If the front speakers are set to "Default" the subwoofer will also set to "Default". If the front speakers are small, the subwoofer will automatically set to "Yes".
NOTE: When the front speakers are set to use the default settings on the ADVANCED SPEAKER SETUP menu, the specific "Large/Small/ None" settings of DOLBY, DTS or STEREO are not available for the other speakers. These speakers will use the default settings.
Subwoofer Setup
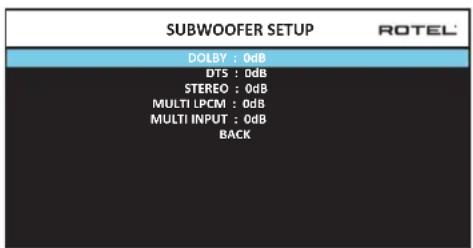
These five lines allow you to override the subwoofer level setting as determined in the Speaker Level Setup menu (see next section) for each specific surround mode.
DOLBY:
DTS:
STEREO:
MULTI LPCM:
MULTI INPUT:
Use the Up/Down arrow buttons to move to the specific surround mode and use the Left/Right arrow buttons to adjust the subwoofer level for the current surround mode. The options are a range of adjustments from -9 dB to +9 dB and MAX (+10 dB). A setting of 0 dB means that the specified surround mode will use the master subwoofer level. Any other setting is an offset to the master setting. For example, an adjustment of -2 dB for a particular surround mode means that the subwoofer level will be 2 dB quieter than the master subwoofer level when that surround mode is selected. Use these subwoofer level settings to adjust the relative bass output of various surround modes. Changing the master subwoofer level will increase or decrease the level for all surround modes.
We recommend starting with the settings for all surround modes at the default 0 dB setting during the speaker level calibration of the system and for a period of familiarization after that. As you listen to a variety of source material over time, you may notice that certain surround modes consistently produce too much or too little bass from the subwoofer. If so, then use these menu settings to customize each surround mode. In general, if the master subwoofer level is set properly (i.e. not too loud), individual settings for each surround mode should not be necessary.
To return to the main menu select "BACK" on the OSD or push the BACK button on the remote control or front panel.
Speaker Level Setup
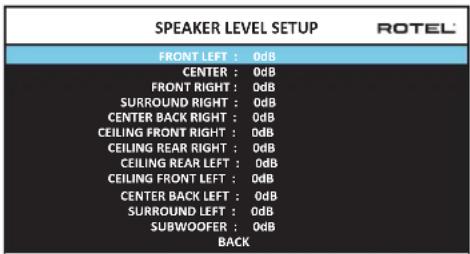
NOTE: If you have configured your system to use two center back speakers, there will be an additional line in the menu, giving you the ability to independently adjust the CENTER BACK LEFT and CENTER BACK RIGHT speakers.
This menu uses filtered noise test tones to set equal volume levels for all speakers (FRONT LEFT, CENTER, FRONT RIGHT, SURROUND RIGHT, CENTER BACK RIGHT, CEILING FRONT RIGHT, CEILING REAR RIGHT, CEILING REAR LEFT, CEILING FRONT LEFT, CENTER BACK LEFT, SURROUND LEFT and SUBWOOFER) to ensure proper surround sound reproduction. Setting the output levels using the test procedure provides the most accurate adjustment so that digital surround sound material will be reproduced as it was intended and is a critical step in calibrating the system. The Audio Configuration will determine which speakers are displayed in the Speaker Level Setup menu.
When you enter the SPEAKER LEVEL SETUP menu, you will hear a test tone coming from the highlighted speaker. Highlight different speakers by moving the cursor to the desired line using the Up/Down arrow buttons. The test tone will shift accordingly to the selected speaker.
Seated in the normal listening location, shift the test tone to the various speakers. Using the one speaker as a reference, listen for any speakers that are noticeably louder or quieter. If so, adjust that speaker's levels up or down (in 0.5 dB increments) using the Left/Right arrow buttons. Continue switching among the speakers and adjusting until all speakers are the same volume.
To return to the MAIN menu, select "BACK" on the OSD or press the BACK button. Press the SETUP/MENU button or select "EXIT" on the OSD to exit setup and return to normal operation.
Calibration with an SPL meter:
Calibrating the system with an SPL (Sound Pressure Level) meter, rather than by ear, provides more precise results and improves the system's performance significantly. Inexpensive SPL meters are widely available and the procedure is quick and easy.
Both Dolby and DTS specify a standard calibration level for all theaters to ensure that soundtracks can be played at the volume level intended by the director of the film. This reference level should result in spoken dialog played at a realistic level for normal speech with the loudest peaks in any single channel at about 105 dB. The RAP-1580's test tones are generated at a precise level (-30 dBfs) relative to the loudest possible digitally recorded sound. At the Dolby or DTS reference level, these test tones should produce a 75 dB reading on an SPL meter.
Set the meter to its 70 dB dial setting with SLOW response and C-weighting, held away from your body at your listening position (mounting the SPL meter on a camera tripod makes this easier). You can point the SPL meter at each speaker as it is being measured; however, positioning the meter in a fixed position pointing at the ceiling is easier and probably produces more consistent results.
Increase the master volume control on the unit until the meter reads 75 dB (+5dB on the meter scale) when playing the test tone through one of the front speakers. Then, use the individual channel adjustments on the SPEAKER LEVEL SETUP menu to adjust each of the individual speakers, including the subwoofer, to the same 75 dB on the SPL meter.
NOTE: Due to meter weighting curves and room effects, the actual level of the subwoofer may be slightly higher than you measure. To compensate, Dolby suggests setting the subwoofer several dB lower when calibrating with an SPL meter (i.e. set the subwoofer to read 72 dB on the meter instead of 75 dB). Ultimately, the proper subwoofer level must be determined by personal taste and some listeners prefer to set it above 75 dB for film soundtracks. Exaggerated bass effects come at the expense of proper blending with the main speakers and place stress on the subwoofer and its amplifier. If you can localize bass from the subwoofer, the subwoofer level may be too high. Music can be useful for fine-tuning the subwoofer level as excessive bass is readily apparent. The proper setting will generally work well for music and movie soundtracks.
Remember the setting of the master volume control used during this calibration. To play a Dolby Digital or DTS soundtrack at the reference volume level, simply return to that volume setting. Note that most home theater listeners find this setting to be excessively loud. Let your own ears be the judge for deciding how loud to playback movie soundtracks and adjust the master volume control accordingly. Regardless of your listening levels, using an SPL meter to calibrate equal levels for all speakers in the system is recommended.
Speaker and Delay/Distance Setup

The SPEAKER DISTANCE SETUP menu, which is reached from the MAIN menu, allows you to set the delay for individual speakers. This ensures that the sound from each speaker arrives simultaneously at the listening position, even when the speakers are not all placed at equal distances from the listener. Increase the delay to speakers located closer to the seating area and decrease the delay to speakers located farther from the seating area. The Audio Configuration will determine which speakers are displayed in the Speaker Distance Setup menu.
This Rotel processor makes setting the delay time for each speaker very easy. Simply measure the distance (in feet or meters) from your seating position to each speaker in your system. Set the measured distance in the line for each speaker. The menu provides a line for each speaker configured in your system and gives a range of settings up to 33 feet (10.6 meters) in 0.25 foot (0.075m) increments with each increment equivalent to an additional delay of 0.25ms .
To change a setting, place the highlight on the desired line using the Up/Down arrow buttons and use the Left/Right arrow buttons to increase or decrease the delay. To return to the MAIN menu, press the BACK button or select "BACK" on the OSD. Press the SETUP/MENU button or select "EXIT" on the OSD to exit setup and return to normal operation.
Miscellaneous Settings
System Setup
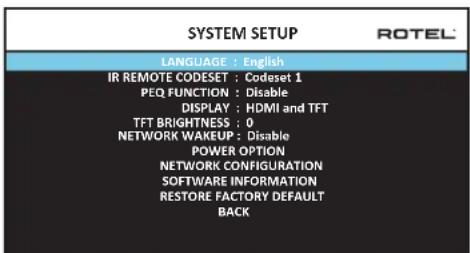
This SYSTEM SETUP menu, reached from the MAIN menu, provides access to several miscellaneous settings as follows:
LANGUAGE: Selects a language for the On Screen Display.
IR REMOTE CODESET: The RAP-1580 has two IR codesets and can be changed in the event there is a conflict of IR codes with other Rotel products.
NOTE: After changing the IR REMOTE CODESET the remote must also be changed to continue using the remote control. Push and hold the TUNER button and 1 (or TUNER and 2 for codeset 2) at the same time and hold for approximately 5 seconds until the backlights on the
remote control blink on then off then release both buttons. This sets the remote control to use codeset 1 (or codeset 2 if TUNER and 2 are held).
PEQ FUNCTION: Turns the PEQ function On or Off.
DISPLAY: Sets the information shown on the main HDMI OSD and front TFT display. Settings are "Off", "HDMI Only", "TFT Only" or "HDMI And TFT".
TFT BRIGHTNESS: Sets the brightness of the front TFT display. Settings range from -10 to +10.
NETWORK WAKEUP: Enables or Disables power on and power off via the network connection. Enable this function for use with automation systems using IP control.
NOTE: When Network Wakeup is configured to enabled, the RAP-1580 will consume additional power in standby mode.
POWER OPTION: Access to configuration of Auto Power Down Timer, Max Power On Volume, Power Mode and Signal Sense Input.

AUTO POWER DOWN TIMER: Sets the amount of time the units stays powered on when there is no audio signal. The RAP-1580 will automatically go to standby mode if audio is not detected for the specified timer period.
Valid settings include: Disable, 1 Hour, 2 Hours, 4 Hours.
MAX POWER ON VOLUME: Specifies a maximum volume level to be used each time the unit powered on, between 20 dB to 70 dB, in 1 dB increments.
POWER MODE: Enables the RAP-1580 to be controlled via the network port when attached to an automation system. This option also allows the rear panel USB power port to remain powered at all times. The power consumption is higher in Quick Power mode. If network control is not required select the Normal Power mode. To enable IP automation controls or continuous power to the rear USB power port select the Quick option. This function is similar to the Network Wake Up option. "Normal" is the factory default.
Valid settings include: Normal, Quick.
NOTE: When the POWER MODE is configured to Quick, the RAP-1580 will consume additional power in standby mode.
SIGNAL SENSE INPUT: Checks if a digital audio signal is present on the configured Signal Sense Input. When this input is selected as the active listening source, the RAP-1580 monitors the digital data stream to determine if there is audio. If there is no audio detected for 10 minutes, the RAP-1580 will enter Signal Sense Standby Mode. When in Signal Sense Standby Mode and the RAP-1580 detects audio on Signal Sense
Input, the unit will automatically power on. To disable this function, select the DISABLE option which is the factory default setting.
NOTE: To use the Signal Sense function, the RAP-1580 must be actively listening to the configured Signal Sense source. If a source other than the configured Signal Sense source is selected, the automatic power off and power on functions will not be active. Example: if the Signal Sense source is configured as COAX 1 and the unit is listening to OPT 2, the signal sense functions will not be activated.
NOTE: When the RAP-1580 enters standby mode via the remote control, the Signal Sense function will not operate until the unit detects the audio has stopped for the minimum 10 minute time-out period. This prevents the unit from immediately powering back on if there is still active audio playing.
NOTE: When the SIGNAL SENSE INPUT function is activated, the RAP-1580 will consume additional power in signal sense standby mode.
NETWORK CONFIGURATION: Sets the network configuration for the unit. In most systems, set the IP ADDRESS MODE to DHCP. This setting will allow your router to assign an IP address to the RAP-1580 automatically. If your network uses fixed IP addresses, set the IP ADDRESS MODE to Static. A fixed or STATIC IP address requires manually entering the IP Address, Subnet Mask, Gateway, and DNS in the IP ADDRESS CONFIGURATION sub menu.
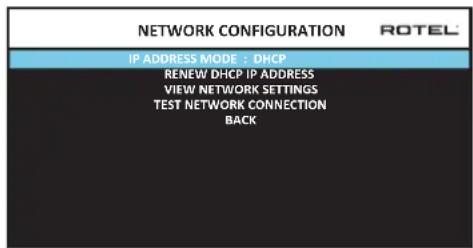
SOFTWARE INFORMATION: Displays the current software installed in the unit. It shows the MAIN, DSP and STANDBY software versions. There is also an option to check for software updates. This feature lets the unit search for software updates on the Internet. The network needs to be properly configured. Alternatively, you can load the software through the front USB socket. For more information on the software update process please contact your authorized Rotel dealer.
RESTORE FACTORY DEFAULT: This option sets the unit back to the original setting as when it left the factory. All user setting will be erased.
NOTE: Use caution when resetting the RAP-1580 to factory defaults as all use configured options will be erased and reset to original factory settings.
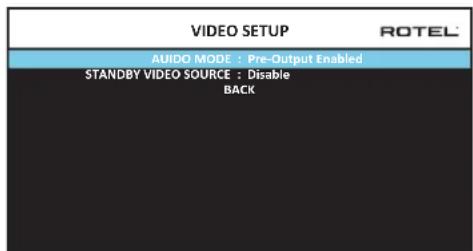
Video Setup
The VIDEO SETUP menu provides configuration of the HDMI outputs. See the HDMI INPUTS & OUTPUTS section of this manual for details on HDMI connections.
AUDIO MODE: Options are "HDMI Audio Output Only" or "Pre-Output Enabled". In "HDMI Audio Output Only" setting, the HDMI audio input is sent to the TV via the HDMI cable, the audio will be from the TV's speakers. Set to "Pre-Output Enabled" mode to play the HDMI audio input through the RAP-1580 RCA or speaker outputs.
NOTE: When configured for "HDMI Audio Output Only" no HDMI audio input will be sent from the RAP-1580 RCA or speaker outputs. HDMI inputs sound is only available on the attached TV display.
STANDBY VIDEO SOURCE: Options are "Disable", "HDMI 1-7", "HDMI Front", or "Last". This allows the selected HDMI source input to pass-through the RAP-1580 while in standby mode. Audio and video are passed directly to the attached TV or display.
NOTE: When the Standby Video Source is enabled the RAP-1580 will consume additional power when in standby mode.
Press the BACK button or select "BACK" on the OSD to exit theVIDEO SETUP Menu and return to the main menu.
PEQ Configuration
| PEQ CONFIGURATION ROTEL |
| SPEAKER : Front Left |
| FREQUENCY : 20Hz | Q : 1 | GAIN : 0 |
| FREQUENCY : 40Hz | Q : 1 | GAIN : 0 |
| FREQUENCY : 60Hz | Q : 1 | GAIN : 0 |
| FREQUENCY : 120Hz | Q : 1 | GAIN : 0 |
| FREQUENCY : 200Hz | Q : 1 | GAIN : 0 |
| FREQUENCY : 500Hz | Q : 1 | GAIN : 0 |
| FREQUENCY : 1,200Hz | Q : 1 | GAIN : 0 |
| FREQUENCY : 4,000Hz | Q : 1 | GAIN : 0 |
| FREQUENCY : 12,000Hz | Q : 1 | GAIN : 0 |
| FREQUENCY : 20,000Hz | Q : 1 | GAIN : 0 |
| BACK | |
The PEQ CONFIGURATION menu allows you to enter EQ values for 10 bands as shown. PEQ setup requires advanced knowledge and equipment for measuring the frequency response of the room and performance of the speakers. To properly configure the EQ you should be familiar with the tools and equipment needed. Typically these settings are only changed by professional installers to ensure optimal performance of the RAP-1580.
Use the navigations buttons to highlight the frequency: Push the ENTER button on the remote control or front panel to access and make changes. Use the Up/Down arrow buttons to change the value. Use the Left/Right arrow buttons to move to the next section on the line. Press ENTER again to confirm settings and allow navigation to the next PEQ BAND. The Audio Configuration will determine which speakers are available for configuration in the PEQ Configuration menu.
FREQUENCY: There are 10 bands available and the frequency can be changed between 10 - 24kHz as below.
BAND 1 Freq: 10Hz - 40Hz 1Hz Step Default 20Hz
BAND 2 Freq: 20Hz - 44Hz 1Hz Step Default 40Hz
BAND 3 Freq: 45Hz - 89Hz 1Hz Step Default 60Hz
BAND 4 Freq: 90Hz - 180Hz 10Hz Step Default 120Hz
BAND 5 Freq: 190Hz - 350Hz 10Hz Step Default 200Hz
BAND 6 Freq: 360Hz - 690Hz 10Hz Step Default 500Hz
BAND 7 Freq: 700Hz - 1900Hz 100Hz Step Default 1.2kHz
BAND 8 Freq: 2kHz - 7.78kHz 100Hz Step Default 4kHz
BAND 9 Freq: 8kHz - 20kHz 100Hz Step Default 12kHz
BAND 10 Freq: 8kHz - 24kHz 100Hz Step Default 20kHz
Q: The Q value can be adjusted between 1 to 10.
GAIN: The gain can be set between -12 to +2.
To exit this menu press the BACK button or select "BACK" on the OSD then press the SETUP/MENU button to return to normal operations.
NOTE: Q in EQ value relates to the bandwidth of the filter. The higher the value, the narrower the bandwidth.
Troubleshooting
Most difficulties in audio systems are the result of incorrect connections, or improper control settings. If you encounter problems, isolate the problem area, check the control settings, determine the cause of the fault and make the necessary changes. If you are unable to get sound from the unit, refer to the suggestions for the following conditions:
The unit does not turn on
Make sure the power cord is plugged into the rear panel and a AC outlet.
Make sure the rear panel POWER switch is in the ON position.
Make sure that MUTING is off and VOLUME is turned up.
If not using the RAP-1580's internal power amp channels, make sure that the pre-amp outputs are connected to a power amplifier and that the amplifier is powered on.
Make sure that any speakers are connected correctly.
Make sure source inputs are connected and configured correctly.
- Check that the setting for AUDIO MODE in the VIDEO SETUP menu is set to "Pre-Out Enable".
No sound from digital sources
Make sure that digital input connector is assigned to the proper source input and that the source input is configured to use the digital input rather than an analog input.
- Check the configuration of the digital input source player to ensure that the digital output is activated.
No sound from some speakers
- Check all power amp and speaker connections.
- Check Speaker Configuration settings in the Setup menus.
No Video Output
Make sure that the TV monitor is connected properly and check the input assignments.
- Check the source input and TV output resolution are compatible. A 4K source can only be sent to a 4K monitor.
- HDMI cables must be 5 meters or less in length.
- If watching 3D source, make sure the display is 3D enabled.
Video and Audio do not match.
- Check that the proper video source is selected for each input.
- Check that the group delay (lip-synch) setting is not mis-adjusted.
- The unit uses relay switching to preserve maximum sound quality. The mechanical clicking of the relays is normal.
- Switching between HDMI sources may cause delays as HDMI two way communications "handshake" must be established between the source and display. The time required for the handshake varies depending on the attached equipment.
Controls do not operate
- Make sure that fresh batteries are installed in the remote.
- Make sure that the IR sensor on the front panel is not blocked. Aim the remote control at the sensor.
- Make sure the sensor is not receiving strong IR light (sunlight, halogen lighting, etc.).
- Unplug the unit from the AC outlet, wait 30 seconds, and plug it back to reset.
- Confirm the IR Codeset set in the remote control and RAP-1580 are matched to either Codeset 1 or Codeset 2.
Specifications
Audio
Continuous Power Output 100 watts / channel (20 - 20k Hz, THD < 0.05%, 8 ohms) 7 channels d
Continuous Power Output 150 watts / channel (1k Hz, THD < 0.03%, 8 ohms) 2 channels driven
Total Harmonic Distortion < 0.03%
Intermodulation Distortion (60 Hz:7 kHz, 4:1) < 0.03%
Frequency Response Phono Input 20 Hz - 20k Hz, ± 1 dB Analog Bypass 10 Hz - 100k Hz, ± 1 dB Digital Input 20 Hz - 20k Hz, ± 0.5 dB
DampingFactor(1kHz,8ohms) 230
Signal to Noise Ratio (A-weighted)
Analog Bypass 100 dB
Digital Input 96 dB
Input Sensitivity/Impedance
Phono Level 3.85mV / 47k ohms
Line Level 300mV / 100k ohms
Balance Level 600 mV / 100k ohms
Preamp Output Level 1.2 V
Digital Audio LPCM (up to 192kHz, 24-bit)
Dolby Surround, Dolby TrueHD, Dolby ATMOS, DTS-HD Master Audio.
DTS X
Video
Input Resolutions 480i/576i, 480p/576p, 720p, 1080i, 1080p, 1080p 24Hz, 3D, 4K, UHD
Output Resolution 480i/576i, 480p/576p, 720p
1080i, 1080p, 1080p 24Hz, 3D, 4K, UHD
Color Space Support
RGB,YCbCr4:2:2,YCbCr4:4:4
Deep Color Support
24-bit, 30-bit, 36-bit
HIDAI Inputs/Outputs
8 inputs with 3 supporting HDCP 2.2
2 outputs supporting HDCP 2.2 Audio Return Channel
General
Power Consumption
1100 watts
< 0.5 watt (standby)
120 volts, 60Hz
230 volts, 50Hz
BTU (4 ohms. 1/8 Power) 2800 BTU/h Dimension (W × H × D)
431×192×470mm
17x7 5/9x181/2in
Front Panel Height Weight
4U/177mm/7in
22.8 kg / 50.27 lbs
All specifications are accurate at the time of printing. Rotal reserves the right to make improvements without notice.
Rotel and the Rotel Hifi logo are registered trademarks of The Rotel Co., Ltd. Tokyo, Japan.
"Made for iPod," and "Made for iPhone," means that an electronic accessory has been designed to connect specifically to iPod or iPhone, respectively, and has been certified by the developer to meet Apple performance standards. Apple is not responsible for the operation of this device or its compliance with safety and regulatory standards. Please note that the use of this accessory with iPod, or iPhone may affect wireless performance.
iPhone, iPod, iPod classic, iPod nano, and iPod touch are trademarks of Apple Inc., registered in the U.S. and other countries.
Made for
iPod iPhone
Sommaire
CharACTERISTQUES Audio
LPCM (up to 192kHz, 24-bit)
Dolby® Sourround,
Dolby® TrueHD,
Dolby® ATMOS,
DTS-HD Master Audio.
DTS X
Vidéo
480i/576i, 480p/576p, 720p,
1080i, 1080p, 1080p 24Hz, 3D, 4K, UHD
480i/576i, 480p/576p, 720p,
1080i, 1080p, 1080p 24Hz, 3D, 4K, UHD
Compatible Color Space
sRGB,YCbCr 4:2:2,YCbCr
4:4:4
Compatible Deep Color
24-bit, 30-bit, 36-bit
Entres/sorties HDM 8 inputs with 3 supporting
HDCP 2.2
2 outputs supporting HDCP
2.2
Audio Return Channel.
Généralités
Consommationelectriche
1100 watts
veille Standby 0,5 watt
120 volts, 60 Hz (version)
Alimentation
U.S.)
230 volts, 50 Hz (version CE)
137 BTU/h
431× 192× 470m
17x7 5/9x181/2in
4U/177 mm/7 in
Hauteur face avant
22.8 kg/50.27 lbs
The rear USB port supplies 5V for charging or powering USB devices, including streaming music player. This port does not allow playback of audio.
Digital Audio LPCM (up to 192kHz, 24-bit)
Dolby ^® Surround,
Dolby® TrueHD,
Dolby® ATMOS,
DTS-HD Master Audio,
Video
Eingangsauflösungen
480i/576i, 480p/576p, 720p,
1080i, 1080p, 1080p 24Hz,
3D, 4K UHD
Ausgangsauflösungen
480i/576i,480p/576p,720p,
1080i, 1080p, 1080p 24Hz
3D, 4K UHD
Farbraum
sRGB,YCbCr4:2:2,YCbCr4:4:4
24-bit, 30-bit, 36-bit
8 inputs with 3 supporting HDCP 2.2
2 outputs supporting HDCP 2.2
Boton DISPLAY (DISP) 83
Boton MENU/SETUP 84
Ajustes Varios (Miscellaneous) 93
Ajustes Varios (Miscellaneous)
480i/576i,480p/576p,720p
1080i, 1080p, 1080p 24Hz
3D, 4K UHD
Comparidad Deep Colour 24-bit, 30-bit, 36-bit
PLCM: Selecteert Dolby ATMOS surround.
Analogypass 10 Hz-100k Hz, ± 1 dB
Digitale ingang 20 Hz - 20k Hz, ± 0,5 dB
Dempingsfactor (1k Hz, 8 ohm) 230
Digitole audio LPCM (up to 192kHz, 24-bit)
Dolby Surround,
Dolby® TrueHD,
ATMOS,
Video
Resolutions ingangen
480i/576i, 480p/576p, 720p,
1080i, 1080p, 1080p 24Hz
3D,4K UHD
Resolutieuitgang
1080i, 1080p, 1080p 24Hz
3D,4K UHD
Ondersteuning van kleuruieme sRGB, YCbCr 4:2:2, YCbCr 4:4:4
24-bit, 30-bit, 36-bit
Tasti SUB, CTR, REAR 8
480i/576i, 480p/576p, 720p,
1080i, 1080p, 1080p 24Hz
3D,4K,UHD
480i/576i, 480p/576p, 720p,
1080i, 1080p, 1080p 24Hz
3D, 4K, UHD
24-bit, 30-bit, 36-bit
BYPASS: Kopplar ur all DSP-processing.
PLCM: Valjer Dolby ATMOS surroundlage.
Upplosning, insignal 480i/576i, 480p/576p, 720p, 1080i, 1080p, 1080p 24Hz, 3D, 4K, UHD
Upplosning, utsignal 480i/576i, 480p/576p, 720p,
Fargrymd-stod sRGB, YCbCr 4:2:2, YCbCr 4:4:4
Deep Color-stod 24-bit,30-bit,36-bit
HDMI in/ut 8 ingangar med tre stddja HDCB 2.2
IpoaHTaiTe Bce HcHCTpyKuMn.
CoxpaHHTe3To pykoBOJCTBO.
06paaiTe BHHMaHHe Ha Bce npdynpexdHm.
Cnedyte Bcem HNCTpykUHM no 3KcNnyatauM.
He nIb3yIe DaHHOe yCTPoIcTBO B6Nm3M BObl.
OuMaaiTe Kopnyc TOnbko npn Nmouu Cxyo TpAnKn Hnn PbIeCoCm.
HeCTabTeYcTPOHCTBOHaKpOaTB,DnBaH,KOBepmHaAnAHOHyIOBepXHOCT,KOTOPaMOKeT nepeKpbTBeHTINrAIOHbIeOTBepCTra.EcmYcTPOHCTBOpa3MeueHO BKNKHomMnCTEHOM 1kafoy,TAMdoJINKa6bIbTeHTINrAIOIINdIOJINKHOOxIAkDeHH.
JepKHe KMOHOENT BOTdAeHnOt 6atapei, KaOpHcpeoB, neey Hnn NIO60Ipyro annapatpyb, KOtopa npno3BODHTenNO.
Nopn30baHbI WTekep MeET Da HOKeBbIX KOHTaKtA, OINH N3 KOToPbIX WHepe DpyrOro. 3azEmHOuMn WTekep MMeET Da HOKeBbIX KOHTaKtA T pTeHn 3azEmHOuMn WItbp. OHn 06eueHbAt Bauy 6e2oNaOHcTb. He oTKa3bIaBeTcB oMep 6e2oNaOHcTb, npeOCTaBmIMn 3azEmHOuMn MM Nnnpn3KbAHbIMn WTekepOM. Ecln NoctabNeMn WTekep He nOxOxDnK Bauw ePOTekE, 6opatNTbc KJIeKTPkY DnA 3aMeHbY cTapeWbEpo3eTNK.
He npoknabbIaTe cTeBoWUnHyp Ta, rge OH Moxer 6bIt Pa3aBneH, nepeXaT, kpyen, NoDBepHyr Bo3eHCTBNO Tenna NIN NobpeKEn KAKHM-NIO CnoCocOB. Opaauite oocOoe BHHMaHHe Ha cTeBOwUnHyp B0nHNuTEKepeHaTm, rge OH XoDHT B3aHIO NaHEn bYcPoIHCTBa.
Hcnoh3yTe TOnbKo pnnadNekHoCTn, ykaaHaHbe Ipom3BODHTeEM.
MnOlb3yTeTbKToTeENkky,IOCTABKy,TOkKy,KpOHUteHmNnONKYCUCTEMbI, peKOMeHOBaHOH KOMNaHMeR RoTe. BydTe OCToPoxHb npu nepemueHH yctpoCTBa HnOCTABKe mNtOKe BO H36EkaHHe paHHeOn OT pOPOKnDbAHH.

CetbeoHnyp Cnpyet OTOeMHNbTb OTcEHNOI PO3eKMOB BPEM rpo3bl Mm ECNI yCTPOINCTBO OCTaBHeH NcHIOJIbEyEMbIM dINTeBHO BPEM.
HeMeIeHnO npeKpAte HcKnob3oBAHne KOMnoHenta H nepeJaTe Ha o6CleObaHne W/nnb 06NyXKBaHBeKbHnOPOBaHHO pEmOHrO pRnHAZmeE cNt: cTeBOH uHyP NmU TKepe 6bln NOBpEKHe; BHTpy cTpoCTBa YPOHN PNeDMtBu HnnpOnHHKmKOCTb; yCTpoiCTBO 0nbIaNoDIOJxDM; yCTpoTBO dEMOHPTpyET npn3hAKn HEHpMaHbHO pa6oTB; yCTpoICTBO 1yPOHN MnNOBpENH NIObIM ApyHM CnoCo6OM.
BbdoJXbbl06eCneHTb MMHmym 10cm CBO6oHOro npocpaHCTBa BOKpy yctpoiCTBa.
IPEIOCTEPEKHEME:CeteBoi pa3bEmHa 3a3HeN pAnHeN ppeH3aHaeHn Ia6bIcTpoOOTcoEINHHY 8yctPoIeTBa O3NeKtpMueCKo CETu. YcTpoIcTBO DoJIKNHO o6ecneMHBaTb Cbo6DhbIOCTyn K 3a3He N aHeH, YTO6bI cTeBoi Ka6bI MOxH 6bIIO b6ICTpo BlydePhytB.
CetbeoHnpanxHeHMe, KKOTOPOMyNOcOeMHNErcaIannapAT, DNOKNHO COOTBETCTBOBaTb Tpe60BaHMA, yka3aHHbM Ha 3aJeHne Naehn annapata. (CUSA: 120 B, 60 T, EC 230 B, 50 T)
IOncoeMHnHte KOMnoHTe K NHTaOuEe PO3eTKe TOnbKo npN NOouc CetEBOro WHypa n3 KOMnKnTa NoCTABK, Hm ERO TOUHO RKBHbaEnHa. He nepeDenbBaTe NOCTABnREMy hHyp. He NcNoB3yTe yDHHNTenb NTaHnA.
OCHBHO WTEKep CTeBOI HYPa ABNETC OTKIOAeMbIM OT Annapata IINNONHO TKNIOHEN H3DEHNOT NHTAOUe CETH, OCHBHO WTEKep CTeBOI KA6Ee CNEyET OTOeHNHTb OTcEBo PO3EKNI NEPEMENHO TOKa tAKHe N3DEHN.3To eHNCTBeHHb cNoCo6, YTObI NNOCTbYdANITb CTeBOE NNTAHNEOT N3DEHN.
OCHOBH BwNkA HcNoB3yETCB KauyeCTBe OCHOBHO YcTPOHCTBa OTKIOUeHHN I DOJXHBIOCTaBaTbCnERKoDOCTYINBMN.
NcnoB3yIe Ka6en C3aunrToi Class 2 npn nOoceHHeHH KOnOHK KJIeMMam yCmHTeTnA Dn oecneHHe HadeXHHO M0nrauM MHmMn3aun pncKa yDapa eNkTPueCTbOM.
3aMeuHne
NoocoeHHeHne RS232doonno6bIbOcyeCTBHeoTbKOABTOHPaHHbIM cnaHnCTOM.
Hhopmaun FCC no 3neKtpomarHHTHO COBmectmocCTn
3To 06bpyoobhae npotechpoBaHO Ha npdeMeT 3NeKtpomarHHTHO CoBMeCTHMocTH N NOtBepKJHeO, YTO OHO yOBnEBoPRe TpeoobAHm IINu uHpOboXyctPoIcTB KnaCCa Class B B acTh Part 15 PpaBn FCC.3Tu TpeoobAHn CofopMynpObaHbI IINrTO, YTO6bIooBeNHTb pa3ymHy0 3aunTy OT BpehBx H3nyeHn B Xmblx NOMeHNAX.3To YcTpoCTBO rHepeHpyET, nONlb3eyET MoKeT h3NyAaTB HeprHNOHa paNoOAcTOnTx H, 6dyuY cTaHOBneHbIM INCnONb3yeMbIM He B COOTBETCBN CHNCTpykUeM, MoKeT co3DaBaTb NOMEx dJI paDIOCBaH.
OdaKo 3To He rapaTnpye, YTO B HeKOtOpbix CnyaHx He Bo3NHKnHT nomExn Dn npHeMa paHIO nn Tenepepa. B TAKOM Cnyae Bbl MoKeTe nonpOobatb PneepnHrtb Cndyouee:
-NepeopmeHTnpoBaTb npemHyHO hENTHHY (TB,padmoH T.n.).
yBENHHTb paCCTOHN MExHy yCTpoiCTBOM H peCHBepOM
- Mcnon308aTb dppyto po3eTKy dTB,paHou nTn.
·06paTb3a 3a KOHybTaueeK dHnepey Hn KBaHmHpuBaHmOy cneuaHnCTy np aHa n TB
BaTapeH, yCTaHOBneHHbE BynbT IV, He DoJXHbI NDoBeprTaBCBaO3JeNCTBnM3NHIbero Tenna, TAKOR KAK CONHeHbI CBET, OOrHb N.T.I.
IPEIOCTEPEKHEH: IaNBbHb BYIKIOHauATEb NtAHnHa PaCIOHOKeH Ha 3aDHeN PAnEH. DOnKeH 6bItb o6ceuehen CBO6OHDh DoCTyn K TnaBHOmy BbIKIOHauTeNo IITAHnH.
O kompanu Rotel
NCTOPIN HAWEI KOMNAHNI Hauana 60nee 50 net Haad.3a npoewne IeCAtTNIEITMbl NOLyUHNI COTHN HarpaD 3a HAI NPOdyKTb IN CdeJAN CACTINBBIMCOHTN TBICHIOJEKOTOpBIE OTHOCAITcK CBOIM pa3BneHnAM BNOJIHE cepbe3HO-TAK KE,KAK B!
Komnain Rote1 6bIa ochoBHa cemEChBOM, yBa CTpactk My3bke npOnda nctpeMJIeHne co3daBaTb hi-fi KOMnoHeHtBi 6eCKmnpomncchoro kaucTeBa.3aMHOrne rOdbI eTa ctpactb HcyTb He Ocnabla, nNo ceN deHb obuae b- BByNCKaTb PPOyKTB NCKIOHHTeBHOJ CEHHOCTN DnayAynoOfIOB NIO6NTeMeMy3bIK, He3aBNCMO OT INx fHNaHCOBix BO3MOXHOCTe, pa3deneTcB CEMNCOTpydnKamn Rotel.
HJKeHepBo Rotel pa6oTaK KaEiHaKaOMHa, npocnyuBa n TuaTeBHO DOBDA KAKDbI HOBII npOyKT Do TaKOrO yPOBn COBepHeCTBa, KORa OH 6yDeTyOBnETBOPaTb XcTPOrIM My3bIaKbHbM CTaHApTAM. IMnpEOCTaBHeHa CBO6Da Bb6opa KOMNLeKTyIOUxN No BCMe MYpU, YTO6bI cDenA Tb Annapat Ka MOnKHO LyuWe. BepoTHO, Bbl CMoxeTe HaITN B HauNX annapatax OTbOpBHe KOHNecATOpBt N BeNKo6pTaHIN I EpMaHIn, NOynPpOBoHKnN 3 RaONHn IN CUSA, Ondako TopoAnDaJIbHbIe CINOBle TpaHcFopMaTOpBbM bN3rotABmBaem HA co6CTBeHHom 3abOde ROTEL.
BceMb3a60TUMc6OxpaHeOkpykaIOeIcpebl.No Mepe TOro,Kak Bce 60bnbe 3NEKTPoHHbIX yCTpoHCTB BMpe BbIyNcKaETCA,anocne OKOHHaHN Cpoka Cnykbblb6paCbBAeTcra,ndnPon3BOaNTeLaOCo6eHHO BaXHo npn KOHCTpyuPoBaHINnpOdyKTOBcEaTb BCE BO3MOJHOe,HTo6bl OHHaHocnn MNHMmaIbHbMyueep6Zemme HNCTOuyHKAM Bobl.
MbB KOMnAHm ROrTe, rOpIMC BcOWM BknaDom B 06uee DeNo. Bo-nerbblx, Mbl COKpatNIu CoepXaHHe CBNUa CBOe 3NeKTPoHnke, 3a Cuet NcnoNb3oBaHnnpnOra, OTBeauOgero Tpe6oBaHnAm ROHS. Hauu INxKeHepbI NOCTOHCTPemATc ynyuWntb K.I.D. 6LokOB PtTAnHn, 6e3 yuep6a IINKaueCTBa 3ByuHnA.HaxoRb B pexnme OxuaHnAstandby, npOdyKtB Rote nCNOJb3yIOT MNHMalbHoe KOJIueCTBO 3Heprn, 4TO6bl yIOBnE TBOPnB rIo6aJIbHbIM Tpe6oBaHnAm Ha notpe6neHne B pexmme OxuaHnA.
Фбрпа Ретел Тадкve BHCNT CBOB BKNaD BУNYUшЕнe OXpaHb OkpykaIOUIe CpeDbIpyTEM NOCTOHHORO COBepHECTBOBaHnI pOn3BOdCTBeHHbIX nPoueCCOB, DeNa Ix BCE 60lee YNCTbIMN IN 3eNeHbIMN.
BceMbcoTpydHnK KOMnAHmROTEL,6NaROpAmpBac3aNOKyIky3TOI0 13eJIy.MbYbepeHb,HTO OHOIOCTABNT BAM MHOROTyDOBOLCTBNA.
MzomoeNo no luuehenu Dolby Laboratories.Dolby, Pro Logic u cumon doouhoD-aymcmzapeucmpupoeaHbmu mobapbmu 3akamu Dolby Laboratories.
I3zomoehe no nuenhu u no namehmam CIIA #s: 5,451,942; 5,956,674; 5,974,380; 5,978,762; 6,226,616; 6,487,535; 7,212,872; 7,333,929; 7,392,195; 7,272,567 u npyzumu amepukahckumu u bcemuphmu namehmamu. DTS, DTSHD u cumbDTS -mo zapeucmpupobahnbie mopzobble mapku, DTS-HD Master Audio u lozomun DTS -mo mopzobble mapku DTS, Inc. Ppodykm kknouaem npozpammhoe oecneuehne. DTS, Inc. Bce npaba zauuienb.
B 3omnpoueccope ucnolb3yemc mexhno2a3uumby om konupobua, komopaa zauuueha namehmamu CUA u dpyzmu 3akohamu o 3aume umennnekmyalbhou co6cmbeHocmu npunaDnkaaar Rovi Corporation. O6pamhbu unxunupunu u dusaccemblupoahue 3anpeucho.
Первные shaу
Blaqadapm Bac 3a npno6peTHe npoeccopokpykaioero 3byka Rotel RAP1580. Ipoecop RAP-1580 -3to NnHooNkUHOHaNb h AV KOHTpOHBn CEHTy npabEnraaynIO INBDOI ANAHOROBbIX uNphiOBbIX KOMnOHETOB -ICTOHNKOB CnHAnOB. OH OcyueCTBnEe TnΦpOByo 6pbOToKy 6bnoro Hcna φopMaTob, BkIoUaDolby Surround, Dolby ATMOS n DTS.
Функи Виdeo
KOMmytaHDMIJIaIuΦpoBbIX BndeocnHaNoB Bnnotbdo pa3peSeHH 4K.
-ПриимmaeTIO6bIe TINbI BIndeocnHAnOB:480i,480p/576p,720p,1080i, 1080p,1080p24Iu4K.
- BbdaetHDMI bIeocnHan cIIObIM pa3peSeHHem (480i, 480p/576p, 720p, 1080i, 1080p, 1080p 24Tq u 4K) dIra corIacobAHna c HDMI coBMeCTmMbIMu IncPiJeMn n IpoEeTopaMn.
Aydno yhknnn
Metod6aahncupobAHHOroI3aHaRoTeCoYetaeTcOBepeHCTBOAHHyop a3B0knyIpaIbIbIyI,IIaTeIbHbIOTbOpTeIaIeIIO3ByuHaHIOu6uHpHbIE NCbIbTaHnIPOCNoUWBaHmEIMIINPbeOCxOHO3ByuHaHnIHAdExHoCTN.
- Pexim aHaIoroboro 06xOda nla Ynctoro 2-KaHaIbHoro cTepeo 6e3 cnΦpOBoi 06pa6Otn.
LunpoBbIe n anaHOrOBoBte aynIO BXoDbI N BbIXoDbI, B Tom YnCne Coax, Optical, RCA n Balanced XLR.
- IMeetc7.1-KaHaJIbHbI aHaIIOROBbI BXoD.InA COBMecTINMbIX NCTOUYHKOB CnIHAnOB.
Функшн Okржkaioцero 3byka
- ABTomatneckoe Dolby in DTS Surround dekoipobaHne BceX nonynpbIX φopMaTOB Do 7.1.4 KaHaNoB.
- Pexmmb Okpykaojoero 3Byka dna Bocponn3BeDeHnMHOroKaHaBHorO ayno Ha 2-KaHaJIbHbIX n 3-KaHaJIbHbIX cIcTeMax.
KaHAn Bo3BpTa aYdNo cunHaNoB Audio Return Channel (ARC) no3BoJaOuIe nn 6bpa6aTb1BaTb 3ByK C TeJeBn3opa B npoceccope RAP-1580 npn noKnIOueHnn no HDMl.
Dpyrme yHKun
Дружжелбая система Краньх Мени (OSD)спогрампуемы IMeHaMn Дяг BCex BXOIOB.
- Bb60p 3b6KOB npn HacTpoJIke 3KpaHHbIX MeHIO (OSD).
Bo3m0xHocTb 6OBHbENHnI npOrpAMMHorO o6ecneHnI dIyUnx anrpeiIOB uee3 nHTepHeT coeINHeHnE Ha 3aHne I naHn I nnuepe3 nopT USB.
Ha3Hauaemble 12-BoIbTOBHe TprrrRePbIe 3aynCkaiuNe BixOdbIy ydaenHHoro BKNIOUeHrycINlTeEn MoUHOctn IpyrNIX KOMNOHETOB.
PacnaKobka
Octopoxho Bbtaunite yctpoctBO u3 ynakobKn. Haidnnte npyt Dny npyrne npnaednckno. CoxpaHnte Kopo6ky, T.K. OHa 3aunTt YcTPOCTBO, eCInn Bbl 6ydeTe nepebo3ntb nnBn BO3Bpaaatb erO dIraTexnueckoro o6cnyknBaHn.
Pazmeuenie
YCTAHOBHTyeyCTPOIcTBaHTEBpDoI,ROP30HTaJIbHOIOBepxHOCTN BdaINOT COJIHeHOrO CBeTa,TeIIa,BlaIIn BnB6paun.
YunbaiBe BC pa3Mepby yctpoiCTBa. Y6eNTecb, YTO noJIka, uKaΦ nIN CTOnKa MoKeT bIePkaTb Bec RAP-1580.
BoBpMaHbNo paObTb, yCTpoiCTBO bIeJIeR TeIIO. He 3akpbBaIte BHTNIAUHHbIX OTBepCTNI. OCTaBBTe MNHMym 10 cm CBO6oHoro npocTaHCTBA BOKpy yCTpoiCTBa. Pn yCTaHOBKe B IkaFy, y6eINTEcb, YTO B HEM cyuectByet HEoXoIMma BEHTNIAUria.
He ctabte npytne KOMnoHentb nnnnpedMeTb cbepxHa yctpoictBO.He donyckaite nonadaHnnaIIO6o KNDKocTN BHTpb yctpoictBA.
0630p coeHHeHn
IIPIMEYAHNE: He nooknouaime kakou-nu6o cucmemhbu KOMnoHeHm K ucmouhyk nepeemehzo moka, noka BCE nooknoueHru He 6ydym 8binoHbdoJxHbIM o6pa3om.
KaKdbI N3 KOMNHOHTOB -NCTOCHNKOB B Baawe CNTcEMe NODcoEINHReTCA K BXoam npn NOMOUs CTaHapTHoro aHaONOROBO ayDIO KA6eRA RCA nn 6anachoro XLR, nnn Je npn NOMOUs uNΦpOBoro Ka6eRA HDMI JnBnDeo c ONUOHbIM uNΦpOBbM ayDIO Ka6eEM (KoAKCuaNBbM nn ONTNueckm).
BbixodnbieaynOcHnblAVpeCnBepaRAP-1580nepeaIOTcaHa7akcytnecknx cnCTemnnHa ycnntenMoohoctn npn nmoon CTanapThbX aynO ka6enei RCA c aynO BbIXoOB npedBapntelbHoro ycuiNTeHa. Haemnbie BixoBb ayctnecknx cnCTem TaKke NoctynbUpe3 RCA-BbIXoDbI pnoKnIOueHn K bWeHemy ycuiNTeNoocTabnDo 7.1.4 KaHaNob aydno.BuJeocnHaNb ot npoueccopa RAP-1580 nepeaotcHa moHHTOp nHTepfeSy HDI.
Kpome 3Toro, npoecccop mmeet BxOdbi MULTI INPUT dnn KOMnoHeHTa - nCTouHnka, KOtobni obopydOBaH co6CTbeHHbIM deKOepom OkpyKaIOeero 3Byka, aTaKke BxOdbI dny ydaNEHHORO NK-dATnuKa n12-BonbTObIe TpIRrEpHbIe BblXOdbI.
IPMMEYAHNE: He noeklouaume Hukakou u3 kOmnoHeHmoe cucmebI e cemeyio pozemky nepemeho2o moka noka He bInonHume ece coedunehu 0doJxhm o6pa3om. Cmahdapm Ha uΦpObou ayduo unhepeuec S/PDIF mpebyem umnedanca 75 OM u ece xopouee uΦpObeie KaBenu coombemcbyom 3momy mpe6obahu. HE ucNoIb3yume obbyhne Mek6louhye ayduo KaBenu BECTO uΦpObox KabeJe. Obyu hne MeK6noHyte ayduo KaBenu nponycymam makue cuZhanbl, Ho ux OzpanuHenna nonoc a nponyckauha ydywhum kauecm8o 3Byka.
Pnncnoh3oBAMn ananorObix coeHNHeH y6eNTbc, YTO bIXoJ IeBORIO npaBOrO kaHana LEFT n RIGHT coeHNHeBc npaBnIbHbIMn RCA pa3bemamn. Bce pa3bembl TnA RCA y 3TOro npocecoppa MeiOT cTaNapThbIe CBeta:
Jebbi KaHaJ ayDno Left: 6bI RCA pa3beM
Ppabbl KaanaynroRght:KpaChBnRCA pa3bem
IPMMEYAHNE: KaKbU exoHou ucmOuHK doJxhen 6bmb npabunbo cKoHfUypOpoean npu nomou MeHIO INPUT SETUP kpaHoo MeHIO cUcMemb. Mbi peKoMeHdyem nepexod 3mo MeHIO nocne nodcoeHHeu KaKdo20 ucmOuHuka, 4mO6bl cKoHfUypOpOBam ezo no BauemyKeenaHIO. PpOboHyIO unFopMaUcIO cm. E MeHIO INPUTSETUP bpa3dene《HaCmpoKa》
HDMI BxOdbI N BblXOdbI
3n coeHHeHn HcNoIb3yIOTcI dI NOckIOueHn BIndeocHrAnOB KnpoecCopy n ot npouecoppa. Cm. pa3dEeBbINOHeHne coeHHeHn DnI npOyHn KOHKpeTHbIX INCTpyKuIN dI KOMNOHeHTa KaKdOrO TnHa Ha cTp. 167.
3aDneBnDoe BxOdbHDMIN1-7
BxobblHDMIO6ecneuBAIOTpa3nUHbIeunpOBBIEBINOeCoaHHeHINdI INcNoIb3OBAHINBMecTe C KOMNOHEHTAMK, KOtOpBe IMeIOT BbXoDBiHDMl. CoeHNHeHNAHDMI nepeaIOT BnDEOCIRHaJIb BO BCEx fOpMaTAX, BKJIOUyA3D, 1080p/24Hz n 4K. DAnHHaPeaINzauN HDMI noIDepkNaETaynO crHaJIb, mN OTeJeHoe ayNDIOcoEINHeHNEOT KOMNOEHNTA HDMl. Tpn BxoDAHMI noIDepkNAIOT 4K UHD HDCP 2.2, KaK hAKNeEHa Ha zadHne naHEn.
ΦoHTaIbHbI BuaDeO BxOД HDMI IN
OuHn n3 BxodOB Video 8 pa3meuen Ha nepeHne naHEn nIg O6nereHnnaPknouhen. Hcnonb3yte TOT pa3bem HDMI nnpTaNHBx INCTOCHKOBnn IIN dyTex yctponCTB, KOtOpblc He 6dyT NOCoEHNHeHb NocToHNO.
BbIXOblHDMIHaTVMOHITOp 15
ДваHDMIВидаоьвixoапераит Видаocnнан Всбокоро pa3peшеня Habu TB-MOnHT npapanlenbNo. BixoыHDMI Moryr pepedaBaT BИдeocnHaNbl Ha TeleBnOры Всбokorpo pa3peшеня TV 2D (480p/576p, 720p, 1080i, 1080p nIIN 4K) nIIN 3D (do 1080p/24Hz).Одн ВсIxODПодержka HDMl 4K UHD HDCP 2.2,Κak NaKeeeHa NaЗаднй паели.
IMeETcBbBixOdaHDMHa3aDHe nAneHn,HaKOTOpBie BbIdaETcOIN HTOJ KcCnHAn. HoTOnbKO ODNH N3 HNX BbIdaET 3KpaHHOe MeHHO NaODKnIOUeHHbI TeneBn3Op.
ИЗ dBух HDMI bixoob Tolyko OINH DMI ochaeн Функиь Bo3Bpata ayno cunhana ARC (Audio Return Channel) n meeT o6o3naueHne «ARC» na pa3bemom HDMI. Cm. Pa3dEN «Hactpoikn BIneo» B MeHO VIDEO SETUP nI INOnyueHn 60Jee noDpo6Hoi nHΦopMaun Ha cTp. 179.
YBaJero TB MoKeT6bIb 60eJeemOHN HDMI BxOJ.He BCEnHIN OCHaIaOTc
fynKlnei ARC.NoToTMy BbIbepnte ToT BxoHDMHHa TepeBn3ope,KOTOpB
oBeceNHT ARC.Ha hemdoJnxHa 6bIt MapKnipOBKa paDOM cpa3bEMOM.
DOnonHnTeBbHaNnΦopMaunnoHDMI BnDeo BbIXoanam:
Bce noCoeHHeHbIe no HDMl yctpoiCTBa doJXhbl 6bITb COBMeCTMbI c3aunToIOT KOINPOBaHnH HDCP,TO6bl npABnHbHO BbIaBaTb nO6paKeHn.
- Ecn pekim ayduo yctahOBJIeB nnoJoxHeNe "HDMI Audio Output Only", TOnbko BixOd HDMI c hAnPiNcIbIO ARC/OSD MoKet nepeJaBaTb ayduo K TeneBu3Opy.
Ayno cnHaBb, nonyaemble uepe3 HDMI ot nctouHnka, 6ydyT o6pa6atbBaTcnpueccopom NbdaabaTcbpe3 RCA nnnyakctmecnx cnCTem bixObl. Ina nepeaun ayyno cnHana Ha noDcoeHNHeHHbl TV npoeccop RAP-1580 doJKeH 6bItb yctahOBHe B noNoJeHne "HDMl Audio Output Only" B MeHO VIDEO SETUP kpaHoro MeHO OSD.
-Пи ИСПОЛБЗОВАнИОБИX BыхОДН HDMI OДНOBРЕМНЮ,HA HIX 6удET yCTAHOBЛЕнонАнКOBоpepa3peшен.3To 6уdETcamoe Hn3Koe pa3peшени 3Д bByx NODKJIIOUeHHbIX MOHITOpbl.
Ayno BXOdbI N BblXOdbI
3To npocccop Rotel oecneuBaet kak aHaIorOBbI, TaK n cHpObIe ayDIO coEINHeHn.
BxoAbi Phono 30
Papa (IeBbI/npabB) ananorobbx aydno BxOIOB RCA npedHa3nueHbI nIPOKIOUeHINpOINrPBAtenBHNIOBbIXnAtnHOKcNATPOHOMDBNXyUeOcARMaHTa.EcIn 3OT pOnrPBAten IMeET KJIEMMY 3aEMeHIN,coeHNHTee c BNHTOBKJEMMO,MapKnipoBaHHoN“GND”CbeaOt uNΦpOBbx BxOIOB.
BxOdbI DnTIOhepa-Tuner 30
Papa (neBbI/npabB) ananorobbix aynIO BXoOB RCA npedHa3NaeHb Ipnoknouehn AM/FM Tiohepa.
BxOaBc CD
Papa (nebby/npaBb) ananorobbix aydno Bxod OB RCA npedha3naeHHbx nny noqkiueyn CD-nponrpblatej.
BaIaHcHbIe ayDIO BxOdbI BALANCED 28
Napa (neBb/npaBb) aHaNoroBbix aynO BxOoB Ha XLr pa3bEmax npedHa3NaeHHbIX DnI NpKIOUeHnKOMNOHeTOB C6anaHCbIMn ayDnO bIxOamn XLR.
BxodblMULTI
Ha6op BxOoB RCA, KOTOpbIe npHmMaIO T Do 7.1 KaHaNOB aHAnorobbix CnHANOB OT DVD-A INSACD npOnrpbBaTeJIa. CyueCTByIO T BxObl I nI pOHTaNbHbIX neBoro n npaboro KaHaNOB FRONT L & R, cHTpaNbHorO KaHaja Center, ca6byepa SUB, 6okobix neBoro n npaboro KaHaNOB REAR L & R, n DByx TaIOBbIX ceHTpaNbHbIX KaHaNOB CENTER BACK L1 & R2.
3nBXOdbb6xOaT Bc0 cHpOByo6pa60kTyB npoccepe HnapBaIHO Tc HENOCpeCTBeHHo Ha peYJATOP rPOMKCTN BBXOdbI ppeBapNTbHorO yCmnten.
BbIXOdbI npEcbapnteHbHorO ycnHtEna 35
Ipynnna n3 anahorobbix aydno bblxoxoBn RCA nepedaet bblxodHble cnHnbln HneHoro ypOBn npoueccopa RAP-1580 na BHeuHne ycunnteInn aKtNBhie ca6byepb. YpOBenb 3Tnx bblxOOB perynnpyertc npn nomoOn opraHa npablennra rpmkoctbpoueccopa RAP-1580. 3Tu DecaTb pa3beMoB o6ceuHBAOT bblxODJn: ppontalbHex neBoro n npaboro kaHaoB FRONT L &R, ceHTpaBbHex KaHaoN CERTER 1 &2, 6okobX neBoro n npaboro KaHaoN SURROUND (REAR) L & R, TblNObBx cHtpalbHex KaHaoB 1 n 2 CENTER BACK CB L[1] &CB R[2] n c6byepob 1 n 2 n HEIGHT 1 L & R n HEIGHT 2 L & R.
UuΦpOBBIe BXoJIb1
Ipoceccop nnn pecnBep npHHMaet uHpObIe BxOhbIe cHnbl ot TaKnx nctouHKOB, kak CD-npOurpbIaTeN, cnTHNKOBle npneMHNKu npOnrPbBaTeIN DVD. BcTpoEHhB B yCtPOJCTBO uHpOBo npocccsp DSP paNo3Haet npabInbHbIe qactoTb Bi6OpKn. PndepKNaOTcaCToTb Bnnot do 192 KfU.
IPIMUEAHHE: Uxobbe 60dbi nooepkuaom kak 2-kaHahbHOe cmepeo, maku MHOzOkaHAnbHe iayuo cuzHaJI. Ipu uCnOJ3ObaHuu uXpOBOzo 60da npouecop DSP 6ydem deKodupoamb exohou nomok daHHbx, Bknoua Dolby unu DTS.
Ha 3aHnei nanei npoecccopa yctahOBnHeb6 uΦpObIX BXoOB, TPN KOAKCNbHbIX INTINuecknx.ETN uΦpObBle BXObl MORYT 6bITb HA3NaeHb HAnIOBle IcTOUHNKn VIDEO1-8PnPi NOMOUIkEpaHHoro MeHO INPUT SETUP BO BPEMnpoeDpybI HAcTPOBKn.HanPIMep,BblMOKeTe Ha3NaHTb uΦpOboi
BxOHN pa3bem COAXIAL 1 Ha nCTouHnK VIDEO 1 uNΦpOBoB BxOJ OPTICAL 2 HnCTouHnK VIDEO 3. Ito yMOJIaHnIO, BXoHbIMn NCTouHnKaMn dIy BxOJOB VIDEO 1 - 8 cONHfIpynpoBaHb noD HDMI Audio.
Ha 3aBoJe aaynIO BXoD CD cKoHfynpynpoBaN KaK CD (aHaNoIroBbRCA), Ho erO moJHO CMeHnTb Ha Ha XLR, Coax 1-3 mnn Optical 1-3.
BxoJ PC-USB
CM.puc.5
CoeHNHTeT0BxOc nOmoIbIO npnnaeraemoro USB ka6enr c noprom USB Ha BaIeM KOMnbHOtepe.
RAP-1580 noDepKnBaet kak USB Audio Class 1.0, taK n USB Audio Class 2.0 pexmbl. Komnbtopebl noD Windows He tpe6yot yctahOBKn dpaBepa dny USB Audio Class 1.0 n noDepKnBAOT Bocnpoun3BedeHne aydno Bnnot do qactotbl 96 Kt.
PoiocoeDHeHne MoHToPA
CM.puc.10
IIOcOeINHInTe OIN H3 HDMI BbIXoOB RAP-1580 K BxOy HDMHa BaWem TV MOHTope.RAP-1580 IMeET Dba HDMI BbIXoJa.TolbKO Ha OINH HDMI BbIXoBbIaTeCkpaHHoe MeHIO OSDnHa HEm peaIm3oBaHa yHKzraARC.3TOT BbIXoMapKnipOBaHa 3aDHe NaHEIN CmBOLOM ARC/OSD.
Iopknouchenie CD-npounrpblbateiHa RCA uu XLR pa3bembl
Cm.puc.8
UΦpObIe ayDnO coEInHEnI: IOnCoeINHITe BbXoID npONrPbIbAteIaKOMnAKT-DnCKOB K IIO6OMy N3 ONTnecknx INN KoAKCNaIbHbIX UΦpObBx BXoOB Ha npoueccope. IcNoIb3yIe MeHIO INPUT SETUP dIra Ha3NaHEnIuΦpOBO rBxOda HnPOrPbIbATElb KOMnAKT-DnCKOB (no yMOJuaHnO, IM YBnIETCA CD).
AhaorobbieaydnocoeHHeHHa:
Onu1: PooCoHnHTe aHaIorOBbIe BxOdbIeBoro n npaBoro KaHAnOB ot npoirpblBaTeR KOMnAKT-dNcKOB KrHe3dAM AUDIOIN cMapKnipOBKO CD (Lebbi n npab).3ToNo3BOJHETNCNOb3oBaTB uΦpoHaIorOBB npoe6pa3oBaTeB (LAP) npoirpblBaTeR KOMnAKT-dNcKOB; OHaKO, 3To MoKeT npNBecTu KdoONHtEnbHbIM 3Taam aHaIorOB-oΦpoBoro n uΦpoHaIarOBOr npoe6pa3oBaHra.
Onu2: EcnB Baa CD-nIeep (nIyDpyroH nCTOchNk) IMeet BbXoHa XLR pa3bemax, Bbl MoKTe nCNoB3ObaTb XLR BxOdbi RAP-1580 nJa coEINHeHna. PndcoEHHnTE XLR BbXoDbI neBOrO n npaBoro KaHAnOB ot CD-nIeepa nn NCTOCHNka Kpa3bemam, MapKnipoBaHbIM BALANCED INPUT (neBbl npabbl). 3To TaKke no3BoJnET nCNoB3ObaTb cnΦpoAnaIorobbl npeo6pa3oBaTeNb (LJI) npoinpblBaTeNaKOMnAKT-DnCKOB. B 3aBnCmOCTn OT bblpaHoro DSP peKIma, 3To MoKET npBBeCTn K Heo6xoMocTn DonoJIHntBHoro anaIorobOuNphiPBOrO npeo6pa3oBAHnI dnn o6pa6OTkn B npoucecope.
XOTaObIuHO He cyueCTByET BIneO coeINHeHn IpynnpBpBaTeJI KOMnAKT DnCKOB, RAP-1580 MoKet H3NaHTb pyroR BIneOBXoH Na CD nXLR BXoD. BApHaNTbIyIb6opa:HDMI 1-8 (Front), Last Video Source (nocneHn BIneO nToUHK) mN «off'. BIneO BXoH HDMI 1 h3NaueH Ha CD n XLR B KaueCTBe HAcTPOKn No ymOnuHaHIO.
TioKluoyene Tiohepa
CM.puc.9
UΦpObIe ayDnO coEiHHeH: Ecn nCnoB3yETc H D radio nn npryoI ΚΦpOBoT TIOHEP, NOcOeHNHTe ΚΦpOBoB BbXoD TIOHepa K ONDHOY I3 BXoDB DIGITAL IN OPTICAL 1-3 nn DIGITAL IN COAXIAL 1-3 Ha RAP-1580.
IPIMMEYAHNE: Icmouhuk TUNER noymoJauHIO He no38oJIem b6upamb uΦpOoi 6xod. UcnoJb3yUme 6xodbl Video 1-8dI mIoHePOB C uΦpOBIb M bIXODOM.
Anorobbye ayno coeHHe: Ecn Bbl nCnOlb3yTe TIOhe nnecn Bbl XOTNE 3aIncatb ayno CnHaONOT TIOhepa, noCoeHNHTe neBbN INpabBn anarorobbte BbXObl OT TIOhepa Knape rHe3d ayINO BXOda Hnpoucecope RAP-1580.Y6eINTEcb, YTO Bbl NODKlOuaTe npabBk KaHAN KBXODHOMYrHe3dy R,aLeBbKaHAN-KBXODHOMYrHe3dy L.
XOTIO6bIHO He cyueCTByET BIneo coeINHnIyAM/FM TIOhepa, RAP-1580 MoKet Ha3HaunTb IpyroB BIneoBXoH Na BxOJ Tuner. BapnaHTbIy Bb6opa: HDMI 1-8 (Front), Last Video Source (nocJeHnB Ineo nctouHnK) nn «off'. BIneo BXoH HDMI 1 Ha3Haen Hn Tuner B KaueCTBe HacptoiKn no yMOnuHnIO.
Подклочени iPod/iPhone
CM.puc.7
IpoedoeinHte iPod/iPhone K φpθntaIbHOMy pa3bemy USB.
IPMMEYAHVE: Ayduo BXOdbi CD, PHONO, XLR, MULTI, USB, PC-USB, BLUETOOTHu TUNER Ha3nauhebHa budeo BXOd HDM1 noymouhauHIO.3my hacpmoyu moxno u3mehumb ha HDM1-8, Last Video Source (nocneDhu budeo ucmouhuk) unu «off».
063op nepedne pahei
Hnke npBedeK kpaTkn o63op orapHOB ynpablenHa fynkun Ha nepeDne naHeI npOeccopa. NpOboHocTn nCnONb3OBaHN 3TNx orapHOB ynpablenna daHb I nocJeDyUox pa3denax daHHoro pykoBOcTBa, onncbBaOnux pa3nUnhle 3daun.
DinneHa nepeDne naHenn
Kpynhbl LCD nncnne Ha nepeHne naHenn npoueccopo o6ceuBaet OTo6paKeHne 3kpaHoro MeHIO OSD npoueccopa. Korda 3kpaHoe MeHIO He nCOnb3yeTc,Ha dncnEe BbBODInTc rPOMKocTb,peXIM DSP, HsBaHne Bb6paHoro nCTOCHNka nTnaydno peXIMa, B KOTOPOM npouecopnpHHMaet nn 06pa6abTaBaet CnHan.
DaTnK DnCTaHnOHHOro ynpaBneHn
3TOT datyHK npHnMaet IK-cunHnbl ot nybTa ductaHIOHOYnpabHeH. He 3aropaxnBaTe 3TOT datyHK.
PIMMEYAHNE: OcmalnbHbIe KhONku U op2aHbI ynpabHeu npeDneu naHenu onucahB 8 o63ope KhONo u pa3dene «Op2aHbI ynpabHeu.
0630p nylbTa dNCTaHcNoHHoro ynpabNeHnA
RAP-1580 cha6xhen IerKIM B nCnOJIb3OBaHm NpIbTom DY RR-CX100. Ecnn KoIbI npOecCop KOHΦIINKTYIO T CpyrUMN KOMnOHeHTamr Rotel, IMeETcB O3MOJHXocTb BbIbPaTb HApOp KOIOB IR code 1 nnIR code 2. HaxMnTe Ha KONKy TUNER nOndHOBpeMeHHo HA uNpOBOyIO KONKy 1 (TUNER nKONKy 2 dIy BTOPOrO HApOp KAOD) nUdepKInTE B TeueHne 6OeyE 5 cekyH, nOka He ZAMIRAe TNOCBETKa NylTa, n 3aTeM OTNcyTNE KONKn. Pocne 3TOrO pNtB nepExoINB HApOp KOIOB IR code 1(IIIn 2). B CnCTemHom MeHIO RAP-1580 mMeETcR OIeYCTaHOBKn npOceCop BAhOp KOIOB 1 nn 2. 3aBoDcKoI BapHaNT no ymoJuaHnIO - IR code 1.
Nyt DY RxC100 MoKet TaKke ynpabTb NODcoEINHeHbIM CD-npeepom Rotel. B uCnle Doctynbix fHKu: KOMaHdbI Play, Stop, Pause, Track Forward, Track Back, Fast Forward, Fast Reverse. IraakTNBaunm 3tnx fHKu n Haxmai Te KONky CD Ha npbTe. Ecn CD-nleep noCoeHNHe KXL BR xOy, 3tnf yHKu m MOKnHO AKTNBipOBaTb, Haxmam Ha KONky XLR. IraakTNBaunm CD fHKu n Haxmnte u YdepKnte B TceHne 5 ckynd KONky XLR n KONky 1 do Tex nop, noka He 3AmrAeT DbaJbNoCBETKa npbTa, n 3atem OTnyCTte KONkn. IraOTkIoUeHn fyHKuNi CD-ypabNeHn fHKu, haxmnte u YdepKnte B TceHne 5 ckynd KONky XLR n KONky 0 do Tex nop, noka He 3AmrAeT NoCBETKa npbTa.
KhONKn ynpablenHIO tpaHcnoptOM CD dncOB 6dyT pa6oTaB toIbKO torda, KOrDa ha nyIbTe 6bln HauaTb KhONKn CD mN XLR. Ecn n cyIbTa BbIpaH dpYrO BxOd,3TN KhONKn He 6dyT noCbIaNb Ha CD tpaHcnopt IR KOMAHdb.
0630p KhoNOK n opraHOB ynpaBleHn
DaHHb pa3dien daet oChOBhIe npedctabHeHn O KhoNkax n opraHax ynpaBHeHn Ha nepeDneHn paHEn nnyIte Ny. Ioppo6Hbe HnCTpyKunn no npimHeHIO 3Tnx KHOJOK DaHbIB 6OoneoNHBix ONncAHnx B NOcNeYIOx npa3dEax.
KhONka STANDBY 1 n KhONka Power ON/OFF A
KhONKa STANDBY Ha nepeDneH naHEni H KhONka ON/OFF Ha nyIbTe Dy BkIOuAOT n BbIKIOUaOHT yctpoCTBO.OcHOBHO BbIKIOUaTeNb POWER Ha 3adHn aHEni DoJKeH 6bIT B NOJoxeHN ON, UTO6bI C NyIbTa pa6oTan Jdyuin peXIM.
Pyka VOLUME n Khonka VOLUME UP/DOWN 4①
KhONKnVOLUME UP/DOWN Ha nyIbTe Iy n 6oIbwa pyka pernyaTopa HnpeJeHne naHEnNo oecneuBaOT oChOBHe ynpabHe He rpoMkoCTbO, peryiPyB bixOHOH yPoBeH BCex KaHAnOB OHOBpeMeHHO OT Hemoro,1do96.
Khonka DISPLAY (DISP) 128
HaximaiTe Ha3Ty KhoNky, cyo6bl nepeKnoueHn MeKdy TFT n peXIM dncnnep TelenB30pa.
KhoNKn HauRaunn N BbI6opa Enter ①
Haxmnte Ha KhoNky MENU/SETUP nIy BbIbOda 3KpaHoro MeHIO OSD nHDMI BixOda,Ha KOToPbI BbIOBnTcR OSD.IIra OTKIOHeHHaMeHO Haxmnte KhoNky MENU/SETUP eue pa3.1ncNoJIb3yIte KhoNkn HabIRaun UP/DOWN/LEFT/RIGHT n ENTER dI naocTyBa p3aJIuHbe MeHIO.
KHONKA MUTE 13F
Haxmnte KhoNky MUTE Ha nepeDne nane nn nynte Dy oyn pa3, yTo6bI OTKnIOuHTb 3ByK. Ha ekpaH eHa dnCnnee nepeDne naHen noaBNTc HnDnKaun. Haxmnte KhoNky eue pa3, YTO6bI BocCTaHOBt npedbyuue ypOBn rPOMKOCTn.
KhonKn INPUT Ha nepeHne NaHn MOxHO nCnOb3oBaT DnBbIOHa Ha dncIe MeHIO Bb6opA nCTOuHKnOB. 3aTe BxOHDn NCTOuyHK MoXHO MeHrTa, BbIpaera cnoMoBIO KhoNOK HABraCm INoTBePjDeHn KhoNkOI ENTER Ha nepeHne NaHn. KhonKn BxOoBn HnyIte nCnOlb3yOTc TaKke dI pyAmoro Bb6opBAxOHBx NCTOuyHKOB.
KhONKa SUR+ ⑥
KhONK SUR + Ha nIbTe nII nepeDne NaHEn nCnObl3yeTcIra BbIOda Ha dncPne INHOFopMaun O pexkmax Okpykaiooero 3Byka Tekyux Bb6paHHbx NCTOCHIKOB.Pekm IOnyMOJuaHHIO MOxHO 3aDaB B MeHIO HAcTpoE Setup
Ja KaJdoRo I3 BxOJHbIX NcToUHNKOB. HaxmMaTe KhoNky SUR+ HeckoJbko pa3, 4To6blpe6bnpaTb BCE DoCTynbIe DSP peKmbI.
Bapnntb DSP 6pa60TKMOTyMeHATbC B3aBCIMOCTOn Ttna Bbl6paHHoro nctouhka.He BCE DSP onuNIOCTyHbI B peximax aHaIOrOBbIX ININ cIpobbx BXODOB.
Dpyrme KhoIKNHa NylbTe MOryT npRoMo Bbl3bBaTbOppeJeHHeBle DSP pexMbl.
2CH:MeHReTpeKIMayNoHaSTEREO,DOWNMIXnB BYPASS.
BYPASS:pekm06x0daBcExDSPo6pa6oToK.
PLCM: Bb6npaet pexm06bemHoro 3ByaHnA Dolby ATMOS.
KhoNkynpaBneHnBocpon3BeHeHem ①
3TNKHOJNIOOBcNEuHBAIOCTOCHOBHbIe ONEpaUNo ynpaBHeHIO BOCpON3BeHdHem iPod/USB AUDIO.B uNCne noDnepXnBaEMbIX fYHKU:Play,Stop, Pause, Next Track, Previous Track.
Khonka DIM ①
NcnoB3yIte 3Ty KhoKny Ira npnryuweHna RkoCTn Dncnner Ha nepedne naHenn.
HactpoKn, CenJAHbIe C NOMOJIbIO TToI KNHOKN ① TOnbKO BpeMeHHbIe HcoxpaHJIOTc PnBbIKIOUeHN NITaHIN.
KhoonkSUB,CTR,REAR 8
3TN KHNKn N03B0JNt 3aHTn B HAcTPOKn KONOH n OtperyuNpOBaTb BixoHNO ypoBeH dIy KaKdoN AC B CnCTeM. NcNoB3yIne KHNKn Up n Down h Na IyIbTe IIN N3MeHeHn 3NaueHn. Ho 3TO 6yUT ToIbKO BpeMeHHbe I3MeHeHn. UTo6bI cEnaTb NoCTOaHbNe I3MeHeHn, 3aIITe B MeHIO SPEAKER LEVEL SETUP n3 EkaPahHoro MeHIO OSD.
Khonka MEM E
3a KhoNka He pa6oTaet c RAP-1580 n uCnoBbEyTc TOnbko dIra TIOhepoB Rotel, 4TO6bl 3anOMHaTb PpeTebl.
KhONka LIGHT N
Pn Haxatm 3ToKHOKN BkIOUaETcN OoCBETKa NylbTa dny o6nerHnna pa60tB 3aTeMHeHHOM NOMEeHN.
BcnoMoraTeIbHaNoDcBeTka - ASSISTIVE LIGHT
Haxmnte u depknte KhoNky LIGHT Button N B TeueHne 3 cekyHnnBKNIOeHHN BCnOMOraTeIbHOI NOCBETKNe. Ee moKHO nCNoB3ObaT bIra OcBeuHHeN6bln3Knx 06bKeTob B 3aTeMHeHHOM NOMEueHIn, BPOJe DomaUHero TeaTpa.Cbet 6ydt CBETNbcr Do tex nop, noka ydepKnaBaETc KhoNka.
AbTomatnueckne peKmbl Okpykaiooero 3ByKa
Декорpoваиме сфлровьх intocHTHKNOB, NOIDcoeINHEHbIX K cIphpobbIM BXOdAM, B OБцем Clyaee, AIBNETcA BtOMATMueCkIM, pRn NOMOuOshApuyKeHЯ «Флага» B cIphpoB0 3aIncs, roBopraIeO yctPoIcTBy, kakoi φoPmAT DeKoDipOBaHaH Tpe6yTeC. HanpImep, kOrda obHapuyKeH Dolby nII DTS, yCTpoIcTBo aKTMBpyet HADJIeKaIe ee DeKoDIPOBaHaHne.
Ppoecccop TaKke 6hApynBaet uHpOBoi CnHaI c KOpOBaHnEM Dolby Surround (Tak KaK OH YBnEeTc3 BvkoBOJ DOpOxKO Jno yMOnuHaNIO Ha MHorix Dcckax DVD) n AKnBnpyET deKoDnPOBaHne Dolby. KpOme TOrO, Bb MoKeTe cKOHfrynpoBaTB peKIM OKpyKaIoUeTo 3Byka no yMOnuHaNIO dJa KaJDoTO BXoDa npri nOMoum MeHIO INPUT SETUP (cm. pa3dEn *HacTPOKa" DaHnHOr pkyoBocCTBa). B coYehann C aBTOMaTuueckm 6hApynKeHnEM Dolby Digital
n DTS, 3a NahtpoKa Okpykaiooero 3Byka no ymonauHIO denaet pa6oty peKIMOB OKpykaiooero 3Byka NOJHOCTbO AOTOMaTneCKoN.
Длгастею Вховд.Tuner,Бу можerte Вьбратpeхим BYPASS/ STEREOВКачесспехимma noумочанio Длга 2-калного BOCPON3BedeHn, Илл My3ikalbhhpexim DSP,ecln BblnpednoHTaTe Cnyuath My3ikalbHbte nCTOCHNKI BOKpykaIOeM 3Byke.
IPIMUEAHHE: Lufpobou cu2han, nocmnaiou u Ha ycmpoucmbo, 6ydem obnapkyen u dekodupoban Hadlnekaum o6pa3om. OdaHko, Ha duckax DVD c hecKOBkUMu 38ykbim dopoxkamu, bbl doNkhbyka3amb npoupbbamEODVD, kakyu u3 Hux nepedabamb ha npoueessop. Hanpumep, bam moxem nompe6oabmcBb6pam 38kyoboyo dopokkyu Doly Digital unu DTS.
Puchon Bbl6op peKIMOB OkpykaIoIeTo 3ByKa
Дя nonьзовател,在пдочи�хбожeeakntнуюponьВсаршke pexmOBOKpykaioцero3byka,KNHKnHa nnybteДИипepdneHnanaHn npoccecopa obecneuBaIOT pyHOBbl6Op pexmMa OKpykaioцero 3Byka, KOTopbHeONpeDelenABTOMaTNeCCKN,NN,BHeKOTopbIX CnyaX,ДЯ npHyNTeBHOrO N3MeHEnA ABTOMaTNeCCKNoHcTPOKn.
PyHbIe HAcTPOKIN,IOCTyNtBIE C nepeDHe nAHeIn n/Inn pyNbTa DY, MOryt 6bItb NcOJIb3OBAHbI, KOrDa Bbl XOTNTE BOCIpON3BecTN:
CTaHapTHeO 2-kaHaJIbHOoe Ctepeo (IeBb/npaBbI rPOMKOrOBOpHTen, IN B3aBcIMOCtN OT HAcTpoE rPOMKOrOBOpTEne TaKke ca6ByΦep) 6e3 o6pa6OTKn OkpyKaIOUe 3Byka.
- CBeDeHbIe B Da KaHaIa 3aIiNc Dolby Digital 5.1 nn DTS.
Dolby trpexkanaHbHoe ctepeo (neBb/npaBb/ceHTp) n3 2-kaHaNbHbIX 3anicei.
-5,7,-9-nnn11-kaHabHbIe cTepeo 3aIncn n3 2-kaHaJIbHbIX 3aInciei.
ДуггелpeхиIMbMOrT6bITb HeOCTyHbI B3aBnMocTn OT KOHpyaUNCNTeMbI nAKTINBHOrO nCXoHOrO MaTePnAna.
LcHpoBle 2-KaHaIbHbIe PCM cnHbI (He 96 KTu) MOryt 6bITb npHyntelbHo nepHaCTpoeHb BpyHuHa Dolby 3-Stereo,5CH Stereo, 7CH Stereo, 9CH Stereo, 11CH Stereo, Stereo, Dolby Atmos n DTS Neural.x.
Дясмени ржима нахима Te SUR+Ha nylbTe YnHa nepeндп nahe nla nepe6opa Bexd OocTynbix BapmaHOB. KhoNka 2CH Ha nybTe D'no8BnAet CBeTb BDA KaHana Ctepeo NIO6O MnHOrOKaHaIbHbI CnHAn.
PIMMEYAHNE: He epe pexkmbo Okpykaioeze 38yka docmynbI dnerbcex ucmouhkoB. Cuzhan BxodHOzo ucmouhka onpeDenem, kakue bapuaHmb okykeHnMoym sbimb bblpaHbI.
UΦpObIeayDnO
BbMOKeTe BOCPON3BOJnTb 3TN 3aNnCnB 2-KaHaJIbHOM Ctepeo, 3-KaHaJIbHOM Stereo,5-KaHaJIbHOM Ctepeo,7-KaHaJIbHOM Ctepeo,9-KaHaJIbHOM Ctepeo, 11-KaHaJIbHOM Ctepeo, Stereo,Dolby Atmos n DTS Neuralx peKIMax.
Bce hactpoikn ynpablenia 6acom (pa3Mep rpmKorOBOpnteIa,ca6Byeep n KpoccoBep) pa6oTaoTToNbKO CUnPpObIMn CTpeo BXoAMn.
Iy CMeHbpeKIMaHaKIMaTe KHOJky SUR+Ha nyIbTe IYnHa nepeJeHn HaneHn dInepe6opa BcEx DocTyNhbix BapnaHTOB OKpyKeHn.
IPIMUEAHHE: He ece pexkmbi Okpykaioeze 3eyka docymnbl dnaecx ucmouhkuo. Cuzhan bXoHoo zcmouhka onpeenem, kakue cepuahmbl okpykehmu Mozym sbimb bblpaHbl.
Ananoroboe ctepeo
TOT TIN 3aINCEB KNIUOaETIIO6o CTaNAPTHbI CTEPeOcHAnOT aHaNOrOBbIX BXODB IPOeCCOPA, BKNIOyA aHaNOrOBbI 3ByK OT CD npOnrPbIbATEeI, FMTOHEPOB, BNDEOMARHnTOFOHOB, KACCETHBIX MaHHToFOHOB N.T.I.
Ahanorobblctepeo Bxodblrpe6yotBb6paTbMapwpyt cneobahna Cunhana uepe3 yctpoiCTBO. Ondno n3 hacptoek aBnIeTcpezmn aHanoroboro 06xoda.B 3OM pezime, ctepeocnHn HnpanpabnIeTc HnncpecdtbeHn Ho peryIaTOp rPOMKOTN BixOdb.3To-CHCTOE 2-KanHbHOe ctepeo,coXODM BCExCnfoPBbIX CXEM.Bce yHKmUynpAbHeHn 6acom,Hacptoek ypOBHn Akyctuuecknx CNTem,TEM6pa Nn3aepKKn OTKnIOUeHb.CnrHn Ha BvIXOde DnI NOKIIouHn Ca6ByepeoOTCYTCTBYET.PONHOJOnOChb CnHn HAnpMyo NoCTynaet Ha DBa pOHTaNbHbIX rPOMKOrOBOpTeJIa.
AInbTepeHaTINBHO,pexIMDSPMOKET6bITBkIOUeH,3TOABIeTcPipeo6pa3OBAHne aHaIaONOBbIX BXoDhX CnIHANOB B uNphiPObBE, C npoxOKeHEm IN Chepeu cNphiPobBe IPOueccopb IB RAP-1580.3ToNo3BOAnEaKTINBIpObaTB BCE yHKmua BKIOUa HAcTpoKNynpaBHeHNAcOM,pa3DeNtEnbHXΦNtPB,BBXODa HA Ca6Byfepb,HAcTpoKN TEm6pa nT.N.B 3Tom peKmUE,Bbl MoKTe Bbl6paTb HeckOJbKO pexIMMoB OKpyKaIooero 3Byka,BkIOUaY 2-KaHaJIbHbI CTpeo, Dolby 3-stereo,5-KaHaJIbHbI CTpeo,7-KaHaJIbHbI CTpeo,9-KaHaJIbHom CTpeo,11-KaHaJIbHom CTpeo, Stereo,Dolby Atmos n DTS Neural:x.
Дясмьп ржима нахима Te KONky SUR+ Na lyte Dу Иин ha nepejdne hy nahe nla nepe6opa Bex Doctynbix BapnaHTOB OkpykeHry. Khonika 2CH Ha nyIte Dy no3BONaRc TBeCTN B Da KaHaA cTepeo JIO6O MHorokHaHbHn CunHan.
PIMMEYAHNE: He cpe pexkmbi Okpykaioeze 38yka docmynbI dner 8cex ucmouhkuo. Cuzhan Bxodno zu cmouhka onpeenem, kakue bapuaHmbi OKpyxhenu Mozym 6bmbb6bpaHbI.
OCHOBHbIE ONEPAUIN
3To pa3dien onncbBAe ynpabnene OCHOBHmOnepaunm npocccopa RAP-1580 nnybTa DY.
Bb60p BxoOoB
Bb moke Te Bb6paT bio60n 13 nctOuHKnOB dnn npocnyuBaHnN/nnnpocmotpa:VIDEO 1-8,CD,PHONO,XLR,MULTIINPUT,USB,PC-USB,BLUETOOTHnTUNER.
Bce BxOJHbIe NCTOuyHKn MOrTy 6bItb CkOHfNpypOBOaHbI NoJIb3ObaTeMeI npI NOMOuM MeHIO INPUT SETUP, YTO6bI Ha3HaUHTb BXoD HDMIB KaueCTBE BInDeo NCTOuyHKa. BxOdbI VIDEO 1-8 MOrTy 6bItb TaKKe CkOHfNpypOBOaHbI YTO6bI pINHMaTb IIO6bIe aHaIaIorOBbIe NcIFPOBBle ayIDIO NCTOuyHKn. IOn yMOUaHIO ayIDIO NCTOuyHK Ha3HaauetcHa HDMl Audio.
Iocne KOHfpynpoBaHH BxOJbHx IcTOUHNOB MxHO INCnOJIb3OBAt KHOJIK INOIOB INPUT dRyblbopaKeNaemoro IcToHnKa.
- Haxmte KhONky INPUT Ha nepeDne naHenn 6 nCnONb3yTe KhONKn Habiracn DnA nepeKnIOueHnBac Ha BbIbpaHHb BXOHOH nCTOHNK, T.e. CD, Tuner, Video 1 nT.D, a3aTe m Haxmte KhONky ENTER.
- Haxmte KhoNky BxOJHoro NCTOuHnKa Ha npyIbTe M nra Bbl6opa Jenaemoro NCTOuHnKa.
Pa6ota c USB/iPod
IpoCoeHHeHne iPod/iPhone
- iPod/iPhone Mochno noCoHnHt b c nomoubIO npxOJueo USB-ka6en K pa3bemy USB ha nepedHe nanei RAP-1580.
- iPod/iPhone nocbilaet B npouecccop ufo poboy My3bkaIbHbI ciHAn. Bb60pom TpekoB uBOcpon3BeHem MoxHo ynpabTb c iPod/iPhone.
- Θkpān iPod/iPhone octaetcA kTINBbIM n pπo NpOCoEINHeHm K npOceccopy.
KhoNkynypaBneHn Bocpon3BeHeHnem ①
BoBpMaBOcnpOn3BeHnMoXHoCnYbTaynPabNtBnPoecccOp CnOMOuHKOmaHd:PLAY,STOP/PAUSE,NEXTTRACK,PREVIOUSTRACK.
Bluetooth
Bluetooth coeDnHeHne
Функць Bluetooth no3BONJIET BAM NepeDABaT bTOKOBy My3bIky CBaWeroBluetooth yctpoiCTBa, HanpIMep c cOTOBOr TenefoHa. Bb6epITe BXoD BLUETOOTH (BT) Ha RAP-1580. Ha BaWem YcTPOINCTBe (cOTOBOM TenefoH e n T.n.) aKTHBIPyIte Bluetooth n daTe EMy BO3MOxHOCt b HAIIT dpyrme Bluetooth yctpoiCTBa. Bb6epITe "Rotel RAP-1580" n copyInte erO. NocNe yCTaHOBHeHn coeMHENH BA CMOXTe nepeDABaT bTOKOBy My3bIky HA RAP-1580.
ПРМЕЧАНЕ:Bluetooth ветаь в RAP-1580 coьмсима c APTX.Зmono380ягам bam nepeabamb nomokobук my3bky c kauecmbom CD u 6e3nomepb.
IPIMMEYAHNE:HeKOMOpbIe BluteothymcmbaMoym nompe6oamb bHOb8ycmHOBumcoedunHeue nocle omKnIOUeHnnpoueccopRAP-1580 om numanu. Ecnmo npouODEM npouDme BCE Heo6xOdUmble wau, onucanhBbIwe, dner noomopnozo nooknouenua.
BxoJ PC-USB ha 3aJHei naHei
IopocoeiHHeKPC-USB
USB pa3bem, MapKnpoBaHHb PC-USB OTHrocntc K TnY B USB nopTOB. OH npHnMaet PCM aydno CnHaJIb, nocbinae b c BaIero KOMnbTepa c pa3peuHHeM do 246NT/192KtU.
HACTPOIKA
Rotel RAP-1580 ochaen DBympa3HOBnHocTMy nHΦOpMaioNoHHbIX dncnneB, nomoraOuXy npaBnTB cIcTeMo. NepBb coCToNT n3 npoCTbIX oTo6paxhencoToHnna, KOtOpBie noBnIOCTra Ha ekPae TB n/nnnpeJeHn naHei npoueCCopa pni NIO6OM n3MeHeHn nepBnuhbx HAcTpoek (rPOMKocTb, BXOD n T.I).
INPMMEYAHNE: INdukaaue cocmoHua 3KpaHa docmynHa moIbKO Ha exodax HDMl om 4 do 8.
Bolee cIooHna CNTema 3KpaHHoRo MeHIO OSD DoCTynBa IIO6oe BpeMaNo HaxaTnIO KhoNKn SETUP Ha nylte Dy mIn N KhoNkn MENU 7Ha nepeDnei naHei. 3TO 3KpaHHoe MeHIO hAnpabniet Bac cepe KOhFpynpoBaanie n HactpoKy npOecccopa RAP-1580.B o6IeM cIyue, HacTroPkn, BblONHeHbIe B npOecce KOhFpynpoBaan, 3anOMHaIoTc KaK hAcTroPkn No yMOnluHIO, IN He Tpe6yIOT NOBtOpHoro N3MeHEnr npn HopMaIbHo pa6ote yctPoICTBa.
3KpaHbIe MeHO OSD MOrTy 6bIt cKoHfpynpObaHbI nToOppaKeHHa Ha HeckobkNx pa3nUhByx 3bIXac. Bepcna BceX MeHIO c aHrnnickm RaBikOM no yMOnuHaHIO nok3aHa B hauane daHHoro pykoBoDCTBa. Ecn BaA J3bIK DoCTyHe, 3TN MeHIO MOrTy 6bIt bNOKa3aHb B HnHexcneJyoux INHCTpyKlax. Ecn Bb XOTnE N3MeHntb 3bIK c aHrnnickORo Ha npRo nped npocdupoi NahtpOKn, CM. IHCTpyKUIN DnI MeHIO SYSTEM SETUP B konCe DaHHoro pykoBOdCTBa.HaxOAcB bTOM MeHIO, BblMOKeTe N3MeHntb 3bIK OTo6paKeHHa.
OchOBhble HaCTpoiKmMeHIO
KhoNk HABRAtuM
IJIIEIepeMeHnI NO CNTeME 3KpaHHbIX MEHO NcNoIb3yOTcNcEduOuIe KHOKN PynbTa IY:
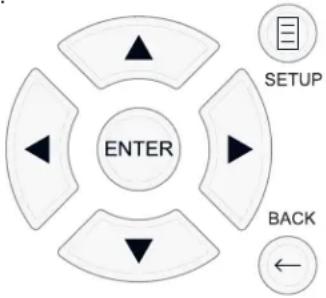
Khonka SETUP: Haxmte nra oTo6paKeHnna KpaHa MAIN MENU (rnabhoe meHIO).Ecn MeHIO yke OTo6paKaetc, Haxmte 3Ty KhoNky dna Bo3Bpata K hopMaIbHOH pa6ote.
KhONKn UP/DOWN: HaxMnTe IJIpeMeueHnBbExn BHN3 CnNCKaX nyHKTOB MeHIO, KOToPbIe NoAIBIAOTcH A KpaHHbIX MeHIO.
Khonk Left/Right: HaxmTe dIa I3MeHeHH TeKyuue HAcToKn dIy Bb6paHoro NyHKta MeHIO.
Khonka ENTER: Haxmite ENTER nla noTbepeKdene HaCTpoKn.
KhONka BACK: HaxMMTe BACn DnBa Bo3BpTa Bnpdebldyuee MeHIO.
MAIN MENU -Главhoe MeHIO
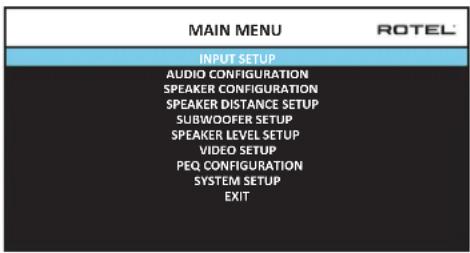
IaBHOe MeHIO MAIN MENU o6ecneuBAert DocTyn B OSD kpaHbI pya3nnHbX bapnaHTOB KOHpyaun. Mo MAIN MENU moKHO do6paTbcra, Haxab HA KhoNkY SETUP Ha npbte nIIMENU 7 Ha nepeHne IaHEn. YTo6bl nonactb KJekaEMoe MeHIO, nepemueaIte BblJeHene C NMOOJIbKO HONOK Kypcopa UP/ DOWN n Left/Right ha npbte, a 3aTe mHaKMITE KhoNkY ENTER. Haxmite KhoNkY SETUP/MENU Ha eue pa3 nIIN Bb6epnte *EXIT' Ha 3KpaHe, YTo6bl OTMeHNTb HAcTpOkiy N BO3BpATNbCRA HopMaIbHoI pa6ote.
KoHfIpynpOBAHne BXoIDOB
KIOUeBbIM 3TANOM B HAcTPOKe npOceccopa ABnIeTc KOHOFNpyPobAHne KaJdORo BXODHO RTOCTOuHnKa npn NOMOOn 3KpaHOB INPUT SETUP. KOHOFNpyPobAHme BXODOB NO3BOJAEr Bam yCTaHOBt ByMOJuaHn DnPa rJaD HAcTPOEk, BKIOUaY TIN BXODHO rpaBeMa, JEnaEMb peXmM OkpykaIoTeo 3Byka,Apblk NOL3OBATEJI, KOTOpB NOrBnETcH Na 3KpaHax PnN BbOpe ITOCHNKA, INMOrne dpyrNe. DnKOHOFNpyPobAHnBXODOB nCnONb3yIOrTa cJeDyIOUHe 3KpaHNbIe MeHO OSD.

MeHIO INPUT SETUP KOHfNpynpyET BXOdbI OT NCTouHnKOB IN DocTyHNO I3 rnaBHoro MeHIO. 3KpaH o6ecneuBaET cIeMyIe napaMeTpbl, BbIbpaemble nyTem BbIeHnraJKeHaemOn CTpOKn pRn nmoOn KNONK UP/DOWN:
SOURCE:ИЗмени重大项目TORO BXODA TAKKHe NO3BONReT BAM Bb6paTb ONpeDeneHHbI BXoДгЯ кОнФиурпupOBaHnA (CD, TUNER,VIDEO 1-8, USB, PC-USB, XLR, PHONO, MULTI INPUT mN BLUETOOTH).
NAME: MoKHO 3aadaTb NOb3ObaTeNbCKoe HAnMeHOBaHne nCTOuHnKa. Hanpnmep, BxOVIDEO1 MoKHO Ha3BaTb "TV" dN for oBleUeHnHaONcKa. IIMr no yMOnuHnIO NAME coBnAaet C HAnMeHOBaHnEM nCTOuHnKa SOURCE. YTo6bl Naatb MapKnPOBky, pa3MeCTnte BblJeHne Ha 3Toi CTpKe i Haxmnte KhoNkY ENTER Ha nyIte Hn Ha nepeHne naHeIn, N Bbl nonaTe B nOdmHo SOURCE NAME EDIT.
- HaximmaTe KhoNk Left/Right Ha nyIbte Dy nn Ha nepeDne nanei dna N3MeHnna nepBo 6yKbbl, npokpyuBra CnCOK DoCTynhix 3HaKOB.
- Haxmte KhONky ENTER Ha nyIbTe Dn Ha nepeDne nAeHn dna NOITBepKDeHn 3ToN 6yKbN npeXoNTe Ha cIeNyUO npNo3uNO.
- NIOBTOPAIte nn.1 n 2, noka BCE BOCEMb 3HakOB (BKIOUaI np6ebl) He 6ydyT 3aONHeHb.ITORBOOE HaxaTne KHOKN ENTER COXpAHReT HOBBI apblk. INI bbl6epnte Ha kpaHe KHONky BBOD InnaNoDTBePckDeHHA, ecNI Bbl BBeHN MeHee 8 3HakOB.
VIDEO INPUT: Bb6npaETNCTOCHNK BnDEOCINHAA, KOTOpB HADo OTO6pa3ntb Ha TB-MOHTope. Ha3NaChte BXoHa NODcoEINHEHHK bOMNOHeHT-NTOCHNK, KOTOpB Bb Bb6paAn n3 HDMI 1-7 n HDMI Front. Dna ayDnO NCTOCHNKOB (Tnna CD-nneepa), o6bHuHO Bb6npaIOT OFF, TAK Tc06bl BnDEo He BbIOmnoCb Ha dncnneBnDeo NCTOCHNKMOJHO TaKae 3aDaTb KaK "LASTVIDEO SOURCE", Tc06bl
PnpekeKIOUeHnHa3aADHHbBXoVDVideo npedbyuINBIDeoNCTOCHNKe CMEHNCA.3aФyHKUINPOE3HA,KoIgA BbXOTNE CMEHNTbTOLkOayINO INPODQNKaTcMOITpeTBTOJKe CaMbINBIDOCTOCHNK.
AUDIO INPUT:Ha3Hauaet fH3Nueckoe BxOJHoe coeINHeHne, KOtOpoe nCIOIb3yETcB KaueCTBe yMOnuHaHN IIN NCTOuHNka, OTO6paKaemoro B nepBoi cTPOKe DaHHoro MeHIO. 3TO MOKeT 6bITb OPTICAL 1-3, COAXIAL 1-3, HDMI AUDIO, TUNER, MULTINPUT, XLR, PHONO, CD, BLUETOOTH, USB, PC-USB, AUX, ARC nn Off.
PIMMEYAHNE: Onmuuecku, koakcuanbhi, CD u XLR bxodmy 6bmb h3nauehba ha bxodho ucmouhuk CD unu Ha Video 1-8. Ayduo bxod he docmynen dna umocnuka bxodnozo cuzana XLR, abmomamuecku, mOhep, MHOJcEMBOM bxodob, BLUETOOTH unu USB.
The menu AUDIO CONFIGURATION con figures amp and preamp RCA outputs. The screen provides options from 5.1 to 7.1.4 and 5.1 with the option for bi-amplification. After selecting the desired configuration of the speaker outputs and preamp RCA audio output to connect the signals are displayed up to 12 channels:
IPIMUEAHHE: Hekomopbte bixxobdtocmynbmonko uepe3 bixoBt RCA npedyucunemra mpebyiom bheuhezo ycunumena.
KoHfIpypOBAHne akyctnuecknx cnCTem n aydno
3TOTpa3dienpocecaHaCTpOKNOnncBtAEyHKbI,KacaoUeCEBOcPon3BeDeHn3ByKa,TakneKAKuNCN0aKyCTNuECKHXCINCTEm,YnpabLeHne6aCOM,BKIOUaPa3dienTeNBhIEΦuNbTpblCa6Byepa,yCTaHOBLeHneOINHaKOBbIXBbIXoHbIXypOBHeiDnBcexKaHaNOB,HaCTpOKN3aJepKeNnapamETpuueckoroKBAIaI3epa.
POnHMaHHe KOHnIpyaun akyctuYecknx CInTeM
Domaunne KINHOteatpaibhble cncTeMb otTnuaOTcNcHOM aKCTUecknx cnCTem n 6acobbIMn cnooc6HOCTMn 3TNX aKCTUecknx cnCTem. YcTPOCTBO npednaraet pekmbo kOpykaiooero 3Byka, npncnoC6JIeHbke K cnCTemam C pa3nHbim uCnclom aKCTUecknx cnCTem n yfHKuAMn ynpabHeHg 6acom, KOtbpie nepepaot6acobyu nHfOpmauiHOHa rPOMKOrOBOpTeB (aKCTUeckne cnCTembl), hainyUHM oBaP3OM cnOC6HbIe ee o6pa6aTbIBaTb, -ca8byepbi n/nn 6bnlwe aKCTUeckne cnCTembl. DnI noJUYehn ONTMaJIbHbIX xapakTeprctNK, BbldONKHyka3aTb Ppoecccopy HcNLO aKCTUecknx cnCTem B BaWei cnCTEme n cnooc pacnPdeJeHn 6aca Mekjdy HmN.
HnkeJeUeIe HNCTpyKuINIO KOHfynypnpoBaHIO OTHOCTC KTPOMKOROBopntLMARGE(60nbunm) N SMALL (He60bnunm), 7TO 60nbue OTHOCITcK INXJenAeMoN KOHfynypaUNIb6aca, YEM KIN XfN3NuCeCKomy pa3Mepy. AImehO, IcNoB3yIte NaCTPOUY LARGE dIy AkcyTnecknx CNTEm, KOtOpBie BbXOTITE 3aCTABINb BOCPONIBDOnTB rny6okne 6acobble cunHanbl. IcNoB3yIte Ha3NaueHne SMALL dIy AkcyTnecknx CNTEm, KOtOpBie bbl 3ByaIy Lyuwe nepeadCBWb6ac60one CNOco6bHM rPOMKOROBOPTeLIMM.CNTEmaynpaBHeHNA 6acompehanpablanet6acobvU IHΦopMaUnIO ATyCtNecknx CNTEm SMALL I nepedaet ee HAkyTneckme CNTEmb LARGE n/nn ca6byep. ETo moKeT 6bIb NOE3HO dIy NoHMaHNA LARGE Ka "nonHonoNocHb", a SMALL kaK AC DnIcreHNIX BBICOKNX qACTOT.
Pntb akyctnuecknx cncTe M LARGE n ca6byepe 3Ta cnctema He Tpe6yet nepehnpablenia 6aca. Bce pTb akyctnuecknx cncTe bocnpo3boaHT hopmaIbHbI 6ac, 3aIncahHbI B IN COOTBETCTBvOuNX KaHAnax. Ca6byepe BOCpOIN3BOJNT HopMaIbHbI 6ac KaHAna. Mexdy Tem, HopmaIbHbI 6ac npdeIbAIIeT 60ee BeICOKne Tpe6oBaHnK CnOcO6HOCTM OctaIbHbIX akyctnuecknx cncTe M yCUNITeNe, KOTOpBie IN Bo36yXdaOT.
PntbakctuuecknxcuTeM LARGE,ca6byfepeotcytCTByET.HopMaIbHbI 6acn3phiOHTaIbHbIX,eHTpaIbHOrO60KOBbIXKaHaIOBBOcIpOn3BODNTC eRO COOTBEcTByUIMN rPMOKOROBOpITeJMM.
Bce akyctnueckne cnctembl n ca6byep. HopMaIbHbI 6ac co Bcex kaHaoB nepeHaanpaBlen Ha c6byep. Ca6byep onepnpyET BCEM 6acom. 3ta konhpya uin Imeet prn pneuyeCTB: rny6okn 6ac Bocnpou3BOUNTc HAn6oone npncnoc6eHHbIM K Hemy rpOMKOROBOpTelem, OCHOBhle akyCTnueckne cnCTembl MOrTy INrpaTb TNIwe, C MeHbIMN NCKaKeHnRM, INTre6obAHm K MOUHOctN yCUNITeIN CHNXeHb. TaKaONKHypauaM MoIa 6bITb peAIm3OBAHa C NOIOHbIMN mIn yMeHbWeHHBMN OCHOBHbIMN rPOMKOROBOpTEJIIMN. Y HeKOTopbIX CNYaX, OHa paCCMaTpNBaETc N CHAnOBhIMN rPOMKOROBOpTEJIIMN. 3Ta KOHpyaun IMeet npneMUYeCTBO, KOrda pa6Otae C nCTEmOn yCUNITeIN yMEpeHHoMOUHOCTN.
- Ppontabhe akyctneckn cnctemb LARGE, ceHTpaHbHIO 6okobie SMALL n ca6byep. HopmabHbI 6ac ot eHTpaHbHO r 6okobix akyctnecknx cnctem SMALL nepehanpabHe Ha pOHTaBbHie akyctneckn cnctembl LARGE n ca6byep. PpOHTaBbHie akyctneckn cnctembl LARGE BOCPON3BOJNT IX CO6CTBENH bAC NIOc nepehanpab HbHN b6ac OT akyctnecknx cnctem SMALL. Ca6byep BOCPON3BOJNT nepehanpabHbHN b6ac OT BCex OCTaBbX KAHAOB. 3Ta KOHpyaun MoKet 6bITn PnpemNemoi C npao Oueh CnocO6HbIX PpOHTaBbHx akyctnecknx cnctem, BeDOMbIX 6oBbHM ycINlTeEM MOUHOCTN. IToEHuaNBbHM HeOCTaTkom CMeWahHBX KOHpyaun LARGE/ SMALL JABIIETCTO, YTO 6acOBbI dInana3OH M0KET 6bITb HE TAK XopoWo cornaocBaHnOKaHaBHo, KaOH Mor 6b1b6b1b corNaocBaH B KOHpyaun co BCEMn rPOMKOrOBOpnteMaSMALL.
PIMMEAHHE: Pacmmpubar anbmepehumubhyo konfoyupaunoc k Komnnekmom camenlumbi/cab6yep b kauecmbe fpohmnbhix akymueckux cuscmem, cnedyume uncmpykuunnpou3bodumena akymueckux cuscmem, coedunnoe uxbdybcickozo ypobnaakmubho zcbyepa HenocepdecmbeHc bixohamu fpohmnbhix akymueckux cuscmem npouecoppa, a camennlumbi -kco6cmbehHompa3denumelbHomby mmpy cab6yepa. B makou konfozypauu, akymueckue cuscmembl 6bl 6bl knaccuupuopoaHb kak LARGE, u hacmpoukou ca6byepa 6bl 6bl OFF (bbkIOUeH) dnybcex pekumob okpykaioe2o 3yka. Bo 8pemraocnpou3beHure He mepremca Hukakou uHfOpmauu, nomomy umcucmemanepehanpaenem bacooyu uHfOpmauHa phoHNbIte akymueckue cuscmembl LARGE. Nocokbky makaon konfozupauna zapanmuayem hadnekauyu pa6omy camellumoe, ucnonb3ry co6cmbenhhe pa3denumelbHie pfunbmpaikycmueeckux cuscmem, oha umeem onpeedenenhie hedocmamku b cmbcne kalubpoeku cuscmembu, 8 obsem ciyyae, he moxem 6bimb pekomedobana kak npednoumumelbna.
KoHpynpobAHne akyctuuecknx cntem - Speaker Configuration
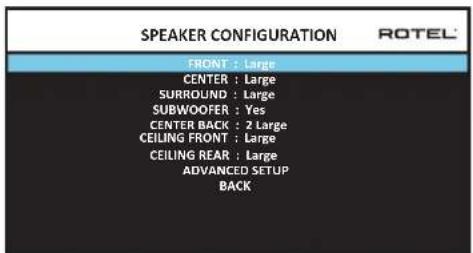
MeHIO SPEAKER CONFIGURATION nCnoIb3yTeTcIaI KOHfNpypaIINpoeccopa RAP-1580 dI npMHeHn CBaIIMM KOHNpeTHBIMn rPOMKOrOBOpNTeAMn I dIOnpeDeneHn KOHfNpypaIynypaBHeHn 6acm, KaK OINCAHO B ppeDbIysem 063ope. 3To MeHIO DoCTyHIO n3 rIaNBO HOrO MeHIO MAIN.
B HEM DOCTYINbI CNEyIOJIe NHe AChTPOJKN AkyCTNueCKNX CnCTEM:
FRONT SPEAKERS (small/large): Ncnoj3yte Hactpokey LARGE, YTo6b3aCTaBnTb foPTaIbHbIe akCTuYeCKne CNTeMbI BOCpOnu3BODntb HN3Kb6ac (NoHyIO nonocy). Ncnoj3yte Hactpokey SMALL, YTo6bI nepeHaNPabITb HopMaIbHbIb 6acOT aTnx akCTuYeCKnx CNTeM Ha cABByep (OTfNtPobAHbHb BvICOKne yACToTbl).
CENTER SPEAKER(S) (large/small/none): IcnoIb3yIte LARGE (he doctynha, ecnn φροNTaJIbHbIe akyCTnueckne CnCTembl SMALL), yTO6bl 3aCTaBntb ceHTpaJIbHbI rpoMkoROBOpNTb BOCpIPON3BODITb H13Km 6ac (noIHyIO NOcy). IcnoIb3yIte rpoNkY SMALL, ecnn BaIu CEHTpAlbHbI rpoMkoROBOpNTb Imeet orpAunHeyIO Hn3KoAcToTHyIO CnOc6HocTb, nIIe cEIN Bbl ppeIOnuHTaTe nepeDaBaTb 6ac Ha ca6Byep (OTΦInbTPOBaHbI BICOKne acToTb). Bbi6epTe NONE, ecnn B BaIeu CnCTeme OTCyTCTByET rpoMkoROBOpNTb CEHTpaJIbHO KAHaJa (pexKmbI OKpyKaIoIeero 3Byka 6dyT ABtOMaTIeCKn DeIITb BCIO INHφopMaIIO CEHTpaJIbHO KAHaNA NOPOBHy MEXNy DByMa φpOHTaJIbHbIMrpoMkoROBOpNTeAMN, co3daBaJ KaxCyIinca CEHTpaJIbHbIKaHaJ).
SURROUND SPEAKERS (small/large/none): NcnoB3yIte HaCTPOKy LARGE (He DCtynha, ecn foPONaJIbHbIe akCTMne CNTEmb SMALL), qTo6bl 3actaBntb 60koBbIe akyCTMne CNTEmb BOCpON3BOIDnTb HN3KN 6ac (NoHyIO NOLOCY). EcIn BAuIN 60koBbIe akyCTMne CNTEmb IMEOT ORpaHEnHHyO cNOcoBHOCTb K BCpON3BeHdNIO 6aca, nIn ecn bbl npEnNoHTaTe nepeDaTb 6ac Ha ca6Byfepe, nCnoB3yIte HAcTPOkY SMALL (OTfNlBtPOBaHbIb BicOKNe cAtoTb). EcIn BAuIN CNTMe OTCyTCTBYOT 60koBbIe akyCTMne CNTEmb, BBiBePntE NONE (60koBbIe KaHaJIb Do6abJIrTOc K foPOnTaHbIM rPOMKOrOBOpNTeJAM, TAK YTO HnHerO IN 3aNNc He nponaadaT).
SUBWOOFER (Yes/Max/No):HacTpoKa YES AaJIeTcStaHdApTHoH AcTpoKoi, ecn BaIa cNCTema NImeet ca6Byfepe. Ecn BaIa cNCTema He Imeet ca6Byfepe, Bb6epnte NO. Bb6epnte HAcTpoKy MAX dIra MaKcIMaIbHorO 6aca Ha BbIXoJe BmecTe C HopMaIbHbIM 6acom, dy6IpyembIM o60mM ca6ByfepeMaN IIO6bIMn fpoHTaIbHbIMn rPOMKOrOBOpUTeJenMn LARGE B cNCTeme.
CENTERBACK(1large/1small/2large//2small/none):HeKOTOpBle CNTeMBI MNEIO OMHN IIN DBA DOJONHInTeHBbIX CEHTPaNBbX TBINOBbX rPOMKOBOpNTeNA. IcNOLb3yIte HAcTPOiKY LARGE (He DCCTYNa,ecnI φροNTaJIbHbE aKyCTUeCKNe CNTeMBI SMALL), YTO6bI 3actABNTb BaaIN TBIOBBie aKyCTUeCKNe CNTeMBI BOCIPNO3BDOInTB H3KmBac (NONHYO NOLOCY). IcNOLb3yIte LARGE1,ecnI y Bac OIN CHENTPAIBHbTIbIOB TpOMKOBOpNTeB (6.1) mN LARGE2 (7.1),ecnI y Bac DBA CEHTPaNBbIX TBIOBBx rPOMKOBOpNTeRA (7.1).ECnI BAaIN TBIOBBie AkyCTUeCKNe CNTeMBI IMEOT ORpAHuEHHyO cnoC6HOCTb KBOcIPNO3BEdENIO 6aca, INN ECNI Bbl npedNoHTaTe nepeDaTb Bac HAcbByep, McNOLb3yIte HAcTPOiKY SMALL (SMALL1 dA oDHoro rPOMKOBOpNTeNA,SMALL2 -dIA bByx).ECNI BaaaBcN CNTeME Het TBIOBBx aKyCTUeCKNX CNTeM, Bbl6epNTe HAcTPOiKY NONE.
CEILING FRONT (small/large/none): Ncnonb3yute HactpoKy LARGE (he 0ctynha,ecn pontaHbIe akcytueckne cntembl SMALL), qto6b3actabntb 6okobie akyctuueckne cnCTembl BOCnpun3BODntb HN3KN 6ac (noHnyo nonocy).Ecnn Baun 6okobie akyctueckne cnCTembl IMeOT orpauHeneHyIO cnoc6hOCTb K BOCnpun3BeDeHHIO 6aca, INe ecnn Bbl npednoHTaTe nepedaTb 6ac Ha ca6byep, nCnonb3yute HactpoKy SMALL.
SPEAKER (Front/Center/Surround/ Center Back/Ceiling Front/Ceiling Rear/Subwoofer): BbIbepeTe Ha6Op akyCTnuecknx CnCTEm, KOToPbI Heo6xOJIMOCKOHIFrpyIpOBAb TCNoB30BaTeJIbCKMn HACTpoKaMn.
CROSSOVER (40Hz/50Hz /60Hz/70Hz /80Hz /90Hz /100Hz /120Hz /150Hz / 200Hz/OFF): Θа hacptpoika Bepxneи n Hxneи qactotb pa3deJa knpoccoBepa akTmbna TOnbko dIn AC Tnna SMALL c ca6byfepom. Korda bbl
3axoHTe B MeHIO ADVANCED SPEAKER SETUP BnepBbIe, TeKUee 3aueHna HaCTObl pa3dena 6ydt NOKa3aHO B 3ToI CTPOKe, KOTOPa YCTaHOBNeHa Ha «100 TgNo yMOnuAHIO. IVMeHnTe 3NaueHne B 3ToI CTPOKe, ToJIbKO eCNI BbXOTHe, YTObIte KcUaA AC Imema dpyrTu OAcTOTy pa3dena. Ta HAcTpoKa BnIeT TOJIbKO Ha nepeHaPabLeHbI bac.
IPIMUEAHHE: Hacmpouka OFF (docmynna monbko dna cabeyepa) nepedaem nonhonoiochbl cuzhan ha bau ca6yep, ymo6bl bo MoZn npumehm bcmpoehbl 8 Hezo H3K04acmombl fumbp.
PIMMEYAHNE: Kozda zpomkozobopumelb ycmahOBen LARGEB MeHIO SPEAKER SETUP unu 3mOM MeHO, hacpmouka vacmombi pa3deneHua He docmynha 88duy mozo, umo, no onpedehenu, zpomko2oBopumelb LARGE 8ocnpou3bodum nonhbu duana3oh be3 nepehanpaBneHua bacaHa ca6byep u 6e3 pa3denumbeho zfubmpa. Kpome mozo, hacpmouka CROSSOVER He docmynha dna 8xoda MULTI INPUT.
DOLBY(Default/Large/Small/None):YctaHabnBaTeKyuIrpomKorOBopnteB (nok3aHHb B nepBoB CTPOke) B Large, Smal NII None, 3ameHra BeyuH yHaCTpOHy B MeHIO SPEAKER SETUP. EcnJKe BblXOTNe MCNOJb3ObaTb YcTaHOBKn pa3MePob AC, 3adaHbIe B MeHIO SPEAKER SETUP, Bbl6epNTe "Default". YcTaHOBKa "None" HeDocTuHa dA AC FRONT.
DTS(Default/Large/Small/None):AHaIaONuHbIe OINcaHHbIM dIa Dolby napameTpbI,3a NcKIIouHeHem TOrO,HTo 3TN HAcTpOKn BInraJrTOJIbKO npi deKoIupOBaHN DTS.
STEREO(Default/Large/Small/None):AHaIaONuHbIe OINcAHbIM Dn Dolby npapaMeTpbl,3a NcKIIoueHemToT,TO TTO HAcTpoiKn BInraJOT TOJIbKO b peXmme OKpykaIoUero 3Byka STERO.
Длca6byфера npи�бedingьыше Habсрουкдг DOLBY, DTS n STEREOTahOBtca "Yes/No/Default".Ca6byфер nepexoNT b noJoxeHne "Default"ecnФpoHTaNbIbIe AC 3aJaHbI kak "Default", n OH 3aJaETcKaK "Yes" ecnФpoHTaNbIbIe AC 3aJaHbI kak "Small".
INPMMEYAHNE:Ko2aΦpoHmAbHbIeakymueckue cucmembHaCmpoeHb Ha ycmahOBku no ymonuHIO B MeHO ADVANCED SPEAKER SETUP, oO6be Hacmpouku "Large/Small/None"DnA DOLBY,DTS uNt STEREO He docmynHb I dny dpyux akymueckux cucmem.3mu akymueckue cucmemb Bydym uonlb30abmb hcmpouku no ymonuHIO.
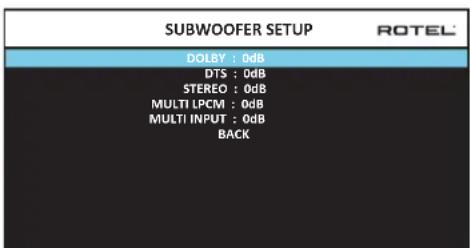
HacrpoiKa ca6Bypepa - Subwoofer Setup
PbCTPOK B MeHIO SUBWOOER SETUP n03B0JIaIOT pInHydnteHbHO OTMeHHTb HAcTPOIK, 3aDaHHBe B MeHIO Speaker Level Setup (cM. cNeDyUoi pa3JeI) Jn KaKdoI O3 KOHKpeTHbIX pexmMoB OkpykaIoJero 3Byka.
DOLBY:
DTS:
STEREO:
MULTI LPCM:
IcnoB3yIte KhoNkUp/Down dIy nepexoA B KOHkpTehblpeXIM OKpykaOJero 3Byka, a 3aTeM KhoNkU Left/Right dIy noCTpoKu npOBHa ca6Byepea dIy TEkyoero pexkMa OKpykaOJero 3Byka. HAcTPOKe OcyueCTbIaeTcB Dnana3OHe perynopBKn OT-9Db +9 Db MAX (+10 Db). HAcTPOKa 0Db 03Naayet, yTo yKa3aHHb peXIM OKpykaOJooero 3Byka 6dET nCIOB3OBAb TbeDuyuim npOBeH cb6Byepea. IIO6aIpyra HAcTPOKa CdBnRaET BeDuyuO HAcTPOKy. HanPImep, HAcTPOKa -2Db dIIy KOHkpTeHOro peXIMa OKpykaOJooero 3Byka O3Naayet, yTo npOBeH cb6Byepea 6dET Ha 2 Db TmWe, cem BeDuyuim npOBeH cb6Byepea, kOrDa Bb6paH daHHb peXIM OKpykaOJooero 3Byka. IcNoB3yIte 3Tu HAcTPOKn npOBH Ca6Byepea dIy NODCTPOKn OTHOCTeBHoro BbXoHDoro npOBH b Pa3NIuHbXpEkmMax OKpykaOJooero 3Byka. IVMeHeHne BeDuyuero npOBa cb6Byepea ByenuHT mI INYEmhUnT npOBeH dIy BCEx PekxMOB OKpykaOJooero 3Byka.
Mbl pekomehnyem hauatb c Hactpoek dIe BcepxekmOB okpykaiozero 3Byka npu ypoBHe no ymoUaHnIO O db b npocceke kann6pOBKn CnCTEmbl nCbltaTeNbHbIM CNrHaON M Ha nepnoD ocBOEHN NOcne 3Toro. KorDa bblnpocnyuBaTe pa3NIuHbMI MatepnaI NCTOCHNKOB B TceHne HeKOTOPORBVPemHb, Bbl MOKeTe 3aMeTnTB, YTO ONPeJeHHeBpeXmBI OKpykaiozero 3Byka npou3BOJAT CNlKOM MHOro INI CNlKOM MAno 6aca OTcBvepa. ToIbKO nOcNE 3Toro, NCNoJIb3yIte 3TN HAcTPOKN MeHO DnI N3MeHHeN KaKdOROpexIMA.B ObseM cnuae, ecn BeNDyIIN yPoBeH cb6Byepa yCTahOBNeHOnJXhBM O6pa30M (T.e. He CNlKOM rPOMKMM), B OTdJIbHBx HAcTPOkAx dIgKaKdORo peXkMA OKpykaiozero 3Byka Het Heo6xoImOCTN.
Длвоьзралпгларьhoe мсн,在ддпгштсрку «BACK»Внжнч actn
экраha OSD ninn haxmte kHonky BACK ha nybte Ду ninn Ha nepeHne nahenl
ДлвоьзралкHopmalbho pa6ote.
HactpoKa BbIXOdbix ypOBHeAkyCTnuecknx CNTem
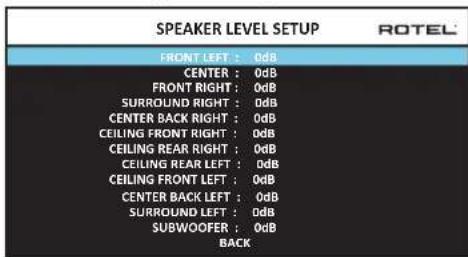
PIMEAHHE: Ecnu bckoHpUpypuObau bawy cucmemy dnpumehnue dyx uehmpanbHbix mbIObX akymueckx cucmem, MEHO nonumcDononHmEnbHa cmpoka, daouaBAM BO3MOKHOmb He3abucmo ompezynupoambakymueckue cucmembi CENTER BACK RIGHT uCENTER BACK LEFT.
B3OM MEHIO INOJIb3yETcA NcIbITaTeNbHbN CINHaJ B VnDE OTfHbTPOBaHHOPO3OBORO WymA DnY yCTaHOBKn paBbX yPobHe rPOMKoCTn DnR BCeX aKyCTuuecknx CNTEM (FRONT LEFT,CENTER,FRONT RIGHT, SURROUND RIGHT,CENTER BACK RIGHT, CEILING FRONT RIGHT, CEILING REAR RIGHT, CEILING FRONT LEFT, CEILING REAR LEFT, CENTER BACK LEFT, SURROUND LEFT n SUBWOOFER)DnOeCneueHn PabINbHorO Bocnpoun3BeHnOg Okpykaoueero 3Byka. HAcTpOJa BBxOaNbIX yPobHe npn NmOOnu NcIbTaTeNbHoi pnoeDpyblOecneuBaET Ha60oeToHyNoNDCTpOky CTem, YTObUInpOboMATEpnaOkpykaoueero 3Byka 6bn Bocnpoun3BeHn, KAc 6bln 3aDymHo, N ABnEeTcBAKHBIM 3TanOM B KaII6pOBKe CNTeMbI.
Длдядупа В ЭTO мeни Oсушьecтблелгй KANБрOBКИ NСпытaleNBHIM CINHAHOM, Bbl MOKTe HaxoMDtbcR BIIbObem pexkme OkpykaHIOSeI3Byka,
Kpome BYPASS, n cnio6bIM BXoDOM, Kpome MULTI INPUT. BoiHnTe B kpaHHoe MeHIO CNTeMbI N Bbl6epHTe SPEAKER LEVEL SETUP B rnaBHom MeHIO MAIN MENU, UTO6bI BOITN B 3OTkpan.
KordaBbBOBdTe BMeHNO SPEAKER LEVEL SETUP,BblcbluNTe NcBtateNBbI CNrHaIOT BbIeHNHO rPOMKOROBOpNTe. BIdenTJe DpyRte AkyCTnecKe CnCTeMbI,NEpeMeEaJyKPCOP Ha XeJaemYIO CTPOKY pni NOMOUs KHOJOK UP/ DOWN.NcBtateNBbI CNrHaI 6yDet CdBiratbCootBETCBHeHO BbleneHHOMy rPOMKOROBOpNTeIO.
CnBnOBbHOMNoLOXeHNnIpyoCnyuBaHnI,nepeDbiratneNCbTaTeNBn CnHnHa Ha pa3NHyBHeAkyCTnuecknCnCTEmb. IcNoIb3yOndn rPomKorOBOp nTb B KaueCTBe o6pa3CuBOrO, npocNyUmbaTe octaNbHbte AkyCTnuecknCnCTEmb, KOTpbIe 3aMeTHo rPOMue HmTNtSe. Ecln 3ToT Tak, noDcPtOte ypOBHn 3TxN AkyCTnuecknx CnCTEM BBepx NIN BHN3 (c 7ar0m 1 D6), nCnoIb3yKnOHKn Left/Right. IpOdoJnxai Te nepeKnouehme AkyCTnuecknx CnCTem n NOdctpoNk, noka Bce AkyCTnueckne CnCTEmb He 6byT OndnHaKOBo TpOMKoCTn.
Длб BO3BpaueHn B rnaBHe MeHIO, BbIeNITe cTpOky «BAck» B nHxHne yactm 3KpaHa OSD nHnxMITE KhoNkY BACK hnyIte Dy nHn HapeDne nAHeHn ⅡIa BO3Bpata K HopMaJIbHoI pa6ote.
Kann6pOBAk npn noMoOnu n3MepeTEna 3ByKOBOrO daBneHra SPL:
KaIIN6PbOKa CNTeMb Ipi NIOMOOIN 3MepnTeN 3BkyKOB0 DaBnEHN, BMeCTO uei, 06ecneuBaET 6oJIeToTOnHbe pe3yNbTaBnI yNpyUaET npaMeTpbi CNTeMb. HeDopORne n3MepnTeN ayINO daBHeN 7mPpO KOtynHb, a npOceDypa n3MEpeHH - 6bICTpa IN HcNOxHa.
I KODIPOBAHne Dolby, n DTSyka3bIbAoiT cHaIapThn ypoBeH kAIIN6pOBKn IIN BcEx TeATPOB, YTO6bl rapaHTnpoBaTB BOCIpON3BedeHne 3ByKOBoX dOpOKeH a npOBye HpyOBHe rPOMK0CTN, 3aYMaHHom peKmCEpOM KInHOΦnIbMa. 3ToT o6pa3OBoBn npOBye HdoJIKeH o6ceNeuHTB BOCIpON3BedeHne dAnlora Ha eCTeCTBeHHom npOBye HopMaHbON peuB BMeCTe C CambIM rPOMKMM 3ByKaMn B LIO6om eHNHUM KOHAne pImepHo 105 d5. NcbltATEbHbte CrrHaNb IpOceccopa reHeppyOTcH a ToCHOM npOByE (-30 d5 n.) OTHOCITeHbHO camrO rPOMKOrO 3ByKa, KOtopb MOKeT 6blt 3aIncan uIφpOBbIM cnocobom. Ho 6pa3zOBOM npOBye Dolby mN DST, 3TN nCbltATEbHbte CrrHaNb IOnKbH b npON3BOUntb OTCET B 75 dHa h3MepeNTe 3ByKOBOrO daBHeHn.
UctahOBnte n3mepntelb 3bykoBOrO daBHeHnHa dnaIana30H 70 5 npn OTKnke SLOW u B3BeWuBaHn C, depKnte ero daJeKO ot BaWero Tena B BaWeM noLoXeHN DnI npocLywBaHn (yCTAHOBKa n3MePnteHa WtATNB OT KAMepbI o6JIercaETnpoeCC). Bbl MoKeTe HAnpabTb N3MePnteB ayINO DaBHeNHa KaJdbuN3MepeMbI rPOMKOROBOpNTeB;OdaHo, paCnoLoXeHne n3MePnteB bΦNKCuPoBAHHoTouKe npI erO HApBaJIeHN Ha notolok 06JIercaETn3MepeHn I daET 6Oone HAdEkhBtepe3ynbTaBl.
YBENHUNBAIte OCHOBHyr pOMKocTb Ha npOecCope, noka n3MepnteNB 3ByKOBO r DaBHeHn He nokAket 75 d5 (+5 d5 Ha dnnaa3oHe) Bo BpemBoCnpon3BeDeHn NcbltATEbHoro CnHana OdHmN3 φpOHTaJIbHbIX AkyCTUeCKnx CnCTEm. 3aTeM, nONb3yTe OTdEhBHe NOKaHaJIbHbIeperynlupOBKn B MeHIO TEST TONE IIN NOCTPOIK KAKDOro n3 AkyCTUeCKnx CnCTEm, BKNIOaRa CaBByFep, K TOMy Jx Ce CamOMy yPoBHIO 75 d5 Ha n3MepNTeNB 3ByKOBO DaBHeHn.
NPMMEYAHNE: 3a xapakmepucmu 83eueuuaHua u3mepumennu bnnn HOMHAMbpehbu ypoebcbayepa moem 6bmb hemnoo bhu npu u3mepeuu. JnKOMnncauuu, Dolby pekomehoyem hacmpaunbcbayepHa heckonko deueubenhuke bopemaKanupoeku c nomoubo u3mepumenn (m.e. c6byepdoJxhen nokaibam72 d5 Bmecmo 75 db).B koneyHom umoe, npabunbHu ypoebcbayepa
doJxhen 6bim onpeDeneH Bauum luHbIM bkycom, u Hekomopbie cnyuamenu npednouumaom ycmaHabnubamb e2o bIwe 75 db 38yko8bix dopoKek Khoofunmb. N3nuHne nOdUeKHymbie 6acobbe 3fkekmbo nocmnaiom 3acem npaBunbHOz noOmeuuaBuHaC OCHOBHbIMU zpOMKOOBOpumelaMu u cunbHO hAspykaioom cabeyfepeu e2o ycunumelb. Ecnbl MoKeme nokanuzoamb 6ac om cabeyfepea, e2o ypoeeHb MoKem 6bim cnuikom bICOKUM. Jn moHKou Hacmpouku ypoBnca6byepa MoKem 6bim nonE3Hou My3bka, nockonbky U3nuHnui bAcraernca ne2ko pa3nuumbIM. PpaBunhaj Hacmpouka 6ydem paBomamb xopouo oJMy3bku u 38yko8bix dopoKek Khoofunmb06.
3anomnhte hactpokey Bedyuero ypOBHr rpmkOCTN, nCnoB3oBAHHyIO BO BVPMA 30I KOaIN6PbOKN. YTO6bI BOCnpon3BODHTB 3ByKOBYIO dopoxky Dolby IIN DTS Ha o6pa3oOBOM ypOBHe rpmkOCTN, npocTo Bo3BaPATTEc K 3TOI HACTPOKe rpmkOCTN. OTMeTUM, qTO 60JbShINHCTBO CUYwATEne JOMaHNIX TEATPOB HAXoRD T Ty HACTpOky N3NIuHE rpmKoN. PpeIOCTABBe BAaIM Co6CTBeHNbIM Uwam CyDITb O TOM, KAK rPOMKO BOCnpon3BODHTB 3ByKOBBie DOPOXK INHOFOUHbMO B COOTBETCTBEHNO OTPeYnIPyTe BEDUHN peryAIONTOP rPMKocTN. He3aBNCIMo OT BAuNX ypOBHe npocNuWbAHNA, peKOMEHyETcnpImeHHe N3MepNTeAayINO daBJIeHnI Da KaIN6PbOKN OINHaKOBOrO ypOBHdNRCBEx AkyCTUeCKNX CNTEM B CNCTeME.
HacTpoIka pacCToHm/3aIepKk Do AC -Speaker Distance/Delay Setup
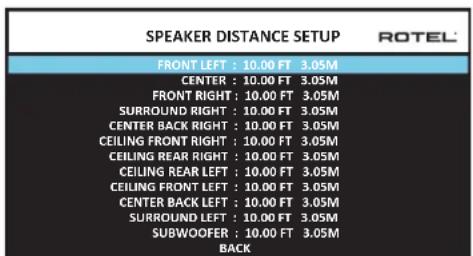
MeHIO SPEAKER DISTANCE SETUP, KOtOpoe DoctynHO n3 rnaBHoro MeHIO, No3BOJnRE BAM ycTaHaabNBAb 3aepKky dIy OTeJeNbHbIX akCyTnecknx CnCTem.3To rapaHTnpuyET, yTO 3ByKOTKaqDOrO rPOMKOROBopNTen npi6bIbaET B NIOLOXeHNe dIg PNOcNyUWBaHN ODNHOpeMeHHO, DaJce KOrDa He BCE akCYTnecknecCnCTembl paCNOJOxKeHbHa OOnHAKOBom pacCTOHNOTcLyWATEA. YBeINuBaIte 3aepKky dIy akCYTnecknx CnCTem, paCNOJOxKeHHbIX 6NIke K MecTy dIg CnyWateA, I yMeHbSaiTe 3aepKky dIy akCYTnecknx CnCTem, paCNOJOxKeHHbIX daJIbe OT MeTa dIy CNYwATEA.
Ipoceccop Rotel deaet hactpoy Ky BpeMeH 3aepKKn dna KaKdo rporMkorOBopnte ouhe lyerKo. IpocTo n3mepe tacctOAHne (B cyfax nn Metpax) ot BaWero noJoxeHN do KaKdo rporMkorOBopnte B BaWe cnCTeme. YcTahOBte n3mepeHHoe pacctOAHne B cTPOke dna KaKdo rporMkorOBopnte.MehIO npedocTabnE tCPOky dna KaKdo rporMkorOBopnte, cKOHfNpynpobAHORo BAwe cnCTeme, n o6ecneuBaet dnaanaoh hactpoyKn do 10.6 MePb (33 cyta)c warom 0,075 m (0.25 cyta), 3KBVBaENTHbIM DonONHtEnbHO 3aepKKe 0.25 Mc.
YTo6bI n3MeHnITb HAcTPOky, BBydIeNtE JxenaemyIO CTPOky npi NOMOUI KHOONK Up/Down n IcNoB3yIte KHOINk Left/Right dJa YBeNueHHe Nnn yEmhSeHHe HaCTPOky 3aepKKn. IJn BO3Bpata B rIaNbHOe MeHIO, HaxMITE KHOKNy BACK IIN BBydIeNtE CTPOky BACK B EKpaHE OSD. IIN Ha nepeJeHn NaHEn IIN BO3BpATA K HopMaJIbHOH pa6Ote.HaxMITE KHOKNy SETUP/MENU IIN Bb6epTe EXIT B EKpaHE OSD, YTo6bI bIitn I3 peXIMHa HAcTPOky IN BEpyTbC K HopMaJIbHOH pa6Ote.
Pa3nHbIe HaCTpoiKu
Hactpoika cncembl - System Setup
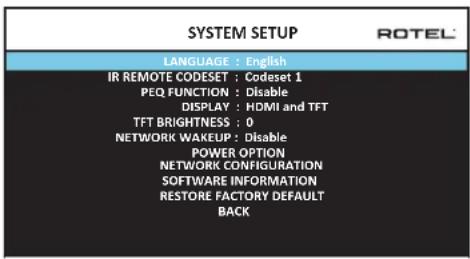
3To MeHIO SYSTEM SETUP,doCTynHoe n3 rnaBHoro MeHIO,06ceNeuBaET DocTyN K HeCKOJIbKIM pa3Hoo6pa3HbIM HaCTpoiKaM, npNBedeHHbIM Hnke:
LANGUAGE: Bb6npaertBbIKdIaEkaPahHbIX MeHO OSD.
Ha6op IK-KoOB - IR REMOTE CODESET: Y RAP-1580 dBa ha6opa IR KoOB, KOTOpBie MoXHO MeHb B Cnyuae KOHpNkTa C DpyrMn npOyKtAm Rotel.
IPIMMEYAHNE: Iocne cMeHbHa6opa KaOoB IR REMOTE CODESETux HnyKHO makke cMeHumb b nyIbme. Haxmume Ha Khonky TUNER u odHOBpeMeHHo Ha uΦpOyoIu Khonky 1 (TUNER u Khonky 2 dIra Bmopozo Ha6opa KaOoB) u ydepXumE b meueHue 60lee 5 cekyHd, noka He 3amUzaem noDceMaKa nyIbma, u 3aem omnycmume Khonku. Iocne 3mozo nyIbIm nepexodum B ha6op KaOoB IR code 1(ulu 2).
Bo3MOxHbIe HEnCnPaBHOCTN
BoIbIbnHCTBO 3aTpdyHeHn B ayDnO CnCTeMaX ABNIAOTcpe3yIbTaOM HnnpabINbNbIX CoeDInHeHn,IM6 Ho npapBnblbHMn HAcTPOKaMynpaBHeHn. EcBb CTOLKNHyNCb C npOBeLemaMn, N3OJIpyTe O6NaCTb 3aTpdyHeHn, npoBepbTe HAcTPOKn UynpaBHeHn, ONpeDenITE npuHny c6oN i CdenaiTe Heo6xOaMbIe N3MeHeHn. EcBb Hc MoKeTe NOnyUHTb 3ByK OYCTpOiCTBa, o6paTInTeCb K COBETAM DnA CneDyUOxN CtTuAun:
YCTPOICTBO HE BKNIOUaETcR
Y6eTeCb, YTO CeTeBOI uHyp BCTaBHeN B 3aHIO IaHEn Ib npOceccopa n B pa6oTaHOuIPO3ETky nepemEHnHO TOka.
Y6eHntecb, YTO nepeKIOUaTeIb POWER Ha 3aDHe IaHEIn HaxOHTcB B nIoJKeHHN ON.
0TcyTCTByeT 3ByK CnIb6oRo BxOda
Y6eIuTeCb, 7TO npurnyeHne MUTING oTKnOHeNo rpoMkoCTb VOLUME BKIOUeHa.
EcnBbHeNcNoB3yeTeBHyTpeHnHeKaHaBbIITaHnYcUNITeR RAP-1580, y6eINTEcb, YTO BbIXOdbI PneDbapNTeBbHOrO YcUNITeR IIOCoEINHeHb KycUNITeIO MOuHOCTN UTO YcUNITeB BKIOueH.
Y6eDITecb,yTO CnIKepeHIOPOCoEINHEHbIKCOKHpynpoBaHbipnpaBbNo.
Y6eINTeCb, CTO BXOdbI NCTOCHNka NOcOeHNHeHb I cKOHfpynpoBaHbI npaBnblHo.
- Поверьт,чTo NaCTpoIkoДЯ AUDIO MODE BЭКpaHOM MeHIOVIDEOSETUP AaJIaETcra"Pre-Out Enable".
OTcyTCTByeT 3Byk OT UcΦpOBbIX INTOUHKNOB
Y6eHITcB, YTO UΦpOBoB BXoHOb pa3bEm Ha3NaueH Ha npaBnBbH BxOHOH NCTOuHMK N TO BXoHOb NCTOuHMK cKOHnpyPupOBaH dIa NCNoJb3OBAHmR CUnΦpOBbIM, A He aHaIOrOBbIM BXoDM.
- PpOBeBpTe KOHnHygauaIIO npOnrpbBaTeJIa DVD nIra rapaHTN, YTO aKTHBnPOBaH uPPOBOI NOToN/UNu uPPOBOI BbIXoD.
OTcyTCTByeT 3Byk N3 HeKoTopbIX aKyCTNuEcKnX cNCTEm
PpOBepeTe BCE coeINHeHryCUNITeMaMOHOCnN akyCTNuCeKnx CNTEm.
- PioBepbTe HacTpoKn Speaker Configuration B MeHIO HacTpoKn.
OTcyTCTBye TBnDEOBbIXoHa TB-MOHHTop
Y6eHITcB,HTOB-MOHITOPnoCDoeHNHeDOnKHBIMobpa3OM,I npOBepbTe Ha3NaueHnB BXoJa.
IpoBepBeTc COBmectnMOCTb NCTOCHNkA n DnCnner no pa3peWeHIO. NCTOCHN4 KMOXET 6bITb OTNPaBLeH ToJbKO Ha 4K MOHNTOp.
Ka6enHDMIDonKhbI MeTb DnHy He 6oone 5MeTpOB.
EcnBbIcMOTPnTE3NCTOHTHnK,Y6eHNITecb,yTOINCTnNEMOKeT OTo6pa3ntb 3D n3o6paKeHne.
He coBnadaIOT n3o6paKeHne H 3ByK
- PpOBepbTe, YTO dIa KaKdOrO BXoDa Bbl6paH npabNtBnHn NCTouHnK BnDeocnHaJa.
- PpOBepeBte, TTO HAcTPOKa rpynnNoBo 3aJePckn He paCCTpoEHa.
Ieunpnpeepknuehenn Bxoob
YCTPOINCTBOHCNIOB3yeTnepeKJIouHeHneIpiNTOMOUnpEneIcoXpaHnMaKcMmAlbHorO KaueCTBa 3ByuHaHn. MexaHnueckne IeunKn peIeRbIANTCHOPMaNbHbIMN.
BoBpemnpeeknueehnHDMInctouhNKBo3mOxHb3aepKKn UΦpOBbIX CnHANOB,UTo6bI INPACNO3HaTb NDeKOINPOBaTb DOnKHbIM 06pa3OM.Bpemn3aepKKN3aBNCNTOTNOKNIQUeHHORoO6OpyDobAHn.
He pa6oTaIOT opraHbI ynpaBleHna
- Y6eIntecb,чToВnytbeДуУctaHOBneHbI CBexKHe 6aTapei.
- Y6eIntecb, yTO IK-DaTnK Ha nepeDneH naHEn npoceccopa He 3a6NoKpOBAH. HanpaBraTe nybl Ty H a DaTnK.
- Y6eHNTecb, yTO DaTnKHe npHnHMaet CINbHoe NK-n3nyeHne (COnHeHbI CBET, ranoEHHoe OCBeueHene n T.n.).
- OToeHNHnTe yCTpoIcTBo OT cTHeHn PO3eTKn NepemEHnOro TOKa, NOdoXdnte 30 cekyHn BCTaBbTe wTekep o6paTHo dna nepeyctaHOBKn.
- Y6eInTeScb,уTo ha6op IR konob B nyIbe N B npoueccope RAP-1580 odHn tot Jke:Codeset 1 nn Codeset 2.
TexHnueckne xapaKTepeNtNU
Aydno
Homahha bha bxaohn moohocb, hnp 100 Bt/kaHan (20Tu-20Ktu THD<0.05% Ha8OM) 7 kaHao npnbodom
HomHahbHa BxOJHAR MoHcTb, HnP 150 Br/KaHAn (1KuTHD<0.03%ha8OM)2KaHANOB npBODm
VckaeHHA (THD) < 0,03%
VHTEPMOQYNAHOOHHEMOCKKEHVA(60Tu:7Ku)<0.03%
Dnana3OH BOCINPOV3BDOJIMBX YACTOT
LHPOBOOΦHO 20Γu-20KΓu+/-1D
Anorobmyo6xO 10T-100Kt+/-1D5
LHPOBOBovBxOa20Tg-20KΓu+/-0.5D
JemnHr-akTrop(1Ktu,8OM) 230
OTHOWHE CnHAnVwym (IHFA-83eeuw.)
AHAJorOBbI O6xO1 100n5
LHpOBOB BxOJ 96 n5
Bxqhpan yyactbntbHocn/MmnehaC
ΦOHO BXoD
JIHHeNbI BxOJ
BalaHChbI BxOaD 600MB/100KOM
BbXOpHoypoBEn npDyCanmtn
PLmΦpOboa aydno
230
1,2B
LPCM (up to 192kHz, 24-bit)
Dolby® Surround,
DolbyTrueHD
Dolby ATMOS,
DTS-HD Master AudioTM
DTS X.
Bnapeo
Bxophe paoepenew
480i/576i, 480p/576p, 720p,
1080i, 1080p, 1080p 24Hz
3D,4K,UHD
480i/576i, 480p/576p, 720p
1080i, 1080p, 1080p 24Hz
3D,4K,UHD
sRGB,YCbCr4:2:2,YCbCr4:4:4
Bbxoghhe paepeeennn
8BxoOoBc3noDpeKkoHDCP2.2
2BbixoDa cnoepKkoHDCP 2.2
Audio Return Channel
06xue xapaekrepcntk
Iotpe6nemar moHoctb
1100BT
0.5 BT (standby)
120B,60T(BepcnaCJIA)
230B,50Γ(EBponeNckA BepcnA)
STE
2800 6TE/4
431x192x470MM
4U/177MM/7 in
22.8K
"Made for iPod" and "Made for iPhone" 03haaet, yto 3neKtpHnBn akccecCyap cnpoektnpOBAH TAK, qTO6bI NOcEOEINHrTcBc K IPoD nII iPone, COOTBetCTBeHNO, IN cepTNfNtnpOBAH pa3pa6OToYkOM HA COOTBetCTBNE cTAHdpTAM kAueCTBa KOMnAHnApple. Apple He HecET OTBeCTBHeHOctn 3a pa6Oy 3TO rTO yCTPOJCTBa nII 3aERO COOTBetCTBNE cTAHdpTAM n HopMam 6e3oNAChOCTn. IOnkanynta, IMeHTe BnuNy, yTO nCnONb3OBAHne 3TO rACCEcyAPA c iPone, nII iPone moKeT IOBnTb Ha KaueCTBO 6ecIpOBoHDNo CB3N.
iPhone, iPod, iPod classic, iPod nano u iPod touch -эTO TOPROBIE Марки Apple Inc., зерпсгетрюванье B CWA u pyruхстрах.
Made for

iPod

iPhone
Bce xapaektpcnk n BnIOTC TOnHbIMn Ha MOMENT ny6nkaun. KomnaHra Rotoctabnnet 3a coboi npabo BHocnty uyuueHH 6e3 ybeDMHeHH.
Rotel n Iorotun «Rotel HiFi»Ялnotca 3apeTnCTpnpoBaHHbIMTOBapHbIMN 3HaKaMn KOMnaHm The Rotel Co., Ltd., Tokno, RaonHua.
ROTEL
The Rotel Co. Ltd.
Tachikawa Bldg. 1F.,
2-11-4, Nakane, Meguro-ku,
Tokyo, 152-0031
Japan
Rotel of America
54 Concord Street
North Reading, MA 01864-2699
USA
Phone: +1 978-664-3820
Fax:+1978-664-4109
Rotel Europe
Dale Road
Worthing, West Sussex BN11 2BH
England
Phone: +44 (0)1903 221 710
Fax: +44 (0)1903 221 525
Rotel Deutschland