CS375D - Hi-Fi System ONKYO - Free user manual and instructions
Find the device manual for free CS375D ONKYO in PDF.
| Product Type | Hi-Fi system with CD tuner amplifier, FM/DAB radio, Bluetooth and auxiliary inputs |
| Model | Onkyo CS375D |
| Dimensions (W × H × D) | 215 mm × 117 mm × 296.5 mm |
| Weight (main unit) | 2.2 kg |
| Weight speaker (each) | 2.6 kg |
| Power supply | AC 220-240 V, 50/60 Hz |
| Power consumption | 20 W (standby 0.5 W) |
| Auto Standby | Yes, adjustable On/Off (20 min) |
| CD playback | CD audio, CD-R/RW MP3 (32-48 kHz, 32-320 kbps VBR) |
| FM radio | Range 87.5-108 MHz, memory 30 stations, RDS |
| DAB radio | Range 174.928-239.200 MHz, memory 10 stations |
| Bluetooth | Version 4.1+EDR, range ~10 m, profile A2DP/AVRCP |
| Inputs | 1x OPTICAL (up to 48 kHz/24 bits), 1x LINE IN (analog), 1x USB Type-A (front, 5V/0.5A) |
| Headphone output | Mini-jack 3.5 mm (impedance 16-50 Ω recommended 32 Ω) |
| Included speakers | 2-way type (tweeter 2.5 cm, woofer 13 cm), impedance 6 Ω, max power 20 W |
| Sound settings | Bass (BASS ±6), Treble (TREBLE ±6), Super Bass, DIRECT mode |
| Timer | Wake-up alarm (Source CD/USB/DAB/FM), sleep timer (10-180 min) |
| Cleaning | Soft dry cloth, diluted neutral detergent (no alcohol or solvent) |
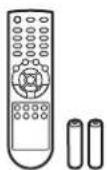
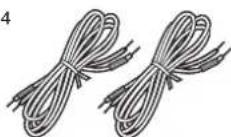
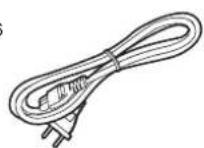
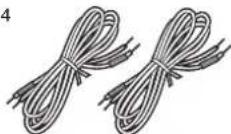
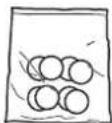
| Included accessories | Remote control RC-961S, batteries, speaker cables (2x1.1 m), DAB/FM antenna wire, anti-slip pads, quick guide |
Frequently Asked Questions - CS375D ONKYO
User questions about CS375D ONKYO
0 question about this device. Answer the ones you know or ask your own.
Ask a new question about this device
Download the instructions for your Hi-Fi System in PDF format for free! Find your manual CS375D - ONKYO and take your electronic device back in hand. On this page are published all the documents necessary for the use of your device. CS375D by ONKYO.
USER MANUAL CS375D ONKYO
text_image
Illustration showing three-step steps of a device operation: adding a CD to a speaker, inserting a USB into a digital display, and adjusting the keyboard with a 'SLEEP' button.> Before Start > Part Names > Install > Playback

Advanced Setup | Others
Table of Contents
Before Start
What's in the box 3
Part Names
Front Panel 4
Rear Panel (CS-375D) 5
Rear Panel (CS-375) 6
Remote Controller 7
Display 8
Speakers System 9
Install
Connect the Speakers 10
Connecting the antenna and power cord, etc. ..... 11
Playback
Playing CDs 12
USB Memory 14
Listening to the FM Radio 16
Listening to DAB Digital Radio (CS-375D) 19
BLUETOOTH® Playback 22
Playing audio from an external device 23
Time setting / Using the alarm to start play ..... 24
Adjusting sound quality 26
Advanced Setup
Advanced Settings 27
Others
Troubleshooting 29
Other notes 31
General Specifications 32
> Before Start > Part Names > Install > Playback

Advanced Setup | Others
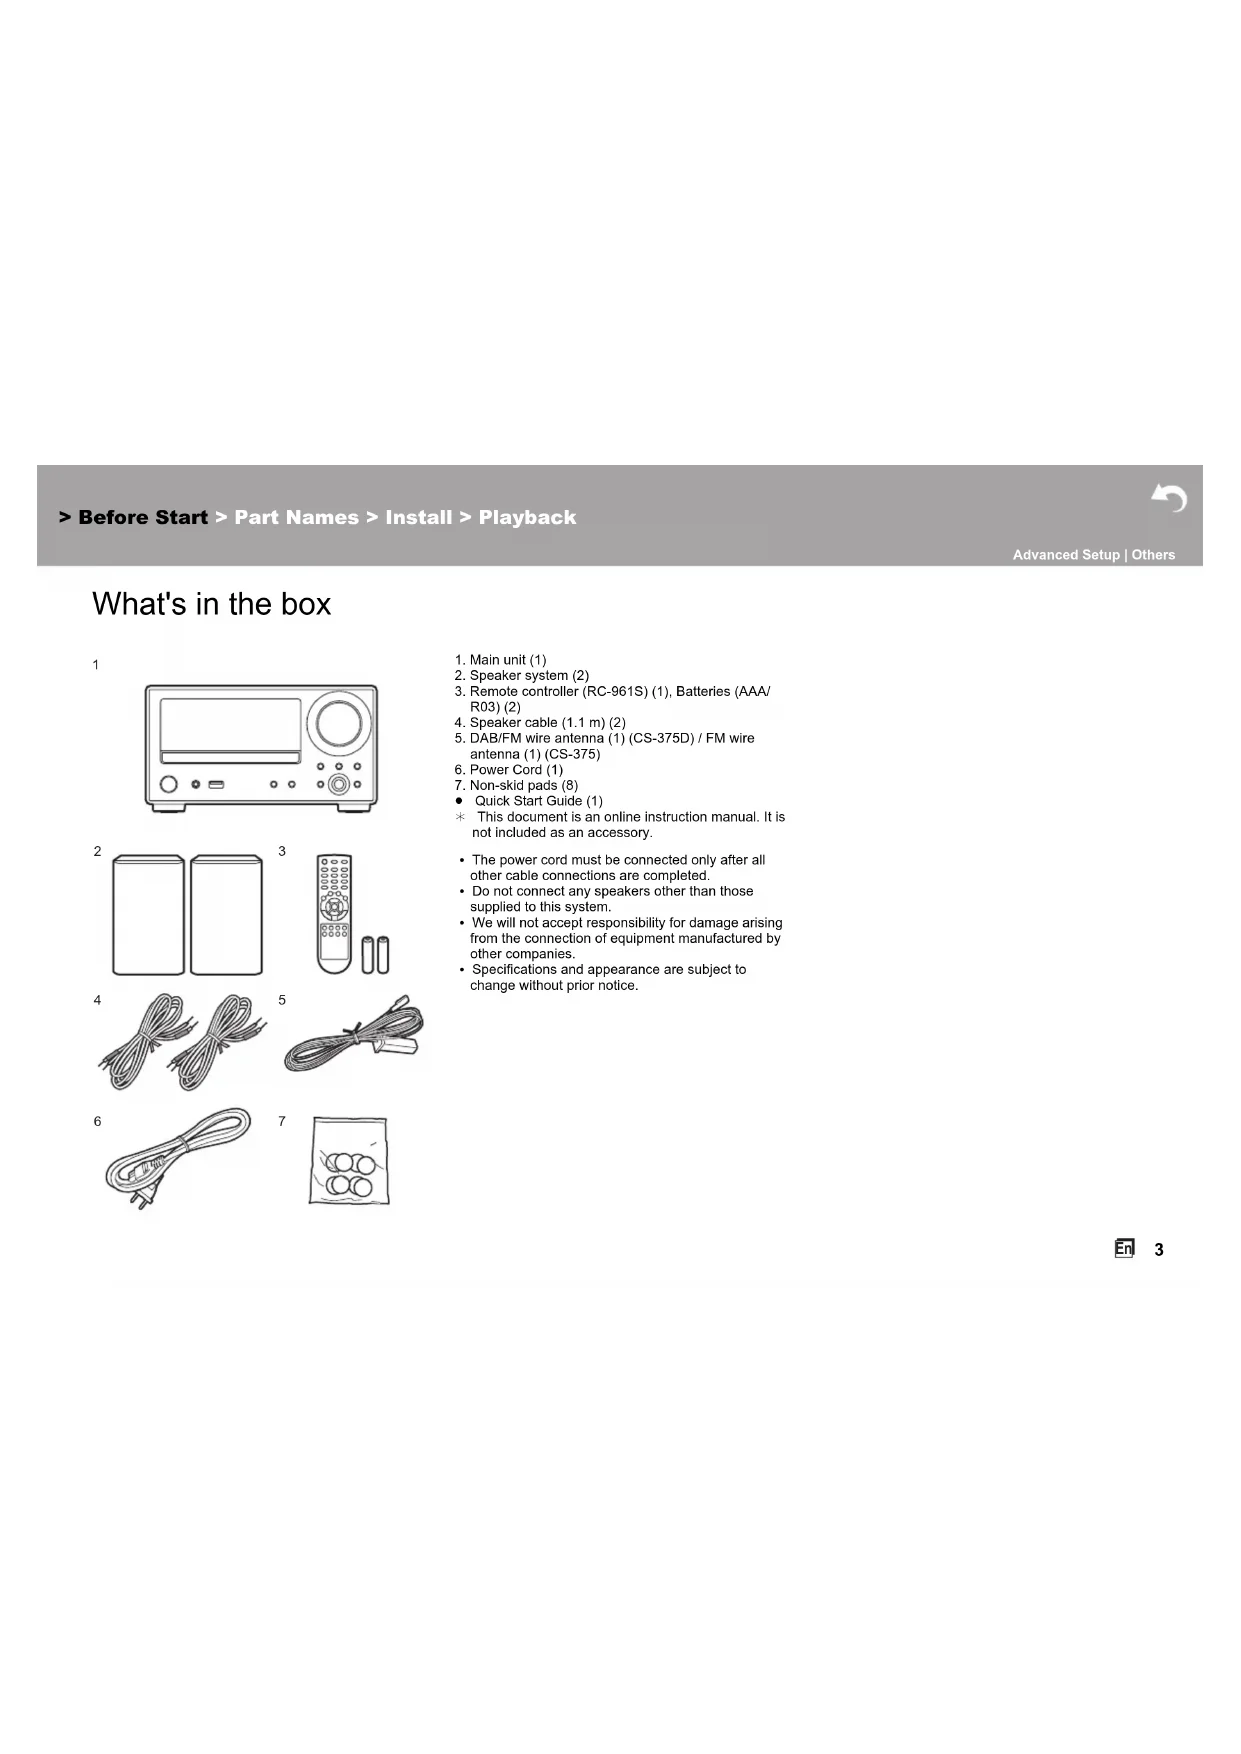
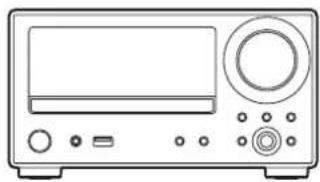
What's in the box
1
natural_image
Front view line drawing of a vintage electronic device with control panel and buttons (no text or symbols)2
3

4

5

6

7

-
Main unit (1)
-
Speaker system (2)
-
Remote controller (RC-961S) (1), Batteries (AAA/R03) (2)
-
Speaker cable (1.1 m) (2)
-
DAB/FM wire antenna (1) (CS-375D) / FM wire antenna (1) (CS-375)
-
Power Cord (1)
-
Non-skid pads (8)
- Quick Start Guide (1)
This document is an online instruction manual. It is not included as an accessory.
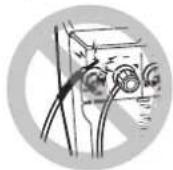
- The power cord must be connected only after all other cable connections are completed.
- Do not connect any speakers other than those supplied to this system.
• We will not accept responsibility for damage arising from the connection of equipment manufactured by other companies.
- Specifications and appearance are subject to change without prior notice.
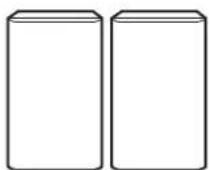
Front Panel
text_image
ONKYO TIMER ON/STANDER OFF DISPLAY INPUT TOME RETURN NOTES 1 2 3 4 5 6 7 8 9 10 11 12 13 14 15-
TIMER indicator: This lights when the alarm is set and this unit is on standby.
-
Remote control sensor: Receives signals from the remote controller.
- The signal range of the remote controller is within about 23'/7 m, at an angle of 30° to either side.
-
Display ( P8)
-
Disc tray: Place discs here. 8-cm discs can also be used.
-
▲ button: Open or close the disc tray.
-
Volume dial: Adjust the volume. Adjust between 0 and 50.
-
Play buttons:
■: Stops playback.
▶/II: Plays or pauses playback.
- Depending on the input, the operation may not start.
-
⏻ ON/STANDBY button: Turns the unit on or into standby mode.
-
○jack: Stereo headphones with a mini plug (∅1/8"/3.5 mm) are connected.
-
USB port: Connect a USB memory to play music files.
-
DISPLAY button: Switches the information on the display.
- Depending on the input, the operation may not start.
-
INPUT button: Switches the input to be played. (CD / BLUETOOTH / USB / OPTICAL / LINE / DAB (CS-375D) / FM)
-
TONE button: Adjust the sound quality. Press the button repeatedly to select item to adjust from "BASS", "TREBLE" and "S.BASS", and turn the skip (|◄◄/►►|) dial to adjust.
-
ENTER button, skip (|◄◄/►►|) dial:
When playing, turn left or right to select the folder or file, then press to confirm.
- Depending on the input, the operation may not start.
While the menu is displayed, turn the dial to select items and press to confirm the settings.
- RETURN button: Returns the display to the previous state.
Before Start
Part Names
Install
Playback

Advanced Setup | Others
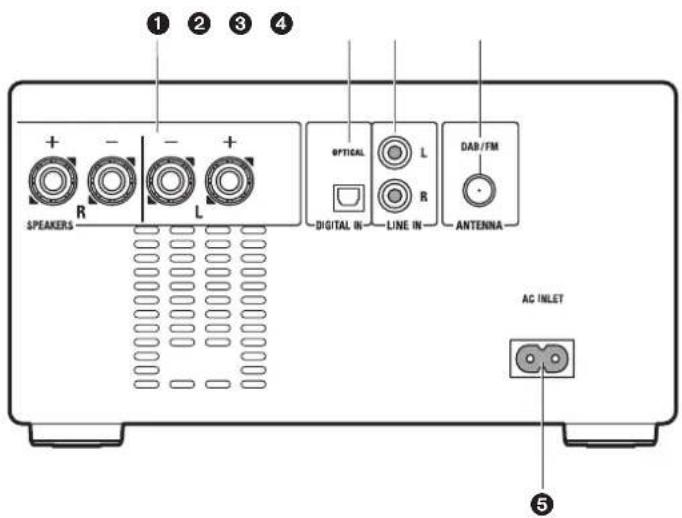
Rear Panel (CS-375D)
text_image
① ② ③ ④ SPEAKERS R L OPTICAL DIGITAL IN LINE IN L R DAB/FM ANTENNA AC INLET ⑤- SPEAKERS terminals: Connect speakers with the supplied speaker cables.
- DIGITAL IN OPTICAL jack: You can play the digital audio from an external device such as a television connected with a digital optical cable.
- LINE IN jacks: You can play the audio from an external device such as a television connected with an analogue audio cable.
- DAB/FM ANTENNA jack: Connect the supplied DAB/FM wire antenna.
- AC INLET: Connect the supplied power cord.
Before Start
Part Names
Install
Playback

Advanced Setup | Others
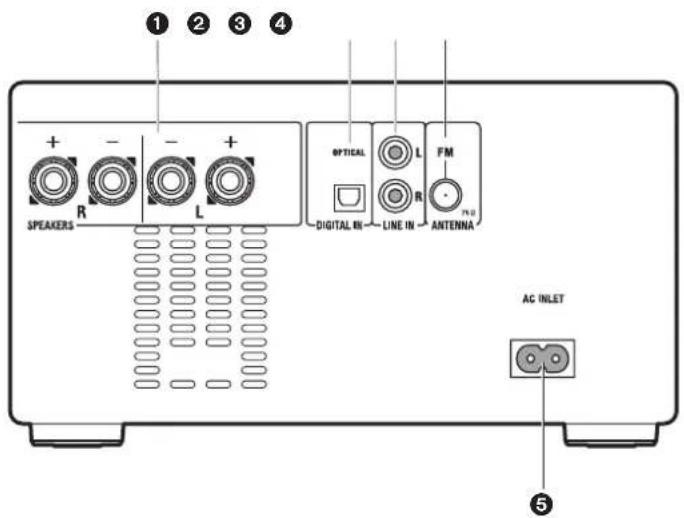
Rear Panel (CS-375)
text_image
① ② ③ ④ + - - + SPEAKERS R L OPTICAL L FM DIGITAL IN LINE IN ANTENNA AC INLET ⑤- SPEAKERS terminals: Connect speakers with the supplied speaker cables.
- DIGITAL IN OPTICAL jack: You can play the digital audio from an external device such as a television connected with a digital optical cable.
- LINE IN jacks: You can play the audio from an external device such as a television connected with an analogue audio cable.
- FM ANTENNA jack: Connect the supplied FM wire antenna.
- AC INLET: Connect the supplied power cord.
Before Start
Part Names
Install
Playback

Advanced Setup | Others
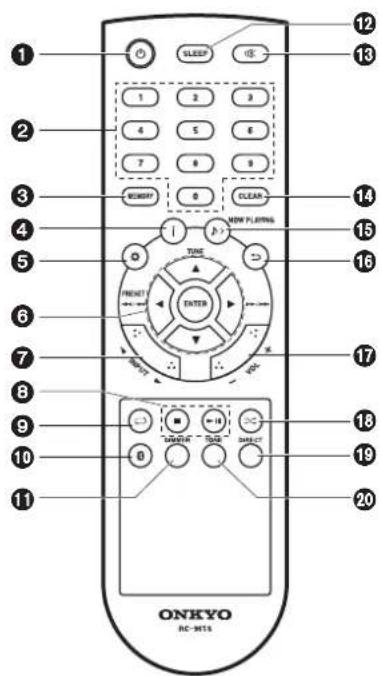
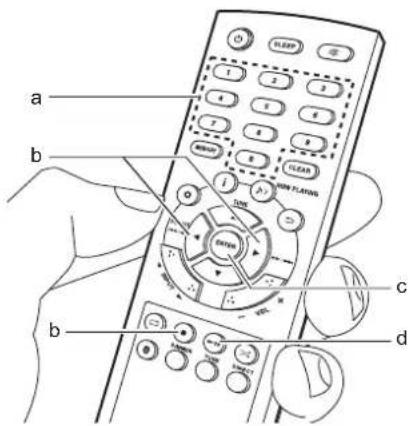
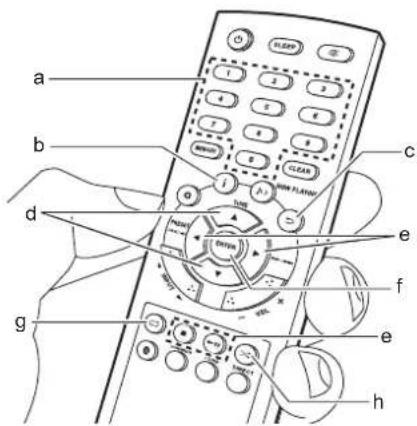
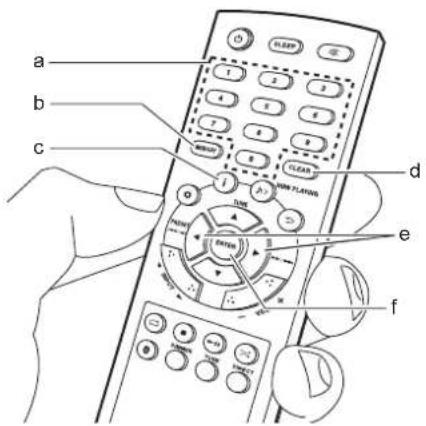
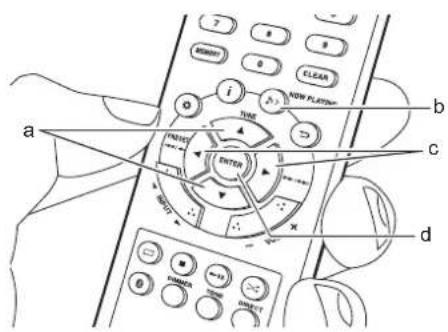
Remote Controller
text_image
1 2 3 4 5 6 7 8 9 10 11 SLEEP 1 2 3 4 5 6 7 8 9 10 11 SLEEPY 0 1 2 3 4 5 6 7 8 9 10 11 12 13 14 15 16 17 18 19 20 ONKYO RC-9616-
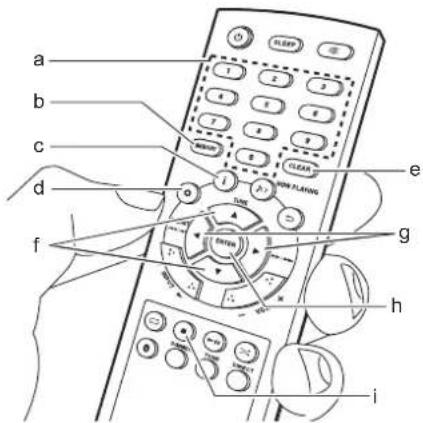
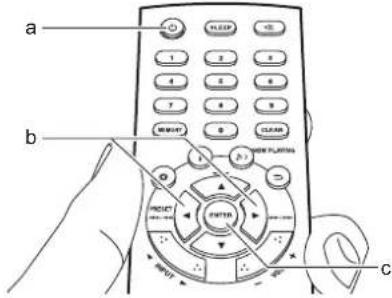
⏻ button: Turns the unit on or into standby mode.
-
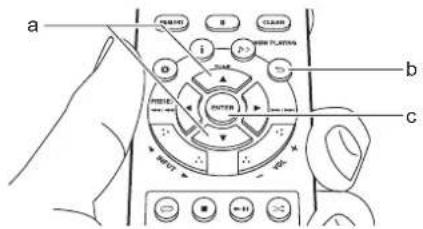
Numbered buttons: Use to directly input the CD or USB track number when selecting tracks.
-
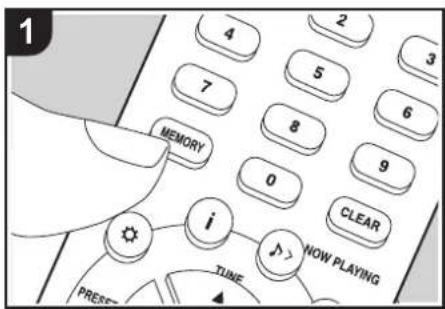
MEMORY button: Used to register favorite radio stations.
-
button: Switches the information on the display.
-
Depending on the input, the operation may not start.
-
button: Displays the menu.(→P27)
-
Cursors, ENTER button: Select the item with the cursors and press ENTER to confirm.
TUNE ▲/▼: Used to select radio stations.
PRESET ◀/▶: Used to select stations that have been registered.
Play buttons:
|◀◀/◀◀: Return to the beginning of the track being played. Press again to move to the track before. Press and hold to rewind the track quickly.
▶▶/▶▶: When pressed during play, move to the next track. Press and hold to fast-forward through the track.
- Depending on the input, the operation may not start.
-
INPUT ◀/▶ buttons: Switches the input to be played. (CD / BLUETOOTH / USB / OPTICAL / LINE / DAB (CS-375D) / FM)
-
Play buttons:
■: Stops playback.
▶II: Plays or pauses playback.
- Depending on the input, the operation may not start.
-
button: Set repeat play.
-
⚙ button: Switches the input to BLUETOOTH.
-
DIMMER button: You can adjust the brightness of the display in four steps. It cannot be turned off completely.
-
SLEEP button: Set the sleep timer. When the time set (10, 20, 30, 60, 90, 120, 150, or 180 minutes) has elapsed, the unit switches to standby. If SLEEP button is pressed after setting, the time remaining until sleep is displayed.
-
☑ button: Temporarily mutes audio. Press again to cancel muting.
-
CLEAR button: Press while setting the time, the alarm, etc., to exit the settings without saving them. Also, when pressed and held with FM/DAB, all preset stations are deleted.
-
NOW PLAYING button: Press once to display the current input. Press twice to display the current time.
-
⊃ button: Returns the display to the previous state.
-
VOL +/- buttons: Adjust the volume. Adjust between 0 and 50.
-
✗ button: Set random play.
-
DIRECT button: Switch the DIRECT mode on and off. (→P26)
-
TONE button: Adjust the sound quality. (→P26)
natural_image
Diagram of a hand holding a device inside a circular frame (no text or symbols)
Before Start > Part Names > Install > Playback

Advanced Setup | Others
Display
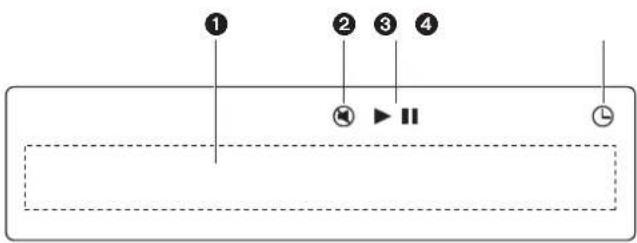
text_image
① ② ③ ④ 播放 ▶ II ①- Message display: Displays information about tracks and menus.
- Characters that cannot be displayed by this unit appear as "■".
• The following icons are displayed.
: Folder
Track title
- This is displayed when muting is on.
- Displays the play status
- This lights when the alarm is set.
> Part Names
Speakers System
1
4
2
5
3
2 1
1 2
There is no distinction between left and right with the included speaker system. There will be no difference in sound quality whichever side you choose to put each speaker.
- Tweeter: Plays the treble.
- Woofer: Plays the mid range and bass.
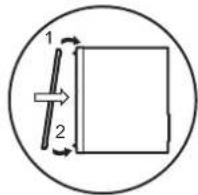
- Grill net fittings: Used to attach the grill nets. When removing the grill net, hold the bottom of the grill net with both hands and pull gently forward, then gently pull the top of the grill out to remove. To attach again, attach the top first, then the bottom.
- Speaker cabinet
- Speaker terminals: Connect speakers to the main unit with speaker cables.
Before Start
Part Names
Install
Playback

Advanced Setup | Others
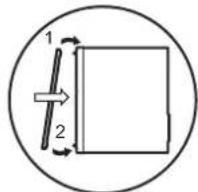
Connect the Speakers
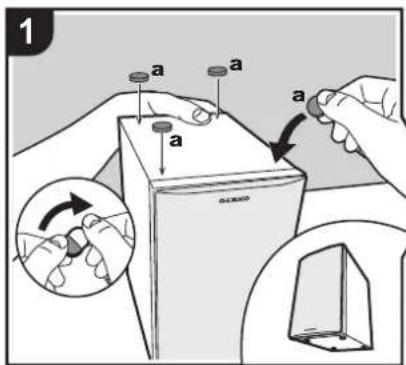
text_image
1 a a a a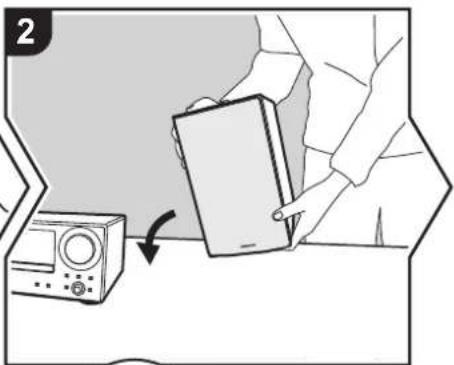
natural_image
Illustration of a person holding a tablet next to a device with an arrow indicating rotation (no text or symbols)
text_image
3 RED RED 1 2 b b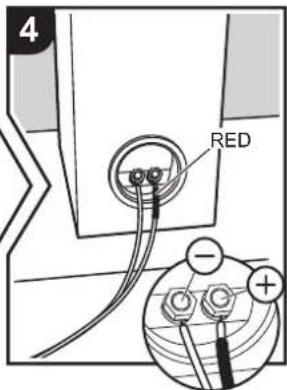
text_image
4 RED - + +Before Installing
Attach the included non-skid pads to the four corners of the bases of the front speakers. This makes the speakers less likely to slip, improve the stability of the installation, and enables better sound.
Instructions on how to connect speakers
Connect the included speaker cables with ends with the red tubing attached to the + jacks on the main unit and the speaker. If connection is wrong, the phase reverses and this makes it harder to output bass. After inserting the speaker cables, tighten the terminals firmly by turning to the right. Also make sure the exposed wires of the speaker cables do not stick out of the speaker terminals when connecting. If the exposed wires of the speaker cables touch the rear panel or the + and - wires touch each other, the protection circuit may be activated and the power may turn off.
Before Start
Part Names
Install
Playback

Advanced Setup | Others
Connecting the antenna and power cord, etc.
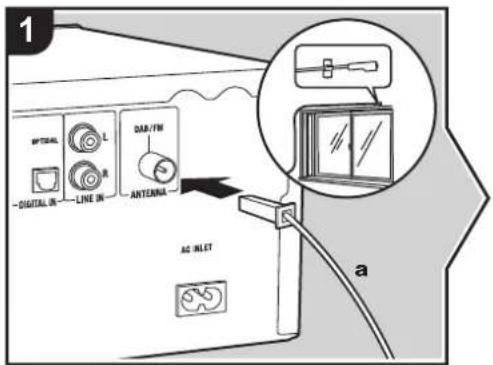
text_image
1 MPTUAL L -DIGITAL IN -LINE IN DAB/FW -ANTENA AG INLET aAntenna Hookup
Move the antenna around while playing the radio to find the position with the best reception.
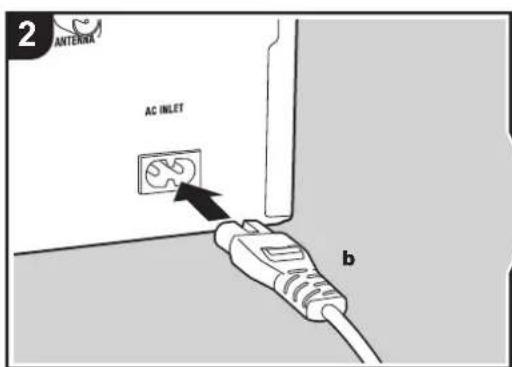
Power Cord Hookup
This model includes a removable power cord. The power cord must be connected only after all other connections are completed. Make sure you first connect the power cord to AC INLET terminal of the unit and then connect to the outlet. Always disconnect the outlet side first when disconnecting the power cord.
text_image
2 ANTERNA AC INLET b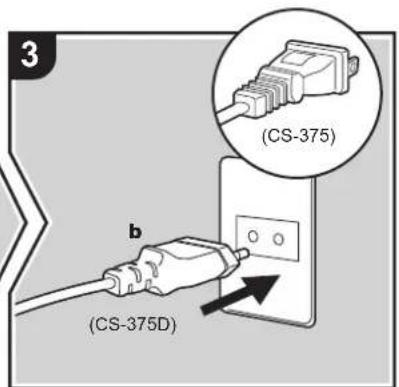
text_image
3 (b) (CS-375D)a DAB/FM Wire Antenna (CS-375D) / FM Wire Antenna (CS-375), b Power Cord

> Before Start > Part Names > Install > Playback

Advanced Setup | Others
Playing CDs
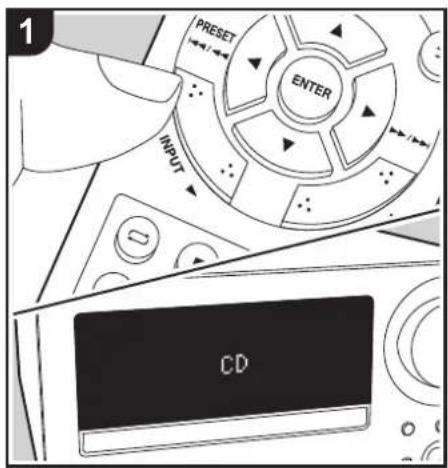
text_image
1 PRESET ENTER INPUT CD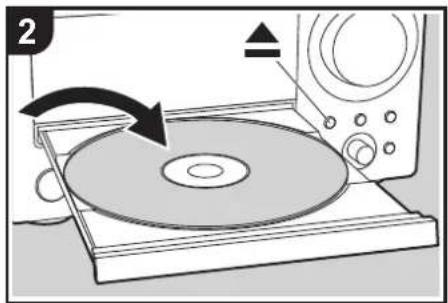
text_image
2This unit can also play CD-R/CD-RW recorded with MP3 format files, along with commercially available music CDs.
- The supported sampling rates for MP3 files are 32 kHz to 48 kHz, and supported bitrates are between 32 kbps and 320 kbps and VBR.
- Play of CDs not conforming to the CD standards, such as copy control CDs, is not guaranteed.
Playing music CDs
Perform the following procedure when the unit is on.
- Repeatedly press INPUT ◀/▶ on the remote controller to switch input to CD.
- Press ▲ on the main unit to open the disc tray, and after putting the disc on the tray, press ▲ again to close the tray.
- Press ▶II (d) on the remote controller to start play. Use other play buttons (b) to stop play or choose tracks to play. You can also select by entering the track number with number buttons (a) and pressing ENTER (c).
text_image
a b c d> Before Start > Part Names > Install > Playback

Advanced Setup | Others
Playing MP3 discs
Perform the following procedure when the unit is on.
-
Repeatedly press INPUT ◀/▶ on the remote controller to switch input to CD.
-
Press ▲ on the main unit to open the disc tray, and after putting the disc on the tray, press ▲ again to close the tray.
-
After reading the disc is complete, use ▲/▼ (d) on the remote controller to select the folder or file. If you selected a folder, the content of the folder is displayed when you press ENTER (f). To return to the previous display, press ⊕(c).
When you select a file and press ENTER (f) on the remote controller, play starts.
- Only the music files in the same level of the folder are played.
- Use play buttons (e) to stop play or choose tracks to play. You can also select by entering the track number with number buttons (a) and pressing ENTER (f).
Also, by pressing (b), you can switch the display in the order Track title/Artist name/Album name/Track number in the folder, Elapsed play time/Remaining play time.
• ID3 version 1 (1.0 and 1.1) only is supported with the title, artist name, and album name displays.
- Characters that cannot be displayed by this unit appear as "■".
- A maximum of 255 folders and 999 files can be read. This includes folders that contain files this unit cannot play.
Repeat play
- Repeatedly press (g) during play to display "REPEAT ONE" or "REPEAT ALL" on the display. REPEAT ONE: Repeat play of the selected individual track.
REPEAT ALL: Repeat play of all tracks. Repeat play of all tracks within a folder on an MP3 disc.
- To cancel repeat play, press(g) several times until "REPEAT OFF" is displayed.
- Repeat play is canceled if random play is started during repeat play.
Random play
Play tracks in randomly.
- Repeatedly press (h) during play to display "RANDOM ON" on the display.
- To cancel random play, press (h) until "RANDOM OFF" is displayed.
- Random play is canceled if repeat play is started during random play.

text_image
a b c d e f g h> Before Start > Part Names > Install > Playback

Advanced Setup | Others
USB Memory
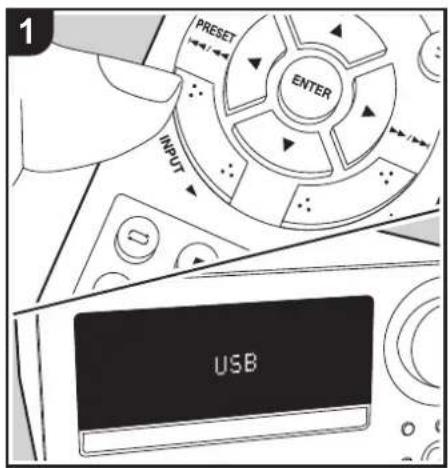
text_image
1 PRESET ENTER INPUT USB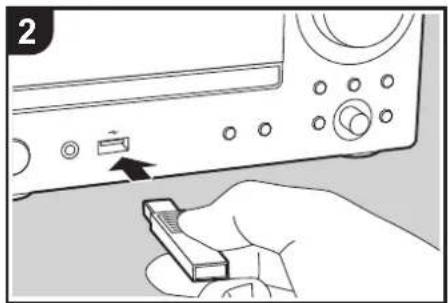
natural_image
Hand holding a USB flash drive on a computer interface (no text or symbols visible)You can play MP3 music files by connecting a USB memory to the USB port on the front of the unit.
- The supported sampling rates for MP3 files are 32 kHz to 48 kHz, and supported bitrates are between 32 kbps and 320 kbps and VBR.
Basic operations
Perform the following procedure when the unit is on.
-
Repeatedly press INPUT ◀/▶ on the remote controller to switch input to USB.
-
Plug your USB memory into the USB port on the front.
-
After reading is complete, use ▲/▼ (d) on the remote controller to select the folder or file. If you selected a folder, the content of the folder is displayed when you press ENTER (f). To return to the previous display, press □c).
When you select a file and press ENTER (f) on the remote controller, play starts.
- Only the music files in the same level of the folder are played.
- Use play buttons (e) to stop play or choose tracks to play. You can also select by entering the track number with number buttons (a) and pressing ENTER (f).
Also, by pressing (b), you can switch the display in the order Track title/Artist name/Album name/Track number in the folder, Elapsed play time/Remaining play time.
- ID3 version 1 (1.0 and 1.1) only is supported with the title, artist name, and album name displays.
- Characters that cannot be displayed by this unit appear as "■".
- A maximum of 255 folders and 999 files can be read. This includes folders that contain files this
unit cannot play.
text_image
a b c d e f g h> Before Start > Part Names > Install > Playback

Advanced Setup | Others
Repeat play
- Repeatedly press (g) during play to display "REPEAT ONE" or "REPEAT ALL" on the display. REPEAT ONE: Repeat play of the selected individual track. REPEAT ALL: Repeat play of all tracks in the folder.
- To cancel repeat play, press ☐(g) several times until "REPEAT OFF" is displayed.
- Repeat play is canceled if random play is started during repeat play.
Random play
Play tracks in a folder randomly.
- Repeatedly press (h) during play to display "RANDOM ON" on the display.
- To cancel random play, press > (h) until "RANDOM OFF" is displayed.
- Random play is canceled if repeat play is started during random play.
USB Memory Requirements
- This unit can use USB memories that comply with the USB mass storage device class standard. (However, there are still devices that cannot be played by this unit even if they comply with the USB mass storage class standard.)
- The unit is also compatible with USB memories using the FAT16 or FAT32 file system formats. Other formats such as exFAT, NTFS, and HFS cannot be played by this unit.
- This unit does not support the use of an external hard drive.
• USB hubs and USB storage devices with hub
functions are not supported. Do not connect these devices to the unit.
- We accept no responsibility whatsoever for the loss or damage to data stored on a USB memory when that device is used with this unit. We recommend that you back up your important music files beforehand.

Listening to the FM Radio
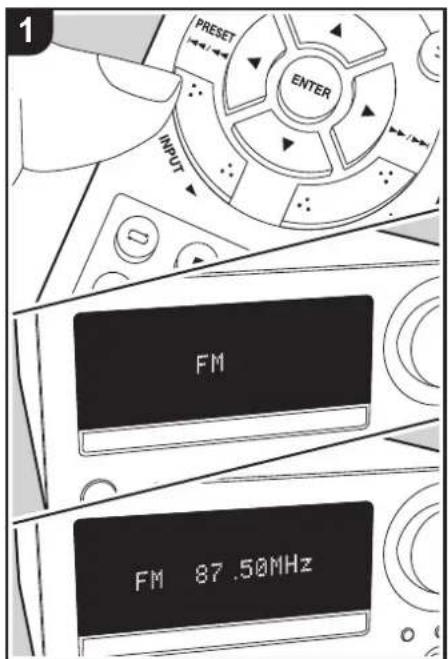
text_image
1 PRESET ENTER INPUT FM FM 87.50MHzTuning
Perform the following procedure when the unit is on.
- Repeatedly press INPUT ◀/▶ on the remote controller to switch input to FM.
- Press TUNE ▲/▼ (b) on the remote controller to select a station.
To tune automatically: Press and hold TUNE ▲/▼ (b) until "SEARCH UP" or "SEARCH DOWN" is displayed to start automatic tuning. Searching stops when a station is found.
To tune manually: The frequency changes one step each time you press TUNE ▲/▼ (b). Tune by looking at the display.
When FM reception is poor: Reception may improve with monaural reception. Press (a) to display the menu, press ▲/▼ (b) to select "FM STEREO/MONO", then press ENTER (c). Press ▲/▼ (b) to select "MONO". To exit the settings, press (a).
text_image
a b C> Before Start > Part Names > Install > Playback

Advanced Setup | Others
text_image
1 MEMORY i NOW PLAYING TUNE PRESO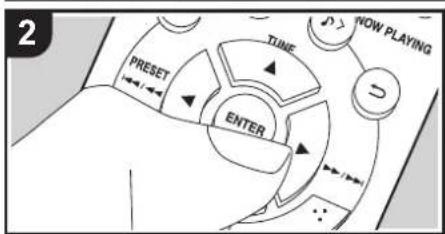
text_image
2 PRESET TUME VOW PLAYING ENTER
text_image
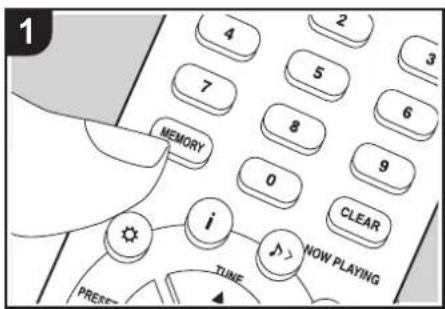
3 7 5 3 8 6 MEMORY 0 9 i CLEARRegistering a station
You can register a maximum of 30 FM stations. After tuning into the radio station you want to register, perform the following procedure.
- Press MEMORY (b) on the remote controller so that the preset number on the display flashes.

- While the preset number is flashing (about 5 seconds), repeatedly press PRESET ◀/▶ (g) on the remote controller to select a number.
- Press MEMORY (b) on the remote controller again to register the station. When registered, "STORED" is displayed and the preset number stops flashing.
Selecting registered stations
- Repeatedly press INPUT ◀/▶ on the remote controller to switch input to FM.
- Press PRESET ◀/▶ (g) on the remote controller to select a preset number. You can also select by entering the preset number with number buttons (a) and pressing ENTER (h).
To select the registered stations while listening to them in order
- Repeatedly press INPUT ◀/▶ on the remote controller to switch input to FM.
- Press and hold PRESET ◀/▶ (g) on the remote controller until the preset number starts flashing. The preset numbers change automatically at intervals of 5 seconds.
- When the station you want to listen to comes on, press PRESET ▶ on the remote controller.
To delete a registered station
- Repeatedly press INPUT ◀/▶ on the remote controller to switch input to FM.
- Press and hold CLEAR (e) on the remote controller. "MEMORY CLEAR" is displayed and all registered stations are deleted.
text_image
a b c d e f g h i> Before Start > Part Names > Install > Playback

Advanced Setup | Others
Using RDS (CS-375D)
RDS stands for Radio Data System and is a method of transmitting data in FM radio signals. In regions using RDS, the radio station name is displayed when you tune into a radio station broadcasting program information. You can use the following functions.
Displaying RDS Information
- With the station name displayed, press i(c) on the remote controller repeatedly to change the information displayed in order; station name (PS)/Program Type (PTY)/Radio Text (RT)/frequency. Long pieces of information scroll across the display.
0 "NO RDS" is displayed when no text information is available. Note that if the station name, Program Type, and Radio Text are not being received, "NO PS", "NO PTY" and "NO RT" are displayed instead. 1 Unusual characters may be displayed when the unit receives unsupported characters. However, this is not a malfunction. Also, if the signal from a station is weak, information may not be displayed.
Search for stations by Program Type
- With the name of the station on the display, press (d) on the remote controller to display the menu, press ▲/▼ (f) to select "FM RDS", then press ENTER (h).
- Use ▲/▼ (f) to select "PTY" and press ENTER (h).
- Press the PRESET ◀/▶ (g) to select the Program Type you want to find, then press ENTER (h) to start the search. The Program Types displayed are as follows: None News (News reports) Current Affairs Information
Sport
Education
Drama
Cultures
Science (Science and technology)
Varied Speech
Pop Music
Rock Music
Easy Listening
Light Classics M
Serious Classics
Other Music
Weather & Metr
Finance
Children's Progs (Children's programmes)
Social Affairs
Religion
Phone In
Travel & Touring
Leisure & Hobby
Jazz Music
Country Music
National Music
Oldies Music
Folk Music
Documentary
Alarm Test
Alarm - Alarm!
0 The information displayed may sometimes not match the content being broadcast by the station.
- When a station is found, the frequency is displayed and that station is received.
To search for a different station using the same
Program Type, continue with steps 1 to 3.
0 If no stations are found, the message "NOT FOUND" is displayed.
0 To cancel the procedure, press ■ (i).
0 Unusual characters may be displayed when the unit receives unsupported characters. However, this is not a malfunction. Also, if the signal from a station is weak, information may not be displayed.
Registering RDS stations automatically
You can automatically search for and register RDS stations using the Auto Station Program Memory (ASPM) feature.
- Repeatedly press INPUT ◀/▶ to switch input to FM.
- Press (d) on the remote controller to display the menu, press ▲/▼ (f) to select "FM RDS", then press ENTER (h).
- Use ▲/▼ (f) to select "ASPM" and press ENTER (h).
"ASPM" flashes during the search. When registered, the preset number and "STORED" are displayed. "END" is displayed when the search is finished.
0 If no stations are found, the message "NOT FOUND" is displayed.
0 To cancel the procedure, press ■ (i).
0 Selecting registered stations (→P17)
Listening to DAB Digital Radio (CS-375D)
text_image
1 PRESET ENTER INPUT DAB SCAN ABC StationTuning
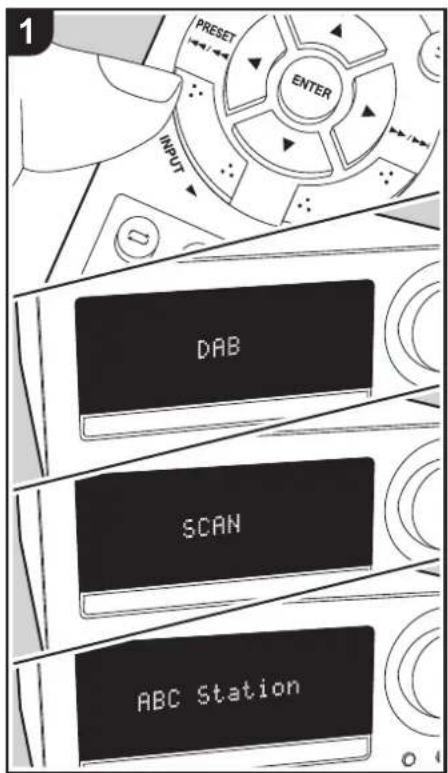
Perform the following procedure when the unit is on.
- Repeatedly press INPUT 2/1 on the remote controller to switch input to DAB.
- The very first time you select Tuner DAB, the Auto Tuning function automatically scans the DAB Band 3 for the multiplexes (i.e., stations) available in your area.
- Once the scanning process is complete, the stations are stored in alphanumeric order and the first station is selected.
-
If a new DAB station is introduced, or you move to a new area, press (a) on the remote controller to display the menu, then use "AUTO" in "DAB SCAN".
-
Select the desired radio station with TUNE 3/4 (b) on the remote controller, then press ENTER (c) to confirm the selection.
Tuning Manually
You can tune to stations that cannot be found automatically by using manual tuning.
-
Repeatedly press INPUT 2/1 on the remote controller to switch input to DAB.
-
Press (a) on the remote controller to display the menu, press 3/4 (b) to select "DAB SCAN", then press ENTER (c).
-
Use 3/4 (b) to select "MANUAL" and press ENTER (c).
-
The frequency changes each time you press TUNE 3/4 (b) on the remote controller. Watch the display as you change to the required frequency, then press ENTER (c) to confirm the selection.

text_image
a b C> Before Start > Part Names > Install > Playback

Advanced Setup | Others
text_image
1 MEMORY i NOW PLAYING TUNE PRESO
text_image
2 PRESET TUNE VOW PLAYING ENTER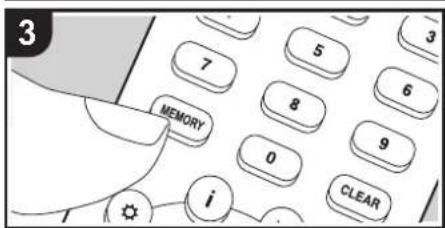
text_image
3 7 5 3 8 6 MEMORY 0 9 i CLEARRegistering a station
You can register a maximum of 10 DAB stations. After tuning into the radio station you want to register, perform the following procedure.
- Press MEMORY (b) on the remote controller so that the preset number on the display flashes.
CH01
- While the preset number is flashing (about 10 seconds), repeatedly press PRESET ◀/▶ (e) on the remote controller to select a number.
- Press MEMORY (b) on the remote controller again to register the station. When registered, "STORED" is displayed and the preset number stops flashing.
Selecting registered stations
- Repeatedly press INPUT ◀/▶ on the remote controller to switch input to DAB.
- Press PRESET ◀/▶ (e) on the remote controller to select a preset number, then press ENTER (f) to confirm the selection. You can also select by entering the preset number with number buttons (a) and pressing ENTER (f).
To delete a registered station
- Repeatedly press INPUT ◀/▶ on the remote controller to switch input to DAB.
- Press and hold CLEAR (d) on the remote controller. "MEMORY CLEAR" is displayed and all registered stations are deleted.
text_image
a b c d e f> Before Start > Part Names > Install > Playback

Advanced Setup | Others
Displaying DAB Radio Information
- Press the button (c) repeatedly to display more information about the selected DAB station.
Programme Name : Station name is displayed. (set by default)
Scrolling text : Information scrolls across the display when sent from the station.
Programme type : Displays the type of content being broadcast by the station.
Multiplex name : Displays the name of the multiplex (ensemble) which provides the current service.
Channel/Frequency : Displays the channel and frequency of the current station.
Stereo mode : Displays stereo mode.
Transfer speed : Displays the data transfer speed.
Signal quality : The signal quality is displayed as a number.
0 - 69: Poor reception
70 - 84: Good reception
85 - 100: Excellent reception

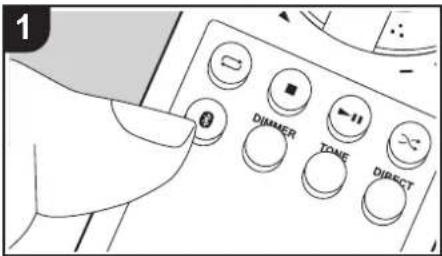
BLUETOOTH® Playback
text_image
1 DIMMER TONE DIRECT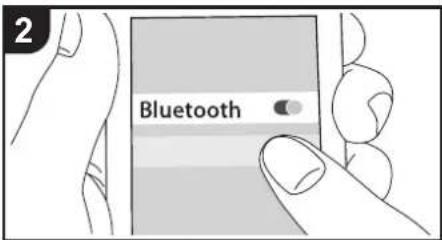
text_image
2 Bluetooth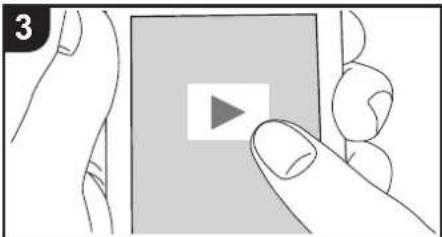
natural_image
Illustration of two hands holding a video player interface (no text or symbols visible)Pairing
Perform the following procedure when the unit is on.
- When you press the button on the remote controller, "Pairing" is displayed on the display, and the pairing mode is enabled.
Pairing
- Enable (turn on) the BLUETOOTH function of the BLUETOOTH wireless technology enabled device, then select this unit from amongst the devices displayed. If a password is requested, enter "0000". This unit is displayed as "Onkyo CR-375".
- "Pairing" on the display changes to the name of the BLUETOOTH wireless technology enabled device.
- When connecting to another BLUETOOTH wireless technology enabled device, first disable the connection with any paired BLUETOOTH wireless technology enabled device, then after "Pairing" is displayed, do the operations in step 2. This unit can store the data of up to eight paired devices.
- The coverage area is within about 32'/10 m. Note that connection is not always guaranteed with all BLUETOOTH wireless technology enabled devices.
- All pairing information is deleted when you reset the settings to the status at the time of shipment. Note that this does not delete the pairing information on the BLUETOOTH wireless technology enabled device. When pairing the unit again with the device, be sure to clear the pairing information on the BLUETOOTH wireless technology enabled device in advance. For information on how to clear the pairing information, refer to the BLUETOOTH wireless technology enabled device's instruction manual.
Playing Back
Perform the following procedure when the unit is on.
- Press to change input to BLUETOOTH.
- Perform the connection procedure on the BLUETOOTH wireless technology enabled device.
- Play the music files. Increase the volume of the BLUETOOTH wireless technology enabled device to an appropriate level.
- Due to the characteristics of BLUETOOTH wireless technology, the sound produced on this unit may slightly be behind the sound played on the BLUETOOTH wireless technology enabled device.
Playing audio from an external device
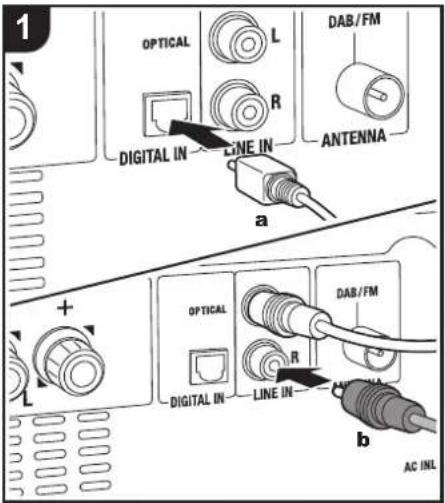
text_image
OPTICAL L R DIGITAL IN LINE IN DAB/FM ANTENNA a + L OPTICAL R DAB/FM DIGITAL IN LINE IN b AC INL
text_image
2 PRESET ENTER INPUTa Digital Optical Cable, b Analog Audio Cable
Connections
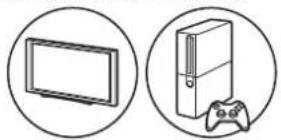
You can play the audio from external devices such as TVs and game consoles through this unit. If the external device has an optical digital output terminal, connect using a digital optical cable to the DIGITAL IN OPTICAL terminal on this unit. When the external device is to be connected with an analog audio cable, connect to the LINE IN jacks on this unit.
natural_image
Two circular icons: one showing a flat-screen monitor, the other showing a classic Sony game controller (no text or symbols)Playing Back
Perform the following procedure when the unit is on. 1. When playing a device connected to the DIGITAL IN OPTICAL terminal, press INPUT ◀/▶ repeatedly to change the input on this unit to "OPTICAL".
OPTICAL
When playing a device connected to the LINE IN jacks, press INPUT ◀/▶ repeatedly to change the input on this unit to "LINE".
LINE
- Start play on the player.
- When connected by a digital optical cable, this unit supports linear PCM signals of up to 48 kHz/24 bits for input.
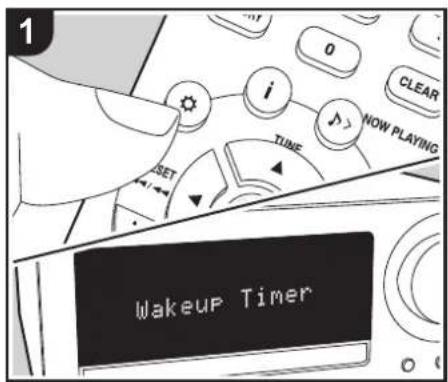
Time setting / Using the alarm to start play
text_image
1 i j > NOW PLAYING TUNE RESET Wakeup Timer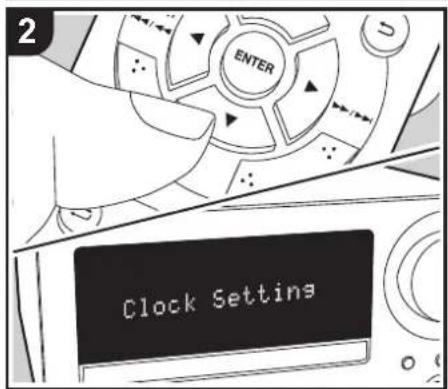
text_image
2 ENTER Clock SettingTime setting
By setting the time, you can use the alarm to start play.
- Press ☐ on the remote controller to display the menu.
- Press ▲/▼ (a) to select "Clock Setting", then press ENTER (d).
-
When setting for the first time, press ENTER (d) while "CLOCK" is flashing. From the next time, press ENTER (d) while the day of the week and time are displayed.
-
Set the day of the week with ◀/▶ (c), then press ENTER (d).
-
Set the time with ◀/▶ (c), then press ENTER (d).
-
Set the minutes with ◀/▶ (c), then press ENTER (d). Setting ends automatically after a short time.
- Once you have completed the setting, the set time can be displayed by pressing NOW PLAYING button (b) twice.
text_image
a b c d> Before Start > Part Names > Install > Playback

Advanced Setup | Others

text_image
1 OK i TIME NOW PLAYING SET ENTER Wakeup Timer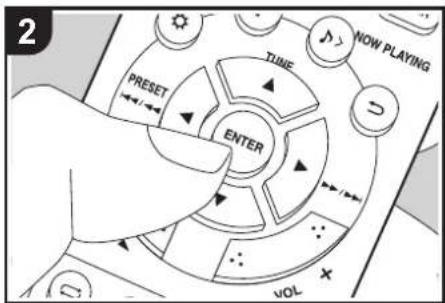
text_image
2 PRESET ENTER TUNE NOW PLAYING VOLSetting the alarm to start play
At the set time, the unit switches on and starts play of the desired source. Make sure that the clock on this unit is set correctly. You cannot use the timers if the clock has not been set.
- Press ☐ on the remote controller to display the menu.
- Press ENTER (c) when "Wakeup Timer" is displayed.
- Press ◀/▶ (b) to select "ONCE" or "DAILY" and press ENTER (c).
- Press ◀/▶ (b) to select "TIMER SET" and press ENTER (c).
- Press ◀/▶ (b) to select the source to use for timer play, then press ENTER (c).
- The sources you can select are "CD", "USB", "DAB" (CS-375D) and "FM".
- Press ◀/▶ (b) to select the day of the week, then press ENTER (c).
- If you select "DAILY", select one day of the week to start and one to stop from amongst "SUN", "MON", "TUE", "WED", "THU", "FRI", or "SAT" and confirm.
- Use ◀/▶ (b) to set the start time for the alarm, the end time, and the volume (0 to 50) in turn, then press ENTER (c) to confirm each selection.
- lights on the display when the settings are complete.
- Press ⏻ (a) to switch the unit to standby.
• The alarm does not work when this unit is on.
Checking the alarm On/Off settings: If the alarm setting is on, lights on the display when this unit is on. When the unit is in standby mode, the TIMER indicator lights red.
Turning the alarm setting On or Off: If the alarm is already set, you can turn the function on or off.
- Press ☑ on the remote controller to display the menu, press ENTER (c) when "Wakeup Timer" is displayed.
- Press ◀/▶ (b) to select "ONCE" or "DAILY" and press ENTER (c).
- To turn off, press ◀/▶ (b) to select "TIMER OFF" and press ENTER (c). • To turn on, press ◀/▶ (b) to select "TIMER ON" and press ENTER (c).
- Press ⏻ (a) to switch the unit to standby.
text_image
a b C PLEEP E I E B 4 E B 7 F G V M O N O CREAM NEW PLATINGS PRESET START OK OK OK OK OK>Playback
Adjusting sound quality
Adjusting the bass (BASS)
- Press TONE button (c).
- Press ◀/▶ buttons (a) to adjust the bass. (-6 to +6)
a
Adjusting the treble (TREBLE)
- Press TONE button (c) twice.
- Press ◀/▶ buttons (a) to adjust the treble. (-6 to +6)
b
Emphasizing the low range (S.BASS)
- Press TONE button (c) three times.
- Press ◀/▶ buttons (a) to select "ON" and press ENTER (b).
C
Reproduce the original sound faithfully (DIRECT mode)
Processing that affects sound quality is shut down so sound closer to the original is reproduced.
- Each time you press DIRECT (d), the settings switches between "ON" and "OFF".
- When the DIRECT mode is on, BASS, TREBLE, and S.BASS are disabled.
d
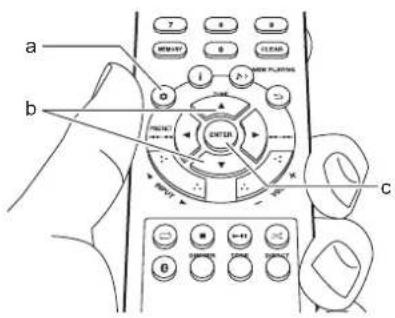
Advanced Settings
text_image
1 MEMORY 8 6 0 9 CLEAR i NOW PLAYING TUNE SET ENTERThe unit allows you to configure advanced settings to provide you with an even better experience.
- Press on the remote controller.
Wakeup Timer
- Select the item with ▲/▼ (a) on the remote controller and press ENTER (c) to confirm your selection.
- Select the setting value with the ▲/▼ (a) on the remote controller. To return to the previous display, press ⊕(b).
- To exit the settings, press ⚙
text_image
a b cWakeup Timer
Make settings for the alarm. (→P25)
Clock Setting
Set the time. (→P24)
Auto Standby
This setting places the unit on standby automatically after 20 minutes of inactivity without any audio input.
"ON": The unit will automatically enter standby mode.

> Before Start > Part Names > Install > Playback

Advanced Setup | Other
"OFF": The unit will not automatically enter standby mode.
- Default values vary depending on the regions.
Bluetooth Wakeup
This function wakes up the unit with BLUETOOTH input when this unit is on standby and a BLUETOOTH wireless technology enabled device is connected.
"On": Use this function
"Off" (Default Value): Do not use this function
- Setting to "On" increases the power consumption even when the unit is on standby.
FM STEREO/MONO
This is displayed only when "FM" is selected as the input source.
Switch reception to receive FM stereo or monaural.
"AUTO" (default value): To receive as FM stereo
"MONO": To receive as monaural
- The setting returns to "AUTO" if the input is changed or the unit is switched to standby.
FM RDS (CS-375D)
This is displayed only when "FM" is selected as the input source.
ASPM
You can automatically search for and register RDS stations. (→P18)
■ PTY
You can search for RDS stations by Program Type. (→P18)
DAB SCAN (CS-375D)
This is displayed only when "DAB" is selected as the input source.
You can run the auto scan or select stations manually again when new DAB stations
are added or when you move house.
Software Version
The software version for the CD features, etc., are displayed.
Factory Reset
Reset the settings of this unit to the status at the time of shipment. We recommend that you take a note of the settings you have changed before going ahead with a factory reset. To go ahead, press ENTER when "OK?" is displayed. The unit will be placed on standby automatically when initializing is completed.
Troubleshooting
Before starting the procedure
When operation is unstable, problems may be solved by simply turning the power on or to standby or disconnecting/connecting the power cord, rather than reviewing settings and operations. Try the simple measures on both the unit and the connected device. If the problem isn't fixed after referring to
"Troubleshooting", resetting the unit to the status at the time of shipment may solve the problem. Note that your settings will also be initialized when you reset, so we recommend that you note down your settings before doing the following.
Resetting the unit (this resets the unit settings to the default)
- Press ☐ on the remote controller, select "Factory Reset" in the menu and press ENTER.
- Press ENTER.
- The unit switches to standby and the settings are reset.
Power
Cannot turn on the unit
- Unplug the power cord from the wall outlet, wait 2 minutes or more, then plug it in again.
The unit turns off unexpectedly
- The unit automatically switches to standby when the "Auto Standby" setting in the menu functions.
- Check if the speaker cable wires are touching the rear panel or if the + side and - side have shorted. If there is contact or shorting, the unit will switch to standby automatically.
- If the same symptoms such as being unable to turn
the unit on happen repeatedly, unplug the power cord from the wall outlet immediately and contact the dealer or our company's support.
■ A speaker produces no sound
- Make sure that the polarity of the speaker cables (+/-) is correct, and that no bare wires are in contact with metal parts near the speaker terminals.
- Make sure that the speaker cables are not shorting.
- While headphones are connected to the jack, no sound is output from the speakers.
■ There is no audio from external devices
- There is no sound if this unit is muted. Press on the remote controller to cancel muting.
- Confirm that the connection between the output jack on the external device and the input jack on this unit is correct.
- Change the input selector on this unit to the position of the terminal to which the external device is connected.
- Check the digital audio output setting on the connected component. On some game consoles, such as those that support DVD, the default setting is off.
■ The display doesn't light
- The display may go dim while the DIMMER is working. Press DIMMER button and change the brightness level of the display.
■ Remote Controller
- Make sure that the batteries are installed with the correct polarity.
• Install new batteries. Do not mix different types of batteries, or old and new batteries. - Make sure that this unit is not subjected to direct sunshine or inverter-type fluorescent lights. Relocate if necessary.
- If this unit is installed in a rack or cabinet with colored-glass doors or if the doors are closed, the remote controller may not work reliably.
■ Cannot play discs
- Place the disc in the disc tray so the label is facing up.
- Play may not be possible if the disc is scratched or dirty.
- Sound files that are protected by copyright cannot be played.
■ Cannot Play USB memory
- Check whether the USB memory is correctly inserted to the USB port of the unit.
- Disconnect the USB storage device from the unit, and then try reconnecting.
- This unit may not recognize USB memories as proper devices sometimes. Try switching this unit to standby and then turning it on again.
- Sound files that are protected by copyright cannot be played.
- Cautions regarding USB memories (→P15)
> Before Start > Part Names > Install > Playback

Advanced Setup | Others
■ FM reception is poor
- Re-check the antenna connection.
- Separate the antenna from speaker cables and the power cord.
- Move the unit away from your TV or PC.
• Passing cars and airplanes can cause interference.
• Concrete walls weaken radio signals. - Listen to the station in mono.
- FM reception may become clearer if you use the antenna jack on the wall used for the TV.
■ BLUETOOTH function
- Try plugging/unplugging the power of the unit and try turning on/off the BLUETOOTH wireless technology enabled device. Restarting the BLUETOOTH wireless technology enabled device may be effective.
- The BLUETOOTH wireless technology enabled devices must support the A2DP profile.
- Near components such as microwave oven or cordless phone, which use the radio wave in the 2.4 GHz range, a radio wave interference may occur, which disables the use of this unit.
- If there is a metallic object near the unit, BLUETOOTH connection may not be possible as the metal can effect on the radio waves.
- In order to respond to operations on the remote controller of this unit, the BLUETOOTH wireless technology enabled device must support the AVRCP profile.
-
Note that operation with the remote controller is not always guaranteed with all BLUETOOTH wireless technology enabled devices.
-
Check that the BLUETOOTH function of the BLUETOOTH wireless technology enabled device is enabled.
- If an already paired unit cannot be connected, delete the pairing information on the BLUETOOTH wireless technology enabled device, then pair again.
Music playback is unavailable on the unit even after successful BLUETOOTH connection
- When the audio volume of your BLUETOOTH wireless technology enabled device is set low, the playback of audio may be unavailable. Turn up the volume on the BLUETOOTH wireless technology enabled device.
- Some BLUETOOTH wireless technology enabled devices may be equipped with a Send/Receive selector switch. Select Send mode.
Sound is interrupted
- There may be a problem with the BLUETOOTH wireless technology enabled device. Check the information on the internet.
Cannot connect with this unit
> Before Start > Part Names > Install > Playback

Advanced Setup | Others
Other notes
CDs
Precautions for Playback
- Compact discs (CDs) with the following logo on the label surface can be used.


* This unit supports CD-R and CD-RW discs. Note that some discs may not play back because of the disc characteristics, scratches, contamination or the recording state.
- Never use discs which have an unusual shape (such as hearts or octagons). These types of discs could jam and damage the unit.
- Some audio CDs with copy-control functionality do not comply with official CD standards. These are special discs and cannot be played with this unit.
- Do not use discs with residue from cellophane tape, rental discs with labels which are peeling off, or discs with decorative labels. This type of disc could get stuck in the unit, or could damage the unit.
- Do not leave a CD-R/CD-RW having a label printed with an inkjet printer in the unit for a long time. The disc could get stuck in the unit, or could damage the unit.
Condensation
Drops of water can form inside this unit if it is taken from a cold place to a warm room or when a cold room is rapidly warmed by a heater. This is called
condensation. This may not only cause the unit to malfunction, but it can also damage the disc or parts of the unit. We recommend removing discs from the unit if it is not to be used for a while. If there is a possibility that condensation has formed, unplug the power cord and allow the unit to stand for at least 3 hours at room temperature.
■ Speaker system
Notes on use
- The speaker cabinets are made out of wood and their performance is therefore sensitive to extreme temperatures and humidity. Do not use them in locations subject to direct sunlight or in humid places, such as near an air conditioner, humidifier, bathroom, or kitchen.
- When placed near televisions, etc., noise may be output from the speakers due to the influence of radio waves, which may not be fixed by turning off the power. If this noise concerns you, separate the speakers further from the other device.
- Powerful magnets are used in the speakers of this system. Keep metal objects, such as screw drivers, away from the fronts of the speakers. These objects can be attracted to the speakers and cause injury or damage the diaphragms. Also keep objects that use magnetism, such as bank cards, floppy discs, etc., away from the speakers. The magnetism from the speakers may render the object inoperable or cause data to be lost.
• These speakers have no magnetic shielding. If the speakers are used near a cathode ray tube (CRT) of a television or computer monitor, the screen may be influenced by magnetism, producing discoloring or fuzziness. Separate the speakers further from the
other device if this occurs.
- Under normal music playback conditions, you should experience no problems with this unit, but when particular sounds such as those described below are introduced, excessive current may occur that cause circuit burnout.
- The noise that occurs when FM radio stations are not tuned 2. High pitched noise from an oscillator, electronic instrument, etc. 3. Particular signals such as from an audio test CD 4. The howling that occurs with microphones 5. The sound made when cassette tapes are fast-forwarded 6. When an amplifier oscillates 7. The sharp noise that occurs when plugging or unplugging pin cables, etc.
Care and maintenance
Occasionally wipe the sides and top of the unit with a soft, dry cloth. If there is noticeable dirt, dip a cloth in a diluted solution of neutral detergent, wring thoroughly, clean the dirt off, and then finish with a dry cloth. Carefully read the instructions included with chemical wipes and other cleaning products before using them. Do not get volatile liquids such as thinners, alcohol, or insect sprays on this unit. This may cause the coating to come off or deformation of the case.
General Specifications
■ Amplifier Section
RMS Output Power
• 20 W + 20 W (1 kHz, 10%, T.H.D 6 Ω)
FTC Power
• 12 W + 12 W (1 kHz, 0.9%, T.H.D 6 Ω)
THD (Total Harmonic Distortion)
• 0.05% (LINE IN, DIGITAL IN, 1 kHz, 1 W)
Tone Control Characteristics
• ±6 dB (60 Hz (BASS))
• ±6 dB (10 kHz (TREBLE))
Signal to Noise Ratio
• 90 dB (IHF-A, LINE IN, DIGITAL IN, SP OUT)
Speaker Impedance
• 6 Ω - 16 Ω
Headphone Corresponding Impedance
Headphone Recommended Impedance
• 32 Ω
■ Tuner Section
CS-375D
Tuning Frequency Range (FM)
• 87.5 MHz - 108.0 MHz, RDS
Tuning Frequency Range (DAB)
• 174.928 MHz - 239.200 MHz
Preset Channel
• FM:30, DAB:10
CS-375
Tuning Frequency Range (FM)
• 87.5 MHz - 107.9 MHz
Preset Channel
• 30
■ Bluetooth Section
Communication system
- BLUETOOTH Specification version 4.1+EDR compliant
Frequency band
• 2.4 GHz
Modulation method
• FHSS (Freq Hopping Spread Spectrum)
Compatible Bluetooth profiles
- A2DP 1.3
- AVRCP 1.5
Correspondence Contents Protection
• SCMS-T
Supported Codecs
• SBC
PIN Code
• 0000
Transmission range (A2DP)
• 20 Hz - 20 kHz (Sampling frequency 44.1 kHz)
Maximum communication range\*
• (Line of sight approx.) 10 m Class2
* The actual range will vary depending on factors
such as obstacles between devices, magnetic fields around a microwave oven, static electricity, cordless phone, reception sensitivity, antenna's performance, operating system, software application, etc.
Maximum radio-frequency power transmitted in the frequency band(s)
• 2400 - 2483.5 MHz: 5.33 dBm
■ General
Power Supply
• CS-375D : AC 220 - 240 V, 50/60 Hz
Dimensions (W × H × D)
- 215 mm × 117 mm × 296.5 mm
(8-1/2" × 4-3/5" × 11-2/3")
Weight
• 2.2 kg (4-1/5 lbs.)
■ Input Jacks
Analog Input
- LINE IN : 1
Digital Input
• OPTICAL : 1 (Max Fs: 48 kHz)
> Before Start > Part Names > Install > Playback

Advanced Setup | Others
■ Other Jacks
• USB : 1 (Front, Ver. 2.0, 5 V/0.5 A)
■ Speaker
Type
• Enclosure 2 way closed box
Configuration
- Tweeter : 2.5 cm Soft Dome
- Woofer : 13 cm Cone
Impedance
· 6 Ω
Frequency Range
- 55 Hz - 40 kHz
Output Sound Pressure Level
- 82.5 dB/W/m
Maximum Input Power
• 20 W
Dimensions (W × H × D)
- 160 ~mm × 250 ~mm × 184 ~mm
(6-5/16" × 9-7/8" × 7-1/4")
Weight
• 2.6 kg (5-3/4 lbs.)
Bluetooth
The Bluetooth ^® word mark and logos are registered trademarks owned by Bluetooth SIG, Inc.

All other trademarks are the property of their respective owners. / Toutes les autres marques commerciales sont la propriété de leurs détenteurs respectifs. / El resto de marcas commerciales son propiedad de sus respectivos propietarios. / Tutti gli altri marchi di fabbrica sono di proprietà dei rispettivi proprietari. / Alle anderen Warenzeichen sind das Eigentum ihrer jeweiligen Eigentümer. / Alle andere handelsmerken zijn eigendom van de desbetreffende rechthebbenden. / Alla andra varumärken tillhör deras respektive ägare.
ONKYO
2-3-12 Yaesu, Chuo-ku, Tokyo 104-0028 JAPAN
http://www.onkyo.com/
18 Park Way, Upper Saddle River, N.J. 07458, U.S.A.
For Dealer, Service, Order and all other Business Inquiries:
Tel: 201-785-2600 Fax: 201-785-2650
http://www.us.onkyo.com/
For Product Support Team Only:
1-800-229-1687
http://www.us.onkyo.com/
Gutenbergstrasse 3, 82178 Puchheim, Germany
Tel: +49-8142-4401-0 Fax: +49-8142-4208-213
http://www.eu.onkyo.com/
Anteros Building, Odyssey Business Park, West End Road, South Ruislip,
Middlesex, HA4 6QQ United Kingdom
Tel: +44 (0)871-200-1996 Fax: +44 (0)871-200-1995
For Product Support only: +44 (0)208-836-3510
http://www.uk.onkyo.com/en/
6, Avenue de Marais F - 95816 Argenteuil Cedex FRANCE
For Product Support only: +33 969 368 138
Unit 1033, 10/F, Star House, No 3, Salisbury Road, Tsim Sha Tsui Kowloon,
Hong Kong.
Tel: +852-2429-3118 Fax: +852-2428-9039
http://www.hk.onkyo.com/
302, Building 1, 20 North Chaling Rd., Xuhui District, Shanghai, China 200032,
Tel: +86-21-52131366 Fax: +86-21-52130396
http://www.cn.onkyo.com/
Please contact an Onkyo distributor referring to Onkyo SUPPORT site.
http://www.intl.onkyo.com/support/
Корпорация О энд Пи
The above-mentioned information is subject to change without prior notice.
Visit the Onkyo web site for the latest update.
(C) Copyright 2017 Onkyo & Pioneer Corporation Japan. All rights reserved.
SN 29403218
F1707-0

* 2 9 4 0 3 2 1 8 *
ONKYO
CS-375D
CS-375
text_image
Illustration showing three-step steps of a device operation: adding a CD to a speaker, inserting a USB into a digital display, and adjusting a keyboard with 'SLEEP' buttons.natural_image
Front view line drawing of a vintage electronic device with control panel and buttons (no text or symbols)2

3
4
5

6

7

text_image
① ② ③ ④ SPEAKERS R L OPTICAL DIGITAL IN LINE IN L R DAB/FM ANTENNA AC INLET ⑤text_image
① ② ③ ④ + - - + SPEAKERS R L OPTICAL L FM DIGITAL IN LINE IN ANTENNA AC INLET ⑤natural_image
Diagram of hands holding a device inside a circular frame (no text or symbols)
text_image
① ② ③ ④ 播放 ▶ II ①text_image
Technical diagram of a speaker panel with labeled components and internal components, including circular and rectangular views with numbered annotations.text_image
1 a a a a
natural_image
Illustration of a person holding a tablet next to a device with an arrow indicating rotation (no text or symbols)
text_image
3 RED RED 1 2 b b
text_image
4 RED - + +text_image
2 ANTERNA AC INLET b
text_image
3 (b) (CS-375D)a Fil d'antenne DAB/FM (CS-375D) / Fil d'antenne FM (CS-375), b Cordon d'alimentation

natural_image
Hand holding a USB flash drive on a computer interface (no text or symbols visible)The Ground Truth image displays a single, solid horizontal line. According to Rule 2 (UNDERSCORE & LINE RULES), this is a stylistic or background line, not a placeholder underscore. Therefore, the OCR result must ignore it. The provided OCR content is "____", which consists of four underscores. This is an incorrect interpretation of the line as a placeholder and violates the rule that stylistic lines must be ignored. The OCR has hallucinated text (underscores) where none should exist based on the GT's visual context. Hence, the OCR result is inconsistent with the Ground Truth.

text_image
3 7 5 6 8 9 0 i CLEARtext_image
a b c d f g h i e FLOWING CLEAR HLEEP HOLDING HOLDING HOLDING HOLDING HOLDING HOLDING HOLDING HOLDING HOLDING HOLDING HOLDING HOLDING HOLDING HOLDING HOLDING HOLDING HOLDING HOLDING HOLDING HOLDING HOLDING HOLDING HOLDING HOLDING HOLDING HOLDIN
text_image
3 7 5 6 8 9 0 i CLEARnatural_image
Illustration of two hands holding a rectangular object with a play button icon (no text or symbols)Jumelage
text_image
1 OPTICAL L R DIGITAL IN LINE IN ANTENNA a + L OPTICAL R DIGITAL IN LINE IN DAB/FM b AC INL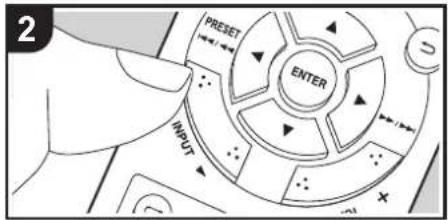
text_image
2 PRESET ENTER INPUTConnexions
natural_image
Two circular icons: one showing a flat-screen monitor, the other showing a classic game controller with a game controller (no text or symbols)Lecture
• 20 W + 20 W (1 kHz, 10%, D.H.T. 6 Ω)
Puissance FTC
• 12 W + 12 W (1 kHz, 0,9%, D.H.T. 6 Ω)
THD (DHT Distorsion harmonique totale)
• 0,05% (LINE IN, DIGITAL IN, 1 kHz, 1 W)
• ±6 dB (60 Hz (BASS))
• ±6 dB (10 kHz (TREBLE))
Rapport signal-bruit
• 90 dB (IHF-A, LINE IN, DIGITAL IN, SP OUT)
Speaker Impedance
• 6 Ω - 16 Ω
• FHSS (Freq Hopping Spread Spectrum)
Profils Bluetooth compatibles
- A2DP 1.3
- AVRCP 1.5
Correspondance protection des contenus
• SCMS-T
Codecs pris en charge
• SBC
Code PIN
• 0000
Dimensions (L × H × P)
• 160 mm × 250 mm × 184 mm
(6-5/16" × 9-7/8" × 7-1/4")
Poids
The Bluetooth ^® word mark and logos are registered trademarks owned by Bluetooth SIG, Inc.

All other trademarks are the property of their respective owners. / Toutes les autres marques commerciales sont la propriété de leurs détenteurs respectifs. / El resto de marcas commerciales son propiedad de sus respectivos propietarios. / Tutti gli altri marchi di fabbrica sono di proprietà dei rispettivi proprietari. / Alle anderen Warenzeichen sind das Eigentum ihrer jeweiligen Eigentümer. / Alle andere handelsmerken zijn eigendom van de desbetreffende rechthebbenden. / Alla andra varumärken tillhör deras respektive ägare.
ONKYO
2-3-12 Yaesu, Chuo-ku, Tokyo 104-0028 JAPAN
http://www.onkyo.com/
18 Park Way, Upper Saddle River, N.J. 07458, U.S.A.
For Dealer, Service, Order and all other Business Inquiries:
Tel: 201-785-2600 Fax: 201-785-2650
http://www.us.onkyo.com/
For Product Support Team Only:
1-800-229-1687
http://www.us.onkyo.com/
Gutenbergstrasse 3, 82178 Puchheim, Germany
Tel: +49-8142-4401-0 Fax: +49-8142-4208-213
http://www.eu.onkyo.com/
Anteros Building, Odyssey Business Park, West End Road, South Ruislip,
Middlesex, HA4 6QQ United Kingdom
Tel: +44 (0)871-200-1996 Fax: +44 (0)871-200-1995
For Product Support only: +44 (0)208-836-3510
http://www.uk.onkyo.com/en/
6, Avenue de Marais F - 95816 Argenteuil Cedex FRANCE
For Product Support only: +33 969 368 138
Unit 1033, 10/F, Star House, No 3, Salisbury Road, Tsim Sha Tsui Kowloon,
Hong Kong.
Tel: +852-2429-3118 Fax: +852-2428-9039
http://www.hk.onkyo.com/
302, Building 1, 20 North Chaling Rd., Xuhui District, Shanghai, China 200032,
Tel: +86-21-52131366 Fax: +86-21-52130396
http://www.cn.onkyo.com/
Please contact an Onkyo distributor referring to Onkyo SUPPORT site.
http://www.intl.onkyo.com/support/
Корпорация О энд Пи
The above-mentioned information is subject to change without prior notice.
Visit the Onkyo web site for the latest update.
(C) Copyright 2017 Onkyo & Pioneer Corporation Japan. All rights reserved.
SN 29403218
F1707-0

* 2 9 4 0 3 2 1 8 *
ONKYO
CS-375D
CS-375
CD RECEIVER SYSTEM
Instruction Manual
Mode d'emploi
text_image
Illustration showing three-step steps of a device operation: adding a CD to a speaker, inserting a card into a display, and adjusting a keyboard with a 'SLEEP' button.Panel trasero (CS-375D) 5
Panel trasero (CS-375) 6
Mando a distancia 7
Pantalla 8
Sistema de altavoces 9
Instalación
natural_image
Front view line drawing of a vintage electronic device with control panel and buttons (no text or symbols)2

3

4

5

6
7

Panel trasero (CS-375D)

text_image
① ② ③ ④ SPEAKERS R L OPTICAL DIGITAL IN- LINE IN- DAB/FM ANTENNA AC INLET ⑤text_image
① ② ③ ④ + - - + SPEAKERS R L OPTICAL L FM DIGITAL IN LINE IN ANTENNA AC INLET ⑤natural_image
Diagram of a hand holding a car interior, showing hand positioning and seat alignment (no text or symbols)
text_image
① ② ③ ④ 播放 ▶ II ①text_image
Technical diagram of a speaker panel with labeled components and internal components, including circular and rectangular views with numbered annotations.text_image
1 a a a a
natural_image
Illustration of a person holding a tablet next to a device with an arrow indicating rotation (no text or symbols)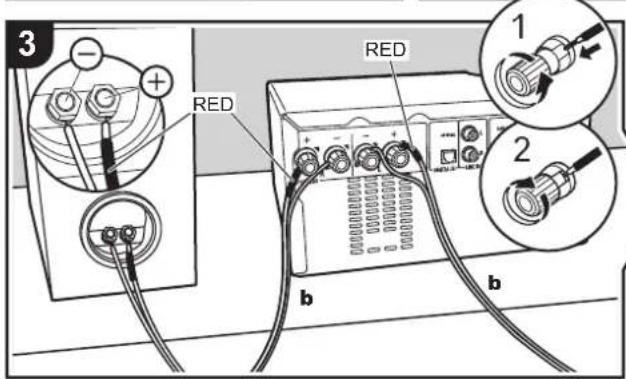
text_image
3 RED RED 1 2 b b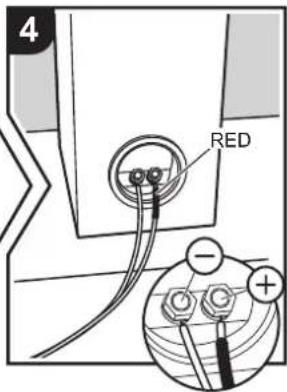
text_image
4 RED - + +text_image
2 ANTERNA AC INLET b
text_image
3 (CS-375) (b) (CS-375D)natural_image
Hand holding a remote control device with an arrow pointing to a device on the front panel (no text or symbols visible)text_image
3 MEMORY i CLEARtext_image
a b c d f g h i e FLOWS FLOWS FLATINGtext_image
3 7 5 3 8 6 MEMORY 0 9 i CLEARnatural_image
Illustration of a hand holding a video player interface (no text or symbols visible)Emparejado
natural_image
Two circular icons: one showing a flat-screen monitor, the other showing a classic Sony game controller (no text or symbols)Reproducción
• 20 W + 20 W (1 kHz, 10%, T.H.D 6 Ω)
Potencia FTC
• 12 W + 12 W (1 kHz, 0,9%, T.H.D 6 Ω)
• 0,05% (LINE IN, DIGITAL IN, 1 kHz, 1 W)
• ±6 dB (60 Hz (BASS))
• ±6 dB (10 kHz (TREBLE))
• 90 dB (IHF-A, LINE IN, DIGITAL IN, SP OUT)
Speaker Impedance
• 6 Ω - 16 Ω
(8-1/2" × 4-3/5" × 11-2/3")
Peso
• 2,2 kg (4-1/5 libras)
- 160 mm × 250 mm × 184 mm (6-5/16" × 9-7/8" × 7-1/4")
Peso
• 2,6 kg (5-3/4 libras)
Bluetooth
The Bluetooth ^® word mark and logos are registered trademarks owned by Bluetooth SIG, Inc.

All other trademarks are the property of their respective owners. / Toutes les autres marques commerciales sont la propriété de leurs détenteurs respectifs. / El resto de marcas commerciales son propiedad de sus respectivos propietarios. / Tutti gli altri marchi di fabbrica sono di proprietà dei rispettivi proprietari. / Alle anderen Warenzeichen sind das Eigentum ihrer jeweiligen Eigentümer. / Alle andere handelsmerken zijn eigendom van de desbetreffende rechthebbenden. / Alla andra varumärken tillhör deras respektive ägare.

ONKYO
2-3-12 Yaesu, Chuo-ku, Tokyo 104-0028 JAPAN
http://www.onkyo.com/
18 Park Way, Upper Saddle River, N.J. 07458, U.S.A.
For Dealer, Service, Order and all other Business Inquiries:
Tel: 201-785-2600 Fax: 201-785-2650
http://www.us.onkyo.com/
For Product Support Team Only:
1-800-229-1687
http://www.us.onkyo.com/
Gutenbergstrasse 3, 82178 Puchheim, Germany
Tel: +49-8142-4401-0 Fax: +49-8142-4208-213
http://www.eu.onkyo.com/
Anteros Building, Odyssey Business Park, West End Road, South Ruislip,
Middlesex, HA4 6QQ United Kingdom
Tel: +44 (0)871-200-1996 Fax: +44 (0)871-200-1995
For Product Support only: +44 (0)208-836-3510
http://www.uk.onkyo.com/en/
6, Avenue de Marais F - 95816 Argenteuil Cedex FRANCE
For Product Support only: +33 969 368 138
Unit 1033, 10/F, Star House, No 3, Salisbury Road, Tsim Sha Tsui Kowloon,
Hong Kong.
Tel: +852-2429-3118 Fax: +852-2428-9039
http://www.hk.onkyo.com/
302, Building 1, 20 North Chaling Rd., Xuhui District, Shanghai, China 200032,
Tel: +86-21-52131366 Fax: +86-21-52130396
http://www.cn.onkyo.com/
Please contact an Onkyo distributor referring to Onkyo SUPPORT site.
http://www.intl.onkyo.com/support/
Корпорация О энд Пи
The above-mentioned information is subject to change without prior notice.
Visit the Onkyo web site for the latest update.
(C) Copyright 2017 Onkyo & Pioneer Corporation Japan. All rights reserved.
SN 29403218
F1707-0

* 2 9 4 0 3 2 1 8 *
ONKYO
CS-375D
CS-375
CD RECEIVER SYSTEM
Instruction Manual
Mode d'emploi
text_image
Illustration showing three-step steps of a device operation: adding a CD to a speaker, inserting a USB into a digital display, and adjusting the keyboard with 'SLEEP' buttons.natural_image
Front view line drawing of a vintage electronic device with control panel and buttons (no text or symbols)2

3

4
5

6

7
text_image
① ② ③ ④ SPEAKERS R L OPTICAL DIGITAL IN LINE IN L R DAB/FM ANTENNA AC INLET ⑤text_image
① ② ③ ④ + - - + SPEAKERS R L OPTICAL L FM DIGITAL IN LINE IN ANTENNA AC INLET ⑤natural_image
Diagram of hands holding a device inside a circular frame (no text or symbols)
text_image
① ② ③ ④ 播放 ▶ II ①text_image
Technical diagram of a speaker with three concentric circular components labeled ①, ②, and ③.
text_image
Technical diagram of a device panel with labeled components and internal features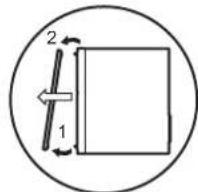
text_image
1 a a a a
natural_image
Illustration of a person holding a tablet next to a device with an arrow indicating rotation (no text or symbols)
text_image
3 RED RED 1 2 b b
text_image
4 RED - + +text_image
2 ANTERNA AC INLET b
text_image
3 (b) (CS-375D)natural_image
Hand holding a USB flash drive on a device panel, with an arrow indicating the next component (no text or symbols visible)text_image
3 7 5 3 8 6 0 9 MEMORY i CLEARtext_image
3 7 5 3 6 8 9 0 i CLEARnatural_image
Illustration of two hands holding a rectangular device with a play button icon (no text or symbols)Abbinamento
text_image
1 OPTICAL L R DIGITAL IN LINE IN ANTENNA a + L OPTICAL R DIGITAL IN LINE IN DAB/FM b AC INL
text_image
2 PRESET ENTER INPUTnatural_image
Two circular icons: one showing a flat-screen monitor, the other showing a classic Xbox controller (no text or symbols)Riproduzione
• 0,05% (LINE IN, DIGITAL IN, 1 kHz, 1 W)
• ±6 dB (60 Hz (BASS))
• ±6 dB (10 kHz (TREBLE))
• 90 dB (IHF-A, LINE IN, DIGITAL IN, SP OUT)
Speaker Impedance
• 6 Ω - 16 Ω
• FHSS (Freq Hopping Spread Spectrum)
Profili Bluetooth compatibili
- A2DP 1.3
- AVRCP 1.5
Dimensioni (L × A × P)
- 215 mm × 117 mm × 296,5 mm
(8-1/2" × 4-3/5" × 11-2/3")
Peso
• 2,2 kg (4-1/5 lbs.)
Dimensioni (L × A × P)
- 160 mm × 250 mm × 184 mm (6-5/16" × 9-7/8" × 7-1/4")
Peso
• 2,6 kg (5-3/4 lbs.)
Bluetooth
The Bluetooth ^® word mark and logos are registered trademarks owned by Bluetooth SIG, Inc.

All other trademarks are the property of their respective owners. / Toutes les autres marques commerciales sont la propriété de leurs détenteurs respectifs. / El resto de marcas commerciales son propiedad de sus respectivos propietarios. / Tutti gli altri marchi di fabbrica sono di proprietà dei rispettivi proprietari. / Alle anderen Warenzeichen sind das Eigentum ihrer jeweiligen Eigentümer. / Alle andere handelsmerken zijn eigendom van de desbetreffende rechthebbenden. / Alla andra varumärken tillhör deras respektive ägare.

ONKYO
2-3-12 Yaesu, Chuo-ku, Tokyo 104-0028 JAPAN
http://www.onkyo.com/
18 Park Way, Upper Saddle River, N.J. 07458, U.S.A.
For Dealer, Service, Order and all other Business Inquiries:
Tel: 201-785-2600 Fax: 201-785-2650
http://www.us.onkyo.com/
For Product Support Team Only:
1-800-229-1687
http://www.us.onkyo.com/
Gutenbergstrasse 3, 82178 Puchheim, Germany
Tel: +49-8142-4401-0 Fax: +49-8142-4208-213
http://www.eu.onkyo.com/
Anteros Building, Odyssey Business Park, West End Road, South Ruislip,
Middlesex, HA4 6QQ United Kingdom
Tel: +44 (0)871-200-1996 Fax: +44 (0)871-200-1995
For Product Support only: +44 (0)208-836-3510
http://www.uk.onkyo.com/en/
6, Avenue de Marais F - 95816 Argenteuil Cedex FRANCE
For Product Support only: +33 969 368 138
Unit 1033, 10/F, Star House, No 3, Salisbury Road, Tsim Sha Tsui Kowloon,
Hong Kong.
Tel: +852-2429-3118 Fax: +852-2428-9039
http://www.hk.onkyo.com/
302, Building 1, 20 North Chaling Rd., Xuhui District, Shanghai, China 200032,
Tel: +86-21-52131366 Fax: +86-21-52130396
http://www.cn.onkyo.com/
Please contact an Onkyo distributor referring to Onkyo SUPPORT site.
http://www.intl.onkyo.com/support/
Корпорация О энд Пи
The above-mentioned information is subject to change without prior notice.
Visit the Onkyo web site for the latest update.
(C) Copyright 2017 Onkyo & Pioneer Corporation Japan. All rights reserved.
SN 29403218
F1707-0

* 2 9 4 0 3 2 1 8 *
ONKYO
CS-375D
CS-375
CD RECEIVER SYSTEM
Instruction Manual
Mode d'emploi
text_image
Illustration showing three-step steps of a device operation: adding a CD to a speaker, inserting a USB into a digital display, and adjusting a keyboard with 'SLEEP' buttons.natural_image
Front view line drawing of a vintage electronic device with control panel and buttons (no text or symbols)2

3

4

5

6

7

text_image
① ② ③ ④ SPEAKERS R L OPTICAL DIGITAL IN LINE IN L R DAB/FM ANTENNA AC INLET ⑤text_image
① ② ③ ④ + - - + SPEAKERS R L OPTICAL L FM DIGITAL IN LINE IN ANTENNA AC INLET ⑤natural_image
Diagram of hands holding a device inside a circular frame (no text or symbols)
text_image
① ② ③ ④ 播放 ▶ II ①text_image
Technical diagram of a speaker panel with labeled components and internal components, including circular and rectangular views with numbered annotations.text_image
1 a a a a
natural_image
Illustration of a person holding a tablet next to a device with an arrow indicating rotation (no text or symbols)
text_image
3 RED RED 1 2 b b
text_image
4 RED - + +natural_image
Hand holding a device with an arrow pointing to a small electronic component (no text or symbols visible)text_image
3 7 5 6 8 9 0 i CLEARCountry Music
National Music
Oldies Music
Folk Music
Documentary
Alarm Test
Alarm - Alarm!
text_image
3 MEMORY i CLEARnatural_image
Illustration of two hands holding a rectangular device with a play button icon (no text or symbols)Pairing
text_image
1 OPTICAL L R DIGITAL IN LINE IN DAB/FM ANTENNA a + DIGITAL IN R LINE IN b AC INL
text_image
2 PRESET ENTER INPUTAnschlüsse
natural_image
Two circular icons: one showing a flat-screen monitor, the other showing a classic Xbox controller (no text or symbols)Wiedergabe
text_image
1 0 CLEAR NOW PLAYING i TIME SET Wakeup Timer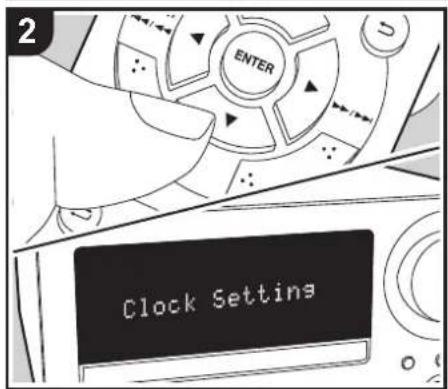
text_image
2 ENTER Clock SettingZeiteinstellung
• 0,05% (LINE IN, DIGITAL IN, 1 kHz, 1 W)
Klangregelungscharakteristik
- ±6 dB (60 Hz (BASS)) - ±6 dB (10 kHz (TREBLE))
Signal-/Rauschabstand
• 90 dB (IHF-A, LINE IN, DIGITAL IN, SP OUT)
Speaker Impedance
• 6 Ω - 16 Ω
• FHSS (Freq Hopping Spread Spectrum)
Kompatible Bluetooth-Profile
- A2DP 1.3 - AVRCP 1.5
- 160 mm × 250 mm × 184 mm (6-5/16" × 9-7/8" × 7-1/4")
Gewicht
• 2,6 kg (5-3/4 lbs.)
Bluetooth
The Bluetooth ^® word mark and logos are registered trademarks owned by Bluetooth SIG, Inc.

All other trademarks are the property of their respective owners. / Toutes les autres marques commerciales sont la propriété de leurs détenteurs respectifs. / El resto de marcas commerciales son propiedad de sus respectivos propietarlos. / Tutti gli altri marchi di fabbrica sono di proprietà dei rispettivi proprietari. / Alle anderen Warenzeichen sind das Eigentum ihrer jeweiligen Eigentümer. / Alle andere handelsmerken zijn eigendom van de desbetreffende rechthebbenden. / Alla andra varumärken tillhör deras respektive ägare.

ONKYO
2-3-12 Yaesu, Chuo-ku, Tokyo 104-0028 JAPAN
http://www.onkyo.com/
18 Park Way, Upper Saddle River, N.J. 07458, U.S.A.
For Dealer, Service, Order and all other Business Inquiries:
Tel: 201-785-2600 Fax: 201-785-2650
http://www.us.onkyo.com/
For Product Support Team Only:
1-800-229-1687
http://www.us.onkyo.com/
Gutenbergstrasse 3, 82178 Puchheim, Germany
Tel: +49-8142-4401-0 Fax: +49-8142-4208-213
http://www.eu.onkyo.com/
Anteros Building, Odyssey Business Park, West End Road, South Ruislip,
Middlesex, HA4 6QQ United Kingdom
Tel: +44 (0)871-200-1996 Fax: +44 (0)871-200-1995
For Product Support only: +44 (0)208-836-3510
http://www.uk.onkyo.com/en/
6, Avenue de Marais F - 95816 Argenteuil Cedex FRANCE
For Product Support only: +33 969 368 138
Unit 1033, 10/F, Star House, No 3, Salisbury Road, Tsim Sha Tsui Kowloon,
Hong Kong.
Tel: +852-2429-3118 Fax: +852-2428-9039
http://www.hk.onkyo.com/
302, Building 1, 20 North Chaling Rd., Xuhui District, Shanghai, China 200032,
Tel: +86-21-52131366 Fax: +86-21-52130396
http://www.cn.onkyo.com/
Please contact an Onkyo distributor referring to Onkyo SUPPORT site.
http://www.intl.onkyo.com/support/
Корпорация О энд Пи
The above-mentioned information is subject to change without prior notice.
Visit the Onkyo web site for the latest update.
(C) Copyright 2017 Onkyo & Pioneer Corporation Japan. All rights reserved.
SN 29403218
F1707-0

* 2 9 4 0 3 2 1 8 *
ONKYO
CS-375D
CS-375
CD RECEIVER SYSTEM
Instruction Manual
Mode d'emploi
text_image
Illustration showing three-step steps of a device operation: adding a CD to a speaker, inserting a card into a display, and adjusting the keyboard with a 'SLEEP' button.natural_image
Front view line drawing of a vintage electronic device with control panel and buttons (no text or symbols)2

3

4

5

6

7

-
Hoofdtoestel (1)
-
Luidsprekersysteem (2)
-
Afstandsbediening (RC-961S) (1), batterijen (AAA/R03) (2)
-
Luidsprekerkabel (1,1 m) (2)
-
DAB/FM-draadantenne (1) (CS-375D) / FM-draadantenne (1) (CS-375)
-
Netsnoer (1)
-
Antislip-laagjes (8)
- Snelle Startgids (1)
text_image
① ② ③ ④ + - - + SPEAKERS R L OPTICAL L FM DIGITAL IN LINE IN ANTENNA AC INLET ⑤natural_image
Diagram of hands holding a device inside a circular frame (no text or symbols)
text_image
① ② ③ ④ 播放 ▶ II ①text_image
Technical diagram of a speaker with three concentric circular components labeled ①, ②, and ③.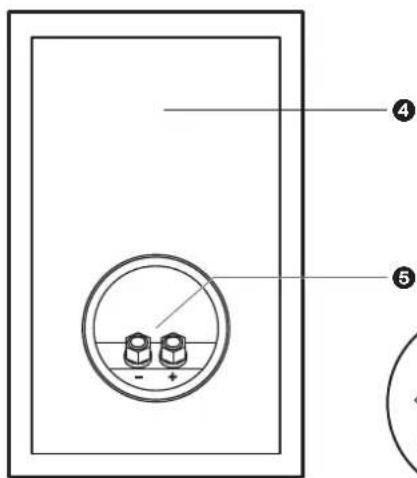
text_image
Technical diagram of a device panel with labeled parts and central hub connection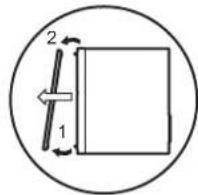
text_image
1 a a a a
natural_image
Illustration of a person holding a tablet next to a device with an arrow indicating rotation (no text or symbols)
text_image
3 RED RED 1 2 b b
text_image
4 RED - + +Vóór de installatie
natural_image
Hand holding a USB flash drive on a computer interface (no text or symbols visible)text_image
3 7 5 6 8 9 0 i CLEARtext_image
3 7 5 3 8 6 MEMORY 0 9 i CLEARnatural_image
Illustration of two hands holding a rectangular device with a play button icon (no text or symbols)Koppelen
text_image
1 OPTICAL L R DIGITAL IN LINE IN DAB/FM ANTENNA a + DIGITAL IN LINE IN OPTICAL R DAB/FM AC INL
text_image
2 PRESET ENTER INPUTAansluitingen
• 20 W + 20 W (1 kHz, 10%, T.H.D 6 Ω)
FTC power
• 12 W + 12 W (1 kHz, 0,9%, T.H.D 6 Ω)
• 0,05% (LINE IN, DIGITAL IN, 1 kHz, 1 W)
• ±6 dB (60 Hz (BASS))
• ±6 dB (10 kHz (TREBLE))
• 90 dB (IHF-A, LINE IN, DIGITAL IN, SP OUT)
Speaker Impedance
• 6 Ω - 16 Ω
• FHSS (Freq Hopping Spread Spectrum)
Compatibele Bluetooth-profielen
- A2DP 1.3
- AVRCP 1.5
(6-5/16" × 9-7/8" × 7-1/4")
Gewicht
• 2,6 kg (5-3/4 lbs.)
Bluetooth
The Bluetooth ^® word mark and logos are registered trademarks owned by Bluetooth SIG, Inc.

All other trademarks are the property of their respective owners. / Toutes les autres marques commerciales sont la propriété de leurs détenteurs respectifs. / El resto de marcas commerciales son propiedad de sus respectivos propietarios. / Tutti gli altri marchi di fabbrica sono di proprietà dei rispettivi proprietari. / Alle anderen Warenzeichen sind das Eigentum ihrer jeweiligen Eigentümer. / Alle andere handelsmerken zijn eigendom van de desbetreffende rechthebbenden. / Alla andra varumärken tillhör deras respektive ägare.
ONKYO
2-3-12 Yaesu, Chuo-ku, Tokyo 104-0028 JAPAN
http://www.onkyo.com/
18 Park Way, Upper Saddle River, N.J. 07458, U.S.A.
For Dealer, Service, Order and all other Business Inquiries:
Tel: 201-785-2600 Fax: 201-785-2650
http://www.us.onkyo.com/
For Product Support Team Only:
1-800-229-1687
http://www.us.onkyo.com/
Gutenbergstrasse 3, 82178 Puchheim, Germany
Tel: +49-8142-4401-0 Fax: +49-8142-4208-213
http://www.eu.onkyo.com/
Anteros Building, Odyssey Business Park, West End Road, South Ruislip,
Middlesex, HA4 6QQ United Kingdom
Tel: +44 (0)871-200-1996 Fax: +44 (0)871-200-1995
For Product Support only: +44 (0)208-836-3510
http://www.uk.onkyo.com/en/
6, Avenue de Marais F - 95816 Argenteuil Cedex FRANCE
For Product Support only: +33 969 368 138
Unit 1033, 10/F, Star House, No 3, Salisbury Road, Tsim Sha Tsui Kowloon,
Hong Kong.
Tel: +852-2429-3118 Fax: +852-2428-9039
http://www.hk.onkyo.com/
302, Building 1, 20 North Chaling Rd., Xuhui District, Shanghai, China 200032,
Tel: +86-21-52131366 Fax: +86-21-52130396
http://www.cn.onkyo.com/
Please contact an Onkyo distributor referring to Onkyo SUPPORT site.
http://www.intl.onkyo.com/support/
Корпорация О энд Пи
The above-mentioned information is subject to change without prior notice.
Visit the Onkyo web site for the latest update.
(C) Copyright 2017 Onkyo & Pioneer Corporation Japan. All rights reserved.
SN 29403218
F1707-0

* 2 9 4 0 3 2 1 8 *
ONKYO
CS-375D
CS-375
CD RECEIVER SYSTEM
Instruction Manual
Mode d'emploi
text_image
Illustration showing three-step steps of a device operation: adding a CD to a speaker, adding a USB flash, and adjusting the keyboard with 'SLEEP' buttons.Bakpanel (CS-375D) 5
Bakpanel (CS-375) 6
Fiärrkontroll 7
Display 8
Högtalarsystem 9
Installera
natural_image
Front view line drawing of a vintage electronic device with control panel and buttons (no text or symbols)2

3

4

5

6

7

- Huvudapparat (1)
- Högtalarsystem (2)
- Fjärrkontroll (RC-961S) (1), Batterier (AAA/R03) (2)
- Högtalarkabel (1,1 m) (2)
- DAB/FM-trådantenn (1) (CS-375D) / FM-trådantenn (1) (CS-375)
- Nätkabel (1)
- Halkfria fötter (8)
- Snabbstartsguide (1)
text_image
① ② ③ ④ SPEAKERS R L OPTICAL DIGITAL IN LINE IN L R DAB/FM ANTENNA AC INLET ⑤text_image
① ② ③ ④ + - - + SPEAKERS R L OPTICAL L FM DIGITAL IN LINE IN ANTENNA AC INLET ⑤natural_image
Diagram of hands holding a device inside a circular frame (no text or symbols)
text_image
① ② ③ ④ 播放 ▶ II ①text_image
Technical diagram of a speaker panel with labeled components and internal components, including circular and rectangular views with numbered annotations.natural_image
Hand holding a USB flash drive on a device panel, with an arrow pointing to the flash (no text or symbols visible)text_image
3 7 5 3 8 6 MEMORY 0 9 i CLEARRegistrera en kanal
Children's Progs (barnprogram)
Social Affairs
Religion
Phone In
Travel & Touring
Leisure & Hobby
Jazz Music
Country Music
National Music
Oldies Music
Folk Music
Documentary
Alarm Test
Alarm - Alarm!
text_image
3 7 5 3 8 6 MEMORY 0 9 i CLEARRegistrera en kanal
natural_image
Illustration of two hands holding a rectangular device with a play button icon (no text or symbols)Hopkoppling
natural_image
Two circular icons: one showing a flat-screen monitor, the other showing a classic Sony game controller (no text or symbols)Uppspelning
• 20 W + 20 W (1 kHz, 10%, T.H.D 6 Ω)
FTC-effekt
• 12 W + 12 W (1 kHz, 0,9%, T.H.D 6 Ω)
THD (Total Harmonisk Distorsion):
• 0,05% (LINE IN, DIGITAL IN, 1 kHz, 1 W)
Tonkontrollegenskaper
• ±6 dB (60 Hz (BASS))
• ±6 dB (10 kHz (TREBLE))
Signal-/brusforhallande
• 90 dB (IHF-A, LINE IN, DIGITAL IN, SP OUT)
Speaker Impedance
• 6 Ω - 16 Ω
• FHSS (Freq Hopping Spread Spectrum)
Kompatibla Bluetooth-profiler
- A2DP 1.3
- AVRCP 1.5
(6-5/16" × 9-7/8" × 7-1/4")
Vikt
• 2,6 kg (5-3/4 lbs)
Bluetooth
The Bluetooth ^® word mark and logos are registered trademarks owned by Bluetooth SIG, Inc.

All other trademarks are the property of their respective owners. / Toutes les autres marques commerciales sont la propriété de leurs détenteurs respectifs. / El resto de marcas commerciales son propiedad de sus respectivos propietarios. / Tutti gli altri marchi di fabbrica sono di proprietà dei rispettivi proprietari. / Alle anderen Warenzeichen sind das Eigentum ihrer jeweiligen Eigentümer. / Alle andere handelsmerken zijn eigendom van de desbetreffende rechthebbenden. / Alla andra varumärken tillhör deras respektive ägare.
2-3-12 Yaesu, Chuo-ku, Tokyo 104-0028 JAPAN
http://www.onkyo.com/
18 Park Way, Upper Saddle River, N.J. 07458, U.S.A.
For Dealer, Service, Order and all other Business Inquiries:
Tel: 201-785-2600 Fax: 201-785-2650
http://www.us.onkyo.com/
For Product Support Team Only:
1-800-229-1687
http://www.us.onkyo.com/
Gutenbergstrasse 3, 82178 Puchheim, Germany
Tel: +49-8142-4401-0 Fax: +49-8142-4208-213
http://www.eu.onkyo.com/
Anteros Building, Odyssey Business Park, West End Road, South Ruislip,
Middlesex, HA4 6QQ United Kingdom
Tel: +44 (0)871-200-1996 Fax: +44 (0)871-200-1995
For Product Support only: +44 (0)208-836-3510
http://www.uk.onkyo.com/en/
6, Avenue de Marais F - 95816 Argenteuil Cedex FRANCE
For Product Support only: +33 969 368 138
Unit 1033, 10/F, Star House, No 3, Salisbury Road, Tsim Sha Tsui Kowloon,
Hong Kong.
Tel: +852-2429-3118 Fax: +852-2428-9039
http://www.hk.onkyo.com/
302, Building 1, 20 North Chaling Rd., Xuhui District, Shanghai, China 200032,
Tel: +86-21-52131366 Fax: +86-21-52130396
http://www.cn.onkyo.com/
Please contact an Onkyo distributor referring to Onkyo SUPPORT site.
http://www.intl.onkyo.com/support/
Корпорация О энд Пи
The above-mentioned information is subject to change without prior notice.
Visit the Onkyo web site for the latest update.
(C) Copyright 2017 Onkyo & Pioneer Corporation Japan. All rights reserved.
F1707-0