
BM4580 - Bread maker TRISTAR - Free user manual and instructions
Find the device manual for free BM4580 TRISTAR in PDF.
| Device type | Bread machine |
| Brand | TriStar |
| Model | BM4580 |
| Dimensions | 29 x 45.5 x 27 cm (W x D x H) |
| Weight | Approx. 7 kg |
| Power supply | 230 V ~ 50 Hz, 850 W |
| Safety class | I |
| Bread types | White, whole wheat, country, sweet, yogurt, etc. |
| Number of programs | 10 programs with 99 variations |
| Bread weight | 750 g, 1000 g, 1250 g |
| Timer | Up to 15 hours |
| Display | LCD |
| Non-stick coating | Teflon-Classic on the pan and kneading hooks |
| Additional functions | Kneading, rising, baking, jam/marmalade, keep warm |
| Viewing window | Yes |
| Anti-failure fuse | Automatic restart up to 2 hours |
| Included accessories | 2 wooden spatulas, measuring cup, measuring spoon |
| Cleaning | Hand wash only (not dishwasher safe) |
| Maintenance | Clean the pan and hooks with warm soapy water |
| Repairability | Call a qualified professional |
| Standards | GS and CE |
Frequently Asked Questions - BM4580 TRISTAR
User questions about BM4580 TRISTAR
0 question about this device. Answer the ones you know or ask your own.
Ask a new question about this device
Download the instructions for your Bread maker in PDF format for free! Find your manual BM4580 - TRISTAR and take your electronic device back in hand. On this page are published all the documents necessary for the use of your device. BM4580 by TRISTAR.
USER MANUAL BM4580 TRISTAR
DISPOSITIONS DE GARANTIE
Congratulations on the purchase of your new bread machine, we are sure that this modern appliance will live up to your expectations.
To enable you to become acquainted with all the possibilities of your bread machine and to ensure its optimum use on each occasion, we ask you to:
Carefully read this manual before using the appliance and to follow all instructions.
Packing materials: Please keep the original box and packing materials. Use them for packaging the appliance and protecting it from further damage in the event that service is required.
Before you use the appliance for the first time
Remove the box and packing materials.
Also remove all plastic or stickers present.
Carefully read the safety instructions.
WARNING: never place this bread machine on a gas or electric burner or on or in any other appliance that generates heat (stove, grill, deep fryer, etc). Even not when below a cooker hood. Doing so will invalidate any claims under warranty.
Unpack all the machine components and clean the baking pan and kneading blades (see Section: Cleaning and maintenance). Dry thoroughly afterwards.
Insert the two kneading blades into the drive shafts in the bottom of the baking pan.
Measure the recipe ingredients into the baking pan. Always add the ingredients into the baking pan before fitting the pan into the bread machine. This avoids any flour or other ingredients from spilling into the machine or ending up on the heating coil.
Fit the baking pan back into the machine. Push down on the pan until your hear a click, which signifies that it is locked into place.
Connect the plug to an earthed wall socket. Start the machine by pressing the "On/Off" switch (underneath, at the front). You will hear a beep and the LED display will read: "13:23". The machine is now ready for use.
- Lid
- Air vents
- Lid handle
- Viewing window
- Heating element
- Tension spring
- Drive shaft
- Main housing
- Wooden spatula
- Control panel
- On/Off switch (underneath)
- Measuring scoop
- Measuring cup
- Baking pan
- Kneading blades
Technical data:
Electrical rating: Safety Class I
230 V - 50Hz - 850 Watt
Dim.: ± 29 × 45.5 × 27 cm
Weight: ± 7kg
99 programming options with timer to delay start of baking.
10 baking cycles
For loaf sizes of 750, 1000 and 1250 grams
LCD display
Baking pan and kneading blades have a Teflon Classic non-stick coating.
With viewing window
incl. user manual with recipes, 2 wooden spatulas for removing kneading blades, 1 measuring cup.
GS and CE certified.
General safety instructions.
Before using the appliance, carefully read this manual and save it in a safe place together with the warranty certificate, receipt and the box and packing materials.
- The appliance is intended for household use only and should be used solely for the designated purposes. The bread machine is not intended to be used for advertising purposes. The appliance should only be used indoors. Protect the appliance from heat, direct sunlight, moisture (never immerse in water or any other liquid) and sharp objects. Do not touch the bread machine with wet hands. If the bread machine has become wet or moist, unplug the power supply cord immediately. If the bread machine has dropped into water, never bring your hands in contact with the water.
- Switch off the appliance and unplug the power supply cord when the appliance is not in use, or before cleaning, installing or changing parts or in case of a malfunction.
- Never lose sight of the appliance while it is in operation. To protect children against the dangers of electrical appliances, do not allow the power cord to hang over the edge of a table or counter and ensure that children cannot touch the appliance.
Regularly check the appliance and power cord for damage. Do not use or operate the appliance when it or the power cord is damaged. - Do not attempt to repair the appliance yourself but call in a qualified professional technician or electrician. To avoid unnecessary risks, also have a qualified professional replace the power cord. Do not move that appliance unless all components have cooled down.
- When making the appliance available to another person, also provide the manual.
- Use the appliance only for the purpose for which it has been designed. This bread machine is intended for household use only; it is not suitable to be used for advertising purposes.
- Place the appliance on a dry, flat and heat-resistant surface. Make sure that the appliance cannot slide sideways; the chance of this occurring is increased when kneading tacky dough.
- When using the appliance on a wooden table or counter, place a heat-resistant board or cloth between the table or counter and the bread machine.
- Never place the appliance near a heat source and under no circumstances on a stove. Never expose the machine or the power cord to heat or open flame.
- Place the appliance well away from electrical heating or a gas flame, as well as from flammable objects such as curtains, carpets, etc.
Take care that the steam vents of the machine are never closed off or become clogged, because this can cause the appliance to overheat. - Maintain a spacing of at least 10cm between the bread machine and other electrical appliances.
- Before inserting the plug into a wall socket, check that the mains voltage in your house is the same as the value indicated on the type plate.
- This bread machine must be connected to an earthed 230V wall socket.
- The bread machine may only be operated with a filled baking pan: operating it with an empty baking pan can result in the appliance overheating.
- To fill the baking pan, you must remove it from the bread machine to avoid ingredients being spilt into the motor and heating section of the machine. Never exceed the maximum quantities indicated.
Always use oven mitts and remove the plug from the wall socket before lifting the baking pan from the machine after baking. Allow all metal parts to cool down before touching them. - Regularly check the appliance and power cord for damage. Never use the appliance when damaged; return it to your supplier or have it repaired by a qualified professional.
Before using an extension cord, make sure that the extension cord is suitable for this purpose. - Never allow the power cord to drape over the tabletop or countertop. Also watch out for cords lying loose on the floor; people may trip over them and pull the hot appliance along.
- The bread machine must not be used outdoors.
- Never remove the baking pan while the machine is operating.
- Be aware that the outside of the bread machine also gets hot, and be particularly cautious around the hot steam outlets. For this reason the appliance must be placed away from children.
- Never leave children unattended in the vicinity of electrical appliances. You must also pay close attention when any appliance is used near children.
- Use only original spare parts in the appliance.
-
The inside of the housing and the outside of the baking pan must always be clean.
-
Do not use metals or metal foil inside the appliance; this can cause a short-circuit or fire.
For reasons of safety the appliance must always be watched, during timer delay times as well. - Make particularly sure that the appliance is not moved while filled with hot liquids (jam/conserves).
- After use, store the appliance in a safe place out of reach of children.
- The machine components (baking pan, spatulas, kneading blades) are not suitable for washing in a dishwasher; they must be washed by hand.
- Do not clean with sharp or abrasive cleaning agents, also not with solvents or alcohol.
- Never immerse the appliance or the power cord in water or any other liquid.
With your new bread machine you can:
bake bread using pre-blended mixes;
bake bread using a dough mixture prepared by yourself based on the recipes supplied with your bread machine or commercially available recipes;
knead pasta and confection or bun doughs, and then shape and bake them yourself; make jams.
Operation
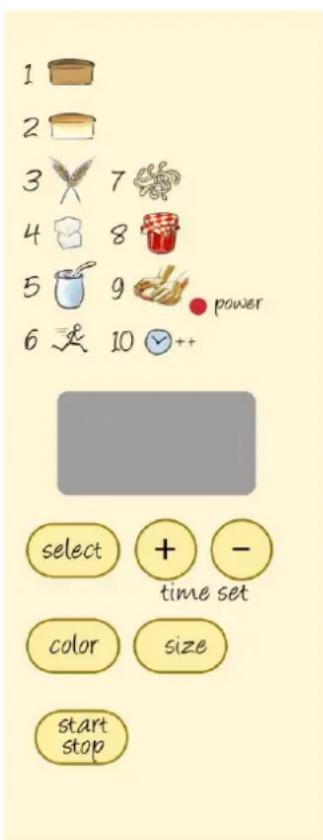
1. Digital display window
After you have connected the plug to the wall socket and switched the appliance on, the LCD display window automatically shows the following code: "13:23". The 1 means that the appliance is in cycle 1 (basic). The figures 3:23 indicate that the cycle will take 3 hours and 23 minutes. The setting is also such as to ensure an average loaf weight and an average degree of crust browning, as indicated by the 2 arrows at the top of the LCD display window.
2. Timer buttons
You can delay the start of the baking process to ensure that you have fresh bread at the time selected by you. Press these buttons to set the time when the bread has to be ready; the maximum setting is 15 hours, depending on the loaf size and the cycle. Pressing the timer buttons will increase or decrease the delay time. Note; the pre-programmed baking times of the cycles cannot be shortened.
3. Selection buttons
The bread machine has 10 different cycles, which can be selected by pressing the appropriate button. Press the buttons until the cycle of your choice appears (on the left of the display window).
4. Colour buttons
The colour buttons can be used to select the desired crust colour for cycles 1 to 6. After pressing this button, the time appears in the display window as well as an arrow indicating that you have selected a 'light', 'medium' or 'dark' crust colour.
5. Size button
For cycles 1 to 6 it is possible to select loaf weights of 750, 1000 or 1250 grams. The default setting is 1000 grams. Press the button until the arrow is under the weight of your choice.
6. Start/Stop indicator
The LCD display window lights up as soon as the appliance is switched on.
7. Operation signal
This LCD light comes on as soon as a baking cycle has been completed.
8. START/STOP button
Use this button to start or halt the cycle you have chosen. Use this button to start cycles in the case of both timer-delay and immediate baking.
9. Summary
List of cycles that can be selected using the menu buttons.
Directions:
To achieve perfect results for each cycle you should also pay attention to the following factors, each of which can influence the quality of your bread.
All liquids used should be at room temperature. The optimum temperature is between 20 and 23 degrees Celsius.
As the bread machine starts to warm up, moisture will form on the viewing window. After some time this condensation will be removed via the vent filter.
During the entire process the air vents for the motor and those in the lid must never be covered.
If the bread machine starts smoking (perhaps because dough has dripped onto the heating element) keep the lid closed and immediately remove the plug from the wall socket. Under no circumstances try to get rid of the smoke by pouring water onto the bread machine! Smoke can be generated when the dough rises too much, causing some to drip over the edge of the baking pan onto the heating element. Make sure therefore that you do not exceed the maximum quantities.
This bread machine has been designed for baking bread with a maximum weight of 1250 grams: never exceed the total weight of 1250 grams, including liquid!
Use only dry powdered easy-blend yeast; fresh yeast can produce poor results.
Note that when baking rye bread, the bread will hardly rise and thus become sticky. It is therefore recommended to use at the most 7 parts of rye flour and 3 parts of white flour.
Using your bread machine
Preparing the dough.
- Remove the baking pan vertically from the bread machine.
- Push the kneading blades onto the drive shafts in the baking pan.
- Add the ingredients in the order listed: First the liquids, followed by the flour, sugar and salt. The added dry ingredients are best sprinkled along the outside of the flour. Make a small hollow in the centre for the yeast; the yeast must not come into contact with the salt.
- The outside of the baking pan must be completely clean. Fit the baking pan into the machine and push it down firmly until you hear a click indicating that it is locked into the tension springs. Close the lid.
The ingredients must be added into the baking pan before the pan is fitted into the bread machine. This is to prevent ingredients from ending up on the outside of the baking pan, and then in turn drip onto the heating element.
Menu selection
a) After you have fitted the baking pan in the bread machine and closed the lid, connect the plug into the wall socket and switch on the machine. You will hear a beep and the LED display window will indicate cycle 1 (basic)
b) Press the menu buttons until the cycle of your choice appears; each time you press the button you will hear a beep. You can choose from the following cycles:
1 = Basic . This cycle is suitable for plain white bread and for mixtures that primarily consist of white flour (white with rye for instance).
2 = French bread. For white bread using French-style finely ground wheat, and for light-textured breads with a crispy crust.
3 = Wholewheat bread. For bread with significant amounts of white/wholewheat and rye flour, oats or bran. These loafs are heavier and denser than light-textured breads.
4 = Sweet bread. Choose this cycle to bake confections, cakes or sweet bread and for recipes that use additional sugar, raisins or chocolate.
5 = Yoghurt bread. For bread prepared with yoghurt or buttermilk.
6 = Fast. Choose this cycle if you wish to bake your bread significantly faster. Remember however, that this bread will have a texture that is less light and it will also be less tasty.
7 = Pasta dough. This cycle is designed for preparing dough for pasta or noodles. This cycle does not include baking.
8 = Marmelade. With this cycle, making marmalade or jam becomes easy.
9 = Kneading. Use this cycle to knead dough (yeast dough for instance), which you can then shape into buns and bake in a regular oven. This cycle also does not include baking. 10 = Baking. This cycle only includes baking, without the dough being kneaded or allowed to rise. It is mainly intended for finishing partially-baked bread or for achieving a darker crust.
c) Select the weight.
For cycles 1 to 6 you can select final loaf weights of 750, 1000 or 1250 grams. Press the button until the arrow is under the weight of your choice. The default setting is for a 1000 gram loaf.
d) The crust colour can be selected for cycles 1 to 6 and for cycle 10. The arrow in the top left of the display window indicates the crust colour selected. You can choose "light", "medium" or "dark".
e) To bake at a later time, use the timer. Example: it is 10:30 p.m. and you want your bread freshly baked by 7 a.m. the next morning. (812 hours later). Keep pressing the timer button until the display window shows 8:30; this is the length of time between the present and the time the baking process must be completed.
Tip: use the timer only when working with dry ingredients because fresh ingredients such as milk and eggs can spoil very quickly.
Baking bread
Beginning the baking cycle.
- Press the "START/STOP" button to begin. The LED light comes on. The display window shows the duration of the selected cycle. The dots between the hours and minutes flash on and off; the bread machine starts up the selected cycle or starts counting down the delay time set using the timer.
- The bread machine automatically carries out all operations; kneading, rising, baking, etc. In the display window the remaining cycle time also counts down. In the kneading stage, the bread machine will first mix the ingredients for a few minutes. Only then does the actual kneading start. This cycle then stops after a few minutes, after which the dough is given time to rise. At this stage the yeast starts to work and moisture will form on the viewing window. It is normal for the bread machine to vibrate or shake during kneading. For cycles 1, 3 and 4, the machine will beep to remind you that you can add other ingredients such as nuts, raisins, etc., should you wish to do so. However, when you do so open the lid as briefly as possible to prevent the dough from collapsing.
- To interrupt the cycle, hold the "START/STOP" button down for 2 seconds. After a cycle has been interrupted, it cannot be resumed at the same position. You will have to start again with the "Baking" cycle.
Always ensure adequate ventilation. The bread machine may produce some smoke, particularly when it is used for the first time. This is caused by the heating up of the heating element and is quite normal.
Ending the baking cycle.
As soon as the cycle is finished the machine beeps and automatically switches to the "keep warm" function. This function allows the bread to remain in the baking pan for up to an hour without becoming soggy. It is however recommended to remove the bread from the baking pan as soon as possible. The "keep warm" function can be switched off at any time: hold the "START/STOP" button down for 2 seconds. Switch off the bread machine using the "START/STOP" button, remove the plug from the wall socket and open the lid.
Always use well-insulated oven mitts for handling the baking pan because both the pan and the bread can be very hot. Place the pan on a heat-resistant surface, certainly not on a wooden or plastic table, or on a tablecloth or a surface of synthetic material. Allow the bread to cool in the pan for 5 minutes, then carefully invert the pan at an angle above a metal grill and allow the bread to slide onto the grill. Sometimes the kneading blades remain stuck in the bread; remove them carefully with the supplied wooden spatulas without damaging the bread. Allow the bread to cool down for a further 15-30 minutes before slicing and/or eating. Make sure the entire bread machine has cooled down before putting it away.
Power failure
This appliance is fitted with a safeguard against a power failure, which means that if the power is interrupted for less than 2 hours, the bread machine will automatically resume where it left off at the time of the power failure. It is however possible that even a shorter interruption may cause the cycle begin a new right from the start. In this case or in the case of a longer interruption, you can use cycle 10 to finish baking the dough. To prevent the kneading blades from becoming stuck in the bottom of the bread, you can remove them before returning the bread to the pan for finishing the baking process.
Recipes
General advice: When using the terms "tablespoon" and "teaspoon" we mean the level quantity in the large and small sides respectively of the measuring scoop provided with the bread machine. Slightly inaccurate measurements can already lead too poor baking results. You must therefore measure the indicated quantities carefully and accurately.
Where a recipe specifies finely ground flour this means most of the readily available types of flour, such as rye and wheat flour (type 405-1150) as well as the readily available bread-baking mixtures. When adding small quantities (10-20%) of oats or bran, the cycle for fine flour should also be used. Cycle 3 can be used for baking bread containing 70-95% of wholewheat ingredient. Even when you use wholewheat flour prepared to your own recipe, you should also try this cycle first. When using rye flour, use no more than 70% rye flour and at least 30% white flour because rye flour contains no gluten and the loaf of bread will fall apart. Use lukewarm milk and/or water as the liquid for most recipes. Butter or margarine should be softened or even melted before being added. If you wish to make other types of bread, we recommend that you use recipes from specialised cookery books. A few recipe suggestions are listed below:
Quantities:
ml = millilitre
g=gram
tsp - teaspoon
tbsp - tablespoons
DF = deep-frozen
Directions:
11 grams of yeast correspond to a packet of powdered easy-blend yeast.
A fast method, which requires almost no preparation time, is of course to use ready-made bread-baking mixtures, a great variety of which can be found in supermarkets.
PLAIN WHITE BREAD (fine)
300 ml milk (± 30° C)
2 tsp salt (10 g)
50 g margarine
500 g white flour, type 405
2 tsp sugar
1 packet of powdered easy-blend yeast (11 g)
Final loaf of bread: 750g
Fast cycle 6, or basic cycle 1
BROWN LOAF
340 ml water (± 30^)
500 g ready-made brown bread mixture
Final loaf of bread: 750g
Fast cycle 6, or basic cycle 1
WHOLEWHEAT BREAD
330 ml water (± 30^)
500 g ready-made wholewheat bread mixture
Final loaf of bread: 750 g.
Fast cycle 6, or basic cycle 1
if so desired 10 grams of salt and 10 grams of caraway, aniseed, coriander or mixtures of these can be added to produce a spice loaf.
JAM/MARMELADE
To make this, you can for instance add 680g of chopped prunes, peaches or mixtures into the baking pan. The kneading will cause the mixture to thicken without the addition of sugar or gelling agent. Add some sugar or lemon (juice) to taste.
Choose the Marmalade/Jam cycle.
CYCLE TIMES
The baking, rising and kneading times depend on the mass and are listed for 750, 1000 and 1250 gram loaves of bread.
The times listed are those to produce an average crust colour. For bread with a lighter crust, times are 2 minutes shorter; a darker crust takes 3 minutes longer.
During rising and kneading, the heating light will switch on and off at 5 to 25-second intervals.
After kneading has finished, the machine will beep to remind you that you can add other ingredients such as nuts, raisins, etc.
After the 3^rd rise, the dough is given a 3-minute rest before the 4^th rise; during this rest period the kneading blades can be removed if desired.
| Cycle | 1 | 2 | 3 | 4 | 5 | 6 | 7 | 8 | 9 | 10 |
| Total time | 3h13/3h23/3h29 | 3h20/3h29/3h34 | 3h13/4h31/3h26 | 2h59/3h08/3h13 | 3h15/3h20/3h24 | 2h59/3h02/3h05 | 15 min. | 2hour | 1h20 | 1 hour |
| Slow stirring | 5 min. | 5 min. | 5 min. | 5 min. | 5 min. | 5 min. | 15 min. | - | 5 min. | - |
| \( 1^{st} \) rise | 5 min. | 5 min. | 5 min. | 5 min. | 5 min. | 5 min. | - | 22 min. | 5 min. | - |
| Kneading | 20/23/24min. | 20/22/25 min. | 20/21/23 min. | 25/27/29min. | 20/20/22 min. | 20/21/21 min. | - | 1h08 | 20 min. | - |
| 2nd rise | 45 min. | 45 min. | 45 min. | 40 min. | 40/40/42 | 45 min. | - | 30 min. | 50 min. | - |
| \( 1^{st} \) rest | 0.5 min. | 0.5 min. | 0.5 min. | 0.5 min. | 0.5min. | 0.5 min. | - | - | - | - |
| 3rd rise | 17.5 min. | 19.5min. | 17.5min. | 19.5 min. | 19.5min. | 9.5 min. | - | - | - | - |
| 2nd rest | 3 min. | 3 min. | 3 min. | 1.5 min. | 3 min. | 1.5 min. | - | - | - | - |
| 4th rise | 45/45/50min. | 50/50/52 min. | 40/40/43 min. | 35/37/40min. | 50 min. | 40/40/42 min. | - | - | - | - |
| Baking | 52/59/59min. | 52/59/59min. | 57/64/64 min. | 47/52/52min. | 52/57/57 min. | 52/55/55 min. | - | - | - | 60 min. |
| Rest | 25/28/29min. | 25/27/30 min. | 25/26/28 min. | 30/32/34min. | 25/25/27 min. | - | - | - | - | - |
| Keeping warm | 50 min. | 50 min. | 50 min. | 50 min. | 50 min. | 50 min. | - | - | - | - |
| Max. time | 13h35/13u53/13h35 | 13h50/13u59/13h54 | 13h53/13u51/13h56 | 13h59/13u58/13h53 | 13h55/13u50/13h54 | 13h55/13u50/13h54 | 13h59/13u53/13h55 | - | - | 13h50 |
Trouble shooting:
Problem/Fault
Possible cause/Solution
| Machine does not start | The plug is not properly inserted in the wall socket. Remove the plug from the wall socket, wait 10 seconds and insert the plug properly in the wall socket. A fuse has tripped or a contact breaker activated. Replace the fuse or press the contact breaker down again. (leave any repairs to a professional) Wall socket does not function properly: check with another electrical appliance and |
| have repaired by a professional if necessary. | |
| Bread machine does not heat up. | The lid is not closed properly: close the lid. |
| The kneading blades are stuck in the bread. | This is normal. You can use the wooden spatulas to carefully remove them from the bread without damaging it too much. Never use a metal object that can damage the non-stick coating of the blades. |
| The bread has not risen properly. | Too much or too little yeast added or the use-by date of the yeast has been exceeded. The yeast may also have come into contact with the salt too quickly, which also reduces its effectiveness. The lid must also remain closed during the entire processing time. A large proportion of wholewheat or rye flour and too much added ingredients can also result in poor rising. |
| The bread rises too much | Check whether you used the correct quantities of yeast, flour and liquid. You should use only powdered easy-blend yeast because fresh yeast can also have a detrimental effect. Too much added ingredients can also result in other effects. |
| The dough is not being kneaded, even though the motor is running. | Check whether the kneading blades are placed tightly and correctly on the drive shafts. Has the baking pan been correctly fitted and/or clicked into place? |
| The dough was not properly kneaded | Have the ingredients been added in the correct order, and the quantities not exceeded? The butter/margarine not sufficiently melted, or the liquid is too cold. |
| The bread is sticky and moist on the inside. | Next time use one tablespoon more flour or add less liquid. You can also reduce the amount of yeast by up to 1/4. |
| The bread is not baked right through | Did you choose the correct cycle? Place the loaf of bread back in the pan and bake it further in cycle 10. |
Further directions:
To achieve good results, it is essential to follow the instructions and particularly to use the exact quantities indicated. However, should a particular recipe fail to produce the desired result, you may try changing the recipe slightly or adapting it to your own taste. Furthermore, the different brands of flours or mixtures from various producers may yield an entirely different result; this also applies to all the other added ingredients. Also make sure that you never use two different brands of yeast at the same time. Except where indicated otherwise, the liquids must be at room temperature, i.e. between 18 and 23 degrees Celsius. The butter or margarine must also be melted.
General rule: try this bread machine several times until you have found the mixtures of ingredients that are right for you and do not despair after 1 or 2 attempts.
Cleaning and maintenance.
Always allow the bread machine and all components to cool down, switch the machine off and remove the plug from the wall socket.
The baking pan and the kneading blades have a non-stick coating, which facilitates cleaning. Never touch these components with a fork or other metal object.
Remove the baking pan and the kneading blades from the machine; they can be cleaned in a lukewarm washing-up liquid solution. In the case of baked on ingredients, let the pan or blades soak in hot water for 30 minutes; after this they will be much easier to clean.
To clean the inside and the outside of the bread machine, wiping with a moist cloth will suffice. Never use abrasive cleaning agents. Also never use steel wool, petrol or other solvents; they can cause damage to the surfaces.
When cleaning the inside of the appliance, you should carefully work around the heating element and touch it as little as possible. Never immerse the appliance in water or any other liquid. Thoroughly dry all components afterwards. Always continue to observe the general safety instructions.
The components of this appliance are not dishwasher-proof.
When disposing of the appliance at the end of its service life, make sure you observe the legal provisions and regulations governing such disposal.
WARRANTY PROVISION
This appliance has undergone to the most rigorous testing and complies with all applicable European laws and regulations. Should the appliance nevertheless not work properly, please return it to your supplier.
The warranty period is 2 years, commencing on the day of purchase. Keep your warranty certificate and your receipt in a safe place as proof of purchase and the purchase date. The warranty covers defects in materials and manufacture, though not of breakable parts, nor damage to the outside.
During the guarantee period you can return the appliance to you supplier free of shipping costs. Your repaired appliance will then be returned to you as soon as possible. If the appliance cannot be repaired you will receive a new appliance. After the end of the warranty period, you can also return your appliance to your supplier though you will have to pays the shipping costs yourself. The appliance should be returned using the original box and packing materials to prevent further damage.
Your appliance is not covered by warranty in the event that you have used the appliance for purposes for which it is not intended, if it has been damaged by being dropped or through actions by outside persons or through incorrect attempts at repair by persons not properly qualified to do so.
Guidelines for protection of the environment

This appliance should not be put into the domestic garbage at the end of its useful life, but must be disposed of at a central point for recycling of electric and electronic domestic appliances.
This symbol on appliance, instruction manual and packaging puts your attention to this important issue.

The materials used in this appliance can be recycled. By recycling used domestic appliances you
contribute an important push to the protection of our environment.
Ask your local authorities for information regarding the point of recollection..
Guidelines for protection of the environment
- DISPOSITIONS DE GARANTIE
- Before you use the appliance for the first time
- General safety instructions.
- Operation
- Digital display window
- Timer buttons
- Selection buttons
- Colour buttons
- Size button
- Start/Stop indicator
- Operation signal
- START/STOP button
- Summary
- Directions:
- Using your bread machine
- Preparing the dough.
- Menu selection
- Baking bread
- Power failure
- Recipes
- PLAIN WHITE BREAD (fine)
- BROWN LOAF
- WHOLEWHEAT BREAD
- JAM/MARMELADE
- CYCLE TIMES
- Further directions:
- Cleaning and maintenance.
- WARRANTY PROVISION
Brand : TRISTAR
Model : BM4580
Category : Bread maker