
HyperPen 10000U - Tablet AIPTEK - Free user manual and instructions
Find the device manual for free HyperPen 10000U AIPTEK in PDF.

| Product Type | Graphics Tablet with Stylus |
| Brand | Aiptek |
| Model | HyperPen 10000U |
| Tablet Dimensions | 35.4 x 27.7 x 1.5 cm (13.9 x 10.9 x 0.6 inches) |
| Tablet Weight | 820 g |
| Active Work Area | 25.4 x 15.8 cm (10 x 6.25 inches) |
| Aspect Ratio | 16:10 |
| Resolution | Up to 4000 lpi |
| Stylus Pressure Levels | 1024 levels |
| Stylus Accuracy | +/- 0.3 mm |
| Number of Shortcut Keys | 16 macro keys |
| Interface | USB 2.0 Full Speed |
| Tablet Power Supply | Via USB port (max. 0.35 W) |
| Stylus Power Supply | 1 AAA alkaline battery 1.5 V (included) |
| Stylus Weight | 25 g |
| Compatible Operating Systems | Windows XP/Vista/7 32/64-bit; Mac OS X 10.4.11 to 10.6 |
| Box Contents | Tablet, stylus, 3 replacement nibs, pen holder with nib extractor, AAA battery, driver CD, software CD Adobe Photoshop Elements 6.0 |
| Main Features | Customizable stylus buttons, work area adjustment, adjustable pressure, 16 programmable shortcuts |
| Care and Cleaning | Clean with a soft, dry cloth; avoid contact between the stylus nib and objects to save battery; change the nib using the extractor built into the pen holder |
| Safety and Recycling | Do not dispose of batteries with household waste; recycle the device and its components at end of life |
Frequently Asked Questions - HyperPen 10000U AIPTEK
User questions about HyperPen 10000U AIPTEK
0 question about this device. Answer the ones you know or ask your own.
Ask a new question about this device
Download the instructions for your Tablet in PDF format for free! Find your manual HyperPen 10000U - AIPTEK and take your electronic device back in hand. On this page are published all the documents necessary for the use of your device. HyperPen 10000U by AIPTEK.
USER MANUAL HyperPen 10000U AIPTEK
Thank you kindly for purchasing this product.
Much investment in time and effort has gone into its development, and it is our hope that it will give you many years of trouble-free service.


If the time arises to throw away your product, please recycle all the components possible. Batteries and rechargeable batteries are not to be disposed in your domestic waste. Please recycle them at your local recycling point.
Together we can help to protect the environment.
Package Contents
You should have received the following items inside of package:
- Graphic Tablet
- Digital Pen
- Pen tips
- Pen holder & tip remover
● Alkaline AAA battery - Quick Start Guide
- Hotline leaflet
- Driver CD
● Application Software CD
System Requirements
1. for Windows PC
- Windows XP / Windows Vista 32 & 64bit / Win7 32 & 64bit
- 1 free USB port
- Optical drive for software installation
2. for Macintosh
- MAC OS X 10.4.11 to 10.6 Version
Knowing your HyperPen 10000U
1. Tablet
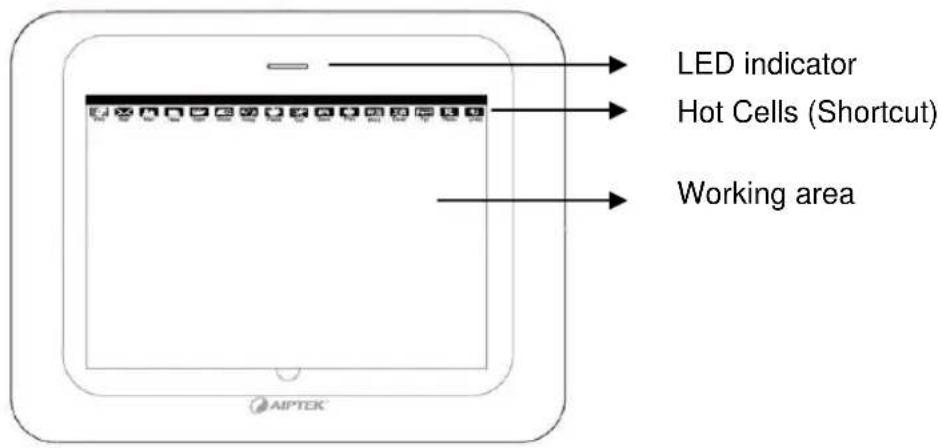
text_image
LED indicator Hot Cells (Shortcut) Working area AIPTEK®2. Digital Pen
3. Pen Holder & tip remover
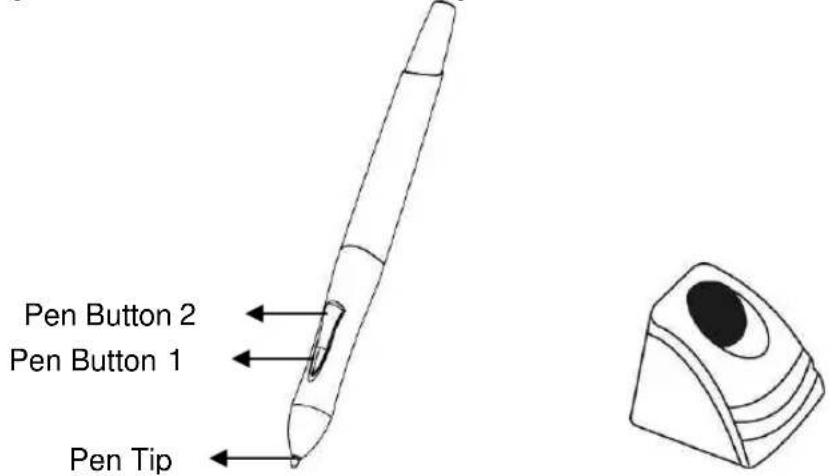
text_image
Pen Button 2 Pen Button 1 Pen TipLoading the battery for digital pen
Step 1: Pull the upper and lower part of the digital pen to opposite direction to open it.
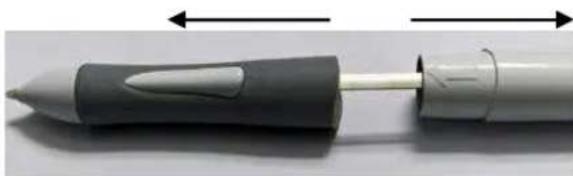
natural_image
Close-up of a pen-like tool with a pointed tip and black handle, shown with measurement arrows (no text or symbols)Step 2: Load the battery into the battery compartment with + and - aligned with the contact correctly as indicated.
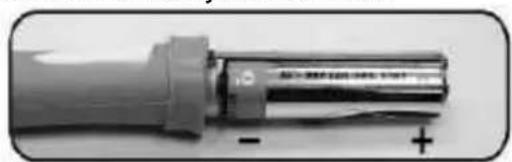
natural_image
Close-up of a cylindrical electronic component with visible internal structure and polarity markers (no text or symbols)Step 3: Wind the pen by aligning the symbol with pen buttons.
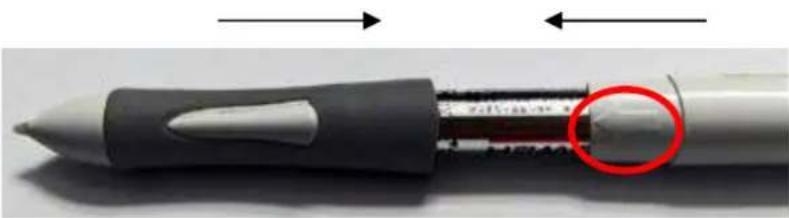
natural_image
Close-up of a pen tip with a red-circled end, showing internal structure and two directional arrows (no text or symbols)Storing the digital pen between tasks
To store the digital pen properly, please make sure that the pen tip does not have contact with any object. By doing so, pressure applied to the pen tip will cause a constant drain on pen's battery. You are recommended to place the pen in the pen holder, store it with the pen tip pointing upward, or lay it flat with the pen tip free of contact with any object.
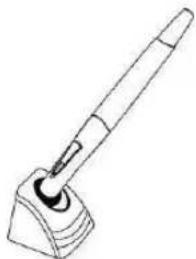
natural_image
Line drawing of a pen or stylus with a base and handle, no text or symbols presentChanging the pen tip
To change the pen tip, pull the pen tip out from pen by using the embedded pen clip on the bottom of pen holder.
Step 1: Insert the pen tip into the pen clip.
Step 2: Pull the pen so the pen tip becomes detached.
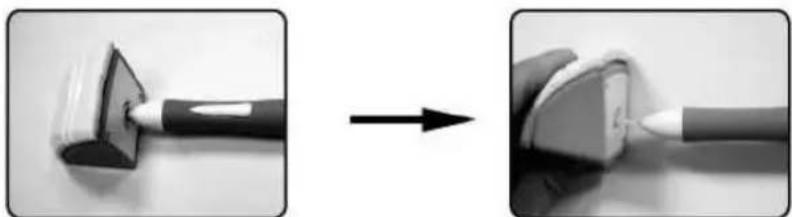
natural_image
Two-step illustration showing a tool being inserted into a device, with no visible text or symbols.Step 3: Push the new pen tip into the pen.
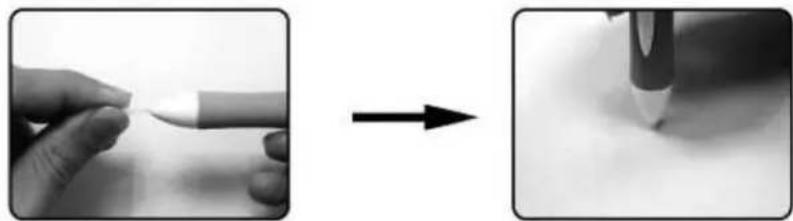
natural_image
Two-step black-and-white photo showing a hand holding a pencil and then applying a pencil to a surface (no text or symbols visible)Installation
Step 1: Install the driver for Windows OS
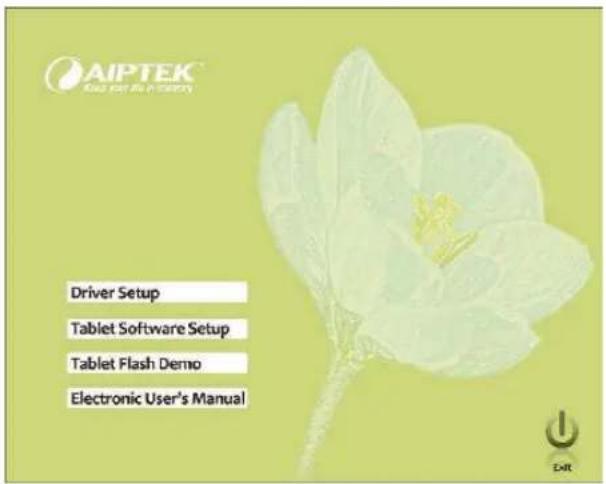
(1) Insert the CD into the CD-ROM drive. The setup program will be started automatically.
(2) Click 'Driver Setup' to start the installation.
Notice: Please install the driver before plugging in the tablet into your PC.
text_image
AIPTEK® Kiss per 80 in every Driver Setup Tablet Software Setup Tablet Flash Demo Electronic User's Manual(3) If a window pops up information 'The software you are installing has not passed Windows logo testing to verify its compatibility with Windows XP', click 'Continue Anyway' to proceed the installation.

text_image
Software Installation The software you are installing has not passed Windows Logo testing to verify its compatibility with Windows XP. (Tell me why this testing is important.) Continuing your installation of this software may impair or destabilize the correct operation of your system either immediately or in the future. Microsoft strongly recommends that you stop this installation now and contact the software vendor for software that has passed Windows Logo testing. Continue Anyway STOP InstallationInstall the driver for Mac OS
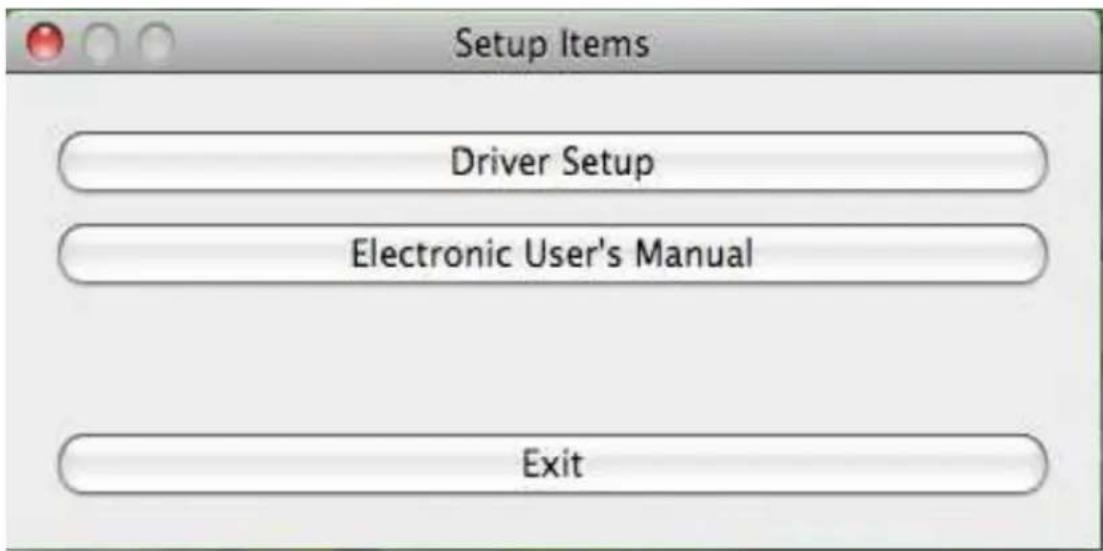
(1) Browse the CD and find the driver version for your Mac:
Step 1 Click Driver Setup
Step 2 Click Driver Setup
(2) Follow up the instructions step by step to install the driver.
(3) Wait until the installation has been completed.
text_image
Setup Items Driver Setup Electronic User's Manual ExitStep 2: Connecting the tablet to PC or MAC by USB cable
For windows:
(1) Connect the tablet to the computer by USB cable. It will take a few seconds until a window 'Found New Hardware Wizard' pops up. Click on the "finalize" button.
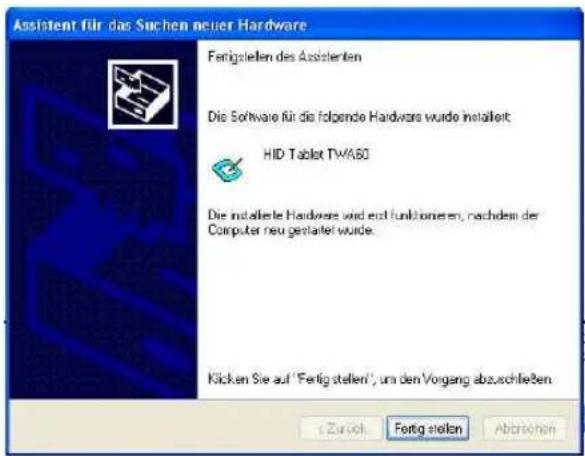
(2) A small tablet icon will appear in the taskbar on the bottom of the screen. Double click and the set up window will open.

text_image
3:20 PMStep 3: Set up the tablet and pen
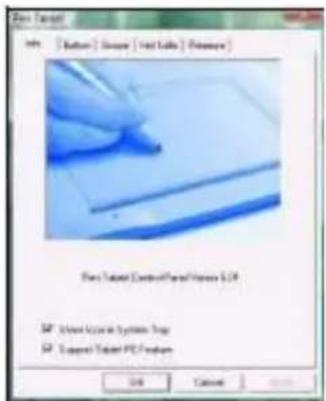
text_image
New Tablet Info | Button | Close | Next Table | Preview | New Tablet Control Panel Version 5.0 New Access System Help Done Tablet PC Provider OK Cancel OK1. The Info Tab
The Info tab displays the information of current driver. You could choose to:
a. display the icon in the toolbar or not. b. enable the features if you use a tablet PC.
Notice: There're no features for Tablet PC under the Mac OS.
text_image
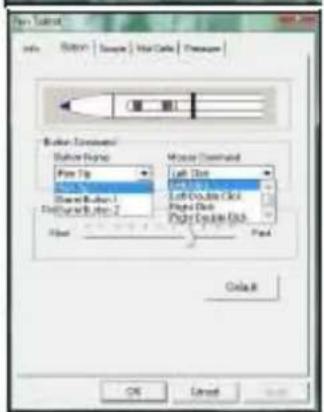
Pan Tablet Info Switch Sample Main Cells Pressure Marker Command Pan Tip Mouse Command Left Dot Left Column Dot Left Column Dot Right Column Dot Load Load OK Cancel2. The Button Tab - Button Command
You can define the function for the pen tip and two-barrel buttons based on your preference.
You can adjust the sensitiveness of double click speed between slow to fast.
Notice: Mac OS has no middle click and middle double click.

text_image
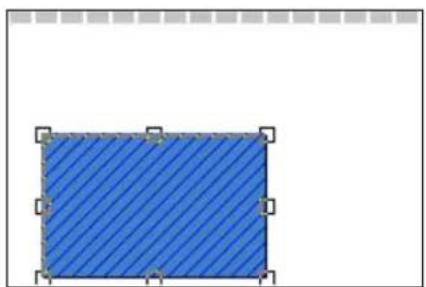
Pen Tablet Info | Button | Stop | Hot Cells | Pressure Pen Area Full Area Screen Ratio Reverse Edge 0.16 inch Pen Area Dimensions Width (X) 0.00 inch Height (Y) 0.00 inch Pen Area Offset Offset (X) 0.00 inch Offset (Y) 0.00 inch OK Cancel Apply3. The Scope Tab
The Scope Tab contains three functions:
a. Full Area Select the largest working area. b. Screen Ratio Set the working area to automatically fit to the screen aspect ratio. c. Reserve Edges: Reserve the space for hot cells on the top area.
natural_image
Blue rectangular shape with diagonal hatching and corner markers, no text or symbols presentTip: In addition to these three options, it's easy to resize or relocate the working area to suit your need by moving the frame of the blue square shown in the picture.
text_image
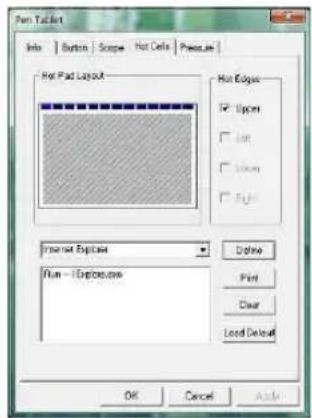
Fun Tablet Info | Button | Scope | Hot Cells | Pressure Hot Pad Layout Hot Edges Up to Up to Up to Internet Explorer Run - 16ptcs.com Online Print Clear Load Default OK Cancel Apply4. Hot Cell Tab
a. Hot Edges
Hot edges show the possibilities of allocating hot cells. The hot cells of HyperPen 10000U are allocated only in the upper side of the tablet.
b. Hot Pad Layout
You can change the default setting of hot cells by selecting any of 16 hot cells.
If you want to redefine the hot cells, click 'Define'. Then key in the program or function, route of where the program is saved, and parameters if necessary. The string typed will be passed to the program as parameters. Click 'OK' to confirm the reset.
If you want to get an overview of all hot cells, click 'Print'.
Notice: There's no Print Key in Mac System.
If you want to clear the initial setting, click 'Clear'
text_image
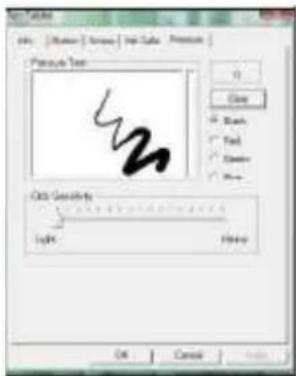
Picture Text OK Cancel Add: Grainth Light Heavy5. Pressure Tab
The pen pressure can be adjusted the indicator between 'Light' and 'Heavy'. Draw on the 'Pressure Test' area to see the thickness of handwriting under the selected pressure.
Step 4: Verifying installation for hardware and driver functions
Use the tips here to verify the tablet function:
- As soon as the pen tablet itself activates, the LED begins to flash.
- Tap on any surface with the pen tip to "wake it up" if it has gone into standby mode. When the pen is not used for some time, a built-in power saving function makes the pen or mouse enter into standby mode.
- Press a button on the pen barrel. The LED will light up.
- Hover or move the pen in the working area, the cursor on the screen should move accordingly.
Product Specification
| Specifications | |
| I. Tablet | |
| Size 30.7 cm (12") in diagonal | |
| Working Area 25.4x15.8 cm (10" x 6.25") | |
| Aspect Ratio 16:10 | |
| Dimensions 35.4 x 27.7 x 1.5 cm (13.9" x 10.9" x 0.6") | |
| Resolution Up to 4000 lpi | |
| Detection Distance Max. 10 mm for reading. Max. 5mm for writing | |
| Report ration 200 rps (report per second) | |
| Function Keys 16 macro keys | |
| LED Indicator 1 green LED | |
| Power Consumption Max. 0.35W, from USB | |
| Interface USB 2.0 (Full Speed) | |
| Weight 820g | |
| II. Digital Pen | |
| Model Code P23 Black | |
| Pen Pressure 1024 levels | |
| Pen Accuracy +/- 0.3mm | |
| Button 3 | |
| Weight 25g | |
| III. Package Content | |
| Software Bundle | Adobe Photoshop Element 6.0, PenNotice, Annotate for Word, PenCommander, PenMail, PenSigner |
| Accessory | Pen x1, Pen Refill x3, Pen holder x1, Alkaline Battery (1.5V) AAAx1, Quick Start Guide, Driver CD x1, Adobe Photoshop Element 6.0 CDx1 |
| Article No. | 100055 |