HyperPen 10000U - Tableta AIPTEK - Manual de uso y guía de instrucciones gratis
Encuentra gratis el manual del aparato HyperPen 10000U AIPTEK en formato PDF.
| Tipo de producto | Tableta gráfica con lápiz |
| Marca | Aiptek |
| Modelo | HyperPen 10000U |
| Dimensiones de la tableta | 35,4 x 27,7 x 1,5 cm (13,9 x 10,9 x 0,6 pulgadas) |
| Peso de la tableta | 820 g |
| Área de trabajo activa | 25,4 x 15,8 cm (10 x 6,25 pulgadas) |
| Relación de aspecto | 16:10 |
| Resolución | Hasta 4000 lpi |
| Niveles de presión del lápiz | 1024 niveles |
| Precisión del lápiz | +/- 0,3 mm |
| Número de teclas de acceso directo | 16 teclas macro |
| Interfaz | USB 2.0 velocidad completa |
| Alimentación de la tableta | Por puerto USB (máx. 0,35 W) |
| Alimentación del lápiz | 1 pila alcalina AAA 1,5 V (incluida) |
| Peso del lápiz | 25 g |
| Sistemas operativos compatibles | Windows XP/Vista/7 32/64 bits; Mac OS X 10.4.11 a 10.6 |
| Contenido de la caja | Tableta, lápiz, 3 minas de repuesto, portalápiz con extractor, pila AAA, CD de controlador, CD de software Adobe Photoshop Elements 6.0 |
| Funciones principales | Personalización de los botones del lápiz, ajuste del área de trabajo, presión ajustable, 16 accesos directos programables |
| Mantenimiento y limpieza | Limpiar con un paño suave y seco; evitar el contacto de la mina del lápiz con objetos para ahorrar batería; cambiar la mina usando el extractor integrado en el portalápiz |
| Seguridad y reciclaje | No tirar las pilas con la basura doméstica; reciclar el dispositivo y sus componentes al final de su vida útil |
Preguntas frecuentes - HyperPen 10000U AIPTEK
Preguntas de los usuarios sobre HyperPen 10000U AIPTEK
0 pregunta sobre este aparato. Responde a las que conoces o haz la tuya.
Hacer una nueva pregunta sobre este aparato
Descarga las instrucciones para tu Tableta en formato PDF gratis! Encuentra tus instrucciones HyperPen 10000U - AIPTEK y toma tu dispositivo electrónico nuevamente en la mano. En esta página están publicados todos los documentos necesarios para el uso de su dispositivo. HyperPen 10000U de la marca AIPTEK.
MANUAL DE USUARIO HyperPen 10000U AIPTEK
HyperPen 10000U
Quick Start Guide
Index
English....2
Finnish....10
German....18
Italian....27
Norwegian....35
Portuguese....43
Spanish....51
French....59
Welcome
Thank you kindly for purchasing this product.
Much investment in time and effort has gone into its development, and it is our hope that it will give you many years of trouble-free service.


If the time arises to throw away your product, please recycle all the components possible. Batteries and rechargeable batteries are not to be disposed in your domestic waste. Please recycle them at your local recycling point.
Together we can help to protect the environment.
Package Contents
You should have received the following items inside of package:
- Graphic Tablet
- Digital Pen
- Pen tips
- Pen holder & tip remover
● Alkaline AAA battery - Quick Start Guide
- Hotline leaflet
- Driver CD
● Application Software CD
System Requirements
1. for Windows PC
- Windows XP / Windows Vista 32 & 64bit / Win7 32 & 64bit
- 1 free USB port
- Optical drive for software installation
2. for Macintosh
- MAC OS X 10.4.11 to 10.6 Version
Knowing your HyperPen 10000U
1. Tablet
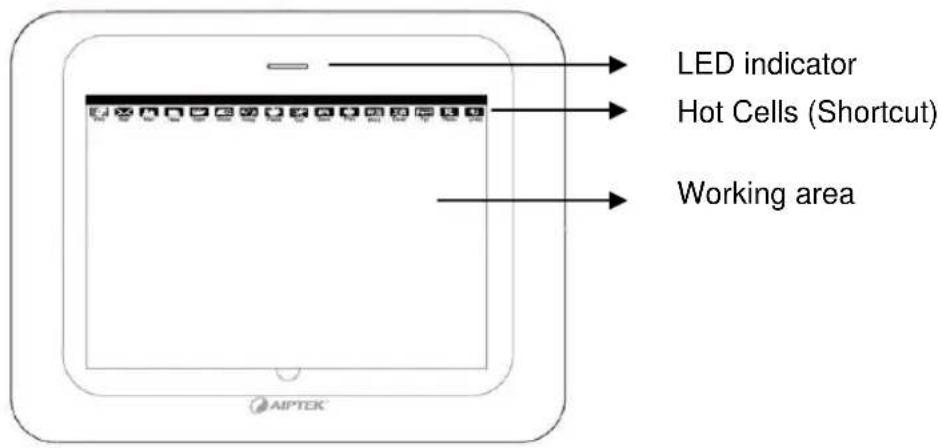
text_image
LED indicator Hot Cells (Shortcut) Working area AIPTEK®2. Digital Pen
3. Pen Holder & tip remover
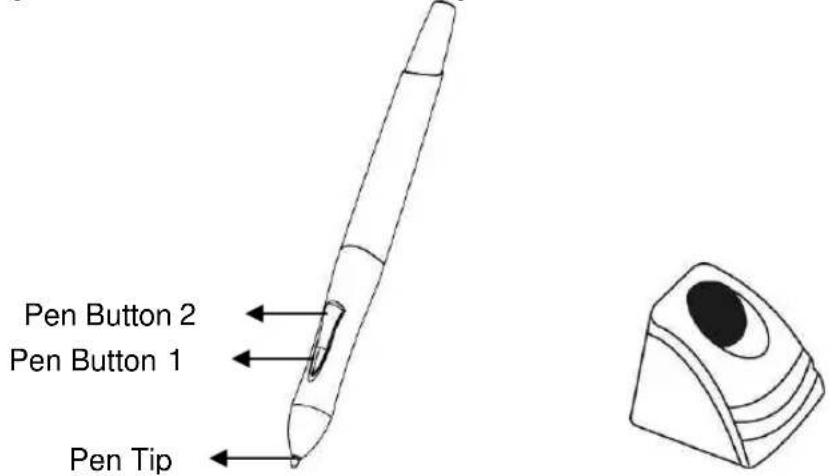
text_image
Pen Button 2 Pen Button 1 Pen TipLoading the battery for digital pen
Step 1: Pull the upper and lower part of the digital pen to opposite direction to open it.
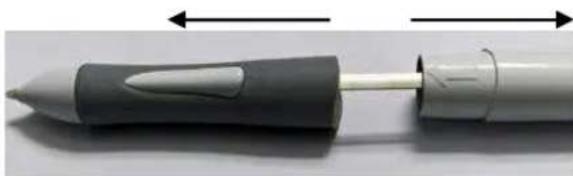
natural_image
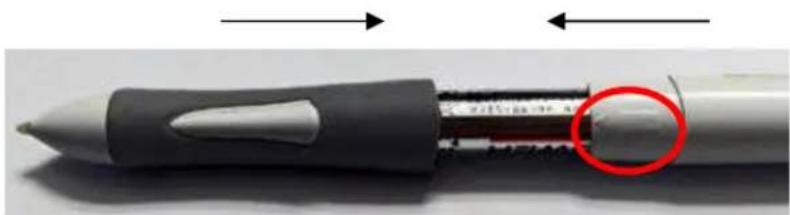
Close-up of a pen-like tool with a pointed tip and black handle, shown with measurement arrows (no text or symbols)Step 2: Load the battery into the battery compartment with + and - aligned with the contact correctly as indicated.
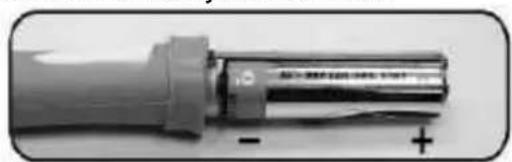
natural_image
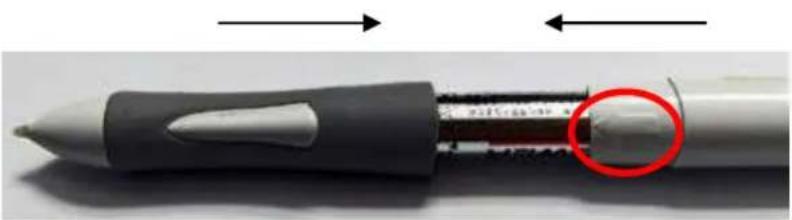
Close-up of a cylindrical electronic component with visible internal structure and polarity markers (no text or symbols)Step 3: Wind the pen by aligning the symbol with pen buttons.
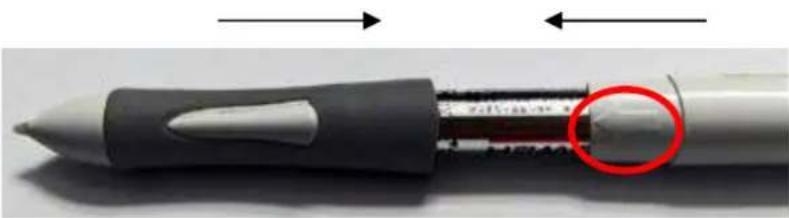
natural_image
Close-up of a pen tip with a red-circled end, showing internal structure and two directional arrows (no text or symbols)Storing the digital pen between tasks
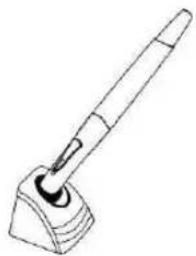
To store the digital pen properly, please make sure that the pen tip does not have contact with any object. By doing so, pressure applied to the pen tip will cause a constant drain on pen's battery. You are recommended to place the pen in the pen holder, store it with the pen tip pointing upward, or lay it flat with the pen tip free of contact with any object.
natural_image
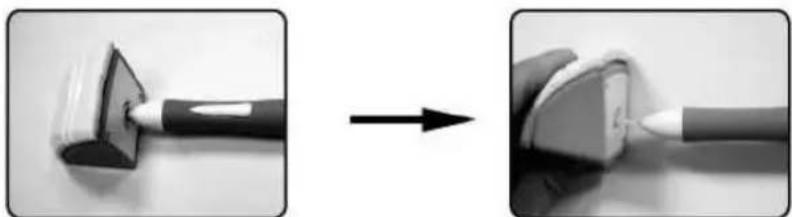
Line drawing of a pen or stylus with a base and handle, no text or symbols presentChanging the pen tip
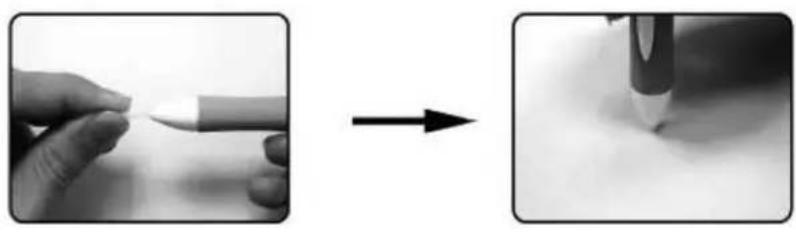
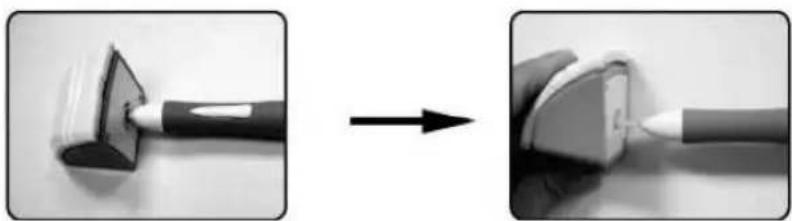
To change the pen tip, pull the pen tip out from pen by using the embedded pen clip on the bottom of pen holder.
Step 1: Insert the pen tip into the pen clip.
Step 2: Pull the pen so the pen tip becomes detached.
natural_image
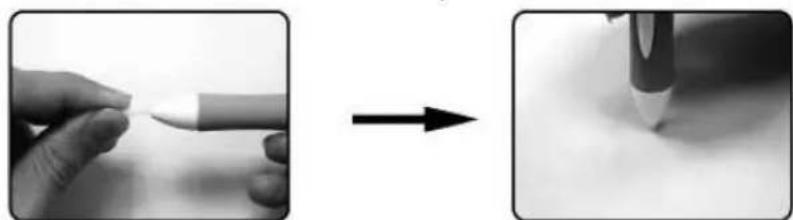
Two-step illustration showing a tool being inserted into a device, with no visible text or symbols.Step 3: Push the new pen tip into the pen.
natural_image
Two-step black-and-white photo showing a hand holding a pencil and then applying a pencil to a surface (no text or symbols visible)Installation
Step 1: Install the driver for Windows OS
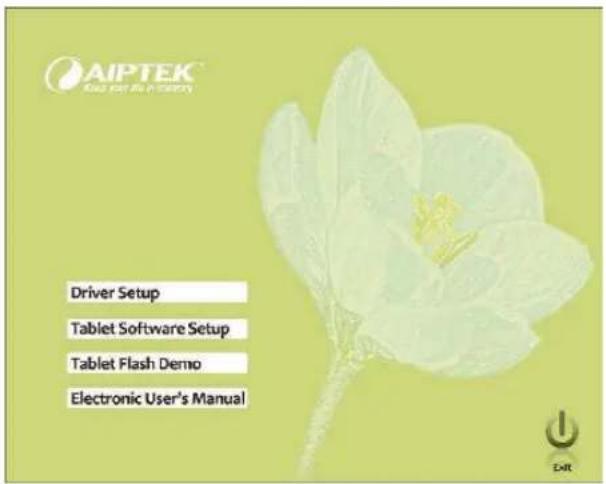
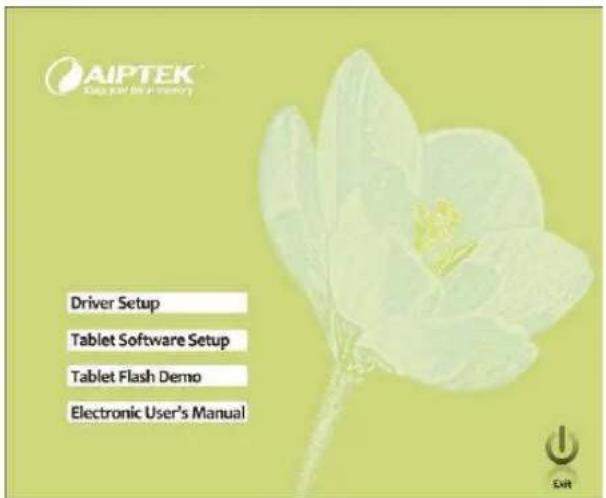
(1) Insert the CD into the CD-ROM drive. The setup program will be started automatically.
(2) Click 'Driver Setup' to start the installation.
Notice: Please install the driver before plugging in the tablet into your PC.
text_image
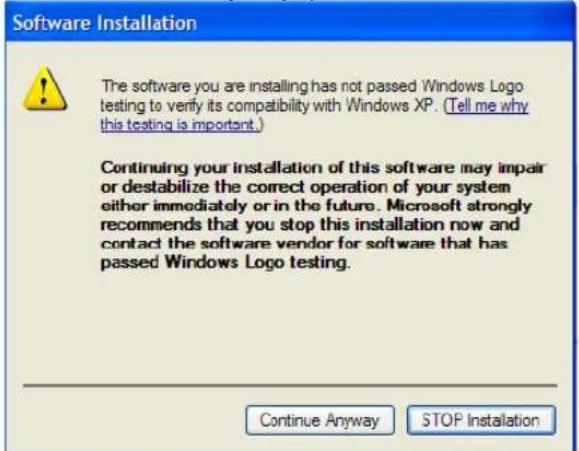
AIPTEK® Kiss per 80 in every Driver Setup Tablet Software Setup Tablet Flash Demo Electronic User's Manual(3) If a window pops up information 'The software you are installing has not passed Windows logo testing to verify its compatibility with Windows XP', click 'Continue Anyway' to proceed the installation.

text_image
Software Installation The software you are installing has not passed Windows Logo testing to verify its compatibility with Windows XP. (Tell me why this testing is important.) Continuing your installation of this software may impair or destabilize the correct operation of your system either immediately or in the future. Microsoft strongly recommends that you stop this installation now and contact the software vendor for software that has passed Windows Logo testing. Continue Anyway STOP InstallationInstall the driver for Mac OS
(1) Browse the CD and find the driver version for your Mac:
Step 1 Click Driver Setup
Step 2 Click Driver Setup
(2) Follow up the instructions step by step to install the driver.
(3) Wait until the installation has been completed.
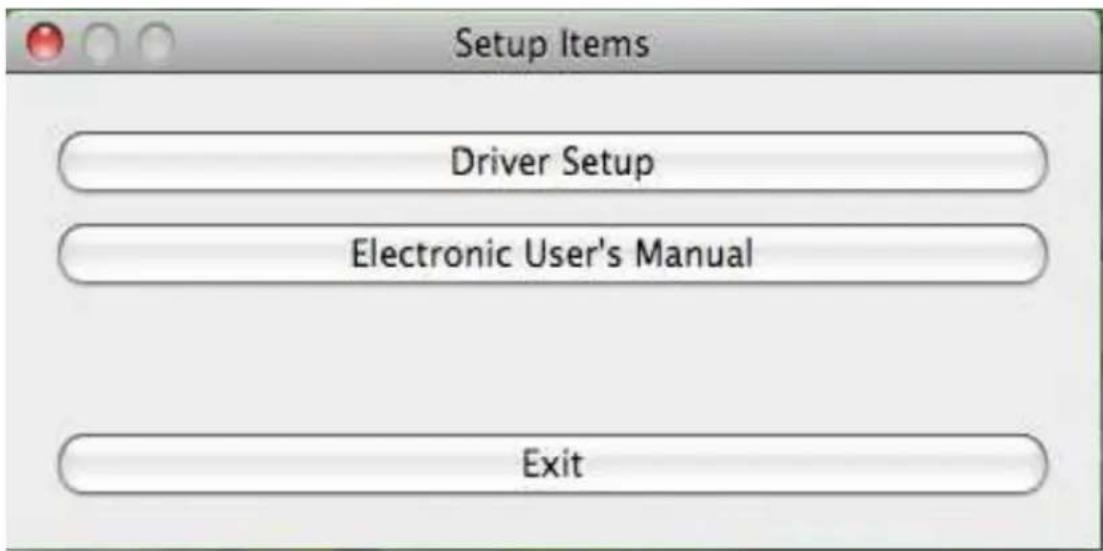
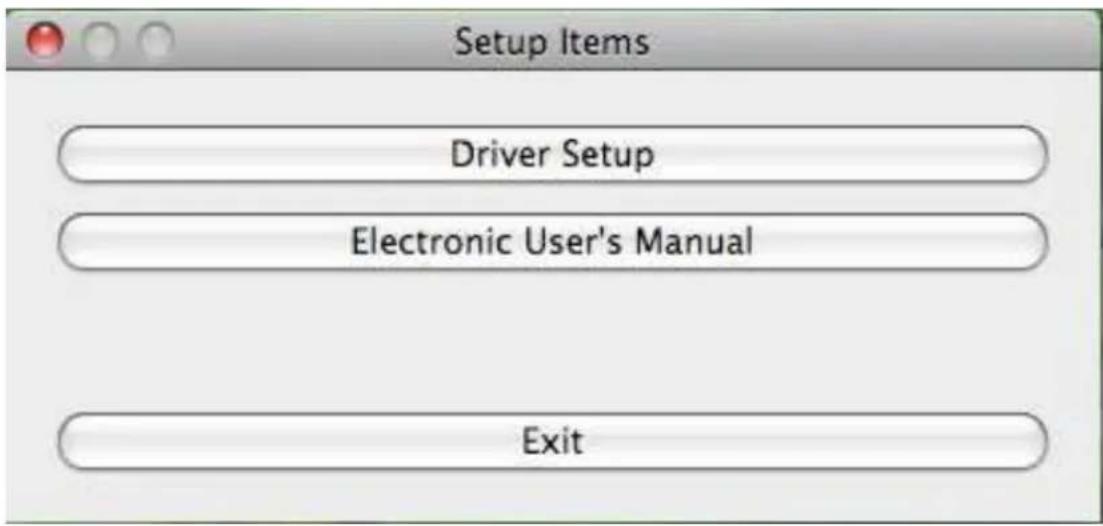
text_image
Setup Items Driver Setup Electronic User's Manual ExitStep 2: Connecting the tablet to PC or MAC by USB cable
For windows:
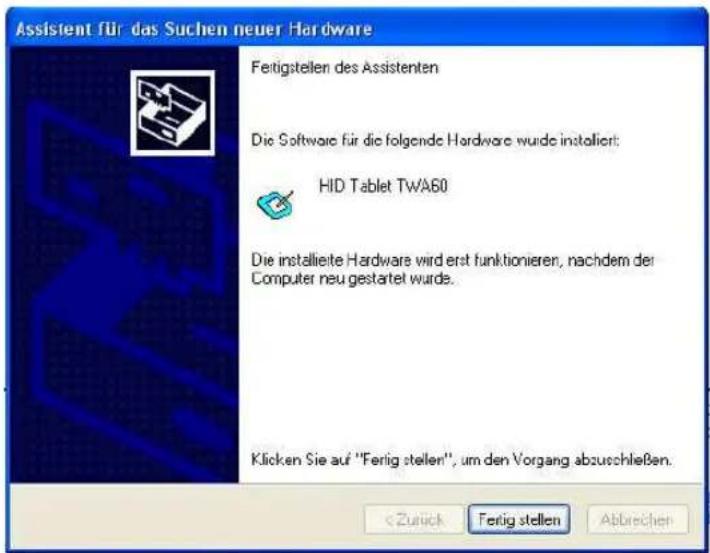
(1) Connect the tablet to the computer by USB cable. It will take a few seconds until a window 'Found New Hardware Wizard' pops up. Click on the "finalize" button.
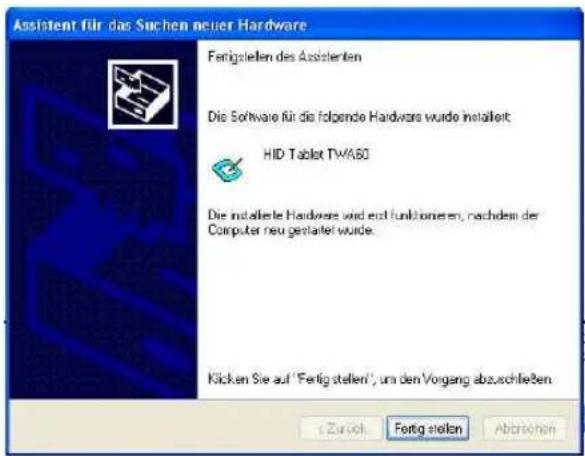
text_image
Assistent für das Suchen neuer Hardware Fertigstellen des Assistenten Die Software für die folgende Hardware wurde installiert HID Tablet TWASO Die installierte Hardware wird erst funktionieren, nachdem der Computer neu gestaltet wurde. Klicken Sie auf 'Fertigstellen', um den Vorgang abzuschließen. © Zureich Fortig stellen Abzehan(2) A small tablet icon will appear in the taskbar on the bottom of the screen. Double click and the set up window will open.

text_image
3:20 PMStep 3: Set up the tablet and pen
text_image
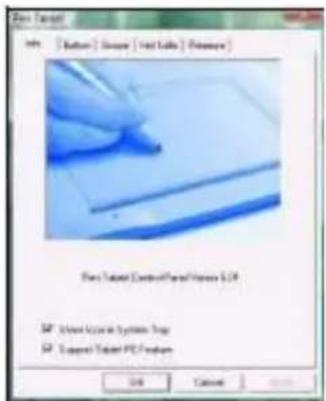
New Tablet Info | Button | Close | Next Table | Preview | New Tablet Control Panel Version 5.0 New Access System Help Done Tablet PC Provider OK Cancel OK1. The Info Tab
The Info tab displays the information of current driver. You could choose to:
a. display the icon in the toolbar or not. b. enable the features if you use a tablet PC.
Notice: There're no features for Tablet PC under the Mac OS.
text_image
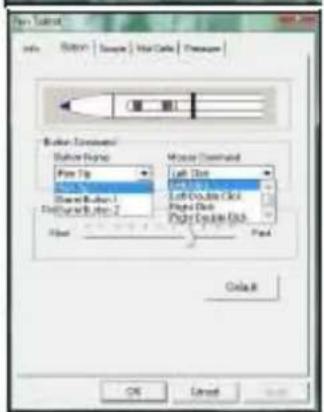
Pan Tablet Info Switch Sample Main Cells Pressure Marker Command Pan Tip Mouse Command Left Dot Left Column Dot Left Column Dot Right Column Dot Load Load OK Cancel2. The Button Tab - Button Command
You can define the function for the pen tip and two-barrel buttons based on your preference.
You can adjust the sensitiveness of double click speed between slow to fast.
Notice: Mac OS has no middle click and middle double click.

text_image
Pen Tablet Info | Button | Stop | Hot Cells | Pressure Pen Area Full Area Screen Ratio Reverse Edge 0.16 inch Pen Area Dimensions Width (X) 0.00 inch Height (Y) 0.00 inch Pen Area Offset Offset (X) 0.00 inch Offset (Y) 0.00 inch OK Cancel Apply3. The Scope Tab
The Scope Tab contains three functions:
a. Full Area Select the largest working area. b. Screen Ratio Set the working area to automatically fit to the screen aspect ratio. c. Reserve Edges: Reserve the space for hot cells on the top area.
natural_image
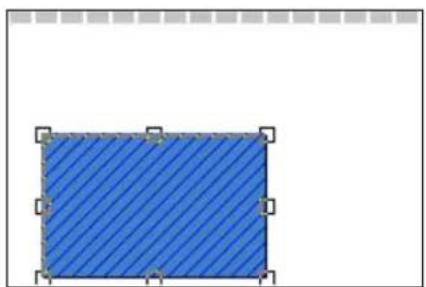
Blue rectangular shape with diagonal hatching and corner markers, no text or symbols presentTip: In addition to these three options, it's easy to resize or relocate the working area to suit your need by moving the frame of the blue square shown in the picture.
text_image
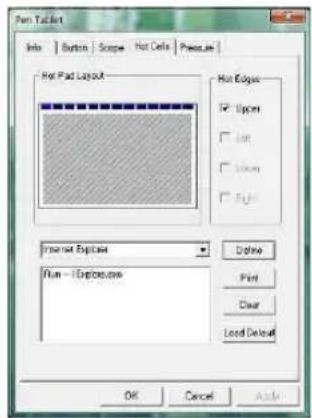
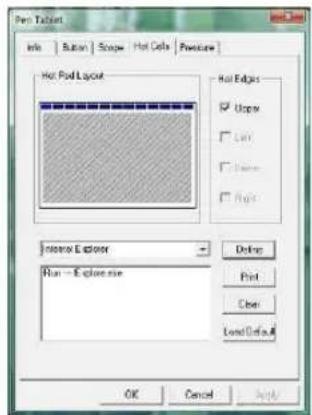
Fun Tablet Info | Button | Scope | Hot Cells | Pressure Hot Pad Layout Hot Edges Up to Up to Up to Internet Explorer Run - 16ptcs.com Online Print Clear Load Default OK Cancel Apply4. Hot Cell Tab
a. Hot Edges
Hot edges show the possibilities of allocating hot cells. The hot cells of HyperPen 10000U are allocated only in the upper side of the tablet.
b. Hot Pad Layout
You can change the default setting of hot cells by selecting any of 16 hot cells.
If you want to redefine the hot cells, click 'Define'. Then key in the program or function, route of where the program is saved, and parameters if necessary. The string typed will be passed to the program as parameters. Click 'OK' to confirm the reset.
If you want to get an overview of all hot cells, click 'Print'.
Notice: There's no Print Key in Mac System.
If you want to clear the initial setting, click 'Clear'
text_image
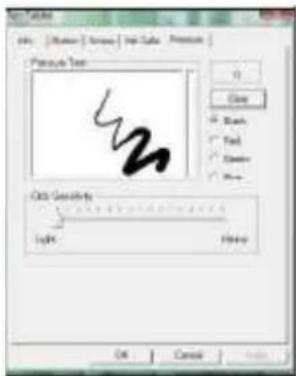
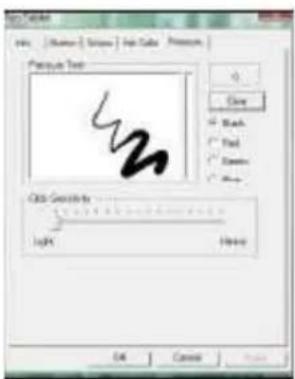
Picture Text OK Cancel Add: Grainth Light Heavy5. Pressure Tab
The pen pressure can be adjusted the indicator between 'Light' and 'Heavy'. Draw on the 'Pressure Test' area to see the thickness of handwriting under the selected pressure.
Step 4: Verifying installation for hardware and driver functions
Use the tips here to verify the tablet function:
- As soon as the pen tablet itself activates, the LED begins to flash.
- Tap on any surface with the pen tip to "wake it up" if it has gone into standby mode. When the pen is not used for some time, a built-in power saving function makes the pen or mouse enter into standby mode.
- Press a button on the pen barrel. The LED will light up.
- Hover or move the pen in the working area, the cursor on the screen should move accordingly.
Product Specification
| Specifications | |
| I. Tablet | |
| Size 30.7 cm (12") in diagonal | |
| Working Area 25.4x15.8 cm (10" x 6.25") | |
| Aspect Ratio 16:10 | |
| Dimensions 35.4 x 27.7 x 1.5 cm (13.9" x 10.9" x 0.6") | |
| Resolution Up to 4000 lpi | |
| Detection Distance Max. 10 mm for reading. Max. 5mm for writing | |
| Report ration 200 rps (report per second) | |
| Function Keys 16 macro keys | |
| LED Indicator 1 green LED | |
| Power Consumption Max. 0.35W, from USB | |
| Interface USB 2.0 (Full Speed) | |
| Weight 820g | |
| II. Digital Pen | |
| Model Code P23 Black | |
| Pen Pressure 1024 levels | |
| Pen Accuracy +/- 0.3mm | |
| Button 3 | |
| Weight 25g | |
| III. Package Content | |
| Software Bundle | Adobe Photoshop Element 6.0, PenNotice, Annotate for Word, PenCommander, PenMail, PenSigner |
| Accessory | Pen x1, Pen Refill x3, Pen holder x1, Alkaline Battery (1.5V) AAAx1, Quick Start Guide, Driver CD x1, Adobe Photoshop Element 6.0 CDx1 |
| Article No. | 100055 |
Tervetuloa
Kiitos tämän tuotteen ostamisesta.
Sen kehittelyyn on käytetty paljon aikaa ja vaivaa, ja toivomme, että siitä on sinulle paljon iloa vielä moneksi vuodeksi.


Tuotteen käyttöiän päättyessä kaikki mahdolliset komponentit tulee kierrättää. Paristoja ja uudelleen ladattavia akkuja ei saa hävittää kotitalousjätteen mukana. Vie ne paikalliseen kierrätyspisteeseen.
Yhdessä voimme auttaa suojelemaan ympäristöä.
Pakkauksen sisältö
Pakkauksessa tulee olla seuraavat tarvikkeet:
- piirustuslauta
- digitaalinen kynä
• kynänkärkiä - kynäpidike ja kärjenpoistaja
- alkaliparisto tyyppiä AAA
- pikaohje
- asiakaspalvelun esite
- ajuriohjelman sisältävä CD
- käyttöohjelmiston sisältävä CD.
Järjestelmävaatimukset
1. Windows-käyttöjärjestelmä
- Windows XP / Windows Vista 32 & 64bit / Win7 32 & 64bit
- 1 free USB port
- Optical drive for software installation
2. Macintosh-käyttöjärjestelmä
- MAC OS X, versio 10.4.11 - 10.6
HyperPen 10000U:n osiin tutustuminen
2. Lauta
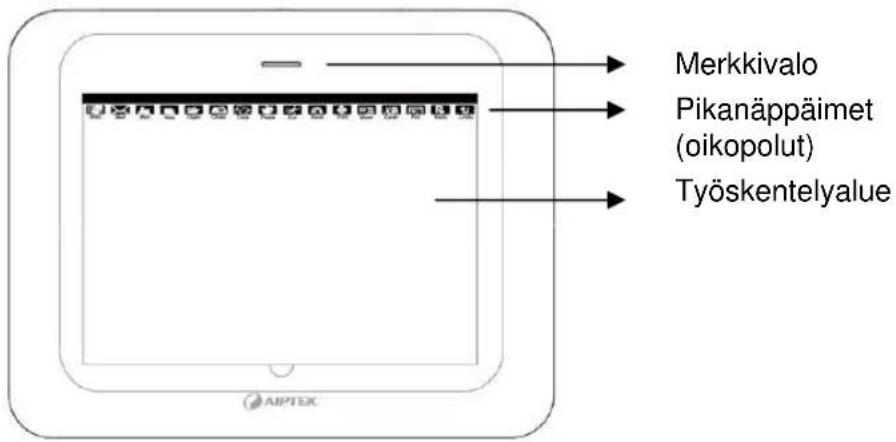
text_image
Merkkivalo Pikanäppäimet (oikopolut) Työskentelyalue-
Kynäpidike ja
-
Digitaalinen kynä kärjenpoistaja
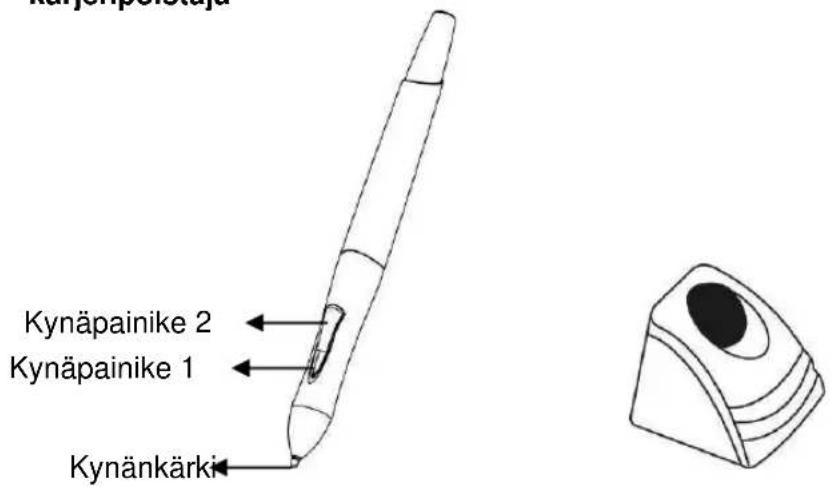
text_image
Kynäpainike 2 Kynäpainike 1 KynänkärkiPariston asettaminen digitaaliseen kynään
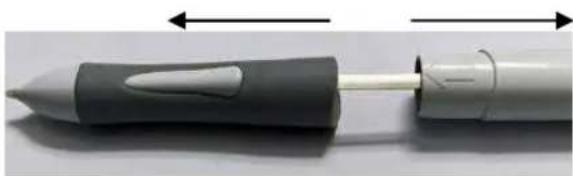
Vaihe 1: Vedä digitaalisen kynän ala- ja yläosaa eri suuntiin, jotta saat kynän auki.
natural_image
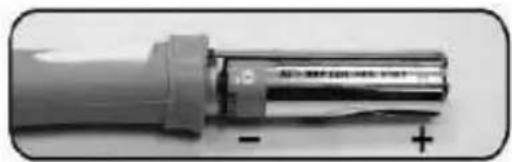
Close-up of a pen-like tool with a pointed tip and handle, shown in side profile (no text or symbols visible)Vaihe 2: Aseta paristo paristolokeroon siten, että + ja – tulevat oikeinpäin merkintöjen mukaisesti.
natural_image
Close-up of a cylindrical electronic component with metallic leads and a battery, showing no visible text or symbols.Vaihe 3: Kierrä kynä kiinni siten, että painikkeiden kanssa.
-merkki tulee samaan linjaan kynän

natural_image
Close-up of a pen tip with a red circle highlighting a specific area, showing no text or symbols on the object itself.Digitaalisen kynän säilyttäminen tehtävien välillä
Digitaalista kynää säilytetään siten, ettei kynänkärki koske mihinkään esineeseen. Kynänkärkeen kohdistuva paine saa kynän pariston varauksen pienentymään. Kynää suositellaan säilytettäväksi kynäpidikkeessä siten, että kynänkärki osoittaa ylöspäin, tai kynä voidaan asettaa vaaka-asentoon siten, ettei kynänkärki kosketa mihinkään esineeseen.
natural_image
Line drawing of a handheld tool or brush with a base and handle (no text or symbols)Kynänkärjen vaihtaminen
Kynänkärki vaihdetaan vetämällä se irti kynästä kynäpidikkeen pohjassa olevaa kärjenpoistajaa käyttäen.
Vaihe 1: Työnnä kynänkärki poistajaan.
Vaihe 2: Vedä kynää siten, että kynänkärki irtoaa.

natural_image
Two-step illustration showing a tool being inserted into a device, with no visible text or symbols.Vaihe 3: Paina uusi kynänkärki kynään.
natural_image
Two-step black-and-white photo showing a hand holding a pencil and then applying a pencil to a surface (no text or symbols visible)Asentaminen
Vaihe 1: Ajuriohjelman asentaminen Windowskäyttöjärjestelmään
(1) Aseta CD-levy CD-ROM-levyasemaan. Asennusohjelma käynnistyy automaattisesti.
(2) Käynnistä asennus käskyllä 'Driver Setup' (asenna ajuri).
Huomaa: Ajuriohjelma on asennettava ennen piirustuslaudan kytkemistä tietokoneeseen.
text_image
AIPTEK Setup and the inventory Driver Setup Tablet Software Setup Tablet Flash Demo Electronic User's Manual(3) Mikäli näyttöön ilmestyy ikkuna, jossa lukee 'The software you are installing has not passed Windows logo testing to verify its compatibility with Windows XP' (ohjelmisto, jota olet asentamassa, ei läpäissyt Windowsin logotestiä, jolla tarkistetaan sen yhteensopivuus Windows XP:n kanssa), jatka asentamista napsauttamalla painiketta 'Continue Anyway' (jatka silti).

text_image
Software Installation The software you are installing has not passed Windows Logo testing to verify its compatibility with Windows XP. (Tell me why this testing is important.) Continuing your installation of this software may impair or destabilize the correct operation of your system either immediately or in the future. Microsoft strongly recommends that you stop this installation now and contact the software vendor for software that has passed Windows Logo testing. Continue Anyway STOP InstallationAjuriohjelman asentaminen Macintosh-käyttöjärjestelmään
(1) Selaa CD-levyltä Macintoshiin tarkoitettu ajuriohjelman versio.
Vaihe 1: Napsauta painiketta 'Driver Setup' (asenna ajuri).
Vaihe 2: Napsauta painiketta 'Driver Setup.
(2) Asenna ajuriohjelma noudattamalla vaiheittaisia ohjeita.
(3) Odota, kunnes asennus on päättynyt.
text_image
Setup Items Driver Setup Electronic User's Manual ExitVaihe 2: Piirustuslaudan kytkeminen Windows- tai Macintosh-tietokoneeseen USB-kaapelilla
Windows:
(3) Kytke piirustuslauta tietokoneeseen USB-kaapelilla. Kestää muutaman sekunnin ennen kuin 'Found New Hardware Wizard' -ikkuna (uusi ohjattu toiminto löytynyt) ilmestyy näyttöön. Napsauta painiketta 'Finalize' (viimeistele).
text_image
Assistent für das Suchen neuer Hardware Fertigstellen des Assistenten Die Software für die folgands Hardware wurde installiert HID Tabet TWA60 Die installierte Hardware wird erst funktionieren, nachden der Computer neu gestaltet wurde. Klicken Sie auf "Fertig stellen", um den Vorgang abzuschließen. Zurich Fertig stellen Abbrachen(4) Näytön alareunan tehtäväpalkkiin ilmestyy pieni lautakuvake Kaksoisnapsauta sitä, niin näyttöön avautuu asetusikkuna.


text_image
3:20 PMVaihe 3: Piirustuslaudan ja kynän asetustenteko
text_image
New Document View: Button1 Mouse Next Tools Preview New Label Control Panel Version 5.0F Mouse Type in Systems Ship Mouse Label PC Feature OK Cancel New Document Info: (Default) Sample: Web Cells Preview Button Command Button Name Free Tip Mouse Command Left Dot Left Column Left Column Click Playoff Click Party Cycle Dot Reset Find Close OK Cancel Cancel1. Info-välilehti (tiedot)
Info-välilehdellä näkyvät käytössä olevan ajuriohjelman tiedot. Välilehdeltä voidaan haluttaessa: c. liittää kuvake tehtäväpalkkiin tai olla liittämättä sitä d. aktivoida toiminnot, jos käytössä on Windows-lauta.
Huomaa: Toimintoja ei ole valittavissa, jos käytössä on Macintosh-käyttöjärjestelmä.
2. Button-välilehti (painikkeet) - painikkeilla annettavat käskyt
Kynänkärjen ja kahden painikkeen toiminnot voidaan määrittää mieltymysten mukaan.
Kaksoisnapsautuksen herkkyyttä voidaan säätää hitaan ja nopean nopeuden välillä.
Huomaa: Macintosh-käyttöjärjestelmässä ei ole käytettävissä keskimmäistä painiketta tavanomaista eikä kaksoisnapsautusta varten.
text_image
Pen Tablet Info | Button | Scope | Hot Cells | Pressure Pen Area Full Area Screen Ratio Reserve Edge 0.10 inch Pen Area Dimensions: Width (X) 0.00 inch Height (Y) 5.01 inch Pen Area Offset: Offset (X) 0.00 inch Offset (Y) 0.00 inch OK Cancel Apply3. Scope-välilehti (laajuus)
Scope-välilehdellä on kolme toimintoa: a. Full Area (koko alue) tällä valitaan laajin mahdollinen työskentelyalue. b. Screen Ratio (kuvasuhde) tällä valitaan työskentelyalue, joka sopii automaattisesti näytön kuvasuhteeseen. c. Reserve Edges (marginaalit): tällä valitaan yläosioon jäävä tila pikanäppäimiä varten.

natural_image
Blue rectangular shape with diagonal hatching on a white background, no text or symbols present.Vihje: Näiden kolmen vaihtoehdon lisäksi työskentelyaluetta on helppo siirtää ja sen kokoa säätää liikuttamalla kuvassa näkyvän sinisen suorakulmion kehystä.
text_image
Per Tablet Info | Button | Scope | Hot Cells | Preview Hot Pad Layout Heat Edges ✓ Uprow □ Left □ Inner □ Right Internal E-mailer Run - E-mailer Define Print Clear Load Cells # OK Cancel Apply4. Hot Cell -välilehti (pikanäppäimet)
a. Hot Edges (pikamarginaalit)
Pikamarginaalien avulla on mahdollista sijoittaa pikanäppäimet. HyperPen 10000U:n pikanäppäimet voidaan sijoittaa ainoastaan laudan yläosaan. b. Hot Pad Layout (pikanäppäinten asettelu) Pikanäppäinten oletusasetuksia voidaan muuttaa valitsemalla mikä tahansa 16 pikanäppäimestä. Napsauta painiketta 'Define' (määritä), mikäli haluat uudelleenmäärittää pikanäppäimiä. Syötä sitten ohjelma tai toiminto, ohjelman tallennuspaikka ja parametrit, mikäli tarpeen. Syötetty merkkijono tallentuu ohjelmistoon parametrinä. Vahvista asetus painikkeella 'OK'.
Kaikki pikanäppäimet sisältävä yleiskuva voidaan tulostaa painikkeella 'Print' (tulosta).
Huomaa: Macintosh-järjestelmässä ei ole tulostuspainiketta.
Napsauta painiketta 'Clear' (poista), mikäli haluat poistaa alkuasetuksia.
text_image
Picture Text OK Cancel Add: 100% Name: Text: Screen: Help Cable Smoothing LogX Home OK Cancel Help5. Pressure-välilehti (painoherkkyys)
Kynän painoherkkyyttä voidaan säätää osoittimen avulla asetuksesta 'Light' (kevyt) asetukseen 'Heavy' (raskas). Piirrä 'Pressure Test' -kenttään (painoherkkyyystesti), niin näet valitulla painoherkkyydellä syntyvän viivan paksuuden.
Vaihe 4: Laitteen ja ajuriohjelman toimintojen asennuksen tarkistaminen
Laudan toiminta tarkistetaan seuraavia ohjeita noudattaen:
-
Merkkivalo alkaa vilkkua heti, kun itse piirroslauta aktivoituu.
-
Jos se siirtyy valmiustilaan, se voidaan aktivoida napauttamalla kynänkärjellä mihin tahansa pintaan. Jos kynää ei käytetä vähään aikaan, sisäänrakennettu virransäästötoiminto saa kynän tai hiiren siirtymään valmiustilaan.
- Paina kynän hylsyssä olevaa painiketta. Merkkivalo syttyy palamaan.
- Kun kynää liikutellaan työskentelyalueella, näytössä näkyvän osoittimen tulee liikkua vastaavalla tavalla.
Tuote-erittely
| Tekninen erittely | |
| I. Piirustuslauta | |
| Koko 30.7 cm (12") in diagonal | |
| Työskentelyalue 25.4x15.8 cm (10" x 6.25") | |
| Kuvasuhde 16:10 | |
| Mitat 35.4 x 27.7 x 1.5 cm (13.9" x 10.9" x 0.6") | |
| Erottelutarkkuus kork. 4000 lpi | |
| Havaintoetäisyys | kork. 10 mm lukemisen aikana, kork. 5 mm kirjoituksen aikana |
| Reagointinopeus 200 rps (havaintoa sekunnissa) | |
| Toimintopainikkeet 16 makropainiketta | |
| Merkkivalo 1 vihreä merkkivalo | |
| Virrankulutus kork. 0,35 W, USB-liitännästä | |
| Rajapinta USB 2.0 (täysnopeus) | |
| Paino 820 g | |
| II. Digitaalinen kynä | |
| Mallin tunnus P23 musta | |
| Kynän painoherkkyys | 1024 tasoa |
| Kynän tarkkuus +/-0,3 mm | |
| Painike | 3 |
| Paino 25 g | |
| III. Pakkauksen sisältö | |
| Ohjelmistojen yhdistelmä | Adobe Photoshop Element 6.0, PenNotice, Annotate for Word , PenCommander, PenMail, PenSigner |
| Lisätarvikkeet | kynä x 1, kynän täyttöpatruuna x 3, kynäpidike x 1, alkaliparisto (1,5 V) AAA x 1, pikaopas, ajuri-CD-levy x 1, Adobe Photoshop Element 6.0 -CD-levy x 1 |
| Tuotenumero | 100055 |
Herzlich Willkommen
Lieber Benutzer, vielen Dank für den Kauf dieses Produkts. In die Entwicklung dieses Geräts wurde viel Zeit und Mühe investiert, und wir hoffen, es wird Ihnen viele Jahre störungsfreien Betrieb und Freude bescheren.

text_image
CE RoHS COMPLIANTWenn Sie eines Tages Ihr Produkt entsorgen müssen, führen Sie bitte alle möglichen Bauteile der Wiederverwertung zu. Batterien und wieder aufladbare Batterien dürfen nicht über den Hausmüll entsorgt werden. Bitte entsorgen Sie diese über Ihre örtliche Sammelstelle.
Umweltschutz lebt vom Mitmachen.
Lieferumfang
Die folgenden Artikel sollten im Lieferumfang enthalten sein:
- Grafiktablett
- Digitaler Zeichenstift
- Stiftspitzen
● Stifthalter & Spitzenwechsler - AAA-Alkali-Batterie
- Erste Schritte
● Hotline-Broschüre - Treiber-CD
- Anwendungssoftware-CD
Systemanforderungen
1. für Windows-PCs
- Windows XP / Windows Vista 32 & 64bit / Win7 32 & 64bit
- 1 freien USB Anschluss
- Optisches Laufwerk zur Software- Installation
2. für Macintosh
- MAC OS X Version 10.4.11 bis 10.6
Machen Sie sich mit Ihrem HyperPen 10000U vertraut
3. Grafiktablett
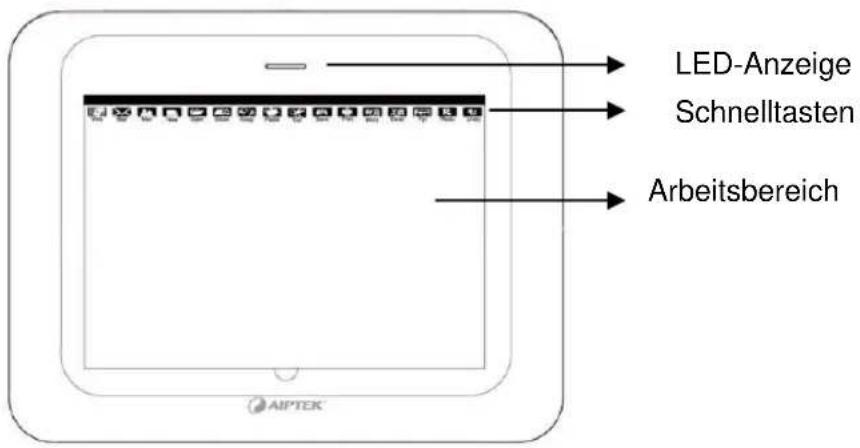
text_image
LED-Anzeige Schnelltasten Arbeitsbereich AIPTEK- Digitaler Zeichenstift 3. Stifthalter & Spitzenwechsler
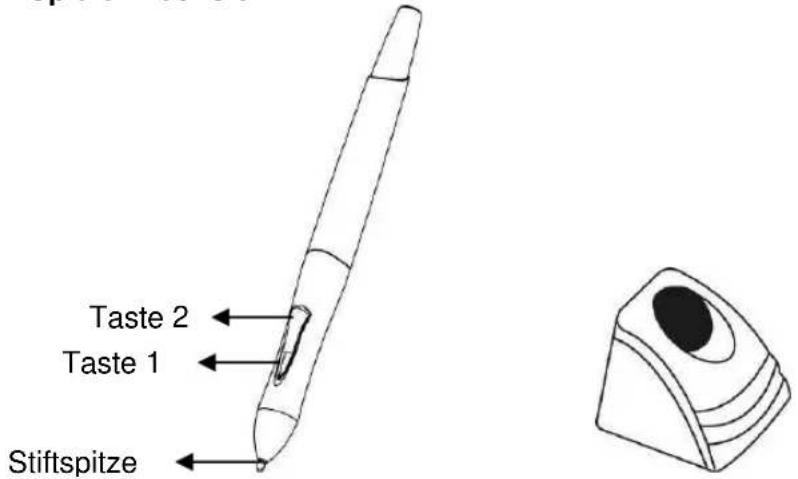
text_image
Taste 2 Taste 1 StiftspitzeEinlegen der Batterie in den digitalen Zeichenstift
Schritt 1: Ziehen Sie das vordere und hintere Teil des digitalen Zeichenstifts auseinander, um ihn zu öffnen.

natural_image
Close-up of a pen-like tool with a pointed tip and handle, shown with measurement arrows (no text or symbols)Schritt 2: Legen Sie die Batterie mit den und Polen +/- korrekt ausgerichtet in das Batteriefach (siehe Abbildung).

natural_image
Close-up of a cylindrical battery with internal components and polarity markings (no text or symbols visible)Schritt 3: Richten Sie den Pfeil an den Tasten des Zeichenstifts aus.
natural_image
Close-up of a pen tip with a red-circled end, showing blade and handle (no text or symbols visible)Ablegen des Zeichenstifts zwischen zwei Aufgaben
Wenn Sie den digitalen Zeichenstift ablegen, stellen Sie bitte sicher, dass die Stiftspitze keinen anderen Gegenstand berührt. Dies verhindert, dass Druck auf der Stiftspitze zur Verringerung der Lebensdauer der Batterie führt. Es wird empfohlen, den Zeichenstift mit der Spitze nach oben in den Zeichenstifthalter zu stellen oder ihn flach abzulegen, wobei darauf zu achten ist, dass die Spitze keine Gegenstände berührt.

natural_image
Line drawing of a pen or stylus with a base and pointed tip, no text or symbols presentAustausch der Zeichenspitze
Um die Spitze des Zeichenstifts auszutauschen, ziehen Sie die Spitze mit der am Boden des Zeichenstifthalters integrierten Klemme aus dem Stift heraus.
Schritt 1: Stecken Sie die Spitze in die Klemme.
Schritt 2: Ziehen Sie den Stift nach hinten, so dass sich die Spitze löst.
natural_image
Two-step illustration showing a tool being inserted into a device, with no visible text or symbols.Schritt 3: Stecken Sie die neue Spitze in den Zeichenstift.
natural_image
Two-step black-and-white photo showing a hand holding a pencil and then applying a pencil to a surface (no text or symbols visible)Installation
Schritt 1: Installation des Treibers im Windows-Betriebssystem
(1) Legen Sie die CD ins CD-ROM-Laufwerk ein. Das Installationsprogramm startet automatisch.
(2) Klicken Sie auf, Driver Setup (Treiberinstallation)', um die Installation zu starten.
Achtung: Bitte installieren Sie den Treiber bevor Sie das Grafiktablett an Ihren PC anschließen.

text_image
AIPTEK® Add your own system Driver Setup Tablet Software Setup Tablet Flash Demo Electronic User's Manual(3) Falls sich ein Popup-Fenster mit dem Hinweis 'The software you are installing has not passed Windows logo testing to verify its compatibility with Windows XP (Die Software, die Sie installieren, hat das Windows-Logo-Testverfahren nicht durchlaufen, um ihre Kompatibilität mit Windows XP zu prüfen)' öffnet, klicken Sie auf ,Continue Anyway (Trotzdem fortfahren)', um mit der Installation fortzufahren.
text_image
Software Installation The software you are installing has not passed Windows Logo testing to verify its compatibility with Windows XP. (Tell me why this testing is important.) Continuing your installation of this software may impair or destabilize the correct operation of your system either immediately or in the future. Microsoft strongly recommends that you stop this installation now and contact the software vendor for software that has passed Windows Logo testing. Continue Anyway STOP InstallationInstallation des Treibers im Mac-Betriebssystem
(1) Suchen Sie auf der CD nach der Treiberversion für Ihren Mac:
(2) Folgend sie den Anweisungen Schritt für Schritt, um den Treiber zu installieren.
(3) Warten Sie bis die Installation beendet ist.
Schritt 1 Klicken Sie auf 'Driver Setup (Treiberinstallation)' Schritt 2 Klicken Sie auf Driver Setup (Treiberinstallation)
text_image
Setup Items Driver Setup Electronic User's Manual ExitSchritt 2: Anschließen des Grafiktabletts an einen PC oder MAC über USB-Kabel
Für Windows:
(5) Schließen Sie das Grafiktablett mit dem USB-Kabel an den Computer an. Nach wenigen Sekunden öffnet sich das Popup-Fenster 'Found New Hardware Wizard (Neue Hardware gefunden)'. Klicken Sie auf die Schaltfläche "Finalize (Beenden)".
text_image
Assistent für das Suchen neuer Hardware Fertigstellen des Assistenten Die Software für die folgende Hardware wurde installiert: HID Tablet TWA60 Die installierte Hardware wird erst funktionieren, nachdem der Computer neu gestartet wurde. Klicken Sie auf "Fertig stellen", um den Vorgang abzuschließen.text_image
3:20 PMSchritt 3: Installation des Grafiktabletts und Zeichenstifts
text_image
New Document View: [Button] [Scope] [Text Table] [Message] New Document: Custom Panel Version 6.03 Show Text in System Top Support Text in PC Framework OK Cancel Help1. Die Registerkarte 'Info'
In der Registerkarte „Info“ werden Informationen zum aktuellen Treiber angezeigt. Sie können folgende Auswahl treffen: e. das Symbol in der Symbolleiste anzeigen oder nicht. f. die Funktionen aktivieren, falls Sie einen Grafiktablett-PC verwenden. Achtung: Unter dem MAC-Betriebssystem sind keine Funktionen für einen Grafiktablett-PC vorhanden. text_image
New Texted Info Switch Sample Har Cells Pressure Button Command: Before Image Size Tip Share Button 1 To Be With Bit 2 Noise Mouse Command Left Dot Left Column Left Column Dot Right Dot Right Column Dot Find Find OK Cancel Help2. Die Registerkarte 'Button (Taste)' - Tastenbefehl
Sie können die Funktion der Zeichenstiftspitze und der zwei Tasten nach Ihren Wünschen festlegen. Sie können bei der Empfindlichkeit der Doppelklickgeschwindigkeit zwischen Langsam und Schnell wählen. Achtung: Beim Mac-Betriebssystem gibt es kein Mittel-Klick und kein Mittel-Doppelklick. text_image
Pen Tablet Info | Button | Scope | Hot Cells | Pressure | Pen Area Full Area Screen Rate Reverse Edge 0.16 inch Pen Area Dimensions Width (X) 0.00 inch Height (Y) 5.04 inch Pen Area Offset Offset (X) 0.00 inch Offset (Y) 0.00 inch OK Cancel Apply3. Die Registerkarte 'Scope (Bereich)'
Die Registerkarte 'Scope' beinhaltet drei Funktionen: a. Full Area (Voller Bereich) Auswahl des größten Arbeitsbereichs. b. Screen Ratio (Bildschirmverhältnis) Richtet den Arbeitsbereichs so ein, dass er sich automatisch an das Bildseitenverhältnis des Bildschirms anpasst. c. Reserve Edges (Aussparen der Ränder): Lässt im oberen Bereich Platz für Schnelltasten. natural_image
Blue rectangular shape with diagonal hatching and corner markers, no text or symbols presenttext_image
Fun Tablet Info | Button | Scope | Net Cells | Pressure | Hot Pad Layout Hot Edges □ Upturn □ Left □ Inner □ Right Internet Explorer Run-126ptec.com Define Find Clear Load Delete OK Cancel Apply4. Registerkarte 'Hot Cell (Schnelltaste)'
a. Hot Edges (Funktionsränder)
In den Funktionsrändern können Schnelltasten angeordnet werden. Die Schnelltasten des HyperPen 10000U können nur oben im Grafiktablett angeordnet werden.b. Hot Pad Layout (Anordnung des Schnelltasten-Feldes)
Sie können die Standard-Einrichtung der Schnelltasten ändern, indem Sie aus 16 Schnelltasten auswählen. Wenn Sie die Schnelltasten neu festlegen möchten, klicken Sie auf 'Define (Festlegen)'. Geben Sie dann das Programm oder die Funktion, den Pfad bzw. Speicherort des Programms und sofern notwendig die Parameter ein. Die eingegebene Zeichenfolge wird auf das Programm in Form von Parametern übertragen. Klicken Sie 'OK', um das Zurücksetzen zu bestätigen. Wenn Sie einen Überblick über alle Schnelltasten haben möchten, klicken Sie auf „Print (Drucken)“.Achtung: Im Mac-System gibt es keine Print-Taste.
Wenn Sie die anfängliche Installation löschen möchten, klicken Sie auf 'Clear (Löschen)'. text_image
Pixelated Text Click Gradients Light OK Cancel Help5. Registerkarte 'Pressure (Druck)'
Der Druck des Zeichenstifts kann zwischen „Light (Leicht)“ und „Heavy (Stark)“ angepasst werden. Führen Sie im Bereich „Pressure Test (Drucktest)“ eine Probezeichnung aus, um die Strichdicke unter der gewählten Druckeinstellung zu prüfen.Schritt 4: Prüfen der Hardwareinstallation und Treiberfunktionen
Prüfen Sie die Funktion des Grafiktabletts wie im Folgenden beschrieben: 1. Sobald sich das Grafiktablett einschaltet, beginnt die LED zu blinken. 2. Tippen Sie mit der Spitze des Zeichenstifts auf eine beliebige Oberfläche, um den Stift erneut zu aktivieren, falls er sich im Standby-Modus befindet. Wenn der Zeichenstift eine Zeit lang nicht in Gebrauch war, wird der Stift oder die Maus über eine integrierte Stromsparfunktion in den Standby-Modus versetzt. 3. Drücken Sie eine Taste auf dem Gehäuse des Stifts. Die LED beginnt zu leuchten. 4. Lassen Sie den Stift über den Arbeitsbereich gleiten, der Kursor auf dem Bildschirm sollte sich gleichermaßen bewegen. Technische Produktdaten| Technische Daten | |
| I. Grafiktablett | |
| Größe 30.7 cm (12") in diagonal | |
| Arbeitsbereich 25.4x15.8 cm (10" x 6.25") | |
| Bildseitenverhältnis 16:10 | |
| Abmessungen 35.4 x 27.7 x 1.5 cm (13.9" x 10.9" x 0.6") | |
| Auflösung Bis zu 4000 lpi | |
| Erkennungsabstand Max. 10 mm Lesen. Max. 5mm Schreiben | |
| Anzeigefrequenz 200 rps (Anzeigen pro Sekunde) | |
| Funktionstasten 16 Makrotasten | |
| LED-Anzeige 1 grüne LED | |
| Stromverbrauch Max. 0,35W über USB | |
| Schnittstelle USB 2.0 (Full Speed) | |
| Gewicht 820g | |
| II. Digitaler Zeichenstift | |
| Modell-Kennzahl P23 Black | |
| Zeichenstift-Druck 1024 Stufen | |
| Zeichenstift-Genauigkeit +/- 0,3mm | |
| Taste | 3 |
| Gewicht 25g | |
| III. Lieferumfang | |
| Softwarepaket | Adobe Photoshop Element 6.0, PenNotice, Annotate for Word , PenCommander, PenMail, PenSigner |
| Zubehör | 1 Zeichenstift, 3 Stift-Nachfüllungen, 1 Stifthalter, 1 Alkali-Batterie (1,5V) AAA, Gebrauchsanleitung "Erste Schritte", 1 Treiber-CD, 1 Adobe Photoshop Element 6.0-CD |
| Artikelnr. | 100055 |
Benvenuto
Grazie per aver acquistato questo prodotto. Il prodotto è stato sviluppato grazie a un considerevole investimento in termini di tempo e impegno al fine di poter garantire diversi anni di funzionamento senza problemi. text_image
CE RoHS COMPLIANTContenuto della confezione
La confezione contiene i seguenti pezzi: - Tavoletta grafica - Penna digitale ● Punte per penna - Portapenna ed estrattore per punte ● Batteria alcalina AAA - Guida avvio rapido ● Foglietto informativo assistenza clienti - CD del driver - CD software applicativoRequisiti di sistema
1. per PC Windows
- Windows XP / Windows Vista 32 & 64bit / Win7 32 & 64bit - 1 porta USB libera - Unità ottica per l'installazione del software.2. per Macintosh
\- MAC OS X versione da 10.4.11 a 10.6Caratteristiche di HyperPen 10000U
4. Tavoletta
text_image
Spia LED Hot cell Area di lavoro AIPTEKtext_image
Pen bottone 2 Pen bottone 1 Punta della pennaInstallazione della batteria nella penna digitale
Fase 1: Tirare la parte superiore e la parte inferiore della penna digitale in due direzioni opposte per aprirla. natural_image
Close-up of a pen-like tool with a pointed tip and handle, shown in side profile (no text or symbols visible)natural_image
Close-up of a cylindrical electronic component with metallic leads and a terminal block, showing no visible text or symbols.natural_image
Close-up of a pen tip with a red-circled end, showing internal structure and movement arrows (no text or symbols)Come riporre la penna digitale quando non è in uso
Per riporre correttamente la penna digitale, assicurarsi che la punta non entri in contatto con alcun oggetto. In caso contrario, la pressione applicata alla punta della penna determinerà un progressivo esaurimento della batteria della penna. Si raccomanda di riporre la penna nell'apposito portapenna con la punta rivolta verso l'alto oppure di appoggiarla orizzontalmente evitando che la punta entri in contatto con qualsiasi oggetto. natural_image
Line drawing of a handheld tool with a base and handle (no text or symbols)Sostituzione della punta della penna
Per sostituire la punta della penna, estrarla con l'apposita pinzetta integrata nella parte inferiore del portapenna. Fase 1: Inserire la punta della penna nella pinzetta. Fase 2: Tirare la penna in modo da estrarre la punta. natural_image
Two-step illustration showing a tool being inserted into a device, with no visible text or symbols.natural_image
Two-step black-and-white photo showing a hand holding a pencil and applying material to a surface, with an arrow indicating the process (no text or symbols present)Installazione
Fase 1: Installazione del driver per il sistema operativo Windows
(1) Inserire il CD nell'unità CD-ROM. Il programma di installazione si avvierà automaticamente. (2) Fare clic su "Driver Setup" (Installazione driver) per avviare l'installazione.N.B. Installare il driver prima di collegare la tavoletta al PC.
text_image
AIPTEK Keep and let us have your own Driver Setup Tablet Software Setup Tablet Flash Demo Electronic User's Manualtext_image
Software Installation The software you are installing has not passed Windows Logo testing to verify its compatibility with Windows XP. (Tell me why this testing is important.) Continuing your installation of this software may impair or destabilize the correct operation of your system either immediately or in the future. Microsoft strongly recommends that you stop this installation now and contact the software vendor for software that has passed Windows Logo testing. Continue Anyway STOP InstallationInstallazione del driver per il sistema operativo Mac
(1) Sfogliare il CD e cercare la versione del driver per il Mac in uso: (2) Seguire le istruzioni della procedura guidata per installare il driver. (3) Attendere il completamento dell'installazione.Fase 1 Fare clic su Driver Setup (Installazione driver)
Fase 2 Fare clic su Driver Setup
text_image
Setup Items Driver Setup Electronic User's Manual ExitPer Windows:
(7) Collegare la tavoletta al computer mediante cavo USB. Dopo pochi secondi verrà visualizzata la finestra "Found New Hardware Wizard" (Installazione guidata nuovo hardware). Fare clic sul pulsante "finalizee" (Fine). text_image
Assistent für das Suchen neuer Hardware Fertigstellen des Assisterten Die Software für die folgende Hardware wurde installiert HID Tablet TWASO Die installierte Hardware wird erst funktionieren; nachdem der Computer neu gestaltet wurde. Klicken Sie auf 'Fertigstellen', um den Vorgang abzuschließen Zurück Fortig stellen Abbröhentext_image
3:20 PMFase 3: Configurazione della tavoletta e della penna
text_image
New Tablet View Bottom Surge Hot Cells Pressure New Tablet (Cardinal Panel Version 5.0) Show User at System Top Transport Tablet PC Provider OK Cancel New Tablet View Bottom Surge Hot Cells Pressure Button: Default Locking Phone: Free Zip: 123476789 Close Button 1 Close to Button 2 Mouse Command Left Click Left Double Click Right Click Play Options Dot Reset Load OK Cancel1. La scheda Info (Informazioni)
La scheda Info visualizza le informazioni del driver corrente. È possibile scegliere di: g. visualizzare o meno l'icona nella barra degli strumenti h. abilitare le relative funzioni se si utilizza un Tablet PC. N.B. Nel sistema operativo Mac non sono disponibili funzioni per Tablet PC.2. La scheda Button (Pulsante) - Comando Button (Pulsante)
È possibile definire la funzione della punta della penna e dei pulsanti della penna in base alle proprie preferenze. È possibile regolare la sensibilità della velocità del doppio clic. N.B. Nel sistema operativo Mac non è possibile fare clic o doppio clic con il pulsante centrale del mouse. text_image
Pen Tacket Info | Button | Scope | Hot Cells | Pressure Pen Area Full Area Screen Ratio Recovery Edge 0.18 inch Pen Area Dimensions Width (X): 0.00 inch Height (X): 0.00 inch Pen Area Offset Offset (X): 0.00 inch Offset (Y): 0.00 inch OK Cancel Apply3. La scheda Scope (Ambito)
La scheda Scope (Ambito) contiene tre funzioni: a. Full Area (Area completa) consente di selezionare l'area di lavoro più grande. b. Screen Ratio (Rapporto schermo) consente di impostare l'area di lavoro per adattarla automaticamente alle dimensioni dello schermo. c. Reserve Edges (Riserva bordi): consente di riservare lo spazio per le celle di richiamo funzioni nell'area superiore. natural_image
Blue shaded rectangle with corner markers, no text or symbols presenttext_image
Pen Tablet Info | Button | Scope | Hot Cells | Pressure | Hot Pad Layout Hot Edges Up Up Up Up Internet Explorer Run - 10pcio.com Online Print Clear Load Default OK Cancel Auto4. Scheda Hot Cell (Cella di richiamo funzioni)
a. Hot Edges (Bordi per celle di richiamo funzioni) I bordi per le celle di richiamo funzioni consentono di scegliere la posizione delle celle. Le celle di richiamo funzioni di HyperPen 10000U sono posizionate solo nella parte superiore della tavoletta. b. Hot Pad Layout (Layout pannello celle di richiamo funzioni) È possibile modificare l'impostazione predefinita delle celle di richiamo funzioni selezionando una delle 16 celle disponibili. Se si desidera ridefinire le celle di richiamo funzioni, fare clic su "Define" (Definisci). Digitare il programma o la funzione, selezionare il percorso in cui è stato salvato il programma e, se necessario, i parametri. La stringa digitata verrà trasmessa al programma sotto forma di parametri. Fare clic su "OK" per confermare la nuova impostazione. Se si desidera ottenere una panoramica di tutte le celle di richiamo funzioni, fare clic su "Print" (Stampa). N.B. Nel sistema Macintosh il tasto di stampa non è disponibile. Se si desidera eliminare l'impostazione iniziale, fare clic su "Clear" (Cancella).5. Scheda Pressure (Pressione)
text_image
Text Format: Text Ctrl OK Cancel Add: Create Text Edit: Create Text LogN HelpFase 4: Verifica dell'installazione per il corretto
funzionamento dell'hardware e del driver
Utilizzare i suggerimenti forniti di seguito per verificare il funzionamento della tavoletta: 1. Appena la tavoletta si attiva, il LED inizia a lampeggiare. 2. Premere su una superficie qualsiasi con la punta della penna per riattivarne le funzioni in caso di attivazione della modalità standby. Quando la penna non viene utilizzata per un certo periodo di tempo, la funzione di risparmio energetico integrata attiva automaticamente la modalità standby per la penna o per il mouse. 3. Premere un pulsante sulla penna. Il LED si illuminerà. 4. Muovere la penna nell'area di lavoro, il cursore sullo schermo dovrebbe spostarsi di conseguenza. Specifiche del prodotto| Specifiche | |
| I. Tavoletta | |
| Dimensioni 30.7 cm (12") in diagonal | |
| Area di lavoro 25.4x15.8 cm (10" x 6.25") | |
| Rapporto aspetto 16:10 | |
| Dimensioni 35.4 x 27.7 x 1.5 cm (13.9" x 10.9" x 0.6") | |
| Risoluzione Fino a 4.000 lpi | |
| Distanza di rilevamento | Max. 10 mm per la lettura. Max. 5 mm per la scrittura |
| Velocità rapporti 200 rps (rapporti al secondo) | |
| Tasti funzione 16 macrotasti | |
| Spia LED 1 LED verde | |
| Consumo energetico Max. 0,35 W, con collegamento USB | |
| Interfaccia USB 2.0 (Alta velocità) | |
| Peso 820 g | |
| II. Penna digitale | |
| Codice modello P23 Nero | |
| Pressione penna 1.024 livelli | |
| Precisione penna +/- 0,3 mm | |
| Pulsanti 3 | |
| Peso 25 g | |
| III. Contenuto della confezione | |
| Software inclusi | Adobe Photoshop Element 6.0, PenNotice, Annotate for Word, PenCommander, PenMail, PenSigner |
| Accessori | Penna x1, Cartuccia per penna x3, portapenna x1, batteria al calina (1,5 V) AAA x1, Guida avvio rapido, CD del driver x1, Adobe Photoshop Element 6.0 CD x 1 |
| Articolo n. 100055 | |
Velkommen
Takk for at du kjøpte dette produktet. Vi har brukt mye tid og innsats for å utvikle dette produktet, og vi håper at du kan bruke det problemfritt i mange år.     Når tiden er inne for å kassere produktet, bes du om å resirkulere alle mulige deler. Batterier og oppladbare batterier skal ikke avhendes sammen med husholdningsavfall. Vennligst resirkuler dem på din lokale resirkuleringsstasjon. Sammen kan vi bidra til å beskytte miljøet.Pakkeinnhold
Du skal ha mottatt følgende elementer i pakken: - Grafisk digitaliseringsbord - Digitalpenn - Pennespisser - Pennholder & spissfjerner ● Alkaliske AAA batterier - Hurtigstartveiledning ● Hotline brosjyre - Driver CD - Brukersoftware CDSystemkrav
1. for Windows PC
- Windows XP / Windows Vista 32 & 64bit / Win7 32 & 64bit - 1 free USB port - Optical drive for software installation2. for Macintosh
\- MAC OS X 10.4.11 til 10.6 VersjonKjenne din HyperPen 10000U
5. Digitaliseringsbord text_image
LED indikator Aktive celler (snarvei) Arbeidsområdetext_image
Penneknapp 2 Penneknapp1 Pen TipSette batteriet i digitalpennen
Trinn 1: Dra den øvre og nedre delen av digitalpennen i motsatt retning for å åpne den. natural_image
Close-up of a pen-like tool with a pointed tip and cylindrical body, shown against a plain background (no text or symbols visible)natural_image
Close-up of a cylindrical battery with internal components and wiring, no visible text or symbolsnatural_image
Close-up of a pen tip with a red-circled end, showing blade and handle (no text or symbols visible)Lagre digitalpennen mellom oppgavene
For å lagre pennen riktig, skal du sørge for at pennespissen ikke har kontakt med noen gjenstander. Hvis dette gjøres, vil trykket som blir lagt til pennespissen forårsake en konstant tømming av batteriet. Det anbefales at du setter pennen i penneholderen, og lagrer den med pennespissen pekende oppover, eller legge den ned slik at spissen ikke kommer i kontakt med noen gjenstander. natural_image
Line drawing of a brush tool with a base and handle (no text or symbols)Skifte pennespiss
For å skifte pennespiss, skal du dra pennespissen med den innebygde penneklemmen nederst på penneholderen. Trinn 1: Sett pennespissen i penneklemmen. Trinn 2: Dra i pennen slik at spissen løsner. natural_image
Two-step illustration showing a tool being inserted into a device, with no visible text or symbols.natural_image
Two-step black-and-white photo showing a hand holding a pencil and then applying a pencil to a surface (no text or symbols visible)Installasjon
Trinn 1: Installere driver for Windows OS (1) Sett CD-en i CD-ROM stasjonen. Oppsettprogrammet vil starte automatisk. (2) Klikk "Driver Setup" (Driveroppsett) for å starte installasjonen. Merk: Vennligst installer driveren før du plugger digitaliseringsbordet i PC-en. text_image
AIPTEK® Rapid for RAP TAKES Driver Setup Tablet Software Setup Tablet Flash Demo Electronic User's Manualtext_image
Software Installation The software you are installing has not passed Windows Logo testing to verify its compatibility with Windows XP. (Tell me why this testing is important.) Continuing your installation of this software may impair or destabilize the correct operation of your system either immediately or in the future. Microsoft strongly recommends that you stop this installation now and contact the software vendor for software that has passed Windows Logo testing. Continue Anyway STOP InstallationInstallere driver for Mac OS
(1) Søk gjennom CD-en og finn driverversjonen for din Mac: Trinn 1 Klikk Driver Setup (Driveroppsett) Trinn 2 Klikk Driver Setup (Driveroppsett) (2) For å installere driveren, skal du følge instruksjonene trinn for trinn. (3) Vent til installasjonen er fullført. text_image
Setup Items Driver Setup Electronic User's Manual ExitFor Windows:
(9) Koble digitaliseringsbordet til datamaskinen med USB-kabel. Det vil ta noen sekunder før et vindu viser "Found New Hardware Wizard" (Funnet ny hardwareveiviser). Klikk på "finalize" (avslutte) knappen. text_image
Assistent für das Suchen neuer Hardware Fertigstellen des Assistenten Die Software für die folgands Hardware wurde installiert H10 Tabet TWA60 Die installierte Hardware wird erst funktionieren, nachdem der Computer neu gestaltet wurde. Klicken Sie auf "Fertig stellen", um den Vorgang abzuschließen e Zuckk Fertig stellen Abbrechentext_image
3:20 PMTrinn 3: Sette opp digitaliseringsbordet og pennen.
text_image
New Document Help | Button | Scope | Next Slide | Package | New Document Control Panel Version 5.01 SP: Inset U-Oral Systems Swap SP: Setup Tablet PD Feature OK Cancel OK1. Infofanen
Infofanen viser informasjon om den aktuelle driveren. Du kan velge å: i. vise ikonet i verktøylinjen eller ikke. j. aktivere funksjonene hvis du bruker en Tablet PC. Merk: Det er ingen funksjoner for Tablet PC under Mac OS.2. Knappfane – Knappkommando
Du kan definere funksjonen for pennespissen og tosyllinder knappene etter ønske. Du kan justere følsomheten med dobbeltklikkhastigheten mellom sakte til hurtig. Merk: Mac OS har ingen midtklikk og midtdobbelklikk. text_image
On: Select Info SubMI Sample View Color Pressure Button Continued Button Name: Free Tip Close Button 1 Button to Button 2 Mouse Continued Left Dot Left Outer Dot Left Outer Dot Left Outer Dot Left Outer Dot Find Default OK Lockedtext_image
Pen Tablet Info | Button | Scope | Hot Cells | Pressure Pan Area Full Area Screen Fails Pan Area Edges 0.16 inch Pan Area Dimensions: Width (X): 0.00 inch Height (Y): 5.01 inch Pan Area Offset: Offset (X): 0.00 inch Offset (Y): 0.00 inch OK Cancel Apply3. Områdefanen
Områdefanen har tre funksjoner: a. Fullt område: Velg det største arbeidsområde. b. Skjermforhold: Sett arbeidsområde til å automatisk passe til skjermens bildesideforhold c. Reserver kanter: Reserverer plassen for aktive celler på det øverste område. natural_image
Blue rectangular shape with diagonal hatching and corner markers, no text or symbols presenttext_image
Pen Tablet Info | Button | Scope | Hot Cells | Postcode Hot Pad Layout Hot Edges ✓ Upgrade □ Left □ Left □ Right Internal & closer Run - & close size Delining First Clear Load Data A OK Cancel Apply4. Fane for aktiv celle
a. Aktive kanter
Aktive kanter viser mulighetene for tilordning av aktive celler. Aktive celler til HyperPen 10000U er kun tilordnet på oversiden av digitaliseringsbordet.b. Hot Pad Layout
Du kan endre standardinnstillingen på de aktive cellene ved å velge en hver 16 aktive celler. Hvis du ønsker å omdefinere de aktive cellene, klikk på "Define" (Definer). Tasten i programmet eller funksjonen viser vei der programmet er lagret, og om nødvendig, parameterne. Strengen som er skrevet vil formidles til programmet i form av parametere. Klikk "OK" for å bekrefte justeringen. Hvis du ønsker å få et overblikk over alle aktive celler, skal du klikke "Print". Merk: Det er ingen skrivetast i Mac-systemer. If you want to clear the initial setting, click 'Clear'. text_image
Pixel Tree Cock Sensitivity Light Heavy OK Cancel5. Trykkfane
The pen pressure can be adjusted the indicator between 'Light' and 'Heavy'. Draw on the 'Pressure Test' area to see the thickness of handwriting under the selected pressure.Trinn 4: Bekrefte installasjon for hardware og driverfunksjoner
Bruk disse spissene for å bekrefte funksjonene til digitaliseringsbordet: 1. Så snart selve pennedigitaliseringsbordet aktiveres, starter LED å blinke. 2. Bank lett på overflaten med pennespissen for å "vekke" den hvis den er gått i hvilemodus. Hvis pennen ikke skal brukes over tid, får en innebygd strømsparingsfunksjon pennen eller musen til å gå inn i hvilemodus. 3. Trykk en knapp på pennesylinderen. LED vil lyse. 4. Sirkle eller flytt pennen i arbeidsområdet, og skjermmarkøren vil bevege seg i overensstemmelse med dette. Produktspesifikasjon| Spesifikasjoner | |
| I. Digitaliseringsbord | |
| Størrelse | 30.7 cm (12") in diagonal |
| Arbeidsområde | 25.4x15.8 cm (10" x 6.25") |
| Bildesideforhold | 16:10 |
| Dimensjoner | 35.4 x 27.7 x 1.5 cm (13.9" x 10.9" x 0.6") |
| Oppløsning | Opp til 4000 lpi |
| Påvisningsavstand | Maks 10 mm for lesing. Maks 5 mm for skriving |
| Rapportrate | 200 rps (rapporter per sekund) |
| Funksjonstaster | 16 makrotaster |
| LED indikator | 1 grønn LED |
| Strømforbruk | Maks 0,35W, fra USB |
| Grensesnitt | USB 2.0 (Full hastighet) |
| Vekt | 820g |
| II. Digitalpenn | |
| Modellkode | P23 Sort |
| Pennetrykk | 1024 nivåer |
| Pennenøyaktighet | +/- 0,3 mm |
| Knapp | 3 |
| Vekt | 25g |
| III. Pakkeinnhold | |
| Softwarepakke | Adobe Photoshop Element 6.0, PenNotice, Kommentarer for Word, PenCommander, PenMail, PenSigner |
| Tilbehør | Penn x1, Pennrefill x3, Penneholder x1, alkalisk batteri (1.5V) AAAx1, Hurtigstartveiledning, Driver CD x1, Adobe Photoshop Element 6.0 CDx1 |
| Artikkel nr. | 100055 |
Bem-vindo
Muito obrigado por ter adquirido este produto. Investimos muito tempo e esforço no seu desenvolvimento e esperamos que lhe proporcione muitos anos de funcionamento sem problemas. text_image
CE RoHS COMPLIANTConteúdo da embalagem
A embalagem deverá conter os seguintes artigos: - Mesa gráfica - Caneta digital - Bicos de caneta - Suporte de caneta e removedor do bico - Pilha AAA alcalina - Guia de início rápido - Folheto de linhas telefónicas directas - CD do controlador - CD do software da aplicaçãoRequisitos do sistema
1. para PC Windows
- Windows XP / Windows Vista 32 & 64bit / Win7 32 & 64bit - 1 free USB port - Optical drive for software installation2. para Macintosh
\- Sistema Operativo MAC X, versão 10.4.11 a 10.6Conhecer a sua HyperPen 10000U
6. Mesa
text_image
Indicador LED Teclas de atalho Área de trabalho AIPTEKnatural_image
Technical line drawing of a pen and its base (no text or symbols)Carregar a pilha da caneta digital
Passo 1: Para abrir, empurre as partes superior e inferior da caneta em direcções opostas. natural_image
Close-up of a pen tip with a black handle and white tip, shown from an angle measurement (no text or symbols visible)natural_image
Close-up of a cylindrical electronic component with metallic leads and a battery, showing internal structure and polarity markers (no text or symbols)natural_image
Close-up of a pen tip with a red-circled end, showing blade and handle (no text or symbols visible)Guardar a caneta digital entre trabalhos
Para guardar adequadamente a caneta digital, certifique-se de que o bico da caneta não entra em contacto com nenhum objecto. Se isto acontecer, a pressão exercida sobre o bico da caneta causará o desgaste constante da pilha da caneta. Recomenda-se que coloque a caneta no respectivo suporte, guarde-a com o bico da caneta a apontar para cima, ou pousada numa superfície plana sem que o bico entre em contacto com qualquer objecto. natural_image
Line drawing of a mechanical tool or probe with a base and handle (no text or symbols)Substituir o bico da caneta
Para substituir o bico da caneta, retire o bico da caneta utilizando o grampo para canetas incorporado na parte inferior do suporte da caneta. Passo 1: Insira o bico da caneta no grampo para canetas. Passo 2: Puxe a caneta de modo a que o bico se separe. natural_image
Two-step illustration showing a tool being inserted into a device, with no visible text or symbols.natural_image
Two-step black-and-white photo showing a hand holding a pencil and another pointing to a pen tip (no text or symbols visible)Instalação
Passo 1: Instale o controlador para o sistema operativo Windows
(1) Insira o CD na unidade de CD-ROM. O programa de configuração é iniciado automaticamente. (2) Clique em 'Driver Setup (Configuração do controlador) para iniciar a instalação. Aviso: Instale o controlador antes de ligar a mesa ao PC. text_image
AIPTEK® Driver Setup Tablet Software Setup Tablet Flash Demo Electronic User's Manualtext_image
Software Installation The software you are installing has not passed Windows Logo testing to verify its compatibility with Windows XP. (Tell me why this testing is important.) Continuing your installation of this software may impair or destabilize the correct operation of your system either immediately or in the future. Microsoft strongly recommends that you stop this installation now and contact the software vendor for software that has passed Windows Logo testing. Continue Anyway STOP InstallationInstale o controlador para o sistema operativo MAC
(1) Procure no CD a versão do controlador para o seu Mac: Passo 1 Clique em Driver Setup Passo 2 Clique em Driver Setup (2) Siga as instruções passo a passo para instalar o controlador. (3) Aguarde até a instalação estar concluída. text_image
Setup Items Driver Setup Electronic User's Manual ExitPasso 2: Ligar a mesa ao PC ou ao MAC através de um cabo USB
Com o Windows:
(11) Ligue a mesa ao computador através de um cabo USB. Demora alguns segundos até surgir uma janela com "Found New Hardware Wizard" (Detectado assistente de hardware novo). Clique no botão "finalizee" (finalizar). text_image
Assistent für das Suchen neuer Hardware Fertigstellen des Assistenten Die Software für die folgende Hardware wurde installiert HID Tablet TWABO Die installierte Hardware und erst funktionieren, nachdem der Computer neu gestaltet wurde. Klicken Sie auf 'Fertig stellen', um den Vorgang abzuschließen < Zurück Fortig stellen Abbrochentext_image
3:20 PMPasso 3: Configurar a mesa e a caneta
text_image
New Document Info | Bottom | Simple | Next Slids | Complete New Document Controls Panel Version 5.01 Smart Access System Top Smart Tablet PC Provider OK Cancel OKtext_image
Button Command Name Name Free Tip Width Button Standard Button 1 Standard Button 2 Width Size Command Left Clust Right Clust Left Clust Click Right Clust Right Clust Clust Close OK Canceltext_image
Pen Tablet Info | Button | Stop | Hot Cells | Pressure | Pen Area Full Area Screen Ratio Reserve Edges 0.16 inch Pen Area Dimensions Width (X): 0.00 inch Height (X): 0.00 inch Pen Area Offset Offset (X): 0.00 inch Offset (X): 0.00 inch OK Cancel Apply1. O separador Info (Informações)
O separador Info apresenta as informações sobre o controlador actual. Pode escolher: k. apresentar ou não o ícone na barra de ferramentas. I. activar as funcionalidades se estiver a utilizar um PC com a mesa. Aviso: Não existem funcionalidades para o PC da mesa com o sistema operativo Mac.2. O separador Button (Botão) - Button Command (Comando de botão)
Pode definir a função do bico da caneta e dos dois botões no depósito da caneta, de acordo com a sua preferência. Pode ajustar a sensibilidade da velocidade do clique duplo entre lento e rápido. Aviso: O sistema operativo Mac não tem uma velocidade média de clique e de clique duplo.3. O separador Scope (Âmbito)
O separador Scope contém três funções: a. Full Area (Área total) □ Seleccionar a área de trabalho mais ampla. b. Screen Ratio (Escala do ecrã) □ Configurar a área de trabalho para se ajustar automaticamente à relação altura/largura do ecrã. c. Reserve Edges (Reservar barras): Reservar espaço para as teclas de atalho na área superior. natural_image
Blue rectangular shape with diagonal hatching and corner markers, no text or symbols presenttext_image
Fun Tablet Info | Button | Scope | Hot Cells | Pressure Hot Pad Layout Hot Edges Up to Up to Up to Up to Internet Explorer Run - Options.com Delete Find Clear Load Default OK Cancel Apply4. Separador Hot Cell (Tecla de atalho)
a. Hot Edges (Barras de atalho)
As barras de atalho mostram a possibilidade de atribuição de teclas de atalho. As teclas de atalho da HyperPen 10000U estão localizadas apenas na parte superior da mesa.b. Hot Pad Layout (Disposição das teclas de atalho)
Pode alterar a configuração predefinida das teclas de atalho seleccionando quaisquer das 16 teclas de atalho. Se pretender redefinir as teclas de atalho, clique em 'Define" (Definir). Em seguida, escreva o programa ou função, a raiz onde o programa é guardado e os parâmetros, se necessário. A cadeia (string) digitada será passada para o programa sob a forma de parâmetros. Clique em 'OK" para confirmar a reinicialização. Se pretender obter um resumo sobre todas as teclas de atalho, clique em 'Print" (Imprimir).Aviso: Não existe a tecla Print no sistema Mac.
Se pretender limpar a configuração inicial, clique em 'Clear' (Limpar). text_image
Palette Text Black Red Green Blue Color Sensitivity Style: Herso OK Cancel Help5. Separador Pressure (Pressão)
A pressão da caneta pode ser ajustada no indicador, entre 'Light" (Leve) e 'Heavy" (Pesada). Desenhe na área 'Pressure Test" (Teste de pressão) para ver a espessura da caligrafia com a pressão seleccionada.Passo 4: Verificar a instalação relativamente às funções do hardware e do controlador
Use as sugestões abaixo para verificar o desempenho da mesa: 1. Assim que a mesa fica activada, o LED começa a piscar. 2. Bata levemente em qualquer superfície com o bico da caneta para a "activar", se esta estiver em modo de espera. Quando a caneta não é utilizada durante algum tempo, uma funcionalidade integrada de poupança de energia faz com que a caneta ou o rato passem ao modo de espera. 3. Prima um botão no depósito da caneta. O LED irá acender. 4. Passe ou mova a caneta na área de trabalho; o cursor no ecrã deve mover-se em conformidade. Especificações do produto| Especificações | |
| I. Mesa | |
| Dimensão 30.7 cm (12") in diagonal | |
| Área de trabalho 25.4x15.8 cm (10" x 6.25") | |
| Relação altura/largura 16:10 | |
| Dimensões 35.4 x 27.7 x 1.5 cm (13.9" x 10.9" x 0.6") | |
| Resolução Até 4000 lpi | |
| Distância de detecção Máx. 10 mm para leitura. Máx. 5 mm para escrita. | |
| Velocidade de transmissão 200 rps (transmissão por segundo) | |
| Teclas de função 16 teclas macro | |
| Indicador LED 1 LED verde | |
| Consumo de energia Máx. 0,35 W do USB | |
| Interface USB 2.0 (Velocidade total) | |
| Peso 820 g | |
| II. Caneta digital | |
| Código do modelo P23 Black (Preta) | |
| Pressão da caneta 1024 níveis | |
| Precisão da caneta +/- 0,3 mm | |
| Botão | 3 |
| Peso 25 g | |
| III. Conteúdo da embalagem | |
| Pacote de software | Adobe Photoshop Element 6.0, PenNotice, Annotate for Word, PenCommander, PenMail, PenSigner |
| Acessórios | Caneta x1, Recarga de caneta x3, Suporte de caneta x1, Pilha alcalina (1,5 V) AAAx1, Guia de início rápido, Unidade de CD x1, CD do Adobe Photoshop Element 6.0 x1 |
| Artigo N° | 100055 |
Bienvenido
Le agradecemos que haya adquirido este producto. Se ha invertido mucho tiempo y esfuerzo en su desarrollo y esperamos que le proporcione muchos años de servicio sin ningún problema.    Si llega el momento de desechar su producto, por favor recicle todos los componentes posibles. Las pilas y las pilas recargables no deben desecharse en sus residuos domésticos. Por favor, recíclelas en su punto de reciclaje local. Juntos podemos ayudar a proteger el medioambiente.Contenido del paquete
El paquete recibido debe contener los siguientes artículos: Una tableta gráfica Un lápiz digital Puntas para lápiz Un base para lápiz y un dispositivo de extracción de puntas Una pila alcalina AAA Una guía rápida Una hoja técnica de la línea de acceso directo Un CD con controladores Un CD con softwareRequisitos del sistema
1. para PC con Windows
- Windows XP / Windows Vista 32 & 64bit / Win7 32 & 64bit - 1 puerto USB libre - Unidad óptica para la instalación de software2. para Macintosh
\- SO MAC X versiones 10.4.11 a 10.6Acerca de su HyperPen 10000U
7. Tableta
text_image
AIPTEK2. Lápiz digital 3. Base para lápiz y herramienta de extracción de puntas
text_image
Botón 2 del Botón 1 del PuntaCargar la pila del lápiz digital
Paso 1: Tire de la parte superior y de la parte inferior del lápiz digital en direcciones opuestas para abrirlo. natural_image
Close-up of a pen-like tool with a pointed tip and handle, shown with measurement arrows (no text or symbols)natural_image
Close-up of a cylindrical electronic component with metallic leads and a terminal block, showing no visible text or symbols.natural_image
Close-up of a pen tip with a red-circled end, showing internal structure and two directional arrows (no text or symbols)Guardar el lápiz digital entre tareas
Por favor, para guardar el lápiz digital adecuadamente, asegúrese de que la punta del lápiz no esté en contacto con ningún objeto. Si lo está, la presión que se aplica en la punta causará un desgaste constante de la pila del lápiz. Se recomienda situar el lápiz en la base, guárdelo con la punta hacia arriba o colóquelo en posición horizontal con la punta del lápiz libre de contacto con cualquier objeto. natural_image
Line drawing of a brush with a pointed tip and base, no text or symbols presentCambiar la punta del lápiz
Para cambiar la punta del lápiz, tire de la punta hacia afuera utilizando el prensador incorporado debajo de la base. Paso 1: Inserte la punta del lápiz en el prensador. Paso 2: Tire del lápiz para extraer la punta. natural_image
Two-step illustration showing a tool being inserted into a package, with no visible text or symbols.natural_image
Two-step black-and-white photo showing a hand holding a pencil and then applying a pencil to a surface (no text or symbols visible)Instalación
Paso 1: Instale el controlador para el SO Windows
(1) Inserte el CD dentro del lector de CD-ROM. El programa de instalación se ejecutará automáticamente. (2) Haga clic en "Driver Setup" (Ejecutar controlador) para comenzar con la instalación. Aviso: Por favor, instale el controlador antes de conectar la tableta a su PC. text_image
AIPTEK 400.00 GB / 78 GB / 12345 Driver Setup Tablet Software Setup Tablet Flash Demo Electronic User's Manualtext_image
Software Installation The software you are installing has not passed Windows Logo testing to verify its compatibility with Windows XP. (Tell me why this testing is important.) Continuing your installation of this software may impair or destabilize the correct operation of your system either immediately or in the future. Microsoft strongly recommends that you stop this installation now and contact the software vendor for software that has passed Windows Logo testing. Continue Anyway STOP InstallationInstale el controlador para el SO Mac
(1) Examine el CD y encuentre la versión del controlador para su Mac:Paso 1 Haga clic en Driver Setup
Paso 2 Haga clic en Driver Setup
(2) Siga las instrucciones paso a paso para instalar el controlador. (3) Espere hasta que se haya completado la instalación. text_image
Setup Items Driver Setup Electronic User's Manual ExitPaso 2: Conectar la tableta a la PC o MAC con cable USB
Para Windows:
(13) Conecte la tableta al ordenador mediante el cable USB. Tras unos segundos aparecerá la ventana "Found New Hardware Wizard" (Asistente para Nuevo Hardware Encontrado). Haga clic en el botón "finalize" (finalizar). text_image
Assistent für das Suchen neuer Hardware Fertigstellen des Assistenten Die Software für die folgende Hardware wurde installiert: HID Tablet TWASO Die installierte Hardware wird erst funktionieren, nachdem der Computer neu gestaltet wurde. Klicken Sie auf 'Fertig stellen', um den Vorgang abzuschließen. Zurück Fortig stellen Abzuschentext_image
3:20 PMPaso 3: Configuración de la tableta y del lápiz
text_image
New Tablet Control Panel Version 3.0 ■ New System Systems Step ■ Expand Tablet PS Feature OK Cancel1. La ventana Información
La pestaña Información muestra la información del controlador actual. Puede elegir: m. mostrar el ícono en la barra de herramientas o no. n. habilitar las funciones si está utilizando una Tablet PC. Aviso: No existen funciones para la Tablet PC bajo el SO Mac. text_image
Open Button Info Shift Detect Hat Call Pressure Button Command Close Click Type Tip Close Click Close Click 1 Close Click 2 Mouse Command Left Cut Left Close Click Play Cut Play Close Cut Ctrl... Find OK Cancel ...2. La ventana Botón - Comando del botón
Puede definir la función de la punta del lápiz y de los dos botones basándose en sus preferencias. Puede ajustar la sensibilidad de la velocidad del doble clic entre lento y rápido. Aviso: El SO Mac no tiene clic ni doble clic intermedio. text_image
Pen Tablet Info | Button | Stroke | Hot Cells | Pressure | Pen Area Full Area Screen Ratio Reverse Edge 0.16 inch Pen Area Dimensions Width (X): 0.00 inch Height (X): 5.00 inch Pen Area Offset Offset (X): 0.00 inch Offset (Y): 0.00 inch OK Cancel Apply3. La ventana Alcance
La pestaña Alcance contiene tres funciones: a. Zona completa Seleccione la zona de trabajo más grande. b. Proporción de la pantalla! Configure la zona de trabajo para que se ajuste a la proporción de la pantalla. c. Márgenes de reserva: Reserve el espacio para las teclas de acceso rápido en el zona superior. natural_image
Blue rectangular shape with diagonal hatching and corner markers (no text or symbols)text_image
Fun Tablet Info | Button | Scope | Hot Cells | Pressure | Hot Pad Layout Hot Edges □ Upcens □ Incl □ Lina □ Pull Inlet Express Run - Express.com Online Find Clear Load Default OK Cancel Apply4. Ventana Teclas de acceso rápido a. Bordes de acceso rápido
Los bordes de acceso rápido muestran las posibles localizaciones de las teclas de acceso rápido. Las teclas de acceso rápido del HyperPen 10000U se sitúan únicamente en la parte superior de la tableta.b. Disposición de la pantalla de acceso directo
Puede cambiar la configuración por defecto de las teclas de acceso directo al seleccionar cualquiera de las 16 teclas de acceso directo. Si desea redefinir las teclas de acceso directo, haga clic en "Define" (Definir). Luego introduzca el programa o la función, la ruta en la que se encuentra el programa y los parámetros si fuera necesario. La cadena introducida se transmitirá al programa en calidad de parámetros. Haga clic en "OK" para confirmar la restauración. Si desea obtener una vista general de las teclas de acceso directo, haga clic en "Print" (Imprimir).Aviso: La tecla Print no existe en el sistema Mac.
Si desea borrar la configuración inicial, haga clic en "Clear" (Borrar).5. ventana Presión
text_image
Pixelated Text Close Black Red Dimem Blue Color Sensitivity Light Heavy OK Cancel SavePaso 4: Verificar la instalación del hardware y controlador
Utilice las puntas para verificar el funcionamiento de la tableta: 1. En cuanto la tableta se activa, un LED comienza a parpadear. 2. Toque cualquier superficie con la punta del lápiz para "despertarlo" si ha entrado en modo de suspensión. Cuando el lápiz deja de utilizarse durante un tiempo, una función de ahorro de energía incorporada hace que el lápiz o el ratón entren en modo suspensión. 3. Pulse un botón del lápiz. El LED se encenderá. 4. Apoye o mueva el lápiz en el área de trabajo, el cursor de la pantalla debe moverse respectivamente. Especificaciones del producto| Especificaciones | |
| I. Tableta | |
| Tamaño 30.7 cm (12") in diagonal | |
| Área de trabajo 25.4x15.8 cm (10" x 6.25") | |
| Proporción de la pantalla | 16:10 |
| Dimensiones 35.4 x 27.7 x 1.5 cm (13.9" x 10.9" x 0.6") | |
| Resolución Hasta 4000 lpi | |
| Distancia de detección | Máx. 10 mm para leer y 5 mm para escribir |
| Tasa de informes 200 ips (informes por segundo) | |
| Teclas de función 16 teclas de macro | |
| Indicador LED 1 LED verde | |
| Consumo de energía Máx. 0,35 W, desde el USB | |
| Interfaz USB 2.0 (velocidad máxima) | |
| Peso 820 g | |
| II. Lápiz digital | |
| Código del modelo P23 Negro | |
| Presión del lápiz 1024 niveles | |
| Precisión del lápiz +/- 0,3 mm | |
| Botones 3 | |
| Peso 25 g | |
| III. Contenido del paquete | |
| Paquete de software | Adobe Photoshop Element 6.0, PenNotice, Annotate for Word , PenCommander, PenMail, PenSigner |
| Accesorios | Lápiz x1, Recambio x3, Base para el lápiz x1, Pila alcalina (1.5V) AAAx1, Guía rápida, Controlador CD x1, Adobe Photoshop Element 6.0 CDx1 |
| No del artículo 100055 | |
Bienvenue
Cher utilisateur, Nous vous remercions d'avoir acheté ce produit. Dans le développement de ce dispositif, beaucoup de temps et d'efforts ont été investis, et nous espérons qu'il vous rendra de nombreux services dans la jouissance et sans difficultés. text_image
CE RoHS COMPLIANTContenu du paquet
Les éléments suivants doivent être contenus dans le paquet: - Tablette graphique - Stylet numérique - mines - Porte-Stylet & pincette pour changer la mine ● Batteries alcaline AAA - Les premiers pas ● Brochure pour la Hotline - CD pour pilote - CD pour logiciels d'applicationsSystèmes réquis
1. Pour les PCs Windows
- Windows XP / Windows Vista 32 & 64bit / Win7 32 & 64bit - 1 port USB libre - Lecteur optique pour installation de logiciels2. Pour Macintosh
\- MAC OS X Version 10.4.11 à 10.6Familiarisez vous avec votre Hyperpen 100000U
8. Tablette graphique
text_image
Affichage LED Raccourcis Surface de travail AIPTEK2. Stylet numérique
3. Porte Stylet & Change mine
text_image
Touche 2 Touche 1 MineInsérer la batterie dans le stylet numérique
Étape 1: Tirez la partie avant et la partie arrière du stylet comme indiqué ci-dessous afin de l'ouvrir. natural_image
Close-up of a pen-like tool with a pointed tip and handle, shown with measurement arrows (no text or symbols)natural_image
Close-up of a cylindrical battery with internal components and polarity markings (no visible text or symbols)natural_image
Close-up of a pen tip with a red-circled end, showing blade and handle (no text or symbols visible)Déposer le stylet entre deux tâches
Lorsque vous déposez le stylet numérique, veuillez vous assurer que la pointe de ce dernier ne touche pas un autre objet. Ceci empêche que la pression sur la pointe du stylet n'entraîne la diminution de la durée de vie de la batterie. Il est recommandé d'introduire le stylet dans le porte-plume avec la pointe tourné vers le haut, ou bien de poser le stylet sur une surface plane, en veillant naturellement à ce que sa pointe de touche aucun objet. natural_image
Line drawing of a pen or stylus with a base and pointed tip, no text or symbols presentRemplacement de la mine
Pour remplacer la mine du stylet, veuillez retirer celle à remplacer à l'aide de la pince intégrée sous le porte-plume. Étape 1: Insérez la pointe du stylet dans la pince. Étape 2: Tirer le Stylet vers l'arrière jusqu'à ce que la mine s'en détache. natural_image
Two-step illustration showing a tool being inserted into a device, with no visible text or symbols.natural_image
Two-step black-and-white photo showing a hand holding a pencil and then applying a pencil to a surface (no text or symbols visible)Installation
Etape 1: Installation du pilote sur le système d'exploitation Windows
(1) Insérer le CD dans le lecteur de CD-ROM. Le programme d'installation démarre automatiquement. (2)Cliquez sur le programme d'installation du pilote (installation du pilote) pour démarrer l'installation. Attention: S'il vous plaît installer le pilote avant de connecter la tablette à votre PC. text_image
AIPTEK Driver Setup Tablet Software Setup Tablet Flash Demo Electronic User's Manualtext_image
Software Installation The software you are installing has not passed Windows Logo testing to verify its compatibility with Windows XP. (Tell me why this testing is important.) Continuing your installation of this software may impair or destabilize the correct operation of your system either immediately or in the future. Microsoft strongly recommends that you stop this installation now and contact the software vendor for software that has passed Windows Logo testing. Continue Anyway STOP InstallationInstallation du pilote sur un système Mac
(1) Rechercher sur le CD la version du pilote pour votre Mac: Étape 1 Cliquez sur "Driver Setup (installation du pilote) Etape 2 Cliquez sur "Driver Setup (installation du pilote) (2) Suivez les instructions étape par étape pour installer le pilote. (3) Attendez que l'installation soit terminée text_image
Setup Items Driver Setup Electronic User's Manual ExitPour Windows:
(15) Connectez la tablette graphique à l'ordinateur à l'aide du câble USB. Après quelques secondes une fenêtre Popup s'ouvre „Found New Hardware Wizard (Nouveau périphérique détecté). Cliquez sur le bouton “Finalize (Terminer)”. text_image
Assistent für das Suchen neuer Hardware Fertigstellen des Assistenten Die Software für die folgende Hardware wurde installiert: HID Tablet TWA60 Die installierte Hardware wird erst funktionieren, nachdem der Computer neu gestartet wurde. Klicken Sie auf "Fertig stellen", um den Vorgang abzuschließen. cZurück Fertig stellen Abbreschentext_image
3:20 PMÉtape 3: Installation de la tablette graphique et du stylet
text_image
New Tablet File Edit View Insert Tools Help New Tablet Control Panel Version 6.03 User Users System Ship Support Tablet PC Feature OK Cancel1. L'onglet 'Info'
Dans l'onglet Info ' sont affichées des informations sur le pilote actuel. Vous pouvez faire le choix suivant: o. Afficher l'icône dans la barre d'outils ou non. p. Activer les fonctions si vous utilisez une tablette graphique pour PC. Achtung: Il n'y a aucune fonction pour « une tablette graphique pour PC » sous le système d'exploitation Mac. text_image
Type: Tablet Info Switch Detect View Code Pause Browser Command Default Name New Top New Subs Standard Reader 1 Default Web User 2 Mouse Command Left Dot Left Bottom Dot Left Double Dot Right Dot Right Double Dot Fiber Find Close OK Cancel2. L'onglet 'Button (key ou bouton)' –raccourci clavier
Vous pouvez à votre guise déterminer la fonction de la pointe du stylet, ainsi que celle de chacun de ces deux boutons. Vous pouvez sélectionner la sensibilité de la vitesse du double clic entre lent et rapide. Remarque: Pour Mac OS il n'y a pas de clic ou double clic central/moyen. text_image
Pen Tablet Info | Button | Shift | Hot Cells | Pressure Plan Area Full Area Screen Rate Reverse Edges 0.16 inch Plan Area Dimensions Width (X) 0.00 inch Height (Y) 5.00 inch Plan Area Offset Offset (X) 0.00 inch Offset (Y) 0.00 inch OK Cancel Apply3. L'onglet 'Scope (Champ d'application)'
L'onglet 'Scope' comprend 3 fonctions: a. Full Area : Sélection du plus grand espace de travail. b. Screen Ratio: Met en place l'espace de travail afin qu'il s'adapte automatiquement au format de l'écran. c. Reserve Edges : Réserve la partie supérieure de l'espace de travail pour les raccourcis à configurer. natural_image
Blue rectangular shape with diagonal hatching on white background, no text or symbols presenttext_image
Fun Tablet Info | Button | Scope | Hot Cells | Pressure Hot Pad Layout Hot Edges □ Upert □ Inner □ Inner □ Inner Internet Explorer Run - 10ptcs.com Delete Find Clear Load Default OK Cancel Help4. L'onglet 'Hot Cell (Touche rapide)'
a. Hot Edges (Les bords de fonction)
Sur les bords de fonction, les touches rapides peuvent être ordonnées. Les touches rapides du HyperPen 10000U ne peuvent être ordonnées que dans la partie supérieure de la tablette graphique.b. Hot Pad Layout (Aménagement du champ hotkey)
Vous pouvez modifier la configuration par défaut des raccourcis en sélectionnant à partir des 16 raccourcis. Si vous souhaitez redéfinir les raccourcis, cliquez sur Define (préciser). Entrez ensuite le programme ou la fonction, le chemin ou l'emplacement du programme et, si nécessaire les paramètres. La chaîne d'entrée est transférée au programme sous la forme de paramètres. Cliquez sur 'OK' pour confirmer la réinitialisation. Si vous voulez avoir un aperçu de tous les raccourcis, cliquez sur Imprimer (impression).Attention: Dans le système Mac, il n'y a pas de bouton d'impression.
Si vous souhaitez supprimer l'installation initiale, cliquez sur Effacer (supprimer). text_image
Photo Material | Screen | Hot Cube | Projection Particle Text Black Red Green Blue Color Selectivity Light Hearing OK Cancel5. L'onglet Pression
La pression du stylet peut être ajustée entre „légère“ et „forte“ Déplacer le stylet dans l'espace „Pressure Test“ „(test de la pression)“ en dessinant pour vérifier l'épaisseur du trait sous la pression choisie.Étape 4: Vérifiez l'installation du matériel et les fonctions du pilote
Vérifier le fonctionnement de la tablette graphique comme décrit 1. Une fois la tablette graphique allumée, le témoin LED commence à clignoter. 2. Toucher la pointe du stylo sur n'importe quelle surface, afin de réactiver la plume si elle est en mode veille. Lorsque le stylet n'a pas été utilisé pendant un certain temps, le stylet et la souris sont induis en mode veille grâce à une fonction intégrée de gestion d'énergie. 3. Appuyez sur un bouton sur le boîtier du stylet. La LED commence à briller. 4. Laissez votre plume glisser sur l'espace de travail, le curseur sur l'écran doit également se déplacer. Données techniques| Données techniques | |
| I. Tablette graphique | |
| Taille 30.7 cm (12") en diagonale | |
| Surface de travail 25.4x15.8 cm (10" x 6.25") | |
| Aspect ratio 16:10 | |
| Dimensions 35.4 x 27.7 x 1.5 cm (13.9" x 10.9" x 0.6") | |
| Résolution Jusqu'à 4000 lpi | |
| Distance de reconnaissance Max. 10 mm LIRE. Max. 5mm ECRIRE | |
| Fréquence d'affichage | 200 rps (Affichage par seconde) |
| Touches de fonction 16Touches16 Macro | |
| Affichage LED 1 LED vert | |
| Consommation du courant Max. 0,35W par USB | |
| Port USB 2.0 (vitesse maximale) | |
| Poids 820g | |
| II. Stylet Numérique | |
| Modell-Kennzahl P23 Black | |
| Niveau de pression du stylet 1024 niveaux | |
| Précision du stylet +/- 0,3mm | |
| Touche 3 | |
| Poids 25g | |
| III. Contenu du paquet | |
| Logiciels | Adobe Photoshop Element 6.0, PenNotice, Annotate for Word , PenCommander, PenMail, PenSigner |
| Accessoires | 1 Stylet, 3 Mines, 1 Porte-plume, 1 Batterie Alcaline (1,5V) AAA, Mode d'emploi "Premiers pas", 1 CD pour pilot, 1 Adobe Photoshop Element 6.0-CD |
| Article n° | 100055 |