USER MANUAL EDS SSM 600 D2 SILVERCREST
natural_image
Black-and-white product photo of kitchen utensils including a blender, kiwi, and a micelle with a whisk on a wooden surface (no text or symbols visible on main objects)
HAND BLENDER SET SSMS 600 C3
GB IE NI CY
HAND BLENDER SET
Operating instructions
FR BE
MIXEUR PLONGEANT
Mode d'emploi
GR CY
ΣΕΤ ΜΠΛΕΝΤΕΡ ΡΑΒΔΟΣ
Οδηγία χρήσης
DK
STAVBLENDERSÆT


natural_image
Pure geometric crosshair symbol with concentric circles and a central gear-like pattern (no text or labels)
Contents
- Overview ...... 3
- Intended purpose 4
- Safety information .... 4
- Items supplied 7
- Installation 7
5.1 Blender....7
5.2 Chopper.... 7
5.3 Beater 8
5.4 Remove the accessory part (Figure A) 8
- Operation 8
6.1 Operating times.... 8
6.2 Operating elements.... 9
6.3 Blender....9
6.4 Chopper.... 9
6.5 Beater 10
- Cleaning 11
- Storage 11
- Recipes 12
- Troubleshooting 14
- Disposal 14
- Technical specifications .... 14
- Warranty of the HOYER Handel GmbH 15


2
GB


12 I Power button (adjustable speed)
14 Eyelet for hanging up the motor unit)
15 Marking for unlocking () and locking ()
16 Attachment marking

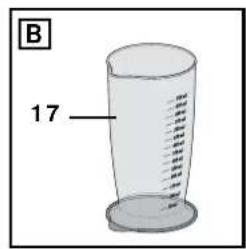
17 Measuring beaker (with combined cover/ base)
GB
3


Thank you for your trust!
We congratulate you on your new hand blender set.
For a safe handling of the product and in order to get to know the entire scope of features:
- Thoroughly read these operating instructions prior to initial use.
- Above all, observe the safety instructions!
- The device should only be used as described in these instructions.
- Keep these operating instructions for information purposes.
- If you pass the device on to someone else, please include these operating instructions. The operating instructions are a part of the product.
We hope you enjoy using your new hand blender set!
Symbol on your device

The food-safe material of devices with this symbol will not change the taste or smell of food.
2. Intended purpose
The Hand Blender Set is intended exclusively for chopping, mixing and pureeing food. For each utensil, please observe the area of application described in these instructions. The device is designed for private, domestic use. The device must only be used indoors. This device must not be used for commercial purposes.
Foreseeable misuse
WARNING! Risk of material damage!
Do not use the device for chopping particularly hard food, e.g. frozen food, bones, nutmeg, grain, coffee beans or spices. This device is also not intended for processing chocolate.
Warnings
If necessary, the following warnings will be used in these operating instructions:

DANGER! High risk: failure to observe this warning may result in injury to life and limb.
WARNING! Moderate risk: failure to observe this warning may result in injury or serious material damage.
CAUTION: low risk: failure to observe this warning may result in minor injury or material damage.
NOTE: circumstances and specifics that must be observed when handling the device.
Instructions for safe operation
- This device must not be used by children.
- Children must not play with the device.
- The device and the power cable must be kept away from children.
- This device can be used by people with restricted physical, sensory or intellectual abilities or people without adequate experience and/ or understanding if they are supervised or instructed on how to use this device safely and if they are aware of the resulting risks.
- This device is equally intended for use in the home and in applications similar to the home, such as for example...
...in kitchens for employees in shops, offices and other commercial areas;
...on agricultural estates;
...by customers in hotels, motels and other residential facilities; ...in bed-and-breakfast establishments.
- Disconnect the mains plug from the wall socket ...
... when it is not supervised,
... before you assemble or disassemble the device, and
... before you clean the device.
- Clean all parts and surfaces that will come into contact with food before using the device for the first time (see “Cleaning” on page 11).
- If the mains power cable of this device should become damaged, it must be replaced by the manufacturer, the manufacturer's customer service department or a similarly qualified specialist, in order to avoid any hazards.


natural_image
Pure geometric crosshair symbols without any text or labels
GB
5


DANGER for children
- Packing materials are not children's toys. Children should not be allowed to play with the plastic bags: There is a risk of suffocation.
- Keep the device out of the reach of children.

DANGER to and from pets and livestock
Electrical devices can represent a hazard to pets and livestock. In addition, animals can also cause damage to the device. For this reason you should keep animals away from electrical devices at all times.

DANGER! Risk of electric shock due to moisture
- This device must never be operated close to a bathtub, shower, filled hand basin or similar.
The motor unit, the power cable and the mains plug must not be immersed in water or other liquids.
- Protect the motor unit from dampness and dripping and splashing water.
- Should liquids enter the motor unit, pull out the mains plug immediately. Have the device checked before reusing.
- Never touch the device with wet hands.
- If the device falls into water, disconnect the mains plug immediately. Only then is it safe to retrieve the device.

DANGER! Risk of electric shock
- Plug the mains plug into the wall socket only after the motor unit has been assembled complete with the selected accessory parts.
- Only connect the mains plug to a properly installed and easily accessible wall socket whose voltage corresponds to the specifications on the rating plate. The wall socket must continue to be eas
- Plug the mains plug into the wall socket only after the motor unit has been assembled complete with the selected accessory parts.
- Only connect the mains plug to a properly installed and easily accessible wall socket whose voltage corresponds to the specifications on the rating plate.
The wall socket must continue to be eas-
ily accessible after the device is plugged in.
- Ensure that the power cable cannot be damaged by sharp edges or hot points. Do not wrap the power cable around the device.
- Even after it has been switched off, the device has not been completely disconnected from the mains. In order to fully disconnect it, pull out the mains plug.
- When using the device, ensure that the power cable cannot be trapped or crushed.
To pull the mains plug out of the wall socket, always pull on the mains plug, and never on the power cable.
- Disconnect the mains plug from the wall socket ...
...if there is a fault,
... when the blender is not in operation,
... prior to each cleaning, and
... during thunderstorms.
- Do not use the device if there is visible damage to the device or the power cable.
- To avoid any risk, do not make modifications to the product.

DANGER! Risk of injury from cutting
The blades are sharp. Please be very careful when handling them. When washing manually, the water should be sufficiently clear that you can see the blades easily.
- Never reach into the rotating blades. Do not touch rotating parts with spoons or similar utensils. Keep long hair or loose clothing away from rotating parts as well.
The blade continues to rotate after the device is switched off. Wait until it has stopped before you take the hand blender out of the food or open the chopper.


DANGER! Risk of electric shock due to moisture
DANGER! Risk of electric shock


WARNING! Risk of material damage
The device is designed for a maximum operating time of 2 minutes without interruption (see "Operating times" on page 8).
- In order to prevent damage to the device, interrupt the blending process immediately if the blade is either turning with difficulty or not turning at all. Pull out the mains plug and check whether there is something in the bowl blocking movement or whether the food is too tough. Also check whether the device is assembled correctly.
Fill the chopper only up to the indicated MAX level (about 500 ml / for liquids max. 300 ml) to prevent a blocking of the knives.
Do not use the device for boiling liquids or during the boiling process and do not fill boiling hot liquids into the container.
- Do not use pointed or sharp-edged objects to remove food.
- Only use the original accessories.
- Do not use any astringent or abrasive cleaning agents.
4. Items supplied
1 Motor unit 2
1 Drive cover 3
1 Beater adapter 4
1 Blade insert 5
1 Beater 6
1 Cover/ base for chopper 7
1 Chopper 9
1 Blender 10
1 Measuring beaker with cover/ base 17
1 Operating instructions
5. Installation
- Remove all packing material.
- Check to ensure that all parts are present and undamaged.
- Clean the device prior to its first use (see "Cleaning" on page 11)!

DANGER! Risk of electric shock! Only plug the mains plug 1 into the wall socket if the motor unit 2 has been connected to the blender.
5.1 Blender
- Attach the motor unit 2 to the blender 10 in such a way that the attachment marking ▲ 16 is below the symbol ☐ 15.
- Turn the motor unit 2 such that the attachment marking ▲16 on the motor unit points to the lock marking 🔒15. The motor unit 2 must engage noticeably.
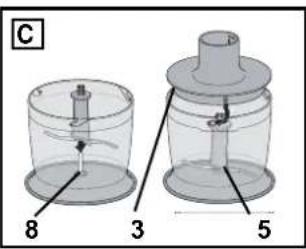
5.2 Chopper
- Press the slip-resistant cover/ base 7 against the chopper 9 from below such that a tight fit is ensured all around.
- Place the blade insert 5 on the arbor 8 in the chopper.
- Fill the chopper 9 with the prepared food only up to the marked MAX level (about 500 ml / for liquids max. 300 ml).
- Set the drive cover 3 on the chopper 9.
- Attach the motor unit 2 to the drive cover 3 in such a way that the attachment marking ▲ 16 is below the symbol ☐ 15.
- Turn the motor unit 2 such that the attachment marking ▲ 16 on the motor unit points to the lock marking 🔒 15. The motor unit 2 must engage noticeably.
GB
7


5.3 Beater
- Attach the motor unit 2 to the beater adapter 4 such that the attachment marking ▲16 is below the symbol ☐15.
- Turn the motor unit 2 such that the attachment marking ▲16 on the motor unit points to the lock marking 🔒15. The motor unit 2 must engage noticeably.
- Attach the beater 6 to the beater adapter 4 until it engages audibly and noticeably.
- To remove the accessory part, turn the motor unit 2 such that the attachment marking ▲ 16 points to the delock marking ■ 15 and pull off the motor unit 2 from the accessory.
6. Operation

DANGER! Risk of injury from cutting!
- Never reach into the rotating blades. Do not touch rotating parts with spoons or similar utensils. Keep long hair or loose clothing away from rotating parts as well.
- Only switch on the device when the blender 10 is immersed in the foodstuff.
The blade continues to rotate after the device is switched off. Wait until the blender 10 stops moving before you take it out of the food.
WARNING!
The device is designed for a maximum operating time of 2 minutes without interruption (see "Operating times" on page 8).
In order to prevent damage to the device, interrupt the blending process immediately if the blade is either turning with difficulty or not turning at all. Pull out the mains plug 1 and check whether there is something in the bowl blocking movement or whether the food is too tough. Also check whether the device is assembled correctly.
6.1 Operating times
We recommend the following operating times for the three applications:
- Blender up to 1 minute without interruption, then 2 minutes break
- Chopper up to 1 minute without interruption, then 5 minutes break
- Beater up to 2 minutes without interruption, then 2 minutes break
6.2 Operating elements
- Speed controller: 13
The blending speed is adjustable from 1 (minimum) to 6 (maximum speed).
Keep the power button 12 pressed to work at the set speed. Release it to switch the device off.
- TURBO: 11
Keep TURBO 11 pressed for blending at maximum speed. The speed controller setting is irrelevant here. Release TURBO 11 to switch the device off.
6.3 Blender
Application area:
The blender 10 is ideal for pureeing cooked fruit and vegetables and for mixing drinks, soups, sauces, etc. and for making milk-shakes.
Do not use the blender 10 for extremely hard food such as ice cubes, nuts or the like.
NOTE: adapt the rotation speed to suit the foodstuff to be blended. Select normal speed for soft foodstuffs to be blended (1-6) 12 and turbo speed for harder foodstuffs (TURBO 11).
- Move the blender 10 up and down a bit in the foodstuff, to ensure that it is blended evenly.
- When you are finished, release the power button 12 or TURBO 11.
- After blending wait until standstill before you remove the blade, then pull the mains plug 1 and take the blender 10 out of the food.
- Clean the device immediately if possible.
NOTE: if the blender 10 builds up a suction and adheres to the bottom of the vessel, release the power button 12 or TURBO 11 briefly.
6.4 Chopper
Application area:
The chopper is ideal for chopping meat, Parmesan, vegetables, fruit, nuts and herbs.
- Rinse or wash the food.
- Cut the food into small pieces.
- Remove the outer shell from nuts. You may use the inner skin if you wish, e.g. with almonds.
- Use fresh herbs without the stalks and in dry condition.
-
Remove sinews, bones and gristle from the meat.
-
Cut the cooked fruit and vegetables into small pieces.
- Put the food into the measuring beaker 17 or another suitable container.
- Attach the motor unit 2 to the blender 10 until it engages.
- Immerse the blender into the food to be pureed/ mixed.
- Connect the mains plug 1 with the wall socket
- To blend at normal speed, keep the power button 12 pressed.
To blend at turbo speed, keep TURBO 11 pressed.
GB
9


Processing table
| Ingredients |  | max. quantity | Processing time | Speed |
| Onions 200 g | appr  sec Steps 1 - 3 sec Steps 1 - 3 | | | |
| Parsley 30 g | approx  | | | TURBO |
| Garlic 20 cloves | app  sec. Steps 1 - 5 sec. Steps 1 - 5 | | | |
| Carrots 200 g | appr  o Steps 1 - 5 o Steps 1 - 5 | | | |
| Hazelnuts / almonds |  | 200 g approx. | 30 sec. | TURBO |
| Walnuts 200 g | appro  c. Steps 3 - 4 c. Steps 3 - 4 | | | |
| Parmesan 250 g | a  | | | TURBO |
6.5 Beater
Application area:
The beater is suitable for beating whipped cream (max. 300 ml), egg whites (max. 4) and foods of a similar light consistency.
- Connect the mains plug 1 with the wall socket
- For chopping, keep the power button 12 / TURBO 11 pressed and release it to switch the device off.
- After chopping remove the mains plug 1 and take the motor unit 2 away from the drive cover 3.
-
Clean the device immediately if possible.
-
Fill the cream, egg whites or similar into the measuring beaker 17 or another suitable container.
- Immerse the beater 6 into the cream or similar.
- Connect the mains plug 1 with the wall socket
- For beating, keep the power button 12 or TURBO 11 pressed and release it to switch the device off.
- After beating pull the mains plug 1 and take the beater 6 out of the food.
- Remove the beater 6 from the beater adapter 4.
- Clean the device immediately if possible.
7. Cleaning
Clean the device prior to its first use!

DANGER! Risk of electric shock!
- Pull the mains plug 1 out of the wall socket before you clean the device.
The motor unit 2, beater adapter 4, power cable and mains plug 1 must not be immersed into water or other liquids.

DANGER! Risk of injury from cutting!
- When washing manually, the water should be sufficiently clear that you can see the blade easily.
- Do not clean any part in the dishwasher.
WARNING! Risk of material damage!
Do not use any astringent or abrasive cleaning agents.
Wiping off
Wipe off the motor unit 2 and the beater adapter 4 using a slightly damp cloth.
Washing-up
- All other parts (drive cover 3, blade insert 5, beater 6, cover/ base for the chopper 7, chopper 9, blender 10, measuring beaker with cover/ base 17) can be washed up by hand in warm water with detergent.
- Then rinse off the parts with clear water.
- Dry all parts carefully, before reassembling the device and storing it.
Some cleaning tips
- Preferably clean the blender 10 immediately after use, to prevent food residues from drying on and sticking to the hand blender.
• After processing very salty foodstuffs, the blender 10 should be rinsed immediately.
8. Storage

DANGER for children! Keep the device out of the reach of children.
DANGER! In order to avoid accidents, the mains plug 1 must never be connected to a wall socket while in storage.
- Select a location where neither high temperatures nor moisture can affect the device.
- Do not store food for more than 24 hours in the containers. This also applies to storage in the refrigerator.
- You may suspend the motor unit 2 at the eyelet 14.
9. Recipes
Vegetables cream soup
2 - 4 persons
Ingredients
• 2 - 3 tsp oil
- 200 g onions
- 200 g potatoes (preferably floury potatoes)
- 200 g carrots
- 350 · 400 ml vegetable bouillon (fresh or instant powder)
- Salt, pepper, nutmeg
- 5 g parsley
Preparation
- Peel the onions and cut them into fine dices. Wash and peel the carrots and cut them into slices. Peel the potatoes, wash them and cut them into about 2 cm large dices.
- Heat the oil in a pot and sweat the onions in it. Add carrots and potatoes and sweat them too. Pour on bouillon so that the vegetables are well covered and cook them for 10-15 minutes until soft. Add bouillon if necessary so that the vegetables are always covered.
- Wash the parsley, shake it dry and remove the stalks. Tear the parsley into rough pieces and add it to the soup. Puree it with the blender 10 for about 1 minute. Season with salt, pepper and ground nutmeg.
Pumpkin soup
4 persons
Ingredients
- 1 medium onion
• 2 cloves of garlic
• 10 - 20 g fresh ginger
• 3 tsp rapeseed oil
- 400 g pumpkin pulp (preferably Hokkaido pumpkin because its skin gets soft when cooked and needs not be peeled)
• 250 - 300 ml coconut milk
• 250 - 500 ml vegetable bouillon
- Juice of half an orange
- some dry white wine
• 1 tsp sugar
- Salt, pepper
Preparation
- Peel and cut onions and garlic in dices. Peel ginger and cut it in fine dices. First sweat onions and ginger in hot oil. Add the garlic after 2 minutes and sweat it too.
- Thoroughly wash the pumpkin using a vegetable brush under warm water and then cut it into 2-3 cm large dices. (Other sorts of pumpkin than hokkaido must first be peeled).
- Add pumpkin dices to the onions and ginger and sweat them too. Add half the amount of the coconut milk and then add so much vegetable bouillon that the pumpkin is well covered. Cook with closed cover about 20-25 minutes until soft.
- Puree it using the blender 10. Add so much coconut milk until the soup has the right, slightly creamy consistency.
- Season the soup with orange juice, white wine, sugar, salt and pepper to give it a spicy but also sweet and balanced acidic-salty flavour.
Sweet fruit spread
Ingredients
- 250 g strawberries or other fruit (fresh or frozen)
• 1 package (about 125 g) of gelling sugar without cooking
• 1 squirt of lemon juice
- 1 large pinch of the core of a vanilla pod
Preparation
- Wash and clean the strawberries and remove their green stem bases.
- Drain them well on a sieve so that excess water can drain and the spread will not become too liquid. Cut larger strawberries into small pieces.
- Weigh 250 g of strawberries and put them into a suitable mixing beaker.
- Add a bit of lemon juice.
- Where appropriate, scrape off the core of a vanilla pod and add it.
- Add the contents of the package of gel-ling sugar without cooking and blend it thoroughly using the blender 10 for 45-60 seconds. If there are still larger pieces let the whole rest for 1 minute and puree it again for 60 seconds.
- Enjoy it right away or fill the fruit spread into a glass with screw lid and close it.
Chocolate cream
For 4 persons
Ingredients
• 350 g whipped cream
• 200 g dark chocolate (> 60% cocoa)
- 1/2 vanilla pod (core)
Preparation
- Bring the cream to the boil, break the chocolate into small pieces and melt them in the cream slowly at low heat. Scrape off the core of half of a vanilla pod and stir it into the mass.
- Let it cool down completely and get solid in the fridge.
- Before serving, stir it up using a beater 6 until it becomes creamy. Serving suggestion: Great with fresh fruit.
Mayonnaise
Ingredients
• 200 ml neutral plant oil, e.g. rapeseed oil
• 1 egg (egg yolk and egg white)
• 10 g mild vinegar or lemon juice
- Salt and pepper to taste
Preparation
- Give an egg and lemon juice into the measuring beaker 17, hold the beater 6 vertically into the beaker and press TURBO 11.
- Add the oil slowly in an equal thin stray (within about 90 seconds) so that the oil may get blended with the other ingredients.
- Finally season it with salt and pepper to taste.


10. Troubleshooting
If your device fails to function as required, please try this checklist first. Perhaps there is only a minor problem, and you can solve it yourself.

DANGER! Risk of electric shock! Do not attempt to repair the device yourself under any circumstances.
| Fault | Possible causes / Action |
| No function | Has the device been connected to the power supply?Check the connection. |
| Tools do not turn or turn only very hardly. | Switch off immediately, pull out mains plug 1 and check:- Blockage in the bowl?- Food too tough or too hard?- Device not assembled correctly? |
| Container looks unclear | Caused by hard food or too strong detergents, does not affect the function. |

11. Disposal
This product is subject to the provisions of European Directive 2012/19/EC. The symbol showing a wheelie bin crossed through indicates that the product requires sep-
arate refuse collection in the European Union. This applies to the product and all accessories marked with this symbol. Products identified with this symbol may not be discarded with normal household waste, but must be taken to a collection point for recycling electric and electronic appliances. Recycling helps to reduce the consumption of raw materials and protect the environment.
Packaging
When disposing of the packaging, make sure you comply with the environmental regulations applicable in your country.
12. Technical specifications
| Model: SSMS 600 C3 | |
| Mains voltage: 220-240 V ~50/60 Hz |
| Protection class: II | ☐ |
| Power rating: 600 W | |
| Max. filling quantitiesMeasuring beaker:Chopper: | 700 ml(liquids 300 ml)500 ml(liquids 300 ml) |
| Max. continuous operationChopper:Blender:Beater: | 1 minute1 minute2 minutes |
CE
Subject to technical modification.
13. Warranty of the HO YER Handel GmbH
Dear Customer,
your device is provided with a 3 year warranty starting with the purchase date. In the event of product defects, you are entitled to statutory rights against the vendor. These statutory rights are not restricted by our warranty presented in the following.
Warranty conditions
The warranty period starts with the purchase date. Please keep the original purchase receipt in a safe place. This document is required to verify the purchase.
If within three years from the purchase date of this product a material or factory defect occurs, the product will be repaired or replaced by us – at our discretion – free of charge to you. This warranty implies that within the period of three years the defective device and the purchase receipt are presented, including a brief written description of the defect and the time it occurred.
If the defect is covered by our warranty, the repaired or a new product will be returned to you. No new warranty period starts with a repair or replacement of the product.
Warranty period and statutory claims for defects
The warranty period is not extended when the warranty has been claimed. This also applies to replaced and repaired parts. Any damages and defects already existing at the time of purchase must be reported immediately upon unpacking. Repairs arising after the expiration of the warranty period are subject to a charge.
Warranty coverage
The device was produced carefully according to strict quality guidelines and tested diligently prior to delivery.
The warranty applies to material or factory defects.
Excluded from the warranty are wear parts subject to normal wear and damages to fragile parts, e.g. switches, batteries, lamps or other parts manufactured from glass.
This warranty expires if the product is damaged, not used as intended or not serviced.
For the proper operation of the product, all instructions listed in the operating instructions must be observed carefully. Any form of use and handling that is advised against in the operating instructions or warned against must always be avoided.
The product is only intended for private and not for commercial use. In the case of incorrect and improper treatment, use of force and interventions not performed by our authorised Service Centre, the warranty shall cease.
Handling in case of a warranty claim
In order to ensure prompt processing of your matter, please observe the following notes:
- Please keep the article number
IAN: 282298 and the purchase receipt as a purchase verification for all inquiries.
- The article number can be found on the rating plate, an engraving, the title page of your instructions (in the bottom left), or as a label on the rear or underside of the device.
- If faulty operation or other defects occur, first contact the Service Centre listed in the following by telephone or email.
- Then, you are able to send a product reported as defective free of charge to the service address specified to you, including the purchase receipt and the information on the defect and when it occurred.

Please visit www.lidl-service.com to download this and many other manuals, product videos and software.

Service Centre
GB Service Great Britain
Tel.: 0871 5000 720 (£ 0.10/ Min.)
E-Mail: hoyer@lidl.co.uk
IE Service Ireland
Tel.: 1890 930 034
(0,08 EUR/ Min., (peak))
(0,06 EUR/ Min., (off peak))
E-Mail: hoyer@lidl.ie
CY Service Cyprus
Tel.: 8009 4409
E-Mail: hoyer@lidl.com.cy
IAN: 282298


Supplier
Please note that the following address is no
service address. First contact the afore-
mentioned Service Centre.
HOYER Handel GmbH
Tasköprüstraße 3
22761 Hamburg
Germany


natural_image
Pure geometric crosshair symbols without any text or labels

FARE for børn
natural_image
Pure geometric diagram with crosshair and circular pattern (no text or symbols)


natural_image
Pure geometric diagram with crosshair and circular pattern (no text or symbols)
Sommaire
natural_image
Pure geometric crosshair symbols without any text or labels

35


natural_image
Pure geometric crosshair symbols without any text or labels


natural_image
Pure geometric diagram with crosshair and circular pattern (no text or symbols)