
KH 2431 - Turntable SILVERCREST - Free user manual and instructions
Find the device manual for free KH 2431 SILVERCREST in PDF.
| Product Type | Turntable with CD player, FM/AM radio, MP3 recording, USB playback and SD/MMC card |
| Brand and Model | SilverCrest KH 2431 |
| Dimensions (L x W x H) | Approx. 420 x 356 x 140 mm |
| Weight | Approx. 4.2 kg |
| Power Supply | 220-240 V~, 50 Hz, 19 W |
| Turntable Speeds | 33⅓, 45 and 78 RPM |
| Motor and Drive | DC servo motor, belt drive |
| Stylus | AT-3600L (Audio Technica) |
| Audio Outputs | LINE OUT (RCA), PHONO OUT (RCA), 3.5 mm headphone |
| Audio Input | AUX IN 3.5 mm stereo |
| Radio | FM 87.5-108 MHz, AM (not specified) |
| Supported File Formats | MP3, WMA (playback and recording in MP3) |
| Maximum Memory (USB/SD) | Not specified, but suitable for FAT32 drives |
| Recording | MP3 from record or AUX to USB/SD (64, 128 or 192 kbps) |
| Integrated Speakers | 2 x 3 W (8 Ω) |
| Included Accessories | Remote control (CR2032 battery included), RCA cable, 45 RPM adapter, platter cover, Audacity CD |
| Maintenance and Cleaning | Clean casing with damp cloth and mild detergent; replaceable stylus |
| Safety | Do not open the casing; unplug before cleaning; use only as described |
| Repairability | Repairs only by authorized service; wear parts: stylus, belt |
| Warranty | 3 years |
Frequently Asked Questions - KH 2431 SILVERCREST
User questions about KH 2431 SILVERCREST
0 question about this device. Answer the ones you know or ask your own.
Ask a new question about this device
Download the instructions for your Turntable in PDF format for free! Find your manual KH 2431 - SILVERCREST and take your electronic device back in hand. On this page are published all the documents necessary for the use of your device. KH 2431 by SILVERCREST.
USER MANUAL KH 2431 SILVERCREST
PLATINE VINYLE USB KH 2431
FR BE
PLATINE VINYLE USB
Mode d'emploi
DE AT CH
USB-PLATTENSPIELER
Bedienungsanleitung

BE
USB-PLATENSPELER
Gebruksaanwijzing

m = 311
USB RECORD PLAYER
Operating instructions
IAN 53140

FR BE
Before reading, unfold the page containing the illustrations and familiarise yourself with all functions of the device.
Installation et raccordement .8
Installation et raccordement
Anti-skating instellen
Belasthaarheid max. 3 W
Versterker
Uitgangsvermogen 2,0W + 2,0W
Frequentriesponsie 60 Hz ... 20 kHz
Radio
Frequentiebereik 87,5-108MHz
USB-informatiedrager/geheugenkaart
Max.stroomafgiffe 200 mA
Limited liability. 92
Warnings 93
Intended use 94
Safety 95
Danger from electric current 95
Basic Safety Instructions 96
Risk of hearing damage. 97
Interaction with batteries 97
Setting up and connecting . .98
Safety instructions 98
Items supplied and transportation
inspection 98
Disposal of the packaging. 99
Requirements on the setup
location 99
Before the initial use 100
Electrical connection. 101
Activating the remote control
battery 102
Exchanging the remote control
battery 102
Connection to an external amplifier 102
VHF-Wire aerial. 102
Connecting the headset .102
General Description. 103
Remote control 103
Device summary. 104
Service and Operation . . . 105
Switching the device on and off ..105
Adjusting the volume 105
Select operational mode 105
Vinyl record operation 106
Radio operation 107
USB and Card operation. 109
Recording functions 112
Maintenance 114
Removing the cartridge and needle 114
Installing a new needle 114
Cleaning 115
Safety instructions 115
Cleaning 115
Troubleshooting 115
Safety instructions 115
Malfunction causes and remedies 116
Storage/Disposal 117
Storage 117
Disposing of the device 117
Appendix 118
Notes on the EU Declaration of
Conformity 118
Technical data. 118
Warranty 120
Service 120
Importer 120
Introduction
Introduction
Congratulations on the purchase of your new device.
You have clearly decided in favour of a quality product.
These operating instructions are a part of this product. They contain important information in regard to safety, use and disposal. Before using the product, familiarise yourself with all of these operating and safety instructions. Use the product only as described and only for the specified areas of application. In addition, pass these documents on, together with the product, to any future owner.
Copyright
This documentation is copyright protected.
Any duplication and/or reprinting, entirely or partially, as well as reproduction of illustrations, also in modifi ed form, is only permitted with written consent from the manufacturer.
Limited liability
All technical information, data and information for installation, connection and operation contained in these operating instructions correspond to the latest at time of printing and, to the best of our knowledge, take into account our previous experience and know-how.
No claims can be derived from the details, illustrations and descriptions in these instructions.
The manufacturer assumes no responsibility for damage caused by failure to observe these instructions, improper use, incompetent repairs, making unauthorised modifi cations or for using unapproved replacement parts.
Warnings
In these operating instructions the following warnings are used:

DANGER
A warning at this risk level indicates a potentially life threatening situation.
If the dangerous situation is not avoided it could lead to serious injury or death.
The directives in this warning are given to avoid serious personal injuries or death.

WARNING
A warning at this risk level indicates a possibly dangerous situation.
If the dangerous situation is not avoided it could lead to injuries.
The directives in this warning are given to avoid personal injuries.
IMPORTANT
A warning at this risk level indicates potential property damage.
If the situation is not avoided it could lead to property damage.
The directives in this warning are given to avoid property damage.
NOTE
A note indicates additional information that could assist you in the handling of the device.
Intended use
This device is intended to be used for the playing of vinyl records, for the reception of FM radio transmissions, for the playback of MP3/WMA fi les from USB memory devices and SD/MMC memory cards, and the playback of audio signals from external audio devices.
In addition, with this device you can record audio signals from vinyl records and external audio devices as MP3 files on USB data carriers and SD/MMC memory cards.
This device is not intended for any other use or for uses beyond those mentioned.
GB
WARNING
Danger from unintended use!
Danger can arise from the device if used for unintended purposes and/or other types of use.
Use the device exclusively for intended purposes.
Observe the procedures described in these operating instructions.
Claims of any kind for damage resulting from unintended use will not be accepted.
The operator alone bears liability.
Safety
In this chapter you receive important safety information regarding handling of the device.
This device complies with the statutory safety regulations.
Incorrect usage can lead to personal injury and property damage.
Danger from electric current
DANGER
Danger to life from electrical current!
Danger to life exists from contact with live electrical wires or components!
Pay heed to the following safety instructions to avoid risks from electrical current:
Do not use the device if the power cable or the power plug is damaged.
Before using the device again have a new connection cable installed by an authorized specialist.
- Under no circumstances open the device's casing. The risk of electric shock exists from touching voltage carrying connections and changing the electrical/mechanical construction.
IMPORTANT
Notice regarding power disconnection
The POWER switch does not completely disconnect the device from the mains power network. To completely separate the device from mains power, the plug MUST be removed from the mains power socket. The device should be positioned so that you have unrestricted access to the power socket at all times, enabling the plug to be immediately withdrawn should an emergency situation arise.
To eliminate the risk of fire you should completely disconnect the plug from the mains power socket if the device is not going to be used for an extended period, for example, during holidays.
Basic Safety Instructions
For safe handling of the device observe the following safety information:
Before use check the device for externally visible damage. Do not operate a damaged device or one that has been dropped.
If the power cable or connections are damaged, have them exchanged by an authorised specialist or the Customer Services department.
■ Persons who, due to their physical, intellectual or motor abilities, are incapable of operating the device safely may only use the device under supervision or direction from a responsible person.
■ Permit children to use the device ONLY under supervision.
Repairs should only be carried out by authorised specialist companies or by the Customer Services department. Incompetent repairs can result in significant risks for the user. In addition warranty claims become invalid.
A repair to the device during the warranty period may only be carried out by a Customer Service department authorised by the manufacturer, otherwise no further warranty claims can be accepted for subsequent damage.
Defective components may only be replaced with original replacement parts Only by using original replacement parts can it be guaranteed that the safety requirements are being complied with.
Protect the device from moisture and liquid penetration.
ALWAYS disconnect the power cable from the mains power socket by the plug, NOT by the cable itself.
Do not carry the device by the power cable.
- Do not allow the power cable to dangle. A risk of pulling the device down by the cable exists.
Avoid direct sunlight.
■ Do not operate or place the device close to open fl ames (e.g. candles).
In the case of malfunctions and during thunderstorms, disconnect the plug from the mains power socket.
- Do not subject the device to spraywater and/or dripping water and do not place any objects flled with liquids, such as vases or opened drink containers, on or near the device.

Risk of hearing damage

WARNING

Risks as a result of extremely high sound levels!
Listening to loud music on a connected pair of headphones can cause hearing damage.
- Avoid extremely loud sound levels, especially over long periods of time, when you are using headphones.
Interaction with batteries

WARNING
Risks from improper use!
For safe handling of batteries observe the following safety instructions:
Do not throw the batteries into a fire.
- Never short-circuit batteries.
Do not attempt to recharge the batteries.
Regularly check the condition of the batteries. Leaking battery acid can cause permanent damage to the device. When handling a damaged or leaking battery special care should be taken. Danger from acid burns! Wear protective gloves.
- Store batteries in a place inaccessible to children. Should a battery be swallowed, seek medical attention IMMEDIATELY.
- Remove the batteries from the remote control if you do not intend to use the device for extended periods of time.
Setting up and connecting
Safety instructions
WARNING
During the commissioning of the device personal injury and property damage can occur!
To avoid risks, pay heed to the following safety instructions:
- Packaging materials may not be used as playthings. There is a risk of suffocation!
Pay heed to the information regarding the requirements on setup location as well as the device's electrical connection to avoid personal injury and property damage.
Items supplied and transportation inspection
NOTE
Check the contents to make sure everything is there and for visible damage.
- If the contents are not complete or are damaged due to defective packaging or through transportation, contact the Service Hotline (see Service).
The device is delivered with the following components as standard:
- Record turntable
- Turntable
- Turntable mat
Drive belt - Adapter for single records (45's)
- Cinch cable
Remote Control
CR2032 battery for the remote control
Audacity programme CD
This operating manual
NOTE
- With the supplied Audacity software CD you can subsequently edit your recordings. Further information can be found on the internet under the address http://audacity.sourceforge.net.
Disposal of the packaging
The packaging protects the device from transport damages. The packaging materials are selected from the point of view of their environmental friendliness and disposal technology and are therefore recyclable.

The recirculation of packaging into the material circuit saves on raw material and reduces the amount of waste generated. Dispos of packaging material that is no longer needed as per the regionally established regulations.
NOTE
If possible, preserve the device's original packaging during the warranty period so that, in the event of a warranty claim, you can package the device ideally for its return.
GB
Requirements on the setup location
For safe and trouble free operation of the device the setup location must fulfil II the following provisions:
The device must be placed on a firm, flat and level surface.
- Do not place the device in a hot, wet or very damp environment or in the vicinity of flammable materials.
- Do not remove the device's pads. If you do, air circulation in the device will be impaired.
The mains power socket must be easily accessible so that the power cable can be easily disconnected in an emergency.
The surface areas of furniture may possibly contain components that could affect the device's rubber pads, softening them. If necessary place a cover under the device's pads.
Operating temperature range: +5 to +40 °C
Humidity (no condensation): 5 - 90%
Before the initial use
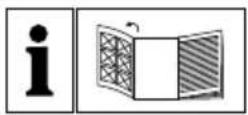
Fitting the turntable
Place the belt around the underside of the turntable 2
Pull the belt outwards.
Place the turntable 2 on the motor shaft so that the recess in the turntable 2 lies over the belt pulley. Thereby, hold the belt tensioned.
Place the belt around the belt pulley of the drive motor.
Place the turntable mat on the turntable. 2
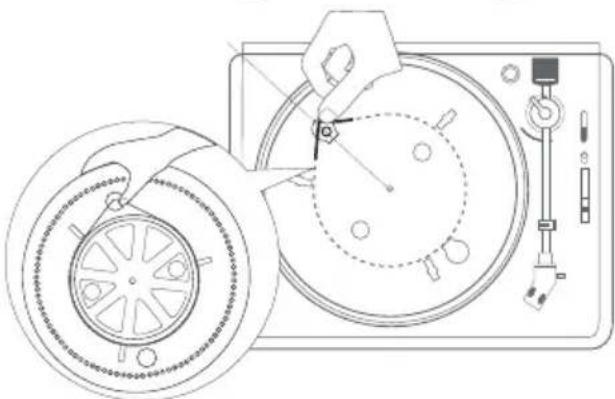
Setting the tracking pressure
Insert the counterweight onto the tone arm until it clicks into place. Thereby, the adjustment ring should face forwards.
Remove the protective cover from the stylus.
Release the securing lever of the tone arm.
Move the lever to the front position to raise the tone arm.
Swing the tone arm over the turntable 2
IMPORTANT
Potential stylus damage.
The stylus can be damaged.
- Hold the tone arm firmly so that the stylus does not touch the turntable.
Move the lever 8 to the rear position to lower the pick-up arm.
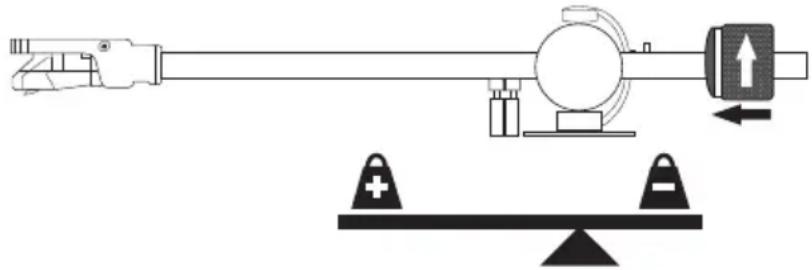
Align the tone arm by turning the counterweight in such a way that it is in equilibrium (see figure).
Swing the tone arm back into its original position.
Hold the counterweight firmly and then turn the adjusting ring so that the "0" marking is at the top.
Rotate the counterweight to the left, to the position "2.5". This corresponds to a tracking pressure of 2.5 grams.
NOTE
Should the tone arm jump, slide, or does not move forward, the tracking pressure and anti-skating force are not set correctly.
- Raise or lower the tracking pressure by turning the counterweight on the tone arm to the left or right.
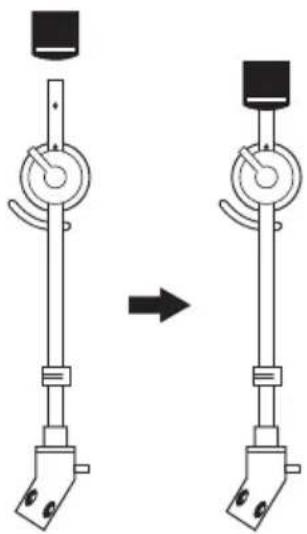
Setting the anti-skating force
Due to the friction of the rotating disc with the needle, the tone arm is pulled inwards and the needle presses more heavily on the inner groove flank of the disc. The anti-skating setting balances this out. The anti-skating force should be set to the same value as the tracking pressure.
Turn the anti-skating knob 5 to the position "2.5".
Electrical connection
Before connecting the device compare the connection data (voltage and frequency) with that on the rating plate of your electric supply.
This data must agree in order to avoid damaging the device.
Make sure that the power cable is not damaged and is not laying over hot surfaces and/or sharp edges.
■ Ensure that the power cable is not over taut or kinked.
■ Do not allow the cable to dangle over edges (trip wire effect).
The mains power socket must be easily accessible so that the power cable can be easily disconnected in an emergency.
Activating the remote control battery
The battery for the remote control is already inserted on delivery.
Activate the battery by removing the insulation strips.
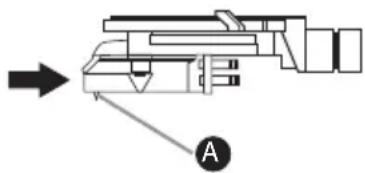
Exchanging the remote control battery
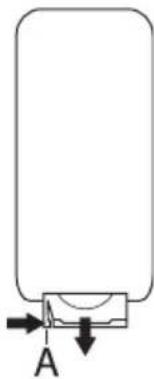
With a fingernail press the notch (A) to the right while at the same time pulling the battery compartment out.
Insert a 3 V battery, type CR 2032, into the battery compartment.. The side with the marking "+" must be facing upwards.
Slide the battery compartment back into the remote control.
Connection to an external amplifier
NOTE
This device is equipped with a LINE OUT output (audio signal processed by an internal amplifier) and with a PHONO OUT output (non-amplified audio signal, and only for playback of records).
Connect the cinch cable to the LINE OUT connection sockets 34 and to the AUX IN connection of the external amplifi er. For this, pay heed to the operating instructions for the external amplifi er.
Connect the cinch cable to the PHONO OUT connection sockets 35 and to the PHONO input of the external amplifi er. For this, pay heed to the operating instructions for the external amplifi er.
IMPORTANT
Potential damage to the external amplifi er!
In the case of a false connection of the device, the amplifi er may be damaged.
- Do not connect the LINE OUT output of the device with the PHONO input of the amplifier.
VHF-Wire aerial
Completely unwind the wire aerial 33 for radio reception.
Connecting the headset
If desired, connect your headphones (with 3.5 ~mm jackplug) to the connection socket ③ The loudspeakers then switch off automatically.
General Description
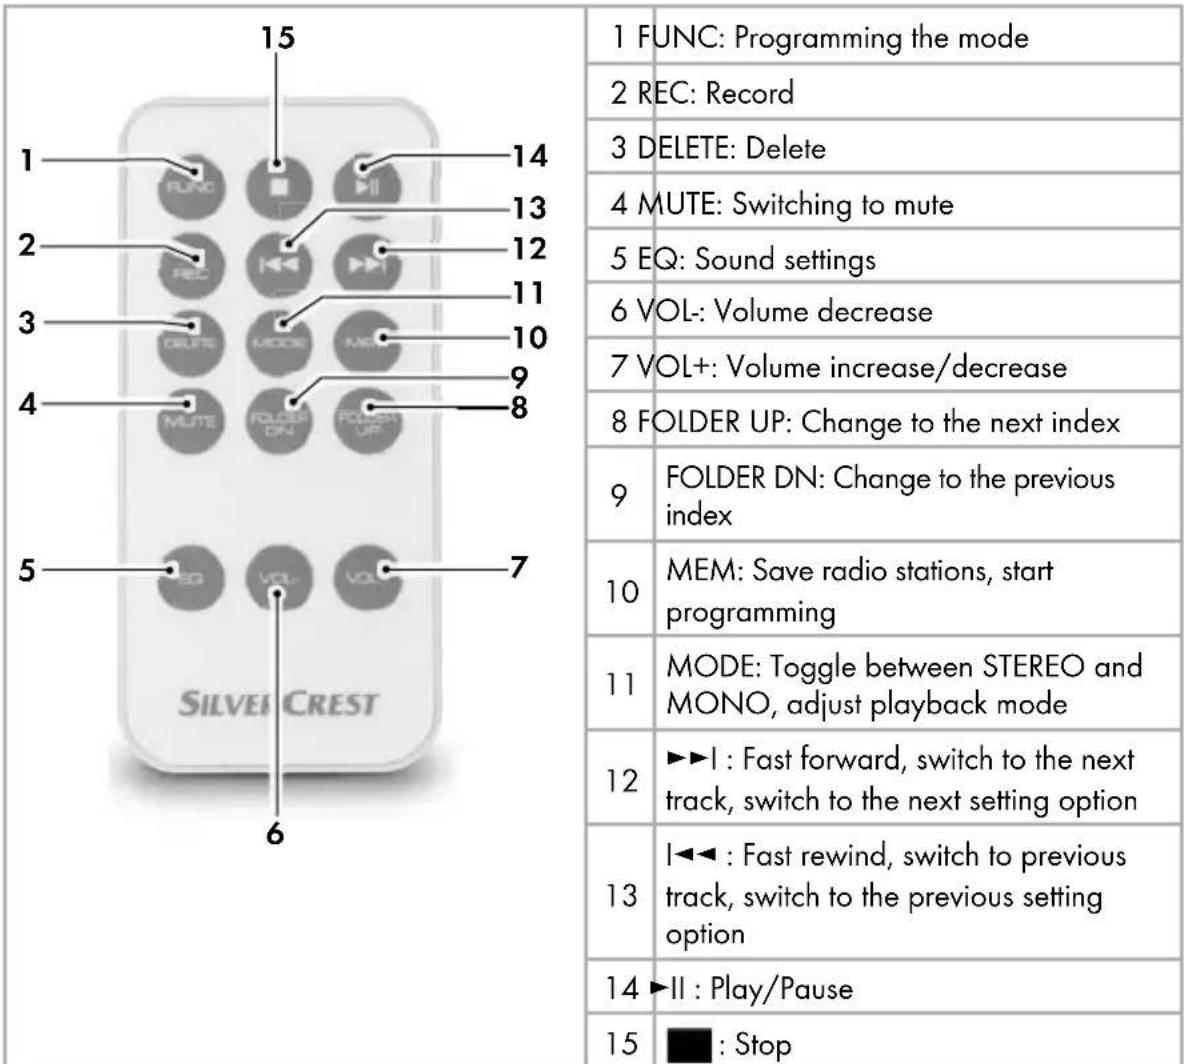
Remote control
Device summary
See illustrations on the foldout page.
See-through window
Turntable
3 Turntable mat
Dust cover
5 Anti-Skating rotation knob
Counterweight with adjustment for the tracking pressure
7 Tone arm
8 Tone arm elevating lever
Turntable speed selection switch: 3313 45 or 78 rpm
10 Adjustment control PITCH ADJ.: Fine adjustment of the rotation speed
10 Tone arm security lever
12 Loudspeakers
13 Needle with cartridge
14 POWER switch: Device on/off switch
15 Card slot for SD/MMC cards
16 Sensor for remote control
17 Display
18 Button REC: Recording
19 Button : Stop playback (USB or memory card)
20 Button II: Start or pause playback (USB or memory card)
2 Button MEMORY/PROG.: Save radio stations/programming functions
22 Button PHONO II: Vinyl record playback pause or resume
23 Button PHONO: Stop vinyl record playback
Volume control: Adjusting the volume level.
25 Button FUNCTION: Select operating mode
26 Button MODE: Adjust playback mode/Toggle between Stereo and Mono
27 Button▶I: Fast forward, switch to the next track, switch to the next setting option (only for USB/CARD)
28 Button: Fast rewind, switch to previous track, switch to the previous setting option (only for USB/CARD)
29 Button DELETE: Delete (only for USB/ CARD)
30 AUX IN: 3.5 mm stereo input socket for the connection of an external audio device
31 3.5 mm stereo output socket for headphones
USB port
3 VHF-Wire aerial
34 LINE OUT: Audio cinch output L/R for amplifier
35 PHONO OUT: Audio cinch output L/R for amplifi er
36 Mains power connection cable
Adapter for single records (45's)
Service and Operation
In this chapter you will receive important information for the service and operation of the device.
Switching the device on and off
To switch the device on activate the switch POWER 14. HELLO will be displayed on the screen and then the last used operating mode is activated.
To switch the device off activate the switch POWER 14 again.
Adjusting the volume
Prerequisite: The device is switched on.
Turn the volume control 24 or press the buttons VOL+ or VOL- on the remote control to adjust the sound volume. The set sound volume level is shown in the Display 17. The sound volume level can be set between 0 (Vol. min.) and 30 (Vol. max.).
NOTE
The set sound volume level is valid for all functions.
Select operational mode
Press the button FUNCTION25 to switch between radio reception (TUNER), USB port (USB), card slot (CARD), record player (PHONO) and audio input (AUX).
Vinyl record operation
Starting playback of records
Press repeatedly on the button FUNCTION 25 until PHONO is indicated on the display.
Open the dust cover
Place the record onto the turntable.
NOTE
For playing records with a large centre hole (Singles) you use the adapter 36
With the turntable speed selection switch set the required rotation speed.
NOTE
The rotation speed is printed on the record label.
Remove the protective cover from the stylus.
Release the securing lever of the tone arm.
Move the lever 8 to the front position to raise the tone arm.
Swing the tone arm to the desired position on the record.
Move the tone arm lever 8 to the rear position to lower the tone arm and to place the stylus onto the record.
NOTE
At the end of the record, the tonearm automatically returns to its starting position.
Fine adjustment of the rotation speed
The rotation speed is correctly set, when the broken line visible through the viewing window 1 is not moving.
If the lines move in a clockwise direction, slide the adjustment control PITCH ADJ. ⑩ backwards in the direction -
If the lines move in an anti-clockwise direction, slide the adjustment control PITCH ADJ. 10 forwards in the direction +.
Operation during playback
To pause the playback, press the button PHONO II 2. The turntable stops and the tone arm remains in its current position.
IMPORTANT
Possible damage to the record or the needle.
If playback is stopped when the needle is still on the record it can lead to damage.
Move the lever to the forward position before you press the button PHONO II 22.
To resume an interrupted playback, press the buttonPHONO II 22 and then move the lever 8 to the rear position.
To stop playback, press the button PHONO 23. The turntable stops and the tone arm returns to its starting position.
Radio operation
NOTE
For good radio reception the wire aerial must be completely unwound. Align the aerial in radio mode for the best reception.
The technical characteristics of the device permit reception of selectable frequencies beyond the VHF (FM) range of 87.5-108 MHz. In some countries various national regulations regarding the allocated radio frequency range can exist. Please note that information received outside of the assigned radio frequency ranges may not be exploited, passed on to third parties or otherwise misused.
Switching the radio function on
Press repeatedly on the button FUNCTION 25 until TUNER is indicated on the display.
Toggle between MONO and STEREO
Press the button MODE twice to toggle between MONO and STEREO.
During stereo reception the symbol is indicated on the display.
Automatic station search
Press and hold the buttons 28 or 27 to start a station search.
The search will stop when a station is found.
Manual station selection
Press the buttons I or briefly to change the frequency in
0.05 MHz steps until the desired frequency is set.
Saving radio stations
You can save up to 30 radio stations.
Press the button MEMORY/PROG. ②. On the display the number of the last selected memory location will blink.
Select with the buttons I or the desired memory location and press the button MEMORY/PROG.
Accessing saved stations
Press and hold the button MEMORY/PROG. ① until -- is indicated on the display.
Select with the buttons 1 or 27 the desired radio station.
NOTE
If for about 3 seconds you do not press either of the buttons I▶2r▶I, 27 the device returns to its previous operating mode (station search).
USB and Card operation
Connecting a USB data carrier
Connect your USB device to the port32
Connecting a memory card
Slide a memory card into the memory card slot 15 with the labelling pointing upwards.
Activating the operating mode
Press repeatedly on the button FUNCTION 25 until USB or CARD is indicated on the display. In the display READING is indicated and the device searches for MP3 or WMA fi les on the data carrier. After reading the data, playback starts automatically.
NOTE
If no data carrier is connected, NO USB resp. NO CARD is indicated.
If no MP3/WMA files are found on the data carrier NO FILE is indicated on the display.
Interrupting playback or fi nishing it
Press the button ll 20, to pause playback.
To continue playback press the button once more.
To stop playback press the button. The track number and directory number are displayed on the display.
Title skip
Press the button 1 to select the next track.
During playback:
Press the button 1 once to skip to the beginning of the current track or twice to select the previous track.
In stop mode:
Press the button I 28 to select the previous track.
Fast forward/backward
During playback press and hold the buttons 1 or 2 to start a fast forward or rewind.
Setting the playback mode
Repeatedly press the button MODE 26 to toggle between the following settings:
- REPEAT ONE: The current title is repeated.
- REPEAT: The current directory is repeated.
- REPEAT ALL: all of the tracks to be repeated.
- RANDOM: The tracks are played in a random order.
If any of these settings are activated, this will be indicated in the display.
NOTE
After pressing the button 19 the setting of the playback mode is reset.
Programming the playback order
You can programme in a playback sequence for up to 99 titles. The programming can be done only when playback is stopped.
Create a list
Press the button MEMORY/PROG. ②. Indicated in the display are F00 (OO blinks) and P01.
Select with the buttons I or the desired directory and press the button MEMORY/PROG. 4. Indicated in the display are TOO (OO blinks) and P01.
Select with the buttons I or the tracks that you want to save on programme space 01, then press the button MEMORY/PROG. Indicated in the display are F00 (00 blinks) and P02.
Repeat these steps until your list is complete.
Press the button to complete the programming and start playback. On the display MEMORY is indicated.
With the buttons 1234567890 can switch between the programmed tracks.
By pressing the button MEMORY/PROG. ④ you can continue the programming.
NOTE
After programming of 99 titles PROGFULL will be indicated on the display.
Deleting a list
To delete the list, press the button or change the operating mode.
MEMORY no longer appears.
Delete tracks
Tracks can be deleted only when playback is stopped.
Press the button DELETE 29. On the display DEL is indicated and the indicator ONE blinks.
Select with the buttons or the desired setting:
- ONE: The current title is deleted.
DIR: All MP3 and WMA files in the current directory to be deleted. - ALL: All MP3 and WMA files on the complete data carrier to be deleted.
IMPORTANT
Possible Data Loss.
The deletion of fi les cannot be reversed.
Press the button DELETE 29 to start the deletion process or press the button 18 cancel the deletions.
If a button is not pressed for about 2 seconds, the device will return to its previous operating mode.
Recording functions
With your device you can convert audio signals from vinyl records or an external audio source into MP3 fi les and save them to USB or SD/MMC data carriers and copy MP3 or WMA fi les from USB data carriers on SD/MMC data carriers and vice versa.
Recording from vinyl records or an external audio device
NOTE
If no data carrier is connected, NO USB resp. NO CARD is indicated.
Place a memory medium into the card slot 15 or connect a data carrier to the USB port 32.
Connect the external audio device.
With the button FUNCTION select the desired operating mode (PHONO resp. AUX).
Start playback of the vinyl record or external audio device.
If necessary, adjust the compression rate for the MP3 file.
Press the button REC 13. On the display 128 KBPS is indicated. Select with the buttons I<28 or I 27e desired setting.
Selection options: 64, 128 or 192.
Press the button REC 18 to confirm the selection.
Press the button REC 18. If you have connected only one USB data carrier or only one memory card, recording will start immediately.
If you have connected both a USB data carrier and a memory card, then REC is displayed and the display will blink USB. With the buttons I 28 or I 27, select whether the recording is to be made on the USB data carrier (REC-USB) or on the memory card (REC-CARD). Confirm your selection by pressing the button REC 18. The recording starts and REC blinks on the display.
Press the button stop the recording.
The recordings will be stored in MP3 format under the names File_001.mp3, File_002.mp3, etc. on the selected data carrier in the directory RECORD/LINE-IN. The directories are, if not already available, created automatically.
NOTE
If you want to save individual tracks of the record into different files, you must stop the recording after each track and restart.
Copying from USB to memory card or memory card to USB
NOTE
-
You can copy fi les either during playback (slow) or when playback is stopped (fast).
Place a memory medium into the card slot 15 and connect a data carrier to the USB port 32.
If you want to copy files from the USB data carrier to the memory card, select the operating mode USB, otherwise the operating mode CARD.
If necessary, stop playback by pressing the button.19
Select with the buttons or the titles to be copied.
Press the button REC18
Select with the buttons 28 or 1 the desired mode: -
ONE: The current title is copied.
DIR: All MP3 and WMA files in the current directory to be copied. - ALL: All MP3 and WMA files on the complete data carrier to be copied.
Press the button REC 18. The copying process starts. The indicators REC and SD resp. USB blink.
The copied files will be stored under the names File_001.mp3, File_002.mp3, etc. on the selected data carrier in the directory RECORD/COPY. The directories are, if not already available, created automatically.
During playback:
The title to be copied is played back and recorded simultaneously on the destination data carrier. The duration of the copying process corresponds to the recording length of the title.
While playback is stopped:
The title is copied to the destination drive. The copy progress is indicated as a percentage.
When the copy process is complete, END REC is displayed for about 2 seconds.
After that, the total number of directories and playable fi les is displayed.
NOTE
If there is too little free space on the destination data carrier, then REC FULL is indicated.
Maintenance
Removing the cartridge and needle
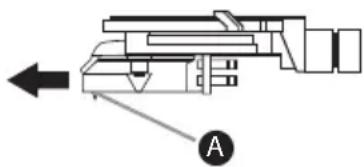
Pull the needle including holderA off.
Installing a new needle
Install the new needle holder A of the type AT-3600L from the fi rm Audio Technica.
IMPORTANT
Possible needle damage.
The needle can be damaged when inserting.
Ensure that, during installation, you do not touch the needle.
Cleaning
Safety instructions

DANGER
Threat to life from electrical current!
- Remove the plug from the mains power socket before beginning to clean the device.
IMPORTANT
Possible damage to the device.
Penetrating moisture can lead to a damaging of the device.
- Ensure that, when cleaning it, no moisture can penetrate into the device, so as to avoid irreparable damage to it.
Cleaning
Clean the casing only with a slightly damp cloth and a mild detergent.
Troubleshooting
In this chapter you receive important information for malfunction localisation and malfunction remedies. To avoid risks and damage pay heed to the safety information.
Safety instructions

WARNING
To avoid risks and property damage, pay heed to the following safety instructions:
Repairs to electric devices may only be carried out by specialists trained by the manufacturer. Through incompetent repairs considerable risk for the user and damage to the device can occur.
Malfunction causes and remedies
The following chart will assist with the localising and remedy of minor malfunctions:
| Defect Possible cause Solution | ||
| no indications on the display. | The device is not switched on. | Switch the device on. |
| The plug is not inserted. | Insert the plug into the mains power socket. | |
| The mains power socket is not supplying power. | Check the house fuse. | |
| No sound. | The sound volume is set to minimum. | Increase the playback volume. |
| A pair of headphones is connected. | Disconnect the headphones from the connection socket 31. | |
| Playback of the audio device is not started. | Start playback of the audio device. | |
| The turntable does not turn, in spite of the fact that the tone arm is located in the playback position. | false operating mode selected | Select the operating mode PHONO. |
| The button PHONO ➔II 22 is pressed. | Press the button PHONO ➔II 22 once again. | |
| Poor sound quality, strong background noise, sound dropout. | Needle is worn out. Replace the needle. | |
| Tone arm jumps, slides or does not move forward. | The device is not standing level. | Stand the device on a level surface. |
| Anti-skating set incorrectly. | Check the anti-skating settings. | |
| Tracking force is set incorrectly. | Check the settings for the tracking force. | |
| Interference with the radio reception. | The transmitter is not properly adjusted. | Select the desired radio station with the buttons I← 28 or ➔ I 27 correctly. |
| The reception is weak. | Try to improve reception by realigning the wire aerial 33. | |
| NO USB is indi-cated. | A USB data carrier is not connected. | Connect a USB data carrier to the port 32. |
| Incorrect format. | Ensure that the data carrier is formatted for the FAT32 fi le system. | |
| NO CARD is indicated. | A memory card is not connected. | Insert a memory card into the card slot ⑤. |
| Incorrect format. | Ensure that the data carrier is formatted for the FAT32 fi le system. | |
| REC FULL is indicated. | Not enough free memory space on the target data carrier. | Delete fi les no longer needed or connect a new data carrier with suffiCNT free memory space. |
NOTE
If you cannot solve the problem with any of the aforementioned methods please contact the Customer Service department.
Storage/Disposal
Storage
Disconnect the plug if you are intending to not use the device for an extended period of time.
Store the device in a dry environment.
Protect the needle with the protective cap.
Close the protective cover after use.
Disposing of the device

Do not, under any circumstances, dispose of the device with household refuse. This product is subject to the provisions of the European Directive 2002/96/EC WEEE (Waste Electrical and Electronic Equipment).
Dispose of the device through an approved disposal centre or at your community waste facility. Observe the currently applicable regulations. In case of doubt, please contact your waste disposal centre.
Appendix
Notes on the EU Declaration of Conformity
In regard to compliance with essential requirements and other relevant provisions, this device complies with the European Electromagnetic Compatibility Directive 2004/108/EC, the Low Voltage Directive 2006/95/EC and the Ecodesign Directive 2009/125/EC (Ordinance 1275/2008 Annex II, No. 1).
The complete original Declaration of Conformity can be obtained from the importer.

GB
Technical data
| General | ||
| Input voltage 220 - 240 V | ~ | |
| Power frequency 50 Hz | ||
| Power consumption 19 W | ||
| Headphone output voltage approx. 80 mV | ||
| Operating temperature +5 - +40 °C | ||
| Humidity (no condensation) 5 - 90 % | ||
| Dimensions | ||
| Device (L x D x H) approx. 420 x 356 x 140 mm | ||
| Remote control (L x D x H) approx. 86 x 40 x 7 mm | ||
| Weight | ||
| Device | approx. 4,2 kg | |
| Remote control with battery | approx. 16 | g |
| Motor and turntable | ||
| Motor Direct current-Servomotor | ||
| Drive system Belt drive | ||
| Speeds 33½, 45, 78 Rev/min | ||
| Flutter less than 0,35 % (WRMS) | ||
| Signal to noise ratio more than 50 dB | ||
| Needle AT-3600L | ||
| Loudspeakers | ||
| Impedance 8 Ω | ||
| Load-bearing capacity max. 3 W | ||
| Amplifier | |
| Output power 2.0 W + 2.0 W | |
| Frequency response | 60 Hz ... 20 kHz |
| Radio | ||
| Frequency range | 87,5 - 108 MHz | |
| USB data carrier / Memory card | ||
| Max. power output USB port | 200 | mA |
| max. storage capacity | 8 | GB |
| Playable File Formats | WMA, MP3 | |
| Recording format | MP3 | |
| Compression rate when recording | 64, 128 or 192 | kBit/s |
Warranty
The warranty for this appliance is for 3 years from the date of purchase. The appliance has been manufactured with care and meticulously examined before delivery.
Please retain your receipt as proof of purchase. In the case of a warranty claim, please make contact by telephone with our Customer Service Department. Only in this way can a post-free despatch for your goods be assured.
NOTICE
- The warranty covers only claims for material and manufacturing defects, but not for transport damage, wearing parts or for damage to fragile components, e.g. buttons or batteries.
This product is for domestic use only and is not intended for commercial use. The warranty is void in the case of abusive and improper handling, use of force and internal tampering not carried out by our authorised service branch.
Your statutory rights are not restricted in any way by this warranty. The warranty period is not extended by repairs made under the warranty. This applies also to replaced and repaired parts.
Damages and defects extant at the time of purchase must be reported immediately after unpacking, resp. no later than two days after the date of purchase.
Repairs made after the lapse of the warranty period are subject to charge.
Service
GB Service Great Britain
Tel.: 0871 5000 720 (£ 0.10/Min.)
E-Mail: kompernass@lidl.co.uk
IAN53140
Importer
KOMPERNASS GMBH
BURGSTRASSE 21
44867 BOCHUM, GERMANY
www.kompernass.com
KOMPERNASS GMBH
BurgsstraBe 21
D-44867 Bochum
www.kompernass.com
Version des informations · Stand van de informatie
- PLATINE VINYLE USB KH 2431
- PLATINE VINYLE USB
- USB-PLATTENSPIELER
- USB-PLATENSPELER
- USB RECORD PLAYER
- FR BE
- Installation et raccordement .8
- Installation et raccordement
- Anti-skating instellen
- Versterker
- Radio
- USB-informatiedrager/geheugenkaart
- Safety 95
- Setting up and connecting . .98
- General Description. 103
- Service and Operation . . . 105
- Maintenance 114
- Cleaning 115
- Troubleshooting 115
- Storage/Disposal 117
- Appendix 118
- Introduction
- Copyright
- Limited liability
- Warnings
- DANGER
- A warning at this risk level indicates a potentially life threatening situation.
- WARNING
- A warning at this risk level indicates a possibly dangerous situation.
- IMPORTANT
- A warning at this risk level indicates potential property damage.
- NOTE
- Intended use
- Danger from unintended use!
- Safety
- Danger from electric current
- Danger to life from electrical current!
- Danger to life exists from contact with live electrical wires or components!
- Notice regarding power disconnection
- Basic Safety Instructions
- Risk of hearing damage
- Risks as a result of extremely high sound levels!
- Interaction with batteries
- Risks from improper use!
- Setting up and connecting
- Safety instructions
- During the commissioning of the device personal injury and property damage can occur!
- Items supplied and transportation inspection
- Disposal of the packaging
- Requirements on the setup location
- Before the initial use
- Fitting the turntable
- Setting the tracking pressure
- Potential stylus damage.
- Setting the anti-skating force
- Electrical connection
- Activating the remote control battery
- Exchanging the remote control battery
- Connection to an external amplifier
- Potential damage to the external amplifi er!
- VHF-Wire aerial
- Connecting the headset
- General Description
- Device summary
- Service and Operation
- Switching the device on and off
- Adjusting the volume
- Select operational mode
- Vinyl record operation
- Starting playback of records
- Fine adjustment of the rotation speed
- Operation during playback
- Possible damage to the record or the needle.
- Radio operation
- Switching the radio function on
- Toggle between MONO and STEREO
- Automatic station search
- Manual station selection
- Saving radio stations
- Accessing saved stations
- USB and Card operation
- Connecting a USB data carrier
- Connecting a memory card
- Activating the operating mode
- Interrupting playback or fi nishing it
- Title skip
- Fast forward/backward
- Setting the playback mode
- Programming the playback order
- Create a list
- Deleting a list
- Delete tracks
- Possible Data Loss.
- Recording functions
- Recording from vinyl records or an external audio device
- Copying from USB to memory card or memory card to USB
- Maintenance
- Removing the cartridge and needle
- Installing a new needle
- Possible needle damage.
- Cleaning
- Threat to life from electrical current!
- Possible damage to the device.
- Troubleshooting
- Malfunction causes and remedies
- Storage/Disposal
- Storage
- Disposing of the device
- Appendix
- Notes on the EU Declaration of Conformity
- Technical data
- Warranty
- NOTICE
- Service
- Importer
Brand : SILVERCREST
Model : KH 2431
Category : Turntable