
DHG 200 - Heating EINHELL - Free user manual and instructions
Find the device manual for free DHG 200 EINHELL in PDF.
| Product type | Hot air generator |
| Brand | Einhell |
| Model | DHG 200 |
| Dimensions (L x W x H) | 76 x 30.5 x 38 cm |
| Weight | 13 kg |
| Power supply | 230 V ~ 50 Hz, 1.5 A |
| Heating power | 20 kW |
| Fuel consumption | 2.0 l/h |
| Tank capacity | 19 l |
| Recommended fuel | Heating oil EL or diesel (no biodiesel) |
| Pump pressure | 0.28 bar (4 PSI) |
| Airflow | 400 m³/h |
| Maximum air temperature | 393 °C |
| Thermostat setting range | +5 °C to +45 °C |
| Heating levels | 1 |
| Safety protection | Safety thermostat, photoelectric cell, fuse |
| Intended use | Heating and drying of well-ventilated rooms (industry, agriculture, construction site, camping) |
| Routine maintenance | Regular cleaning of filters, nozzle and ignition electrode |
| Spare parts | Available from ISC GmbH (www.isc-gmbh.info) |
| Warranty | 2 years (except professional use) |
Frequently Asked Questions - DHG 200 EINHELL
User questions about DHG 200 EINHELL
0 question about this device. Answer the ones you know or ask your own.
Ask a new question about this device
Download the instructions for your Heating in PDF format for free! Find your manual DHG 200 - EINHELL and take your electronic device back in hand. On this page are published all the documents necessary for the use of your device. DHG 200 by EINHELL.
USER MANUAL DHG 200 EINHELL
D
Inhaltsverzeichnis:
- Safety instructions
- Layout
- Intended use
- Mode of operation
- Technical data
- Before starting the appliance
- Operation
- Replacing the power cable
- Cleaning, maintenance and ordering of spare parts
- Disposal and recycling
- Troubleshooting
- Circuit diagram
- Maintenance by customer service
- Troubleshooting - Notes for the expert
GB

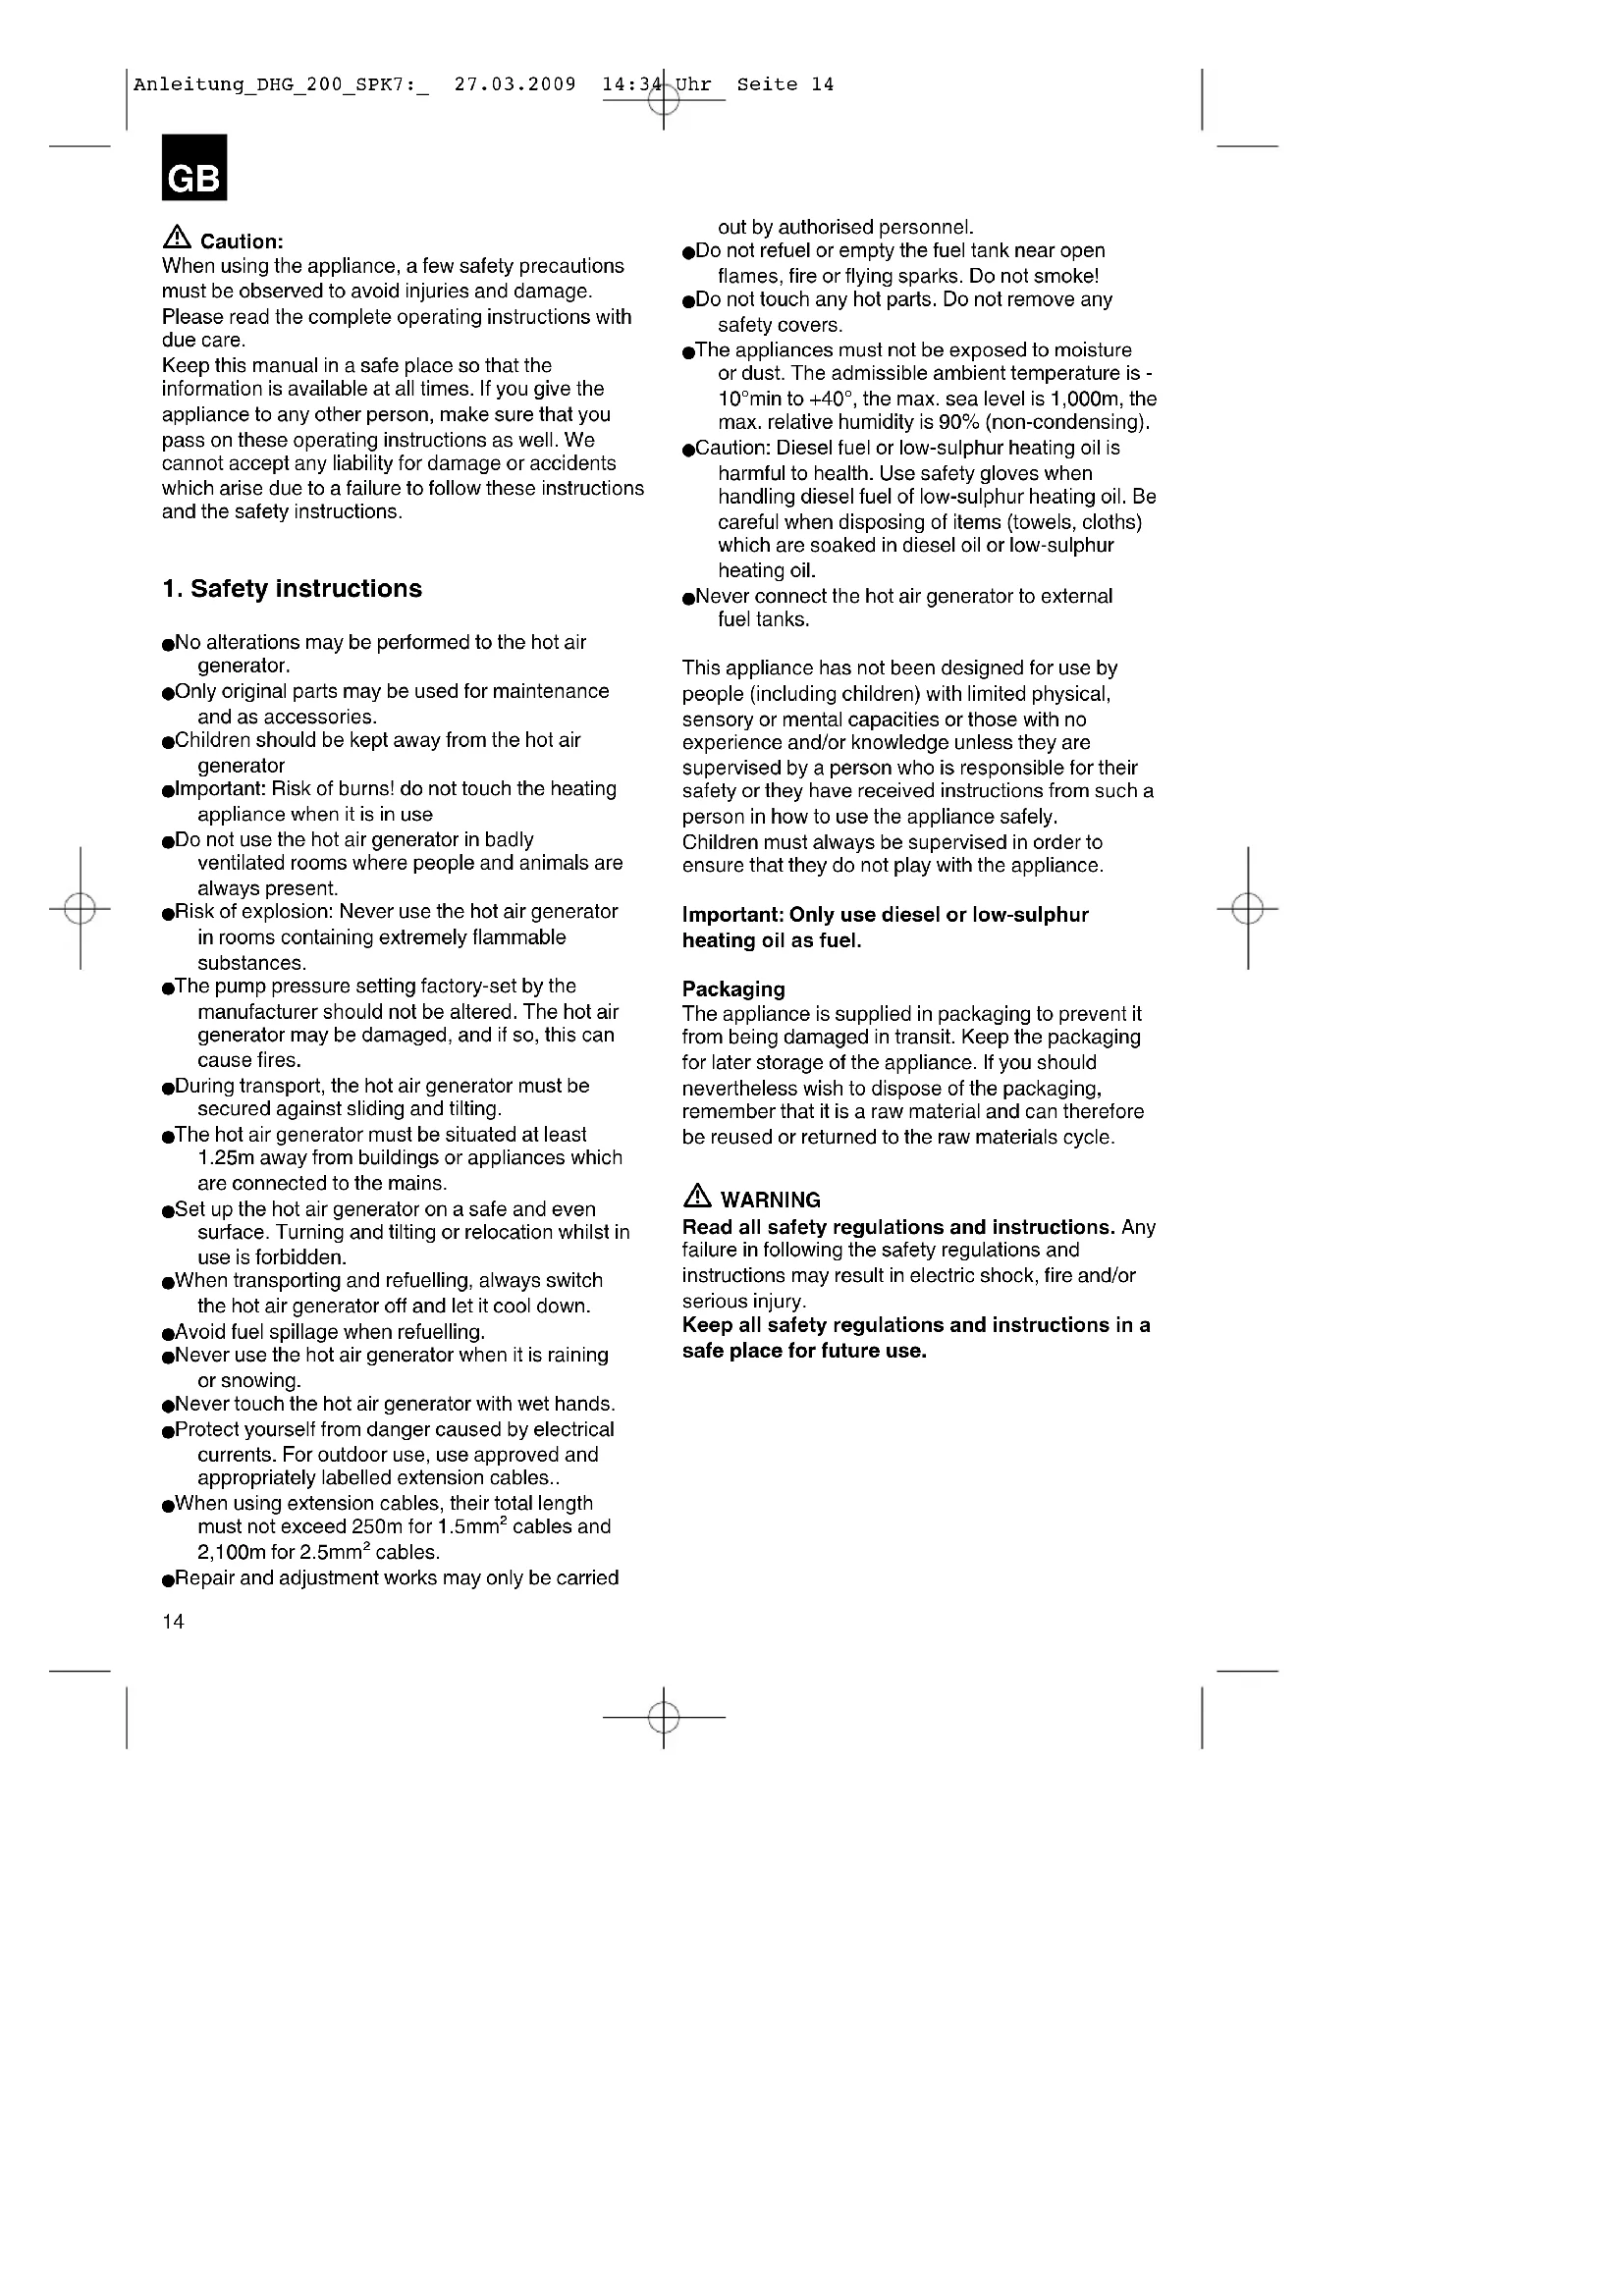
Caution:
When using the appliance, a few safety precautions must be observed to avoid injuries and damage. Please read the complete operating instructions with due care.
Keep this manual in a safe place so that the information is available at all times. If you give the appliance to any other person, make sure that you pass on these operating instructions as well. We cannot accept any liability for damage or accidents which arise due to a failure to follow these instructions and the safety instructions.
1. Safety instructions
●No alterations may be performed to the hot air generator.
●Only original parts may be used for maintenance and as accessories.
●Children should be kept away from the hot air generator
●Important: Risk of burns! do not touch the heating appliance when it is in use
●Do not use the hot air generator in badly ventilated rooms where people and animals are always present.
●Risk of explosion: Never use the hot air generator in rooms containing extremely flammable substances.
●The pump pressure setting factory-set by the manufacturer should not be altered. The hot air generator may be damaged, and if so, this can cause fires.
●During transport, the hot air generator must be secured against sliding and tilting.
●The hot air generator must be situated at least 1.25m away from buildings or appliances which are connected to the mains.
- Set up the hot air generator on a safe and even surface. Turning and tilting or relocation whilst in use is forbidden.
- When transporting and refuelling, always switch the hot air generator off and let it cool down.
●Avoid fuel spillage when refuelling.
●Never use the hot air generator when it is raining or snowing.
●Never touch the hot air generator with wet hands.
- Protect yourself from danger caused by electrical currents. For outdoor use, use approved and appropriately labelled extension cables..
- When using extension cables, their total length must not exceed 250m for 1.5mm^2 cables and 2,100m for 2.5mm^2 cables.
●Repair and adjustment works may only be carried
out by authorised personnel.
●Do not refuel or empty the fuel tank near open flames, fire or flying sparks. Do not smoke!
- Do not touch any hot parts. Do not remove any safety covers.
●The appliances must not be exposed to moisture or dust. The admissible ambient temperature is -10^ min to +40^ , the max. sea level is 1,000m, the max. relative humidity is 90% (non-condensing).
●Caution: Diesel fuel or low-sulphur heating oil is harmful to health. Use safety gloves when handling diesel fuel of low-sulphur heating oil. Be careful when disposing of items (towels, cloths) which are soaked in diesel oil or low-sulphur heating oil.
●Never connect the hot air generator to external fuel tanks.
This appliance has not been designed for use by people (including children) with limited physical, sensory or mental capacities or those with no experience and/or knowledge unless they are supervised by a person who is responsible for their safety or they have received instructions from such a person in how to use the appliance safely.
Children must always be supervised in order to ensure that they do not play with the appliance.
Important: Only use diesel or low-sulphur heating oil as fuel.
Packaging
The appliance is supplied in packaging to prevent it from being damaged in transit. Keep the packaging for later storage of the appliance. If you should nevertheless wish to dispose of the packaging, remember that it is a raw material and can therefore be reused or returned to the raw materials cycle.

WARNING
Read all safety regulations and instructions. Any failure in following the safety regulations and instructions may result in electric shock, fire and/or serious injury.
Keep all safety regulations and instructions in a safe place for future use.
2. Layout (Fig. 1)
- Air outlet opening
- Upper half of housing
- Carry handle
- Mount for extension cable
- Fan cover
- Pressure indicator
- Tank indicator
- Tank cover
- Power cable
- Fuel tank
- ON/OFF switch
- Thermostat adjustor knob
- LED
- Lower half of housing
3. Intended use
The transportable low-sulphur heating-oil or diesel driven hot air generator is ideal for heating and drying well ventilated rooms in industry, agriculture, construction and recreation (camping)
The appliance is to be used only for its prescribed purpose. Any other use is deemed to be a case of misuse. The user/operator and not the manufacturer will be liable for any damage or injuries caused as a result thereof.
Please note that our appliance has not been designed for use in commercial, trade or industrial applications. Consequently, our warranty will be voided if the appliance is used in commercial, trade or industrial applications or for other equivalent activities.
4. Mode of operation
The hot air generator is equipped with a compressor, for suction of fuel out of the tank by creating a vacuum. The suctioned fuel is directed to a blowpipe nozzle. At the nozzle, a mixture of air and fuel is created. The air and fuel mixture is ignited electrically in the combustion chamber. The fan blows air into the combustion chamber, which, after being heated, gets blown out at the front. The thermostat knob can be adjusted to create the right temperature. After this temperature has been reached the appliance is automatically switched off, and if the temperature should drop again, it is automatically switched back on.
A photo cell permanently monitors the combustion process and turns the appliance on or off if there are irregularities. If overheating occurs, the appliance will also switch off.
If this is the case, please contact customer service.
The electrical components are protected by a miniature fuse (fusible insert). If there is a fault in the miniature fuse, please contact customer service.
5. Technical data
Power supply: 230 V \~ 50Hz / 1.5A
Heat output (Hi): 20 kW
Heat settings: 1
Fuel: Low-sulphur heating-oil or diesel
Pump pressure: 0.28 bar
Fuel consumption: 2.0 l/h
Tank capacity: 191
Power rating: 170 W
Air flow rate: 400 m
Maximum air temperature: 393 °C
Appliance dimensions: 76 x 30.5 x 38 cm
Appliance weight: 13 kg
6. Before starting the appliance
● Before you connect the appliance to the power supply make sure that the data on the rating plate are identical to the mains data.
● Always place the portable device on firm, horizontal ground.
● The device must always be in an upright position.
● Take care that the minimum separating distance between the appliance and other objects is 2.5m at the front, 1.25m at the rear and the side.
- The appliance must only be used in well-ventilated rooms or outdoors. The required size of the air intake opening in the room is 0.02m^2 per kW of heat output. For a heat output of 20kW the openings would need to be 0.4m^2 in total size. In addition, be sure to open windows and doors outwards.
6.1 Assembly (Fig. 2).
● Screw the carrying handle (Fig. 2/Item 3) onto the upper half of the housing (Fig. 2/Item 2)
- Screw the mount for the extension cable (Fig. 1/Item 4) onto the side.
GB
7. Operation
7.1 Refuelling
Guidelines and recommendations:
●The required low-sulphur heating oil or diesel must be stored in a container clearly marked with "Low-sulphur heating oil" or "Diesel".
●Please observe the applicable regulations valid for your country when storing low-sulphur heating oil and diesel.
●Never use "bio-diesel".
- We recommend for you to use winter diesel if temperatures are below 5°C to avoid problems with fuel suction.
●Low-sulphur heating oil and diesel will age. Therefore they should be used up within 6 months.
●Only refuel outdoors and when the appliance has cooled down.
- Remove the tank cover (Fig. 1/Item 8).
- Fill the tank up slowly with low-sulphur heating oil or diesel until the indicator (Fig.1/Item 7) indicates "F". The tank volume is 19 Litres maximum.
- Replace the tank cover.
7.2 Switching ON (Fig. 3)
Guidelines and recommendations:
●The hot air generator can be plugged into any shockproof socket with 230V alternating current for which there is a fuse with a 10A circuit breaker. It is advisable to connect the appliance only to an electricity supply protected by a residual-current operated protective device (RCD) with a release current of 30 mA max.
- Only use power cables which are not damaged. The power cable length is restricted (50m max.). The power cable must have a cross section of at least 3x1.0mm.
- We recommend to start up the device outdoors for the first time and let it run for around 10 minutes to burn off any oil residue on the sheet metal parts which may have built up during production.
- Connect the power plug with an extension cable.
- Set the desired temperature (between +5°C and +45°C) by adjusting the thermostat knob (Item 12)
- Switch the ON/OFF switch (Item 11) to ON (I) - The appliance is running, the LED (Item 13) lights up.
Note:
- If the heater's furnace does not switch on, the thermostat must be re-adjusted to a higher temperature. If the heating still does not switch on, switch the appliance off and check it over using the error list (Chapter 11)
7.3 Switching OFF
- Switch the ON/OFF switch (Fig. 3/Item 11) to the OFF position (0) - the appliance switches off.
- Pull the power plug.
7.4 Switching back on
- Wait at least 10 seconds before switching the appliance back on.
- Switch the appliance on again according to point 7.2 and observe all of the above mentioned instructions.
8. Replacing the power cable
If the power cable for this appliance is damaged, it must be replaced by the manufacturer or its after-sales service or similarly trained personnel to avoid danger.
9. Cleaning, maintenance and ordering of spare parts
Always pull out the mains power plug before starting any cleaning work.
9.1 Cleaning
- Keep all safety devices, air vents and the motor housing free of dirt and dust as far as possible. Wipe the appliance down with a clean cloth or blast it with compressed air at low pressure.
●We recommend cleaning the appliance immediately after every use.
●Clean the appliance regularly with a damp cloth and some soft soap. Do not use cleaning agents or solvents; these may be aggressive to the plastic parts in the appliance. Ensure that no water can get into the interior of the appliance.
9.2 At the end of the season
Drain the fuel tank via the tank opening, stow the appliance in its own original cardboard packaging and store it in a dry, dust and frost-free place.
9.3 Maintenance
Maintenance must only be carried out by trained personnel. Please contact customer service.
9.4 Ordering replacement parts:
Please provide the following information on all orders for spare parts:
●Model/type of the appliance
●Article number of the appliance
●ID number of the appliance
●Spare part number of the required spare part For our latest prices and information please go to www.isc-gmbh.info
10. Disposal and recycling
The appliance is supplied in packaging to prevent it from being damaged in transit. The raw materials in this packaging can be reused or recycled. The appliance and its accessories are made of various types of material, such as metal and plastic. Defective components must be disposed of as special waste. Ask your dealer or your local council.
11. Troubleshooting
If the appliance is operated properly you should experience no problems with malfunctions or faults. In the event of any malfunctions or faults, please check the following before you contact your customer service.
Fault
The fan motor does not start up, the LED does not flash
Possible cause
a) Power cut
b) Power cable or power plug damaged
c) Safety temperature limiter switches itself on
Remedy
a) Check the voltage, where necessary wait for the device to switch on again.
b) Overhaul by an expert
c) Determine the cause of overheating. Air inlets/outlets should not be covered. Wait at least 10 minutes until the appliance cools down and switch it on again. If necessary, please contact customer service.
Fault
The fan motor does not start up, the LED flashes
Cause
The thermostat is set too low
Remedy
Adjust the thermostat to a higher temperature
Fault
The fan motor is running, the flame is not ignited, the appliance switches off after a few seconds and the LED flashes.
Possible cause
a) Too little, incorrect or dirty fuel in the tank
b) Viscosity is too high because of low temperature levels
Remedy
a) Check the tank contents, then refuel with clean low-sulphur heating oil or diesel.
b) Use winter diesel
12. Wiring schematics (Fig. 4)
13. Maintenance by customer service
Follow-up maintenance work must only be carried out by specially trained personnel.
●Disconnect the power plug before doing any cleaning and maintenance work!
●Before starting any maintenance work, let the appliance cool down completely.
●Be careful of sharp edges.
●Only use original replacement parts, for safety reasons.
●Inadequate maintenance can lead to higher levels of waste gas, soot, and damage to the appliance.
We recommend carrying out the following maintenance work at the indicated intervals:
Fuel tank
The fuel tank must be washed out with clean fuel every 200 operating hours. Never use water!
GB
Air filter (Fig. 5)
The air suction filter (A) must be replaced every 500 operating hours or earlier, if necessary, or cleaned with soapy water. After cleaning, let the air suction filter dry.
Both air outlet filters (B/C) are to be replaced every 500 operating hours, or beforehand if necessary. To replace, unscrew the filter cover (D).
Fan wings (Fig. 6)
The fan wings (E) must be cleaned at least once per heating season, or if necessary, more often. Remove dust and other dirt with a soft cloth. Be careful not to bend the fan wings. To replace the fan wings, unfasten the screw (F) and pull the fan wing off the motor shaft (G).
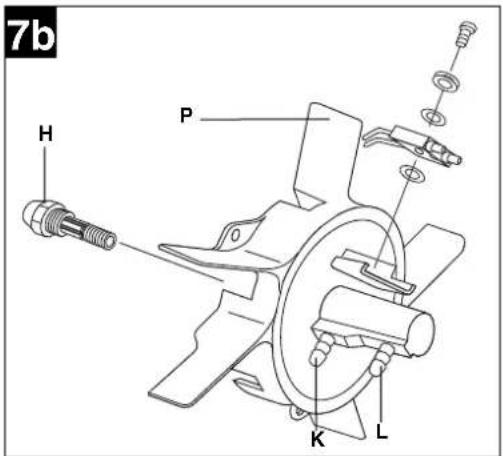
Fuel nozzle (Fig. 7a/7b)
The fuel nozzle (H) is to be cleaned or replaced at least once per heating season or more often, as needed.
Clean the fuel nozzle at the front with compressed air. To remove adhesive dirt, it may be helpful to soak and wash out the fuel nozzle with clean fuel. Take care not to mix up the two hoses (K/L).
Names of items in Fig. 7a/7b:
Item K = air hose (-connection)
Item L = fuel hose (-connection)
Item M = ignition cable
Item N = ignition electrode
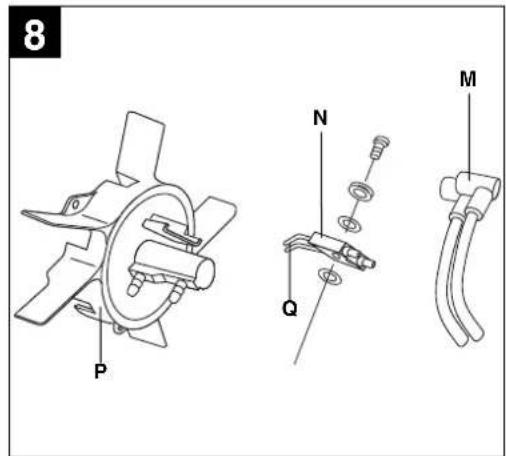
Item P = burner head
Ignition electrode (Fig. 8)
The ignition electrode (N) must be cleaned or replaced every 600 operating hours or earlier, as necessary. Clean the ignition contacts (Q) carefully with a wire brush. Check the separation distance between the ignition contacts (Q). It must be 3.5mm
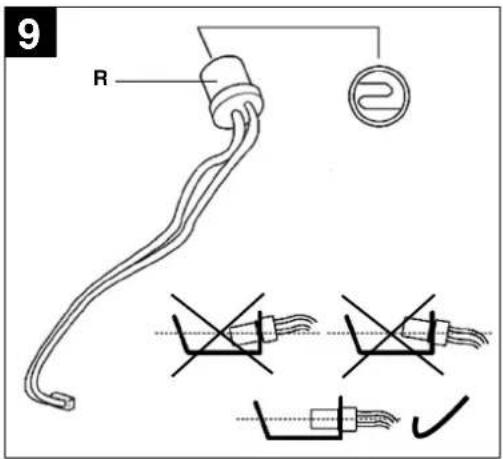
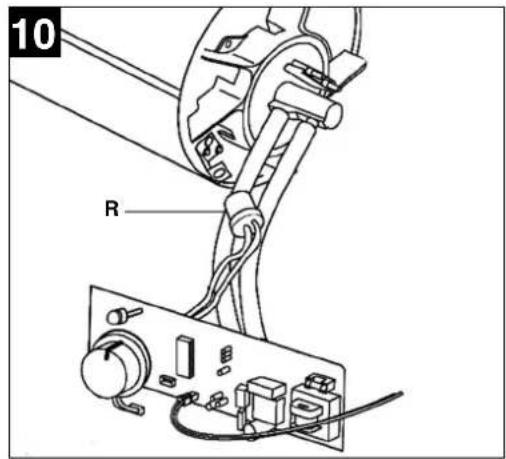
Photo cell (Fig. 9 / 10)
The photo cell (R) is to be cleaned or replaced at least once per heating season or earlier, as necessary. Clean the front of the photo cell with an alcohol-soaked cotton cloth. Take care to fit the photo cell in the right position.
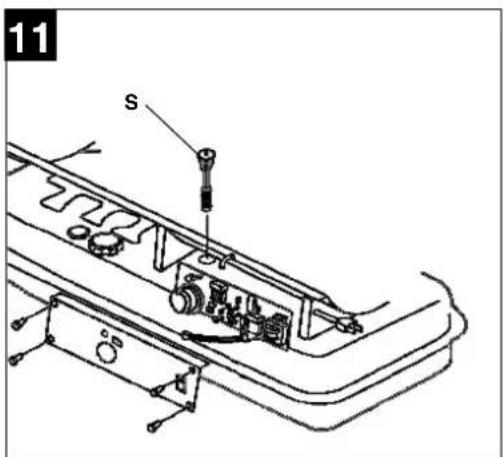
Fuel filter (Fig. 11)
Clean or replace the fuel filter (S) at least twice per heating season, or if necessary, more often. The fuel filter must be washed out with clean fuel.
Note: To detach the fuel filter, turn it 90° clockwise.
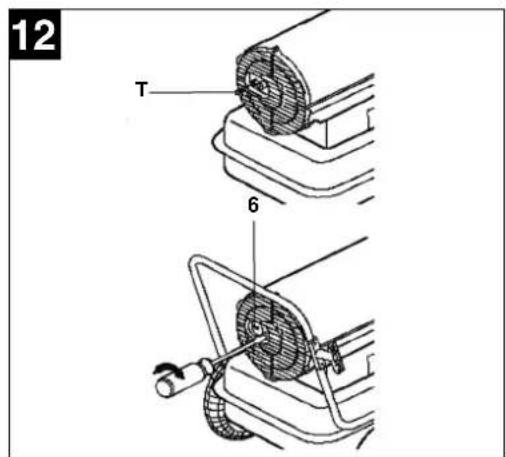
Adjusting the pump pressure (Fig. 12)
The optimum pump pressure is 4 PSI +/- 10% (0.28 bar). Turn the adjusting screw (T) with a screwdriver until the manometer (Item 6) shows 4 PSI. Turn clockwise = higher pressure, turn anticlockwise = lower pressure.
14. Troubleshooting - Notes for the expert
Problem
Flame ignites, but the heater switches off after a short time, the LED flashes.
Possible cause
- Pump pressure is incorrect
- Soiled air filter
- Soiled fuel filter
- Soiled fuel nozzle
- Soiled photo cell
- Photo cell incorrectly assembled
- Faulty photo cell
- Inadequate electrical connection between electronic circuit board and photo cell
Remedy
- Adjust the pump pressure
- Clean or replace the air filter
- Clean or replace the fuel filter
- Clean or replace the fuel nozzle
- Clean or replace the photo cell
- Install the photo cell correctly
- Replace the photo cell
- Test the electrical connection between the electronic circuit board and the photo cell
Problem
Heater does not work at all or fan motor only runs for a short time. The LED flashes.
Possible cause
- No fuel in the tank
- Pump pressure is incorrect
- Corroded ignition electrodes or incorrect separation distance between ignition contacts
- Soiled fuel filter
- Soiled fuel nozzle
- Moisture/water in the fuel or fuel tank
- Inadequate electrical connection between transformer and electronic circuit board
- Ignition cable is not attached to ignition electrode
- Faulty ignition electrode
Remedy
- Refuel the tank
- Adjust the pump pressure
- Clean or replace the ignition electrode
- Clean or replace the fuel filter
- Clean or replace the fuel nozzle
- Clean the tank, fill with new fuel
- Check all electrical connections
- Connect the ignition cable to the ignition electrode
- Replace the ignition electrode
Problem
The fan motor does not switch on. Mains voltage is provided, the ON/OFF switch is set to ON (I). The LED is constantly on or flashes.
Possible cause
- The thermostat is set to a temperature which is too low.
- Electrical connection between electronic circuit board and motor is uninterrupted
Remedy
- Adjust the thermostat knob to a higher temperature
- Check all electrical connections
Problem
The LED flashes.
Possible cause
Thermostat is faulty
Remedy
Replace the thermostat
Problem
Inadequate burning and/or soot
Possible cause
- Flames are escaping at the front of the housing
- The heating output is too low
- Poor fuel quality
- Generally inadequate maintenance
Remedy
- Reduce the pump pressure
- Raise the pump pressure
- Check whether old or dirty fuel is being used
- Have the appliance serviced by an expert
Problem
Heater does not switch on and LED does not light up
Possible cause
- Appliance has overheated and the safety temperature limiter was triggered as a result
- No mains voltage
- Faulty miniature fuse
- Connection between thermal sensor and electronic circuit board is interrupted
Remedy
- Switch the ON/OFF switch to OFF (0) and let the heater cool down for at least 10 minutes. Then switch the ON/OFF switch back to ON (I).
- Check the socket, power cable and extension lead
- Check the miniature fuse and if necessary, replace it.
- Check all electrical connections
F
Sommaire:
Brandstof: stookolie EL of diesel
Pompdruk: 0,28
Snaga grejača (Hi): 20 kW
Stepeni grejanja: 1
Gorivo: lož ulje ekstra lako ili dizel
Pritisak pumpe: 0,28 bara
Potrošnja goriva: 2,0 l/h
Sadržaj rezervoara: 19 l
Snaga: 170 W
Protok vazduha: 400 m
Temperatura vazduha maks.: 393 °C
Dimenzije uređaja: 76 x 30,5 x 38 cm
Težina uređaja: 13 kg
6. Pre puštanja u pogon
●Pre priključivanja uređaja proverite da li podaci na tablici s oznakom tipa odgovaraju podacima o mreži.
●Prenosni uređaj uvek postavljajte na stabilnu i horizontalnu podlogu.
- Uređaj mora uvek da bude u horizontalnom položaju.
- Obratite pažnju na to da razmak uređaja od predmeta mora biti najmanje 2,50 m od napred, 1,25 m s leđne strane, bočno i gore.
- Uređaj treba da se postavi na otvorenom ili u dobro provetrenim prostorijama. Prostorija treba imati otvore za ulaz vazduha veličine 0,02 m² po kW snage grejanja. Kod snage grejača od 20 kW ti otvori imaju ukupnu veličinu od 0,4 m². U tu svrhu otvorite npr. vrata i prozore prema spolja.
6.1 Montaža (sl. 2)
- Pričvrstite zavrtnjima dršku za nošenje (sl. 2/poz. 3) na gornju polovinu kućišta (sl. 2/poz. 2).
●Dobro pričvrstite držač za produžni kabl (sl. 1/poz. 4) s bočne strane.
RS
7. Rukovanje
7.1 Punjenje rezervoara gorivom
Napomene:
- Potrebno lož ulje EL (ekstra lako) ili dizel gorivo obavezno treba da se stavi u odgovarajuće kanistre za gorivo s jasnom oznakom „Lož ulje EL (ekstra lako)“ odnosno „Dizel“.
- Poštujte propise za skladištenje lož ulja EL (ekstra lako) i dizela koji važe u vašoj zemlji.
●Ni u kom slučaju ne koristite „biodizel“.
●Da biste izbegli probleme sa usisavanjem goriva, preporučujemo da kod temperatura nižih od 5 °C koristite zimski dizel. -
Lož ulje EL (ekstra lako) i dizel gorivo stare. Stoga se preostalo gorivo mora potrošiti u roku od 6 meseci.
●Gorivo sipajte u rezervoar samo na otvorenom i kada je uređaj ohlađen. -
Skinite poklopac s rezervoara (sl. 1/poz. 8).
- Polako sipajte lož ulje EL ili dizel do oznake (sl. 1/poz. 7) „F“ na rezervoaru. Kapacitet rezervoara iznosi maks. 19 litara.
- Ponovno montirajte poklopac na rezervoar.
natural_image
Symbol of a trash bin crossed out by two diagonal lines (no text or numbers present)
©Nur für EU-Länder
Never place any electric tools in your household refuse.
To comply with European Directive 2002/96/EC concerning old electric and electronic equipment and its implementation in national laws, old electric tools have to be separated from other waste and disposed of in an environment-friendly fashion, e.g. by taking to a recycling depot.
Recycling alternative to the demand to return electrical devices:
As an alternative to returning the electrical device, the owner is obliged to cooperate in ensuring that the device is properly recycled if ownership is relinquished. This can also be done by handing over the used device to a returns center, which will dispose of it in accordance with national commercial and industrial waste management legislation. This does not apply to the accessories and auxiliary equipment without any electrical components which are included with the used device.
The reprinting or reproduction by any other means, in whole or in part, of documentation and papers accompanying products is permitted only with the express consent of ISC GmbH.
F
All of our products undergo strict quality checks to ensure that they reach you in perfect condition. In the unlikely event that your device develops a fault, please contact our service department at the address shown on this guarantee card. Of course, if you would prefer to call us then we are also happy to offer our assistance under the service number printed below. Please note the following terms under which guarantee claims can be made:
- These guarantee terms cover additional guarantee rights and do not affect your statutory warranty rights. We do not charge you for this guarantee.
- Our guarantee only covers problems caused by material or manufacturing defects, and it is restricted to the rectification of these defects or replacement of the device. Please note that our devices have not been designed for use in commercial, trade or industrial applications. Consequently, the guarantee is invalidated if the equipment is used in commercial, trade or industrial applications or for other equivalent activities. The following are also excluded from our guarantee: compensation for transport damage, damage caused by failure to comply with the installation/assembly instructions or damage caused by unprofessional installation, failure to comply with the operating instructions (e.g. connection to the wrong mains voltage or current type), misuse or inappropriate use (such as overloading of the device or use of non-approved tools or accessories), failure to comply with the maintenance and safety regulations, ingress of foreign bodies into the device (e.g. sand, stones or dust), effects of force or external influences (e.g. damage caused by the device being dropped) and normal wear resulting from proper operation of the device.
The guarantee is rendered null and void if any attempt is made to tamper with the device.
-
The guarantee is valid for a period of 2 years starting from the purchase date of the device. Guarantee claims should be submitted before the end of the guarantee period within two weeks of the defect being noticed. No guarantee claims will be accepted after the end of the guarantee period. The original guarantee period remains applicable to the device even if repairs are carried out or parts are replaced. In such cases, the work performed or parts fitted will not result in an extension of the guarantee period, and no new guarantee will become active for the work performed or parts fitted. This also applies when an on-site service is used.
-
In order to assert your guarantee claim, please send your defective device postage-free to the address shown below. Please enclose either the original or a copy of your sales receipt or another dated proof of purchase. Please keep your sales receipt in a safe place, as it is your proof of purchase. It would help us if you could describe the nature of the problem in as much detail as possible. If the defect is covered by our guarantee then your device will either be repaired immediately and returned to you, or we will send you a new device.
Of course, we are also happy offer a chargeable repair service for any defects which are not covered by the scope of this guarantee or for units which are no longer covered. To take advantage of this service, please send the device to our service address.
F BULLETIN DE GARANTIE
Chère Cliente, Cher Client,


- Inhaltsverzeichnis:
- GB
- Caution:
- Safety instructions
- Important: Only use diesel or low-sulphur heating oil as fuel.
- Packaging
- WARNING
- Layout (Fig. 1)
- Intended use
- Mode of operation
- Technical data
- Before starting the appliance
- Assembly (Fig. 2).
- Operation
- Refuelling
- Guidelines and recommendations:
- Switching ON (Fig. 3)
- Note:
- Switching OFF
- Switching back on
- Replacing the power cable
- Cleaning, maintenance and ordering of spare parts
- Cleaning
- At the end of the season
- Maintenance
- Ordering replacement parts:
- Disposal and recycling
- Troubleshooting
- Fault
- Possible cause
- Remedy
- Cause
- Wiring schematics (Fig. 4)
- Maintenance by customer service
- Fuel tank
- Air filter (Fig. 5)
- Fan wings (Fig. 6)
- Fuel nozzle (Fig. 7a/7b)
- Names of items in Fig. 7a/7b:
- Ignition electrode (Fig. 8)
- Photo cell (Fig. 9 / 10)
- Fuel filter (Fig. 11)
- Adjusting the pump pressure (Fig. 12)
- Troubleshooting - Notes for the expert
- Problem
- F
- Sommaire:
- Pre puštanja u pogon
- Montaža (sl. 2)
- RS
- Rukovanje
- Punjenje rezervoara gorivom
- Napomene:
- ©Nur für EU-Länder
- F BULLETIN DE GARANTIE
- Chère Cliente, Cher Client,
Brand : EINHELL
Model : DHG 200
Category : Heating