
CH 4000 - Heating EINHELL - Free user manual and instructions
Find the device manual for free CH 4000 EINHELL in PDF.
| Product type | Oil heater |
| Brand | Einhell |
| Model | CH 4000 |
| Heating power | 4000 W |
| Fuel consumption | 183 to 317 g/h |
| Tank capacity | 4.6 L |
| Runtime | 14 to 26 hours |
| Ignition type | Electronic (high voltage) |
| Dimensions (H x W x D) | 77 x 59 x 47 cm |
| Weight | 13.5 kg |
| Power supply | 230 V ~ 50 Hz |
| Power consumption | 36 W (at high combustion) |
| Fuse | 250 V - 5 A (primary), 630 mA (secondary) |
| Main functions | Timer (1h), 3-hour mode, continuous operation, temperature control (0-30°C) |
| Safety | Automatic shutdown, overheating protection, anti-tilt, CO sensor, power failure shutdown |
| Error display | Codes E03 to E16 with descriptions |
| Routine maintenance | Cleaning air filter and fuel filter |
| Recommended fuel | Kerosene (liquid fuel for mobile appliances) |
| Warranty | 12 months |
Frequently Asked Questions - CH 4000 EINHELL
User questions about CH 4000 EINHELL
0 question about this device. Answer the ones you know or ask your own.
Ask a new question about this device
Download the instructions for your Heating in PDF format for free! Find your manual CH 4000 - EINHELL and take your electronic device back in hand. On this page are published all the documents necessary for the use of your device. CH 4000 by EINHELL.
USER MANUAL CH 4000 EINHELL
Important information
1. Technical data
2. Preface
3. Starting up and functions
4. Automatic mode
5. Timer mode (switch-on time) 19
6. 3-hour function 19
7. Installation information
8. What to do in case of trouble
9. Error displays and remedies 25
10. Technical data 26
11.Description of functions 27
12.Description of safety features 27
13. Storing the oil heater for extended periods of time 29
14. Special safety precautions 29
Declaration of conformity 95,96
Warranty certificate 97,98
Page
NLInhoudsopgave
Read the operating instructions carefully before starting up your Comfort Heater for the first time. The instructions will tell you how to set up, operate, and service your heater, and - most importantly - how to use it safely and efficiently. Keep the operating instructions in a safe place to have them handy in case of any trouble.
Important information
Caution! Risk of explosion! Risk of fire!
- Never use any fuel other than liquid fuel for mobile heaters authorized by your country's national standards.
- Never fill this type of oil heater with fuels such as gasoline, benzene, solvents, or other substances.
- Never refill your oil heater with liquid fuel while it is still in operation or while it is still hot.
- Never use the oil heater in rooms which pose a fire or gas explosion hazard.
- Never refill the oil heater in closed rooms. Always refill it outdoors.
- Store and transport the fuel only in metal or plastic canisters which...
- are specially designed for fuels.
- are marked with a label identifying the contents as "Liquid Fuel for Mobile Heaters" in accordance with your country's national standards.
- Never store fuel in your living quarters. All fuel must be stored in a cool place outside any living quarters. The oil heater gets extremely hot during operation. Keep children, clothes, furniture and other objects away at a distance of at least 1 meter.
- Never use gasoline (fire hazard).
- Beware of fires and air pollution. Restrict your use of the oil heater to rooms with good air circulation. Never use the oil heater in small or windowless rooms.
Each room in which the oil heater will be used must have sufficient air inflow and outflow (an inlet and an outlet opening with a minimum cross section of 50~cm^2 - Never use the oil heater in rooms with insufficient air circulation or in basement rooms.
- Never use the oil heater for heating or boiling water or for cooking food.
- Never lift out the refill tank while the heater is still in operation or while it is still hot. Never use the
cartridge to transport or store fuel or other flammable substances.
- During start-up, you may notice an odd soun coming from the refill tank: This sound is ca by fuel running from the tank into the bottom container to saturate the wick. This sound is perfectly normal.
Important! Failure to comply with the installation, maintenance or operating instructions may I to burns and/or injuries. In this case, the manufacturer shall not be held liable for any damages.
N.B.: The warnings and instructions contained i operating manual cannot possibly cover all situ imaginable. The use of any type of heater, espe oil heaters, requires a sensible and careful appr and compliance with the safety precautions. Ris free operation of this heater is subject to the observation of the rules.
In the event of problems, we advise you to n your specialist dealer, salesperson, or custo service department.
- Never leave the oil heater burning if you pla leaving for longer or even brief periods of tir Make sure that the heater is really turned of before leaving the room.
- Never leave the heater unsupervised during operation.
- Never use the heater to dry objects.
- Never place objects on top or in front of the heater.
- Never use the convection heater on a boat, camping trainer, or a cockpit.
Caution! Risk of burns!
Do not use the heater unless the safety grille is completely closed. To close the grille, insert the in the housing frame.
GB
Room temperature control
The room temperature should be comfortable. If it gets too warm, ventilate the room by opening a window. Do not manipulate the wick knob. Trying to reduce the heat by manipulating the wick knob will only lead to insufficient combustion which may cause unpleasant odors and health hazards.
KEEP THE OPERATING INSTRUCTIONS IN A SAFE PLACE!!!
1. TECHNICAL DATA
| Model number CH 4000 E |
| Convector type radiant heater |
| Filament wattage 4000 W |
| Fuel consumption 183-317 g/h |
| Daily capacity approx. 12 hours |
| Fuel tank removable |
| Fuel tank capacity 4.6 liters |
| Ignition electronic |
| Dimensions 77 x 47 x 59 cm |
| Weight 13.5 kg |
2. PREFACE
Read the operating instructions carefully. They contain all the information you need for correct operation and safe and efficient set-up of the oil heater. Only a thorough knowledge of the operating instructions will allow you to enjoy all the advantages this heater has to offer.
3. Starting up and functions
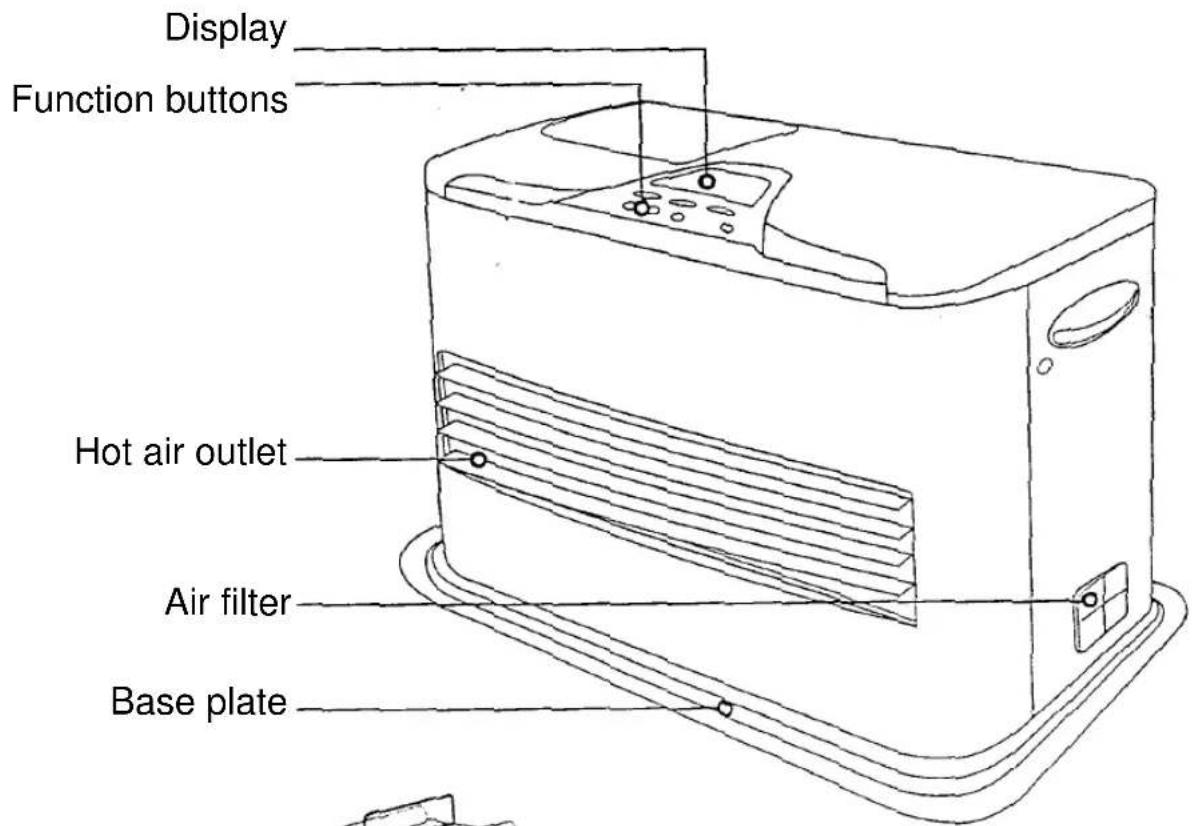
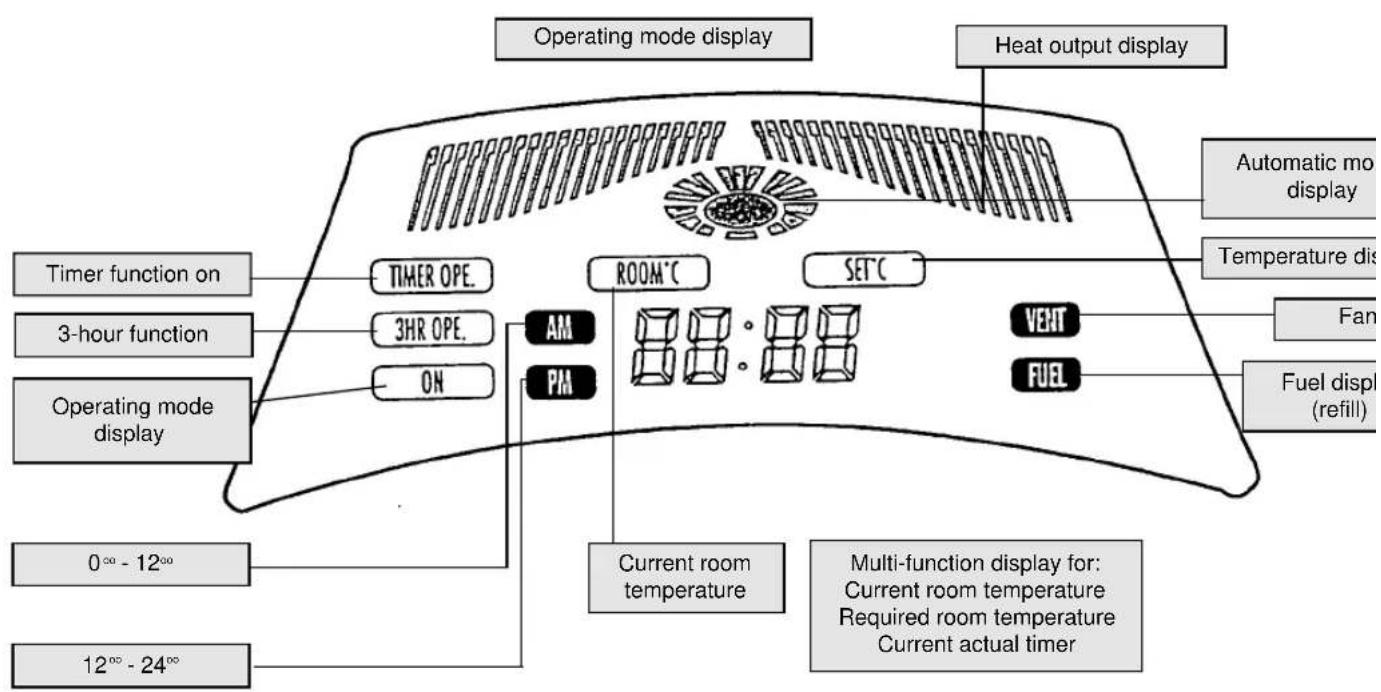
- Open the lid of the tank and pull out the refill tank.
Twist off the tank sealing cap and fill the tank using the hand pump. -
Twist the tank sealing cap back on again (be sure that the thread of the tank sealing cap is not put on at an angle) and place the refill tank back in the heater.
-
Insert the mains plug into a mains socket (2 50Hz ). The time read-out in the display w flash.
- Set the current time using the "TIME Control button.
Use the "HOUR" button to set the hour.
Be sure to allow for the "AM + PM" read-out.
AM = Morning, 0 - 12 o'clock
PM = Afternoon, 12 - 24 o'clock
Use the "MIN" button to set the minutes.
- Use the "TIME Control" buttons to view the current room temperature "Room °C". You can use the "High" button to set the required room temperature.
- Using the "TIMER" button, you can set the required switch-on time. Your Comfort Heat then ignites and starts up automatically. In the TIMER mode of operation the heater switch again automatically after one hour of operation.
The selected switch-on time is activated with "TIMER Ope. ON" button. - With the "3 HR Ope. ON" button you can ac three hours of automatic operation. This function is not connected to the "TIME! Ope. ON" function.
- Use the "ON" button (switched on) to start u heater.
- Use the "OFF" button to turn off the heater. You can now choose between three options starting up the heater.
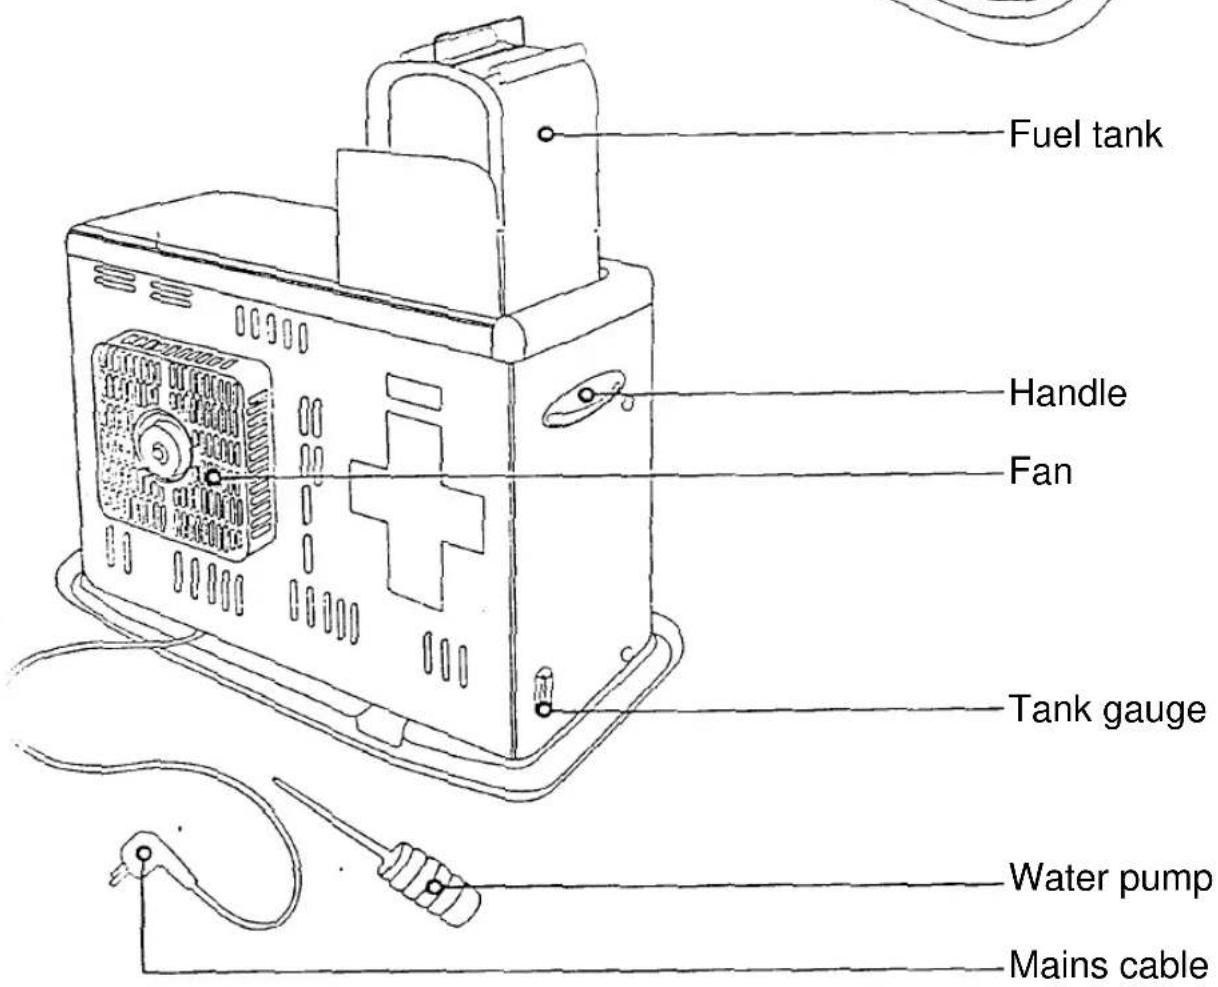
Multi-function control panel of the CH 4000 E (electronic)
4. Automatic mode
a) Press the "ON" button. You will hear an audio signal. The display read-out will show [ON].
b) The heater starts automatically after approximately 2 1/2 minutes warm-up time.
c) The display read-out will show [ ]
d) After approximately 3 minutes the display readout [ ] will appear. Only now will the burner will be burning properly and the automatic mode be in full operation. The read-out [ ] will flash continually at various points on the display. Caution! There may be a faint smell and the slight emergence of smoke during ignition. This is normal and is only temporary.
e) The heater will now heat until it is either turned off with the "OFF" button or until a preselected temperature level is reached.
f) The temperature is set with the "TIME Control" buttons.
g) When you press one of the two buttons, the display will show the following read-out:
current room temperature Room ^ C 20
required room temperature SET ^ C 21
Use the "HIGH + LOW" buttons to set the required temperature [SET]. The current room temperature "Room C^ " is on permanent display. The sensor for the room temperature is positioned at the back of the heater, projecting out at the bottom (Caution! Do not damage!).
N.B.: When you raise or lower the temperature relative to the current room temperature, the heat output will be automatically lowered or raised accordingly. This is indicated on the display scale as well with [ ] [ ]
When you have set the required temperature, you may choose to reset the display to show the current time. Simply press one of the two "TIME Control" buttons.
h) The heater can be turned off completely by pressing the "OFF" button.
5. Timer mode (preselection of swit on time)
a) Use the "TIMER" buttons to select the require switch-on time - "AM" or "PM".
b) Using the "Temperature Control" buttons, you can now set the required temperature as w Alternatively, you can set the temperature instead, after the heater has been started u automatically.
c) Confirm with the "TIMER Ope. ON" button. T "TIMER" read-out will flash in the display.
d) The heater starts up automatically at the tim by you. This can only function, however, if current time is set.
e) In this mode of operation the heater runs for hour and then turns itself off automatically. audio signal will sound before completion o hour. You can also turn off the heater beforehand with the "OFF" button.
6. 3-hour function
a) You start up the heater for 3 hours operation automatically with the "3 HR Ope. ON" but The heater turns itself off automatically after period.
b) Press the "3 HR Ope. ON" button and the "3 ON" read-out will be shown in the display, flashing until the heater has been fully star up. The read-out then remains on permanent display. The ignition operation starts automatically, as described above.
c) Before completion of the third hour, an audio signal will sound again and the "3 HR ON" out will start to flash again.
d) Using the "OFF" button, you may also turn on heater before completion of the three hours.
N.B.: To ensure that no stored heat remains in the heater, the fan runs for approximately 2 minutes every turning off operation, regardless of operat mode.
Display read-outs
VENT + "E 04" read-out in the display.
When this read-out lights up and an audio signal sounds, the room must be ventilated so that no oxygen can be supplied. Press the "OFF" button. After ventilating sufficiently, you can restart the heater again normally.
GB
FUEL + "E 07" read-out in the display.
When this read-out lights up and an audio signal sounds, the heater needs refilling with fuel. The electronics will give out an audio signal approximately 40 minutes before the fuel runs out. If there is no more fuel left, the FUEL and "E 07" read-out lights up and the audio signal sounds. Press the "OFF" button. The heater can be restarted again after refilling with fuel.
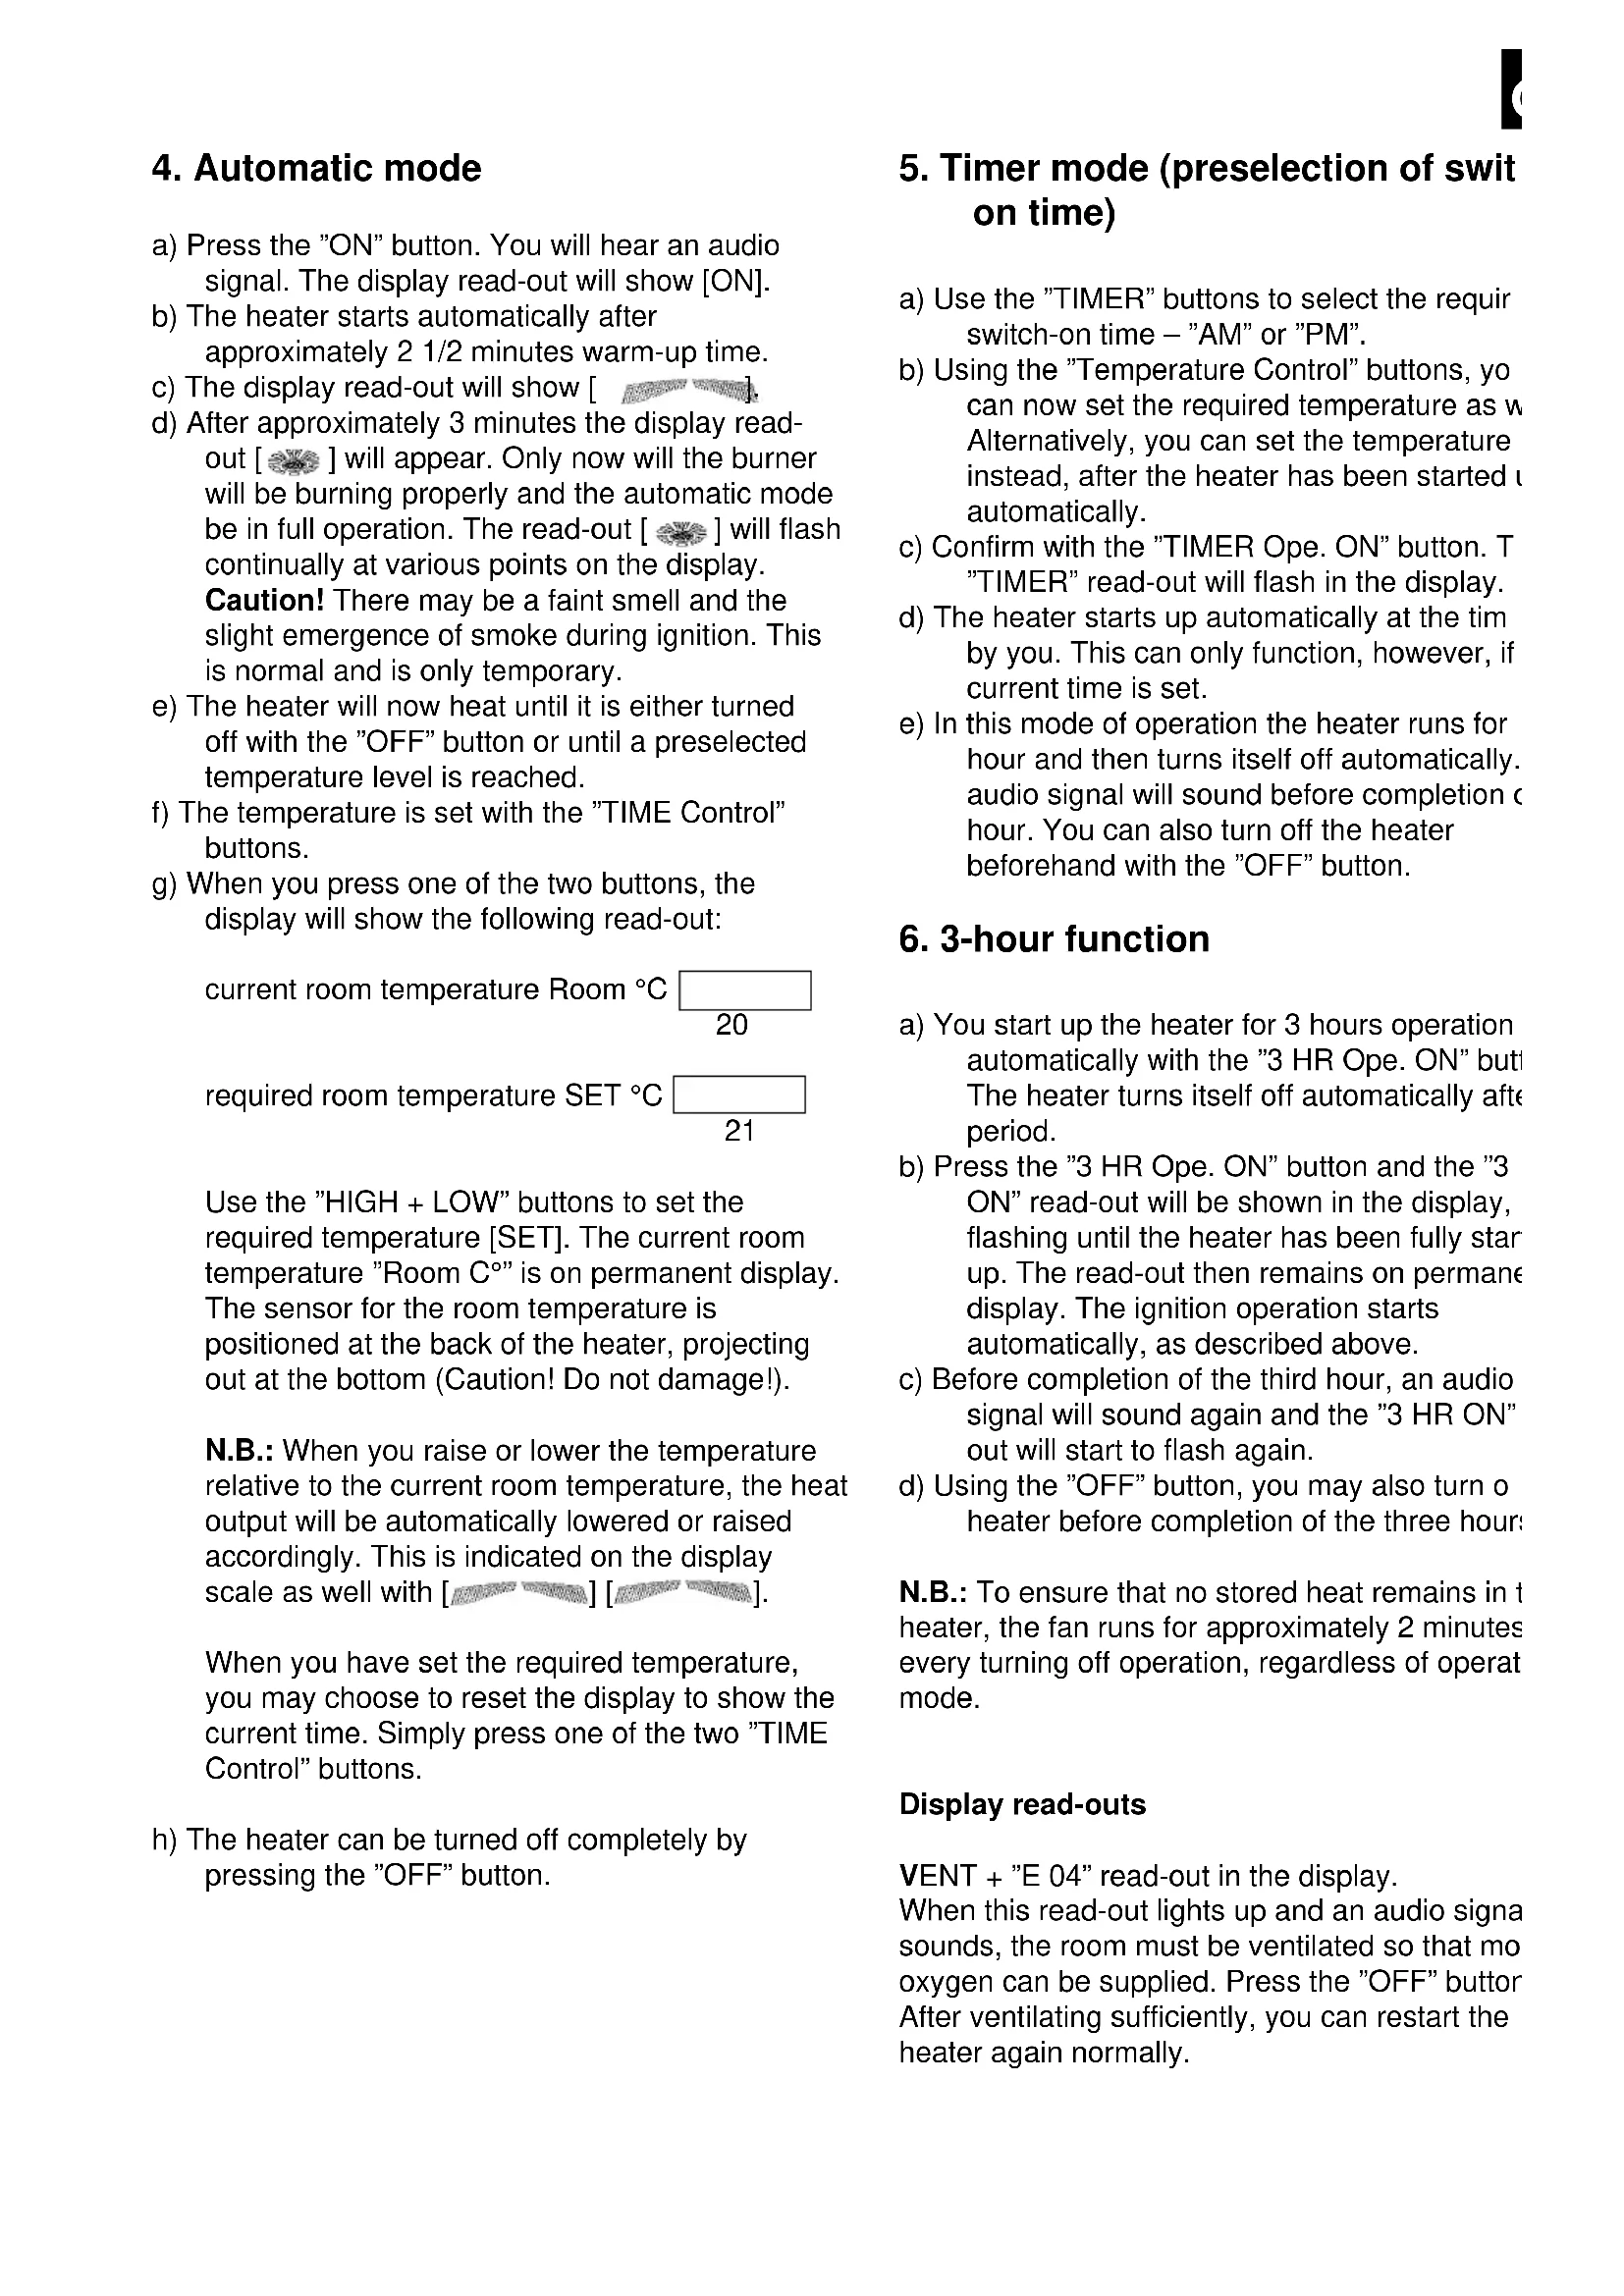
Cleaning the air filter
The air filter is positioned at the side of the heater. Clean the filter with a vacuum cleaner or clean water and dry it before continuing use. Dirty filters cause malfunctions.
→Always check the filter for dirt accumulation after extended periods of not heating.
Caution! The manufacturers have set the suction opening behind the air filter for optimal combustion. The air valve must not be manipulated. In the case of servicing, adjustments may only be carried out by a service specialist.
Automatic control of functions
The latest mechanisms for the control of functions allow optimal heat output and efficient combustion. Repeated monitoring of combustion, automatically carried out at intervals, guarantees constant automatic adjustment to the required and set temperature.
Self-diagnosis system
Should there be a malfunction, this will be shown with a number on the control panel. This normally enables you to deal with the problem yourself.
Fuel supply cut-out in case of insufficient combustion
Odorous and exhaust gases are minimized by a system that puts out the flame quickly. State of the art monitoring of combustion turns off the hot air fan 10 seconds before the flame is turned off. Switch on again after approximately 2 minutes to display remaining stored heat in the heater.
The ceramic cover integrates infrared and hot air
The ceramic cover distributes infrared radiation, which is good for your health.
Use only good quality kerosene
There is a danger of fire if you use easily inflammable fuels such as benzene, solvent similar substances.
- Ventilate the room regularly
When the heater is in use, ensure that the r is ventilated at least once or twice per hour. lack of oxygen causes poor combustion, lea to the production of toxic carbon monoxide.
- Keep inflammable substances away from heater
Do not use or store combustible, explosive substances (e.g. sprays, solvents, gas canics etc.) anywhere close to the heater.
- Keep hands and paper away from the he
Be aware that because of the high air temperatures, there is a danger of fire and o burns.
Never let children near the heater unsuperv during operation and be sure that you are a of the means for turning the heater off.
- Please press the OFF switch or pull out t mains plug if problems arise. Stay calm!
Use the heater for heating only
Do not dry clothes on the heater, since this cause overheating.
Make sure that the heater is really turned before you leave the room being heated.
-Only move or carry the heater when it is turned off
It would be extremely dangerous for the head fall over while in operation.
Close the lid of the fuel tank
There is a danger of fire If the lid is at an ar not properly closed. Fuel can overflow and the floor.
- Ensure that the air filter is always clean
An air filter soiled with dirt or impurities can in the burner flame going out or in unclean combustion.
7. Installation information
Observe a safety zone around the heater.
Keep all combustible materials, such as curtains, wood etc., away from the heater at a distance of at least 1.5 meters. There is a danger of fire occurring through overheating.
- Set up the heater on a level surface only.
Avoid sloping surfaces or vibrating bases. There is a danger of fire if the heater falls over.
-Do not expose the heater to drafts.
Avoid positioning the heater such that it is subject to drafts or where people are constantly passing, since this can give rise to abnormal combustion.
-Do not expose the heater to sunlight
Avoid positioning the heater in direct sunlight or next to objects that emit considerable heat.
- Avoid dusty and damp positions for the heater
Avoid placing the heater in a damp or dusty position, since this can lead to dust and impurities on the air filter or cause other malfunctions.
- Avoid unsuitable positions
Avoid positions where sprays or chemicals are used e.g. in hairdressing salons, painting workshops and chemical processing facilities.
8. What to do in case of trouble
Ignition and turning off
| Problems Causes and solutions | |
| The heater makes a faint noise for This is normal 10 seconds after ignition. | for ignition. |
| White smoke and a smell come from the heater. The | the smell from rust proofing oil or dust when the he is used for the first time or after extended storage disappears after 1-2 hours operation. |
| The heater does not ignite when There may be air used for the first time. heater is used for the first time. | in the fuel pipe, particularly if the storage. In some cases there may be recurring nois Repeat the ignition operation a number of times. |
| The flame turns bright red. This may happen for the | following reasons and is no problem: The heater burns in salty air close to the s The heater burns dusty air; The heater burns in a d atmosphere; The heater is operated close to a runr air dehumidifier. |
Cleaning the heater
Dust should be cleaned from the safety grille of fan and hot air outlet more than once a week. It can be done with a good vacuum cleaner.
Cleaning the oil filter
Turn the oil filter, positioned underneath the tank towards the left and pull it out. Clean the oil filter clean fuel. If a lot of dirt has collected on the oil wipe out the oil inside the fixed tank as well.
N.B.: Impurities and dirt within the tank cause sol-gel and clogging of the solenoid pump.
Position the oil filter according to the markings of fixed tank and insert back in by turning it toward right. ALWAYS CLEAN THE FILTER WHEN YOU REFILL THE TANK.
Extended periods of non-use
Use the hand pump to empty the fuel tank and the fixed tank in the heater. Wipe the dust from the heater and store the heater in a well ventilated p
| Problems Causes and solutions | |
| There is a sound like running water. This can be | the result of the kerosene flowing from t |
| supply tank to the consumption tank. This is normal | |
| Dripping fuel. Check the sealing cap of the tank | and tighten prope |
| FUEL warning light lights up, even though Check | whether there is water in the tank or if other |
| there is sufficient fuel in the tank. substances have | ve collected on the oil filter. If so, rem |
| them. |
What do the following symptoms mean?
| When Because Causes/Remedies The heater stops after a certain period of operation when in after "Programmed Operational Time". | The safety system is activated Press the ON or 3 HR ON butt to 1 hour of operation. |
| FUEL light flashes. Fuel is running out. Press the STOP button, refill wit kerosene and restart. | |
| The heater stops after The safety a certain time. after more than 3 | system is activated Press the 3 HR ON button for a further 3 hours of hours of operation. operation, or press ON for continual operation. |
| The display does not light up. | The mains plug is not inserted. Insert the mains plug in the plug socket. |
9. Error displays and remedies
| Read-out Causes Heater does not ignite Remedies Error display All read-outs are turned off Development of smell Yellow colour with residue Only the fan runs The motor does not run | ||
| The mains plug is not inserted Insert mains | plug correctly | |
| 000 Power failure Switch on 3 Hour operation or permane | operation | |
| E03 Poor ignition Clean the tank and remove water and d | Remove dirt from the fan grille. | |
| E04 Combustion without fresh air You must ventilate! Remove in-flow from the air filter grille. | ||
| E05 Overheating control device has Insert the mains plug again and restart t been triggered. check. If necessary, call your customer service department. | ||
| E06 Automatic cut-out has been triggered. Press the OFF button and restart. | ||
| E07 Flashing FUEL light. Fill the tank. Remove dirt from the oil filt | ||
| E08 "E08" or "E12" lights up in the display. Press the OFF button and restart. | ||
| E09 "E09" read-out. Press the OFF button and restart. | ||
| E14 High temperature level in room. Only switch the heater | on again when th temperature has fallen to under 30°. | |
| E16 Hot air outlet is blocked. The overheating control device | has bee triggered. Remove the obstacle and restart. |
If the same problems continue to occur, consult your customer service department.
10. Technical data
| Model designation CH 4000 E | |
| Model Comfort Heater | |
| Ignition High-voltage ignition | |
| Power Alternating current 230 V - 50 Hz | |
| Fuse 250 V - 5 amp / 250 V - 630 mA | (Use 2 fuses 2EA) |
| Fuel type Petroleum | |
| Fuel tank capacity 4.6 liters | |
| Fuel consumption (g/h) 183 - 317 g/h | |
| Filament wattage (watts/KW) 2,200 - 3,800 | |
| Continuous operation 14 - 26 hours | |
| External dimensions of heater 590 x 470 x 770 mm (Height, Depth, Width) | |
| Weight 13.5 kg | |
| Accessories Hand-held suction pump | |
| Safety features Automatic cut-out, power failure fuse, overheat cut-out, 3-hour cut out device, fuse for insufficient combustion, automatic cut-out for excessively high room temperature, over-voltage cut-out, fire warning | |
| Electricity consumption Intensive combustion - 36 watts | |
11. Description of functions
| No. | Function Description | |
| 1 | Timer | Preprogramming of the time or of the time when you return home. If started with the timer the heater switches itself off automatically after 1 hour of operation. Before setting the timer you must first see current time. The timer flickers once the button has been pressed. |
| 2 | 3 hour operation | Used when 3 hour operation is required. Insert the mains plug and press the button for 3 hour operation. The display will show 3 hour operation. By pressing 3 hour button during operation, you can extend the operation time by a further 3 hours |
| 3 | ON display | Press this button when you require continual opera. See operating instructions also. ● If the air in the room is heavy then ventilation may be necessary once or twice per hour. |
| 4 | Room temperature display | This shows the room temperature. The display shows levels from 0 - 40°C. All levels below 0°C are shown by 00 and those above 40°C with 40. |
| 5 | Program temperature display This shows the required temperature. The range is 0 – 30°C. * When the heater is used for the first time there is set temperature of 20°C. | |
| 6 | Ventilation display This lights up when excessive carbon monoxide lev have been reached, resulting from poor combustion a lack of fresh air inflow. The display will show "E0VENT. | |
| 7 | FUEL display If the kerosene has been used up, a warning signal sound and the display will show "E07" FUEL. | |
| 8 | Setting the time The current time can be adjusted. AM and PM can set separately. The display will show AM:PM, minu and hours. | |
| 9 | Temperature control function This is used to set the required temperature. The display will show 12 – 30°C. | |
| 10 | Off function This is used to turn the heater off, or to stop smells and non-burnt gas when you are not at home, with hot air fan being turned off 10 seconds beforehand This ensures slow reduction of the flame during operation and so prevents the flame being extinguished quickly. |
12. Description of safety features
| No. Designation of the Description safety feature | |
| 1 Automatic cut-out fuse The cut-out device switches the burner off when the temperature level is between 7 - 20°C. The display will show E06. To deactivate the cut-out fuse, press the OFF button. | |
| 2 Overheating protection This is for turning the flame off if the heater becomes overheated by the burner. | |
| 3 Over-voltage protection This turns off the heater in the event of over-voltage. The fu has a capacity of 250 V - 5A / 630 mA. If necessary, change the fuse and restart (only to be carried out by an electrician) | |
| 4 Power failure fuse This fuse is triggered by power failure, if the heater is in operation. The display shows 000 when power is available again. Press the 3 hour ON button or the ON button to restart. The ignition fuse may be triggered in the event of poor ignition during the ignition operation. Flame monitoring controls this operation. | |
| 5 Ignition fuse The display shows E003. The fuse can be deactivated by the OFF button. | |
| 6 Power and oxygen The fuse switches shortage fuse the flame and off because of lack of power, falling off insufficient oxygen. The display will show E0 and VENT. The fuse can be deactivated by pressing the O button. | |
| 7 Excessive rise in room The heater will temperature above 30°C. The stop operating if the room temperature rises The display will show E14. The room temperature fuse is at the back of the heater. The fuse can deactivated by pressing the OFF button. | |
| 8 Overheating fuse for In the event of overheating the burner will be turned off by overheat in the burner. The display will show 05. To deactivate the fuse, pull out the mains plug and reinsert. To cool the burner down, let the fan motor run for 2 minutes. | |
| 9 Oil supply alarm The alarm will be triggered when the remaining liquid fuel in the supply tank is lower than the minimum level. The heater will switch from high to low output and stop after 40 minute. The display will show E07 - FUEL. To cancel the alarm, press the OFF button, fill up the receiver tank and restart. If the rated temperature has fallen below 30°C, operate the heater at the burning output. | |
| 10 Fan protection device If the fan speed is slower than the set speed, insufficient combustion will result. The heater then stops and the display will show E12. Press the OFF button to deactivate the protection device. | |
| 11 Problem with combustion - The speed operation stopped combustion is lower than the set level. The display will show E08. Press the OFF button to deactivate the fuse. | |
| 12 Non-ignition fuse This stops combustion, because no flame was recognized the length of the flame was too short. The display will show E09. Press the OFF button to deactivate the fuse. | |
13. STORING THE OIL HEATER FOR EXTENDED PERIODS OF TIME
If you follow the following instructions exactly, your oil heater will continue to work just as efficiently and reliably during the next heating season.
- Swill a small amount of fuel around in the tank and rinse it out. Never mix any water with the fuel as this will cause the tank to rust on the inside. Remove the last traces of fuel from the heater (by burning away the fuel).
Once the tank is empty, re-light the heater. Turn the wick all the way to the top and allow it to burn down completely (this takes about 1 hour). This procedure must be done outdoors.
Take out the batteries. Allow the fuel tank to dry well on the inside. Remove any traces of carbon or soot which may have accumulated on the wick controller, the wick guide or the burner with a screwdriver and/or a small brush. - To avoid corrosion, remove the batteries before putting the oil heater away for storage.
- Before putting the heater away for storage, make sure that the wick is in the lowest possible position and that the automatic cut-out is unlocked.
Always store the oil heater in the original box, using the original packaging materials. Keep the operating instructions in a safe place. The oil heater must be stored in a well ventilated room.
14. SPECIAL SAFETY PRECAUTIONS
Where is it safe to use the comfort heater?
The oil heater must be set up only on level, horizontal surfaces.
- Do not set up the oil heater in passageways such as entrances or exits, and do not expose it to drafts.
- Do not set up the oil heater underneath a fireplace.
- Do not use the heater in rooms which are already warmer than 30^ .
- Never place the heater in close proximity to curtains or other flammable objects of any sort.
- Do not use the heater in campers, on boats, or in cockpits.
- Never leave the oil heater unsupervised during operation.
How to operate the comfort heater?
- Read the operating instructions carefully before using the heater.
After igniting the wick in accordance with the operating instructions, inspect it to make sure that it is burning properly. If the wick is too hot or if the burner is too far up, combustion may be abnormal and even dangerous. An incorrect adjusted wick may cause the smoke, smells insufficient combustion and the accumulation of carbon deposits on the wick, and it may even shorten wick life. - Use the heater only in well ventilated rooms
- Never use the heater in rooms which contai flammable vapors or gases.
- Never use the heater to dry clothes.
- Never transport the heater while it is still in operation.
- Never use the heater to heat up or cook foo
- Never touch the top plate or the safety front while the heater is still in operation as these surfaces become burning hot.
- Never leave the heater unsupervised during operation. Make sure that the heater is real before retiring for the night.
- If it is impossible to turn off the heater with t automatic cut-out, take out the tank immediat If the flame keeps on burning in a normal w the heater can be kept going until the fuel h burned away completely and the flame dies. If the flames in the burner appear abnormal if they are blazing out over the burner while impossible to turn of the burner with the automatic cut-out, the fire must be extinguis with an "A-B-C" powder fire extinguisher. A such an incident, the heater must not be sta up again until it was inspected and repaired specialist workshop.
- Use only fuel types authorized by your coun national standards.
- Never place the burner in water (risk of rust)
Inspection and maintenance of the comfort heater.
- Consult your specialist dealer if you encounter any problems!
F
7. Instructions d-installation
The guarantee period begins on the sales date and is valid for 1 year.
Responsibility is assumed for faulty construction or material or functional defects.
Any necessary replacement parts and necessary repair work are free of charge.
We do not assume responsibility for consequential damage.
EINHELL GARANTIBEVIS
32, Craven Court Winwick Quay
Warrington, Cheshire, WA2 8QU
Agence Bellut Prudent, Service Apre's-Vente
5, allée Joseph Cugnot, Z.I. du Phare
F-33700 Merignac
DK Danish Trading Co. Silkeborg ApS
Technical changes subject to change


- Page
- NLInhoudsopgave
- Important information
- Caution! Risk of explosion! Risk of fire!
- Caution! Risk of burns!
- GB
- Room temperature control
- KEEP THE OPERATING INSTRUCTIONS IN A SAFE PLACE!!!
- TECHNICAL DATA
- PREFACE
- Starting up and functions
- Automatic mode
- Timer mode (preselection of swit on time)
- 3-hour function
- Display read-outs
- Cleaning the air filter
- Automatic control of functions
- Self-diagnosis system
- Fuel supply cut-out in case of insufficient combustion
- The ceramic cover integrates infrared and hot air
- Use only good quality kerosene
- - Ventilate the room regularly
- - Keep inflammable substances away from heater
- - Keep hands and paper away from the he
- - Please press the OFF switch or pull out t mains plug if problems arise. Stay calm!
- Use the heater for heating only
- Make sure that the heater is really turned before you leave the room being heated.
- -Only move or carry the heater when it is turned off
- Close the lid of the fuel tank
- - Ensure that the air filter is always clean
- Installation information
- What to do in case of trouble
- Cleaning the heater
- Cleaning the oil filter
- Extended periods of non-use
- What do the following symptoms mean?
- Error displays and remedies
- Technical data
- Description of functions
- Description of safety features
- STORING THE OIL HEATER FOR EXTENDED PERIODS OF TIME
- SPECIAL SAFETY PRECAUTIONS
- How to operate the comfort heater?
- Inspection and maintenance of the comfort heater.
- F
- Instructions d-installation
- EINHELL GARANTIBEVIS
Brand : EINHELL
Model : CH 4000
Category : Heating