
HM520 - Coffee machine Bravilor Bonamat - Free user manual and instructions
Find the device manual for free HM520 Bravilor Bonamat in PDF.

| Product type | Milk boiler with bain-marie (milk machine) |
| Brand | Bravilor Bonamat |
| Model | HM520 |
| Milk tank capacity | 20 liters |
| Temperature range | 30°C - 85°C |
| Power supply voltage | 220-240 V~ (50/60 Hz) |
| Power | 2000 - 2380 W |
| Bain-marie water volume | Approximately 9.5 liters |
| Tank material | Double-walled stainless steel |
| Included accessories | Mixer-float lid, brush, cleaning brush for level glass |
| Main functions | Heating and maintaining milk, stirring by float-mixer, milk level indicator |
| Cleaning | Cleaning after each use with special detergent for milk tank or cleaner |
| Safety | Overheat safety thermostat, automatic shut-off in case of water shortage |
| Installation | On a solid, flat surface; connection with grounding |
| Maintenance | Regular descaling, cleaning the tap with a brush, thorough rinsing with hot water |
| Repairability | Intervention by a qualified technician |
| General information | User manual available in multiple languages |
Frequently Asked Questions - HM520 Bravilor Bonamat
User questions about HM520 Bravilor Bonamat
0 question about this device. Answer the ones you know or ask your own.
Ask a new question about this device
Download the instructions for your Coffee machine in PDF format for free! Find your manual HM520 - Bravilor Bonamat and take your electronic device back in hand. On this page are published all the documents necessary for the use of your device. HM520 by Bravilor Bonamat.
USER MANUAL HM520 Bravilor Bonamat
HM 505 / HM 510 / HM 520
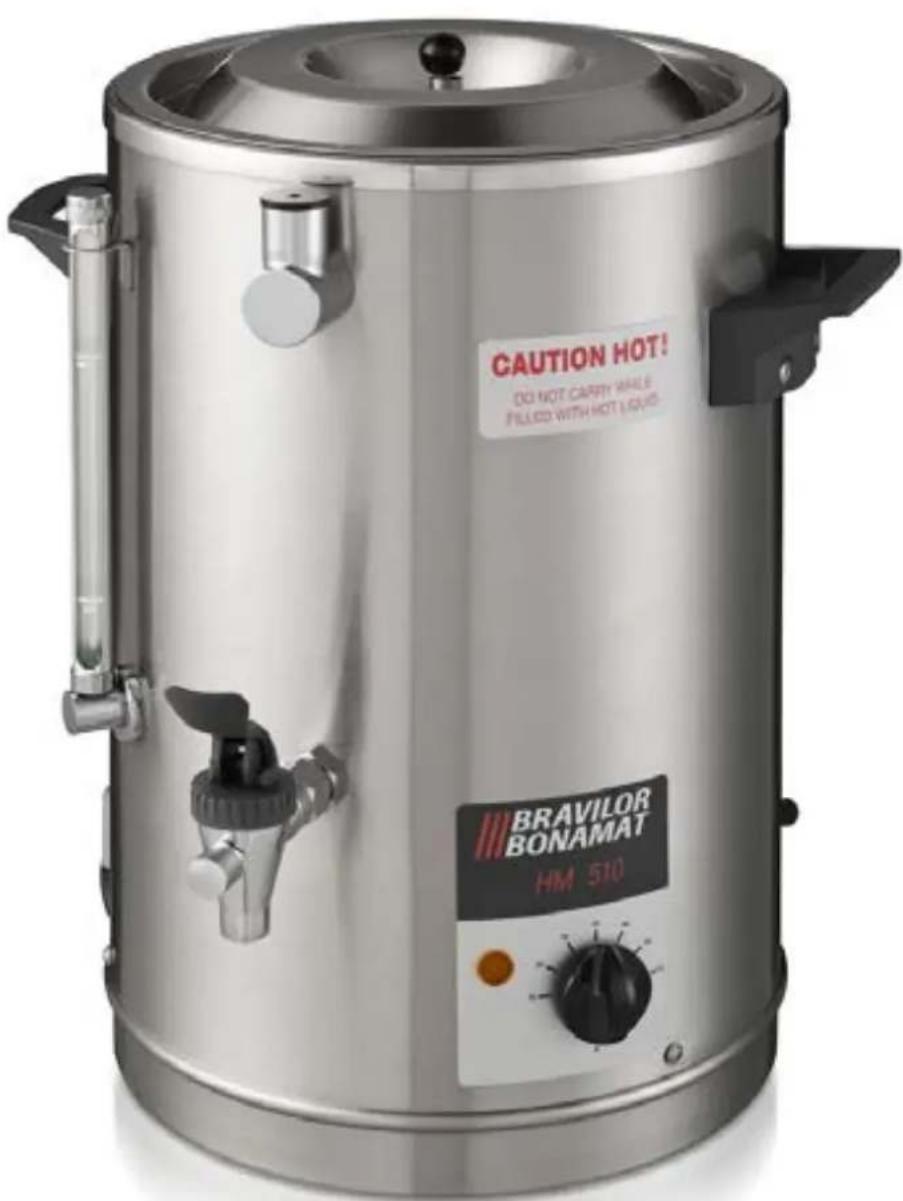
Milk heater HM 505, HM 510 and HM 520
OPERATING INSTRUCTIONS
Table of contents
- Operating instructions. 1
1.1 Introduction 1
1.2 Technical data 1
1.3 Safety precautions 2
- Installation and initial operating procedure 2
2.1 Installation data. 2
2.2 Initial operating procedure 3
- Operation 3
- Maintenance 4
4.1 Cleaning 4
4.1.1 The milk reservoir 4
4.1.2 The tap 5
4.1.3 The outside 5
All rights reserved.
No part of this document may be copied and/or published by means of printing, photocopying, microfilming or by any other means whatsoever without the prior written consent of the manufacturer. This also applies to the included drawings and/or diagrams.
The information in this document is based on data that was available at the time the design, the material characteristics and the operating methods were published, meaning that this document is subject to change.
For this reason, the instructions are merely a guideline for the installation, maintenance and repair of the machine displayed on the front cover.
This document applies to the standard version of this machine.
The manufacturer therefore declines all liability for any damage arising from specifications that deviate from the standard version of the machine delivered to you.
This document has been compiled with the utmost care. However, the manufacturer cannot be held liable for any errors it contains or the consequences thereof.
1. Operating instructions
To operate the milk heater properly and safely, read the following instructions carefully.
EN
1.1 Introduction
The model HM 505, HM 510 and HM 520 milk heaters work with the "bain-marie" (double saucepan) system, in which the milk reservoir is suspended in a pan Oacket) of hot water. a thermostat keeps the water in the jacket at the selected temperature.
The thermostat can be set to the desired temperature with an outside knob, which can also be used to switch off the entire appliance.
For the appliance to function properly, the water in the jacket must be kept at the correct level, which can be checked by means of the level gauge.
In the unlikely event that the water in the jacket should be insufficient, overheating is prevented by a safety device which can be reset on the outside of the appliance. A dipstick with a small cup which rests on the surface of the milk shows the quantity of milk in the appliance

- inlet for water
- cover with dipstick
- outside of water jacket
- handles
- cord inlet with connecting cord
- reset knob for boiling-dry protection
- on/off and adjustment knob
- level gauge
- cap
- tap
- pilot light
The following accessories come with the appliance:
cover with dipstick
- washing-up brush
level gauge brush
1.2 Technical data
| HM 505 HM 510 HM 520 | |||
| capacity 5 litre 10 litre 20 | litre | ||
| milk temperature 30° - 85 °C 30° - 85 °C 30° - 85 °C | |||
| voltage 1 (50/60Hz) 220 - | 240 V~ 220 - 240 V~ 220 | 0 - 240 V~ | |
| power 1 2000 - 2380 W 2 | 000 - 2380 W 2000 - 2380 W | ||
| voltage 2 (50/60Hz) - 220 | V~ 220 V~ | ||
| power 2 - 3000 W 3000 W | |||
| water capacity (jacket) | ± 3 litre ± 5.5 litre | ± 9.5 litre | |
EN
1.3 Safety precautions
When using the appliance, the following rules should be kept in mind:
- The appliance becomes very hot when In use.
- Do not move the appliance when It Is filled with milk and (In the Jacket) hot water.
- As milk is a perishable product, it should not be left in the reservoir any longer than is strictly necessary.
- After each use, thoroughly clean the milk reservoir and all components which come into contact with milk (HYGIENE).
- Stay with the appliance during maintenance operations (such as cleaning).
- The appliance is never to be immersed in water.
- Wash your hands after working with a strong cleansing agent.
- When installing the appliance, be sure to observe local regulations and standards.
- The appliance's electrical system should be properly earthed.
- Under normal circumstances, some water always remains in the appliance; keep this in mind if the appliance is to be exposed to temperatures below 0^ .
- When the appliance will not be used for some time or if it is not functioning properly, it is advisable to remove the plug from the socket.
- All repairs should be carried out by a qualified technician.
2. Installation and initial operating procedure
When installing the appliance and operating it for the first time, keep the above instructions (points 2, 8, 9, 10, and 12) in mind.
2.1 Installation data
Position the milk heater on a solid, level surface where it can be plugged into the mains.
The milk heater is provided with a standard model cord and attached plug.
If the plug has been equipped with a built-in fuse (13A), it should not be used unless the fuse has been shielded.
If the attached plug does not fit into your socket, it should be cut off and replaced with a suitable plug. The old plug should then be disposed of, as it can be dangerous if inserted into a socket.
Keep the following instructions in mind when installing a new plug:
- The yellow-green core (earth) must be connected to the terminal marked with the letter E or the earth symbol (½or coloured green or yellow-green.
- The blue core (neutral) must be connected to the terminal marked with the letter N or O or coloured black.
- The remaining brown or black core must be connected to the terminal marked with the letter L, F or P or coloured red.
IMPORTANT
The triple-core mains is colour coded as follows:
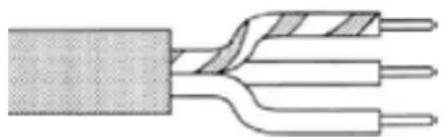
green and yellow core · earth
blue core · neutral
brown or black core · phase
2.2 Initial operating procedure
EN
Here is the procedure to be followed when the appliance is to be used for the first time:
- Clean the milk reservoir and all components which come into contact with milk thoroughly with a cleansing agent and brush. Don't forget to tap a small amount of cleansing agent out of the reservoir in order to clean the tap properly as well.
- After cleaning, thoroughly rinse the reservoir and all parts which have been cleaned with hot water to remove all traces of the cleansing agent.
Rinse the tap, as well, by tapping hot water out of the reservoir. - Position the appliance.
- Remove the stopper from the water inlet and fill the jacket with water to the highest line on the level gauge. Replace the stopper.
The appliance is now ready for use.
3. Operation
When using the appliance, keep the instructions given in the introduction (points 1, 2, 3 and 4) in mind.
- Before use, rinse the milk reservoir thoroughly with ample hot water. Draw off some of the water via the tap to rinse the tap properly too.
- Check 1f the water in the jacket is sufficient. The level should lie between the two lines on the level gauge. Should the level be lower than the lowest line, then the water should be topped up to the highest line.
- Rinse all other parts which come into contact with milk (cover, dipstick, etc.) thoroughly with ample hot water.
- Fill the milk reservoir with milk.
- Replace the cover with the dipstick on the reservoir.
- Put the plug in the socket.
- Switch on the appliance and set the thermostat to the desired temperature by turning the knob to the correct setting. The pilot light will go on.
- When the pilot light goes out, the milk has been brought to the desired temperature. The milk can now be stirred by moving the dipstick a few times up and down. Finally, the dipstick should be raised as far as possible and then allowed to sink gently until the cup rests on the surface of the milk.
- After use, the milk reservoir, the tap and all components which come into contact with milk should be thoroughly cleaned.
4. Maintenance
WARNING
- When carrying out maintenance work, always keep in mind the instructions given in the introduction (points 1, 2, 5, 6 and 7). Stay with the appliance during cleaning to make sure that the cleansing agent is properly used.
4.1 Cleaning
Since milk is a perishable product, it is necessary to thoroughly and hygienically clean the milk reservoir and all components which come into contact with milk after each use. While the reservoir can be cleaned with an ordinary cleanser or detergent, it is nonetheless advisable to use either a special cleansing agent for milk cookers or CLEANER, a cleansing agent tested and approved by us.
Be sure to read the instructions on the packet of cleansing agent you use.
4.1.1 The milk reservoir
To clean the reservoir properly, proceed as follows:
- Empty the reservoir of all milk.
- Fill the entire reservoir with water and add the correct amount of cleansing agent (as indicated on the packet).
- Place the cover on the reservoir. Immerse the dipstick at an angle, to make sure that the cup is completely under water.
- Switch on the appliance and let it stand until the incrustation can be easily removed with a washing-up brush (30 - 60 min.). During the soaking process, draw a half litre of water from the tap every now and then and pour it back into the reservoir so that the incrustation in the tap also soaks off.
- After soaking, all incrustation on the walls of the reservoir and on all components which come into contact with milk must be removed. This can be done with the brush, which has a scraper on the back, or with a scouring pad.
- Switch off the appliance and empty the reservoir via the tap.
REMARK
-
When the tap is blocked, it should be cleaned as indicated in the following paragraph (THE TAP).
-
Now rinse all detachable parts thoroughly with hot water to remove all traces of the cleansing agent.
- Fill the milk reservoir completely with hot water and empty it again via the tap. Rinse the reservoir in this way at least three times.
- Now dry all components as thoroughly as possible.
4.1.2 The tap
EN
It is most advisable to give the tap an extra cleaning at regular intervals. The level gauge brush which is supplied with the appliance can be used for this purpose.
To clean the tap, follow the instructions given below:
- Loosen the cap with locking mechanism and remove it.
- Remove the plug at the front of the tap.
ATTENTION
-
Keep in mind that any (hot) water remaining in the reservoir will spurt straight out when the plug is removed.
-
The connecting pipe to the reservoir, as well as the tap housing itself, can now be thoroughly cleaned on the inside with the special brush. Use a good cleansing agent for this purpose.
ATTENTION
Also remove any deposits from the threads and the cap.
- Once they have been cleaned and all incrustation has been removed, the pipe and the tap housing should be thoroughly rinsed with ample hot water. Don't forget to rinse the cap and plug threads properly as well.
- The inside of the plug and of the cap with locking mechanism should now be thoroughly cleaned as well, after which they should be rinsed with ample hot water.
ATTENTION
Make sure that no traces of cleansing agent remain in the locking mechanism.
- After cleaning and rinsing, put the cap with locking mechanism and the plug back on the tap.
4.1.3 The outside
The outside of the appliance can easily be cleaned with a damp cloth. Use a cleanser if necessary, but it is most inadvisable to use scouring pads or abrasives, which inevitably leave scratches on the appliance. Aside from thorough cleaning of the appliance and all accessories after each use, the milk heater requires no maintenance.
Should you have questions or complaints, please contact your dealer.
FR