ALBA - Coffee machine ISOMAC - Free user manual and instructions
Find the device manual for free ALBA ISOMAC in PDF.
User questions about ALBA ISOMAC
0 question about this device. Answer the ones you know or ask your own.
Ask a new question about this device
Download the instructions for your Coffee machine in PDF format for free! Find your manual ALBA - ISOMAC and take your electronic device back in hand. On this page are published all the documents necessary for the use of your device. ALBA by ISOMAC.
USER MANUAL ALBA ISOMAC
text_image
ISOMAC Tilano SPINCE 1977 ESPRESSO COFFEE MACHINESALBA TEA
natural_image
Exterior view of a modern espresso machine with control panel and side arm (no visible text or symbols)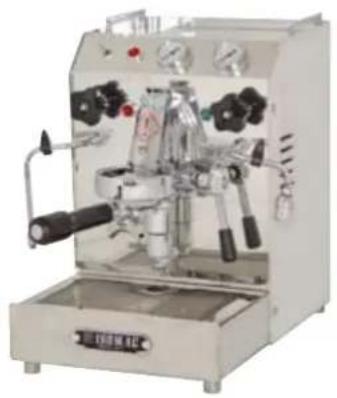
natural_image
Exterior view of a modern industrial coffee machine (no visible text or labels)MANUALE D'USO E MANUTENZIONE
USE AND MAINTENANCE MANUAL
NOTICE D'EMPLOI ET ENTRATIEN
INSTRUKTIONSBOK
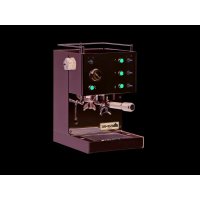
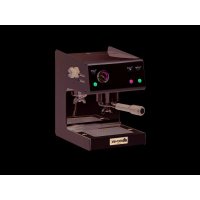
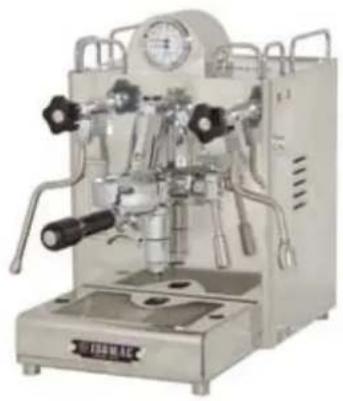
The ALBA/TEA espresso coffee machine is designed and constructed with care to ensure quality, safety and reliability in time.
To be certain of exploiting its potential in the best possible way and maintaining top performance of the ALBA/TEA unaltered we recommend that you follow the instructions in this simple booklet very carefully to install and use the machine and perform daily maintenance correctly.
ALBA
All texts and pictures introduced by this symbol refer exclusively to the machine indicated on it.
F
4.1 Starting the machine
4.2 Preparation of coffee
4.3 Distribution of steam
4.4 Distribution of hot water
5 RECOMMENDATIONS AND SUGGESTIONS
6 ROUTINE MAINTENANCE
6.1 Removing scale from the boiler tank on all machines
6.2 Backflushing
7 INVALIDATION OF THE WARRANTY
F INDEX
1 COMPOSANTS DE LA MACHINE
1.1 Accessoires
2 CARACTÉRISTIQUES ET DONNÉES TECHNIQUES
3 AVERTISSEMENTS ET NORMES DE SÉCURITÉ
4 INSTRUCTIONS POUR L'UTILISATEUR
6 MANUTENTION ORDINAIRE
2 Machine on LED (red)
ALBA
2 Machine on light (red)
TEA
3 Heating element LED (red)
ALBA
3 Heating element light (red)
TEA
4 Coffee LED (green)
ALBA
4 Coffee distribution light (green)
TEA
5 Tank "MAX" water level LED (green)
ALBA
6 Tank "MEDIUM" water level LED (green)
ALBA
7 Tank "MIN" water level LED (red)
ALBA
8 Filter holder
9 Cup warmer
10 Coffee distribution unit
11 Drip tray with cup rack
12 Coffee distribution lever
13 Steam knob
14 Steam nozzle
15 Hot water knob
16 Hot water nozzle
17 Boiler pressure gauge
18 Distribution pump pressure gauge
1.1 Accessories
- Two cup filter holder
• One cup filter holder - Presser
- Measure
F 1. COMPOSANTS DE LA MACHINE
natural_image
Two industrial robotic arms labeled ALBA and TEA, showing mechanical components and a close-up view of the latter arm (no text or symbols on the main image)Fig. D
ALBA - TEA
I
ISOMAC
natural_image
Two hands performing a manual press or testing operation on a mechanical component, labeled ALBA and TEA (no text or symbols on the device itself)Fig. G
ALBA - TEA
ISOMAC
I
natural_image
Two-panel image showing a device with black components and directional arrows, labeled ALBA and TEA (no text or symbols on the devices themselves)Fig. H
natural_image
Two identical white ceramic cups labeled ALBA and TEA, each with a camera setup above (no visible text or symbols on the cups themselves)Fig.1
natural_image
Two-panel image showing hands using a lathe machine to lift milk from a white cup, labeled 'ALBA' and 'TEA' (no text or symbols on the devices themselves)Fig. J
The ALBA/TEA espresso coffee machine has the following features:
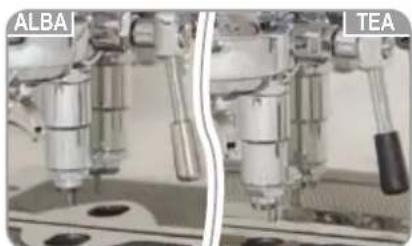
• all AISI 304 stainless steel construction;
- manual coffee distribution unit in chrome-plated brass;
- heat-insulated stainless steel water/steam nozzle ALBA;
• water/steam nozzle in chrome-plated copper TEA ;
• boiler in stainless steel construction;
• mechanical overpressure with drip tray;
- adjustable pressure switch;
• water level sensor ALBA ;
- internal exchanger for distribution of water/coffee;
• copper pipes for water connections;
- solenoid valve;
• electronic unit with automatic water refill sensor;
- micro switch for automatic cutoff of machine in case of lack of water in tank TEA .
| TECHNICAL DATA ALBA | |||
| Depth 420 mm | Pump 12 - 14 atm | ||
| Width 280 mm | Tank 3 l | ||
| Height 420 mm | Power 1400 W | ||
| Weight 21 Kg | Voltage 230 V - 50 Hz | On demand:(115 V - 60 Hz)(240 V - 60 Hz) | |
| TECHNICAL DATA TEA | |||
| Depth 420 mm | Pump 12 - 14 atm | ||
| Width 280 mm | Tank 3 l | ||
| Height 420 mm | Power 1400 W | ||
| Weight 21 Kg | Voltage 230 V - 50 Hz | On demand:(115 V - 60 Hz)(240 V - 60 Hz) | |
3. SAFETY RECOMMENDATIONS AND RULES
Follow these rules carefully:

WARNING
The ALBA/TEA espresso machine should only be used for the purpose for which it was made.

WARNING
Improper use of the machine can cause damage to persons and property for which the manufacturer cannot be held responsible.

WARNING
Always contact a qualified service center or the manufacturer for operations other than those described in the instruction book and for all types of repairs.

WARNING
Make sure the mains voltage is the same as the data on the rating plate.

WARNING
The coffee maker should be well and safety grounded. Have the system checked if you have any doubts.

WARNING
Make sure the power system is equipped with a safety cutoff that works properly and that the cross section of the cables is sufficient for the power absorbed.

WARNING
For any type of malfunction or problems not specified here, unplug the machine and do not attempt to check and/or repair it yourself. Contact a qualified service center or the manufacturer.

WARNING
Do not fill the tank with water when the machine is plugged in.

WARNING
Make sure there is water in the tank when the machine is operating.

WARNING
Never place your hands or other parts of the body in the path of the water/steam nozzle. Hot water and steam can cause serious burns.

WARNING
Never place your hands or other parts of the body or any other object inside the machine when it is plugged in.

WARNING
Never touch the machine with wet hands or feet.

WARNING
Never touch the hot parts of the machine (bottom of coffee distributor and water/steam nozzles).

WARNING
Before performing any routine maintenance make sure the machine is unplugged, without pulling the power cable, or that the main circuit breaker is off.

WARNING
If the power cable should be damaged and have to be replaced, order a new cable from the manufacturer and/or its service center.

WARNING
Never immerse the coffee machine in any type of liquid.

WARNING
Do not use detergents or abrasive substances to clean the machine.

WARNING
Do not leave the machine exposed to atmospheric agents.

WARNING
Do not leave the machine within reach of children or people who are not capable of using it.

WARNING
Keep the coffee maker away from any heat sources.
4. INSTRUCTIONS FOR THE USER
4.1 Starting the machine
To start the ALBA/TEA espresso coffee maker, follow the instructions below:
- open the external packing and take the machine out. Inspect the machine to ascertain that it is intact and in good condition.
Check for the presence of all the accessories supplied with the machine (see paragraph 1.1)
- position the machine on a flat surface;
- remove the cup warmer (9) and take out the water tank (located inside the machine) and rinse it;
- fill the cup warmer (9) with clean water, return it to its housing and insert the silicon tubes. Close the cover on the machine;
close the cover of the cup warmer (9) area;
- plug in the machine;
- press the main circuit breaker (1);
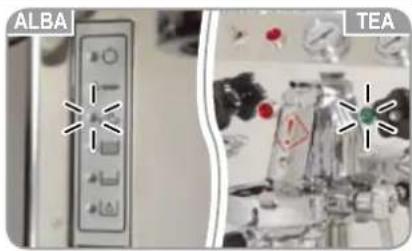
- ALBA The machine on LED (2), and the heating element LED (3) will switch on;
• TEA The main power ON light (2) and the heating element light (3) will go on.
text_image
ALBA TEAFig. C
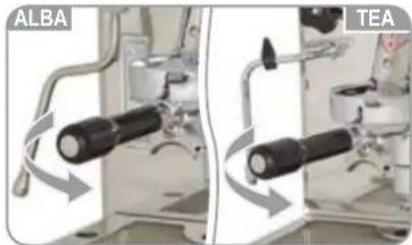
Perform the following operations every time you switch the machine on and every time you draw steam:
- push the coffee lever (12) up so water comes out of the bottom of the coffee distribution unit (10);
- pull down the coffee lever (12). The boiler will automatically fill with water;
- wait about 3 - 4 minutes for the machine to be pressurized;
natural_image
Close-up of two industrial robotic arms labeled ALBA and TEA, showing mechanical components without any readable text or symbols.Fig. D
GB USA
ISOMAC
- ALBA The heating element LED (3) will switch off and the coffee LED (4) will switch on;
- TEA The heating element light (3) goes off and the coffee light (4) goes on.
text_image
ALBA TEAFig. E
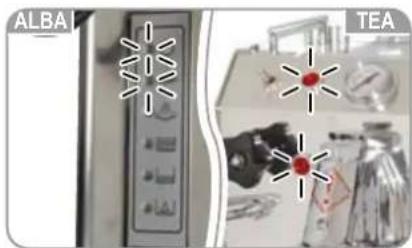
At this point the ALBA/TEA coffee machine is ready for use.
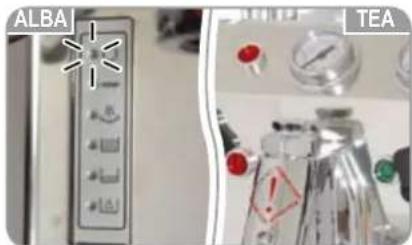
If the water in the tank should run out, the machine will switch itself off automatically.
ALBA LEDs (2) and (7) will remain switched on; TEA All of the lights (2), (3), and (4) will switch off.
text_image
ALBA TEAFig. F
To start the machine again proceed as follows:
- switch off the machine with the main circuit breaker (1);
- unplug it;
- fill the tank with water;
- plug in the power cable;
- switch on the machine with the main circuit breaker (1);
ALBA The machine on LED (2), heating element LED (3) and MAX water level LED (5) will switch on;
TEA The main power ON light (2) and the heating element light (3) will go on;
- wait about 3 - 4 minutes for the machine to be pressurized;
ALBA The heating element LED (3) will switch off and the coffee LED (4) will switch on;
TEA The heating element light (3) goes off and the coffee light (4) goes on.
4.2 Preparation of coffee

WARNING
Make sure the tank is always full of water!
- Make sure the machine is pressurized (see paragraph 4.1);
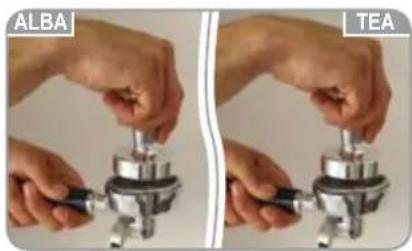
- fill a one cup filter holder (8) if you want one cup of coffee or a two cup filter holder if you want two cups at the same time, and press the coffee slightly with the presser;
natural_image
Two hands performing a mechanical press or clamp operation, labeled ALBA and TEA (no text or symbols on the devices themselves)Fig. G
ALBA - TEA
ISOMAC
USA GB
- fit the filter holder (8) in the coffee distribution unit (10) and twist from left to right to block it in place;
natural_image
Two-panel image showing a device with black lenses and a brush, labeled ALBA and TEA (no text or symbols on the devices themselves)Fig. H
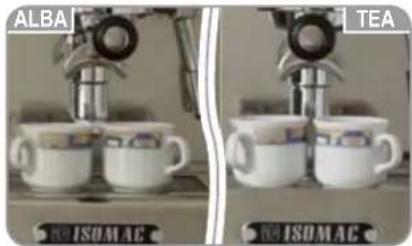
- place one or two cups under the filter holder (8);
- push the coffee lever (10) up;
Coffee will come out the bottom of the filter holder (8):
- lower the lever (10) when you have enough coffee;
natural_image
Two identical photos of a coffee machine with two cups, one labeled 'ALBA' and the other 'TEA', both showing no visible text or symbols.Fig. 1
- if you want to make more coffee remove the filter holder (8) by turning it from right to left and empty out the used grounds. Repeat the above operations.
4.3 Distribution of steam

WARNING
Always make sure the tank is full of water!

WARNING
Never place your hands or other parts of the body in the path of the water/steam nozzle. Hot water and steam can cause serious burns.
- Make sure the machine is pressurized (see paragraph 4.1);
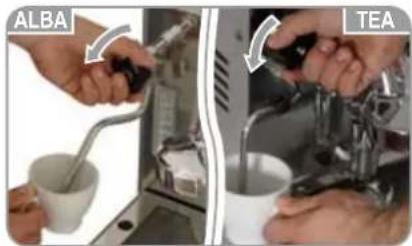
- place a container under the steam nozzle (14);
come out of the bottom part of the steam nozzle (14);
natural_image
Two-panel image showing hands using a lathe machine to lift milk from a white cup, with no visible text or symbols.Fig. J
ALBA - TEA
4.4 Distribution of hot water

WARNING
Always make sure the tank is full of water!

WARNING
Never place your hands or other parts of the body in the path of the water/steam nozzle. Hot water and steam can cause serious burns.
- Make sure the machine is pressurized (see paragraph 4.1);
- place a container under the hot water nozzle (16);
at about 95°C will come out of the bottom part of the steam nozzle (16);
- close the hot water tap (15) when you have enough hot water by

text_image
ALBA TEAFig. K
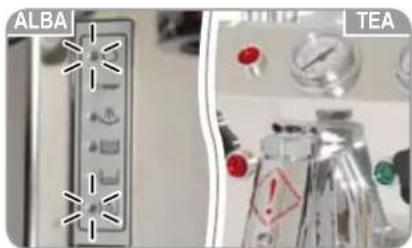
At this point the boiler will recharge it self automatically.
If this operation should need more than 60 - 90 seconds, the heating element will automatically disconnect itself and the heating element light (4) and the coffee light (3) will go off TEA.
Only the machine on LED (2) goes on ALBA.
text_image
ALBA TEAFig. L
To start the machine again proceed as follows:
- switch off the machine with the main circuit breaker (1);
- switch the machine on again with the main switch (1);
• ALBA The machine on LED (2) and the heating element LED (3) will switch on;
• TEA The power ON light (2) and heating element light (3) will be lit.
The water tank refilling operation will resume automatically until the water level reaches a functional level for use.
5. RECOMMENDATIONS AND SUGGESTIONS
To enjoy excellent coffee:
• purchase a good brand of coffee in beans;
- keep the coffee in beans in a dry place;
- grind the coffee beans fresh when you make coffee;
- measure and press the ground coffee slightly to pack it more uniformly.
For boiling hot coffee:
- leave the filter holder with the empty filter in the coffee distribution unit at all times;
- rinse the filter holder and filter with boiling hot water by pressing the coffee switch;
- use the same boiling water to pre-heat the cups.
For a delicious cappuccino:
• use a tall narrow milk pitcher half full;
- immerse the steam/hot water nozzle 1 cm into the milk;
- open the tap with the knob;
- the milk will be covered with a creamy froth.
If you just want to heat the milk:
- immerse the steam/hot water nozzle all the way into the milk;
- open the steam/hot water tap with the knob;
- close the tap when the milk is hot enough.
6. ROUTINE MAINTENANCE

Before performing any routine maintenance make sure the machine is unplugged, without pulling the power cable, or that the main circuit breaker is off.
Do not use detergents or abrasive substances to clean the machine.
To ensure good upkeep of the ALBA/TEA machine we recommend cleaning it every day:
- clean the water tank regularly;
- change the water in the tank frequently if the machine is only used occasionally;
- remove the residues of coffee by soaking the filters in hot water;
- clean the drip tray and cup rack with hot water;
- clean the steam/hot water nozzle to prevent obstruction of the holes in the end;
- clean the structure and all the external parts of the machine with a damp cloth. Dry with a dry cloth to remove any halo and shine the machine;
- clean the funnel (bottom part of the coffee distribution unit) to remove all residues of coffee with a damp cloth and run water through it by pressing the coffee switch.
6.1 Removing scale from the boiler tank on all machines
It is advisable to use a filter or cartridge beneath the sink (in addition to any internal filter used inside the water container in the machine itself) to help to reduce the formation of scale build-up inside your machine. Remember that these filters only reduce the amount of scale build up; they do not eliminate it all together. The correct procedure for scale removal is described here below.
Every month
-
Let the machine heat up for 5 minutes;
-
remove the cartridge from the filter, if fitted;
-
put 300 cc white vinegar + 100 cc water in the container. Be prepared to tilt the container to prevent the machine from switching off on account of low water levels and take care never to let the pump operate without any water. There fore, add more water and vinegar solution if necessary. Another alternative is to leave the container full of water and place the pipes in a separate measuring jug containing the vinegar and water solution made up in the proportions described above. This latter option has the advantage that you can see when enough water has flowed through the machine;
-
let the water run through the unit until you can smell the vinegar solution in the water;
-
let the water run through the steam nozzle until it begins to smell of vinegar;
-
4 and 5 above, when performed in this order ensure that the pipes of the unit and on the steam nozzle are filled with water containing the vinegar solution.
-
Insert the blind filter in the filter holder and insert the filter holder into the unit;
-
Lift the lever for 6 - 8 seconds until the pressure reads 9 or 10 bar; then switch off the machine. This will switch off the pump, given that you do NOT want the unit to lose pressure (make sure that the unit E61 is full of water/vinegar solution);
-
leave the machine switched off overnight (approximately 12 hours) then empty out the water container;
-
wash the container and fill it with clean water;
-
depressurise the unit (by lowering the lever);
-
switch on the machine and wait a few minutes for it to heat up (carefully monitor the pressure if a pressure gauge is fitted to the machine, and dispense water through the steam nozzle if the pressure should exceed 9 bar while the machine is heating). Insert the blind filter and insert the filter holder beneath the unit, back flush the machine 6 or 7 times (see paragraph 6.2);
-
remove the filter holder;
-
dispense water through the unit for periods of 20 seconds, waiting for 15 seconds between each one. Do this 5 times;
-
dispense water from the steam nozzle until you can no longer smell any vinegar;
-
dispense water through the unit until you can no longer smell any vinegar;
-
replace the blind filter and back flush 5 times (see back flushing operation);
-
switch off the machine;
-
fill the container with clean water and start the machine again as described in the instruction manual;
-
dispense 30 - 40 cc of water through the unit into a container and make sure that it does not smell of vinegar or taste unpleasant. Dispense the same amount of water through the steam nozzle into a container and make sure that it does not smell of vinegar or taste unpleasant. If any unpleasant smell or taste remains, distribute more water through the unit and steam nozzle and check it again;
-
the machine is now ready to be used again.
6.2 Backflushing
-
Insert the blind filter into the filter holder;
-
insert the filter holder into the unit t;
-
lower the coffee lever for approx. 1 second and then lift it again;
-
repeat 6 - 7 times;
-
remove the filter holder and lower the coffee lever so that a little water flows out of the unit;
-
lift the lever again.
Make sure that the container has enough water inside before using the machine again.
7. INVALIDATION OF THE WARRANTY
The warranty will be invalidated and the manufacturer will not accept liability for any damage due to failure to follow the instructions in this manual.
For operations other than those described contact a qualified service center or the manufacturer.
Use of the machine in any other way than as contemplated in the instructions will relieve ISOMAC and all sales outlets of any liability for damage to persons or property.
ISOMAC assures the user of full collaboration for any clarification necessary.
2. CARACTERISTIQUES ET DONNEES TECHNIQUES
natural_image
Two robotic arms labeled ALBA and TEA, showing mechanical components and a close-up view of the latter (no text or symbols on the devices themselves)Fig. D
F
ISOMAC
natural_image
Two hands performing a manual press or testing operation on a mechanical component, labeled ALBA and TEA (no text or symbols on the device itself)Fig. G
ALBA - TEA
ISOMAC

natural_image
Two-panel image showing a device with black components and directional arrows indicating rotation or movement (no text or symbols)Fig. H
natural_image
Two identical white ceramic cups under a robotic arm, labeled 'ALBA' and 'TEA', with no visible text or symbols on the cups themselves.Fig. 1
6. MANUTENTION ORDINAIRE

ATTENTION
natural_image
Two industrial robotic arms labeled ALBA and TEA, showing mechanical components without any readable text or symbols.Fig. D
SE
ISOMAC
natural_image
Two hands performing a manual press or testing operation on a metal clamp (no text or symbols visible)Fig. G
ALBA - TEA
ISOMAC
SE
natural_image
Two-panel image showing a device with black lenses and directional arrows, labeled ALBA and TEA (no text or symbols on the devices themselves)Fig. H
natural_image
Two identical grayscale images of coffee cups labeled ALBA and TEA, each with a camera rig above (no visible text or symbols on the cups themselves)Fig.1
natural_image
Two industrial robotic arms labeled ALBA and TEA, showing mechanical components and mounting holes (no text or symbols on the devices themselves)Abb. D
D
ISOMAC
natural_image
Two hands performing a manual press or testing operation on a mechanical component, labeled ALBA and TEA (no text or symbols on the device itself)Abb. G
ALBA - TEA
ISOMAC
D
natural_image
Two-panel image showing a device with black cylindrical components and gray arrows indicating rotation or movement (no text or symbols)Abb. H
natural_image
Two identical white ceramic cups under a laser, labeled ALBA and TEA, with no visible text or symbols on the cups themselves.Abb. I
natural_image
Two-panel image showing hands using a lathe machine to lift milk from a cup, labeled 'ALBA' and 'TEA' (no text or symbols on the devices themselves)Abb. J
Under the senses of art. 13 of Law Decree 25th July 2005, n. 151 "Implementation of the Directives/ Guidelines 2002/95/CE, 2002/96/CE and 2003/108/CE, concerning the reduction of the use of dangerous substances in electric and electronic equipment, as well as the disposal of wastes".
The symbol of the crossed large rubbish container that is present on the machine points out that the product at the end of its life cycle must be collected separately from the other wastes. The user for this reason will have to give the equipment that got to its life cycle to the suitable separate waste collection centres of electronic and electrotechnical wastes, or to give it back to the seller or dealer when buying a new equipment of equivalent type, in terms of one to one. The suitable separate waste collection for the following sending of the disused equipment to recycling, the dealing or handling and compatible environment disposal contributes to avoid possible negative effects on the environment and on the people's health and helps the recycling of the materials the machine is composed of. The user's illegal disposal of the product implies the application of administrative fines as stated in Law Decree n.22/1997" (article 50 and followings of the Law Decree n.22/1997).
RENSEIGNEMENT AUX UTILISATEURS F