EspressoAutomat EM 10 - Coffee machine Petra Electric - Free user manual and instructions
Find the device manual for free EspressoAutomat EM 10 Petra Electric in PDF.
User questions about EspressoAutomat EM 10 Petra Electric
0 question about this device. Answer the ones you know or ask your own.
Ask a new question about this device
Download the instructions for your Coffee machine in PDF format for free! Find your manual EspressoAutomat EM 10 - Petra Electric and take your electronic device back in hand. On this page are published all the documents necessary for the use of your device. EspressoAutomat EM 10 by Petra Electric.
USER MANUAL EspressoAutomat EM 10 Petra Electric
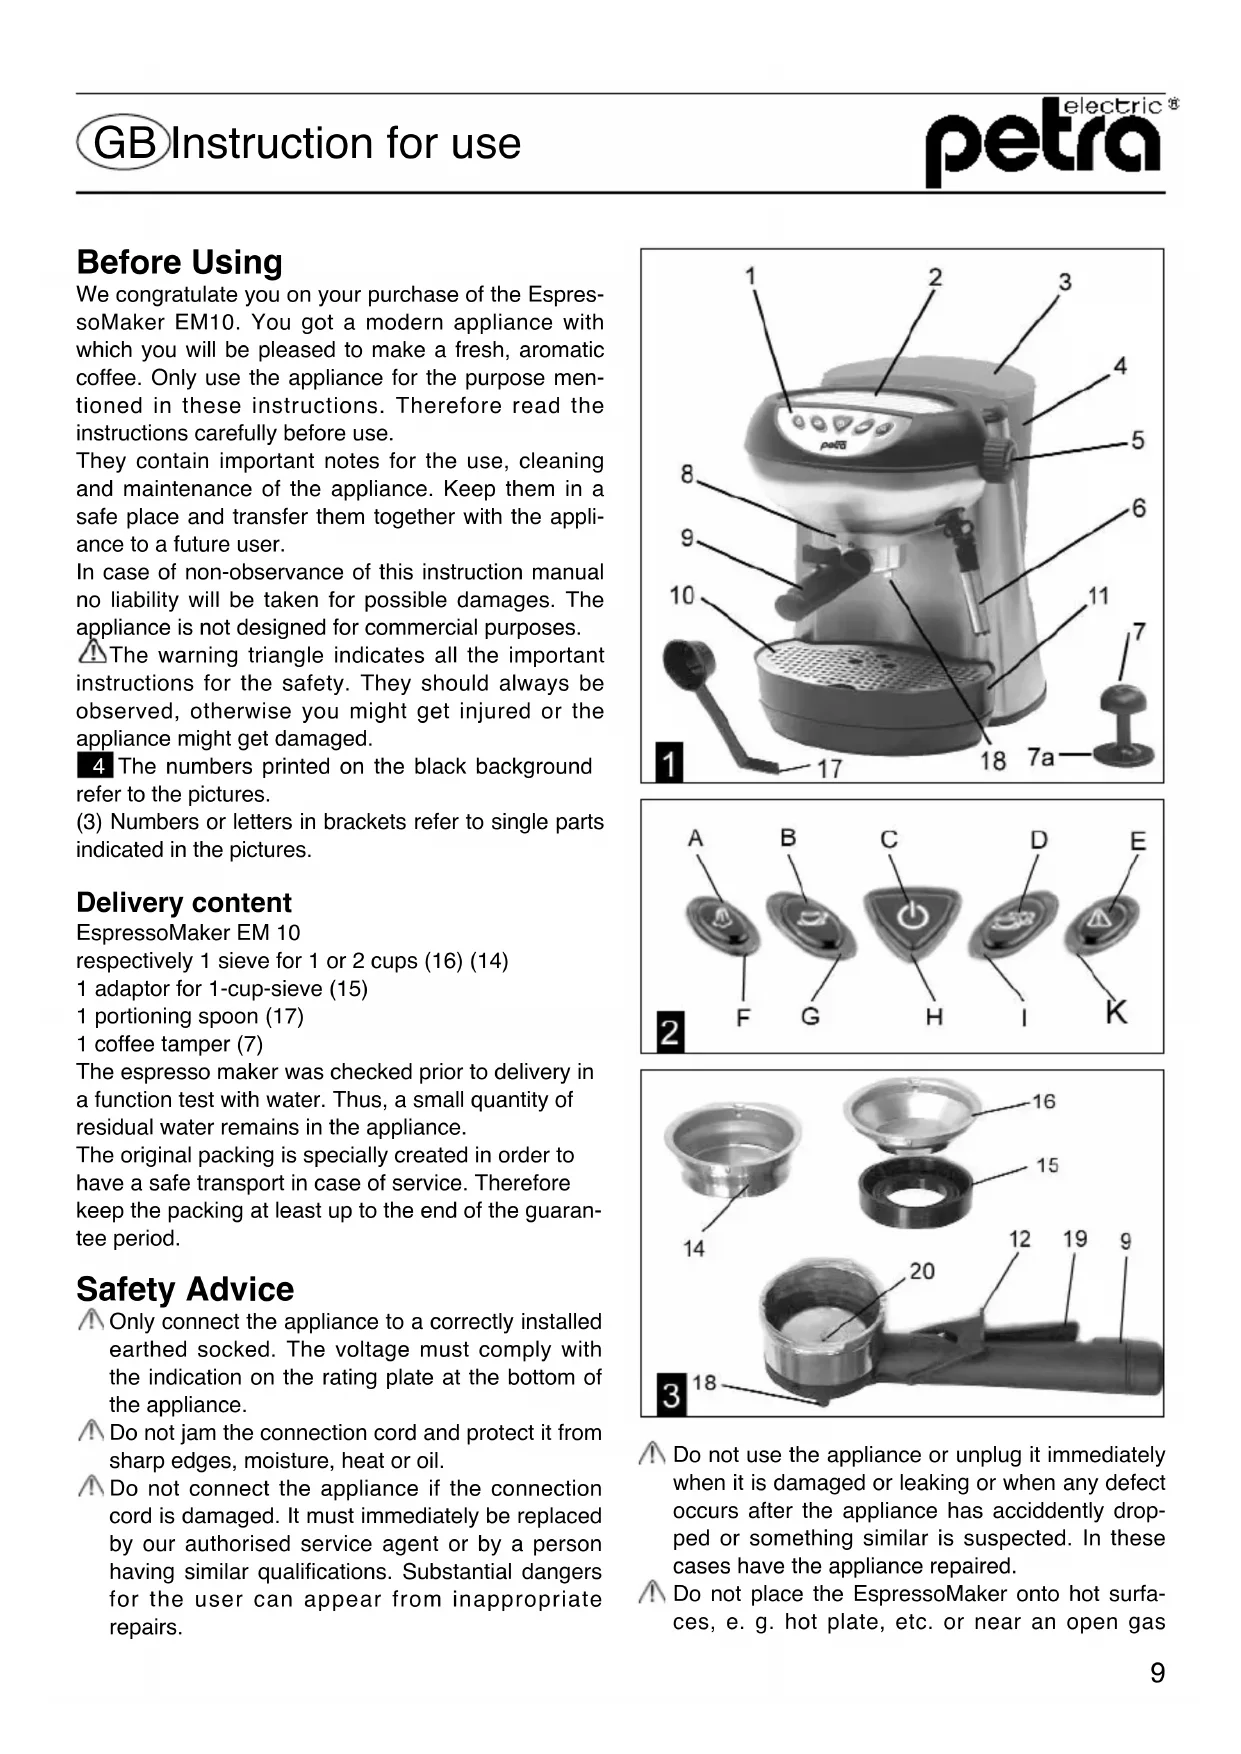
GB Instructions for use
F Mode d'emploi
natural_image
Exterior view of a modern petra coffee maker with black and silver casing (no visible text or symbols)Vor dem Benutzen
text_image
A B C D E F G H I K 2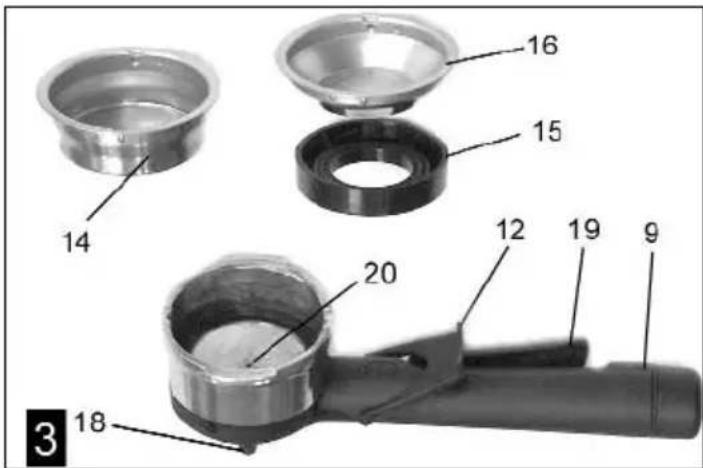
text_image
14 16 15 20 12 19 9 3 18oder Öl.
text_image
Black-and-white photo showing a hand using a coffee machine to adjust the plug into a small pot, with numbered annotations indicating steps 6, 7, and 8.We congratulate you on your purchase of the EspressoMaker EM10. You got a modern appliance with which you will be pleased to make a fresh, aromatic coffee. Only use the appliance for the purpose mentioned in these instructions. Therefore read the instructions carefully before use.
They contain important notes for the use, cleaning and maintenance of the appliance. Keep them in a safe place and transfer them together with the appliance to a future user.
In case of non-observance of this instruction manual no liability will be taken for possible damages. The appliance is not designed for commercial purposes.
The warning triangle indicates all the important instructions for the safety. They should always be observed, otherwise you might get injured or the appliance might get damaged.
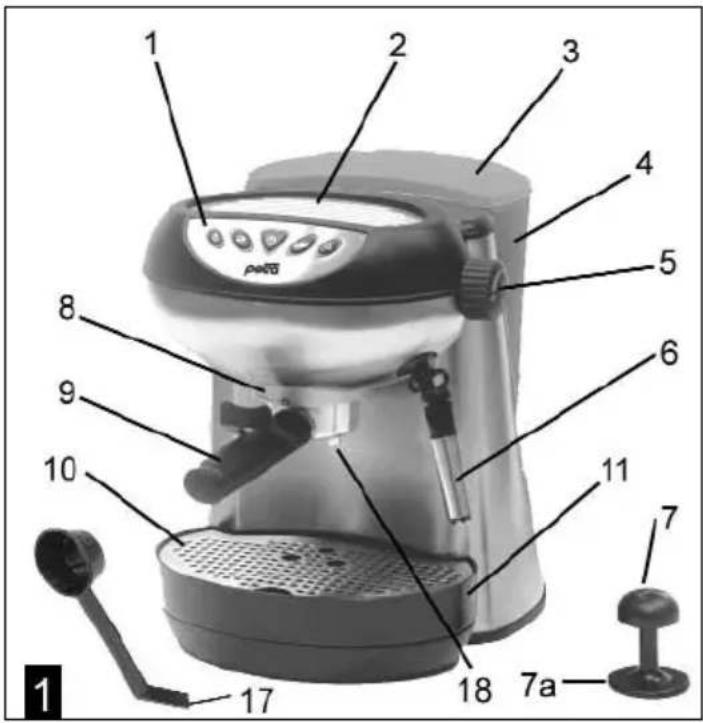
4 The numbers printed on the black background refer to the pictures.
(3) Numbers or letters in brackets refer to single parts indicated in the pictures.
Delivery content
EspressoMaker EM 10
respectively 1 sieve for 1 or 2 cups (16) (14)
1 adaptor for 1-cup-sieve (15)
1 portioning spoon (17)
1 coffee tamper (7)
The espresso maker was checked prior to delivery in a function test with water. Thus, a small quantity of residual water remains in the appliance.
The original packing is specially created in order to have a safe transport in case of service. Therefore keep the packing at least up to the end of the guarantee period.
Safety Advice
Only connect the appliance to a correctly installed earthed socked. The voltage must comply with the indication on the rating plate at the bottom of the appliance.
Do not jam the connection cord and protect it from sharp edges, moisture, heat or oil.
Do not connect the appliance if the connection cord is damaged. It must immediately be replaced by our authorised service agent or by a person having similar qualifications. Substantial dangers for the user can appear from inappropriate repairs.
text_image
1 2 3 4 5 6 7 8 9 10 11 17 18 7a 1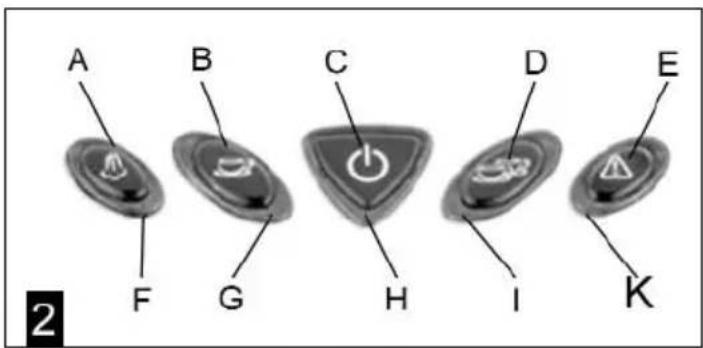
text_image
A B C D E F G H I K 2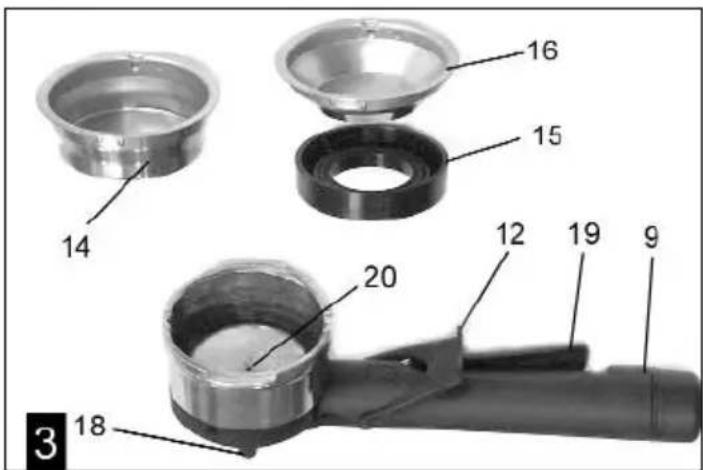
text_image
14 16 15 20 12 19 9 3 18Do not use the appliance or unplug it immediately when it is damaged or leaking or when any defect occurs after the appliance has accidentally dropped or something similar is suspected. In these cases have the appliance repaired.
Do not place the EspressoMaker onto hot surfaces, e. g. hot plate, etc. or near an open gas
flame, the housing might melt. Surfaces sensitive to water are not suitable as they might be damaged by water splashes.
Scalding danger due to hot water or steam. Never place the steam resp. hot water nozzle to the body direction. During the brewing, never try to remove the sieve holder.
Never switch on the appliance if the water container is not placed. Switch off the appliance prior to detaching the water container.
Scalding danger! During the operation, some parts of the EspressoMaker will become very hot. Avoid direct body contact with the hot components. During the operation, always use the handles and buttons designed for this purpose.
Pay attention that children do not have the opportunity to play with the appliance.
⚠️ Disconnect the appliance if it is not used for longer time.
Danger of frost! Since you already taken the appliance into operation, i.e. filled it with water, it may only be used and stored in frost-free rooms. Otherwise the appliance might get damaged.
Usage
With the EspressoMaker, you can prepare 1 or 2 cups of espresso within very short time. The pressure of 15 bar ensures a rich crema. You can use every usual coffee sort. There are special coffee sorts for espresso machines. Just try different sorts in order to find out your favourite. You can use the coffee freshly ground or as coffee soft pods (hard pods with a diameter of 45 mm or soft pods with a diameter of up to 70 mm).
On the pre-warming plate (2), you can warm up the cups in order to enjoy the coffee with an optimum temperature. With the swivelling hot-water / steam nozzle (6), you can froth up milk, warm up liquids or prepare hot water.
Putting into operation
Place the appliance onto a stable and water-resistant surface.
Prior to first use it is recommended to clean the water container (4), the sieve holder (9) with sieve attachments (14) (16) and the adapter (15) with washing-up liquid and rinse it with clean water afterwards.
It is not allowed to press the ON / OFF button (C) before you have not bled it as described as follows.
Vent / Rinsing
Prior to first operation of the EspressoMaker, or when it is not used for a longer time, it has to be vent resp. rinsed prior to switching on. For this purpose, make ready a collecting bowl which has a capacity of at least 700 ml. Take out the water container (4) at the handle from the insert, and open the lid (3) in order to fill in water.
Only fill cold fresh water in it, never carbonated water or another liquid, e. g. milk etc.
If filled up to the max marking, the capacity is sufficient for approx. 20 cups à 35 ml/each.
Place back the water container (4) into the insert in the appliance and firmly press it downwards.
Connect the connection cord into an earthed socket and open the steam valve (5) by rotating the turning knob counter clockwise.
Now push the rinsing button (E). The pump works audibly and the readiness for brewing illuminates (K). As soon as some water came out from the hot water/steam nozzle (6) into the collecting bowl, close the steam valve (5) and place the collecting bowl under the brewing head (8). After the system has been filled completely, the appliance switches off automatically.
Heating up ⏻
Firstly place the adaptor (15) into the sieve holder (9) and afterwards place the one-cup-sieve (16).
Place the 2-cups-sieve (14) into the sieve holder (9).
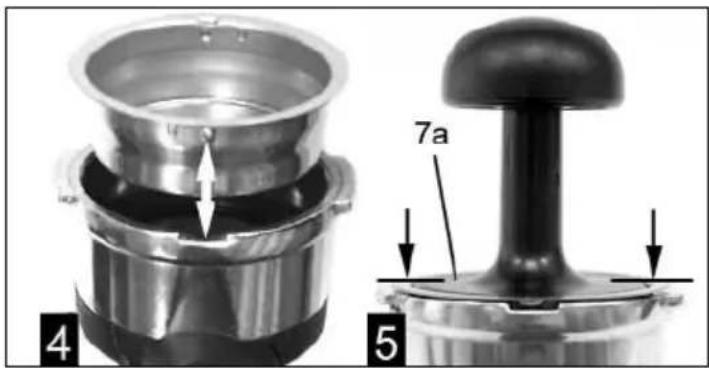
The sieves must be placed exactly in the position shown in picture 4 i.e. the markings must be in line with the handle.
Place the sieve holder (9) in the position shown in picture 6 from the bottom on the brewing head / unit (8) and turn it anti-clockwise if it is not alined correctly it will be hard to turn, and there is a danger that the thread gets damaged and the brewing chamber is leaking. In this case you should take it off and place it again.
Press the ON / OFF button (C). The operation indicator (H) illuminates. When the brewing readiness indicator (K) changes from flashing to steady light, the brewing temperature is reached. The brewing system, as well as the cups on the pre-warming plate (2) need approx. 10 minutes up to the optimum temperature.
text_image
4 7a 5Brewing of coffee


Before brewing the first cup start a passage without coffee powder. For this purpose press the start button (B). The heating system will be filled up with fresh water and the sieve holder will be preheated. Afterwards prepare the brewing as follows:

Fill in a level portioning spoon (17) coffee powder into the sieve (16).

Fill in 1 12 a level portioning spoon (17) coffee powder into the sieve (14).
Press on firmly the coffee powder by the coffee tamper (7), in a way that its plate (7a) is leveled with the above edge of the sieve, as shown in picture 5 Remove the powder residues on the edge of the sieve.

text_image
Three-step diagram showing a coffee maker using a tool, labeled with parts 6, 7, and 8, and numbered annotations.Place the sieve holder (9) in the position shown in picture 6 from the bottom on the brewing head (8) and screw it anti-clockwise
Advice: If you put too much powder, the sieve holder (9) will not fit on the brewing head / unit.

Place one pre-warmed espresso cup under the outlets (18) in the middle of the grating (10). Press the start button (B). After approx. 10 seconds, your espresso is ready.

Place two pre-warmed espresso cups respectively under one outlet channel (18) each on the
grating (10). Press the start button (D). After approx. 20 seconds, your espresso is ready.
After brewing, turn the sieve holder (9) clockwise and detach it from the brewing head / unit.
Push the sieve holder (12) with the thumb against the sieve edge. In this way you avoid that the sieve falls out during the knocking out. Rinse the sieve and the sieve holder (9).
⚠️Check regularly that the outlet valve (20) is not blocked. Thereby, press several times the valve button (19).
Coffee from coffee soft pods

You can use hard pods with a diameter of 45 mm or soft pods with a diameter of approx. 70 mm.
Firstly, lay down the adaptor (15) into the sieve holder (9) and afterwards the 1-cup-sieve (16). Press firmly the pod by the tamper (7), so that its disc (7a) closes with the sieve top edge, like shown in picture 5. The further preparation is made as above-described for one cup.
Steam

Attention: The hot-water / steam nozzle (6) can become very hot. There is scalding danger. Avoid direct body contact and do not direct the nozzle to persons! With the hot-water / steam nozzle (6), you can froth up milk or warm up liquids.
Observe the following steps:
- The machine is ready for brewing.
- Press the steam button (A). When the steam readiness indicator (F) changes from flashing to the steady light after approx. 25 up to 35 s, the steam readiness is reached.
- Firstly open the steam valve (5) for 2 - 3 seconds and let the remaining water run out in a bowl. When opening the valve the next time, only the steam comes out.
- For heating up resp. frothing, immerse the swivelling hot-water / steam nozzle (6) into the liquid.
- Open the steam valve (5) and move slowly the container with liquid up and down. After approx. 20 s, the steam intensity reduces considerably.
- Only after the steam valve (5) is closed again, remove the nozzle (6) from the liquid.
- After having taken the steam, the steam button
(A) has to be pressed again in order to re-fill the heating system.
Attention! Some hot water might drip from the brewing head (8).
- As soon as the brewing readiness indication (K) changes to steady light, the machine is again ready for brewing.
Cleaning of the hot-water / steam nozzle
After every use, the hot-water / steam nozzle (6) has to be cleaned.
For this, please observe the steps described in the section steam.
However, immerse the nozzle (6) completely into clear water during the steaming.
Afterwards, you can still take one cup of hot water.
7 Turn the nozzle (6) clockwise to 14 , by this it can be removed. The now visible nozzle tube (21) can also be withdrawn for cleaning.
Hot water
Attention: The hot-water / steam nozzle (6) can become very hot. There is danger of scalding. Avoid direct body contact and never direct the nozzle to persons!
Take the following steps:
- The machine is ready for brewing.
- Put the cup to be filled under the hot-water / steam nozzle.
- Open the steam valve (5) and press immediately afterwards the start button (D) (approx. 120 ml hot water).
- After the automatic switch off of the pump, the steam valve (5) has to be closed again.
- As soon as the brewing readiness indicator (K) changes to steady light, the machine is again ready for brewing.
Advice for the water container
Please pay attention that there is always sufficient water quantity in the water container (4). If the pump sucks air / works when the water container is completely empty, it does not switch off automatically any more. In this case, switch off the appliance with the ON / OFF button (C) and bled/de-aerate it afterwards.
Take the following steps:
-
Switch the appliance on by the ON / OFF switch (C).
-
Put one cup under the hot-water / steam nozzle (6).
- When the brewing readiness indicator (K) changes from flashing to steady light, open the steam valve knob (5).
- Press the start button (D).
- After the pump has automatically switched off, the steam valve (5) has to be closed again.
- As soon as the brewing readiness indicator (K) changes from flashing to steady light, the machine is again ready for brewing.
De-scaling
The appliance must be de-scaled regularly. For this purpose use the special de-scaling agent durgol® swiss espresso® which is available in selected specialist retailers. If you wait too long with de-scaling, damage of the heating system is not excluded.
The following indications are guidelines. When the crema of the coffee is no longer rich or when the coffee amount starts to reduce with the same adjustment, you have to de-scale earlier.
hardness hardness descaling intervals degree
1 soft 0 - 7° dH 700 up to 1000 cups
2 middle >7 - 14° dH 500 up to 600 cups
3 hard >14 - 21° dH 300 up to 400 cups
4 very hard >21° dH 200 up to 250 cups
1° dH corresponds to approx. 0,18 mmol/l Ca and Mg Ions You can inquire about the hardness degree in your living area at the corresponding waterworks or at the local administration.
⚠️We assume no guarantee for damages which arise through non-observance of the de-scaling instructions.
⚠️Pay attention that no damages are caused by a careful handling with the de-scaling solution.
The complete de-scaling and rinsing procedure takes approx. 20 minutes.
Take the following steps:
- Remove the sieve holder (9).
- Place a collection bowl with a capacity of at least 700 ml under the outlet / brewing head (8).
- Fill in one portion (125 ml) durgol ^® swiss espresso ^® and 1 liter of water into the water container (4).
-
Shortly press the rinse button (E). The de-scaling solution is pumped into the system and it runs from the brewing unit (8) into the collection bowl.
-
Place the emptied collection bowl under the hot-water / steam nozzle (6) and open the steam valve (5).
- Shortly press the rinsing button (E). The de-scaling solution is pumped through the system and runs from the hot-water / steam nozzle (6) into the collecting bowl.
- Place the priorly rinsed water container (4), filled with fresh water up to the max-marking, onto the appliance.
- Put the emptied collection bowl under the brewing
unit (8) and close the steam valve (5).
- Shortly press the rinsing button (E). The rinsing water runs into the collection bowl.
- Fill the water container (4) again up to the max-marking, place the emptied collection bowl under the hot-water / steam nozzle (6) and open the steam valve (5).
- Push the rinsing button (E). The rinsing water runs into the collecting bowl.
- After the water has passed, close the steam valve (5). The de-scaling procedure is finished.
Help if faults occur
| Problem Possible cause Solution | ||
| No coffee comes out. The water container (4) is empty. Fill fresh water into the water container. | ||
| The first cup doesn't fill sufficiently. | The heating system wasn't filled up with fresh water after switching-on. | Start a passage without coffee powder before brewing of each first cup. |
| Coffee runs out on the top of the sieve holder (9). | The sieve holder (9) is not properly placed on the brewing unit / head (8). | Place the sieve holder (9) properly. |
| The sieve holder (9) is not placed tightly on the brewing unit / head (8). | The sieve holder (9) is only dense when it is turned anti-clockwise on the brewing head until it is tightly positioned. | |
| There is no adapter (15) when brewing with the 1-cup-sieve. | Use the adapter (15) when brewing with the 1-cup-sieve. | |
| The coffee is too cold. | The cups are not pre-heated. | Use pre-heated cups.Rinse the cups with hot water from the nozzle. |
| The pump is too loud. | The water container (4) is empty. | Fill the water container with fresh water. |
| The water container (4) is not properly placed. | Push the water container in the appliance somewhat downwards. | |
| Intensity of coffee is not sufficient, with a poor crema | You used too little coffee powder. | Use more coffee powder. |
| The coffee powder is not tamped enough. | Press the powder tightly with the coffee tamper (7). | |
| The coffee powder is not ground fine enough. | Use more finely ground coffee. | |
| The coffee runs out too slowly. | The coffee powder is ground too finely. | Use somewhat less finely ground coffee. |
| The milk froth does not succeed. | The milk is not cold enough. | Use cold milk directly from refrigerator. |
| The hot-water / steam nozzle (6) is not clean. | Clean the hot-water / steam nozzle (6) after every use. | |
Cleaning and Maintenance
⚠️ Unplug the appliance prior to cleaning.
⚠️ The appliance must not be immersed into water.
⚠️ Check regularly on the sieve holder (9) that the outlet valve (20) is not blocked. Thereby push several times the valve button (19).
In the detachable collecting bowl (11) there is a red float. It juts out of the grating (10) when the bowl is too full and when it has to be emptied.
The water container (4), sieve holder (9) and the collecting bowl with float (11) can be rinsed in water with some washing-up liquid. Afterwards rinse well with clear water and rub them dry.
The sieves (14) and (16), the adapter (15), the hot-water / steam nozzle (6), the nozzle tube (21) and the grating (10) are dishwasher-proof.
The outlet sieve on the brewing head has to be cleaned at least twice a year. Use a screw driver in order to unscrew it from the brewing head (8). Brush down the sieve in water with some washing-up liquid. Unblock the clogged holes with a needle. Afterwards, screw it tightly again on the brewing head outlet.
Wipe out the appliance at the outside with a damp cloth only with some washing-up liquid. Afterwards rub it dry. Do not use any caustic or scouring cleaning agents - otherwise the surface would be damaged.
For UK use only
- This product is supplied with a 13 A plug conforming to BS 1363 fitted to the mains lead. If the plug is unsuitable for your socket outlets or needs to be replaced, please note the following. If the plug is a non-rewireable one, cut it from the mains lead and immediately dispose of it. Never insert it into a socket outlet as there is a very great risk of an electric shock.
- The replacement of the plug at the mains lead has to be done according to the following instructions:
Warning - This appliance must be earthed
Important: The wires in this mains lead are coloured in accordance with the following code:
green / yellow: Earth
blue: Neutral
brown: Live
As the colours of the wires in the mains lead of this appliance may not correspond with the coloured markings identifying the terminals in your plug, proceed as follows:
- the wire which is coloured green and yellow must
be connected to the terminal which is marked with the letter E or by the earth symbol ⏻ or coloured green or green and yellow,
- the wire which is coloured blue must be connected to the terminal which is marked with the letter N or coloured black,
- the wire which is coloured brown must be connected to the terminal which is marked with the letter L or coloured red.
- If a 13 A (BS 1363) plug is used it must be fitted with a 13 A fuse conforming to BS 1362 and be ASTA approved. If any other type of plug is used, the appliance must be protected by a 10 A fuse either in the plug or adapter or at the distribution board. If in doubt - consult a qualified electrician.
- Never use the plug without closing the fuse cover.

The appliance complies with the European directives 73/23/EEC and 89/336/EEC.
At the end of its lifetime this product must not be disposed of through the normal domestic waste, but it should be handed to an assembly point for the recycling of electrical and elec-
tronical appliances. You can inquire about details at the local administration.
Special-Decalcifier durgol® swiss espresso®

text_image
durgol Durgol G toothpaste G toothpaste G toothpaste G toothpaste G toothpaste G toothpaste G toothpaste G toothpaste G toothpaste G toothpaste G toothpaste G toothpaste G toothpaste G toothpaste G toothpaste G toothpaste G toothpaste G toothpaste G toothpaste G toothpaste G toothpaste G toothpaste G toothpaste G toothpaste G toothpaste G toothPastedurgol® swiss espresso® is highly effective, easy and safe to use and guarantees so an effortless and quick decalcification without additional influential time. The regular use guarantees an optimal quality and extends the lifespan of your coffee machine. durgol® swiss
espresso® leaves no residues. If your coffee machine will be washed up after the decalcification as mentioned in the user instruction, you can make your coffee unhesitatingly.
Please also observe the comprehensive information for descaling with durgol ^® swiss espresso ^® as well as the warning instructions which can be found in the enclosed brochure of descaling. durgol ^® swiss espresso ^® is available at selected specialized retailers.
Avant utilisation
1 cuillère portions (17)
1 presse café (7)
text_image
A B C D E F G H I K 2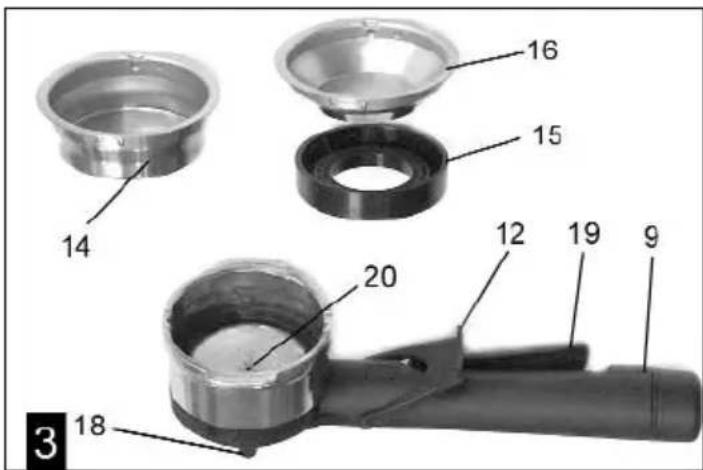
text_image
14 16 15 20 12 19 9 3 18text_image
A B C D E F G H I K 2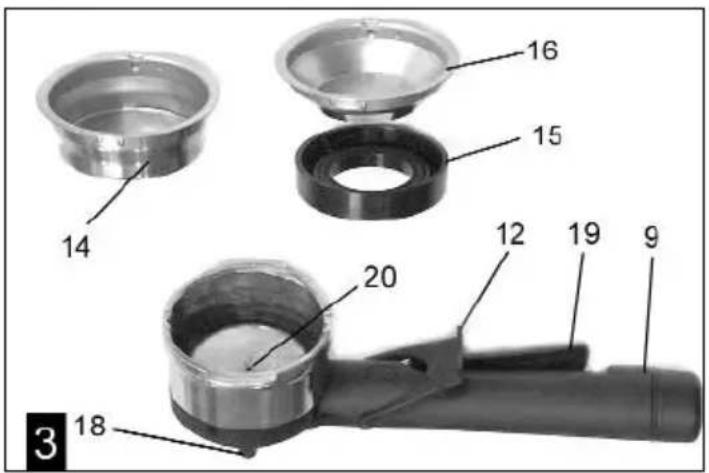
text_image
14 15 16 12 19 9 20 18 3text_image
Three-step diagram showing a hand using a blender with labeled parts: 6, 7, and 8, including a tool tip.text_image
A B C D E F G H I K 2
text_image
14 16 15 20 12 19 9 3 18text_image
A B C D E F G H I K 2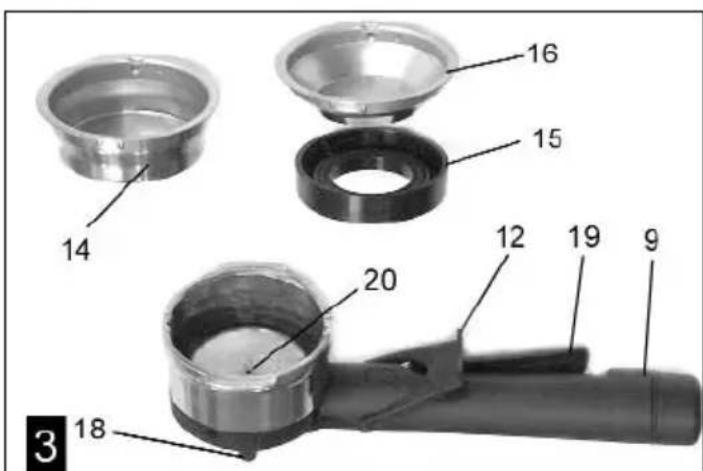
text_image
14 16 15 20 12 19 9 3 18hitte of olie.