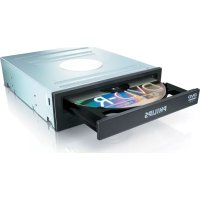
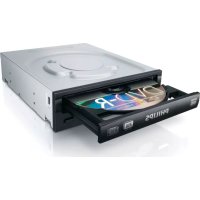
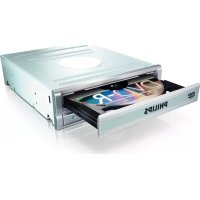
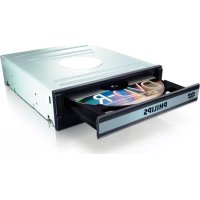
SPD3400CC - DVD Recorder PHILIPS - Free user manual and instructions
Find the device manual for free SPD3400CC PHILIPS in PDF.
| Product type | External DVD recorder |
| Dimensions | Approximately 140 x 140 x 20 mm |
| Weight | Approximately 300 g |
| Power supply | AC adapter (100-240V AC to 5V DC) or power via USB port |
| Main functions | DVD and CD burning and playback, creating video, audio and data discs, disc copying |
| Maintenance and cleaning | Clean discs with a soft cloth from the center to the edges; do not use chemicals or lens cleaning discs |
| Safety | Do not expose to moisture, heat or dust; install on a flat and stable surface; keep plastic bags away from children |
| Spare parts and repairability | Contact Philips customer service for assistance; updates available at www.philips.com/storageupdates |
| General information | Brand: Philips, Model: SPD3400CC, Compatible with Windows 98 SE/Me/2000/XP, requires a high-speed USB port |
Frequently Asked Questions - SPD3400CC PHILIPS
User questions about SPD3400CC PHILIPS
0 question about this device. Answer the ones you know or ask your own.
Ask a new question about this device
Download the instructions for your DVD Recorder in PDF format for free! Find your manual SPD3400CC - PHILIPS and take your electronic device back in hand. On this page are published all the documents necessary for the use of your device. SPD3400CC by PHILIPS.
USER MANUAL SPD3400CC PHILIPS
How to... for External ReWriters
us Install Guide
D Installationsanleitung
F Guide d'installation
Guida d'installazione
NL Installatiegids
E Guia de instalacion
PT Guia de Instalação
TR Kurulum Kilavuzu
PL Instrukcja montazu
Installationsguide
US
Contents
How to connect the External ReWriter to my computer? 5
How to disconnect the External ReWriter without shutting down the computer? 15
How to capture video from a digital DV-camcorder? 17
How to make a video disc from video files which are on the hard disk or a disc? 21
How to copy a disc? 27
How to make a Data disc? 31
How to make an Audio disc? 37
Warranty, Environment, Safety and Frequently Asked Questions (FAQ) 42
D
Inhalt
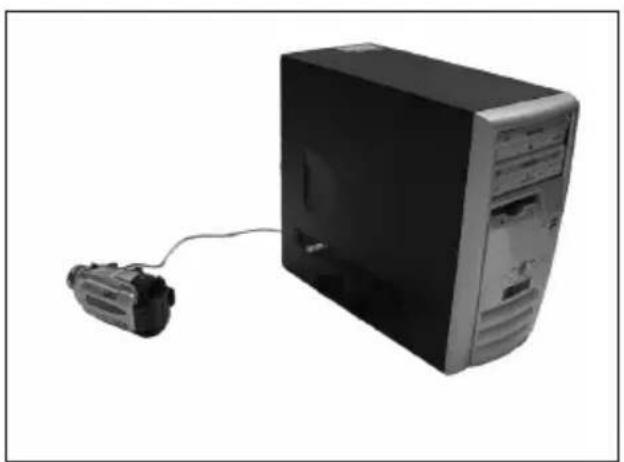
How to connect the External ReWriter to my computer?
The next pages show how to connect your new External ReWriter to a computer.
Since there are many brands and types of computers available, the next photographs show only examples on how your External ReWriter could be installed.
For specific information on your computer, please refer to your computer manual or contact your local dealer.
1
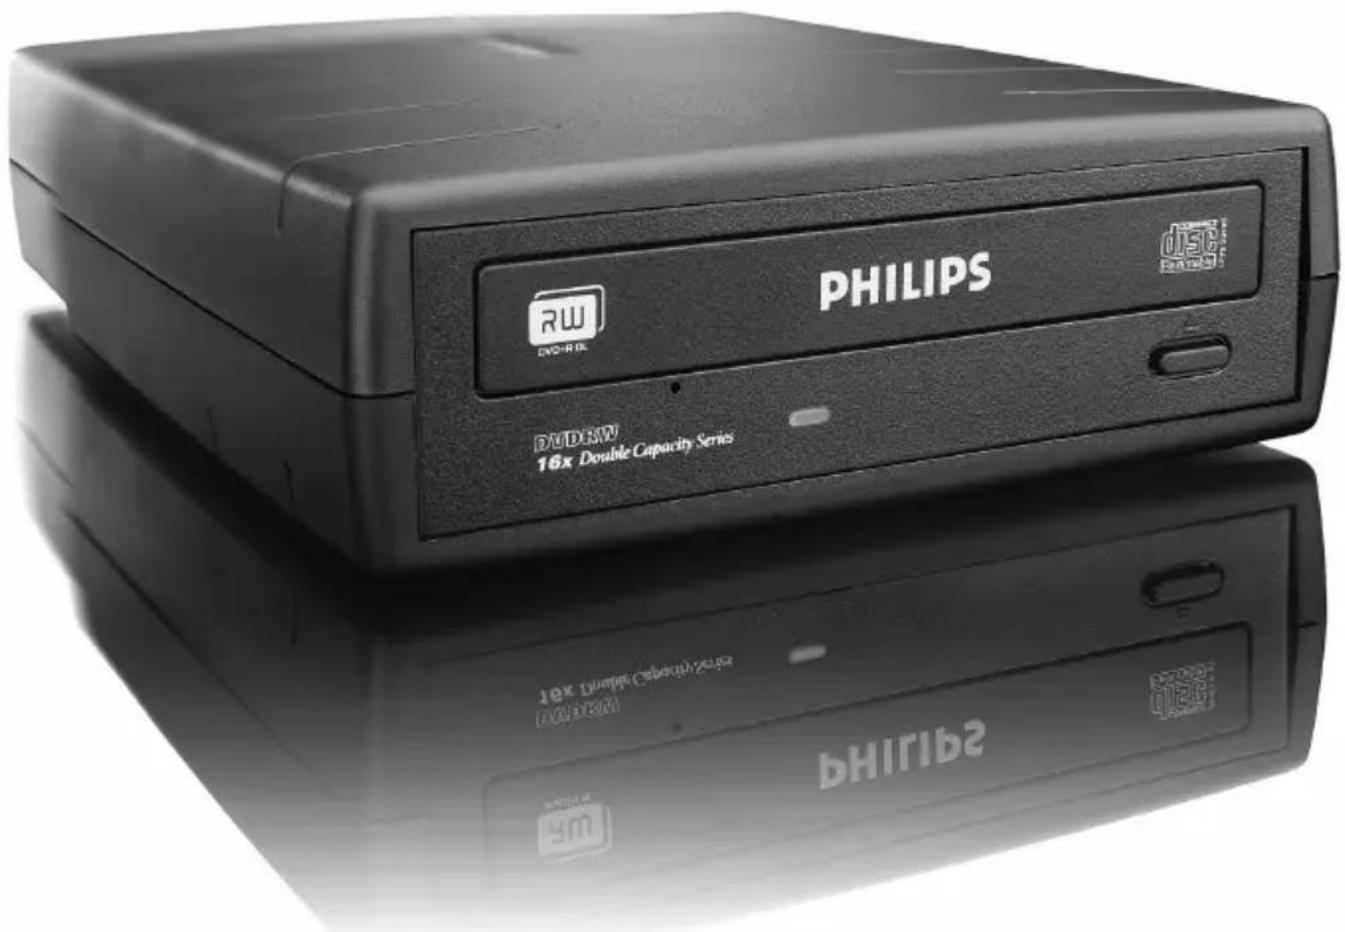
Us You will find an External ReWriter device and following cables in the retail box: A:External rewriter device. B:Power supply (2 parts). C: HiSpeed USB Cable.
A: Voeding.
B: HiSpeed USB.
C: Audioconnector.
3
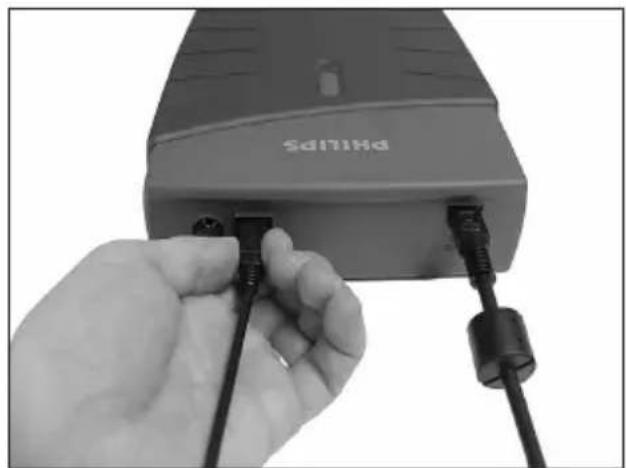
us Connect the power cables together and connect them to the External ReWriter and a power outlet.
D Verbinden Sie die Stromversorgskabel miteinander und mit dem Extemen Brenner und einer Steckdose.
Raccordez les cables d'alimentation l'un à l'autre puis branchez-les au Graveur DVD exter et a une prise secteur.
Collegate i cavi di alimentazione tra loro e collegateli tra il Masterizzatore esterno ed una presa elettrica.
NL Verbind de voedingskabels met elkaar en sluit ze daarna op de Extreme brander en op een stopcontact.

4
Plug the USB cable in the External ReWriter. Do not connect the cable to the computer at this moment.
D Verbinden Sie das USB-Kabel mit dem Extemen Brenner. Verbinden Sie das Kabel zu dieser Zeitpunkt nicht mit dem Computer.
F Branchez le cable USB au Graveur DVD externe. Ne branchez pas le cable à l'ordinateur pour le moment.
Collegate il cavo USB alle Masterizzatore esterno. Non collegate alla il cavo al computer.
NL Sluit de USB-kabel op de Externe brander aan. Sluit dit kabeltje nog Niet op uw computer aan.
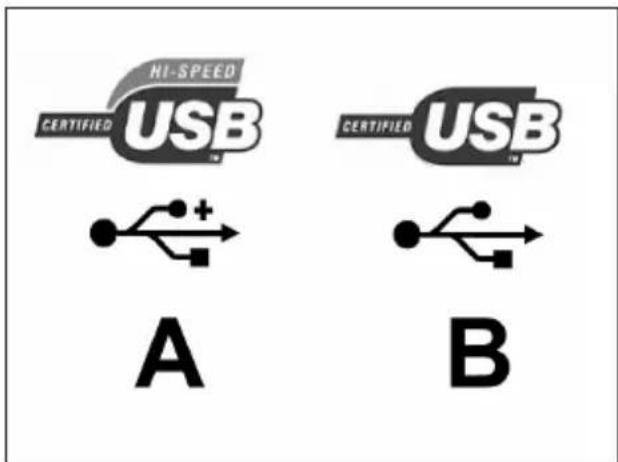
us Search for the HiSpeed USB connector on your PC. A: Logo for the preferred HiSpeed USB or connector. B: Logo for the alternative LowSpeed USB connector. When connected to LowSpeed USB (or USB 1.x), speeds are limited (4x writing and 6x reading on CD, 0,7x reading on DVD) and it is not possible to write on DVD or to watch video.
us Identify your Operating System by right clicking on "My Computer" and choosing "Properties". When you are using Windows 98 Second Edition, please go to step 11, otherwise continue with step 7.
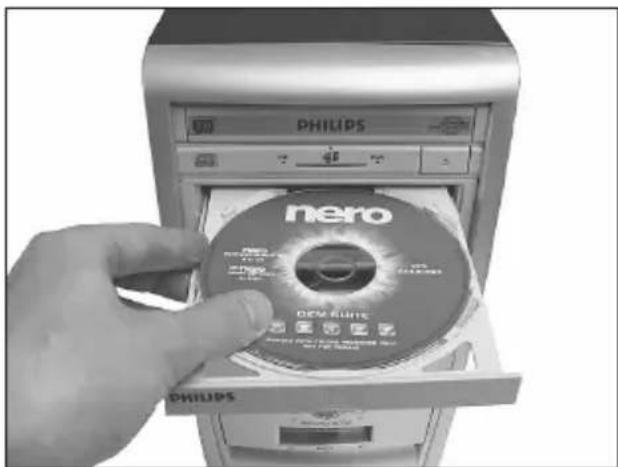
us Insert the Nero Disc in the External ReWriter. Go to step 15!
D Legen Sie die Nero-CD in den Extenen Brenner-Laufwerk ein.
Fahren Sie mit Schritt 15 fort!
F Insérez le disque Nero dans le Graveur DVD externe. Passez à l'étape 15.
1 Inserte il disco di Nero nel Masterizzatore esterno. Procedete al punto 15!
NL Leg de Nero-CD in de Externe brander. Gaaar stap 15!
12 Us Windows 98 Second Edition only! Wait until this screen pops up.
D Nur Windows 98 Second Edition! Warten Sie, bis diese Anzeige erscheint.
F Windows 98 Deuxieme Edition uniquement!
Attendez que cet écran apparaisse.
Solo per Windows 98 Second Edition!
Attendete la comparsa di esta finestra.
NL Alleen voor Windows 98 Tweede Edition! Wacht tot het volgende scherm verschijnt.
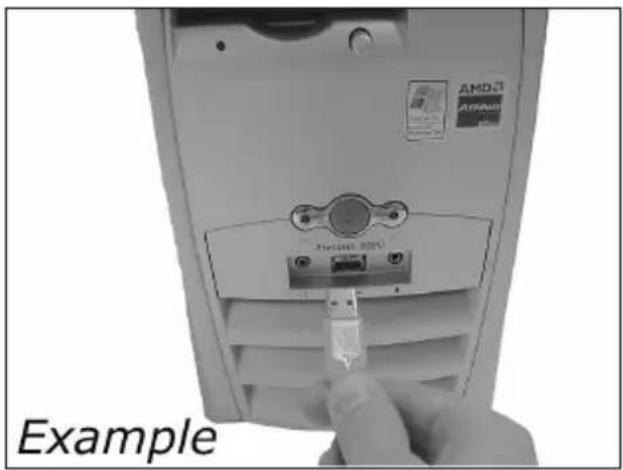
13 US Windows 98 Second Edition only! Connect the USB cable to the computer.
D Nur Windows 98 Second Edition! SchlieBen Sie das USB-Kabel an den Computer an.
F Windows 98 Deuxieme Edition uniquement! Branchez le cable USB à l'ordinateur.
Solo per Windows 98 Second Edition! Collegate il cavo USB al computer.
NL Alleen voor Windows 98 Tweede Edition! Sluit de USB-kabel op de computer aan.
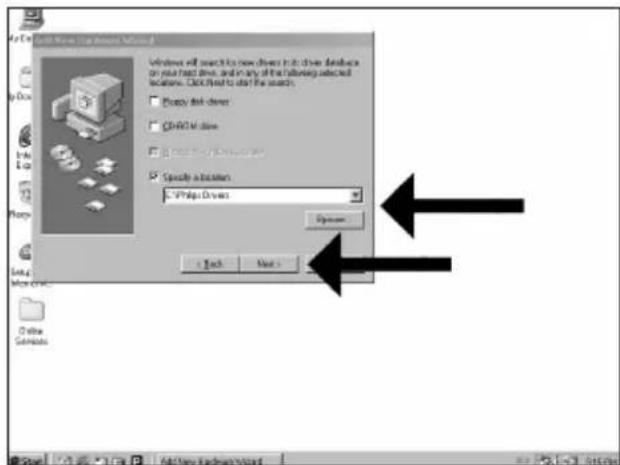
Windows 98 Second Edition only! The "Add New Hardware Wizard" will pop up. Follow these steps:
A. Click "Next" in "The wizard searches for new drivers....".
B. Choose "Search for the best drivers...".
C. Choose "Specify a location".
D. Browse to the directory "Philips drivers" on the Nero disc and click Next.
E. The drivers will be installed.
F. Continue with step 15.
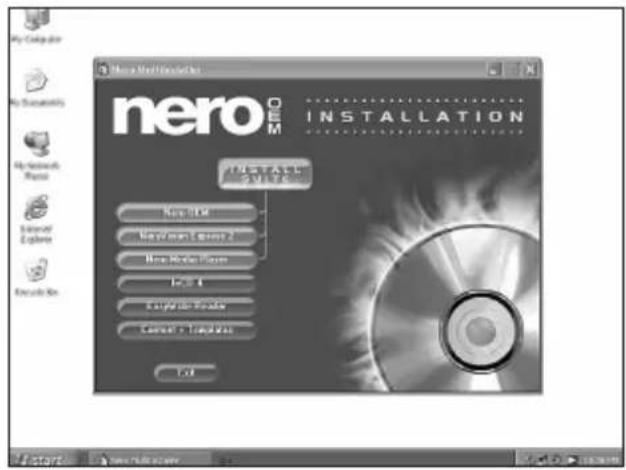
us Click on "Install Suite" to install the main software.
The software will ask to reboot the PC at the end of the installation process.
Us Remember the typenumber of your External ReWriter, which is located on the sticker on the bottom of the device.
This model number will allow you to find easily information and updates on the Philips website. Find more info on www.philips.com/storage Find updates on www.philips.com/storageupdates
Us After installing the software, you should reboot your computer.
Congratulations. Your Philips device is now ready for use.
How to use it and what software applications you need to perform your tasks, is described in the next chapters of this How To Manual.
How to disconnect the External ReWriter without shutting down the computer?
The next pages show how to disconnect your new External ReWriter to a computer. The screenshots are representing the Microsoft Windows XPTM operating system. Other operating systems may show different popups.
1
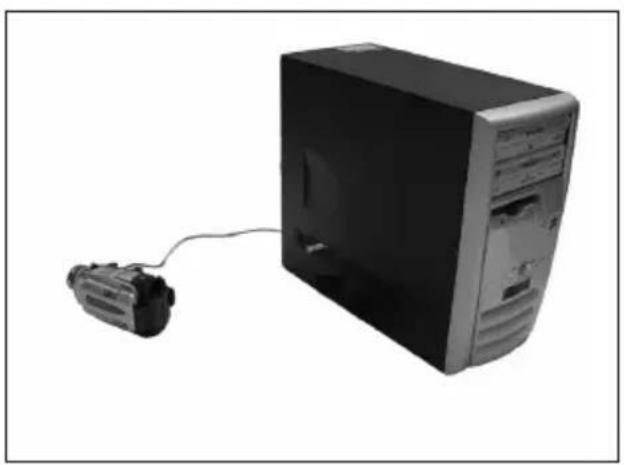
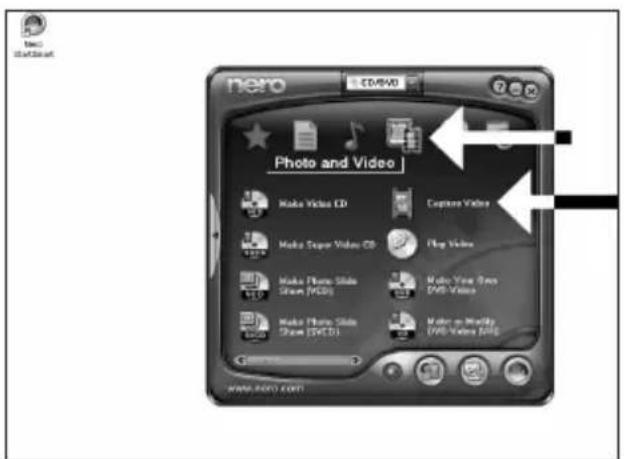
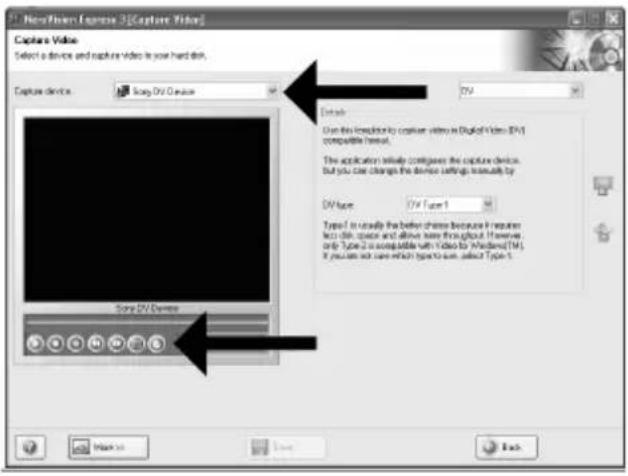
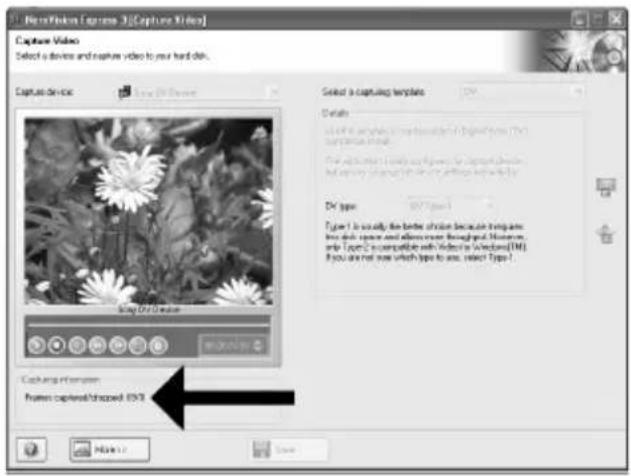
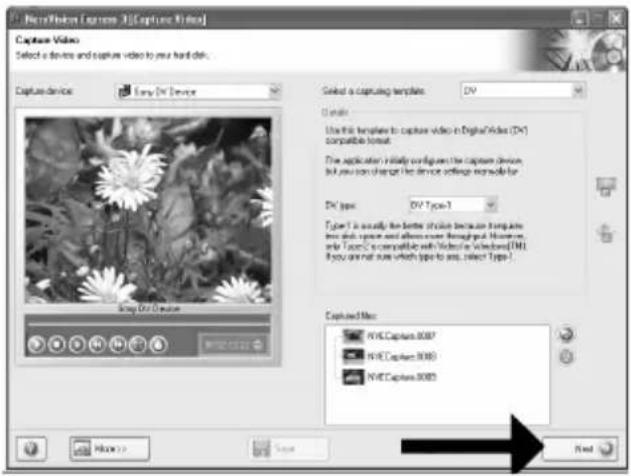
How to capture video from a digital DV-camcorder?
This manual shows an example on how to capture video from a digital DV-camcorder which is connected via FireWire (IEEE1394) to the computer.
#
The application software used here is: Nero Vision Express from Nero AG
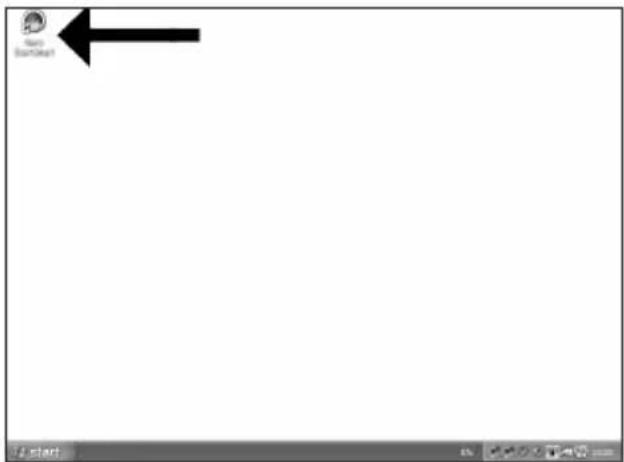
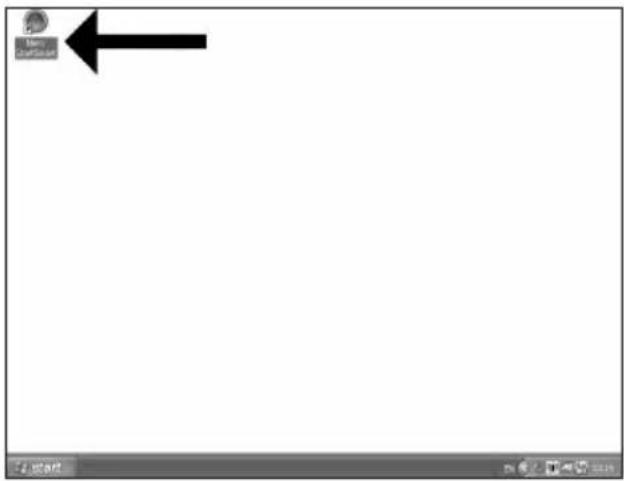
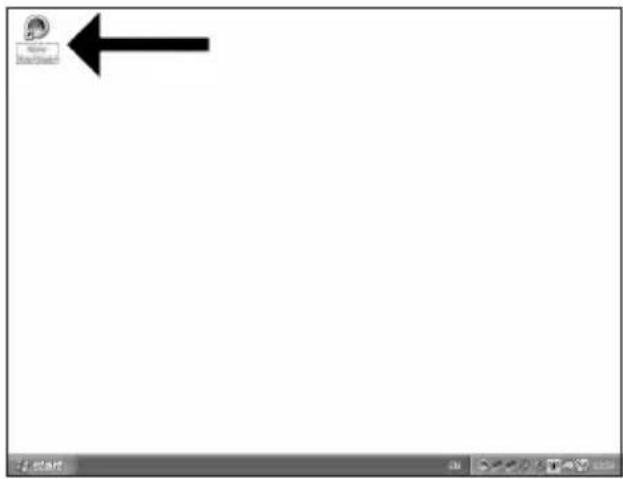
us Start "Nero StartSmart" from the desktop.
1
D Starten Sie "Nero StartSmart" von Ihrer Oberfläche aus.
F Lancez "Nero StartSmart" depuis le bureau.
Aprire "Nero StartSmart" dal desktop.
NL Start "Nero StartSmart" vanaf het bureaublad.
2
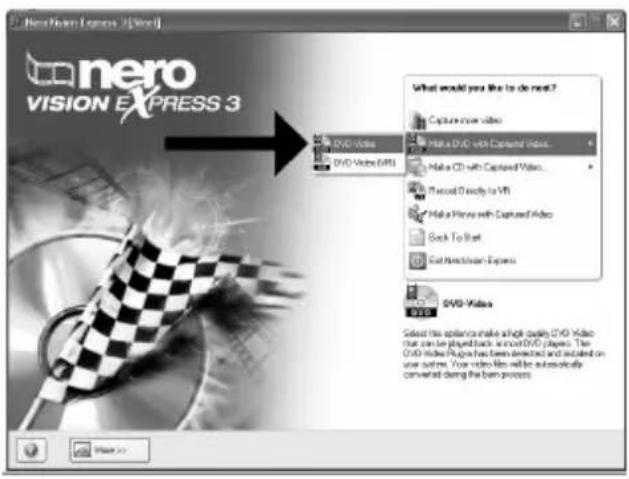
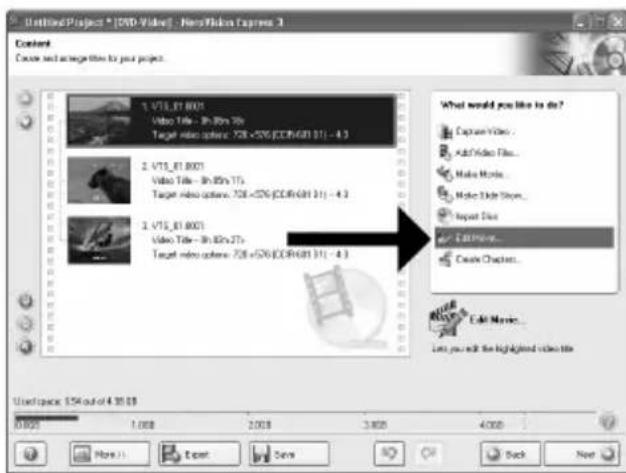
How to make a video disc from video files which are on the hard disk or a disc?
This manual will show you how to make a DVD-Video from source files which are stored on your hard disc or on one or more discs and that can be played in most DVD-players. A DVD Video is a DVD disc with video files in a special format, which you can play on a DVD Video Player or on a DVD-ROM.
#
The application software used here is: Nero Vision Express from Nero AG
1
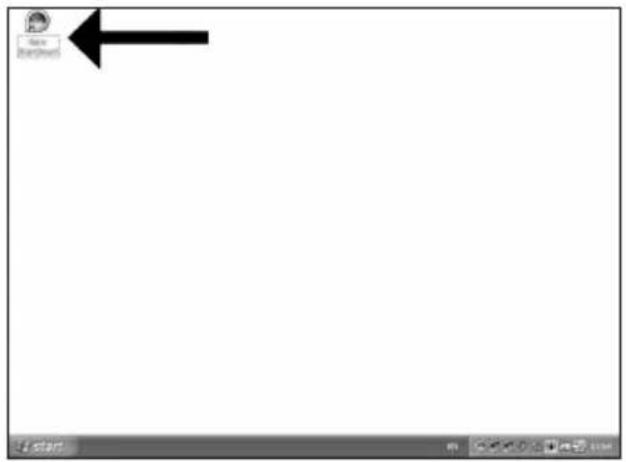
us Start "Nero StartSmart" from the desktop.
D Starten Sie "Nero StartSmart" von ihrer Oberfläche aus.
F Lancez "Nero StartSmart" depuis le bureau.
Apire "Nero StartSmart" dal desktop.
NL Start "Nero StartSmart" vanaf het bureaublad.
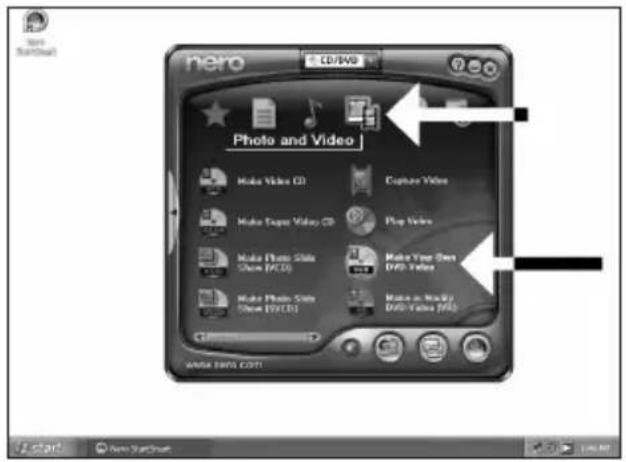
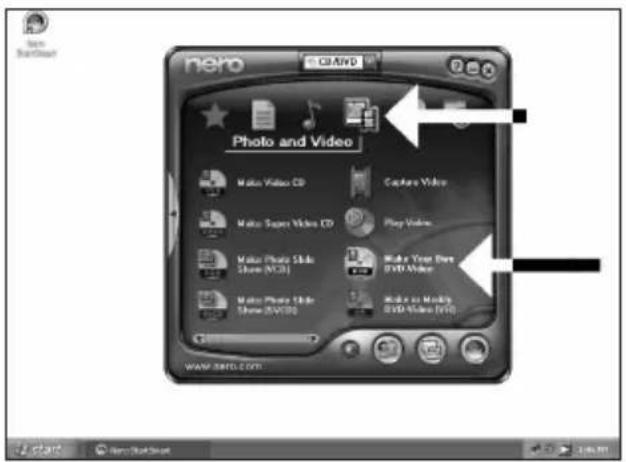
Us Choose "Photo and video" and "Make DVD-Video".
D Wahlen Sie "Foto und Video" und "Eigenes DVD-Video erstellen".
F Choisissez "Photo et video" puis cliquez sur "Créer votre propre DVD-video".
Selectionare "Foto e video" e "Creare il proprio DVD-Video".
NL Kies "Foto en video" en dan "Maak uw eigien DVD-Video".
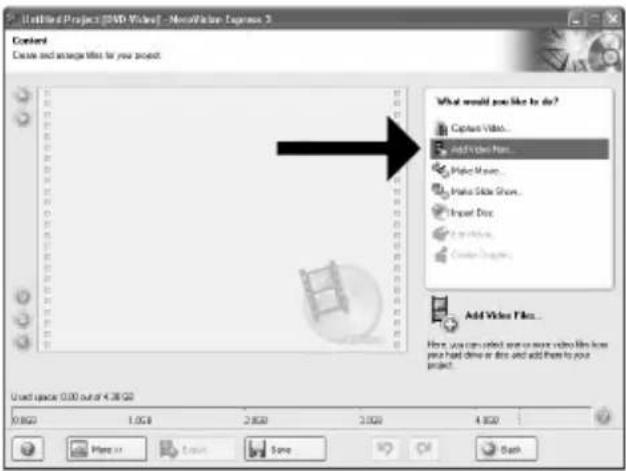
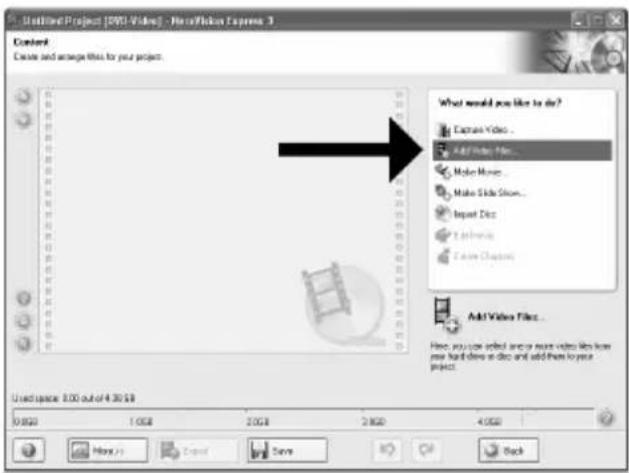
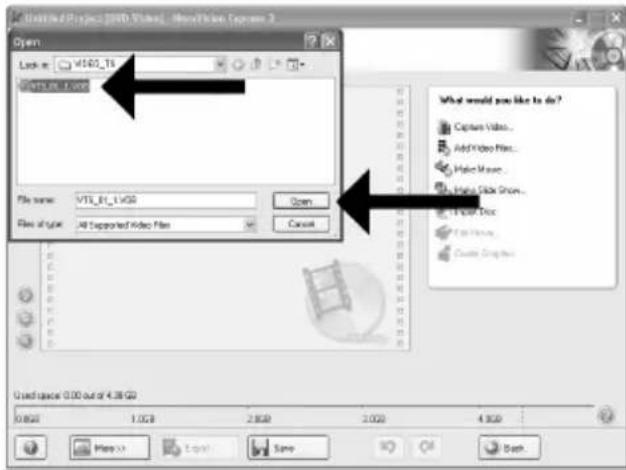
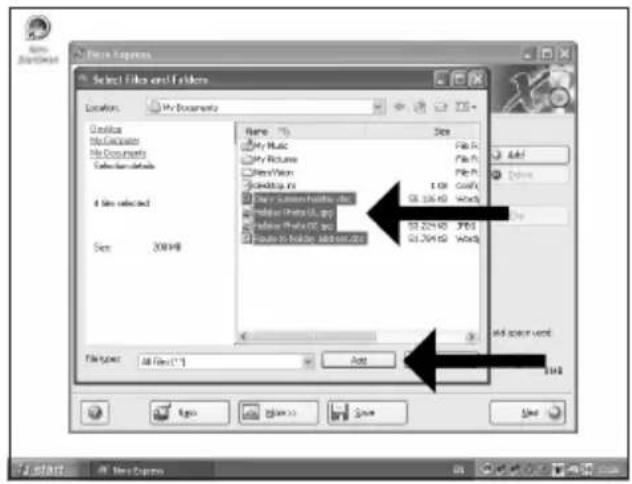
US Choose "Add Video files".
Wahlen Sie "Video-Dateien hinzufugen".
F Choisissez "Ajouter des fichiers video".
1 Selezionare "Aggiungi file video".
NL Kies "Videobestanden toevoegen".
2
3
4
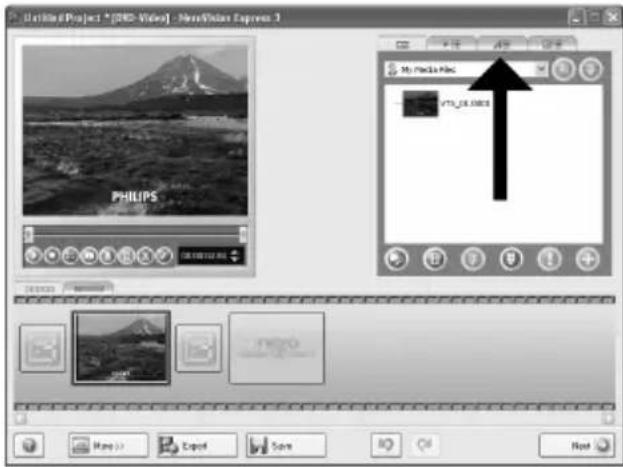
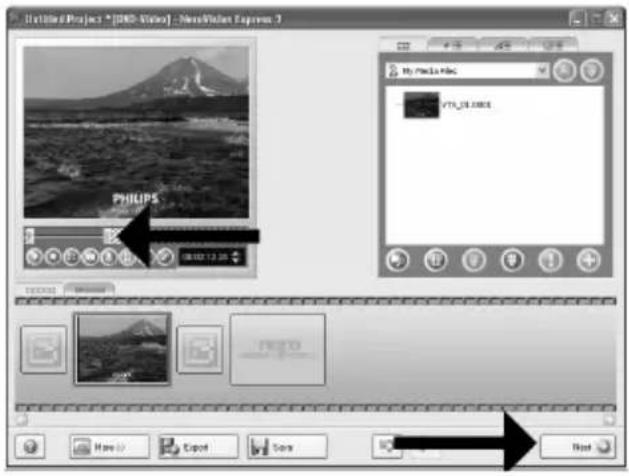
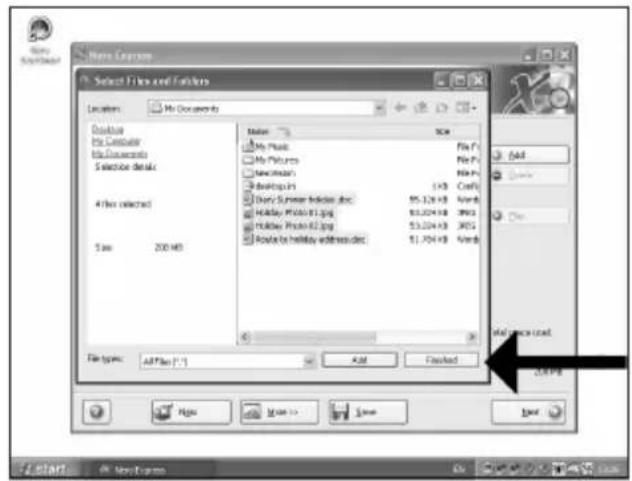
10 Us You can change the layout, the background, add titles, ... here. When done, choose "Next".
11 You can preview the finished movie by pressing on the thumbnails. When done, choose "Next".
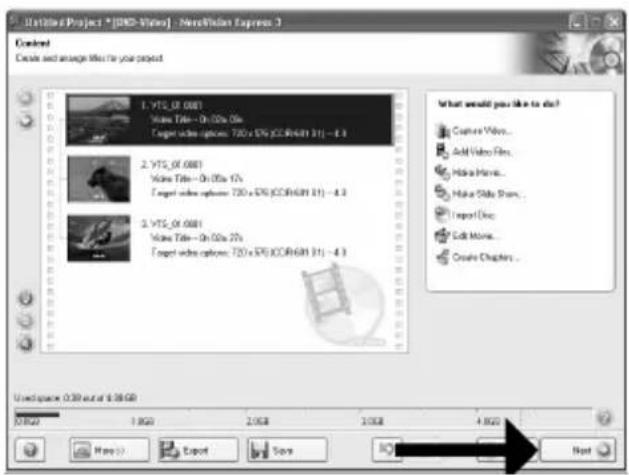
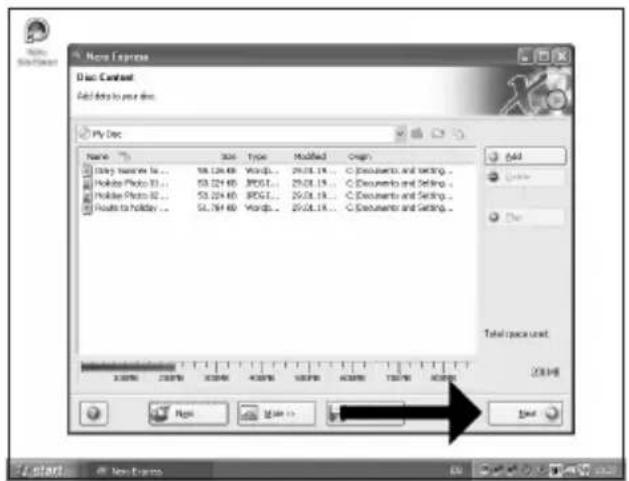
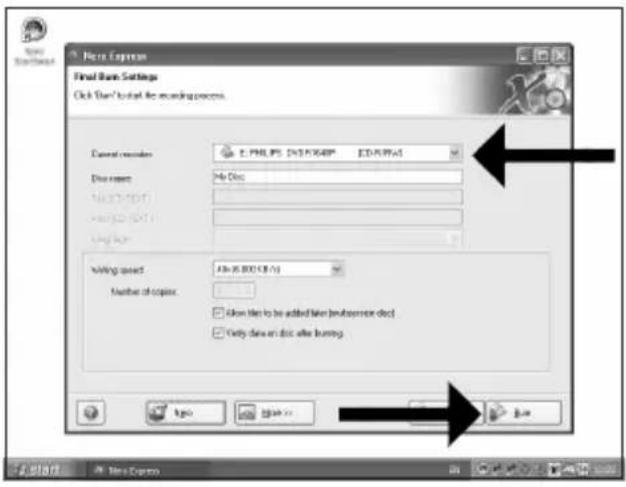
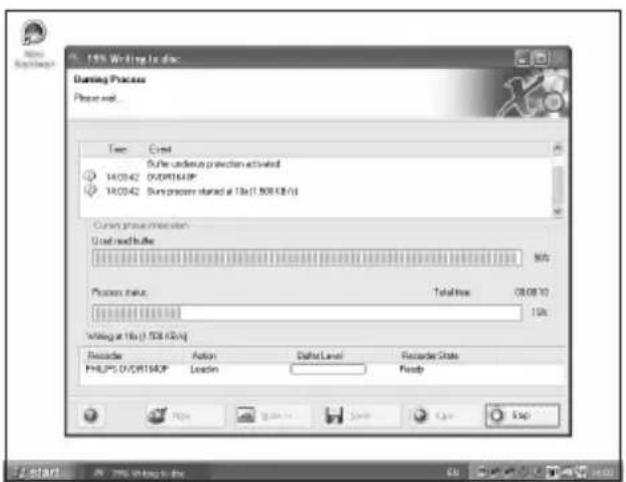
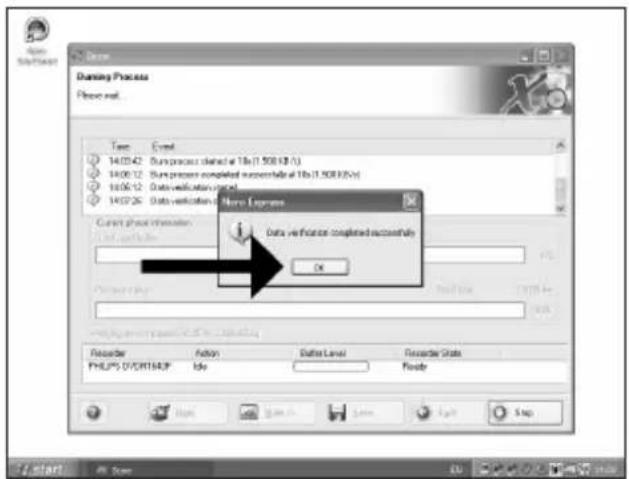
12 Choose "Bum to", choose your recorder and choose "Burn".
This manual shows an example of how to copy a disc.
#
The application software used here is: Nero - Burning Rom from Nero AG
us Start "Nero StartSmart" from the desktop.
D Starten Sie "Nero StartSmart" von ihrer Oberfläche aus.
F Lancez "Nero StartSmart" depuis le bureau.
Apriere "Nero StartSmart" dal desktop.
NL Start "Nero StartSmart" vanaf het bureaublad.

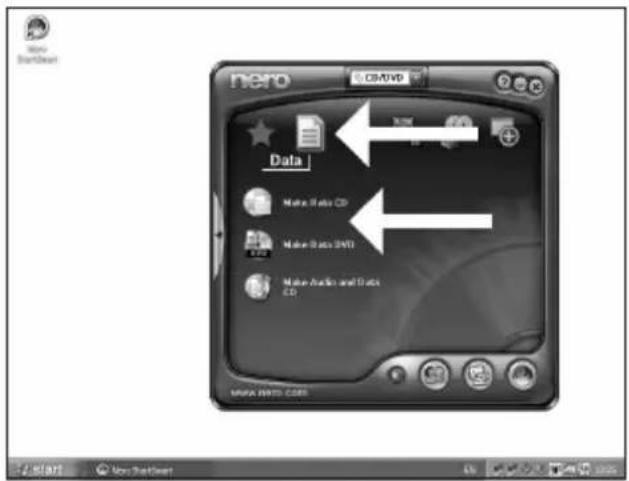
How to make a Data disc?
This manual shows you an example of how to make a Data disc.
#
The application software used here is: Nero - Burning Rom from Nero AG

us Start "Nero StartSmart" from the desktop.
D Starten Sie "Nero StartSmart" von ihrer Oberfläche aus.
F Lancez "Nero StartSmart" depuis le bureau.
Apriere "Nero StartSmart" dal desktop.
NL Start "Nero StartSmart" vanaf het bureaublad.
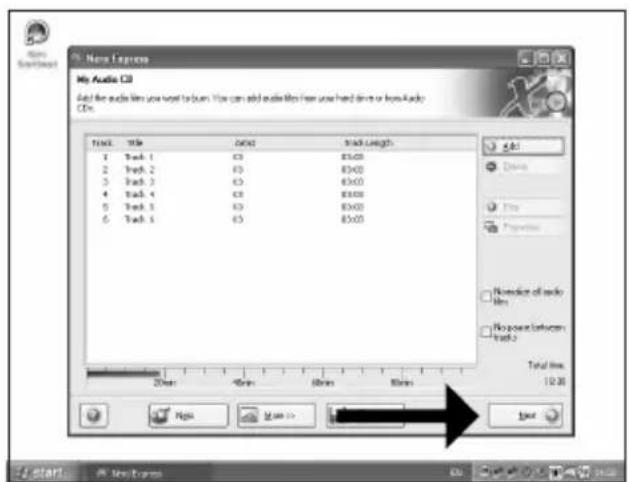
How to make an Audio disc?
This manual shows you an example of how to make an Audio disc which can be played in any CD-Player
#
The application software used here is: Nero - Burning Rom from Nero AG

1
us Start "Nero StartSmart" from the desktop.
D Starten Sie "Nero StartSmart" von ihrer Oberfläche aus.
F Lancez "Nero StartSmart" depuis le bureau.
Apriere "Nero StartSmart" dal desktop.
NL Start "Nero StartSmart" vanaf het bureaublad.
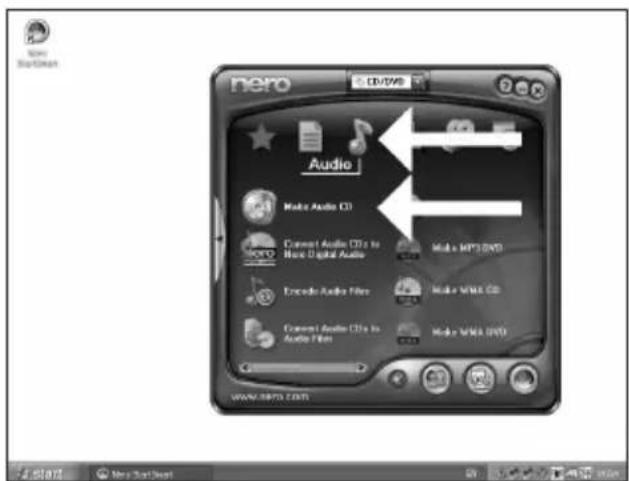
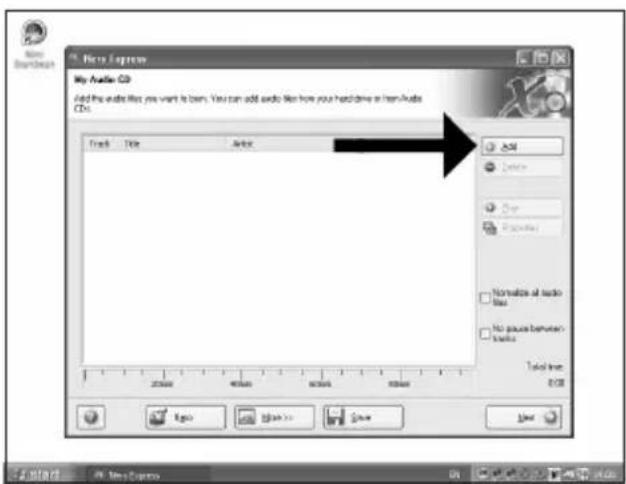
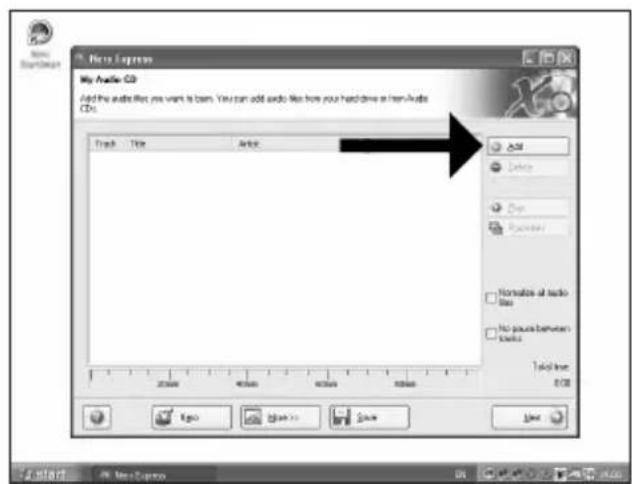
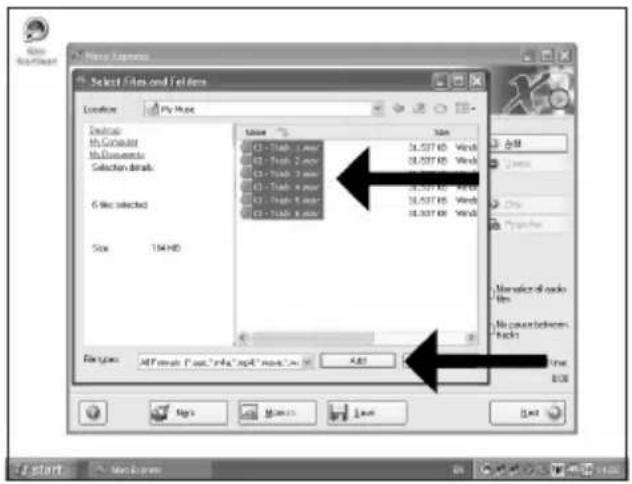
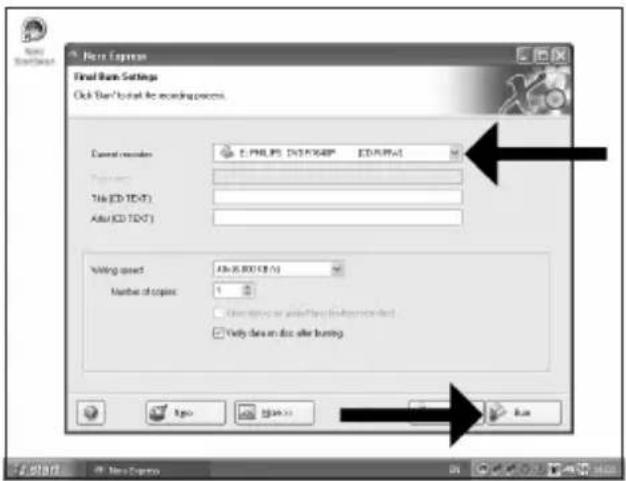
us Choose "Audio" and "Make Audio CD".
2
Wahlen Sie "Audio" oder "Audio CD erstellen".
F Choisissez "Audio" puis "Creer un CD audio".
1 Selezionare "Audio" e fareDIC su "Crea CD audio".
NL Kies "Audio" en dan "Audio-cd make".
3
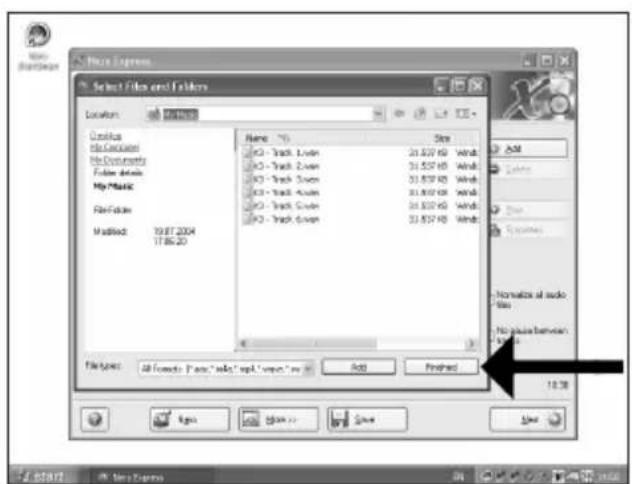
us Click "Add".
D Klichen Sie auf"Hinzufugen".
F Cliquez sur "Ajouter".
Fare cli su "Aggiungi".
NL Klik op "Toevoegen".
4
Warranty, Environment, Safety and Frequently Asked Questions (FAQ)
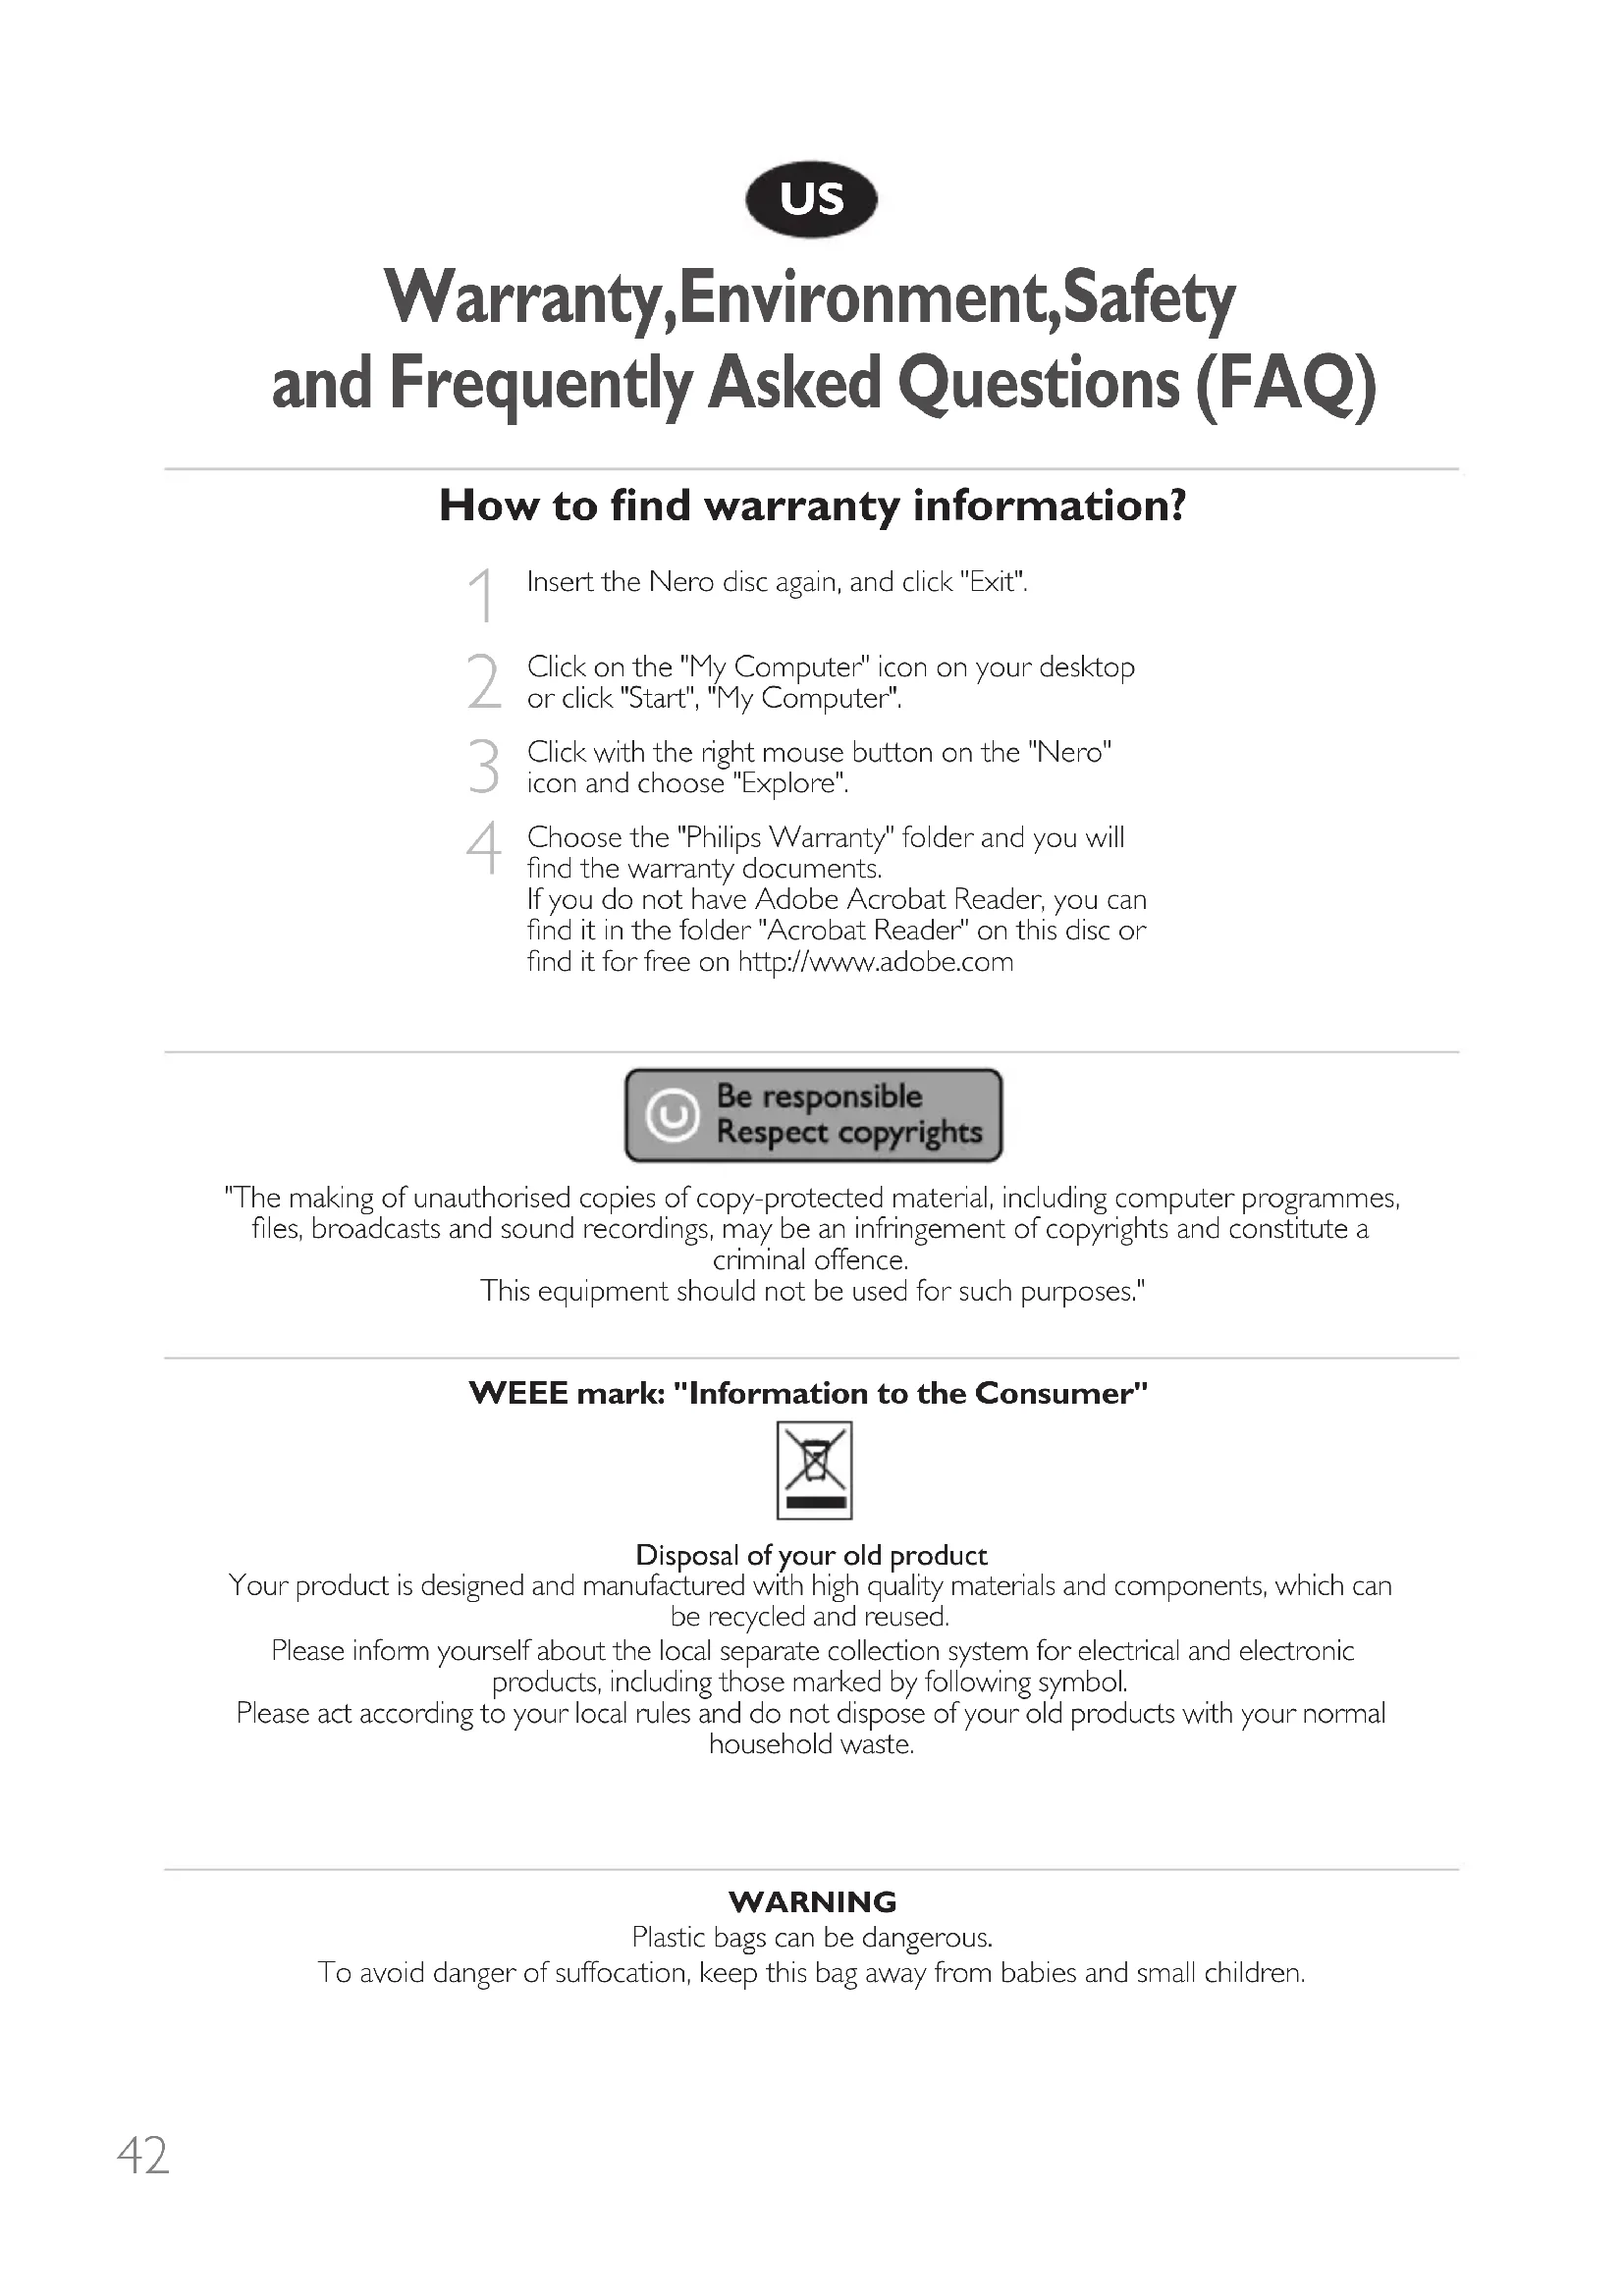
How to find warranty information?
1 Insert the Nero disc again, and click "Exit".
2 Click on the "My Computer" icon on your desktop or click "Start", "My Computer".
3 Click with the right mouse button on the "Nero" icon and choose "Explore".
4 Choose the "Philips Warranty" folder and you will find the warranty documents. If you do not have Adobe Acrobat Reader, you can find it in the folder "Acrobat Reader" on this disc or find it for free on http://www.adobe.com
Be responsible Respect copyrights
"The making of unauthorised copies of copy-protected material, including computer programmes, files, broadcasts and sound recordings, may be an infringement of copyrights and constitute a criminal offence.
This equipment should not be used for such purposes."
WEEE mark: "Information to the Consumer"
Disposal of your old product
Your product is designed and manufactured with high quality materials and components, which can be recycled and reused.
Please inform yourself about the local separate collection system for electrical and electronic products, including those marked by following symbol.
Please act according to your local rules and do not dispose of your old products with your normal household waste.
WARNING
Plastic bags can be dangerous.
To avoid danger of suffocation, keep this bag away from babies and small children.
Frequently Asked Questions (FAQ)
Question 1: I have a Windows 98 Second Edition PC and there is no CDROM device in the computer but I have another PC. How do I install the drivers?
- Start another computer.
- Insert the Nero disc for the External ReWriter into the CDROM device.
- Click "Exit" when the Nero Installation screen appears.
- Click on "My Computer".
- Click on the "Nero"-logo.
- Click on the right mouse button and choose "Explore".
- Go to the directory "Philips Drivers".
- Copy the contents of this directory on a floppy disc.
- Attach your External ReWriter to your Windows 98SE computer.
- When Windows asks for the drivers, insert the floppy from step 8 and point windows to this floppy.
- The drivers will be installed. You can now use your External ReWriter to install the software by inserting the Install disc.
Question 2: I have a windows 98 Second Edition PC and there is no CDROM device in the computer but I have access to the internet. How do I install the drivers?
- Start the computer.
- Start Internet Explorer (or another web browser).
- Go to the Philips website: http://www.philips.com/storageupdates
- Choose "Drivers and manuals".
- Search for the External ReWriter.
- Download the Windows 98SE drivers.
- Unzip the drivers and remember where you saved the unzipped drivers.
- Plug in the External ReWriter.
- When Windows asks for drivers, refer to the location where you saved the drivers in step 7.
- Your External ReWriter will work now.
Question 3: How do I keep my External ReWriter in good shape?
- Do not expose to moisture, rain, sand or heat.
- Place it on a firm, flat surface.
- Keep away from domestic heat and direct sunlight.
- Give the External ReWriter enough place: approx. 2,5cm (1 inch) to all sides is required.
- Do not place anything on the External ReWriter.
Question 4: I have connected the External ReWriter to an USB connector but Windows does not react and the External ReWriter is not recognized.
- Make sure the External ReWriter is connected properly to a power outlet.
- Make sure the USB connectors are switched on (also in the PC Bios, consult your PC manual).
- Check if all drivers are installed (run windows update, check your PC manual and download if required drivers for the PC from the manufacturer's website).
Question 5: Burning or reading takes far too long. How does this come?
- You have connected the External ReWriter to a low speed USB connector, which has a very limited throughput. Connect the drive to a highspeed USB adapter.
- You may have to install drivers for your USB-adapter. Consult the manual and or download drivers from the manufacturer's website.
Question 6: I inserted a disc and it is not played.
- Ensure the disc label is facing up.
- Clean the disc.
- Check whether the disc has the same region code as the player.
- Check if the disc is defective by trying another disc.
- Check to see if the disc is defective, badly scratched or warped (not flat).
Question 7: Player does not respond to some operating commands during playback.
Check whether a PC connection is active. Unplug the USB cable to de-activate the PC connection. The operations may not be permitted by the disc. Refer to the instructions of the disc.
Question 8: I tried to burn a disc and this failed. What happened?
- Check to ensure that there are no scratches or finger marks on the disc.
- Use a new disc and retry the writing sequence.
- Use a different (Philips) branded disc to check that your drive is working correctly.
Question 9: I cannot read from a disc.
- Check to ensure that there are no scratches or finger marks on the disc.
- Use another disc and retry to see if your drive can read a other disc.
Question 10: How can I clean a dirty disc?
Some problems may occur because the disc inside the player is dirty. To avoid these problems clean your discs regularly, in the following way:
When a disc becomes dirty, clean it with a cleaning cloth. Wipe the disc from the center out, in a straight line.
Question 11: May I use chemicals to clean a disc?
No, do not use solvents such as benzene, thinner, commercially available cleaners, or anti-static spray intended for analogue discs.
Question 12: May I use cleaning discs to clean the lens of the External ReWriter?
No, do not use commercially available cleaning discs to clean the lens, as these discs may damage the optical unit.
Be responsible Respect copyrights
Be responsible Respect copyrights
Be responsible Respect copyrights
C: Cabo USB HiSpeed.
The application software used here is: Nero Vision Express from Nero AG

E Inicia "Nero StartSmart" desde el escritorio.
PT Inicie o "Nero StartSmart" a partir da area de travailho.
TR Masaustunden "Nero StartSmart"!baqlatiniz.
PL Uruchom program "Nero StartSmart" z pulpitu.
SV Starta "Nero StartSmart" frän skrivbordet.
1
E Conecte la-camera al ordinador y enciendala.
PT Conecte a sua camera ao computador e ligne-a.
TR Kameranizi bilgisayara takip calistiriniz.
PL Podlacz kamere do komputera i uruchom.
SV Anslut din kamera till datom och sla pa den.
2
E Selezione "Foto y video" y hagablick en "Capturar video".
PT Escolha "Foto e Video" e clique em "Capturar video".
TR "Fotograf ve video"yu seksip "Video yakala" uzerine tiklatiniz.
PL Kliknj "Foto i video" oraz "Przechwyc video".
SV Välj "Foto och video" och klicka på "Fånga video".
3
4
E Seleccione su videograbadora digital y utilise los botones para controlar su CAMERA digital. Pulse el boton "Grabar" para grabar video.
PT Escolha o seu DV Camcorder e use os botoes para controlar a sua DV camera. Pressione o botao "Gravar" para gravar o video.
TR DV-Camcorder'inizi (DV-kaydedici camera) seçip DV-kameraniza kumanda etmede Dügmeleri kullaniz. Videoyu kaydetmek icin "Kaydet" Düɡmesine basiniz.
PL Wybierz posiadana kamere DV i uzyj przycisków, aby nią sterowania. Nacijsnij przycisk "Nagraj", aby nagrac obrz video.
SV Valj din DV-Camcorder och använd kontrollknappama for din DV-kamera. Tryck på "Bränn"-knappen for att spel a in video.
5
E Durante la captura, verá el progreso de la mismaquiry.
PT Durante a captura, você está o andamento lái.
TR Yakalama esnasinda,islemin ilerlemesini burada goreceksiniz.
PL W trakcie przechwytnania, tutaj mozesz observwować postep operacja.
SV Inspelningsforloppet ser du hare.
6
E Una vez capturadas las secuencias de video, haga click en "Siguiente".
PT Quando todas as sequências de video estiverem capturadas, clique em "Avançar".
TR Tum video dizisi yakalandigianda, "ilen" uzerine tiklatiniz.
PL Po przechwyceniu wzystkich sekwenci video, kliknj "Dalej".
Sy När alla videosekvenser har fängats klickard du pa "Nasta".
E Selezione "Crear DVD con video capturado" y "DVD-Video".
PT Escolha "Criar DVD com o video capturado" e "DVD-Video".
TR "Yakalanan video ile DVD yap"ve "DVDVideo"yu seçiniz.
PL Kliknij "Utworz DVD z przechwyconych video" i "DVD-Video".
SV Välj "Skapa DVD med fängad video" och "DVD-video".
E Ahora pase al paso 5 del suiviente capítulo (Cómo crear video a partir de ARCHivos...) para_CONTINUE
PT Agora, va para a etapa 5 do proximo capítulo (Como Criar DVDs de arquivos...) para_CONTINUE.
TR Simdi, devam etmek icin bir sonraki bolumn 5. admina geciniz (Dosyalardan bir video diski yapma yontemi...).
PL Aby kontynuowa, przyddo punktu 5 kolejneo rozdza. (Tworzenia pIyty video z plikow...).
Fortsatt nu med steg 5 i nasta kapitel (Hur du gör en videoskiva fran filer...).
The application software used here is: Nero Vision Express from Nero AG

E Inicia "Nero StartSmart" desde el escritorio.
PT Inicie o "Nero StartSmart" a partir da area de trabajo.
TR Masaustunden "Nero StartSmart"!başlatınüz.
PL Uruchom program "Nero StartSmart" z pulpitu.
SV Starta "Nero StartSmart" frän skrivbordet.
E Selezione "Foto y video" y hagablick en "Crear DVD de video proprio".
PT Escolha "Foto e Video" e "Crie seu propre DVD de video".
TR "Fotograf ve video" ve "Kendi DVD-Video'nu yarat" i seciniz.
PL Kliknij "Foto i video" oraz "Twórz wąsne DVD-Video".
SV Välj "Foto och video" och "Gör din egenDVD-video".
E SeLECTION "Añadir ARCHivos de video".
PT Escolha "Adicionar arquivos de video".
TR "Video dosyasiekle"yi seciniz.
PL Kliknij "Dodaj pliki video".
SV Välj "Addera videoofiler".
4
E Seleccione los archivos que desea añadir y hagalick en"Abrir".
PT Escolha os arquivos que deseja adcionar e clique em "Abrir".
TR Eklemek istediginiz dosyalan secip "Aç"üzerine tɪklatinɪz.
PL Wybierz pliki, które chcesz dodac i kliknij "Otworz".
SV Valj filema som sha laggas till och klicka pa "Oppna".
5
Los videos que ha cargado se muestran bajo. Puede editarlos seleccionando "EditarIELICULA".
PT Os filmes carregados seront exibidos aqui. épossible editá-los escolhendo "Editar terme".
TR Yuklediginiz filmler, burada gosterilir. "Filmi Düzenle"yi seçerek onlar üzerinde duzenlemayapabilirsiniz.
PL Załadowane filmy są wyświetlane tutaj. Możesz je edytownik, klikȩac "Edytuj film".
SV De filmer som du har laddat visas hare. Du kan redigera dem genom att valja "Redigera film".
6
En la pantalla Edit Movie puedaañadir efectos de video, de texto y transuciones.
PT Naanela Editoragem,você pode adcionar efeitos de video,efeitos de texto e transições.
TR Filmi Düzenle ekraninda, video efektleri, metin efektleri veGPCiIer ekleyebilirsiniz.
PL W oknie Edytuj film, mozesz dodawac efekty video, efekty tekstowe i przyjeccia.
Sv Pá skármén for filmredigering kan du lagga till videoeffekter, texteffekter och övergangar.
E Alternativelycoulderecortarel videograbado. Cuando terminhe,hagaclicen"Siguiente".
PT Támbem é possivel fazer adaptações no video gravado. Ao conclusir o procedimento, escolha "Avançar".
TR Kaydedilen video uzerinde kirpma da yapabilirsiniz. Tamamlandiginda, "Ilen"yi seciniz.
PL Mozesz rowniez przycinać nagrane video. Po zakończeniuk kliknij "Dalej".
SV Du kan ocksa trimma en inspelad video. När du ar klar, valj "Nasta".
E Cuando haya editado todos los ARCHivos, hagalick en"Siguiente".
PT Após editar todos os arquivos, escolha "Avançar".
TR Tum dosyalar uzerinde duzenleme yaptiktan sonra, "Ileri"yi seciniz.
PL Po zakoniceniu edycji wzystkich plikow kliknij "Dalej".
SV När du har redigerar alla filer, välj "Nasta".

E Introduzca el titulo en el campo "Cabecera" y hagalick en"Editar menu"para Cambiar el diseño y el fondo del menu del disco.
PT Digite o titulo no campo "Cabeçalho" e clique em "Editar menu" para alterar o layout e o plano dengo do menu do disco.
TR "Basilik" alani icindeki basligi giriniz ve disk menusünun yerlesimini ve arkaplanini degistirmek icin "Menü duzenle" uzerine tiklatiniz.
PL Wpisz tytu w polu "Naglowek" i kliknij "Edycja menu", aby zmienic uklad i tlo menu plyty.
The application software used here is: Nero - Burning Rom from Nero AG

E Inicia "Nero StartSmart" desde el escritorio.
PT Inicie o "Nero StartSmart" a partir da area de travailho.
TR Masaustunden "Nero StartSmart"!baqlatiniz.
PL Uruchom program "Nero StartSmart" z pulpitu.
SV Starta "Nero StartSmart" frän skrivbordet.
E Selezione "Copiar y copia seg." y haga click en "Copiar CD" o "Copiar DVD".
PT Escolha "Fazer copia" e clique em "Copiar CD" ou "Copiar DVD".
TR "Kopyala ve Yedekle"yi seginiz ve "CD Kopyala" ya da "DVD Kopyala" uzerine tiklatiniz.
PL Kliknij "Kopiuj i utworz kopie", a nastepnie "Kopiuj CD" lub "Kopiuj DVD".
SV Valj "Kopiera och backup" och klicka pa "Kopiera cd" aller "KopieraDVD".
The application software used here is: Nero - Burning Rom from Nero AG
E Inicia "Nero StartSmart" desde el escritorio.
PT Inicie o "Nero StartSmart" a partir da area de travailho.
TR Masaustunden "Nero StartSmart"!baglatiniz.
PL Uruchom program "Nero StartSmart" z pulpitu.
SV Starta "Nero StartSmart" frän skrivbordet.
1

E Selezione "Datas" y haga cli en "Crear CD de datos" e "Crear DVD de datos".
PT Escolha "Dados" e clique em "Criar CD de Dados" ou "Criar DVD de Dados".
TR "Veri"yi seçip "Veri CD'si Yarat" ya da "Veri DVD'si Yarat" üzerine tiklatiniz.
PL Kliknij "Dane", a nastepnie "Utworz dysk CD z danymi" lub "Utworz dysk DVD z danymi".
SV Valj "Data" och klicka på "Skapa data-cd" aller "Skapa data-dvd".
2
E Haga cli en "Añadir".
PT Clique em "Adicionar".
TR "Ekle" uzerine tiklatiniz.
PL Kliknij "Dodaj".
SV Klicka pa "Lagg till".
3
4
E Selezione los archivos que deseee grabar y haga tic en "Añadir".
PT Escolha os arquivos a serem gravados e clique em "Adicionar".
TR Kaydedilecek/Yazdinlacak dosyalan secipe "Ekle" uzerine tiklatiniz.
PL Wybierz pliki do nagrania i kliknij "Dodaj".
SV Valj filerna som sha brannas och klicka pa "Lagg till".
5
E Una vez anadidos todos los ARCHivos, haga clic en "Finalizzato".
PT Ao finalizar a inclusao de todos os arquivos, clique em "Concluido".
TR Tum dosyalar eklendiginde, "Bitti" uzerine tiklatiniz.
PL Po dodaniu wzystkich plikow kliknij "Zakończono".
SV När alla filer har lagts till klickar du på "Avslutat".
6
E Haga cli en "Siguiente".
PT Clique em "Avançar".
TR "ileri" uzerine tiklatiniz.
PL Kliknj "Dalej".
SV Klicka pa "Nasta".
E Seleccione la unidad para la grabacion y haga.
clic en "Grabar".
PT Escolha a unidade utilizada para gravacao e clique em "Gravar".
TR Yazdirma/kaydetme icin kullandiginiz surucuyu secip "Yazdir" uzerine tiklatiniz.
PL Wybierz naped uzywany do nagrywania i kliknij "Zapis".
SV Valj filema encheten som sca anvandas for att branna och klicka pa "Brann".
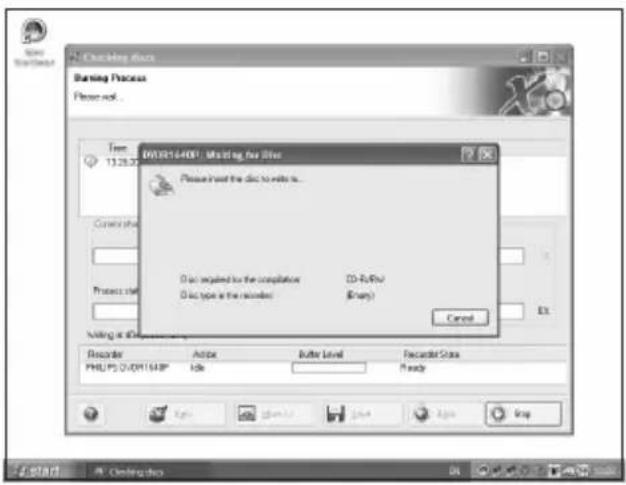
E Ponga un disco vacio.
PT Insira um disco vazio.
TR BoS bir disk yerleStiriniz.
PL WlOz czysta pIyte.
SV Satti en tom skiva.
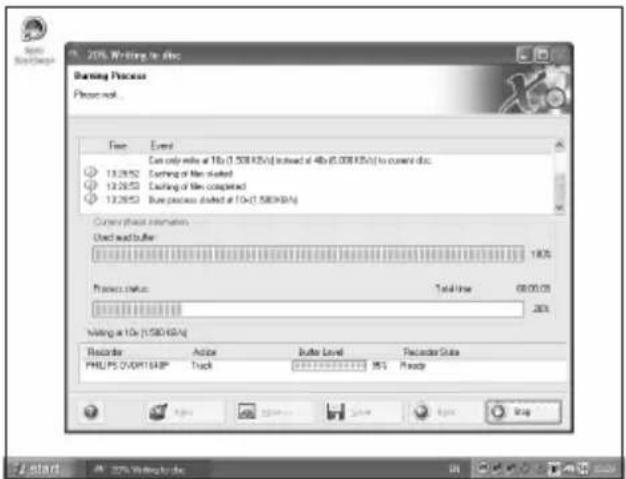
E "Nero" grabar a hora el disco.
PT O "Nero" gravara o seu disco.
TR "Nero" artik diskinizin uzerine yazacaktir.
PL Program "Nero" Rozpocznie nagrywanie pty.
sV "Nero"kommen nu att bränna din skiva.
10
Enhorabuena, su disco se ha grabado correctamente. Haga click en "Aceptar". Ahora可以选择 cerrar la aplicacion.
PT Parabén, o seu disco foi gravado com éxito. Clique em "OK". Agora, você pode fechar o aplicativo.
Tebrikler, diskinize besoinyla yazdirldi. "OK" uzerine tiklatiniz. Simdi uygulamadan cikabilirsiniz.
PL Gratulacj! Zapis plyty zakonczyi sie pomyslnie. Kliknij "OK". Mozesz zakonczyc pracg programu.
Grattis! din skiva har bràntsutan fel. Klicka pa "OK". Du kan avsulta programmet nu.


The application software used here is: Nero - Burning Rom from Nero AG
E Inicia "Nero StartSmart" desde el escritorio.
PT Inicie o "Nero StartSmart" a partir da area de travailho.
TR Masaustunden "Nero StartSmart" i baslatiniz.
PL Uruchom program "Nero StartSmart" z pulpitu.
SV Starta "Nero StartSmart" frän skrivbordet.

E Selectione "Audio" y "Crear CD de audio".
PT Escolha "Audio" e "Criar CD de Audio".
"Sec" ve "Muzik/Sec CD'si Yarat" seçiniz.
PL Kliknij "Audio" i "Utworz Audio CD".
SV Valj "Audio" och "Skapa Audio-cd".
E Haga cli en "Añadir".
PT Clique em "Adicionar".
TR "Ekle" uzerine tiklatiniz.
PL Kliknij "Dodaj".
SV Klicka pà "Lägg till".
4
E Selezione los archivos de audio (.wav) que desea incluir en su nuevo disco de audio y hagalick en "Añadir".
PT Selecione os arquivos de audio (.wav) que deseja gravar em seu novo disco e clique em "Adicionar".
TR Yeni ses diskiniz uzerinde olmasini istediginiz ses dosyalarini (.wav) secip "Ekle" uzerine tiklatiniz.
PL Wybierz pliki audio (.wav), które chcesz umieszć na nowej plycie audio i kliknj "Dodaj".
sv Valj audiofilema (^*.wav) som du vill ha pa din nya audioskiva och klicka pa "Lagg till".
5
E Una vezañadidos todos los ARCHivos, haga click en "Finalizzato".
PT Ao finalizar a inclusao dos arquivos, clique em "Concluido".
TR Tum dosyalar eklendiginde, "Bitti" uzerine tiklatiniz.
PL Po dodaniu wzystkich plikow kliknij "Zakonczono".
SV När alla filer har lagts till klickar du på "Avslutat".
6
E Haga cli en "Siguiente".
PT Clique em "Avançar".
TR "ileri" uzerine tiklatiniz.
PL Kliknij "Dalej".
sv Klicka pa "Nasta".
E Seleccionesugrabadorayhagaclicen"Grabar".
7
PT Escolha o seu gravador e clique em "Gravar".
TR Kaydedicinizi seciip "Yazdir" uzenine tiklatiniz.
PL Wybierz nagrywarke i kliknij"Zapis".
sv Valj din spelare klicka pa "Brann".

8
E Ponga un disco vacio.
PT Insira um disco vazio.
TR Bos bir disk yerleştiniz.
PL WlOz czysta phyte.
SV Satt i en tom skiva.
9
E "Nero" grabar a hora el disco.
PT O "Nero" ira gravar o seu disco.
TR "Nero" artik diskinizin uzerine yazacaktir.
PL Program "Nero" Rozpocznie nagrywanie plyt.
"Nero"kommen nu att brinna din skiva.
10
Enhorabuena, su disco se ha grabado correctamente. Haga click en "Aceptar". Ahora可以选择 cerrar la aplicacion.
PT Parabén, o seu disco foi gravado com éxito. Clique em "OK". Agora, você pode fechar o aplicativo.
Tebrikler, diskinize besoinyla yazdirldi. "OK" uzerine tiklatiniz. Simdi uygulamadan cikabilirsiniz.
PL Gratulacj! Zapis plyty zakonczyi sie pomyslnie. Kliknij "OK". Mozesz zakonczyc pracg programu.
Grattis! din skiva har brantsutan fel. Klicka pa "OK". Du kan avsulta programmet nu.
Be responsible Respect copyrights
Be responsible Respect copyrights
Be responsible Respect copyrights
Be responsible Respect copyrights
Be responsible Respect copyrights
USA/Canada: This player is for use only with IBM compatible UL listed Personal Computers or Macintosh UL listed workstations, weighing less than 18kg .
LASER SAFETY
This unit employs a laser. Do not remove the cover or attempt to service this device when connected due to the possibility of eye damage.
LASER-SICHERHEIT
USE OF CONTROLS OR ADJUSTMENTS OR PERFORMANCE OF PROCEDURES OTHER THAN THOSE SPECIFIED HEREIN MAY RESULT IN HAZARDOUS LASER RADIATION EXPOSURE.
WARNING
Type. Semiconductor laser
Wave length .784 nm (CD) - 658 nm (DVD)
Output power............(measured above the objective lens)
Read: 0,2 mW (CD) - 2 mW (DVD)
Write: 78 mW (CD) - 54 mW (DVD)
Beam divergence 60 degree
CLASS 1 LASERAPPPARAT
CLASS 1 LASER PRODUCT
LUOKAN 1 LASERLAITE
KLASSE 1 LASER-PRODUCT
Notes
Additional information available at our website:
www.philips.com/storage
www.philips.com/storageupdates
Specifications subject to change without notice.
All dimensions shown are approximate.
All rights reserved.
Reproduction, copying, usage, modifying, hiring, renting,
public performance, transmission and/or broadcasting in whole or part is prohibited without the written consent of Philips Electronics N.V.