SuperSystem - Radio REVO - Free user manual and instructions
Find the device manual for free SuperSystem REVO in PDF.
| Product Type | Multi-source digital radio |
| Brand | REVO |
| Model | SuperSystem |
| Dimensions (approx.) | 430 x 130 x 250 mm |
| Weight (approx.) | 4.5 kg |
| Power supply | Multi-country AC adapter (included) |
| Power consumption | 30 W (max) |
| Reception modes | DAB, DAB+, FM, Internet Radio |
| Connectivity | Wi-Fi, Bluetooth (aptX), USB, 3.5mm Auxiliary Input, TOSLINK Optical Input |
| Main features | DAB/FM/Internet Radio, USB Playback, Bluetooth streaming, Spotify Connect, Multiroom UNDOK, Alarm, Timer, Equalizer |
| Display | Backlit OLED, adjustable brightness |
| Remote control | Included, with AA batteries (not included) |
| Care and cleaning | Soft dry cloth. Do not use abrasive products. |
| Safety | Do not expose to water, do not open the case, use only the supplied adapter |
| Spare parts and repairability | Contact technical support or an authorized dealer |
| Warranty | 2 years (subject to conditions) |
| General information | Manufacturer: Revo Technologies Ltd. Support: www.revo.co.uk/support |
Frequently Asked Questions - SuperSystem REVO
User questions about SuperSystem REVO
0 question about this device. Answer the ones you know or ask your own.
Ask a new question about this device
Download the instructions for your Radio in PDF format for free! Find your manual SuperSystem - REVO and take your electronic device back in hand. On this page are published all the documents necessary for the use of your device. SuperSystem by REVO.
USER MANUAL SuperSystem REVO
Should you encounter problems using this product, please refer to the troubleshooting section on page 41 of this owner's guide. Alternatively, call Revo technical support on:
UK 01555 666161 From outside the UK ^+ 44 1555 666161
Alternatively, e-mail support@revo.co.uk or visit the troubleshooting section of our website at: www.revo.co.uk/support
ENVIRONMENTAL INFO
PRODUCT DISPOSAL INSTRUCTIONS (WEEE DIRECTIVE)

The symbol shown here and on the product means that it is classed as Electrical or Electronic Equipment and should not be disposed with other household or commercial waste at the end of its working life.
The Waste of Electrical and Electronic Equipment (WEEE) Directive (2002/96/EC) has been put in place to recycle products using best available recovery and recycling techniques to minimise the impact on the environment, treat any hazardous substances and avoid the Increasing landfall.
For more information please contact your local authority or the retailer where the product was purchased.
RoHS COMPLIANT & CE MARK

This product has been designed to comply with international directives on the Restriction of Hazardous Substances (RoHS) and has been designed and type-tested to comply with EU requirements and carries a CE mark.
SAFETYWARNINGS
- Do not operate this radio near water
- Do not remove screws or casing parts
- Use only the power supply unit supplied
- Avoid small objects and liquids from entering the product

WARRANTY
Revo Technologies Ltd warrants to the end user that this product will be free from defects in materials and workmanship in the course of normal use for a period of one year from the date of purchase. This guarantee covers breakdowns due to manufacturing faults and does not apply in cases such as accidental damage, general wear and tear, user negligence, modification or repair not authorised by Revo Technologies Ltd.
To register your purchase please visit www.revo.co.uk/register
COPYRIGHTS AND ACKNOWLEDGEMENTS
Copyright 2015 Revo Technologies Ltd. All rights reserved.
No part of this publication may be copied, distributed, transmitted or transcribed without the permission of Revo Technologies Limited.
REVO and SUPERSYSTEM and are trademarks or registered trademarks of Revo Technologies Limited.
The Bluetooth® word mark and logos are registered trademarks owned by Bluetooth SIG, Inc. and any use of such marks is under license, aptX® is a trademark of CSR plc.
Revo Technologies Ltd
The Inox Building, Caldwellside, Lanark, Scotland, United Kingdom, ML11 7SR
Tel: +44 (0) 1555 66 61 61 Email: enquiries@revo.co.uk
The Spotify software is subject to third party licenses found here: www.spotify.com/connect/third-party-licenses
DISCLAIMER
Revo Technologies Limited makes no representation or warranties with respect to the content of this publication, and specifi cally disclaims any Implied warranties of merchantability or fit ness for any particular purpose. Further, Revo Technologies Limited reserves the right to make changes to this publication from time to time, without notifi cation to any person or organisation.
CONTENTS
02
Technical
Support
02
Environmental
info
02
Warranty
02
Copyrights
and
Acknowledgements
02
Disclaimer
03 Welcome / Unpacking
04
Anatomy
05
Remote
Control
06
Power
Supply
06
Set-Up
07 Control and Menu Structure
08-09 Setup Wizard
10-11 DAB Mode
12-13 DAB Mode Menu Options
14
FM
Mode
15 FM Mode / AUX-IN Mode / Optical In Mode
16-17 Bluetooth
18-21 Internet Radio Mode
22 Internet Radio Portal
23-24 Setting Up A Music Server
24-27 Music Player Mode/USB Charging
28-30 Spotify Connect
31-33 UNDOK App Control and Multiroom
34-35 Alarm Clock
36-40 System Settings
41-42 Troubleshooting
43
Error
Messages
WELCOME

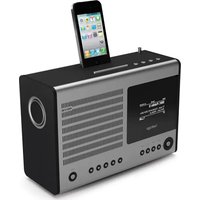
Thank you for purchasing our SUPERSYSTEM digital music system, we are sure that it will provide you with many years of enjoyment and reliable service.
SUPERSYSTEM is a thoroughly modern music system, combining traditional values of craftsmanship and material integrity with next-generation all digital technology and superlative room-filling acoustic performance.
SUPERSYSTEM beats at the heart of your musical ecosystem, providing whatever soundtrack you need, whenever and wherever you want it. Thanks to the inclusion of UNDOK technology, music can be wirelessly distributed to other compatible devices in your home to establish a sophisticated multiroom audio environment.
This guide has been designed to get you up-and-running with your SUPERSYSTEM, offer guidance on the more complex features of this product and provide information on safety, warranty details and troubleshooting.
UNPACKING
The SUPERSYSTEM box should include the following items:
SUPERSYSTEM
Remote control
Power supply with multi-country adaptors
- Screen cleaning cloth
Warranty card
- Owner's guide
Should any item be missing or damaged, please contact your point of purchase or call Revo directly on +44 (0) 1555 66 61 61
NOTE: All packaging should be retained for possible future use, it is the safest way to transport your device should it be necessary.
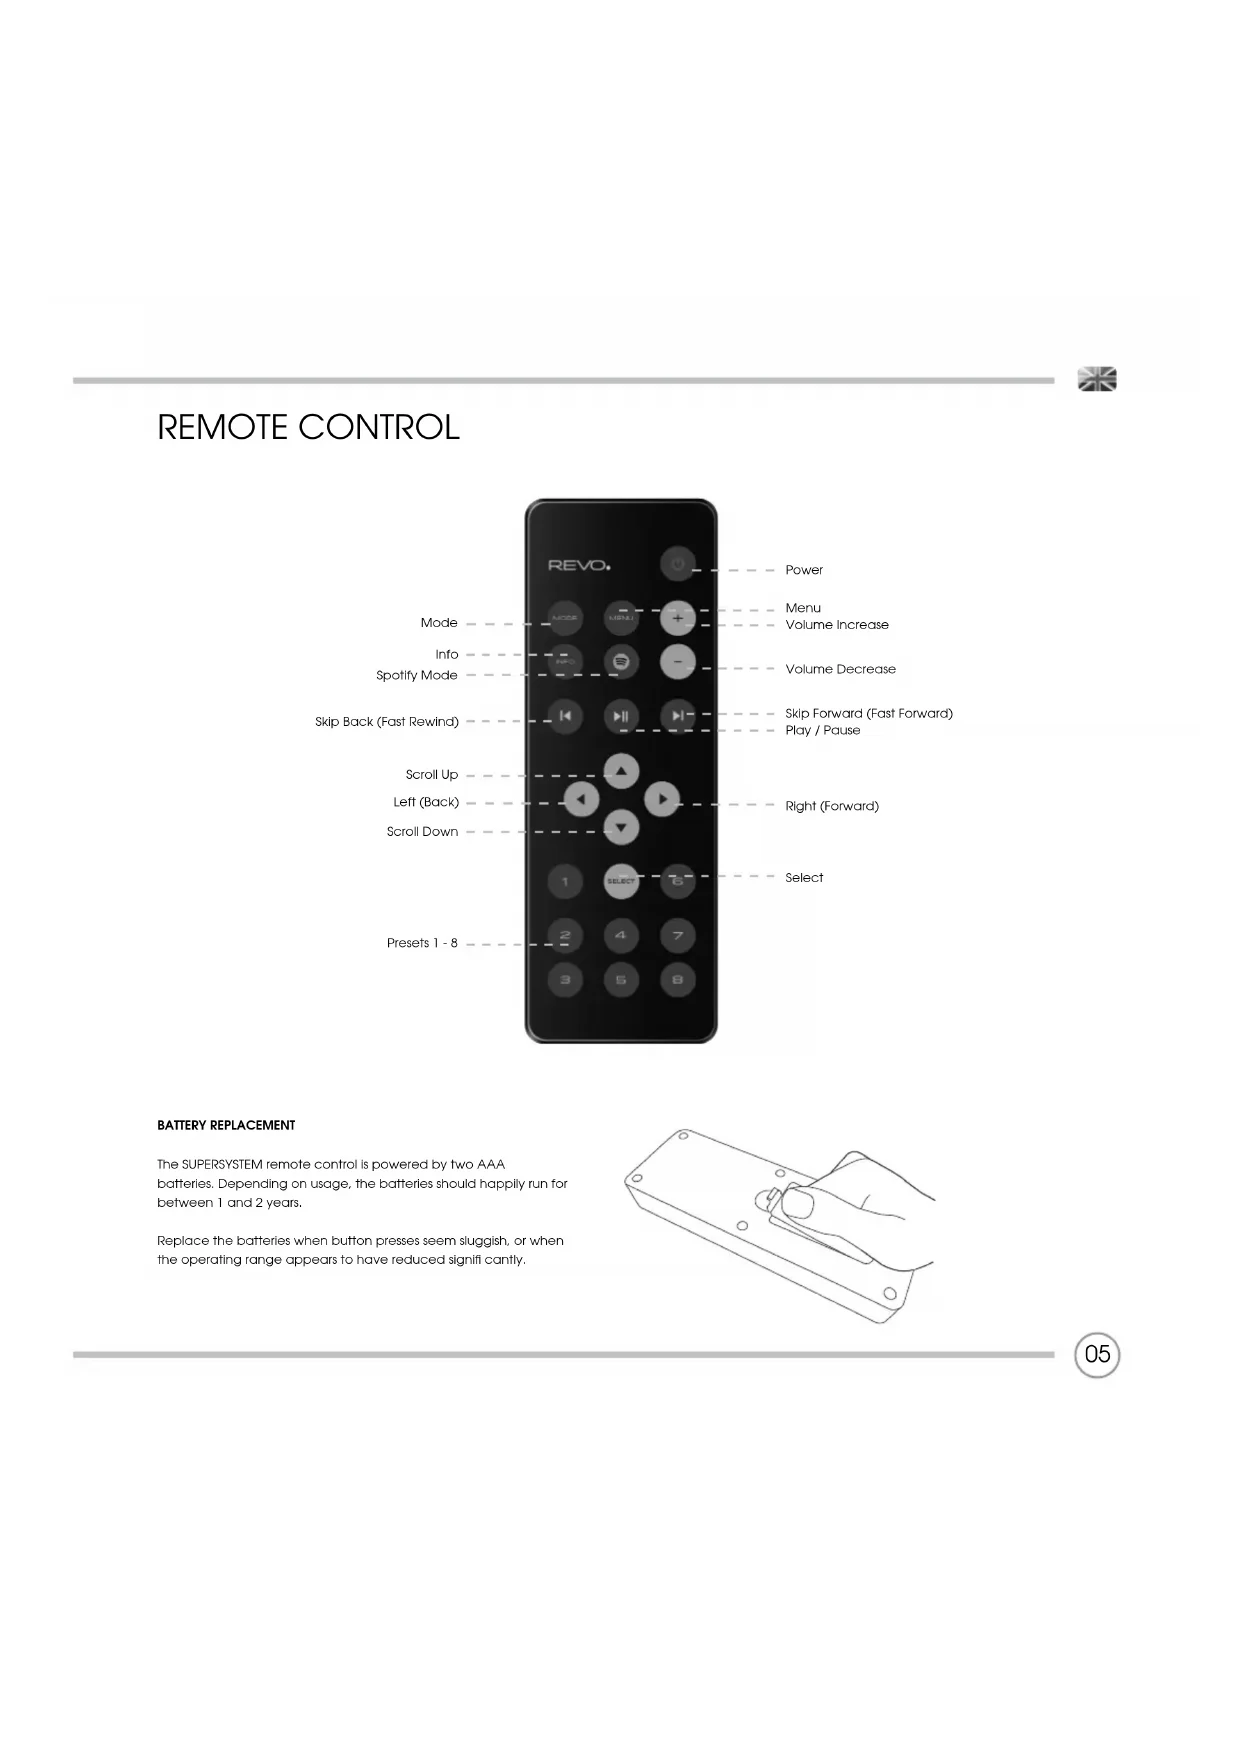
The SUPERSYSTEM remote control is powered by two AAA batteries. Depending on usage, the batteries should happily run for between 1 and 2 years.
Replace the batteries when button presses seem sluggish, or when the operating range appears to have reduced signlfl cantly.


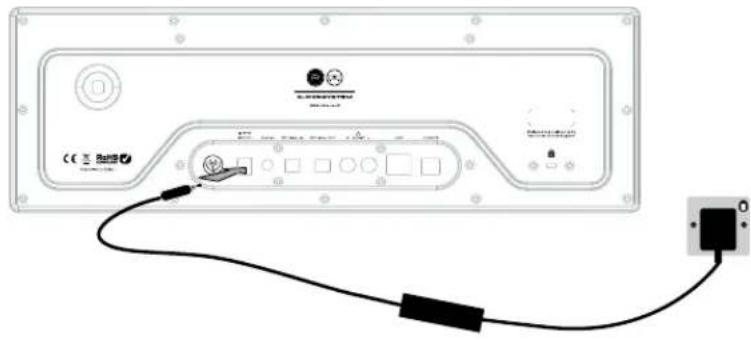
POWER SUPPLY (PSU)
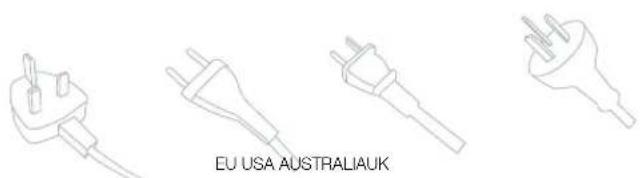
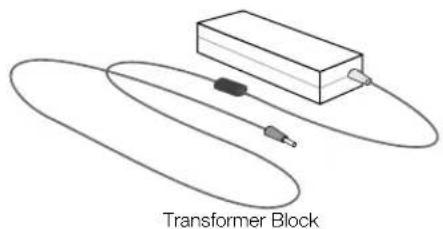
Your SUPERSYSTEM is supplied with a multi-region power supply, meaning that it can be operated in a number of countries around the world.
Select the correct plug for your country then connect it to the transformer block.
SET-UP
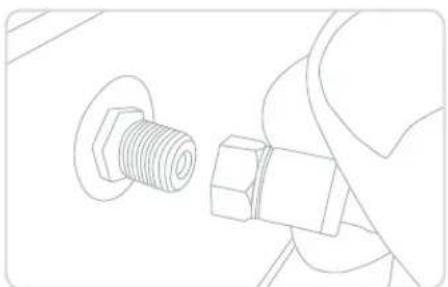
① Attach, tighten and extend the antenna for DAB or FM operation
Using the PSU supplied, connect one end to the DC power socket found on the rear of your device, then plug the opposite end into the mains socket on the wall.
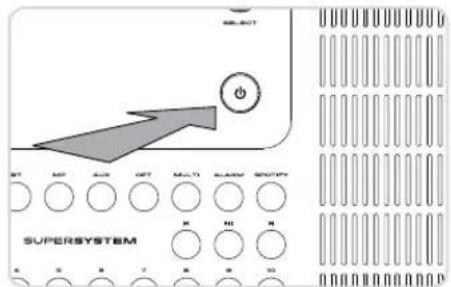
3 Press the POWER button to enter the Setup Wizard (see page 08).

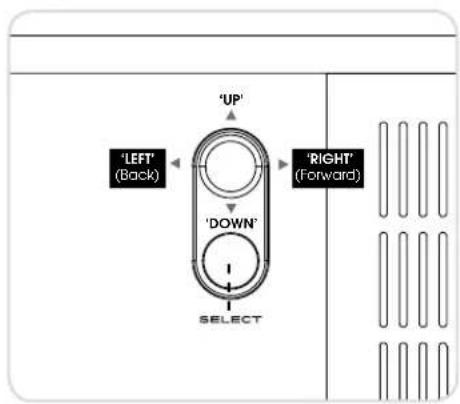
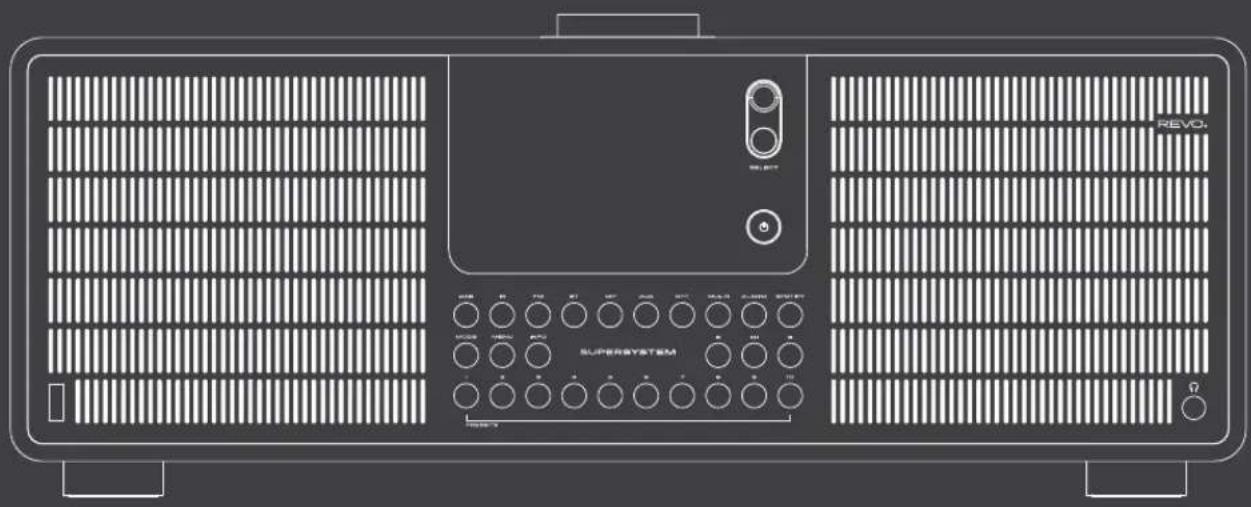
In order for you to get the most from your device, it is important for you to understand how its joyslick and menu system operates.
JOYSTICK CONTROL
SUPERSYSTEM uses a joystick based control system for ease of use.
The joystick controller has four functions and is used in conjunction with a separate SELECT button.
UP ScrolIs Up
DOWN Scroll Down
LEFT Scrols Left and moves back through menus
RIGHT Scrols Right and moves forward through menus
SELECT Selects current option
MENUBUCTION
Pressing the button will take you to the Mode Menu for the particular mode of operation you are in. For example, pressing when In DAB Mode will take you to the DAB MODE MENU.
Pressing the button for a second time will return you to the 'playing screen' that you just left.
MODE BUTTON
Pressing the (mode) button will sequentially cycle through each of SUPERSYSTEM'S modes of operation. However, each mode also has a dedicated button on the front panel.
It is also possible to move between modes of operation via the MAIN
MENU (see below)
MENUSTRUMENTURE EXPLAINED
MAIN MENU
This is SUPERSYSTEM'S principle (top level) menu, and allows you to enter different operating modes, change settings and view information such as the 'Radio ID' number and software version.
MODE MENUS
The Mode Menus are so called because they show the functions available within the currently selected mode.
Pressing the button at any time will take you to the Mode. Menu for the mode of operation your radio is currently in.
Each of the Mode Menus also includes a listing for MAIN MENU, allowing you to return to the top level MAIN MENU.


SETUP WIZARD
USING THE SETUP WIZARD
The first time you use SUPERSYSTEM you will be asked whether you would like to run the SETUP WIZARD. The 'WIZARD' will run through a series of questions, and is the simplest way to get your device up and running.
You can run the SETUP WIZARD again at any time, it can be found in the SYSTEM SETTINGS MENU.
Press the SELECT button, and start the SETUP WIZARD procedure.
Choose and select your preferred hour format (12 or 24 hour).
Choose and select where you'd like SUPERSYSTEM to retrieve its clock time from. (Note: If you're using SUPERSYSTEM in a country where DAB is broadcast, this is the simplest method to ensure the date/time settings are correctly maintained.)
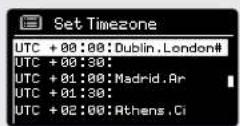
3 If you've chosen 'Update from Network' please Scroll and select your localtimezone from the menu.
If you've chosen 'Update from Network' please select your preferred daylight savings status.
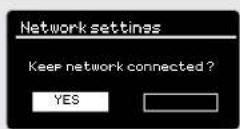
5 By selecting 'Yes' to 'Keep Network Connected', your SUPERSYSTEM will remain connected to your WIFI network even when in non-Internet modes (DAB/FM) and when in standby. This allows you to access It from the UNDOK app or SPOTIFY app at all times.
Scroll and select the region in which you are using SUPERSYSTEM. This will enable the device to scan for the correct type of WiFi network (WiFi frequencies vary worldwide)


SETUP WIZARD
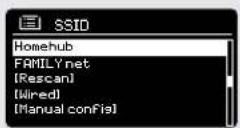
⑦ Scroll and select your NETWORK. In some cases your radio may find more than one. Simply choose the one you want to use.
If you would like to use your radio over a Wired connection, rather than a wireless one, simply choose the Wired option from the SSID list.
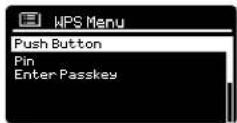
Push Button - If your router supports WPS connectivity and has a WPS or Wireless button, please select this option and follow the on-screen instructions.
Pin - SUPERSYSTEM will display an identif1 cation number which you enter into your router using a web browser (please see your router's user documentation).
Enter Passkey - Select this option to simply enter your router's Passkey (also known as 'Wireless Key', 'WPA Key' or 'Network Key'. Now see point 10 below.
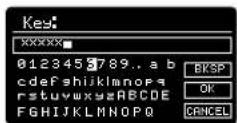
If your wireless network is not password protected, SUPERSYSTEM will automatically connect, and the following screen will be displayed.
10 If you do use password protection, enter your network password using the joystick controller to scroll through the alphanumeric characters, pressing SELECT to enter each number or letter. When you have correctly entered your entire password, select OK.
Select BKSP (back space) if you have entered an incorrect character.
SUPERSYSTEM will save the password into its memory. There will be no need to re-enter the password again.


DAB RADIO MODE
Please ensure that the antenna is attached and extended before operation in DAB Mode.
To enter DAB MODE, press the button on the front panel, or press the button until the DAB Mode intro screen is displayed.

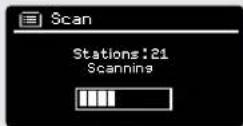
When in DAB MODE for the first time, SUPERSYSTEM will automatically perform a full scan to see what stations are being broadcast in your area, before storing them alphabetically in the memory.
It may be necessary to perform a manual scan from time to time, in order to update the station list. This may be required for any one of the following reasons:
- Station availability can change from time to time as new stations appear, or existing stations cease broadcasting.
- If reception was poor during the initial automatic scan, for example the antenna was not attached or completely extended. It may be that the station list is incomplete or even empty.
- If you have poor reception on some of the stations (resulting in broken or poor quality audio), you may wish to list only stations that have a strong signal strength.
To start a manual scan, press the (MINI) button then select SCAN from the menu list.
When the scan is complete, SUPERSYSTEM will list all available stations.

To remove stations that are listed but unavailable, press (MIND) then choose PRUNE INVALID. When asked whether you wish to "remove all invalid stations", select YES.
DAB RADIO MODE
SELECTING A STATION
To access the station list, press or tap UP, DOWN or LEFT on the joystick controller at any time. Alternatively press (WIND) then select STATION LIST.
Scroll through the available stations using UP and DOWN on the joystick controller, then either press the SELECT button to select your station choice, or tap the joystick RIGHT.

FAVOURITE STATION PRESETS
SUPERSYSTEM allows you to store your favourite stations as presets, either via its 10 front-panel mounted 'hotkeys', or the numbered preset buttons located on the remote control.
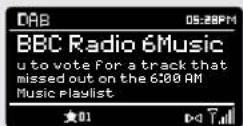
To store the station you are currently listening to as a preset, simply press and hold a preset button until "Preset Stored" is displayed on the screen. The preset number that has been assigned to the station is displayed at the bottom of the screen next to a star icon.
If you want to change a particular preset in the future, repeat the process and the previously stored preset will be automatically overwritten.

DAB MODE MENU OPTIONS
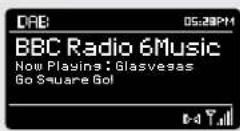
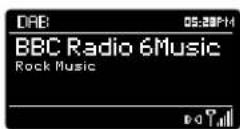
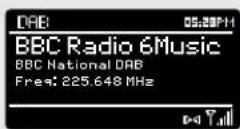
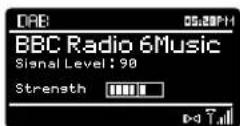
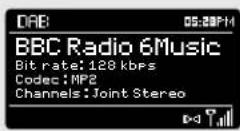
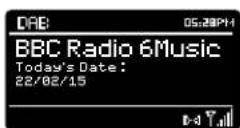
STATION INFO
In DAB MODE, SUPERSYSTEM is capable of displaying various pieces of information on its screen. By pressing the button, you can sequentially cycle through the following types of information.
STANDARD DAB SCREEN Shows scrolling text info from broadcaster
PROGRAMME TYPE For example News, Rock Music, Classical etc.
MULTIPLEX AND FREQUENCY Multiplex owner and station frequency
SIGNAL STRENGTH Station's current signal strength
BIT RATE AND CODEC Audio format, sample rate, mono or stereo
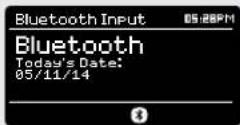
DATE
Today's
date
DAB MODE MENU OPTIONS
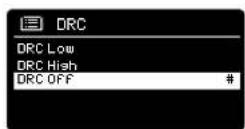
DYNAMIC RANGE COMPRESSION (DRC)
If you are listening to music with a high dynamic range in a noisy environment (for example, classical music while cooking), you may wish to compress the audio's dynamic range. This has the effect of making quiet sounds louder, and loud sounds quieter.
To change the DRC setting, press (MND) then choose the DRC option, before selecting OFF, LOW or HIGH.
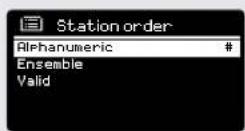
STATION ORDER
It is possible to choose the order of the DAB station list to be either ALPHANUMERIC, ENSEMBLE or VALID.
As the name implies, ALPHANUMERIC lists stations in alphanumeric order.
ENSEMBLE lists groups of stations that are broadcast together on the same ensemble, for example BBC or Central Scotland Local.
VALID lists valid stations if rst, alphanumericically, then off-air stations.
To change the station order, press (MEN) then select STATION ORDER, before choosing either ALPHANUMERIC, ENSEMBLE or VALID.

FM RADIO MODE
FM OPERATION
Please ensure that the antenna is attached and fully extended before operation in FM MODE.
To enter FM MODE, press the button on the front panel, or press the button until the FM Mode Intro screen is displayed.

Pressing the SELECT button will start scanning for the next available station. SUPERSYSTEM will automatically stop scanning when a station is found.
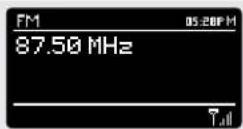
To fine tune, use UP or DOWN on the joystick controller to incrementally change the frequency.
When on an FM station that has a strong signal and is broadcasting RDS Information, SUPERSYSTEM will display the station name and other pieces of text information on-screen.

FAVOURITE STATION PRESETS
SUPERSYSTEM allows you to store your favourite stations as presets, either via its 10 front panel-mounted 'hot-keys', or the numbered preset buttons located on the remote control.
To store the station you are currently listening to as a preset, simply press and hold a preset button until "Preset Stored" is displayed on your radio's screen. The preset number that has been assigned to the station will be displayed at the bottom of the screen.
If you want to change a particular preset in the future, repeat the process and the previously stored preset will be automatically overwritten.

FM RADIO MODE
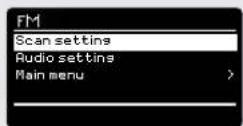
FM SETTINGS
Press the button to access the FM MODE MENU. From here you can set some FM preferences such as SCAN SETTING and AUDIO SETTING.
SCAN SETTING allows you to decide whether the radio should stop scanning only when it finds a station with a strong signal.
AUDIO SETTING gives you the option of listening to a station in mono, should the signal strength not be sufficiently strong to allow stereo reception.
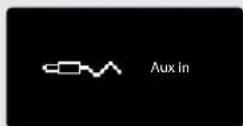
AUX IN MODE
AUX IN MODE allows you to play audio from an external source (such as an MP3 player) through your SUPERSYSTEM. To do so, connect your external audio source to the 3.5mm AUX IN connector on the rear of SUPERSYSTEM.
Before connecting, turn the volume down low on both SUPERSYSTEM and, if adjustable, the external device.
To enter AUX IN MODE, press the button on the front panel, or press the button until the Aux In intro screen is displayed.
Adjust the volume of SUPERSYSTEM and, if necessary, the external audio device as required.
OPTICAL IN MODE
OPTICAL IN MODE allows you to connect a digital audio source (Television/Set Top Box, Computers/Laptops and CDs players etc. might offer this type of output). To connect you will require a "TOSLINK" cable plugged In to the external source and connected to the OPT IN connector on the rear of SUPERSYSTEM.
To enter OPTICAL IN MODE, press the button on the front panel, or press the button until the Optical In intro screen is displayed.
If applicable we recommend setting the volume to about 80% on the source and use the volume control of SUPERSYSTEM to set your desired level.


BLUETOOTH MODE
Wirelessly stream music from your Bluetooth smartphone, tablet, laptop or other Bluetooth enabled device directly to SUPERSYSTEM, without the need for physical docking or connection.
PAIRING WITH BLUETOOTH DEVICES
'Pairing' occurs when two Bluetooth devices talk to each other and establish a connection. This connection is stored in the memory of both devices, meaning that once you 'pair' a particular device with SUPERSYSTEM, you shouldn't have to go through the pairing process again.
HOW TO PAIR A BLUETOOTH DEVICE WITH SUPERSYSTEM
To enter BLUETOOTH MODE, press the button on the front panel, or press the button until the BLUETOOTH Mode Intro screen is displayed.
On your Bluetooth device, ensure that Bluetooth is enabled then Initiate a 'Search' for a new device. When the search process has been completed, your device will list all the available Bluetooth devices in your close proximity.

SELECT "SUPERSYSTEM" FROM THE LIST.
Your Bluetooth device will confirm when pairing has been completed, and SUPERSYSTEM will now display a static Bluetooth logo on screen.
PASSKEY
During the pairing process some Bluetooth devices may prompt you to enter a Passkey. Should your device require a Passkey, enter 0000.
Should you experience problems when pairing your device with SUPERSYSTEM, please see the Bluetooth Troubleshooting section on page 42.
BLUETOOTH MODE
STREAMING MUSIC
Selecting and controlling music playback can be done in one of two ways: either directly from the source device (smartphone, tablet or laptop etc.), or by using the buttons mounted on the front panel.
Please note, the playback volume level can be independently controlled from either SUPERSYSTEM or the source device.
MANAGEMENT OF MULTIPLE BLUETOOTH DEVICES
If you have paired only one Bluetooth device, on entering Bluetooth mode SUPERSYSTEM, will automatically seek to connect with this device.
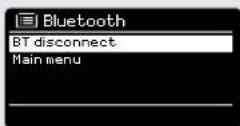
Should you wish to pair another device, press [MND] then select 'BT Disconnect'. SUPERSYSTEM will now disconnect its current Bluetooth device and enter pairing mode again. This will allow you to repeat the 'Pairing with Bluetooth Devices' procedure.
SUPERSYSTEM will remember up to 8 Individual Bluetooth devices. When you reach the point of having a 9th device you wish to pair, SUPERSYSTEM will pair with the 9th device and automatically erase the oldest-paired device from its memory.
You can continue to pair new devices and SUPERSYSTEM will always remember the previous 8 devices it has paired with.
optX®
SUPERSYSTEM'S Bluetooth solution is equipped with CSR's patented aptX® technology, meaning that when it is used in conjunction with a device that also supports aptX®, the streamed audio will be of CD quality rather than the MP3 quality of a standard Bluetooth stream.

INTERNET RADIO MODE
GETTING STARTED
To enter INTERNET RADIO MODE, press the button on the front panel, or press the button until the INTERNET RADIO Mode. Intro screen is displayed.

On entering the INTERNET RADIO MAIN MENU you will be offered the choice of accessing the LAST LISTENED station or selecting a new one.
To choose a new station select the STATION LIST menu entry, you will then be offered the following options:
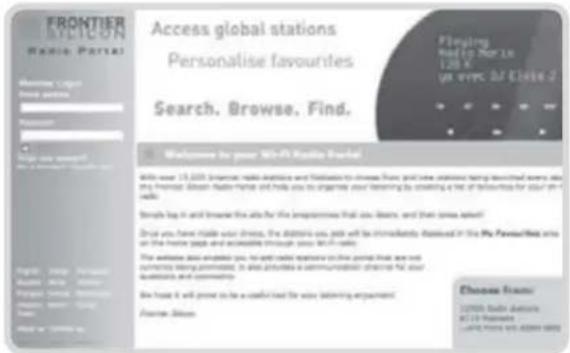
My Favourites: Used to navigate to your favourite stations. These can be set up by visiting the Frontier Silicon Radio Portal (using your PC or Mac). See page 22 for further information.
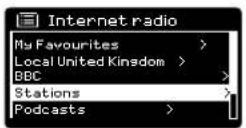
Local: A comprehensive list of all the stations being broadcast from within your own geographical area (or country).
BBC: Used as a shortcut to all BBC stations broadcast worldwide.
Stations: Find stations using a number of search criteria such as: location, genre, most popular etc.
Podcasts: Find Podcasts or 'Listen-Again' broadcasts by location, genre or search by name.
My Added Stations: Shows stations that you have personally added to your radio's station list via the Frontier Silicon Radio Portal. See page 22 for full details.
Help: Find your radio's ACCESS CODE here. Required to access the Frontier Silicon Radio Portal. See page 22.
CHOOSING A STATION
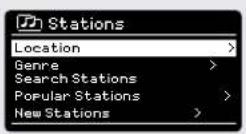
To choose a station, select STATION LIST from the INTERNET RADIO MENU, then select STATIONS using the joystick controller.
You now have the option to choose or find a station using the following search criteria:
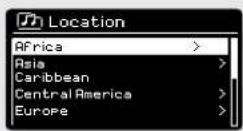
LOCATION (country of origin) GENRE SEARCH STATIONS (by name) POPULAR STATIONS NEW STATIONS
INTERNET RADIO MODE
CHOOSING A STATION (Continued)
Using the joystick controller, scroll through the options and press SELECT to choose your search criteria.
For example, choosing LOCATION will give you an alphabetical list of continents/regions, and then a list of countries. Use the joystick controller to scroll through the list and press SELECT to choose your chosen continent, then country. You will then be given the option of choosing ALL STATIONS or a GENRE, to further refine your search.
After selecting your search criteria, you will be presented with a list of stations. Simply select a station from the list to begin listening.
SEARCH
You can search for an Internet radio station by name (If you know it), or by using a keyword from within its title.
To SEARCH for a station, select SEARCH STATIONS from the STATIONS MENU, then enter a keyword using the keyboard input screen (similar to the keyboard screen you used for password input).
If your station is found, simply select to listen.
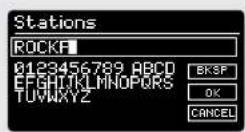
If you searched for a keyword, SUPERSYSTEM will list all the stations found that contain that particular keyword. Scroll through the list and select your station.
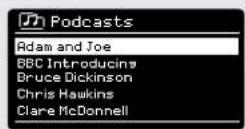
CHOOSING A PODCAST
Podcasts (also referred to as 'Listen Again') are searched and selected in the same way as a regular station.
Select PODCAST from STATION LIST in the INTERNET RADIO MENU, then search by location, genre or a combination of both.
The main difference when searching for a Podcast, is that when you have selected a station, you will then be presented with a list of Shows (or Podcasts) available from that station.
Simply select your choice from the list.

INTERNET RADIO MODE
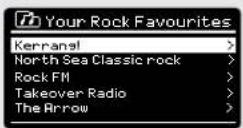
MY FAVOURITES
It is possible to compile a list (or lists) of your favourite stations, allowing quick and easy access to a number of stations from different countries and genres.
To do this you must first register your radio with the Frontier Silicon Radio Portal. See the INTERNET RADIO PORTAL section on page 22.
To store a station as a favourite, press and hold the SELECT button until FAVOURITE ADDED appears on the screen. The chosen station will now appear in the default favourites stations list.
To access the MY FAVOURITES list, select STATION LIST, then MY FAVOURITES, followed by STATIONS. You can now scroll through and select any station in the list.
MY ADDED STATIONS
If you have added any of your own stations to the Internet radio station list, they will be listed here. The MY ADDED STATIONS option can be found under the STATION LIST MENU, in INTERNET RADIO MODE.
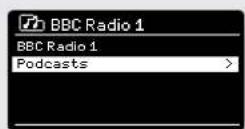
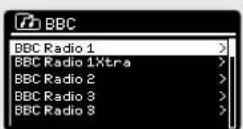
BBC
The BBC option is a shortcut to the entire BBC station list. Simply select this option from the STATION LIST MENU, then scroll through and select a station in the normal way.
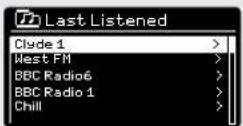
LAST LISTENED
When you enter INTERNET RADIO MODE, the last-listened station is automatically selected. To select another station that you've listened to recently, select LAST LISTENED. A full list will be displayed (the most recent being at the top).
INTERNET RADIO MODE
HELP
The HELP option can be found in the STATIONS LIST MENU. Under HELP, you will find the ACCESS CODE that you require to register your radio on the Frontier Silicon Radio Portal (see page 22 for full Instructions).
A helpful FAQ audio track can also be found under the HELP heading.
LOCAL
The LOCAL station list can be found under the STATION LIST MENU and will differ depending on which country you are currently located in. For example, if you are based in the UK, this selection will display stations originating from the UNITED KINGDOM. Likewise, if you are using your SUPERSYSTEM in Germany, this selection will display only stations that are being broadcast from Germany.
Select this option to navigate either all of the available local stations, or alternatively you can search the list by genre.


INTERNET RADIO PORTAL
ACCESSING ADDITIONAL FEATURES
Some of SUPERSYSTEM's more advanced Internet radio features can only be accessed by visiting the Frontier Silicon Radio Portal.
In order to access these features you must first register your radio.
REGISTERING YOUR SUPERSYSTEM
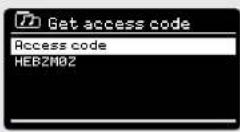
In order to register your SUPERSYSTEM, you will need your unique access code.
To find the access code, firstly enter INTERNET RADIO MODE, then press (MNTN). Select STATION LIST, then HELP. Now select GET ACCESS CODE.
Write down the access code.
Now, using your PC or Mac, visit the portal website at www.wifiradio-frontier.com
Click on the REGISTER HERE link (located on the left hand panel) to begin the registration process.
If you already have an account and wish to add an additional device, log in to your account and select MY PREFERENCES, then ADD ANOTHER WI-FI RADIO.
When you have registered your SUPERSYSTEM with the portal, you can immediately take advantage of various additional features and services that it provides.
SETTING UP A MUSIC SERVER
In order for SUPERSYSTEM to be able to play music files from a connected computer, the computer must first be set up for media sharing.
UPnP media sharing allows devices like SUPERSYSTEM to play music from a shared media library, navigating through tag menus such as Artist, Album or Genre.
If you are running a PC with Windows Media Player 11 or later (WMP), or an Apple Mac with OS X 10 or later and a UPnP application Installed, you can connect SUPERSYSTEM and stream audio.
NOTE: iTunes does not currently operate as a UPnP media server, but there are a number of third party software add-ons available that will allow you to access your iTunes library (see page 24 for details).
SHARING MEDIA WITH WINDOWS MEDIA PLAYER
The most common UPnP server is Windows Media Player (version 11 or later) although other UPnP platforms and servers may be used.
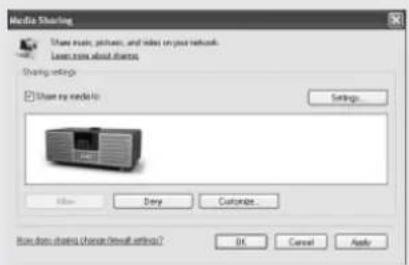
To set up WMP for media sharing, performs the following steps:
Ensure that your PC and SUPERSYSTEM are connected to the same wireless or wired network. SUPERSYSTEM will be recognised as 'SUPERSYSTEM' by your PC.
In WMP, add to the media library the audio files and folders you want to share with SUPERSYSTEM (LIBRARY > ADD TO LIBRARY ...).
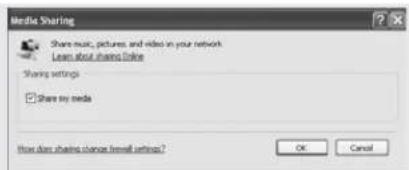
Make sure that the radio has access to the shared media by selecting it and clicking ALLOW. You can also set a name for the shared media settings.
The PC is now ready to stream music to your radio. The WMP UPnP service runs in the background; there is no need to start WMP explicitly.

SETTING UP A MUSIC SERVER
SHARING MEDIA WITH A MAC
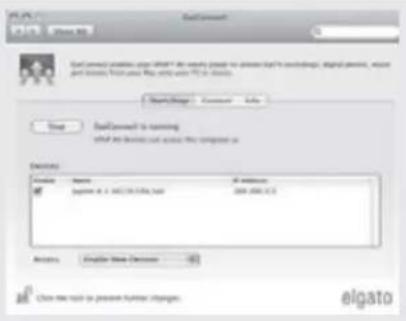
In order to connect SUPERSYSTEM to your Apple Mac, a third party UPnP server application is required. There are a number of applications available to download from the Internet.
One such application is EyeConnect. This is an easy to install media sharing application that enables SUPERSYSTEM to stream audio. EyeConnect can be downloaded from:
http://www.elgato.com
Once Installed, EyeConnect can be found on the System Preference panel. When connecting SUPERSYSTEM, make sure EyeConnect is shown as running on its setup screen.
SUPERSYSTEM will appear as 'SUPERSYSTEM' in the EyeConnect list of devices. The ENABLE box must be checked and the ACCESS selection set to ENABLE NEW DEVICES.
Your Mac is now ready to stream music to your radio. EyeConnect will normally run automatically after boot up.
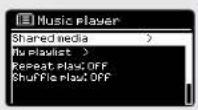
MUSIC PLAYER MODE
PLAYING AUDIO TRACKS IN THE MUSIC PLAYER
MUSIC PLAYER MODE allows you to play audio files such as MP3s, AACs, WMAs or FLACs directly from a computer or music server on your local network, or from a USB memory stick.
To enter MUSIC PLAYER MODE, press the button on the front panel, or press the button until the MUSIC PLAYER Mode intro screen is displayed.
Once in music player mode, press (M), then select either SHARED MEDIA or USB PLAYBACK.
MUSIC PLAYER MODE
Firstly plug your USB stick into the USB socket on SUPERSYSTEM'S front panel.
Selecting USB PLAYBACK from the MUSIC PLAYER MENU will display the contents of the memory stick in the form of a list of file names.

You can navigate your way through the list using the joystick controller, using UP and DOWN to scroll through the list, and either press SELECT or RIGHT on the joystick to advance through folders. When you reach your desired track, a short press of the SELECT button will start the track playing, a long press will add the track to the PLAYLIST (see PLAYLISTS on page 27 for more information).
Audio tracks can also be controlled using the (\boxed{ \begin{array}{c} \text{串串串串串串串串串串串串串串串串串串串串串串串串串串串串串串串串串串串串串串串串串串串串串串串串串串串串串串串串串串串串串串串串串串串串串串串串串串串串串串串串串串串串串串串串串串串串串串串串串串串串
Pressing and holding the button will fast-rewind the track your are currently playing, while doing the same with the button will fast-forward.
USB DEVICE CHARGING
SUPERSYSTEM provides standard USB charging (5V, up to 1000mA) for a range of USB devices such as iPhones, Android smartphones - as well as tablets.
The USB socket is positioned on SUPERSYSTEM's front panel.


MUSIC PLAYER MODE
SHARED MEDIA (From a UPnP Media Server)
In MUSIC PLAYER MODE select SHARED MEDIA. If you have set up shared media (as described on page 23), you should see an entry, for the server you set up, example "SB-Laptop: Audio". If you have more than one computer sharing media, the alternatives are listed. Select the shared media you want to play.
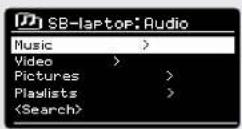
From this point on, the menus are generated from the shared media server (typically Windows Media Player). The first menu shows a list of media types, for example music, video, pictures and playlists. SUPERSYSTEM, can only play music and playlists.
There is also a search function, which finds tracks in a similar way to Internet radio search, as described on page 19.
For music there are numerous ways of selecting tracks, including:
Genre | Artist | Album |Composer | Rating

Once you have found a track you want to play, press the select button to select. A short press plays the track immediately, while a long press will add the track to the PLAYLIST.
MUSIC PLAYER MODE
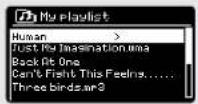
PLAYLISTS
SUPERSYSTEM Is capable of holding a queue of up to 500 tracks In Its playlist. Playlist tracks can be mixed from multiple and UPnP servers devices. To manage the playlist, select MY PLAYLIST from the MUSIC PLAYER MENU.
To view the contents of the playlist, scroll through it using the joystick control. To play the playlist from a certain track, give the select button a short press. To delete a track from the playlist, give the select button a long press, then confirm YES to erase.
If you select a track/album/folder for instant playback, without using the playlist feature, the playlist will be preserved and will continue to be stored by your radio until you choose to delete it.
REPEAT/SHUFFLE
You can choose to repeat tracks or play them in random order by selecting REPEAT PLAY or SHUFFLE PLAY from the MUSIC PLAYER MENU.
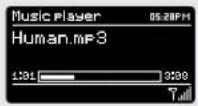
NOW PLAYING INFORMATION
While a track is playing, SUPERSYSTEM will display the track and artist name (UPnP). There is also a progress bar with displays elapsed and total track time.
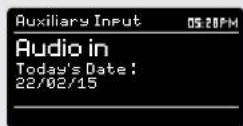
To view further track information, press No. Each time you press No, another piece of Information is displayed as follows:
TRACK NAME CODEC
ARTIST SAMPLING RATE
PROGRESS BAR PLAYBACK BUFFER
TRACK TIMES TODAY'S DATE


SPOTIFY CONNECT EXPLAINED
Spotify Connect is a home audio experience that provides effortless control and enjoyment of your music across a range of devices, from your phone, to your tablet, to your SUPERSYSTEM radio. SUPERSYSTEM owners with a Spotify Premium account can now enjoy instant access to over 30 million songs from the Spotify archive, all at superior audio sampling rates, simply download the Spotify app for smartphone or tablet.
How It Works - You've just walked through the door, listening to your favourite playlist on your phone. With Spotify Connect, simply hit play on your SUPERSYSTEM (when in Spotify mode) and the music instantly fl res up, right where you left off - ensuring you never miss a beat. Now pick up your phone or tablet to keep controlling the music from your sofa, or seamlessly switch the sound to another Spotify Connect enabled product in another room.
The Beat Goes On - With Spotify Connect you don't need to rely on unstable connections to stream music between your devices. You can make calls, play a game, or watch a video - you can even take your phone or tablet out of range and the music will just keep playing.
To use Spotify Connect, Revo SUPERSYSTEM owners are required to download the Spotify app for their smartphone or tablet (iOS or Android), and have an active Spotify Premium account. A free 30-day trial is available, for more details visit www.spotify.com/freetrial/
*For service availability in your country, check www.spotify.com

SPOTIFY CONNECT
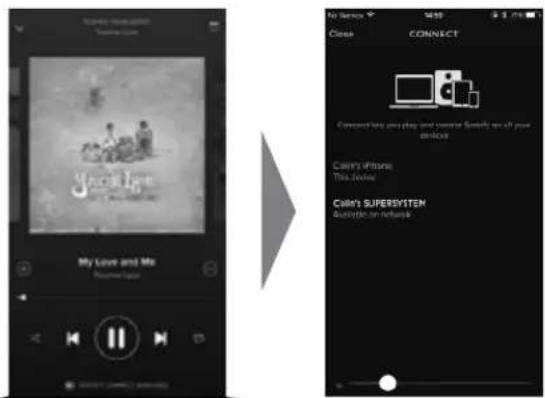
To Initiate Spotify on SUPERSYSTEM, firstly ensure that both your SUPERSYSTEM and iOS/Android device are on the same wifi network and that you are running the latest version of the Spotify app on your device.
As a song is playing on your device, top the Now Playing bar to bring up the Playing screen.
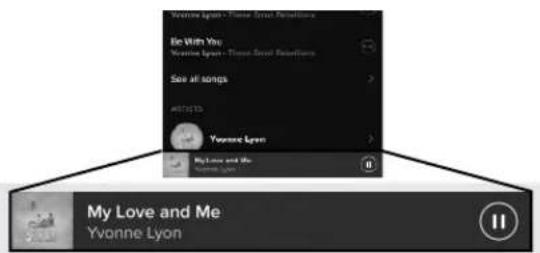
When the Spotify app recognises SUPERSYSTEM on your network, the text 'Spotify Connect Available' will appear at the bottom of the app's playing screen.
Tap on the text to display all available Spotify Connect enabled devices, then select your radio from the list.
The text colour at the bottom of the playing screen will change to green and will now display the name of your radio (example 'SUPERSYSTEM 002261D1718E0').

SPOTIFY CONNECT AVAILABLE
You will notice that your SUPERSYSTEM is currently listed as "Revo SUPERSYSTEMxxxxxx" (the 12-digit alphanumeric code is the MAC address of your radio) in the Spotify App. If you would like to change this name to something more personal ("John's SUPERSYSTEM" for example), you can do so using the UNDOK app (see page 31). Alternatively, do as follows:
On the SUPERSYSTEM: Press Menu and select System Settings -> Network -> View Settings. Scroll down and take a note of the 'IP address'.
On your computer: Ensure that your computer is on the same network as the radio, then enter the IP address into your browser's address bar (example: 192.168.0.34). This will allow you to view some of SUPERSYSTEM's diagnostics, but also change its name.

SPOTIFY CONNECT
Controlling Spotify Connect
You can now control Spotify from the app like normal; search for and play your tracks, change the volume and add to playlists even though playback is through SUPERSYSTEM. The next time you open the Spotify app, playback will continue through SUPERSYSTEM.
The music can also be controlled using the buttons mounted on your SUPERSYSTEM.
The audio is streaming directly from Spotify to SUPERSYSTEM, and the Spotify app is only being used as a remote control for the service. This means that your phone/tablet can be used for making calls and can even be switched off without any disruption to the music.
Spotify Connect is a cloud-based service, therefore after activation on SUPERSYSTEM, your iOS/Android device no longer needs to be on the same wifi network to control audio playback.
SUPERSYSTEM also features a dedicated Spotify Connect mode. To enter SPOOLIFY MODE, press the SPOTIFY button on the front panel, or press the MODE button until the SPOTIFY intro screen is displayed.
Use another Spotify account with SUPERSYSTEM
Your Spotify account details are now stored on SUPERSYSTEM. To overwrite this with another Spotify account, simply follow the activation steps again (see page 29) whilst running the Spotify app using your desired account. Please remember that both your iOS/Android device and SUPERSYSTEM need to be on the same wifi network for the overwriting to occur.
Please note:
Your Spotify app will only recognise SUPERSYSTEM when the radio is connected to the Internet (i.e. In Internet Radio or Music player modes)
To use Spotify when your radio is in non-internet modes (DAB, FM) you need to select 'KEEP NETWORK CONNECTED' in the radio's 'NETWORK SETTINGS' menu. This also allows you to wake the radio from standby using your Spotify app.
APP CONTROL AND MULTIROOM
You should now have an understanding of SuperSystem's various modes of operation.
Now, thanks to the Inclusion of UNDOK technology, audio can be wirelessly distributed to other compatible devices in your home to establish a sophisticated multiroom audio environment.
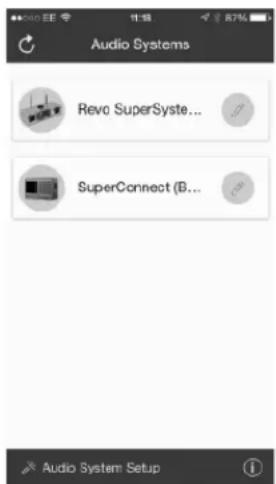
If you own more than one UNDOK-enabled product, two SuperSystems for example, you can wirelessly connect these devices to create a multiroom system.
Multiroom can be setup by using the UNDOK app, or on the SuperSystem itself.
UNDOK App
This Innovative and easy-to-use application not only acts as a full remote control for a single SuperSystem, but is also the control hub for your entire multiroom system if you're using more than one UNDOK-enabled device.
Firstly, download the 'UNDOK' app from the Apple App Store (iOS devices) or the Google Play Store (Android Devices).
Ensure that your phone or tablet is connected to the same wireless network as your SuperSystem. Load the UNDOK app and your UNDOK-enabled devices should appear in the 'Audio Systems' opening screen. Using the app you can control individual devices or create groups of devices to provide a multiroom system.
The UNDOK system is constantly being updated and Improved. For the latest Information and quick-start guides, please visit www.revo.co.uk


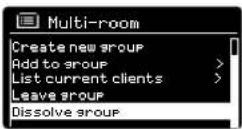
MULTIROOM
UNDOK MULTIROOM SETUP
If you are running more than one SuperSystem (or other UNDOK-enabled device) on the same network you can create a multiroom system without using the UNDOK app.
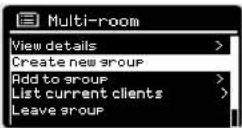
To begin, press the button on the front panel to enter the multroom setup menu.
Select 'Create New Group' to create and name a new multiroom group (e.g. Ground Floor). SuperSystem will then prompt you to add other devices to this group.
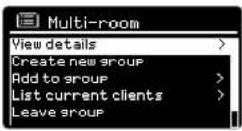
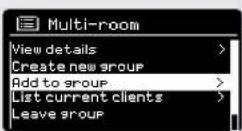
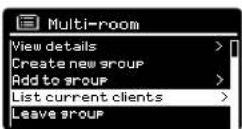
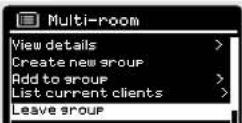
MULTIROOM MENU OPTIONS
View the details of your multiroom group - if the device is a server or client and the group's name.
As the server (master) you can add more devices to your multiroom group.
NB This function can only be performed by the server.
List current clients (slaves) in the group, and remove them if required.
If the device you're using is a client (slave), you can opt to leave the multitroom group.
If the device you're using is the server (master), you can dissolve the multifroom group entirely.
MULTIROOM
Once you have created your multiroom system, you can fully control it using the UNDOK app for iOS or Android (see page 31).
You can also control the system from your Revo device as follows:
USING THE SERVER DEVICE
Once your multiroom group is active, the server device will dictate what mode is being played. If you change the mode, the other client devices will follow.
USING THE CLIENT DEVICE
In a multiroom environment, all client devices simply act as slaves to the server device.
If you select to change the mode being played on a client device, this device will then become the group's server.
VOLUME CONTROL
Adjusting the volume directly on any multiroom device (even the server) will only effect that one device.
To control the volume on an entire multiroom system simultaneously please use the UNDOK app.
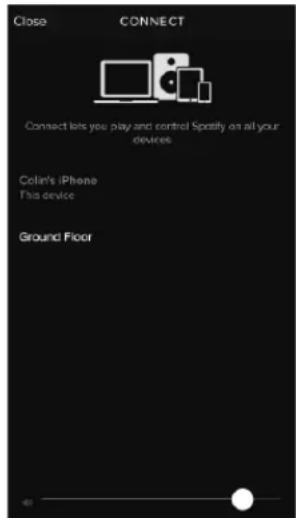
SPOTIFY CONNECT-MULTIROOM
If you are using the Spotify app with your SuperSystem (see page 28) it is also compatible with the UNDOK multitroom environment. If you have created a multitroom group (named e.g. Ground Floor), the Spotify app will recognise this and you can take control of the group from within the Spotify App.

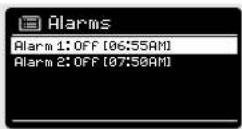
ALARM CLOCK
SETTING AN ALARM
SUPERSYSTEM is able to store two individual alarm settings. To set or change an alarm, either press the ALARM button, or select MENU, then MAIN MENU, then ALARMS. Select which of the ALARM SETTINGS (Alarm 1 or Alarm 2) you would like to modify or enable.
Using the joystick controller, scroll through the options below, setting your preferences.
- Enable: 'Off' or 'Daily', 'Once', 'Weekends' or 'Weekdays'.
Time
Mode: Buzz, Internet Radio, DAB or FM - Preset: Last listened or favourite station preset 1-10
Volume:0-32
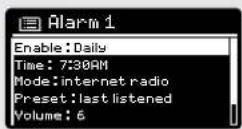
When your preferences have been set, remember to select SAVE.
SUPERSYSTEM shows any active alarms by displaying an icon at the bottom of its standby screen.
When in STANDBY MODE, by simply pressing the ALARM button, you can turn any alarms held in memory ON or OFF. Pressing ALARM will cycle through ALARM 1 and ALARM 2 settings, enabling, and disabling them. If the ALARM icons are displayed, the alarm is enabled. If no alarm icon is shown, the alarms are switched off.

STOPPING AN ALARM
When an alarm is sounding, pressing POWER or ALARM will STOP the alarm.
When the alarm has been cancelled, an ALARM OFF message will be displayed on SUPERSYSTEM's screen.

ALARM CLOCK
SLEEP MODE
By using the SLEEP function, you can set SUPERSYSTEM to automatically switch itself into STANDBY mode.

then select MAIN MENU, then SLEEP. You can now set the to any one of the following: 15, 30, 45 or 60 minutes.
When you have selected a sleep duration, SUPERSYSTEM will return to the MAIN MENU.

to return to the NOW PLAYING screen.
SNOOZE FUNCTION
SUPERSYSTEM Includes a TOUCH-SNOOZE feature which is incorporated into the aluminium front panel. SNOOZE is activated by tapping anywhere on the metal area during an alarm. SNOOZE allows you to temporarily silence the alarm for a period of up to 30 minutes.
The SNOOZE duration can only be set when the alarm is actually sounding. At this point, simply tap the FRONT PANEL to cycle through a range of pre-set SNOOZE durations, either 5, 10, 15 or 30 minutes.
Please note: that the Snooze function will only register a touch for a period of 60 seconds from the commencement of the alarm, meaning that after 60 seconds the front panel can be touched without the Snooze function being activated.
When SNOOZE is activated, SUPERSYSTEM will return to standby for the set period with the icon of the SNOOZED alarm shown on-screen.


SYSTEM SETTINGS
EQUALISER
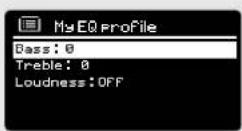
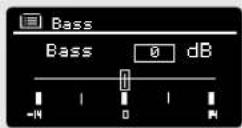
SUPERSYSTEM provides the user with a signifi cant degree of control over its standard (factory default) audio settings. This includes control over BASS and TREBLE, LOUDNESS and the ability to use one of a number of preset EQ settings. It is also possible to create your own personalised EQ setting - known as "My EQ".
To adjust the audio settings, press (MEN) then select MAIN MENU, followed by SYSTEM SETTINGS. Now select EQUALIZER from the menu.
SUPERSYSTEM will display a list of nine EQ options as follows: Normal, Flat, Jazz, Rock, Movie, Classic, Pop, News and My EQ.
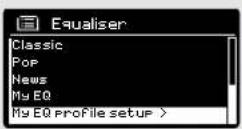
Simply select your preference from the list by highlighting your option and pressing the select button. SUPERSYSTEM will now store this setting in its memory. For reference, the current EQ setting is highlighted by an asterisk (*) in the EQ list.
To configure your own personal EQ setting, select MY EQ PROFILE SETUP from the EQUALISER menu. Now adjust the BASS and TREBLE levels, decide whether you would like the LOUDNESS function OFF or ON - before selecting SAVE. Your personalised EQ setting can now be selected by choosing MY EQ from the EQUALISER menu.
SYSTEM SETTINGS
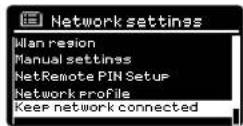
NETWORK
The NETWORK MENU can be found under SYSTEM SETTINGS in the MAIN MENU.
For the more experienced user, a variety of manual settings can also be accessed from here, as follows:
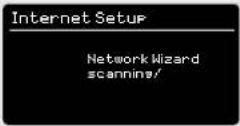
NETWORK WIZARD:
Simplifies the setup of SUPERSYSTEM'S Internet connection by taking you through step-by-step instructions.
PBC WLAN SETUP:
Used to pair your SUPERSYSTEM with a router that uses WPS security.
VIEW SETTINGS:
View the MAC address, Wien region, etc.
WLAN REGION:
Where you are using your SUPERSYSTEM - Europe, USA etc.
MANUAL SETTINGS:
Detailed control of Wired and Wireless connections.
NETWORK PROFILE:
Shows the names of the last four wireless networks SUPERSYSTEM has been connected to.
CLEAR NETWORK SETTINGS:
Clears the saved network profile.
KEEP NETWORK CONNECTED:
By selecting 'Yes' to this, your SUPERSYSTEM will remain connected to your WFI network even when in non-Internet modes (DAB/FM) and when in standby. This allows you to access it from the UNDOK app or SPOTIFY app at all times.
NOTE: SUPERSYSTEM remembers the last four wireless networks it has connected to, and automatically tries to connect to whichever one of them if can find. It's possible however to delete unwanted networks, simply select SYSTEM SETTINGS, then NETWORK, then NETWORK PROFILE. Now select the network profile you'd like to delete and select it.


SYSTEM SETTINGS
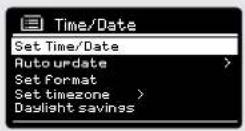
TIME / DATE
Found In the SYSTEM SETTINGS menu, this menu offers you the option of changing a number of time/date related settings. The TIME/DATE menu has three listings as follows:
SET TIME / DATE : Allows you to manually set the time/date.
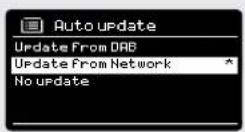
AUTO UPDATE: Choose from three different automatic setting options.
SET FORMAT: Choose whether you would like to use 12hr or 24hr formats.
Update from DAB :
Automatically takes time/date from the DAB signal. SUPERSYSTEM needs to have been operated in DAB MODE (and have received a signal) before this information can be extracted.
Update from Network
Takes time/date from your Internet connection.
LANGUAGE
The default language on your radio is English, though 12 other languages are supported as follows:
Danish Dutch Finnish French German Italian
Norweglan Polish Portuguese Spanish Swedish Turkish

To change the current language setting, select SYSTEM SETTINGS from the MAIN MENU, then LANGUAGE, then select your choice.
SYSTEM SETTINGS
FACTORY RESET
By selecting FACTORY RESET from the SYSTEM SETTINGS menu, you can reset SUPERSYSTEM to its default factory values, erasing any personal settings that may have been configured (time/date, network configuration and preset will be erased). However, the current software version is maintained, as is its registration with the internet radio portal. Internet radio favourites (not preset) are therefore retained, unless you re-register your radio with another account on the portal.
To perform a factory reset, press then select MAIN MENU. followed by SYSTEM SETTINGS, then FACTORY RESET. Now answer YES.

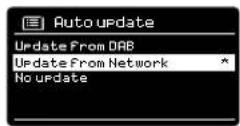
SOFTWARE UPDATES
From time to time we will make software updates available for your SUPERSYSTEM. These are necessary for general maintenance reasons, as well as for adding additional functionality. Software updates are carried out 'over-the-air', via your broadband connection.
SUPERSYSTEM will check for software updates each time it is switched on, and if an update is available, will ask you to confirm that you'd like to go ahead and commence the download.
Please note that after a software upgrade, all user settings are maintained.
If you'd prefer to manually check for software updates, press then select MAIN MENU. Now choose SYSTEM SETTINGS, then SOFTWARE UPDATES. Select AUTO-CHECK SETTING then choose NO when prompted.
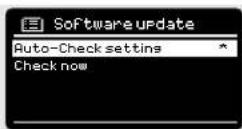
To manually check for updates, select CHECK NOW from the SOFTWARE UPDATES menu.
CAUTION: Before commencing a software upgrade, ensure that SUPERSYSTEM is plugged into a stable mains power connection. Disconnecting power during a software update may permanently damage your device.

SYSTEM SETTINGS
SETUP WIZARD
The SETUP WIZARD automatically runs when you first power up your SUPERSYSTEM, and it can be accessed again in this menu. It simplifies the set-up of both time/date and Internet settings, by running through a series of questions.
To access the SETUP WIZARD, press (MEN) then select MAIN MENU, followed by SYSTEM SETTINGS. Now select SETUP WIZARD from the menu list.
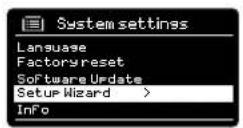
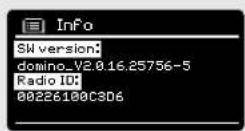
INFO
When dealing with a technical support issue, you may be asked for the SOFTWARE VERSION or RADIO ID number. Both these pieces of information can be found under the INFO heading, in the SYSTEM SETTINGS menu.
Press (MEN) then select MAIN MENU, followed by SETTINGS, then INFO.
BRIGHTNESS
SUPERSYSTEM allows a degree of control over the brightness of its OLED display.
SUPERSYSTEM'S ON LEVEL, for use in normal operation, can be set to LOW, MEDIUM or HIGH.
SUPERSYSTEM'S DIM LEVEL, for use in Standby mode, can be set to OFF, LOW, MEDIUM or HIGH.
It is also possible to set the TIMEOUT duration - a delay on the screen brightness changing when you enter Standby mode.

Note: If 'OFF' is selected, SUPERSYSTEM's display will switch off whilst in Standby mode. You can wake the display by simply pressing any button or touching the front metal panel.
TROUBLESHOOTING
| PROBLEM CAUSE SOLUTIONS | ||
| FM: HISS | Low signal strength. Check/move antenna. | Move radio to another location. Re-scan local (high-strength) stations only. For DAB, check local coverage at www.ukdigitalradio.com/coverage |
| DAB: Burbling/Intermittent | ||
| Cut-Out | ||
| DAB: 'No stations available' Low signal strength. As above, then rescan stations. | ||
| Cannot connect to network Network down. Check that network is working | between computer and the router. | |
| Router restricts access to listed MAC addresses. | Obtain the SUPERSYSTEM MAC address from MENU > SYSTEM SETTINGS > NETWORK > VIEW SETTINGS and add to router list NOTE: SUPERSYSTEM has separate MAC addresses for wired and wireless networks; only the current network adaptor method address is displayed, but the other address can be obtained by changing the first pair of digits between '00' (wireless) and '02' (wired) | |
| Insufficient Wi-Fi signal strength. Check distance to router. See if a computer can connect to the network in this location. | ||
| Unknown encryption method. Change encryption method on router. SUPERSYSTEM supports WEP, WPA and WPA2. | ||
| Unusual network configuration. Setup network manually through MENU > SYSTEM SETTINGS > NETWORK > MANUAL SETTINGS | ||
| Firewall preventing access. Check the following ports are open on the router: UDP and TCP ports 80 and 123 DNS port 53 Windows shares: ports 135 - 139 and 445 Windows media player: varies - Non-Microsoft fi rewrites may require configuration for UPnP. | ||
TROUBLESHOOTING
| PROBLEM CAUSE SOLUTIONS | ||
| Cannot connect to Internet Internet | connection down Check that the Internet is working for a computer connected to the same network. | |
| Firewall preventing access Check the following ports are open:UDP and TCP ports 80 and 123 DNS port 53.Some Internet radio stations may require additional ports to be opened. | ||
| Cannot play particular Internet radio station | Station not broadcasting Overloaded or Insuff client bandwidth.Station broadcasting using unknown codec.Link out of date. | Try other stations.Try listening on computer via Internet radio portal website.Try later. |
| Bluetooth Mode: Can't connect to a paired device | Select BT DISCONNECT from the Bluetooth Menu and delete SUPERSYSTEM's profilé from your Bluetooth device, then re-pair the devices as normal | |
| Bluetooth Mode: Poor audio quality | Your Bluetooth device may be out of rangeElectromagnetic interference | Move your Bluetooth device closer to SUPERSYSTEMMove your Bluetooth device away from other sources of interference such as other Bluetooth devices, wireless routers etc. |
ERROR MESSAGES
| MESSAGE DESCRIPTION EXAMPLE | ||
| Failed to connect Correct key entered, but router rejects request. | MAC filtering enabled on router. | |
| Format error Cannot recognise file format - independent of network. | Received .wma, but found that the stream wasn't WMA when trying to decode. | |
| Network error Problem byeond router - Incorrect data being received from network. | Data obtained from server is unreadable. | |
| Network timeout Problem beyond router - no response being received from network. | Streaming IR station and suddenly station becomes unavailable. | |
| No UPnP media found No UPnP servers found. | ||
| Service not available (DAB) No DAB reception. | ||
| Unauthorized Access not granted by UPnP server. Allow access for SUPERSYSTEM in UPnP server settings. | ||
| Update failed Software upgrade failed. | ||
| Network not ready | problem with connection to router. | Router switched off. |
| No Media or Waiting for Spotify | Spotify connection has been broken or connection has been transferred to another device. | |
REVO.
SUPERSYSTEM
Owner's Guide
v1.0

Deutsch
TECHNISCHE HILFE
Revo Technologies Ltd
The Inox Building, Caldwellside, Lanark, Scotland, United Kingdom, ML11 7SR
Tel: +44 (0) 1555 66 61 61 Email: enquiries@revo.co.uk
Die angewendete Spotify Software Ist Uzenzelgentum Dritter: www.sparkly.com/connect/third-party-licenses
GARANTIEAUSCHLUSS
This is SUPERSYSTEM'S principle (top level) menu, and allows you to enter different operating modes, change settings and view information such as the 'Radio ID' number and software version.

MODE MENUS
KEEP NETWORK CONNECTED:
INFORMATIONS SUR L'ELIMINATION DU PRODUIT (Directive WEEE)
Revo Technologies Ltd
The Inox Building, Caldwellside, Lanark, Scotland, United Kingdom, ML11 7SR
Tel: +44 (0) 1555 66 61 61 Email: enquiries@revo.co.uk
15 Mode FM / Mode AUX-IN / Mode Optical In
16-17 Bluetooth
18-21 Mode Radio Internet
22 Portail Radio Internet
28-30 Spotify Connect
34-35 Réveil
TEMPS DE LA PISTE DATE D'AUJOURD HUI

SPOTIFY CONNECT EXPLIQUÉE
Controller Spotify Connect
MISES A JOUR DU LOGICIEL
E-MAIL - support@revo.co.uk
WEB - www.revo.co.uk/support