GoLondon - Radio SONORO - Free user manual and instructions
Find the device manual for free GoLondon SONORO in PDF.
| Features | Details |
|---|---|
| Product type | Radio |
| Supported frequencies | FM, DAB/DAB+ |
| Connectivity | Bluetooth, AUX input |
| Power supply | Power adapter, rechargeable battery |
| Battery life | Up to 10 hours |
| Dimensions | Compact, easy to carry |
| Weight | Lightweight, ideal for mobile use |
| Usage | Radio listening, audio streaming via Bluetooth |
| Maintenance | Regular cleaning, firmware update if available |
| Safety | Use only with the supplied adapter, avoid moisture |
| General information | Check Bluetooth compatibility with your devices |
Frequently Asked Questions - GoLondon SONORO
User questions about GoLondon SONORO
0 question about this device. Answer the ones you know or ask your own.
Ask a new question about this device
Download the instructions for your Radio in PDF format for free! Find your manual GoLondon - SONORO and take your electronic device back in hand. On this page are published all the documents necessary for the use of your device. GoLondon by SONORO.
USER MANUAL GoLondon SONORO
< DLS> Dynamic Label Segment
The manufacturer continuously works on the further development of all types and models.
We ask for your understanding that changes of the scope of delivery in regard to form, components and technology are therefore possible at any time. The information, illustrations and descriptions in this manual therefore shall not constitute an entitlement to any claims.
Replication, copying or translation, even in parts, is not permitted without the written consent of the manufacturers.
The manufacturer explicitly reserves all rights pursuant to the law governing the copyright.
Subject to changes.
1. Introduction
Congratulations on purchasing a sonoro GoLondon.
This operating manual and the safety instruction provides you with all information concerning the correct and safe operation of the device.
- Please read this operating manual and the safety instructions in its entirety before using the device.
- Keep these instructions in a safe place.
- In case you pass this device on to a third party, please also include the operating manual and the safety Instruction.
- Non-compliance with this manual may lead to serious injuries and damage to the device.
- We may not be held liable for damage that was caused due to noncompliance with this operating manual.
The illustrations in this operating manual serve the purpose to visualize processes.
Enjoy your device!
2. Scope of Delivery
- sonoro GoLondon including sleeve
- Power adapter
- AUX-cable
- Instruction manual, safety instructions, warranty conditions
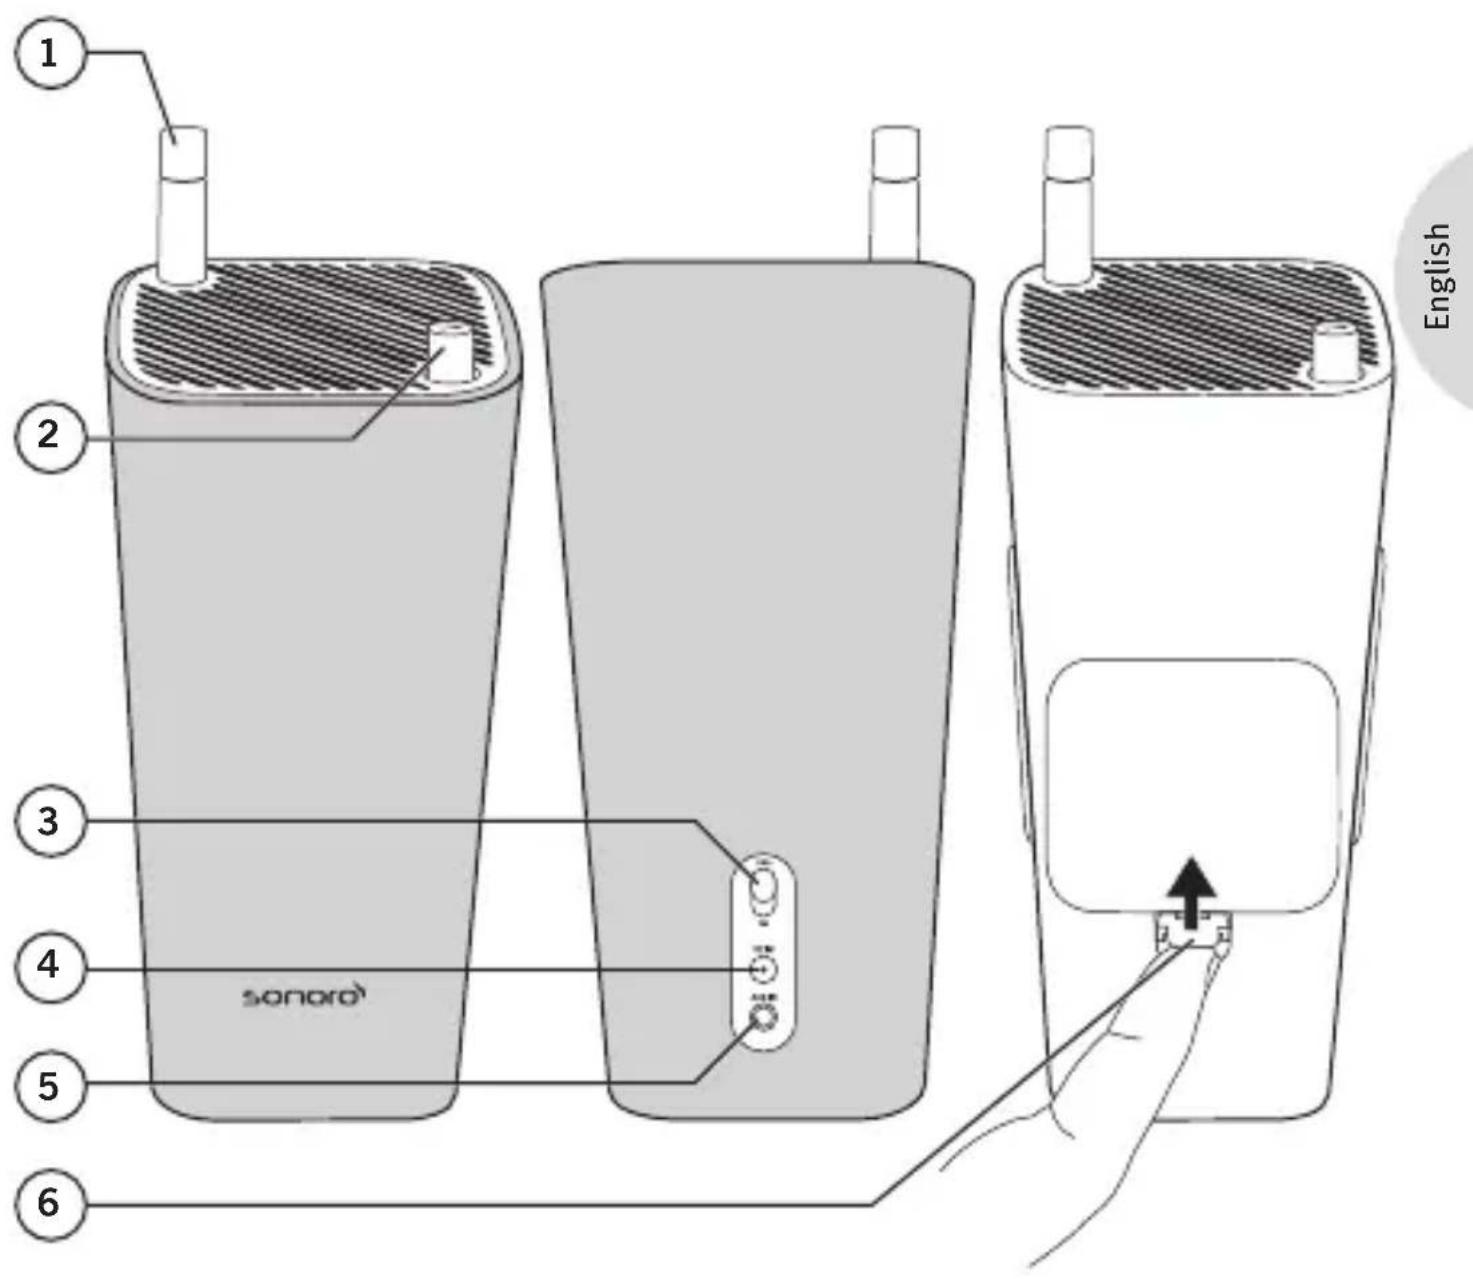
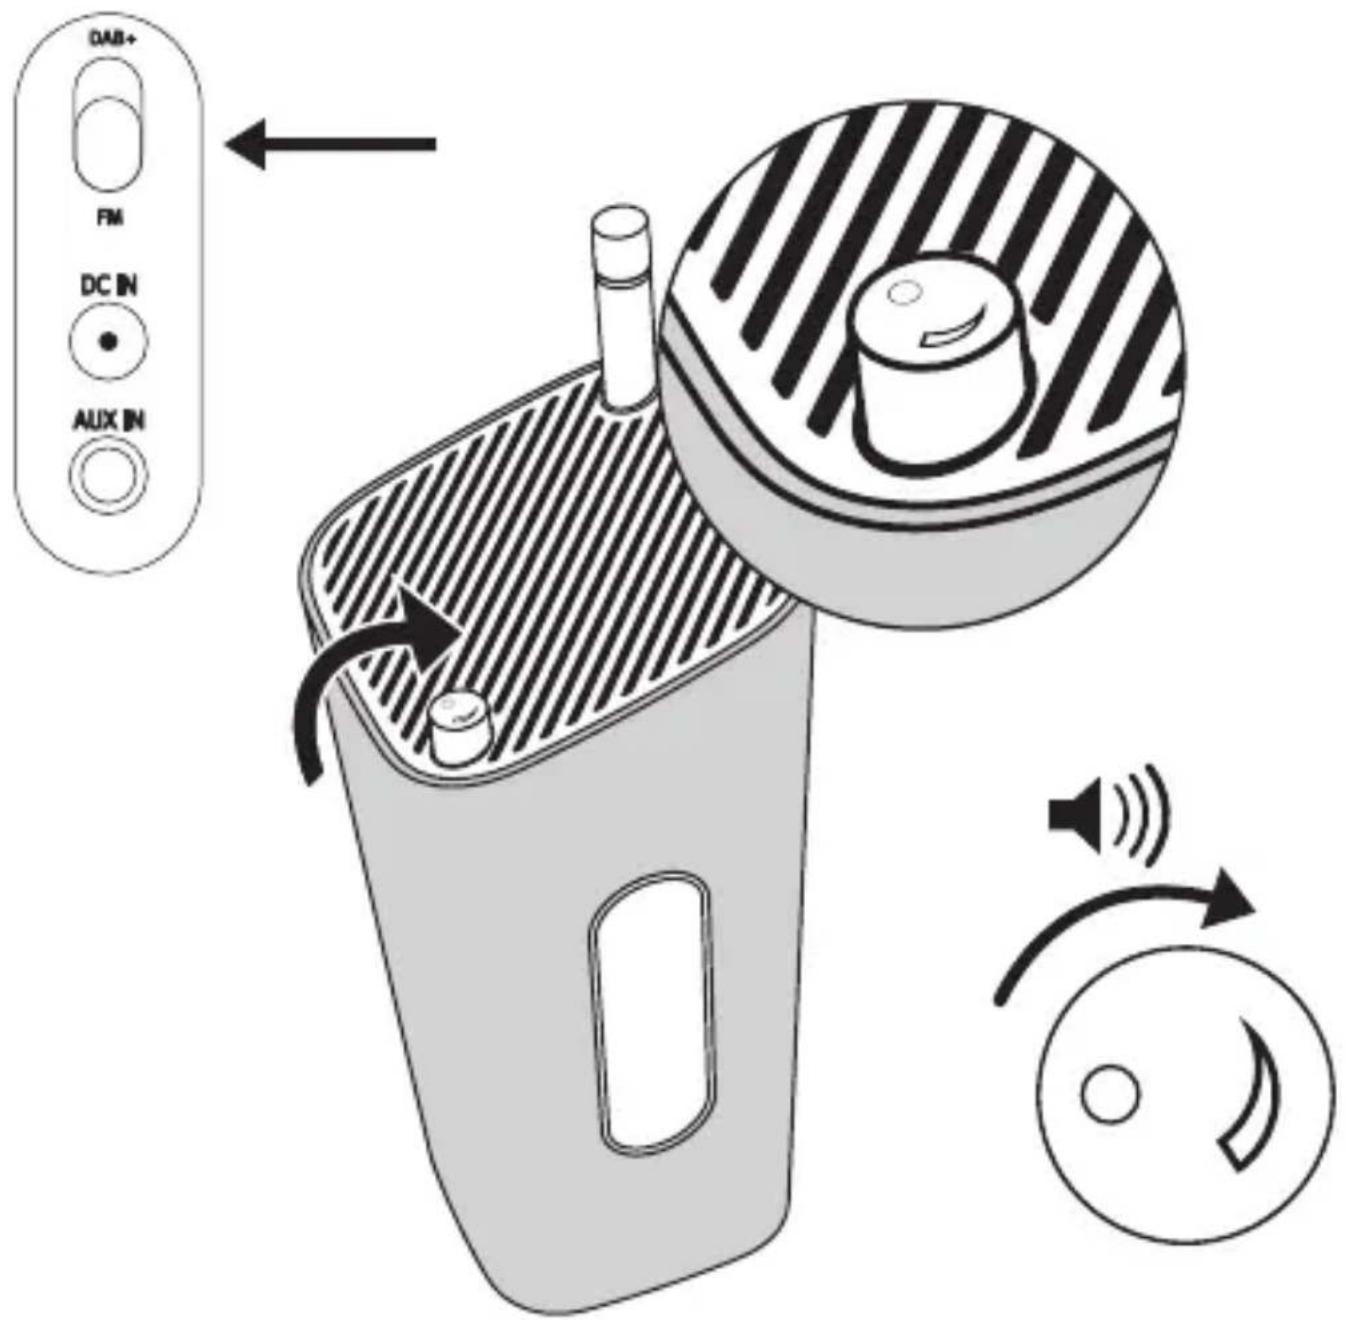
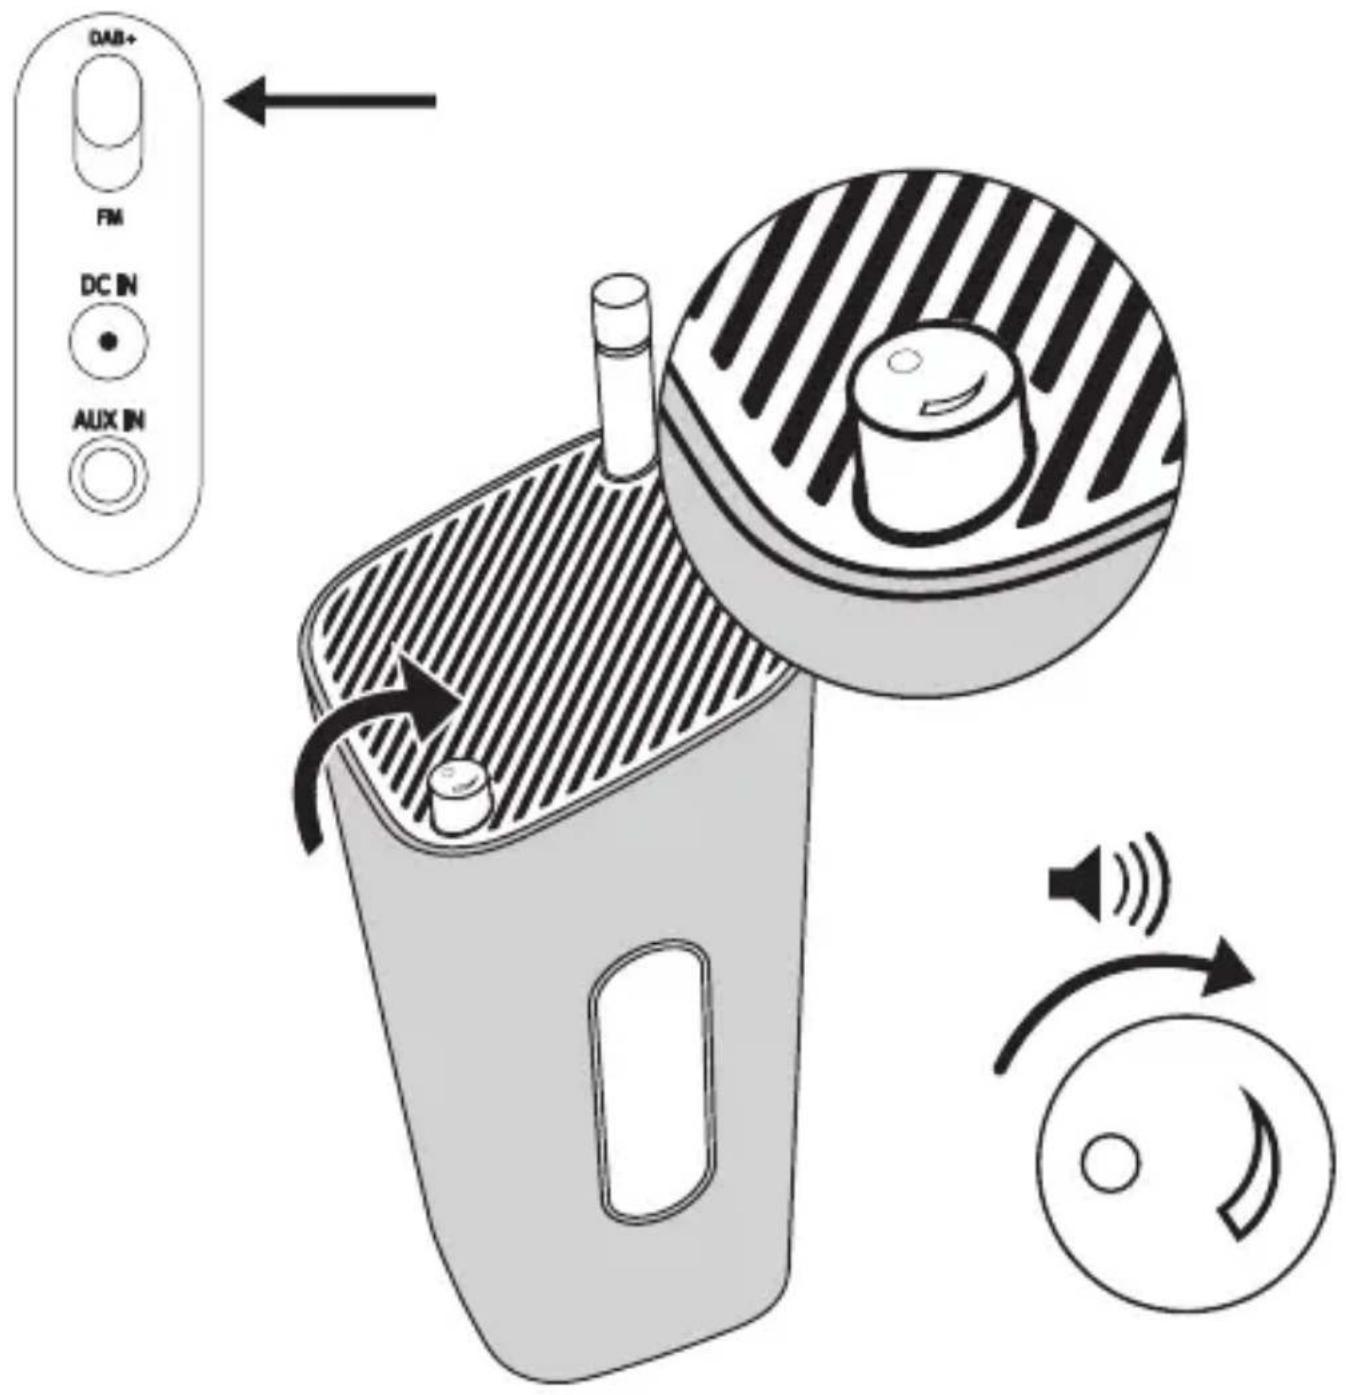
3. Operating elements and connections
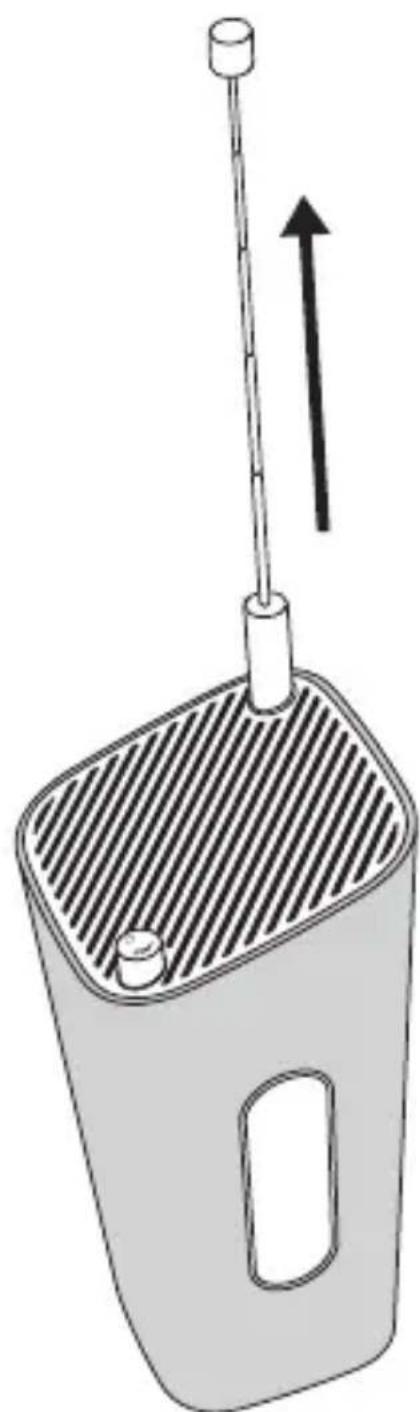
1 FM/DAB Antenne
2 On/Off Volume Knob
3 FM/DAB+Switch
4 12 DC input socket
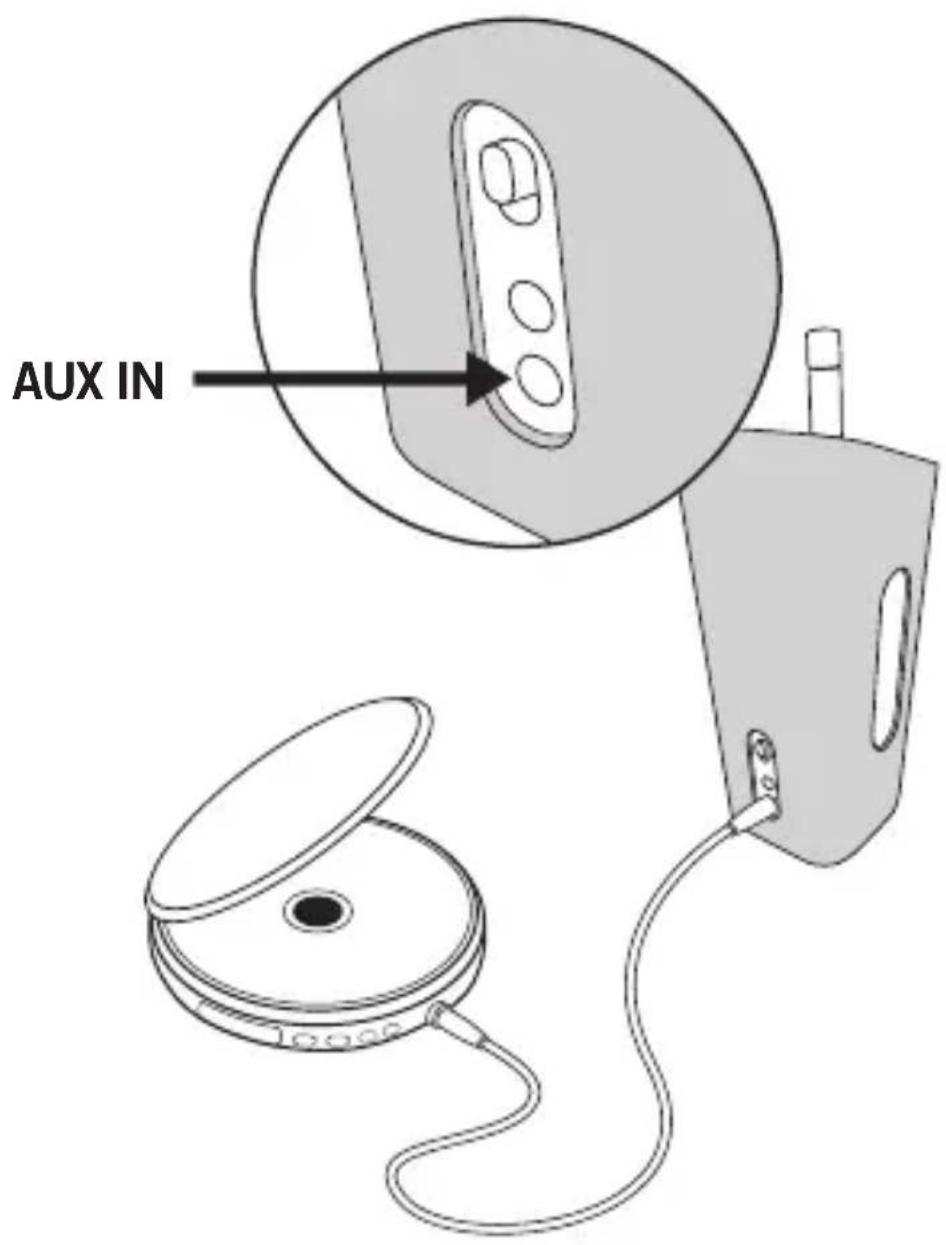
5 AUX-IN socket
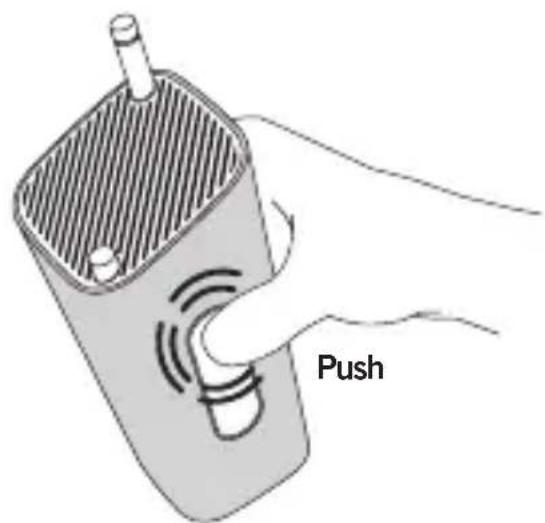
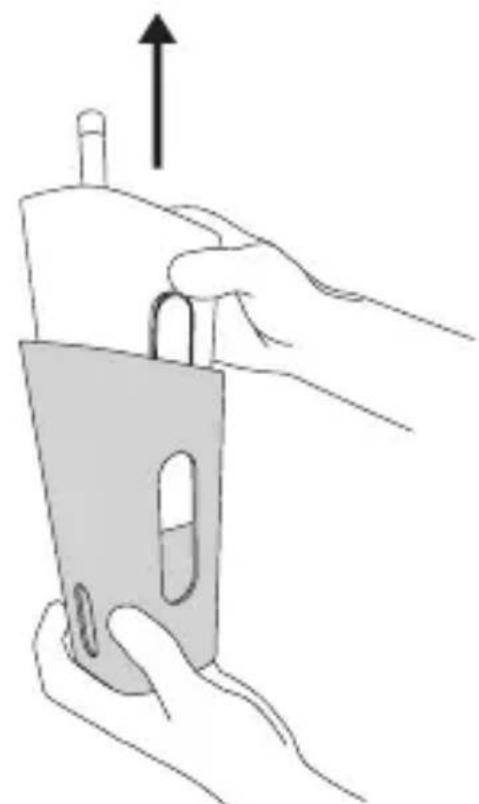
6 Open and close the battery door
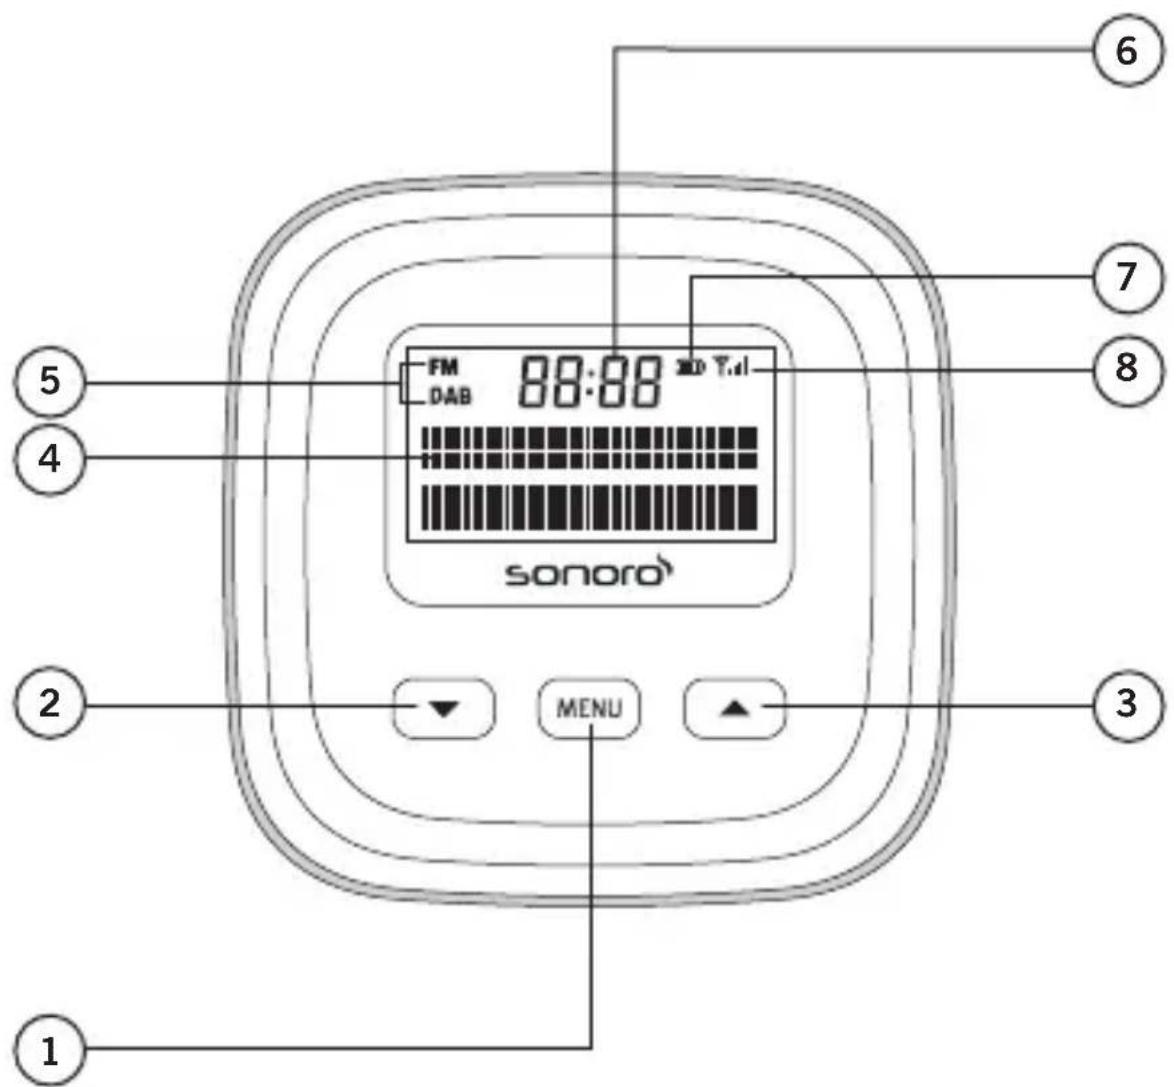
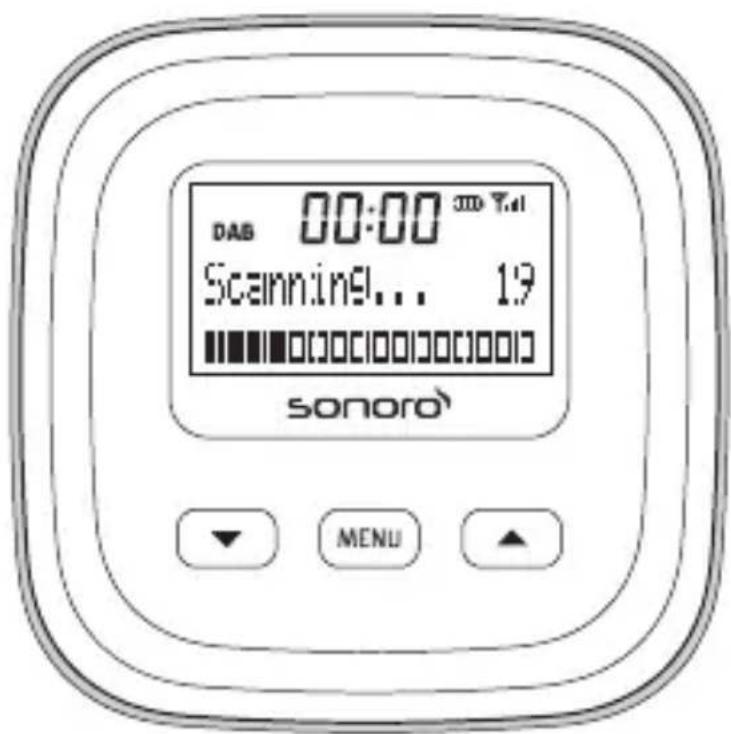
1 MENU Key
2 Down Key
3 Up Key
4 2 × 16 characters display
5 FM/DAB indicator
6 Time
7 Battery charging indicator
8 Antenna signal strength inidcator
English
4. Startup
a. Establish Power Supply
Unpack the device and all accessories and check the content for completeness and proper condition.
NOTE! I case you detect damage due to transportation or if parts of the packet are missing, contact your dealer immediately.
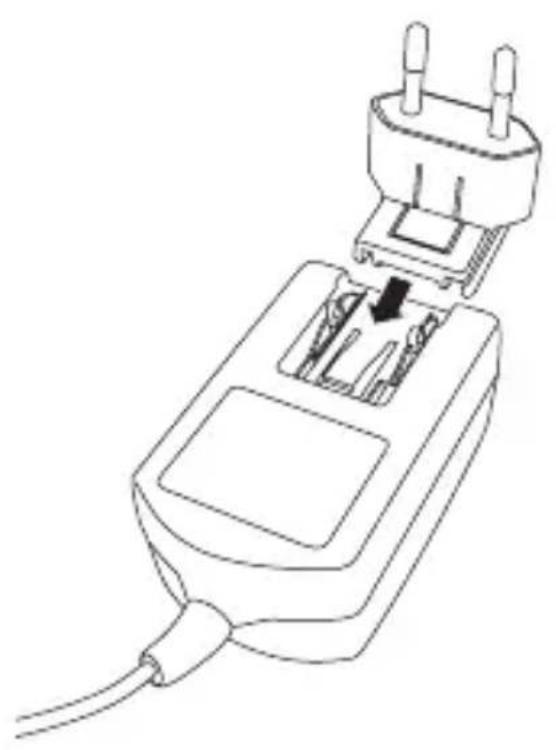
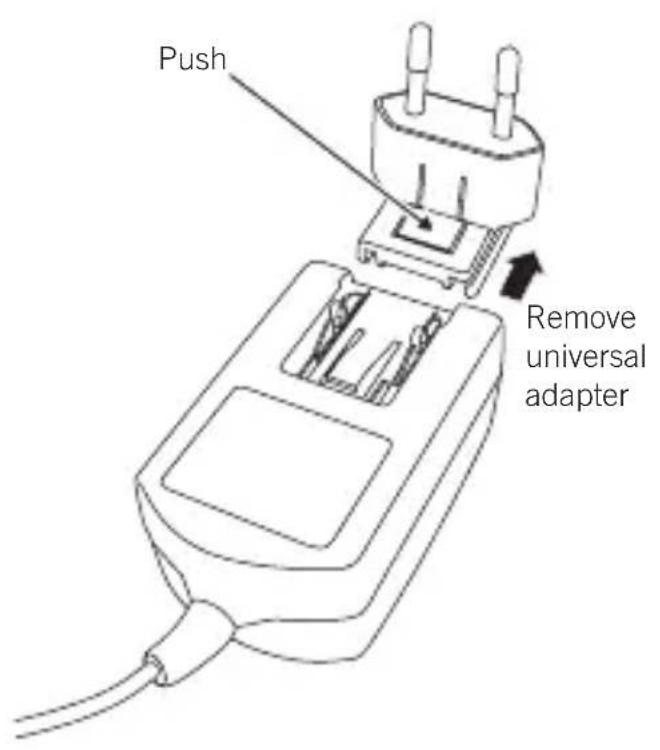
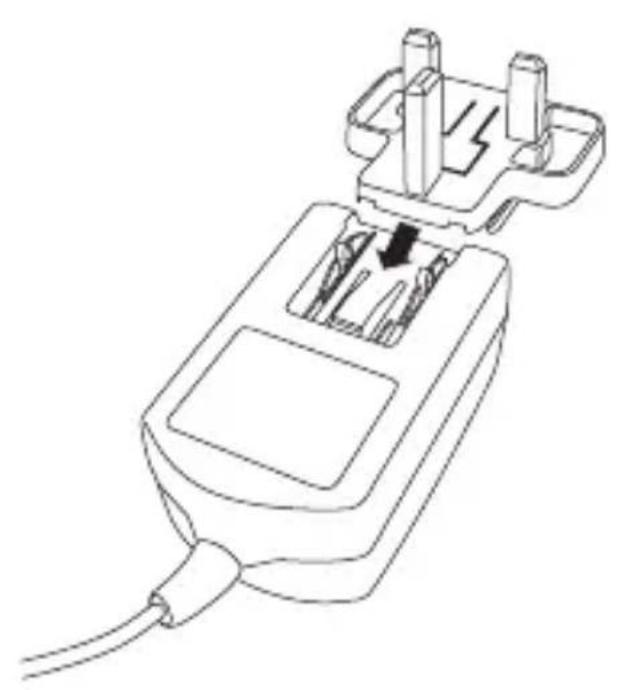
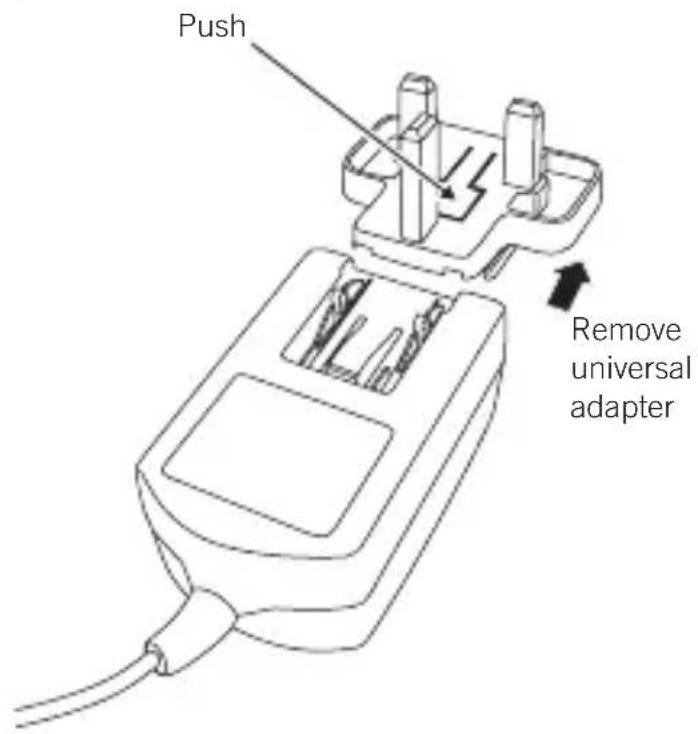
The device is powered via the power supply unit that comes with the packet. Slide the adapter onto the power supply unit until it has snapped into position.
Plug the connecting plug of the power supply into the 12V =1.2A DC port on the back of the device.
Plug the power plug into an electrical outlet.
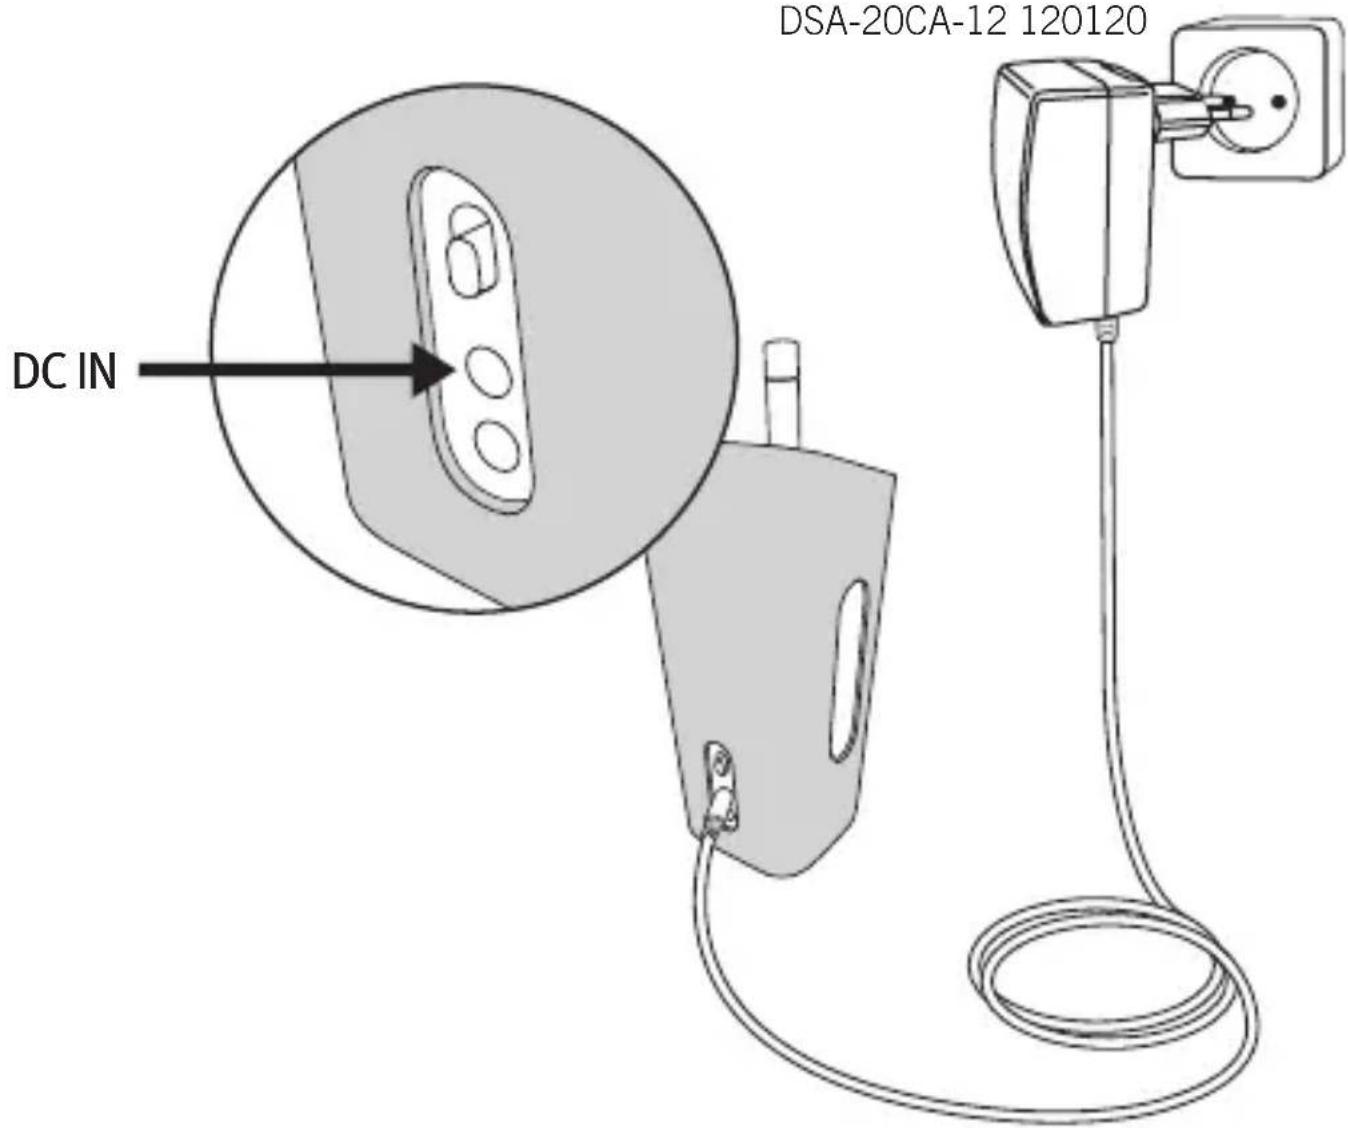
Use only:
DSA-20CA-12 120120
b. Use alkaline batteries

WARNING!
er mix different batteries, nor types or brands and never mixthe polarity! Serious damage or explosions may result!
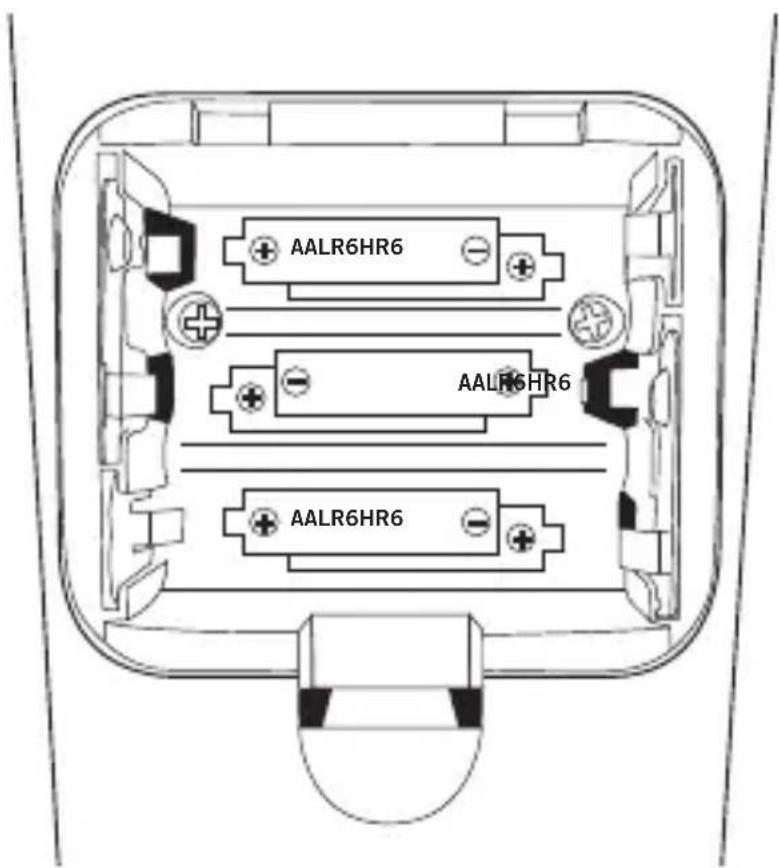
Install 6 pieces of 1,5 Volt AA or LR6 alkaline batteries or 6 pieces of 1,2 Volt HR6 rechargeable Ni-MH batteries, and make sure that the polarity is as shown in the battery compartment.
c. Use Ni-MH rechargeable batteries
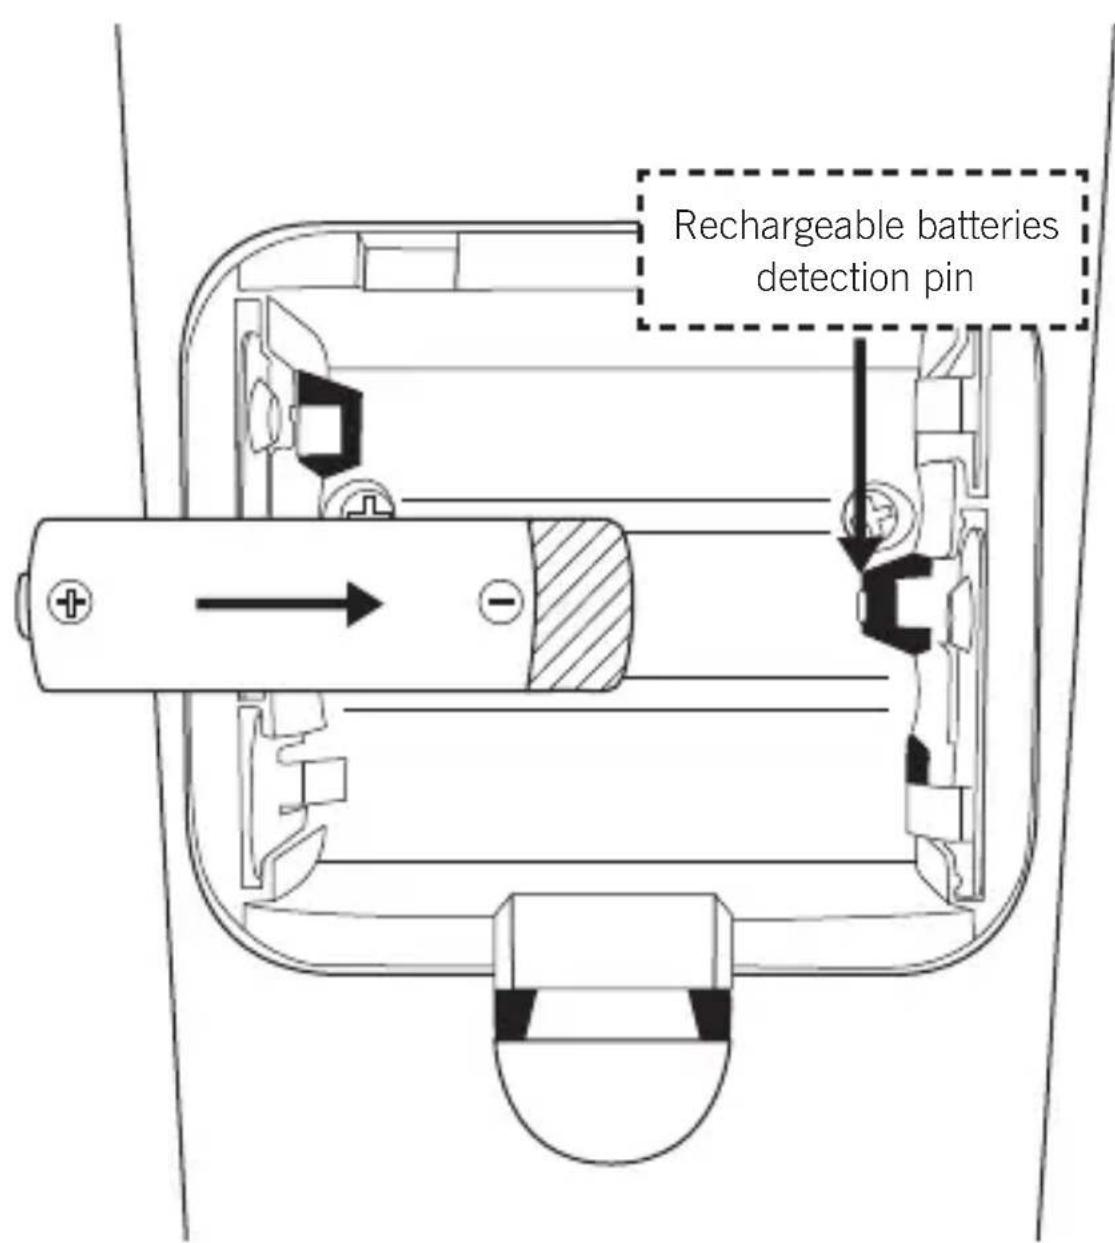
The GoLondon radio is designed with a Ni-MH battery charger. It uses an extra pin for this charging function. The pin is located in the middle of the inside of the battery compartment.

NOTE!
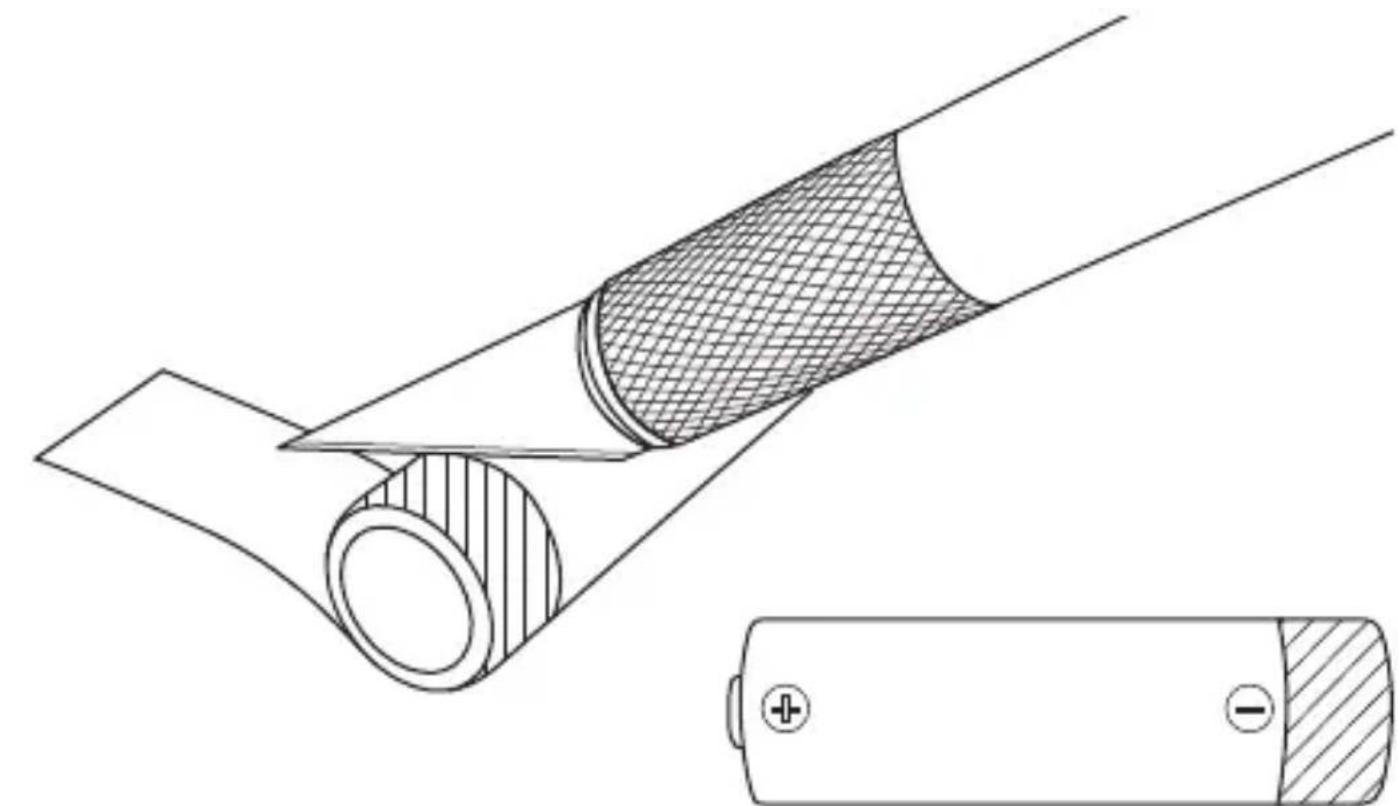
For rechargeable batteries it is vital that one battery jack is peeled off by 1 cm at the negative pole and installed in the bottom battery layer of the middle slot. You will find a small metal contact that needs to be connected directly to the batteries metal jack.
The battery icon (will indicate the remaining battery level. 3 bars indicate full battery power, 2 bars half full and one bar indicates that the battery power is running low. A blinking battery icon indicates that the batteries are charging.
5. FM Radio
a. Tune FM radio stations
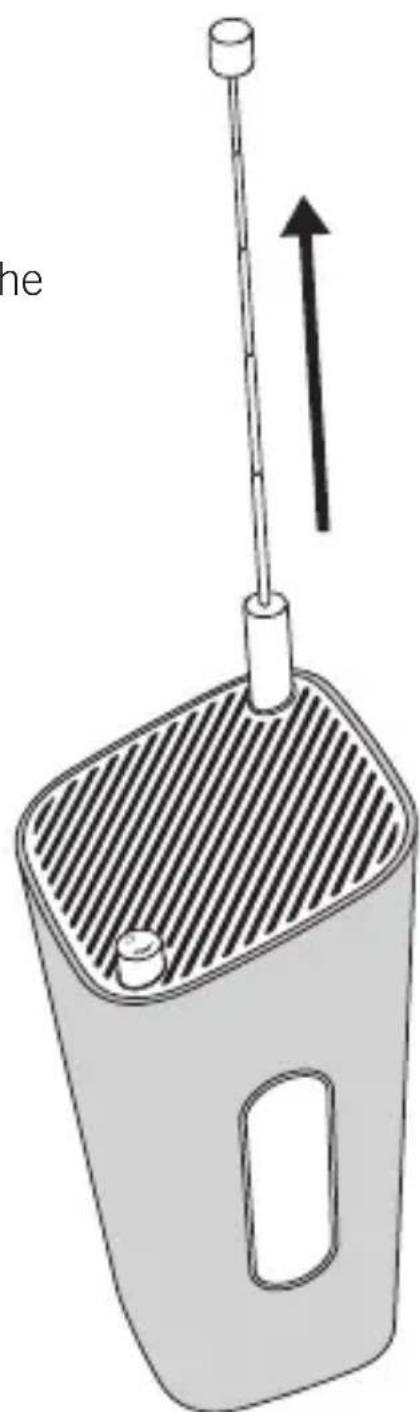
Pull out the FM/DAB antenna, select FM radio mode, switch the unit on and turn the volume up.
Press repeatedly to tune a radio station.
b. Scanning FM radio stations automatically
In FM mode, press and hold keys for more than two seconds.
The unit scans the next available station and broadcasts it automatically.
c. Manually storing radio stations
Tune to an FM radio station
Note I case the display is off, press / or-MENU key to light the display up, then press and hold the MENU key for more than two seconds to enter the MENU mode.
Press and hold MENU key for more than two seconds to activate storing mode. The unit will show
Press MENU key for selection.
Press / repeatedly to select a preset number.
Press MENU key to confirm the stored radio station.
Note Yu can store up to 10 FM radio stations.
d. Select a preset FM radio station
To select a preset FM radio station in FM mode, press MENU key.
Press / repeatedly to select a preset FM radio station.
Press MENU to confirm.
6. FM Menu
In FM mode, press and hold for more than 2 seconds the MENU key to access FM menu.
Press repeatedly the keys to scroll the menu options:
To select an option, press MENU key.
a. Preset stored
<1:87.60MHz>
<2: (Empty)>
<3:99.20MHz>
··
<10:107.10MHz>
Press repeatedly to scroll the preset stored, press MENU key to store a station.
Note Ioverwrite a preset station, store another stations in its place.
b. Scan setting
: scan stations with strong signal only
c. System setting
7. DAB Radio
a. Tune DAB and DAB+ radio stations
Pull out the FM/DAB antenna, select DAB+ radio mode, switch the unit on and turn the volume up.
Note When you enter the DAB/DAB+ mode for the first time, or when the station list is empty, the digital radio automatically scans DAB/DAB+ radio stations. The station list is then retained in the memory. Next time when you turn the unit on, the station scan does not take place.
A bar graph indicates the progress of the search and the number of stations found increase as the scan progresses.
When the scan is completed, the stations are listed and the first available station is automatically broadcasted.
Note I no DAB/DAB+ station is available,
Note I case the display is off, press / or-MENU key to light the display up first, then press and hold the MENU key for more than two seconds to enter the MENU mode.
To change DAB/DAB+ stations:
In DAB mode, press / repeatedly to select a desired radio station from the station list.
Press the MENU key to confirm.
If not, the radio exits the station list automatically.
b. Full scan for DAB/DAB+ radio stations
In DAB mode, press and hold MENU for more than 2 seconds to access the DAB menu. Press repeatedly to display Full scan .
Press MENU key to confirm. The unit scans all DAB/DAB+ radio stations and broadcasts the first available station.
Note New stations and services will be added in the DAB ^+ broadcast. To make new DAB ^+ stations and services available, perform full scan regularly.
c. Manually storing DAB/DAB+ radio stations
Tune a DAB/DAB+ radio station
Press and hold MENU for more than 2 seconds and press
/ repeatedly till
Press MENU for selection
Press / repeatedly to select a preset number and press the MENU key to confirm.
Repeat the above mentioned steps to store more DAB/DAB+ stations.
Note
To overwrite a preset station, store another station in its place.
- You can store up to 10 DAB/DAB+ radio stations.
d. Select a preset DAB/DAB+ radio station
In DAB mode, press MENU key, press repeatedly to select a preset DAB/DAB+ radio station.
Press MENU to confirm.
8. DAB Menu
In DAB mode, press and hold MENU for more than 2 seconds to access the DAB menu. Press repeatedly to display the menu options, and to select an option, press MENU key.
a. Preset stored
<1:WDR2>
<2:1LIVE>
<3: (Empty)>
··
Press / repeatedly to scroll the preset stored, press MENU key to store a station.
b. Full scan
c. Manual tune
d. DRC
< DRC> Dynamic Range Compression adds or removes a degree of compensation for the differences in the dynamic range between radio stations.
< DRC high>: set DRC in high level
< DRC low>: set DRC in low level
< DRC off>: turn off DRC

Note
RC only works if it is enabled by the broadcaster for a specific station.
e. Station order
f. Prune
g. Info
Tune to a DAB/DAB+ radio station, press the MENU key and select with the up/down keys
h. System Setting

Note
button is pressed within 15 seconds, the menu exits.
9. AUX IN
With the included connection cable 3,5 mm you can connect an external device (such as an MP3 Player or mobile phone) to the AUX IN connection to enjoy your music.

Note
GoLondon will automatically change to AUX IN playback mode. Pull out the cable to listen to DAB+ or FM Radio.
10. Automatic power saving
If sonoro GoLondon is not connected with any device for longer than 10 minutes, it will automatically turn off to save energy. To reactivate your AUX-IN function, please use the volume knob to switch the unit off and then on again.
11. Synchronize the time
The time can be synchronized with external clocks broadcasted over DAB/DAB+ and RDS radio stations.
12. Change sleeve
13. Technical Data
| Product name GoLondon | |
| Product type digital DAB/DAB+/FM radio | |
| Model number AU-5110 | |
| Tuner (FM/DAB/DAB+) | |
| Tuning Range FM: 87.5 - 108 MHz | |
| DAB 174.928 - 239.200 MHz (Band III) | |
| Tuning grid (FM) 50 KHz | |
| AC/DC adapter | |
| Brand name DVE Switching adapter | |
| Model DSA-20CA-12 120120 | |
| Input 100-240V~ 50/60Hz 0.8A | |
| Output 12V - - - DC 1 | |
| AUX IN Auxiliary input 3.5mm stereo jack | |
| Batteries 6 x 1,5V AA/LR6 alkaline batteries or 6 x 1,2V HR6 rechargeable Ni-MH batteries | |
| Dimensions Main Unit (H x W x D) approx. 192mm x 94mm x 94mm | |
| Weight Main Unit approx. 735g |

Note
Technical Data is subject to change without prior notice.
14. Troubleshooting
To keep the warranty valid, never try to repair the system yourself. If you encounter problems when using this device, check the following points before contacting the customer service.
No power
- When using batteries/rechargeable batteries, only place new and fully charged batteries/rechargeable batteries.
- When using the AC power plug, make sure that the plug is connected properly, and that there is power at the AC outlet.
No sound
- Adjust the volume.
No response from the unit
- Turn off the unit and then turn it on again.
Poor radio reception
- Increase the distance between your digital radio and your TV or VCR.
- Change location.
Declaration of Conformity
Manufacturer: sonoro audio GmbH
We herewith declare that the sonoro GoLondon is in conformity with the EMC directive 2004/108/EC and the LVD directive 2006/95/EC; with respect to its conception and style of construction as well as its performance as issued by us.
In the case of a modification, unauthorized by sonoro audio GmbH being made to the device, the declaration looses automatically its validity. To receive the full description of conformity please e-mail: support@sonoro.de

Contents
< DLS> Dynamic Label Segment
Tuning Range FM: 87.5 - 108 MHz
DAB 174.928 - 239.200 MHz (Band III)
Raster tuned (FM) 50 KHz
AC/DC adapter
Merknaam DVE Switching Adapter
Model DSA-20CA-12 120120
Invoer 100-240V~ 50/60Hz 0.8A
Output 12V DC 1.2A

AUX-IN 3,5 mm stereo-ingang
Batterijen 6 × 1,5 ~V AA/LR6 alkalinebatterijen of
6 x 1,2V HR6 oplaadbare Ni-MH batterijen
Afmetingen apparatus (H x B x D) ca. 192mm x 94mm x 94mm
Gewicht
Apparaat ca. 735g