USER MANUAL RC30 ACV
QUESTIONS FREQUEMENT POSÉES
The ACV RC30 is a programmable room thermostat designed to control your heating system efficiently, providing comfortable temperatures when you are at home and energy savings when you are away. The following instructions explain how to setup, program and operate your ACV RC30 Programmable Room Thermostat.
Features
- Ergonomic user interface featuring an 'OK-button'.
Large LCD (Liquid Crystal Display) Screen.
- 7-day heating program to match your lifestyle, whilst maximising energy savings.
- 6 independent temperature levels per day (from 5^ to 35^ ).
- Holiday button saves energy by letting you reduce the temperature for 1 to 99 days.
Built-in Memory holds the user program indefinitely.
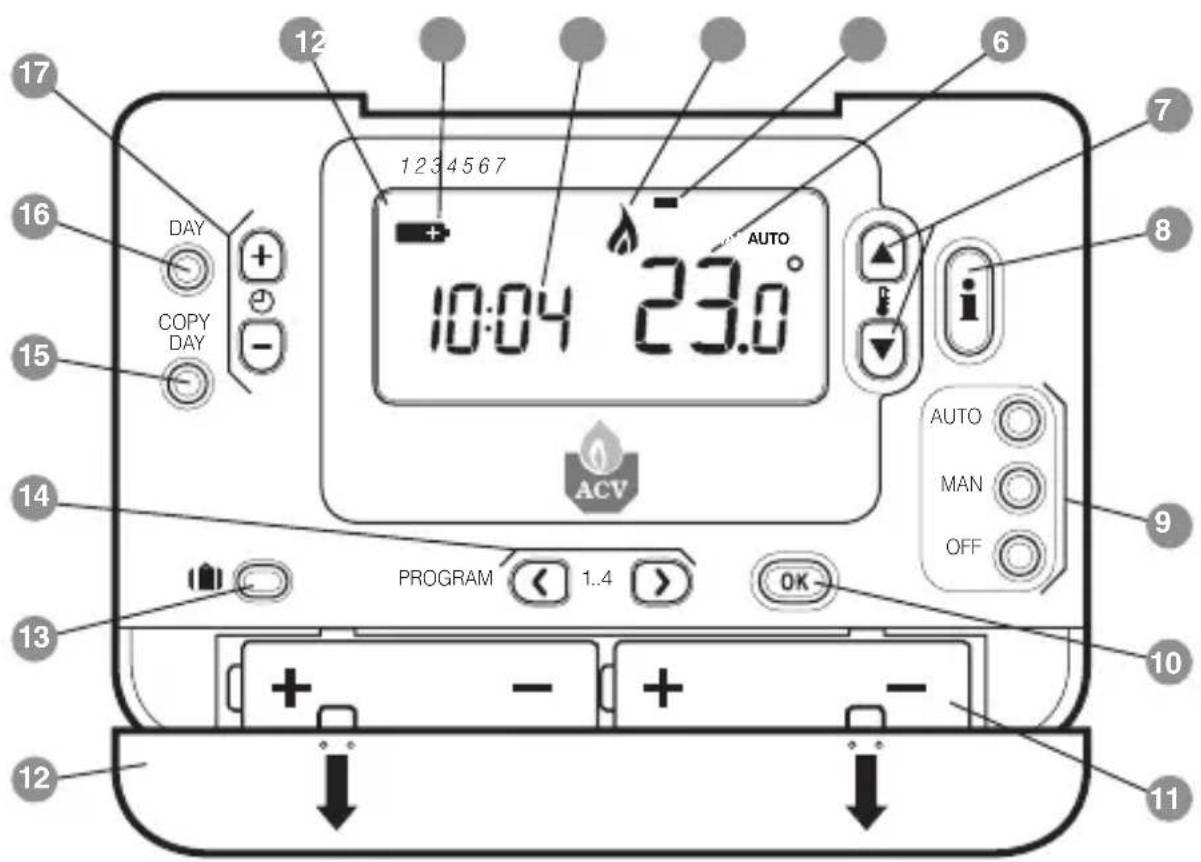
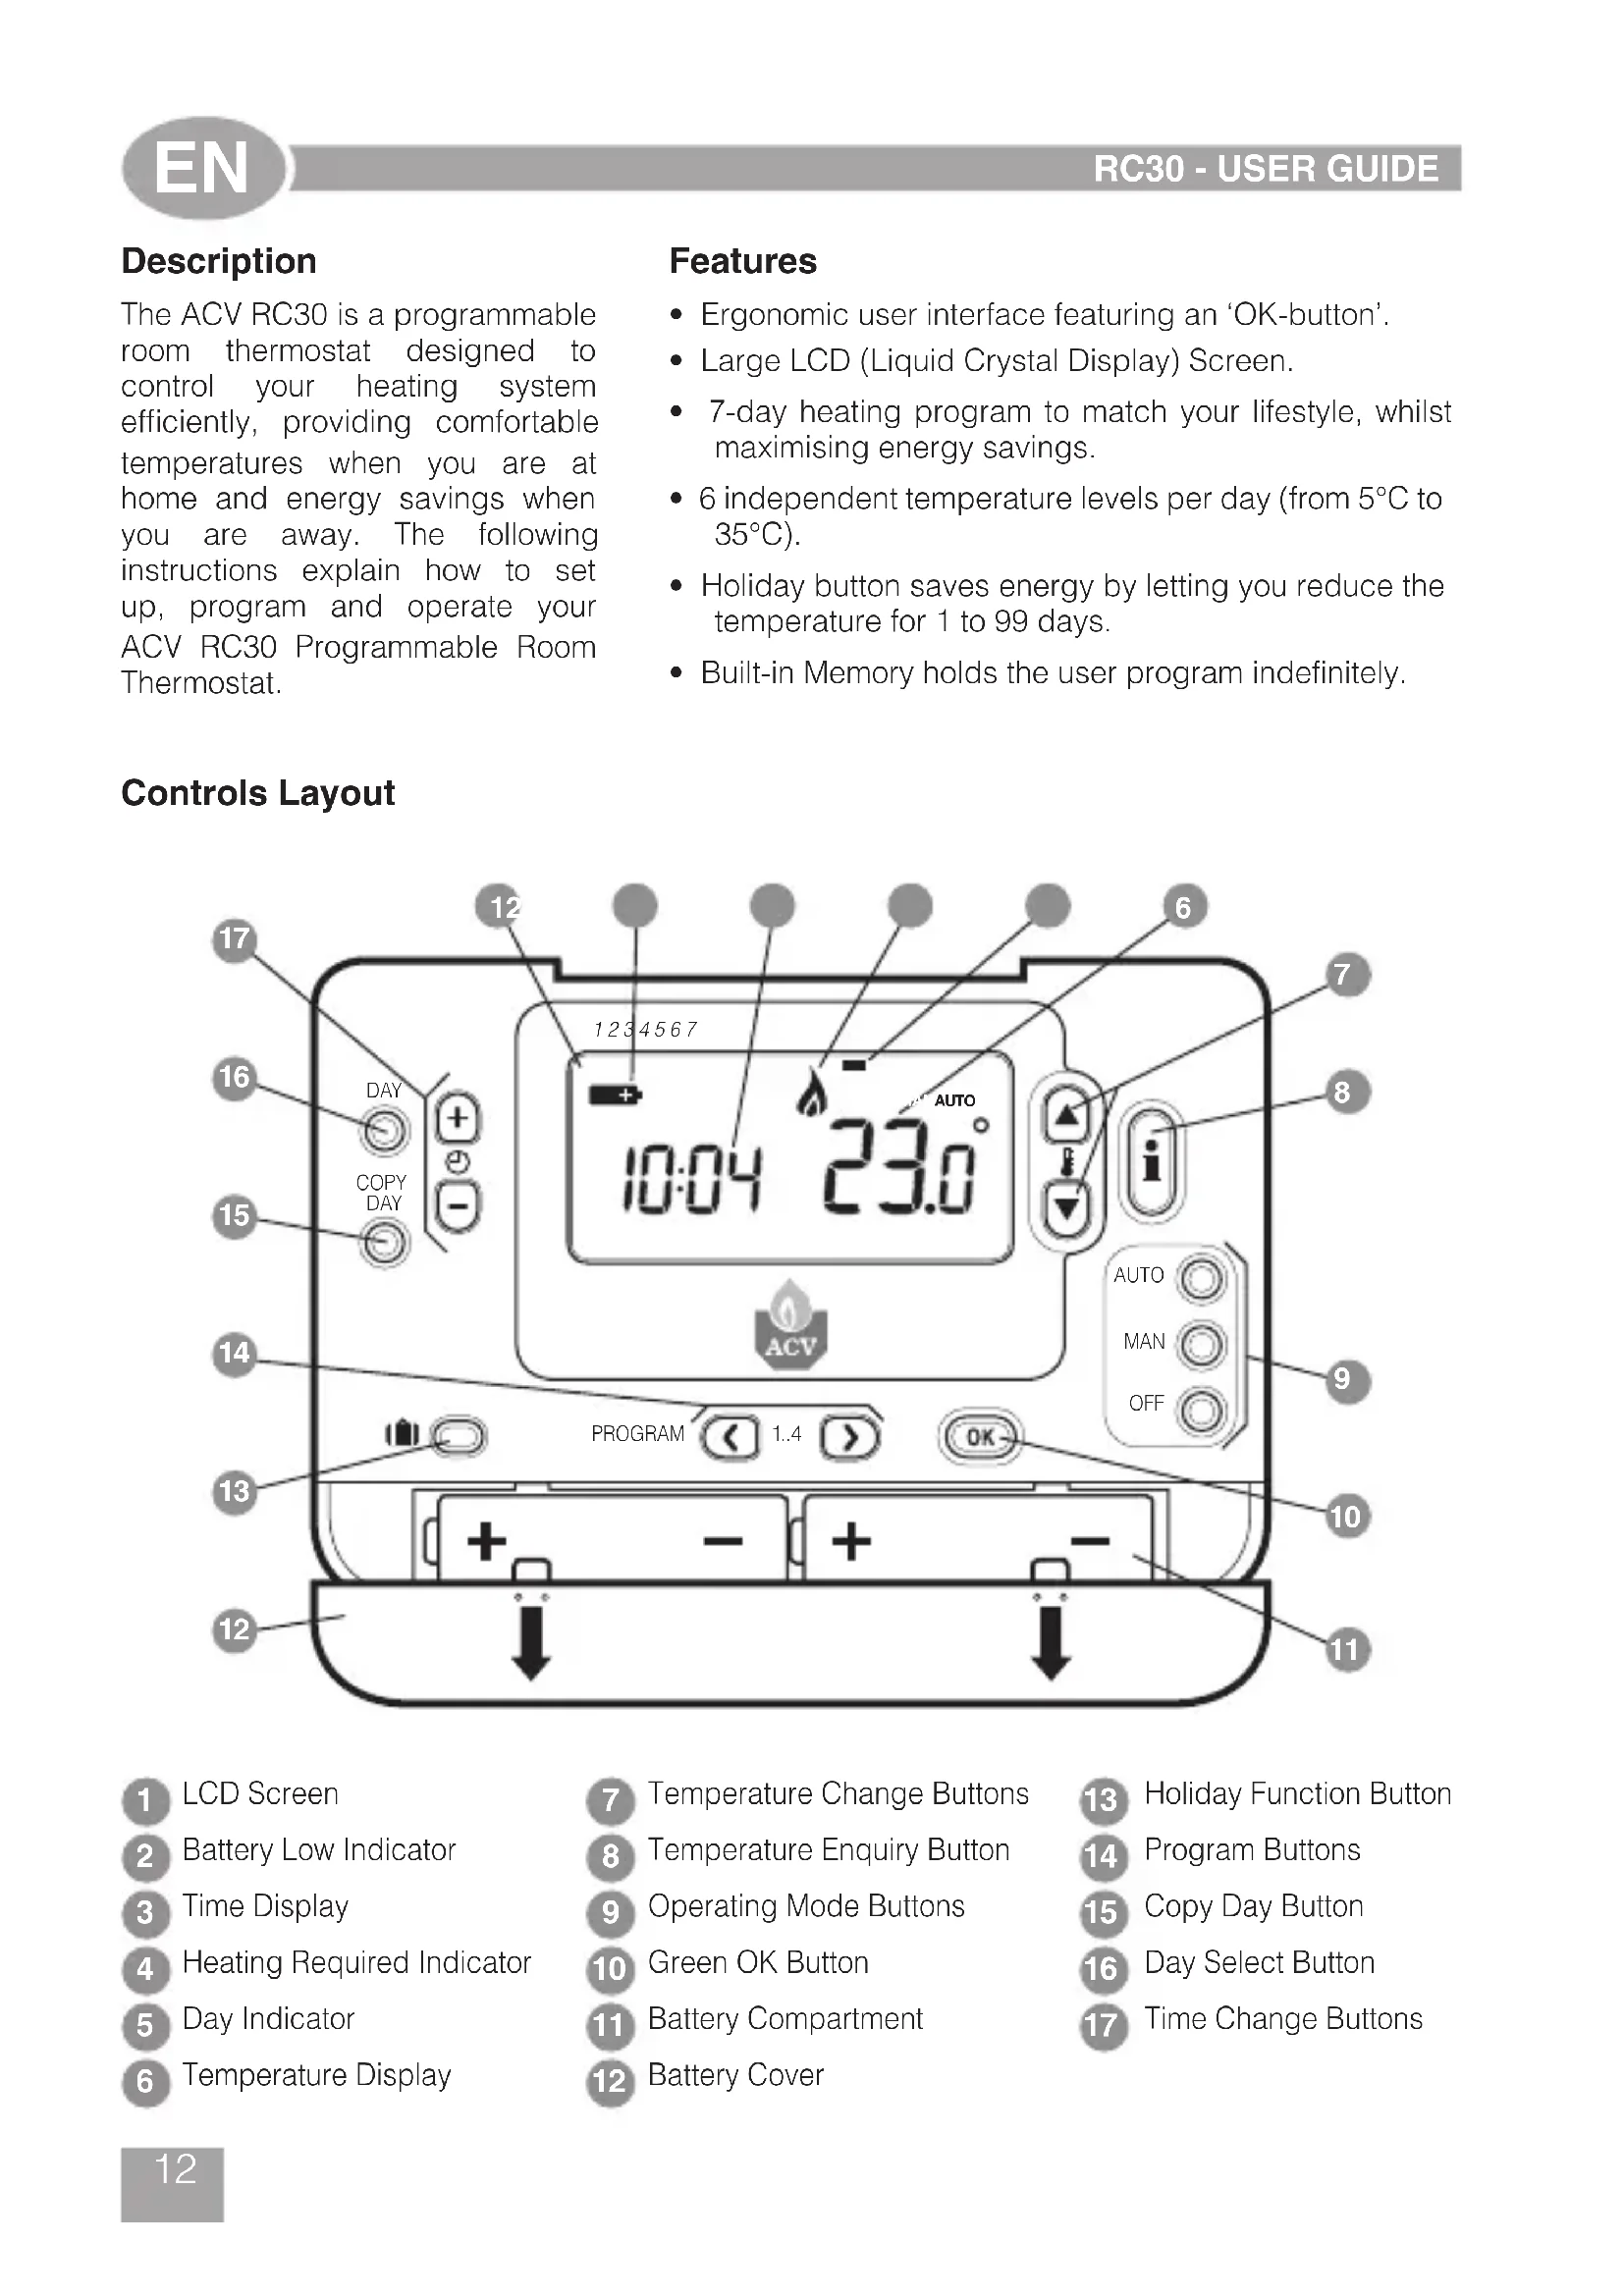
Controls Layout
1 LCD Screen
2 Battery Low Indicator
Time Display
Heating Required Indicator
Day Indicator
6 Temperature Display
Temperature Change Buttons
8 Temperature Enquiry Button
9 Operating Mode Buttons
10 Green OK Button
11 Battery Compartment
12 Battery Cover
13 Holiday Function Button
14 Program Buttons
15 Copy Day Button
Day Select Button
Time Change Buttons
This section shows you how to setup and run the thermostat in 3 simple steps:
STEP 1: Installing the Batteries
Note: if the 'Low Battery' Indicator is showing or the thermostat screen is blank (no symbols or digits are displayed) replace the batteries as follows, otherwise, please go directly to Step 2: Setting the Date and Time.
To install the Batteries:
a. Lift up the front cover of the thermostat to reveal the battery cover and product controls.
b. Remove the battery cover by pressing down and sliding out.
c. Insert the 2 × AA LR6 Alkaline Batteries supplied with the thermostat, ensuring the correct orientation (see 'Controls Layout' on page 12).
d. After a short pause the thermostat will display information on the screen and is now ready for use.
e. Replace the battery cover by sliding it firmly back into the front of the thermostat.
STEP 2: Setting the Day and Time
To set the Day and Time:
a. Press the DAY button once and the 'day indicator' will begin to flash.
b. Press the DAY button until the correct day is reached (Day 1 = Monday). Press the green OK button to confirm.
d. Press either of the + or - buttons once to enter time setting mode. The LCD screen flashes the time digits (when the unit is powered for the first time the display shows 12:00).
e. Use the + or - buttons to set the correct time then press the green OK button to confirm. Each press of the buttons will change the time by one minute and holding them down will change the time slowly at first and get progressively quicker.
Note: If this mode is entered accidentally then press the AUTO, MAN or OFF buttons to exit.
STEP 3: Running the Built-in Heating Program
The thermostat is now ready for operation. Press the AUTO button and the built-in heating program will start running. Note: The built-in heating program has been designed to provide normal comfort requirements, but if you want to customise the settings please see the next section 'Programming the RC30'.
PROGRAMMING THE RC30
The Built-in Heating Program
The built-in heating program has 4 temperature level changes per day that can be set between 3.00am and 2.50am the following day - allowing you to maintain the evening temperature after midnight. Each temperature level can be set between 5^ and 35^ , and adjusted in 0.5^ increments. The factory default program for heating is as follows.
Monday to Friday (Day 1 to 5)
| Period 1 2 3 4 | | | | |
| Time 6:30 8:00 | 18:00 | 22:30 | | |
| Temperature | 21°C | 18°C | 21°C | 16°C |
Saturday & Sunday (Day 6 & 7)
| Period 1 2 3 4 | | | | |
| Time | 8:00 | 10:00 | 18:00 | 23:00 |
| Temperature | 21°C | 21°C | 21°C | 26°C |
Reviewing the Heating Program
To review or edit the heating program use the PROGRAM or buttons to navigate between the 4 individual programming periods for that day. Use the DAY button to step through each day of the week, so the complete 7 day heating program can be reviewed or edited.
Modifying the Heating Program
To change the heating program:
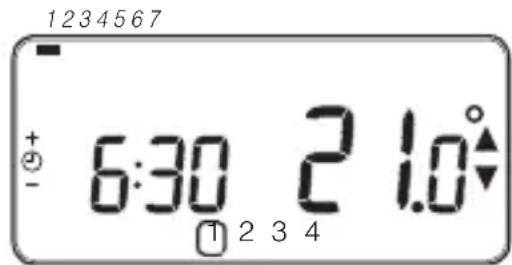
a. Press either of the PROGRAM or buttons to enter the programming mode. The time / temperature settings for period 1 on Monday (Day 1) will be flashing as shown. The active period is highlighted by a flashing square around the numbers at the bottom of the screen and the selected day is shown with the day indicator.
b. To adjust the period start time use the or buttons, the 'OK?' indicator will be displayed to confirm the change. Holding the button down will change the time quickly.
Note: If you are pressing the or 一 buttons and the display flashes the next period, it means the next period will be pushed forward.
c. Once the required time is reached press the green OK button to confirm.
Note: If the original time setting did not require adjustment press the green OK button to move to step d'.
d. The temperature setting for period 1 on Monday (Day 1) will now be flashing. To adjust this press the buttons and confirm the setting again by pressing the green button.
e. The next time and temperature period will now be active. Adjust this by repeating steps b - d above until all 4 periods are set for Monday or press the AUTO button to run the program as set, at any time.
You now have a choice of how to set the program for the next day:
f. i) Press the COPY DAY button to copy Monday's program into Tuesday. The display will go blank apart from the 'non flashing' day indicator, which indicates the day copied and the 'flashing' target day to copy the program to. To accept this day press the green button. To select a different target day press the DAY button until the 'flashing' day indicator is under the required day, then accept it by pressing the green button.
Note: Once the target day is confirmed it becomes the day that is copied if the COPY DAY button is pressed again.
OR
ii) Press the DAY button to move the day indicator to Tuesday (Day 2). The program for that day can then be adjusted by following steps b to e. Programs for the remaining days can be set in the same way, using the DAY button to move to the next day.
To exit the programming mode select the desired operating mode by pressing the AUTO, MAN or OFF buttons. Note: To run the adjusted program select the AUTO mode.
Disabling / Enabling Time Periods
The thermostat has 4 periods each day that can be programmed, but you may not need all of these switch points for your heating requirements. Therefore, any period from 2 to 4 can be removed from (or returned to) the heating program profile.
To disable or enable time periods:
a. To disable unwanted periods go to the desired period (2 to 4) using the PROGRAM buttons to navigate, ensure the correct period is highlighted with the flashing square symbol. Press and hold the button for at least 2 seconds and the display will indicate the period has been removed from the program.
b. To enable periods again follow the same procedure as above, navigating to the already disabled period. To enable this period again press and hold the button for at least 2 seconds.
Choosing the Operating Mode
The thermostat can operate in three different modes: Automatic, Manual or Off. To set the operating mode press either of the AUTO, MAN or OFF buttons. The screen indicates which mode is currently active by displaying AUTO, MAN or OFF.
- AUTO (automatic) mode sets the thermostat to follow the built-in temperature program (default or personalised). Operating the thermostat in this mode is the best way to maintain a high level of temperature comfort whilst maximising your energy savings.
- MAN (manual) mode sets the thermostat to act as a simple thermostat with a fixed setpoint throughout the day. The setpoint can be adjusted from 5^ to 35^ by using the or buttons. The thermostat will continue to maintain this temperature until another operating mode or temperature is selected.
- OFF mode sets the thermostat to control to a minimum temperature setting of 5^ (default) that acts as a frost protection measure for your home.
During Normal Operation
- Temperature Enquiry
In AUTO, MAN and OFF operating modes the thermostat will display the current room temperature. To review the programmed 'target' temperature (the temperature which the thermostat is trying to maintain) press the i button. This 'target' temperature value will be displayed flashing for 5 seconds before returning to the current room temperature value.
- Temperature Override
During normal operation (AUTO mode) the programmed temperature can be adjusted manually by pressing the 口 buttons or the button. The 'target' temperature will be displayed and flash for 5 seconds - during this time the buttons can be used to modify the set value. Note: This temperature override is cancelled at the next programmed temperature change.
Using the Special Functions
HOLIDAY Function
The holiday function allows you to set a constant temperature (default = 10^ ) for a specified number of days (from 1 - 99 days). This lets you save energy and related costs when you are away from home, but resumes normal operation on the day of your return.
To set the Holiday function:
a. Ensure the thermostat is running in AUTO or MAN operating modes.
b. Press the holiday button to display the holiday days counter and temperature setting, along with the holiday indicator
c. Press the or time buttons to set the holiday time (1 - 99 days) and press the green button to confirm.
d. Press the buttons to set the holiday temperature (5^ - 35^) and press the green button to confirm.
The thermostat will now control to the new temperature for the set number of days that your home is vacant. At midnight the holiday counter will be reduced by one until the selected number of days have passed. The thermostat will then return to normal operation as set by the MAN or AUTO mode. To cancel the HOLIDAY function or to exit the function at any time press the button a second time.
Adjusting the Time
To adjust only the time during normal operation use the 2 or buttons to adjust the time and press the green button again to confirm any changes.
| Symptom | Remedy |
| Blank Display (Power Loss). | Check batteries are installed by removing the battery cover.
Check batteries have been installed in the correct orientation.
Replace the batteries. |
| Display shows flashingsymbol. | The batteries in the thermostat are low on power - Replace the batteries. |
| Display shows symbol. | A fault has occurred in your heating system. Remove and re-insert the batteries.
If the symbol does not clear after a few minutes contact your installer. |
FAQ's
How do I change the batteries on the thermostat when they run out?
The thermostat constantly monitors the battery power level, which typically lasts for about 2 years before needing replaced. When the power is running low a flashing symbol will be displayed on the screen. To change the batteries follow the steps in the above section (STEP 1: Installing the Batteries' on page 13), replacing the used batteries with new ones in Step c. Note: While changing the batteries your program settings will be stored but you may need to adjust the time settings to be correct.
How do I set one temperature for the whole day?
To operate as a simple thermostat with one temperature throughout the day, select the manual operating mode by pressing the MAN button. Adjust the temperature by pressing the buttons - this can be set anywhere from 5^ to 35^ in 0.5^ steps. The thermostat will continue to maintain this temperature until another operating mode is selected or the temperature is adjusted.
Beschreibung
CASTO KLADENE OTÁZKY
Jak vyménim vybité baterie u termostatu RC30?
Monday to Friday (Day 1 to 5)
| Period | 1 | 2 | 3 | 4 |
| Врemeи | 6:35 | 8:00 | 18:00 | 22:35 |
| Temпepатуbl | 21°C | 18°C | 21°C | 16°C |
Saturday & Sunday (Day 6 & 7)
| Period | 1 | 2 | 3 | 4 |
| Врemeи | 8:00 | 10:00 | 18:00 | |
| Temператrophyl | 21°C | 21°C | 21°C | 16°C |
Ppocmotp BcTpoEHNo nporpaMMbl OTOnJIeHnA
ДлгпрсмOTpa ИлпpeдakTIpOBaHnB BCTpoEHHOIIpOgPamMbI OTONJIeHnB BOCNoIb3yITeCb KOnPkAmn PROGRAM C IIN NOMOuBIO KOTOpbIX Bbl CMOKeTe nepexOAnTb OT OndHOrO IIpOgPamMpyEmoR opeKIma KdpYrOmy.KhONKa DAY cIyXHT dЯпepexOda OT OndHOrO DnH HeDeJI N DpyrOmy. C NOMOuBIO 3ToI KNOHKn Bbl MoXeTe npocMOTpeTB Ил nI3MeHnTb IIpOgPamMy DЯл IIIO6Oro n3 cEMn DHeN HeDeJI.
I3meHeHne BCTpoEHNo nporpaMMbl OTOpJIeHnA
Ipocecc n3MeHeHn BCTpoEHNo nporpaMMbl OToJIeHnA:
a.Дпяпесхова В ржим
пPORpAMMnPOBaHn,нжмTe KhoNkY
PROGRAM .Ha 3KpaHe
HAчИнЯOT MngaTb napamETpbI BpeMeHn/
TeMнератypы Ддя петидаВ
ПОнeДeЛьнК (Дeнb 1),Κak ПOKa3aHo
Ha рисунke Hnxke.АктИВьй петиOD
БыIDeLEH MngaIOUSeР pamKoB OOKpyr CInФр
В НЖнeЧаСТи DInCnPte, a Ha TeKуши
ДeHb yKa3bIBaET ИДИNKaTOP DнЯ HeDEJI.
b. UTo6bl N3MeHnTb DaTy Haayana nepnoDa HaxmMaIte KHOKky 1nn .CIMBOJbHa DnCnIeepcTaHyT MIRaTb, INoBnTCaHaDnCb OK?'. Haxatne n ydepXnBaHne KHOKN I03BOJNT 6bICTPO N3MeHnTb BpEMr.
PpmeHHe: Ecn npn HaxkTn
KHONOK MnHa DnCnJee
MnraUoza paMa nepExoNT Ha CneDyUoUni nepNoI dIa N3MeHeHNA, 3TO O3HauaeT, YTO CNeDyUOUsi nepNoI 6byET N3MeHen aBtOMaTuueckN.
c. Nocne TOrO, KaK 6yJeT BbICTaBHeHO HxHoe BpeMa, HaxMnte 3eJeHyIO KHONKY OK dIa NOdTBePKeDeHn. IpmeHne: EcnBpeMa He Tpe6yeT n3MeHnHaXMMTe KHNKy OK dIa NepexOda K NyHKTy «d»
d. NaHcHT MfTaB 3HaueHHe TemNepaTpybI IJI NepNoDa B NOHeJeBnK (DeHb 1).TO6bl N3MeHNb 3TO 3HaueHHe, BOCNOb3yInTECb KHONKO JIN IOJTBepDInTe BBOJ HaxKaTHeM 3eJIeHOH KHOKN OK
e. Nocne 3TOro aKTbBpyeTcra CJeDyUOuNn nepnoi n TempepaTypa. Ina HacTppoKn 3TOro nepnoDa NOBTopuTe wArn b-d, npnbEdeHHbIe Bblwe. PpOeJaTe 3Ty npOeDpy dJa BceX 4 nepNoDoB IOHeJeBbHnKa, INI NaHXMITE KHOKNY AUTO DnA 3aNycka nporpaMMbl B TOM BnDE, B KOtOpOM OHa 6bla HAcTpoHa, B JIO6oe BpeMa.
Hacptpontb nporpammy Ha cneyuounn dehb MOxHO HeckoIbKmN cnocobamn:
f. i) HaxmTe KhoNky COPY DAY nTTO, TTo6bI cKoHnpoBaTb nporpaMMy nOHeJeBnHa Ha BToPnK.C DnCpJIeR nCHe3HT BcA IHOpMaunr KpOme CTa6NJbHorO INDnKaTopa DnH HeDeIn, KOtOpBiyKa3bIBaET Ha KOnpyEmbl DeHb, a TaKxe MrraIOUeRo INDnKaTopa DnH HeDeIn, KOtOpBiy Yka3bIBaET Ha TO T DeHb, dJa KOTOpOrO 6yDet cKoHnpOBaHa nporpaMMa. IJr noDTBepXdEHH N3MeHeHn HaxmTe 3eJeHyO KhoNky
OK.ДЯТOrOчTO6bI Bbl6paTb DpyroJ
DeHb,HaxmMaTe KhoNky DAYdo
Texnop,Noka MnaIOUuIN INDnKaTOp
He6yDetYka3bIBaTbHaTOT DeHb,
KOTOpbI Bam Hyxeh.Pocne 3TorO
HaxMnte 3eJeHyO KHONKy 21
NoTBePxxDeHn.IpmeuHne:Piocne
NoTBePxxDeHn.CkOnIpOBaHHbI DeHb
CTaHOBnTCa KOnIPyEmbIMdHem npi
CleNyUoEhem HaxaTmKHOKnCOPY DAY.
NJN
ii) Haxmte KhoNky DAY dIra TORO, YTO6bI nepemecTb IHdNKaTOP dHr HeJeHN Ha BTOPHNK (DeHb 2). PporpaMMy Ha 3TOT DeHb MOXHO yCTaHOBNTb, NOBTOPB DeICTBnB b-e. AHaONuHBIM O6pa3OM yCTaHaBnBaETcR nporpaMMa N Ha cNeDuOuNE dHn (nepexoK KaJDoMy CJIeDyUoEmy dHIO OCUSeCTBnEeTCR C NOMouBo KHOKN DAY).
ДлЯ Вь IXODa n3 peKIMma npoRpaMMnpoBaHnra, Bbl6epnte Tpe6yEmbI pexm pa60TbI, HaxkAB KhoNky AUTO, MAN nIN OFF.
IpmeaHne: 3ayncKa BBeDeHHo nporpaMMblBb6epnte pexm AUTO.
OTKJIUOHeHne / BKJIUOeHne nepnooB BpeMeHn
Tepmoctat RC30 no3Bolnaret 3anporpammpoBaTb no 4 nepnoHa ha KaKdbI DeHb, OHaKO 3TO He 03Haayet, YTO Bbl DOJXHbI nporpaMMnpoBaTb BCE yeTbIpe nepnoDa. TaKIM o6pa3OM, nepnoDbI 2, 3, 4 MoXHO ydaJIaTb n3 nporpammbl OTOpJIeHNII NIN BCTaBnTb INB nporpAMMy.
St. David's Business Park
Dalgety Bay
Fife KY11 9PF
Tel: 01383 82 01 00
uk.info@acv.com
DE
ACV Wärmetechnik
TeKCTnIbIbIuNKOB,1.11
Tel: +7(499) 272-19-65
mos@acv.com