DTFT 203 - TV DUAL - Free user manual and instructions
Find the device manual for free DTFT 203 DUAL in PDF.
| Product type | LCD TV |
| Brand | Dual |
| Model | DTFT 203 |
| Screen size | 20 inches (4:3) |
| Maximum resolution (PC) | 800 x 600 pixels |
| Dimensions (with stand) | 585 x 430 x 225 mm |
| Dimensions (without stand) | 585 x 405 x 92 mm |
| Weight (with stand) | 7.3 kg |
| Weight (without stand) | 6.6 kg |
| Power supply | 12 V DC (adapter 220-240 V AC, 50 Hz) |
| Power consumption | 60 W (standby 1.2 W) |
| Audio power | 2 x 8 W RMS (10% THD) |
| Sound system | Stereo German+Nicam |
| Number of programs | 100 presets |
| Reception bands | VHF (Band I/III), UHF (Band U), Hyperband, Cable TV |
| Connectors | 2 x SCART, VGA input, AV input (video + audio L/R), S-VHS, headphone, 75 ohm antenna |
| Main functions | Teletext (Fastext, TOP text), child lock, sleep timer, APS (automatic programming), PC mode |
| Maintenance and cleaning | Clean with a soft dry cloth; unplug before cleaning |
| Safety | Child lock, automatic shutdown if no signal for 5 min, overheating protection |
| Spare parts and repairability | Use only parts specified by the manufacturer; repair by a qualified technician |
Frequently Asked Questions - DTFT 203 DUAL
User questions about DTFT 203 DUAL
0 question about this device. Answer the ones you know or ask your own.
Ask a new question about this device
Download the instructions for your TV in PDF format for free! Find your manual DTFT 203 - DUAL and take your electronic device back in hand. On this page are published all the documents necessary for the use of your device. DTFT 203 by DUAL.
USER MANUAL DTFT 203 DUAL
PAL/SECAMB/GD/K K'I/I'L'
EMPFANGSKANÄLE
VHF(BANDI/III)
UHF(BAND U)
HYPERBAND
KABELFERNSEHEN(S1-S20/ S21-S41)
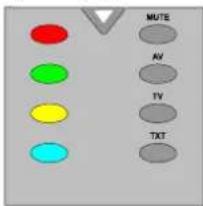
12 MUTE: Silence
13 AV = Source externe
(TV,EXT1,EXT2,EXT3,SVHS,PC)
14TV=TV/Quitterle menu
15 TXT = Télatexte
16 Rouge (SOUND) = Son
17 Vert (IMAGE) = Menu image
18 Jaune (OPTIONS) = Feature Menu (Menu options)
19 Bleu (INSTALLATION) = Installation Menu (Menu installation)
TV LCD
Installati菜单 in AV modi
Program Lock (Programma vergrendeling):
PAL/SECAM B/GD/KK'I/I'L'
KANELEN ONTVANGEN
VHF(BANDI/III)
UHF(BAND U)
HYPERBAND
KABEL TV (S1-S20/ S21-S41)
AANTAL VOORINGESTELDE KANALEN
100
KANAAL INDICATOR
Remote Control Buttons 71
LCD TV 71
Preparation 72
Safety Precautions 72
Before Switching On Your TV 73
Switching The TV ON/OFF 74
Navigating the Menu System 74
Menu System 74
Menu Map 75
PC Mode 80
Other Features 81
Teletext 81
Connect Peripheral Equipment 82
Tips 83
Appendix A: AerialConnection 83
Specifications 83
Appendix B: PC Input Typical Display Modes 84
Connect Peripheral Equipment 85
Peripheral Equipment Connections 85
Remote Control Buttons
① D = Stand By
② 0 - 9 = DirectProgramme
③ M=Menu
4--=DoubleDigit
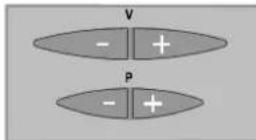
5V+1=Volume+/-
6P+/-=Programme+/-
7 = CursorUp
8 = Cursor Right
9 Cursor Left
10 OK = OK
11 = Cursor Down
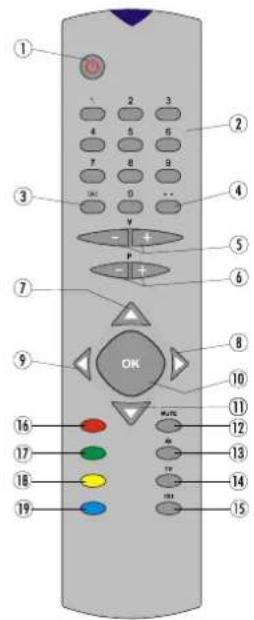
12 MUTE:Mute
13 AVV = External Source
(TV,EXT1,EXT2,EXT3,SVHS,PO)
14TV=TV/QuitMenu
15 TXT = Teletext
16 Red (SOUND) = Sound
17 Green (PICTURE) = Picture Menu
18 Yellow (FEATURE) = Feature Menu
19 Blue (INSTALLL) = Installation Menu
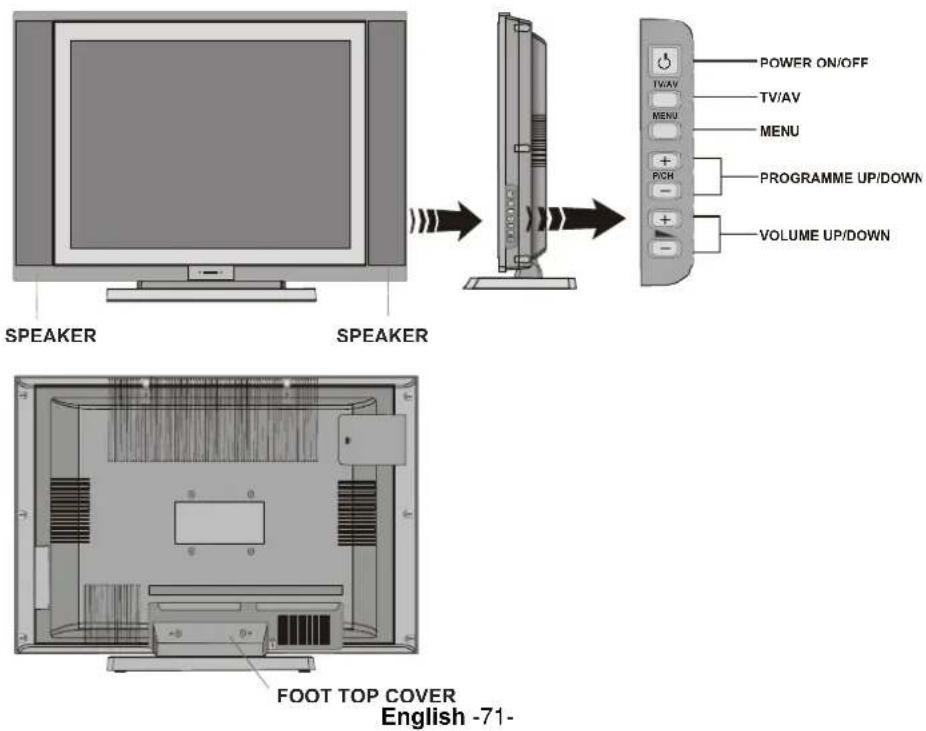
LCD TV
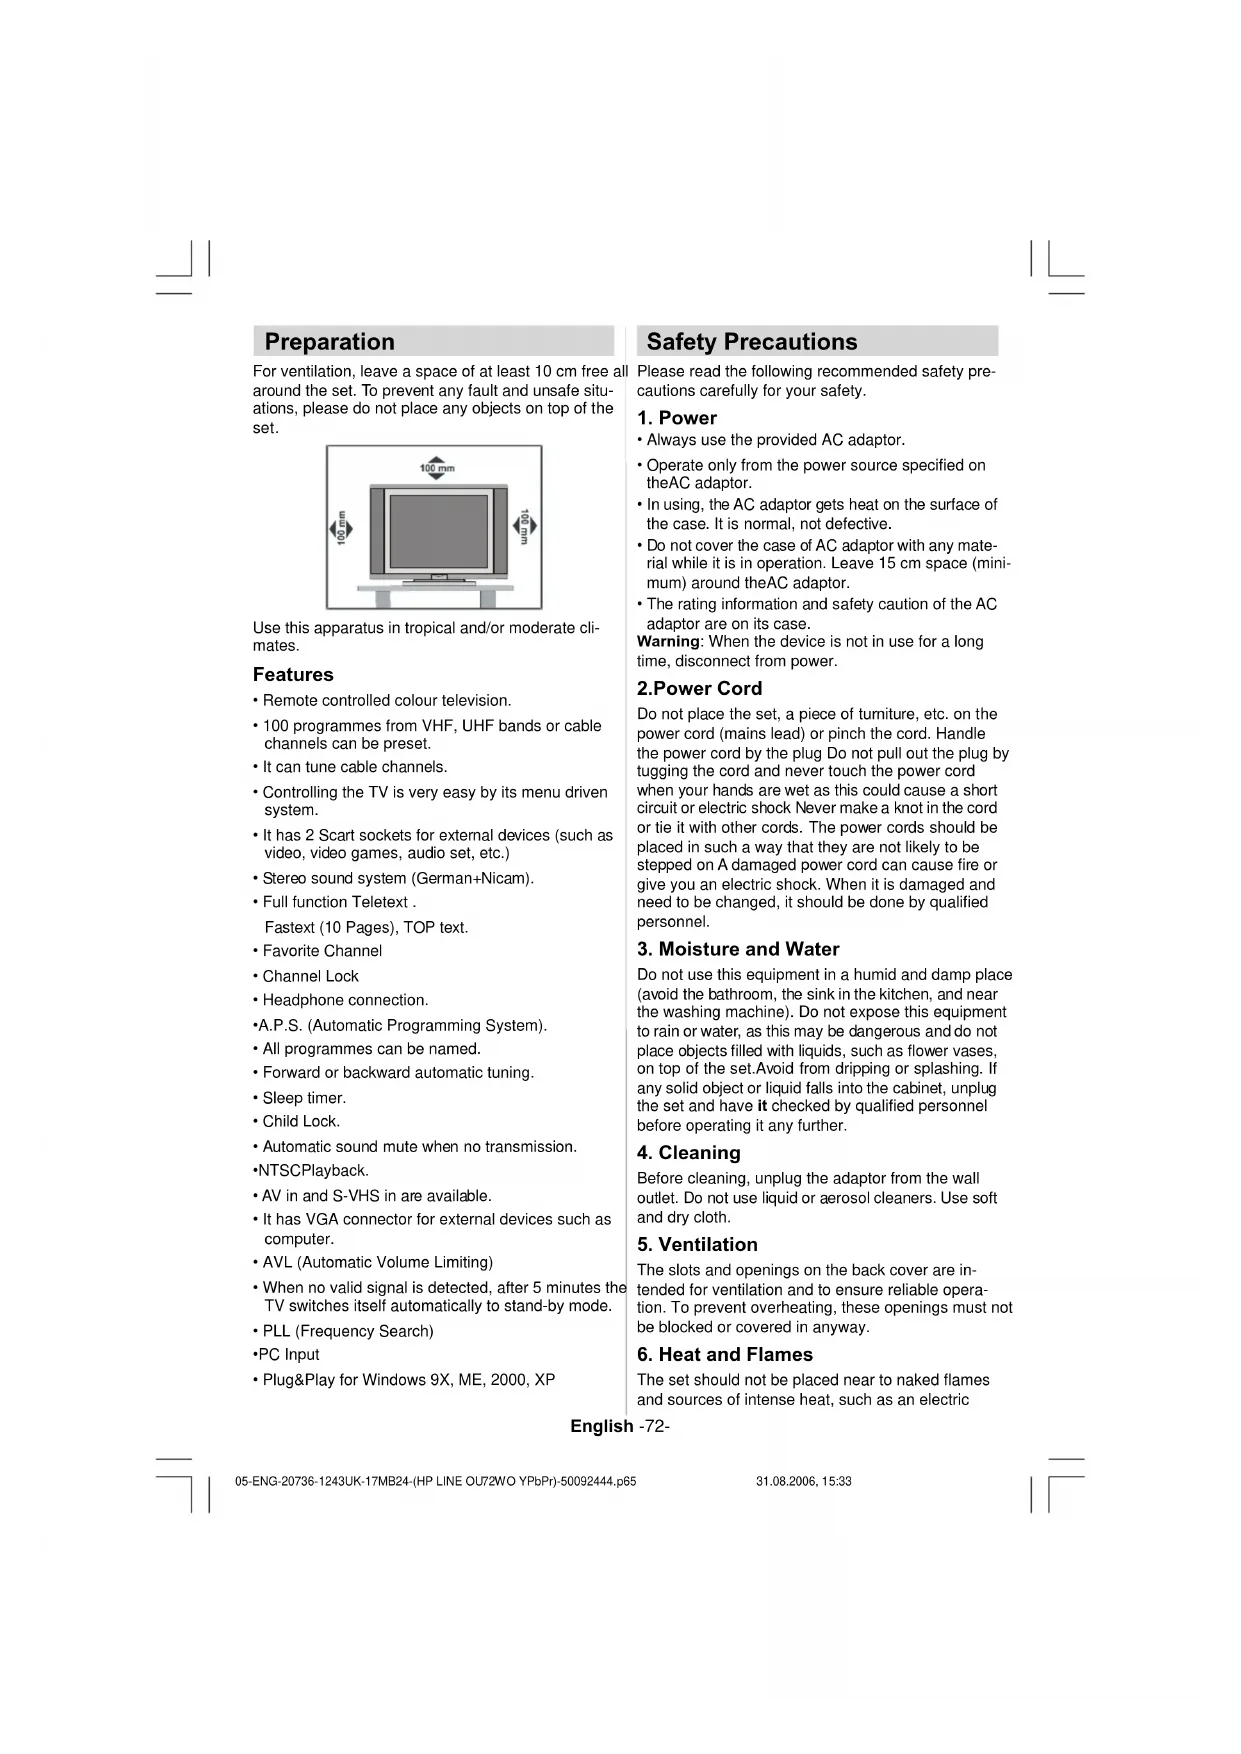
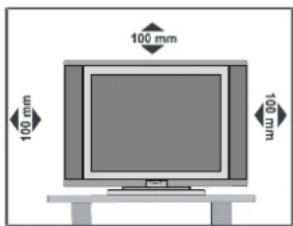
Preparation
For ventilation, leave a space of at least 10cm free all around the set. To prevent any fault and unsafe situations, please do not place any objects on top of the set.
Use this apparatus in tropical and/or moderate climates.
Features
- Remote controlled colour television.
100 programmes from VHF, UHF bands or cable channels can be preset. - It can tune cable channels.
- Controlling the TV is very easy by its menu driven system.
- It has 2 Scart sockets for external devices (such as video, video games, audio set, etc.)
- Stereo sound system (German+Nicam).
Full function Teletext.
Fastext (10 Pages), TOP text. - Favorite Channel
- Channel Lock
- Headphone connection.
A.P.S. (Automatic Programming System). - All programmes can be named.
- Forward or backward automatic tuning.
- Sleep timer.
Child Lock.
Automatic sound mute when no transmission. NTSCPlayback. - AV in and S-VHS in are available.
- It has VGA connector for external devices such as computer.
AVL (Automatic Volume Limiting) - When no valid signal is detected, after 5 minutes the TV switches itself automatically to stand-by mode.
- PLL (Frequency Search)
-PC Input
Plug&Play for Windows 9X, ME, 2000, XP
Safety Precautions
Please read the following recommended safety precautions carefully for your safety.
1. Power
Always use the provided AC adaptor.
- Operate only from the power source specified on theAC adaptor.
- In using, the AC adaptor gets heat on the surface of the case. It is normal, not defective.
- Do not cover the case of AC adaptor with any material while it is in operation. Leave 15 cm space (minimum) around the AC adaptor.
- The rating information and safety caution of the AC adaptor are on its case.
Warning: When the device is not in use for a long time, disconnect from power.
2.Power Cord
Do not place the set, a piece of furniture, etc. on the power cord (mains lead) or pinch the cord. Handle the power cord by the plug Do not pull out the plug by tugging the cord and never touch the power cord when your hands are wet as this could cause a short circuit or electric shock Never make a knot in the cord or tie it with other cords. The power cords should be placed in such a way that they are not likely to be stepped on A damaged power cord can cause fire or give you an electric shock. When it is damaged and need to be changed, it should be done by qualified personnel.
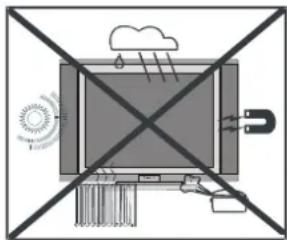
3. Moisture and Water
Do not use this equipment in a humid and damp place (avoid the bathroom, the sink in the kitchen, and near the washing machine). Do not expose this equipment to rain or water, as this may be dangerous and do not place objects filled with liquids, such as flower vases, on top of the set. Avoid from dripping or splashing. If any solid object or liquid falls into the cabinet, unplug the set and have it checked by qualified personnel before operating it any further.
4. Cleaning
Before cleaning, unplug the adaptor from the wall outlet. Do not use liquid or aerosol cleaners. Use soft and dry cloth.
5. Ventilation
The slots and openings on the back cover are intended for ventilation and to ensure reliable operation. To prevent overheating, these openings must not be blocked or covered in anyway.
6. Heat and Flames
The set should not be placed near to naked flames and sources of intense heat, such as an electric
English -72-
heater. Ensure that no naked flame sources, such as lighted candles, are placed on top of the set.
7. Lightning
In case of storm and lightning or when going on holiday, disconnect the power cord from the wall outlet.
8. Replacement Parts
When replacement parts are required, be sure the service technician has used replacement parts which are specified by the manufacturer or have the same specifications as the original one. Unauthorized substitution may result in fire, electrical shock, or other hazards.
9. Servicing
Please refer all servicing to qualified personnel. Do not remove the cover yourself as this may result in an electric shock.
Instructions for waste disposal:
- Packaging and packaging aids are recyclable and should principally be recycled. Packaging materials, such as foil bag, must be kept away from children.
- Battery, including those which is heavy metal-free, should not be disposed of with household waste. Please dispose of used battery in an environmentally sound manner. Find out about the legal regulations which apply in your area.
- Cold cathode fluorescent lamp in LCD PANEL contains a small amount of mercury, please follow local ordinates or regulations for disposal.
"The mains plug of the power supply is used as disconnect device and therefore shall remain readily operable."
Warning: To prevent injury, this device must be securely attached to the floor/wall in accordance with the installation instructions.
"The LCD panel is very high technology product with about a million thin film transistors, giving you fine picture details. Occasionally, a few non-active pixels may appear on the screen as a fixed point of blue, green or red. Please note that this does not affect the performance of your product."
"DONOTLEAVE YOURT VAT STAND-BY OROPERTATINGWHENYOULEAVEYOURHOUSE"
Before Switching On Your TV
sPower Connection
IMPORTANT : The TV set is designed to operate on 220-240V AC. For this, an adaptor is used which gives 12V DC voltage.
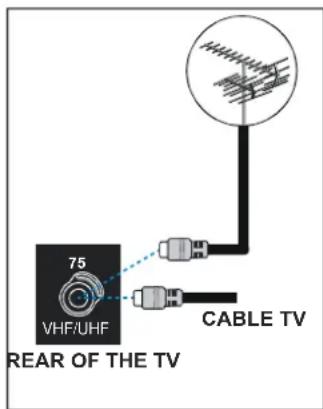
Connections To The Aerial Input Socket
- Connect the aerialor cable TV plugto theAerialinput socket located at the rear of the TV and connect the cable plug coming out from the TV out socket located on the devices (VCR, DVB etc.) to this socket as well.
Inserting Batteries In The Remote Control Handset
WARNING: Remotecontrolis batteryincluded.Aplastic protector is used to disconnect the batteries in order to prevent the battery life from reducing. Please remove the plastic protector before the first use.
Be sure to ground the connection properly.
Connect the ground terminal of the AC adaptor with the ground terminal provided at the power outlet using the enclosed power cord. If the provided plug does not fit your outlet, consult an electrician for replacement of the obsolete outlet.

Surely connect the ground wire
English -73-
Inserting The Battery In The Remote Control Handset
- Remove the battery cover located on the back of the handset by gently pulling backwards from the indicated part.
- Insert two AAA (R03) or equivalent type batteries inside.
- Replace the battery cover.
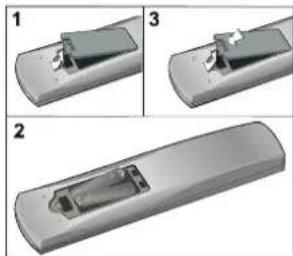
Note: Remove the battery from remote control handset when it is not to be used for a long period. Otherwise it can be damaged due to any leakage of battery.
Switching The TV ON/OFF
To switch the TV on:
Your TV will switch on in two steps:
1- Connect the power supply cord to the system. Press Power On/Off button. Then the TV switches itself to stand-by mode (Optional).
2- To switch on the TV from stand-by mode either: Press a digit button on the remote control so that a programme number is selected, or Press the "P/CH" or "P/CH+" button on the TV or press the "P-" or "P+" button on the remote control, so that last mode switched off is selected.
By either method the TV will switch on. When the TV is operated for the first time, the following screen appears:
For more information on this process, see "Install Menu" section.
To switch the TV off:
- Press the (stand-by) button on the remote control or On/Off switch on the TV, so the TV will switch to stand-by mode.
To power down the TV completely, press Power On/ Off button or unplug the power cord from the mains socket.
Navigating the Menu System

1- Press play the menu.
2- Press " " or "▲" button to select an icon. Press " " for more options.
3-Use or button to highlight.
4- Press " or buttons to change the settings. Press OK to set as default.
5-To exit the menu or return from sub-menu screen, press M
These explanations are available for the navigation of the whole Menu System. to select options that are explained in the following parts, refer to "Navigating The Menu System".
Menu System
Sound Menu
Menu Map

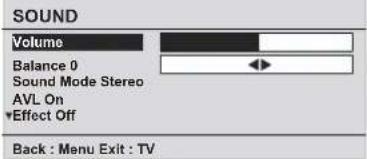


1 SOUND MENU
-Volume
-Balance
-Sound Mode
-AVL
-Effect
-Equalizer
-Mode
-Line Out
-HP Volume
-Store
2 PICTURE MENU
-Picture Mode
-Brightness
-Contrast
-Colour
-Sharpness
-Colour Temp
-Room Lightning
-Picture zoom
-Store
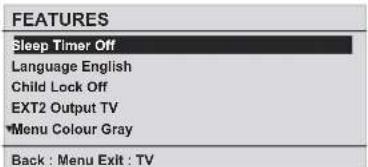
3 FEATURES MENU
-Sleep Timer
-Language
-Childlock
-EXT2 Output
-Menu Colour
-Favorite Mode
4 INSTALL MENU
-Programming
-Programme
-Band
-Channel
-Standard
-Colour System
-Search
-VCR Mode
-Decoder
-Store
-APS
-Auto Programming System
-Txt. Region
-Program Table
A menu map is provided above. For details of the items, refer to relevant explanations in the "MENU SYSTEM".
English -75-
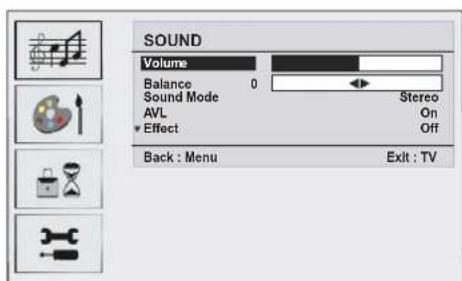
Volume/HP Volume
- By pressing / select Volume/HP Volume.
- Press button to change the levelof the selected option.
Balance
- By pressing / select Balance.
- Press button to change the level of the balance. Balance level can be adjusted between -32 and 32.
Sound Mode
- By pressing / select Sound Mode.
- Press button, you can select Mono, Stereo, Dual or Dual mode, only if the selected channel supports that mode.
AVL
- By pressing / select AVLVL.
- Press / button to set the AVL as on or off.
Effect
- By pressing / select Effect.
- Press button to set Effect as on or off.
Equalizer
- By pressing / select Equalizer.
- Press button to change the Equalizer setting. Inequalizermenu, themodecan be changed to Flat, Speech, Music, Personal and Jazz. Select the desired frequency by / button and increase or decrease the frequency gain by pressing button.
Note: Equalizer menu settings can be altered only when the Sound Mode is in Personal.
Line Out
- By pressing / select Line Out.
- Press button to set Line Out as on or off.
Note: HP Volume bar can not be used if Line Out is selected as on.
Store Program
- By pressing / button, select Store.
- Press or "OK" button to store the adjustments. "Stored" will be displayed on the screen.
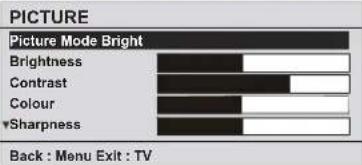
Picture Menu
PIC
Picture Mode
Brightness
Contrast
Colour
Sharpness
Back:Menu

图1-2
Picture Mode
- By pressing / button, select Picture Mode.
- Press button to choose from one of these options: Bright, Standart, Soft and Manual.
Brightness/Contrast/Colour/Sharpness/Hue
- By pressing button, select the desired Option.
- Press button to set the level.
Hint: Hue is displayed in picture menu when the TV receives an NTSC signal.
ColourTemp
- By pressing / button select Colour Temp.
- Press to choose from one of these options:
Cool, Normal and Warm.
Room Lightning
- By pressing / button select Room Lightning.
- By pressing / button, you can select one of these options: Normal, Bright and Movie.
Picture Zoom
- By pressing / button select Picture Zoom.
- Use buttons, to change picture zoom to Auto, 4:3 and Wide.
Store Program
- By pressing button select Store.
- Press or "OK" button to store the adjustments.
"Stored" will be displayed on the screen.
English -76-
Features Menu
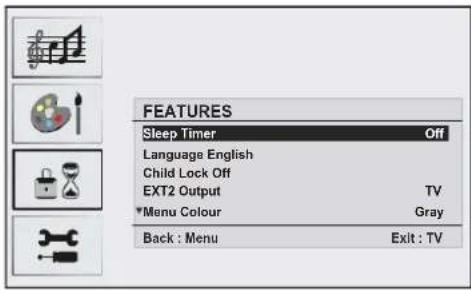
Sleep Timer
- By pressing / select "Sleep Timer".
- Press button to set the Sleep Timer...
The timer can be programmed between Off and 120 minutes in steps of 10 minutes.
Language
- By pressing / button, select Language.
- Use button to select the language.
Child Lock
- By pressing / select Child Lock.
- Press / button to set the Child Lock on or off. When on is selected, the TV can only be controlled by the remote control handset. In this case the control panel buttons, except the Standby button, will not work. Hence, if one of these buttons is pressed, "Child Lock On" will be displayed on the screen.
EXT2 Output
- By pressing / selectEXT2 Output.
- Use button, to set Ext-2 Out to TV, EXT1, EXT3 or SVHS.
Menu Colour
- By pressing / select Menu Colour.
- Use / button to change menu background to Transparent or Gray.
Favourite Mode
- By pressing / select Favourite Mode.
- Use / button to set Favourite mode on or off (See Channel List menu Favourites).
Install Menu
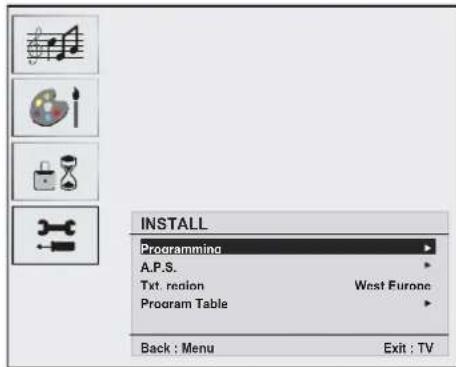
Programming
- By pressing / select Programming.
- After pressing “▶” button, programming menu appears on the screen.
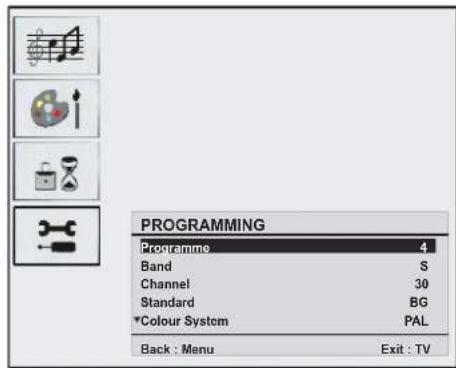
Programme
- By pressing / select Programme.
- By pressing “<”/“>” button, you can select the program number. You can also enter a number via digit buttons on the remote control. There are 100 program storage between 0 and 99.
Band
- By pressing / select Band.
- By pressing “<”/“>” button, you can change the channel type to C or S.
Channel
- By pressing / select Channel.
- Use "▲" / "▶" buttons to change the channel number. You can also enter a number via digit buttons on the remote control.
English -77-
Standard
- By pressing / select Standart.
- Use “ ”/“ ” button to change the standard to B/G, D/K, I or L/L'.
Colour System
- By pressing / select Colour System.
- Use / button to change the colour system to PAL, SECAM or AUTO.
Search
- By pressing / select Search
- Press button to start search. The search will stop when a signal is found.
Note: If you press the buttons with one-step moves, a frequency of 0.25 Mhz will be advanced. However if you press the buttons all at once, it will advance automatically. To stop searching at a certain time, you may press buttons.
VCR Mode
- By pressing / select VCR mode.
- Use / - buttons to set VCR Mode on or off.
Hint If you want to watch a DVD, then you have to set this item as "off".
Decoder
You can use this mode to connect any decoder to your TV.
- By pressing / select Decoder
- Press the / buttons to turn it ON or OFF.
When you switch the Decoder setting to OFF, EXT1 output will be muted. In this case, EXT1 output will not be available to display video. If it is switched ON, the EXT-1 output will be the selected video source. Any decoder can be connected to EXT1 to unscramble required video signal.
Hint: Decoder setting should be stored separately for each programme.
Store
- By pressing / button select Store.
- Press or "OK" button to store the adjustments. "Stored" will be displayed on the screen.
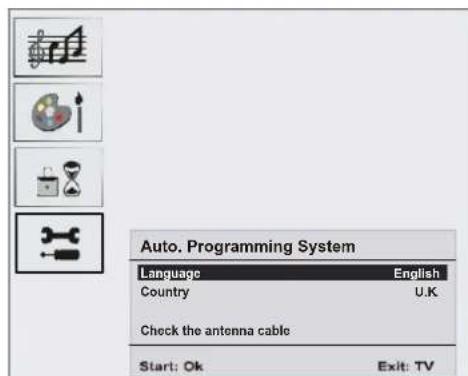
A.P.S.
- By pressing / button select A.P.S.
- Press "▶" button to enter the A.P.S. menu. A.P.S. menu appears on the screen.
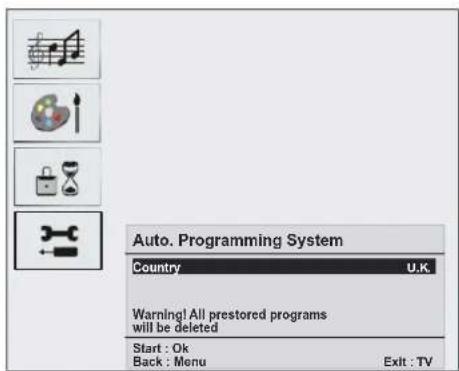
A.P.S. (Auto Programming System) Country
Press button to select your country. If you want to exit from A.P.S. function, press the "TV" button.
For going back, press
When you press OK button for starting APS, all stored programs will be erased and the following screen will be displayed.
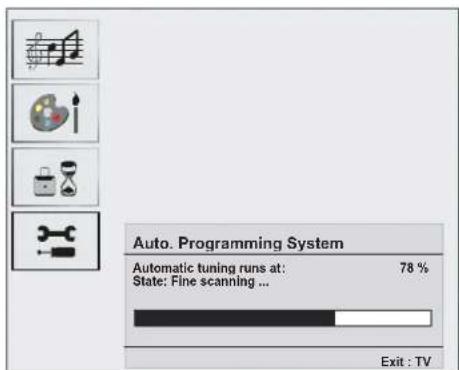
Whenever you press the "TV" button, A.P.S. function stops and Channel table appears on the screen.
If you wait until the end of A.P.S., Channel table is displayed with the programmes found and located.
Teletext Region
- By pressing / button select Teletext Region.
- Using / buttons in the Install menu, select your Teletext region. There are five options to select: West Europe, East Europe, Turk/Gre, Cyrillic and Arabic/Hebrew.
Install menu in AV modes
The following screen appears in the install menu:
English -78-
INSTALL
Programming
Txt. Region West Europe
Back:Menu Exit:TV
Programming
- By pressing / select Programming Mode.
- After pressing “▶” button, programming menu appears on the screen.
PROGRAMMING
| Colour System | PAL |
| VCR Mode | Off |
| Store |
Back:Menu Exit:TV
Colour System
- By pressing / select Colour System.
- By pressing “ ”/“ ” button, you can change the colour system to PAL, SECAM or AUTO.
Program Table
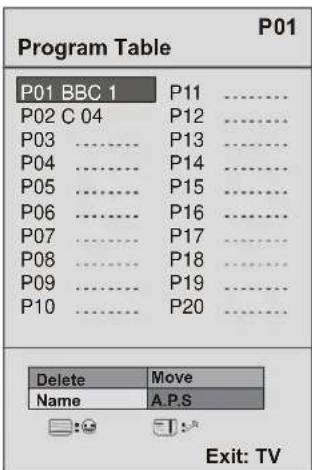
By moving the cursor in four directions you can reach 20 programmes in the same page. You can scroll the pages up or down by pressing the navigation buttons to see all the programmes in TV mode (except the AV mode). By cursoraction,programmeselectionisdoneautomatically.
Name:
To change the name of a programme, select the programme and press the YELLOW button.
The first letter of the selected name starts to blink.
Press / button to change that letter and / button to select the other letters. By pressing the YELLOW button, you can store the name.
Move:
Select the programme that you want to insert by navigation buttons. Press the GREENbutton. By navigation buttons, move the selected programme to the decided programme space and press theGREENbutton again.
Delete:
To delete a programme, press the RED button. Pressing the RED button again erases the selected programme from the programme list, and the programmes below shift one up.
APS (Auto Programming System)
When you press the BLUE button for APS, Auto Programming System Menu will appear on the Screen.
Favourite Mode:
You can set various channels as favourites so that only the favourites are navigated. To set a favourite, use navigation buttons to select a channel and then press the "item. The channel selected as a favourite appears in the Program Table with a
favourites icon ( ) againstthe channel name. For removing a favourite, carry out the same operation. To exit, press MENU.
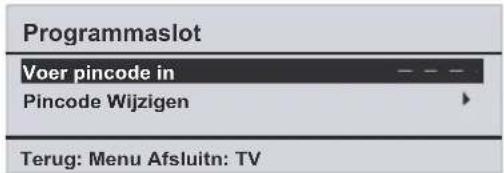
Program Lock :
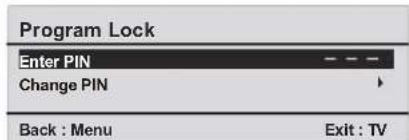
Program Locking provides a password-protected access to channels selected by parents. In order to lock a channel you should know the Program Lock password (default value is set to 0000 in the factory and can only be changed from the Program Lock Menu).
Enter PIN:
Select the channel that you desire to lock by highlighting it and press button. Whenthe "i" button is pressed, Program lock menu will be displayed on screen. After entering the pin code, desired channel will be locked. The program lock icon will appear next to the channel name. When the locked channel is selected through P+ or P- buttons, the following warning screen will be displayed:
Program Is Locked! You May Unlock this Program from Program Table.
English -79-
Change PIN
- By pressing button, select Change PIN.
- Use "▶" button to change the PIN code. After pressing "▶" button, the following message appears on the screen.

Back:Menu Exit:TV
Enter old PIN code through digit buttons and then enter your new PIN code. Program Lock menu will be displayed on the screen when you enter new PIN code.
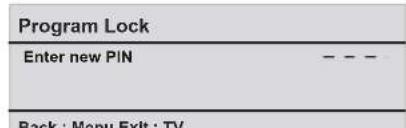
Program Lock Menu will again be displayed short after the identification of new PIN.
Hint: If you forget your Program Lock password, you can deactivate the Program Lock by using the code 7910 and be able to set new password for future use. Thus, do keep this code in a safe place for future references.
PC Mode
Installation
- Power off both Computer and Displaybefore making any connections.
- Set your PC's resolution correctly before connecting to the TV. See the table on Appendix page.
- Use 15-pin display cable to connect a PC to the LCD TV.
Menu System in PC mode
Sound Menu/Feature Menu
The items in these menus are described at Sound & Feature Menu explained in "Menu System".
PC Picture Menu
By pressing / button, select the second icon. PC Picture menu appears on the screen.
Brightness, Contrast and Colour Temperature adjustments in this menu are identical to adjustments defined in TV picture menu in "MENU SYSTEM".
Geometry Menu
By pressing / button, select the fourth icon. Geometry menu appears on the screen.
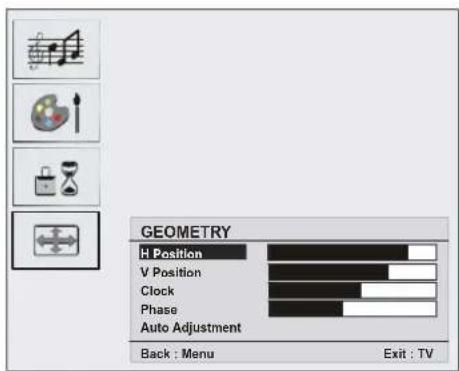
H (Horizontal) Position
This item shifts the image horizontally to right hand side or left hand side of the screen.
- By pressing / button select H. position.
- Use button to adjust the value.
V (Vertical) Position
This item shifts the image vertically towards the top or bottom of the screen.
- By pressing / button select V. position.
- Use button to adjust the value.
Clock
Clock adjustments correct interference that appear as vertical banding in dot intensive presentations like spreadsheets or paragraphs or text in smaller fonts.
- Use / button to adjust the value.
Phase
Depending on the resolution and scan frequency that you input to the TV Set, you may see a hazy or noisy picture on the screen. In such a case you can use this item toget a clear picturebytrial and errormethod.
- Use / button to adjust the value.
Auto Adjustment
If you shift the picture horizontally or vertically to an unwanted position, use this item to put the picture into correct place automatically.
- Select Auto Adjustment item by using buttons.
- Press or OK button.
Warning: Auto position adjustment recommended to be done with the full screen image for the proper adjustment.
Sound in PC mode
Connect the PC's Audio output to the TV's Audio Input sockets with an audio cable.
English -80-
Other Features
TV Status
Programme Number, Programme Name, Sound Indicator and Zoom Mode are displayed on the screen when a new programme is entered.
Mute Indicator
It is placed in the upper side of the screen when enabled.

To cancel mute, there are two alternatives; the first one is pressing the button and the second one is increasing/decreasing the volume level.
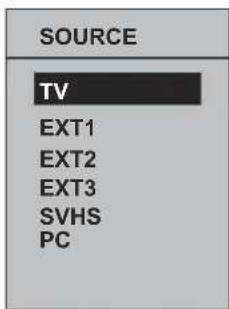
AV Modes
By pressing the AV button you can switch your TV to AV modes (except being in teletext). Pressing this button consecutively will switch the TV in one of the optional AV modes: TV, EXT1, EXT2, EXT3, SVHS, PC. To remove source osd from screen press "TV" or "M" button. In order the quit the AV Mode, press the TV or the "P+, P-" button.
Menu System in AV Modes
Sound/Picture/Features/Install Menu
The items in these menus are described at Sound, Picture, Features and Install Menu explained in "Menu System".
Teletext
(This Information only applies if your TV is equipped to receive TELETEXT) (optional)
Teletext is an information system that displays text on your TV screen. Using the Teletext information system you can view a page of information on a subject that is available in the list of contents (index).
On screen display is not available in text mode.
Contrast, brightness or colour control is not available, but volume control is available in text mode.
To operate Teletext
- Select a TV station on which Teletext is being transmitted.
- Press (TELETEXT) "TXT" button. Usually the list of contents (index) is displayed on the screen.
To select a page of Teletext
- Press the appropriate digit buttons for the required Teletext page number.
The selected page number is displayed at the top left corner of the screen. The Teletext page counter searches until the selected page number is located, so that the desired page is displayed on the screen.
- Press P + button to move the Teletext screen forward one page at a time.
- Press "P-" button to move the Teletext screen backward one page at a time.
Fastext
Your TV supports the 10 page Teletext system. When the page number of any of the 10 pages in memory is entered, the system will not search for the requested page; instead it will display the page automatically. If the requested page is not in memory, the system will search for the requested page number and save the 10 pages including the requested page into memory after finding it.
- Press the button to move the Teletext screen forward one page at a time.
- Press the button to move the Teletext screen backward one page at a time.
For Fastext
The subject-heading for the information may have a particular colour.
- Press an appropriate RED, GREEN, YELLOW or BLUE button in order to reach the relevant page quickly.
English -81-
TOP text
TOPtextmode of operation will be activated automatically according to the transmission.
- If TOP text transmission is present, colour coded buttons will appear in status row.
- If TOP text transmission is not present, status row will not appear.
The subject-heading for information may be located in colored box.
In Top mode the "P" or "P+" commands will request the next or previous page respectively. If TOP text transmission is not available, in case of operation of these commands, wraparound occurs. For example page 100 appears to be one greater than page 199.
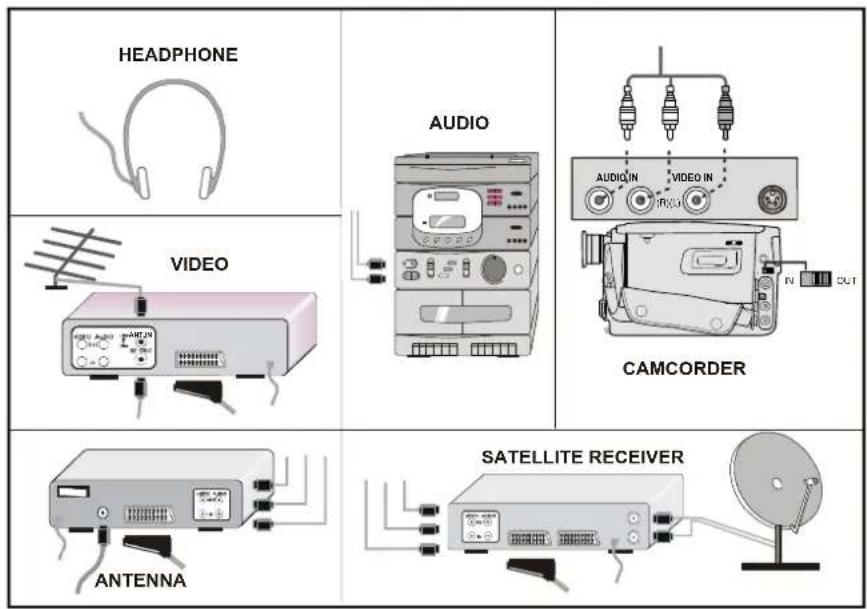
Connect Peripheral Equipment
Via The Scart
The TV has 2 Scart sockets. If you want to connect peripherals (e.g. video, decoder, etc.) which have Scart sockets to the TV, you can use SCART socket of the TV.
Note: If an external device is connected via the Scart sockets, the TV will automatically switch to AV mode. If both sockets are employed at the time, SCART 1 becomes the preferential.
Via Aerial Input
If the device you want to connect does not have a Scart socket, you should connect it to the Aerial input of the TV.
If the VCR is connected via Aerial input, it is suggested to use Programme 0.
Decoder
If you are subscribed to cable TV offers, the organisation will supply you a corresponding decoder unit to allow the programmes to be unscrambled.
For further information consult your dealer.
Connect a decoder with an aerial socket to the TV
- Connect the aerial cable.
Connect a decoder without an aerial socket to the TV
- Connect the decoder to the EXTERNAL socket of TV with a RCA cable. Through the SCART/RCA socket of the decoder, you may attain a better display resolution.
TV And Video Recorder
- Connect the aerial cables.
Better picture quality can be obtained if you also connect a Scart cable to SCART sockets.
Playback NTSC
- Connect NTSC VCR player to a Scart socket of the TV.
Then, press the "AV" button to select EXT1 or EXT2.
Copy Facility
Source selection for VCR recording.
- Select Feature menu.
- Select SCART 2 Out by pressing / button.
- For copying the picture that comes from the tuner, select SCART 1.
Camera And Camcorder
To Connect To AV Input
Connect your camera or camcorder to AV (AV-4) input of the TV.
- Connect your equipment to the TV viaVIDEO (yellow), AUDIO R (red) and AUDIO L (white) inputs. You must connect the jacks into the input with the same colour.
To Connect To S-VHS Input
Connect your camera or camcorder S-VHS input of the TV.
- Connect your equipment to the TV via S-VHS input and audio inputs of AV inputs by using S-VHS cables.
Connect The Decoder To The Video Recorder
Some video recorders have a special Scart socket for decoder.
- Connect a Scart cable to the Scart socket of your decoder and to the special Scart socket of your video recorder. Refer to the booklet of your video recorder.
Connecting Headphones
Use the stereo headphone socket of the TV, to connect headphones.
Note: If you want to connect more equipment to your TV, consult your dealer.)
Audio Lineout
To connect the external speakers to your TV, use the Line Out of the TV.
English -82-
Tips
Care Of The Screen
Clean the screen with a slightly damp, soft cloth. Do not use abrasive solvents as they may damage the TV screen coating layer.
Poor Picture
Have you selected the correct TV system? Is your TV set or house aerial located too close to non-earthy audio equipment or neon lights, etc.?
Mountains or high buildings can cause double pictures or ghost images. Sometimes you can improve the picture quality by changing the direction of the aerial.
Is the picture or Teletext unrecognisable? Check if you have entered the correct frequency.
The picture quality may degrade when two peripherals are connected to the TV at the same time. In such a case, disconnect one of the peripherals.
No Picture
Is the aerial connected properly? Are the plugs connected tightly to the aerial socket? Is the aerial cable damaged? Are suitable plugs used to connect the aerial? If you are in doubt, consult your dealer.
No Picture means that your TV is not receiving a transmission. Have you selected the correct button on the remote control?Try once more.
Sound
You can not hear any sound. Did you perhaps interrupt the sound, pressing the button?
Sound is coming from only one of the speakers. Is the balance set to one extreme? See Sound menu.
Remote Control
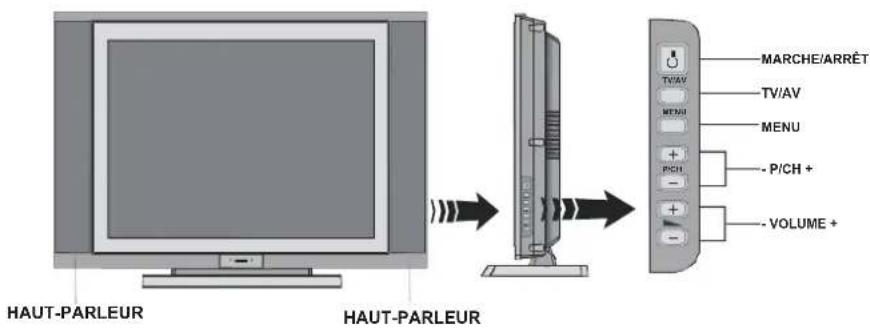
Your TV no longer responds to the remote control. Perhaps the batteries are exhausted. If so you can still use the local buttons at the bottom of the TV.
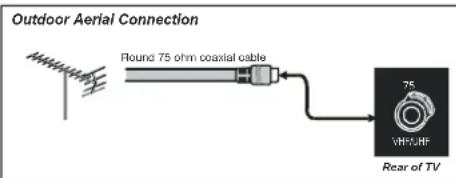
Appendix A: AerialConnection
Specifications
TV BROADCASTING
PAL/SECAMB/GD/KK'I/I'L'
RECEIVING CHANNELS
VHF(BANDI/III)
UHF(BAND U)
HYPERBAND
CABLE TV (S1-S20/ S21-S41)
NUMBER OF PRESETCHANNELS
100
CHANNEL INDICATOR
On Screen Display
RF AERIAL INPUT
75 Ohm (unbalanced)
OPERATING VOLTAGE
12VDC.
AUDIO
German+Nicam Stereo
AUDIO OUTPUT POWER (W_MS) (%10 THD)
2 × 3
POWER CONSUMPTION (W)
60W
1.2 W (Stand-by)
PANEL
4:3 display, 20" Screen Size
DIMENSIONS (mm)
| DIMENSIONS (mm) | ||||
| D | L | H | Weight (kg) | |
| 225 | 585 | 430 | 7,3 | With foot |
| 92 | 585 | 405 | 6,6 | Without foot |
English -83-
Appendix B: PC Input Typical Display Modes
The display has a maximum resolution of 800 × 600 , frequency range of 56 - 75Hz .
The following table is an illustration of some of the typical video display modes.
| Mode | Resolution Horizontal Vertical | Frequency (Hz) | ||
| 1 640 | 480 60 IBM, VGA | |||
| 2 720 | 400 70 IBM, VGA | |||
| 3 800 | 600 56 VESA | |||
| 4 800 | 600 60 VESA | |||
| 5 640 | 480 72 VESA | |||
| 6 640 | 480 75 VESA | |||
| 7 800 | 600 72 VESA | |||
| 8 800 | 600 75 VESA | |||
| 9 1024 | 768 60 VESA | |||
| 10 | 1024 | 768 70 VESA | ||
| 11 | 1024 | 768 75 VESA | ||
| 12 | 1280 | 720 60 VESA | ||
| 13 | 1280 | 768 60 VESA | ||
Information for users applicable in European Union countries

This symbol on the product or on its packaging means that your electrical and electronic equipment should be disposed at the end of life separately from your household wastes. There are separate collection systems for recycling in EU. For more information, please contact the local authority or the dealer where you purchased the product.
English -84-
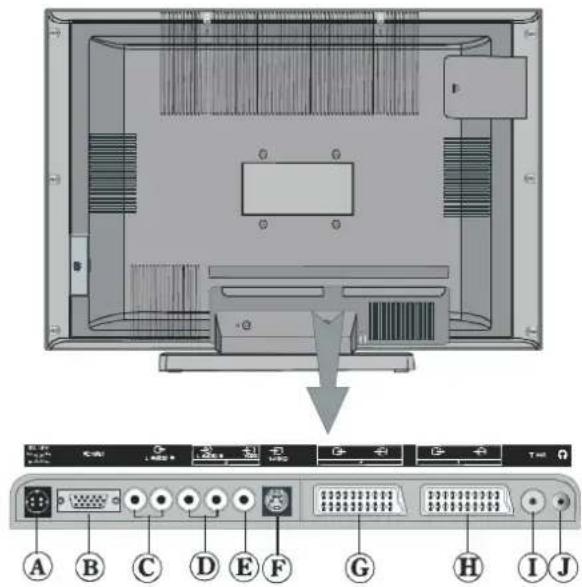
Connect Peripheral Equipment
Peripheral Equipment Connections

A DC 12 V
PCINPUT
AUDIOLINE OUT(L, R)
① AUDIOINPUT(L,R)
VIDEOINPUT
S-VHS INPUT
SCART2
H SCART 1
① ANTENNA
① HEADPHONE
English -85-
#
(TV,EXT1,EXT2,EXT3,SVHS,PC)
Immetti PIN preceded.
German + Nicam Stereo
ALIMENTAZIONE USCITA AUDIO (W_RMS) (%10 THD)
2 × 3
CONSUMO ELETTRICO (W)
60W
1.2 W (Stand-by)
PANNELLO
Display 4:3, dimensione schermo 20"