
Caffe Italiano 242120 - Coffee machine PRINCESS - Free user manual and instructions
Find the device manual for free Caffe Italiano 242120 PRINCESS in PDF.


| Product type | Pod coffee machine |
| Brand | Princess |
| Model | Caffe Italiano 242120 |
| Power supply | 220-240 V ~ 50/60 Hz |
| Power | 1450 W |
| Pump pressure | 15 bars |
| Water tank capacity | 1.2 L |
| Net weight | 4 kg |
| Dimensions (L × l × h) | 30 × 20 × 30 cm |
| Functions | Coffee, hot water, milk froth |
| Pod type | Round pods with 7 cm diameter |
| Ground coffee support | Yes, with paper filter |
| Anti-chlorine filter | ACF 30 (optional) |
| Automatic descaling | Yes, with two-phase program |
| Automatic shut-off | After 60 minutes of inactivity |
| Standby consumption | 0.3 W |
| Maintenance and cleaning | Removable parts dishwasher-safe (except water tank and lid) |
| Spare parts | Anti-chlorine filter, drain sieve, milk froth unit, steam nozzle |
| Safety | Frost protection, automatic disconnection in case of malfunction |
Frequently Asked Questions - Caffe Italiano 242120 PRINCESS
User questions about Caffe Italiano 242120 PRINCESS
0 question about this device. Answer the ones you know or ask your own.
Ask a new question about this device
Download the instructions for your Coffee machine in PDF format for free! Find your manual Caffe Italiano 242120 - PRINCESS and take your electronic device back in hand. On this page are published all the documents necessary for the use of your device. Caffe Italiano 242120 by PRINCESS.
USER MANUAL Caffe Italiano 242120 PRINCESS
Instructions for use
Mode d'emploi
Anleitung
TYPE 242120
CAFFE ITALIANO
NL Gebruiksaanwijzing 4
UK Instructions for use 16
F Mode d'emploi 27
D Anleitung 39
PRINCESS CAFFÉ ITALIANO ART. 242120
INHOU
Vór gebruik 5
Safety instructions 17
Meaning of the indicators 17
Startup 18
Preparation 18
Water level indicator 18
Anti-chlorine lter ACF 30 option 18
Exhaust (only required for new appliances) 18
Preparing the coffee 19
Coffee pads 19
One cup 19
Two cups 19
Adjusting the coffee quantity 19
Making coffee - pre-brewing function 19
Tips for the best possible coffee 19
Ground coffee cassette PK 30 option 20
Hot water 20
Milk froth 20
Professional milk frothing unit 20
Frothing the milk 20
Care of the professional frothing unit 21
Rinsing after use 21
Cleaning after nal use 21
Recommendations for preparation 21
Cappuccino 21
Latte Macchiato 21
Café Mokka 21
Frothed cocoa 22
Disconnecting 22
Cleaning process 22
Dscaling 22
Scaling indicator 22
Hardness range setting 22
Descalerr 22
Dscaling program 23
Preparation 23
Phase 1 - Dscaling 23
Phase 2 - Rinsing 23
Cleaning and Maintenance 24
Coffee Pad cassette 24
Filter insert 24
Professional milk frothing unit 24
Steam vent 24
Troubleshooting 24

PRIOR TO USE
We would like to congratulate you on your purchase of the Caffè Italiano. You have bought a modern appliance, which will allow you to prepare fresh coffee just the way you like it. The Caffè Italiano may only be used in the manner described in these operating instructions. Therefore please read the operating instructions carefully prior to starting the appliance; it provides instructions for its use, cleaning and the care of the appliance. We do not accept liability for potential damage when these instructions are disregarded. Carefully store the operating instructions and pass them on to any subsequent user of the appliance. Please also read the warranty statements at the end of the operating instructions. The appliance is designed only for domestic use.
The warning triangle marks instructions that are important for safety. Always comply with these, to avoid injury to yourself or damage to the appliance.
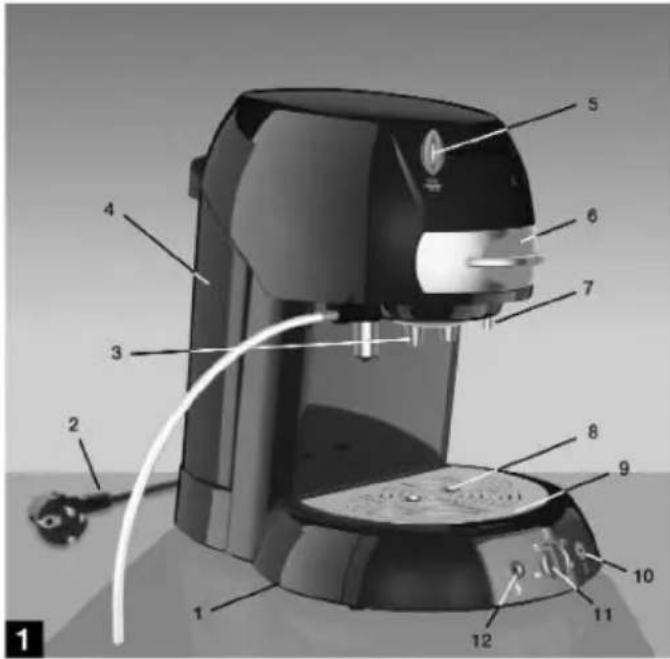
The numbers refer to the illustrations.
(3) Numbers between brackets refer to individual parts mentioned in the illustrations.
The original packaging is speci cally designed to guarantee secure transport in case of service repairs.
Therefore always keep the packaging at least for the duration of the warranty period.
SAFETY INSTRUCTIONS
Only connect the appliance to an earthed socket. The voltage must comply with the specifications on the model tag on the bottom of the appliance.
Do not jam the power supply cord and protect it from sharp edges, humidity, heat or oil.
Do not connect the appliance if the power supply cord is damaged. It must then be immediately replaced by our central customer service or a comparably qualified specialist. Incorrect repairs may result in considerable hazards for the user.
Do not start the appliance or immediately pull the power supply plug out, if it is damaged or leaks or if you suspect a defect after a fall or similar. Have the appliance repaired in these cases.
Do not place the Caffé Italiano on hot surfaces, such as stovetops or similar or near an open gas flame; this could melt the housing.
Δ Do not use the appliance in damp environments.
This appliance is not intended to be used by persons (including children) with limited physical, sensory or mental capacities or without experience and/or knowledge, unless they are supervised by another person responsible for their safety or have received instructions on how to use the appliance.
Δ Please verify that children do not have an opportunity to play with the appliance.
Pull out the power supply plug, if the appliance is not going to be used over an extended period.
There is a risk of scalding by hot water and steam. Please observe the information in these operating instructions when operating this appliance.
Always set the rocking lever (5) to O after every use.
Frost warning! After the appliance has been bled, i.e. is lled with water, it may only be operated and stored in frost-free rooms. Otherwise, the appliance could be damaged. Frost damage is not covered by the warranty.
DESIGNATION OF THE INDICATORS
Red The appliance is rinsing or heating
Red ashing Fill the water tank!
Green Ready for use
Green ashing Bleed new appliance!
① Yellow D escaling program
Yellow ashing Descale the appliance!
① Blue Active steam mode
① Blue/yellow Descale the appliance! ashing Steam mode is not possible

STARTUP
Set the appliance on a stable and at surface.
The appliance may not be operated in locations that are higher than 1,500m above sea level. You can store any unneeded length of the power supply cord (2) on the bottom (1) of the appliance.
PREPARATION
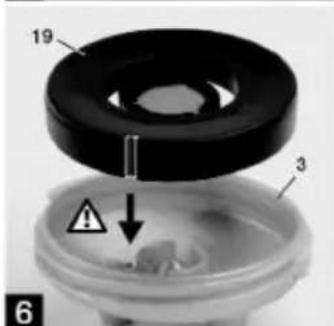
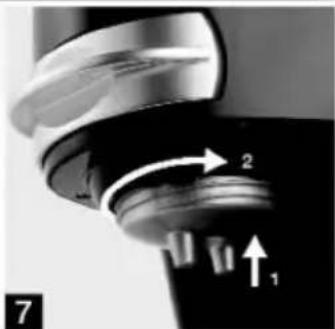
Clean the water tank (4), the pad cassette (6), the liter insert (19) and the coffee dispenser (3) with a dish-washing agent prior to rst use. The water tank (4) is removable. First, tilt backward at the handle and then lift out. It is inserted in reverse order. Set the rocking lever (5) at O to remove the pad cassette (6). The height of the coffee dispenser (3) can be adjusted by a screw-thread. You can hold it on the two dispenser nozzles and adjust its height by turning the coffee dispenser to the left or the right. If you turn over the coffee dispenser (3), the filter insert (19) will drop out. This ensures the best possible foam.
6 After cleaning, it must be reinserted again in such a way that the recess of the filter insert (19) fits into the dispenser (3).
7 Set it from below at the screw-thread to assemble the coffee dispenser (3) and screw it to the desired height.
Water level indicator
The fresh water supply is monitored continuously by a oat which moves up and down in the water tank (4). The start/stop button 12) ashes red when the level dips below the required minimum lling quantity. The process resumes as soon as you have replaced the filled water tank (4).
ANTI-CHLORINE FILTER ACF 30 OPTION
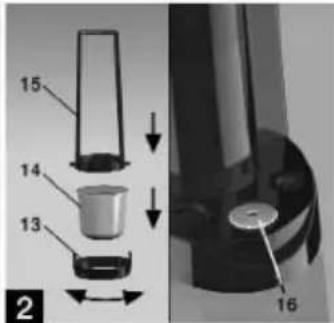
You can obtain the anti-chloride filter ACF 30 (with 3 filter cartridges) from our Service Station. The antichlorine filter (17) ensures a pure coffee taste. It filters chlorine and other contaminants from the water.
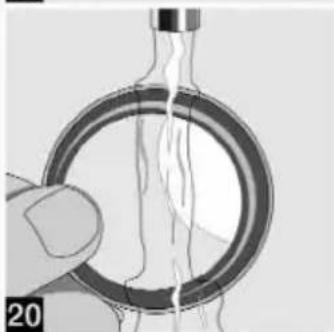
2 Insert the filter cartridge (14) that you have first rinsed under running water into the ring (13) from above. Then place the liter holder (15) on and snap in by turning.
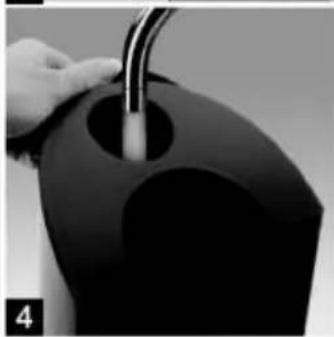
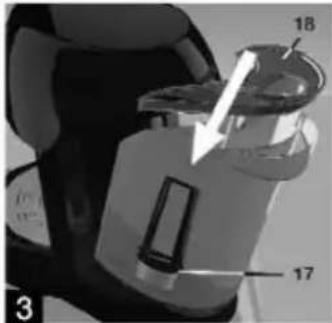
3 In order to lock the assembled liter (17) in the outlet of the water tank (4), press it downward to the stop.
The effect of the iter will diminish with an increase in the use period. It must be replaced after a max. of 3 month (about 700 cups) at an average daily consumption of 8 cups of coffee.
2 Set the time of the next iter replacement on the replacement indicator (16).
DEVENTILATION (only required for new appliances)
The heating system must be deventilated at the first startup of the new Caffé Italiano.
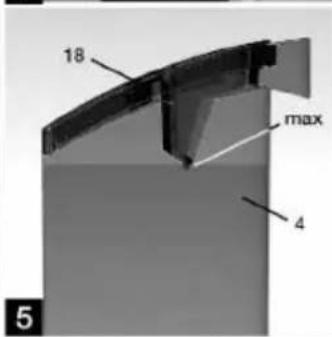
- 4 Fill the water tank (4) through the filler opening in the lid (18) only up to the max-mark 5 and insert it in the appliance.
If you ll it up too much, it will run over when you insert it.
Only fill it with fresh cold water, never use carbonated water or other liquids, such as milk or similar. - Place the cup under the coffee dispenser (3), insert the empty pad cassette (6) and move the rocking lever (5) up
Note: If the pad cassette (6) is not inserted, the rocking lever (5) cannot be set to #. - Switch the appliance on using the on/off button (10). The start/stop button will ash (12) green a short time later.
- In order to start the deventilation, briefly press the start/stop button (12). The water will start flowing out of the coffee dispenser (3) after approx. 25 s.
- After the pump automatically switches off, set the rocker lever (5) to O. The water is heated until the start/stop button 12) changes from red to green after approx. 80 s
- Place one cup respectively under the hot water spout (7) and the froth dispenser (28) and move the rocking lever (5) to
- Brie y press the two push buttons (10 and 12) at the same time. As soon as the right cup is full, push the rocking lever (5) to while the pump is running.
- After the pump switches off automatically, set the rocking lever (5) to O. The water is heated until the start/stop button 12) changes from red to green.
Caution! Scalding risk! Hot steam could escape from the froth dispenser (28) during heating.

Coffee pads
Conventional soft coffee pads with an outer diameter of 7cm can be used (approx. 7g of coffee). Coffee pads with a smaller diameter do not deliver the best coffee. Hard pads, as offered for espresso machines and pads with additives for cappuccino, etc. cannot be used.
Never insert damaged pads, loose ground coffee or instant coffee into the pad cassette; it could clog the system.
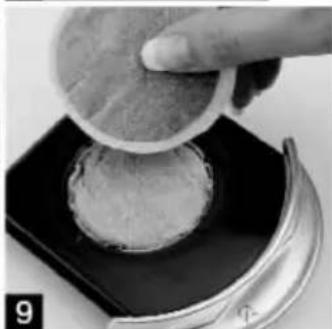
The more carefully the pads are inserted, the better the coffee will turn out. It is important to distribute the ground coffee evenly in the pad up to the rim so that water cannot ow past the pad.
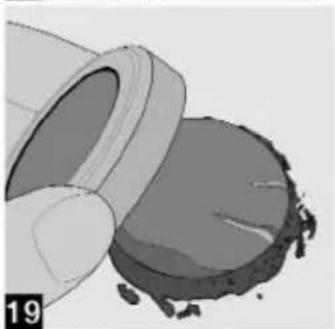
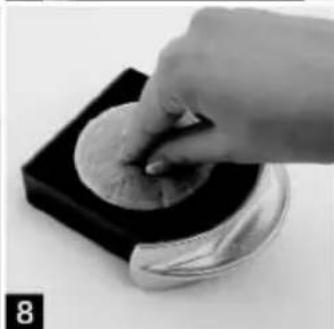
8 9 Tap the pad lightly with your ngertips, making a small indentation in the center. Insert asymmetrical pads with their at side down
One Cup
Place a cup in the center of the grating (9).
8 Place the pad cassette (6) so that "1" is visible on the handle from above. Insert a coffee pad in the recess as described above.
Two Cups
Place two cups under each of the dispenser nozzles of the coffee dispenser (3).
9 Place the pad cassette (6) so that “2” is visible on the handle from above. Now there is space for two pads. The rst one must be pressed rmly into the recess; the paper edge will point upward. Place the second pad on top as described above.
The paper edge of the top pad must lie at in the recess and may not project outward and may not be folded inward. When inserting the pad cassette (6), please verify that the pad does not shift, otherwise, the seal will not close properly and water will escape at the handle of the pad cassette (6). Push the rocking lever (5) in area to the left as far as possible. This is important for the best possible coffee quality.
Adjusting the coffee quantity
The quantity of the coffee in a pad is optimally adjusted to one cup of 125ml . You can vary the lling quantity per cup according to your personal taste and thus change the strength of the coffee. When you are making one or two cups or if you prefer strong or mild coffee, you can adjust the desired coffee quantity on the control knob (11).
Symbol Filling quantity for
| min | One espresso or mocha cup |
| ☐ | One coffee cup |
| ☐ | One large coffee cup |
| ☐ | Two coffee cups |
| max | One jumbo cup |
Making coffee - pre-brew function
In order to start brewing, brie y press the green illuminated start/stop button 2). During Pre-brew only a small water quantity will be initially supplied. The coffee-making will continue only after a brief interval, in which the coffee can swell. An especially intensive aroma will be achieved by this method. You can interrupt this at any time by pressing the button again.
Set the rocking lever (5) to O before removing the coffee when it is ready.
Remove used pads quickly from the appliance for hygienic reasons.
Tips for the best possible coffee
Stir the coffee well prior to consumption; this will provide you with an even coffee strength in the cup. Carefully close the pad packaging to prevent aroma loss. The best storage location is the refrigerator. Top up with fresh water daily. Prior to this, briefly rinse the water tank. If the appliance has not been used for several days, please proceed as described in the section "Rinsing".

GROUND COFFEE CASSETTE OPTION
You can also enjoy your favorite coffee brand freshly ground with a layer of foam. Use the ground coffee cassette (20/21) for this, as described below:
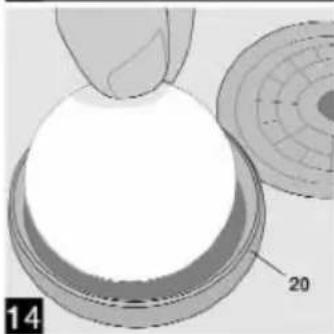
14 Insert a paper filter into the cup (20). This blocks suspended solids, which refines the taste of the coffee. However, you may also proceed without a paper liter.
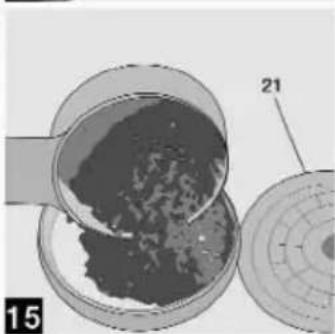
15 Fill with ground coffee or espresso powder. The ground coffee cassette contains 5.5 to 7.5g , depending on the quality of the coffee. This is sufficient for one cup of coffee.
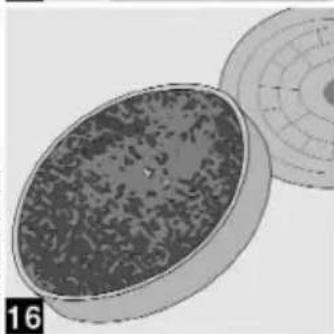
16 Press the powder on lightly and level off to the rim.
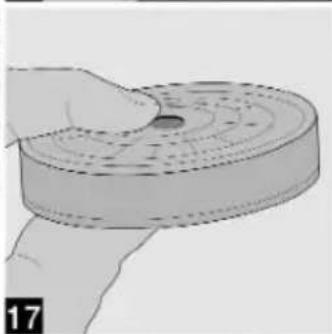
17Press the lid (21) on and thoroughly remove any powder residue sticking to the exterior.
Powder residue can clog the central opening of the pad cassette (6) and block the rocking lever (5)!
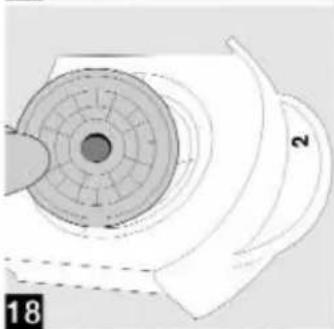
16 Place the ground coffee cassette into the pad cassette (6) in the compartment for 2 pads, and move the rocking lever (5) in area as far to the left as possible. In order to start brewing, briefly press the green illuminated start/stop button (12). Set the rocking lever (5) to O before removing the nished coffee.
10 Empty the ground coffee cassette after brewing. The paper filter is as biodegradable as the coffee powder.
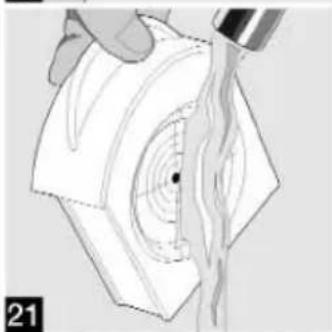
2021Rinse the powder and pad cassette after every round of brewing.
Routinely check that the central opening of the pad cassette (6) is unobstructed.
HOT WATER
You can get water at just the right temperature from the hot water dispenser (7) when making tea or instant beverages. Place the cup at a height of up to 10cm under the hot water dispenser (7) and move the rocking lever (5) up! After setting the desired water quantity on the control knob (11), press the green illuminated start/stop button 2).
The amount of hot water needed may of course differ from
the usual coffee quantity. Therefore, please take care when lling the cup. You can interrupt this at any time by pressing the start/stop button 2) again. Set the rocking lever (5) to O before removing the cup.
MAKING MILK FROTH
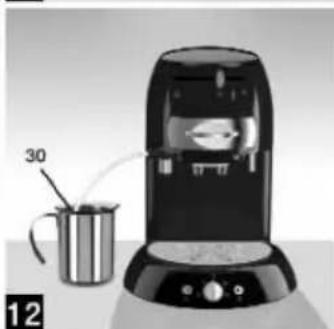
The professional milk frothing unit (24) sucks cold milk from a suctioning cup (30) and channels it heated and frothed directly into the cup.
Professional milk frothing unit
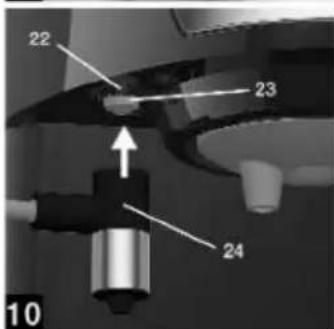
10 Pull the milk frothing unit (24) from the steam vent (22) downward and take it apart.
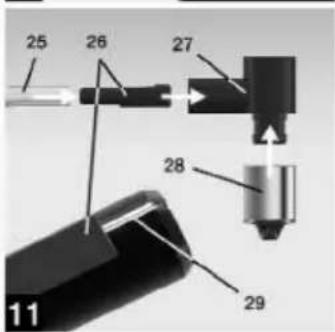
After cleaning in dishwater, reassemble the parts as illustrated in fig. 11:
The tube (25) is cut in a V shape on one side. Push the uncut end onto the tube adapter (26).
Push the tube adapter (26) completely onto the mixer (27). You will feel a ridge 2mm before the stop: you must push the tube over it. Place the froth dispenser (28) onto the mixer (27).
10 Place the milk frothing unit (24) from below onto the steam vent (22) until it snaps in. You can easily identify it on the red steam nozzle (23).
Frothing the milk
12 Hang the tube (25) into a milk suctioning cup (30) that is not higher than 14cm . Place it as close as possible to the appliance, so that the tube reaches the bottom of the cup.
Caution - risk of scalding! Hot steam is used for frothing. Only operate the appliance, if the milk frothing unit (24) is properly assembled and a cup is located under the froth dispenser (28).
Always verify that the milk suctioning cup (30) is suf cientsly filled with cold milk. If it empties during frothing, milk and hot steam will splatter from the froth dispenser (28).
1. Place a cup below the froth dispenser (28) up to a height of 9cm .
2. Switch on the appliance at the on/off button 10). The rocking lever (5) must be located at O.
3. As soon as the start/stop button 12) is illuminated in green, push the rocking lever (5) to The on/off button (0) is illuminated in blue. Wait until the start/stop button (12) changes from red to green, the appliance is then ready.
Caution - risk of scalding! The remaining water and hot steam from the froth dispenser (28) could escape during heating.
4. Set the desired quantity of frothed milk on the control knob (11). The cup symbols will serve as your guide.
5. In order to start, briefly press the green illuminated start/stop button (12). You can interrupt this at any time by pressing the button again.

Bear in mind that the milk froth dispensing does not stop immediately. It will take some time before the pressure in the steam preparation unit has balanced out. Leave the cup there until then. 6. Set the rocking lever (5) to O before removing the cup.
Care of the professional frothing unit
Please take note of the following recommendations for continuous and reliable operation of the professional frothing unit (24):
- Clean the professional frothing unit (24) immediately after use, unless you would like to use it again immediately.
- It must be cleaned daily after the last frothing, only thus will making the milk froth succeed without fail.
The air duct (29) is located on the hose adapter (26) through which air is added to the milk for frothing. Clean it especially carefully. If making the milk froth is unsuccessful at some point, this is no doubt caused by a contaminated or damaged air duct (29).
Cleaning after use
- Place the hose (25) into a cup filled with cold water. Place another cup under the froth dispenser (28).
- Push the rocking lever (5) to 品 and wait until the start/stop button changes from red to green.
- Set the control knob (11) at
- Brie y push the green illuminated start/stop button (12). Push the hose adapter (26) in the mixer (27) back and forth during the ltration process.
- After rinsing, set the rocking lever (5) on the appliance to O again.
Cleaning after final use
- 10 Pull the professional frothing unit (24) downward off the steam outlet (22) and take it apart.
- All residue can be removed in dishwater by using a soft brush or you can place the parts into the dishwasher. Please be careful that parts are not lost.
- After drying, assemble the professional frothing unit (24) again as illustrated in picture 11.
- The hose (25) is cut in a v-shape on one side. Push the uncut end onto the hose adapter (26).
- Push the hose adapter (26) completely into the mixer (27). You will feel a ridge 2mm before the stop: you must push the hose over it.
- Place the froth dispenser (28) onto the mixer (27).
- Place the professional frothing unit (24) onto the steam outlet (22) from below until it clicks into place. You can easily identify it by the red steam nozzle (23).
RECOMMENDATIONS FOR PREPARATION
Espresso is generally used for many coffee specialties. You can prepare a beverage similar to espresso with your Caffè Italiano. Select pads of a stronger roasted coffee type or use espresso powder with the ground coffee cassette. The correct espresso quantity will be obtained at the min control knob setting. You will get a Caffè lungo (extended espresso), if you set the control knob (11) in the center between min and .
Cappuccino
Cappuccino consists of one third espresso and two thirds hot milk and frothed milk. This is the way to make delicious cappuccino: Turn the control knob (11) to the small cup setting and ll a pre-heated 150 - 200ml cup two thirds full with frothed milk. Then turn the control knob to min. and top up the cup with coffee. For the nishing touch, you can dust the froth with a little cocoa powder.
Tip: During the Christmas season you can add a little cinnamon to the cocoa powder.
Latte Macchiato
Latte macchiato is usually served in a glass, in which the three layers that should only mix slightly are especially shown at an advantage. Use a glass that holds 200 - 250ml at a height of 9cm . First add frothed milk into the glass at a control knob setting . Leave the glass for some time or gently nudge it to obtain a better separation of the layers. Then add the coffee. For this, set the control knob (11) at . If the layering is not immediately successful, try to run the coffee over the back of a spoon into the milk froth. Serve Latte Macchiato sprinkled with chocolate akes or cocoa powder.
Caffé Mokka
Caffe Mokka consists of one third espresso, hot chocolate and frothed milk. First make the coffee in a preheated cup that holds 150 - 200ml . Turn the control knob (11) to min. Then add hot chocolate. Fill with frothed milk at the end at the same control knob setting.

Frothed cocoa
Stir instant cocoa powder into fresh milk directly in the suctioning cup (30). After frothing, you can enjoy a wonderfully light cocoa beverage.
DISCONNECTING
The appliance can be switched off at any time at the on/off button ①0). If you leave the machine on, it will is automatically switch itself off 60 minutes after the last use.. The power consumption is only 0.3 Watts during standby.
CLEANING PROCESS
Clean the appliance, if it has not been used for several days. The content of the heating system is thereby replaced by tap water.
- Insert the water tank (4) into the appliance after it has been filled up to the max mark 5 .
- Insert the empty pad cassette (6) and move the rocking lever (5) to
- Place two cups under the coffee dispenser (3).
- Switch the appliance on using the on/off button (10) and then simultaneously press both buttons (10 and 12) briefly.
- After the pump automatically switches off, set the rocking lever (5) to O.
DESCALING
Scaling indicator
Like all hot water appliances the appliance must be routinely descaled. The automatic scaling indicator determines the time for the descending required. Depending on the coffee consumption, you may already be asked to perform descending after 6 to 10 weeks by the yellow ashing on/off button (10). You may continue to brew coffee and prepare hot water. However, milk frothing is no longer possible.
Hardness range setting
The appliance is preset to very hard water (hardness range 4) as a precaution against excessive scaling. Request the hardness range in your residential area from your waterworks company or your local authorities. If it is lower than 4, you can change the setting. You will then no longer have to descale so frequently.
- Switch the appliance off at the on/off button (10).
- Press the start/stop button (12) (3 to 4 seconds) until the on/off button (0) ashes yellow. The number of impulses shows the set hardness range.
Flashing signal Hardness range Hardness
| • • • 1 soft 0 - 7°dH |
| • • • 2 medium > 7 - 14° dH |
| • • • 3 hard > 14 - 21° dH |
| • • • • • 4 very hard > 21° dH |
1°dH corresponds with approx. 0.18 mmol/l Ca- and Mg-Ions
- Each time you press the start-/stop button (12), the setting changes by one range. Hardness range 4 is again followed by range 1, etc.
- In order to set the new hardness range, press the on/off button (10) again briefly. If this is not done within 10 seconds, the appliance is switched off without changing the setting. You can check the hardness range at any time by repeating step 1 and 2.
Descalert
The automatic descending program of your automatic coffee pad appliance is optimized to be used for a portion (125 ml) of durgol® swiss espresso®.
Therefore only use this product in the speci ed quantity when descaling the appliance.
Only thus can complete descending be guaranteed and the material protected during the brief descending period. durgol® swiss espresso® was speci cally developed for automatic coffee and espresso machines. It is used undiluted, is highly effective and guarantees a reliable descending and therefore a long operational life of the appliance. You can obtain the descaler from our Service Station.
Δ Never use vinegar or vinegar concentrate since material of the appliance might be damaged.

Descaling with citric acid is too slow. That is why a proper descaling cannot be guaranteed.
The warranty does not cover damage resulting from the use of an unsuitable descaler or non-compliance with the descending speci cations.
Please be careful when handling the decalcifying agent to prevent damage to furniture or clothing.
Please for that reason use cups that are as tall as possible and place them under the respective dispensers in such a way as to prevent splatters.
Dscaling program
Your Caffé Italiano includes an automatic descaling program that lasts approximately for 25 to 30 minutes.
The program has 2 phases:
phase 1 = descending
phase 2 = rinsing
The rst phase consists of 3 descending cycles, one for each function. In the following second phase the descending agent is rinsed out with tap water through 7 consecutive passes. Note: Once the automatic descending program has started, it cannot be interrupted. In an emergency you can pull out the power supply plug.
Preparation
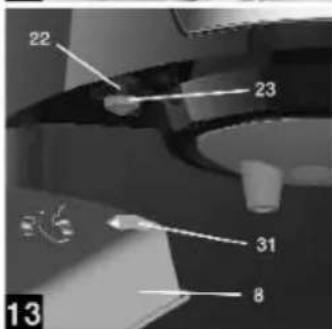
- Unscrew the red steam nozzle (23) from the steam outlet (22). Use the Allen key (31) for this - it is located on the bottom of the drip pan (8).
- Remove the anti-chlorine filter (17) from the water reservoir (4).
- Fill one portion (125ml) of descaler into the empty water reservoir (4), place the red steam nozzle (23) in it and put the reservoir back into the appliance.
- Push the empty pad cartridge (6) into the appliance and move the rocking lever (5) to
- Place a large mug (contents at least 250ml ) under the hot water outlet (7).
Phase 1 - Dscaling
Phase 1 is carried out 3 times:
- Once for the "hot water function" position
- Once for the "coffee function" position
- Once for the "steam function" position
1. Descaling "hot water function"
Switch the appliance on using the on/off button 10 ) and then simultaneously press both buttons (10 and 12) (3 to 4 seconds) until the pump brie y starts running. The on/off button 10 ) is continuously illuminated in yellow as long as the descending program is running. The pump runs three times per minute, each time for one second.
2. Descaling "coffee function"
Approximately 5 minutes after the "hot water descending" the start/stop button (12) ashes red. Shake the liquid that has run into the mug back into the water reservoir (4), place the mug under the steam outlet (22), push the rocking lever (5) to and press the start/stop button (12).
3. Descaling "steam function"
Approximately 5 minutes after the "coffee descaling function" the start/stop button 12) ashes red again. Shake the liquid that has run into the mug back into the water reservoir, place the mug under the steam outlet (22), and press the start/stop button 12) again.
After another 5 minutes the rst phase of the descending program is completed. The start/stop button 12) flashes red again.
Phase 2 - Rinsing
- Rinse out the water reservoir (4) and return it to the appliance lled with tap water up to the max mark. Place the mug under the outlet (3), push the rocking lever (5) to 1/2 and press the green flashing start/stop button 12).
- As soon as the start/stop button 12) flashes green again, place the mug under the hot water outlet (7), push the rocking lever (5) to and press the green ashing start/stop button

- Push the rocking lever (5) one position further to the left after every rinse (follows again after) and place the empty cup always under the respective outlet.
- If the rinse is interrupted by a red ashing light, the tap water must be re lled.
- The descending program is completed after a total of 7 rinse cycles and the appliance switches off. Set the rocking lever (5) to O.
- Screw the red steam nozzle (23) manually back to the stop in the steam outlet (22) without tightening it with the Allen wrench (31). After descending you can best put the pad cassette (6), coffee dispenser (3) and filter insert (19) in the dishwasher.
CLEANING AND SERVICE
Pull the power supply plug out prior to cleaning.
Never immerse the appliance in water.
Clean the outside of the appliance only with a damp cloth. Do not use any aggressive or abrasive cleaning agents, these could damage the nish. All removable parts can be cleaned in the dishwasher except the water tank (4) and the tank lid (18).
Pay attention that you do not loose any small parts. Clean the water tank (4) and the tank lid (18) in the handwash and rinse with clear water.
Pad cassette
Place the pad cassette into the dishwasher with the handle up, so that no dishwasher will remain in the part. Routinely check that the central opening of the pad cassette (6) is unobstructed.
Filter insert
The quality of the froth layer is already clearly reduced when there are slight deposits in the liter insert (19). This could already be the case after 100 cups with calcium residue due to very hard water. The liter must therefore be regularly cleaned. The two liters, which are located on top of each other, may not be pressed together during cleaning. Remove the coffee grease in dishwater by using a soft brush or simply put the liter insert in the dishwasher. Remove any calcium deposits by placing the liters in the descending solution and then rinsing them well.
Professional milk frothing unit
To guarantee reliable operation the professional frothing unit (24) must be cleaned daily as described in the section "Care of the professional frothing unit".
Steam opening
If you are routinely frothing milk, you must clean the steam nozzle (23) monthly. You must do this at the latest when you notice that less steam is available.
13 Unscrew the red steam nozzle (23) from the steam outlet (22). Use the Allen key (31) for this; it is located on the bottom of the drip pan (8). Remove the calcium deposits by placing the nozzle into the descending solution and then rinse it under running water. After cleaning manually screw the steam nozzle (23) into the steam outlet (22) up to the stop without tightening it with the Allen key (31).
TROUBLESHOOTING
The following hints will assist you in eliminating problems. If this is unsuccessful, send the appliance to our customer service for repair. Observe the warranty information.
Flashing red light despite a filled water tank
After a lengthy period of use, it may be possible that deposits (calcium or similar) prevent the free movement of the oat in the water tank (4). In a new appliance, it is possible that residue of the packaging blocks the oat.
The water tank (4) must be cleaned or descaled. When you shake the empty water tank, the oat must clearly move.
The rinse process cannot be started.
The rinse process can only be started in the steam mode, if the water in the heating system is still cold.
Water does not run from the outlet during the rinse process
⇒ Check if the rocking lever (5) is in area

The rocking lever jams long before
⇒ Check if the pad is properly placed in the pad cassette (6). The pad may have moved due to an overly rash insertion of the pad cassette.
⇒ The lower pad must be pressed tightly into the recess when using 2 pads.
⇒ Tap the pad so that a small recess develops in its center.
Water escapes from the pad cassette
⇒ Check if the pad is properly placed in the pad cassette (6). If the paper edge projects over the edge of the recess, the sealing during coffee-making is prevented.
⇒ Insert asymmetrical pads with their flat side down
Water under the appliance
The drip pan (8) is full.
⇒ Empty the drip pan (8).
The water tank (4) was overfilled.
⇒ Only ll the water tank (4) up to the max-mark. After the pump has been switched off, water for the pressure compensation escapes from the overflow into the water tank (4). If you remove the water tank for re lling too quickly, the water drips onto the appliance.
⇒ Wait several seconds after shutting off the pump, so that the over ow can drip into the tank.
If the water tank (4) is not in the appliance over a longer period, it may be possible that water escapes from the inlet of the appliance.
The water tank (4) must only be removed brie y for lling and cleaning.
The coffee intensity is insufficient
⇒ The more carefully the pads are inserted, the better the coffee will turn out. Please observe the instructions in the section "Coffee pads"
⇒ The coffee becomes stronger, if you set a lower coffee quantity on the control knob (11).
⇒ Select a stronger type of coffee.
The coffee is too strong
⇒ The coffee becomes less strong, if you set a higher coffee quantity on the control knob (11).
⇒ Select a milder type of coffee.
Left and right cups fill unevenly
Minor lling differences cannot be completely prevented. If the appliance has been used for some time, this will improve.
⇒ Check if the appliance is located on a horizontal surface.
⇒ Check if the filter insert (19) is inserted properly 6.
The froth layer is clearly deteriorating
The iter insert (19) is clogged by calcium or coffee residue.
⇒ Regularly descale and clean the filter insert (19). Observe the information in the section "cleaning and service".
⇒ The two filters in the filter insert (19) may not be pressed against each other. However, if this does occur, the iter insert must be replaced.
No coffee emerges, although the pump is operating
⇒ Set the rocking lever (5) in area to the left as far as possible.
It is possible that the central opening of the pad cassette (6) is clogged by coffee powder or calcium deposits. A relief valve reduces the pressure to a harmless value and directs the water into the water tank (4).
⇒ Routinely check that the central opening of the pad cassette (6) is unobstructed.
Hot water cannot be removed
⇒ Check if the rocking lever (5) is at.
The water in the water tank heats up
If the appliance is started, although the rocking lever
(5) is not at or if the central opening of the pad cassette (6) is clogged by coffee powder or calcium deposits, a relief valve channels hot water into the water tank (4).
⇒ Routinely check that the central opening of the pad cassette (6) is unobstructed.

The rocking lever cannot be opened
If the central opening of the pad cassette (6) is clogged by coffee powder or calcium deposits, the pressure cannot escape completely and the rocking lever (5) is blocked.
⇒ Pull the power plug out and leave the appliance for several hours, so that the pressure can be reduced. If this does not work, you can open the opening in the pad cassette (6) with a needle. Remove all removable parts and place the appliance on its side. The opening in the pad cassette (6) is now accessible from below. Try to open it with a needle. Careful, it may spray coffee.
Routinely check that the central opening of the pad cassette (6) is unobstructed.
The coffee quantity is reduced
⇒ Set the rocking lever (5) in area to the left as far as possible.
It is possible that the central opening of the pad cassette (6) is partially clogged by coffee powder or calcium deposits.
⇒ Routinely check that the central opening of the pad cassette (6) is unobstructed.
Calcium deposits clog the inner pipes. This may damage the appliance.
The appliance must be descaled.
The outlet drips when reheating
⇒ If after the coffee-making you set the rocking lever (5) or the rinsing process at O, longer post-dripping will be reliably prevented.
Calcium deposits inhibit the function of the valves.
The appliance must be descaled.
The appliance switches off after heating
If the coffee-making temperature is not achieved during heating, the appliance will shut off after approx. 2 minutes.
The appliance may not be operated in locations that are situated higher than 1,500m above sea level. The water would otherwise boil prior to reaching the coffee-making temperature.
Milk is not suctioned
If you have not frothed milk over an extended period, it may be possible that the necessary steam will not be available during the rst attempt.
⇒ Wait until the start/stop button (12) is again illuminated in green and try once more.
⇒ If you have not frothed milk over an extended period, first rinse the professional milk frothing unit (24) as described in section "rinse after use". This provides a more consistent output during subsequent frothing.
The steam nozzle (23) may be clogged by calcium deposits or similar.
⇒ Clean the steam nozzle (23) as described in the section "cleaning and service".
Milk froth does not develop
The air channel (29) on the tube adapter (26) is contaminated or damaged due to improper cleaning.
⇒ Clean the professional milk frothing unit.
⇒ Replace the damaged tube adapter (26).
Extreme splattering of the milk froth
The tube (25) is incorrectly assembled.
The uncut end must be placed on the tube adapter (26).
The tube adapter (26) is not placed far enough in the mixer (27).
⇒ Push the tube adapter (26) completely onto the mixer (27) until the stop.
The milk froth runs continuously
If you are using a milk suctioning cup (30), in which the milk is located higher than the mixer, the suctioning cup (30) is suctioned dry (siphoning effect) after frothing.
The milk suctioning cup (30) should not be higher than 14cm . Do not hang the tube (25) directly into a 1 liter pack.

PRINCESS CAFFÉ ITALIANO ART. 242120
CONTENU



- PRINCESS CAFFÉ ITALIANO ART. 242120
- INHOU
- PRIOR TO USE
- SAFETY INSTRUCTIONS
- DESIGNATION OF THE INDICATORS
- STARTUP
- PREPARATION
- WATER LEVEL INDICATOR
- ANTI-CHLORINE FILTER ACF 30 OPTION
- DEVENTILATION (ONLY REQUIRED FOR NEW APPLIANCES)
- COFFEE PADS
- ONE CUP
- TWO CUPS
- ADJUSTING THE COFFEE QUANTITY
- SYMBOL FILLING QUANTITY FOR
- MAKING COFFEE - PRE-BREW FUNCTION
- TIPS FOR THE BEST POSSIBLE COFFEE
- GROUND COFFEE CASSETTE OPTION
- HOT WATER
- MAKING MILK FROTH
- PROFESSIONAL MILK FROTHING UNIT
- FROTHING THE MILK
- CARE OF THE PROFESSIONAL FROTHING UNIT
- CLEANING AFTER USE
- CLEANING AFTER FINAL USE
- RECOMMENDATIONS FOR PREPARATION
- CAPPUCCINO
- LATTE MACCHIATO
- CAFFÉ MOKKA
- FROTHED COCOA
- DISCONNECTING
- CLEANING PROCESS
- DESCALING
- SCALING INDICATOR
- HARDNESS RANGE SETTING
- FLASHING SIGNAL HARDNESS RANGE HARDNESS
- DESCALERT
- DSCALING PROGRAM
- PHASE 1 - DSCALING
- DESCALING "HOT WATER FUNCTION
- DESCALING "COFFEE FUNCTION
- DESCALING "STEAM FUNCTION
- PHASE 2 - RINSING
- CLEANING AND SERVICE
- PAD CASSETTE
- FILTER INSERT
- STEAM OPENING
- TROUBLESHOOTING
- FLASHING RED LIGHT DESPITE A FILLED WATER TANK
- THE RINSE PROCESS CANNOT BE STARTED
- WATER DOES NOT RUN FROM THE OUTLET DURING THE RINSE PROCESS
- THE ROCKING LEVER JAMS LONG BEFORE
- WATER ESCAPES FROM THE PAD CASSETTE
- WATER UNDER THE APPLIANCE
- THE COFFEE INTENSITY IS INSUFFICIENT
- THE COFFEE IS TOO STRONG
- LEFT AND RIGHT CUPS FILL UNEVENLY
- THE FROTH LAYER IS CLEARLY DETERIORATING
- NO COFFEE EMERGES, ALTHOUGH THE PUMP IS OPERATING
- HOT WATER CANNOT BE REMOVED
- THE WATER IN THE WATER TANK HEATS UP
- THE ROCKING LEVER CANNOT BE OPENED
- THE COFFEE QUANTITY IS REDUCED
- THE OUTLET DRIPS WHEN REHEATING
- THE APPLIANCE SWITCHES OFF AFTER HEATING
- MILK IS NOT SUCTIONED
- MILK FROTH DOES NOT DEVELOP
- EXTREME SPLATTERING OF THE MILK FROTH
- THE MILK FROTH RUNS CONTINUOUSLY
- CONTENU
Brand : PRINCESS
Model : Caffe Italiano 242120
Category : Coffee machine