RILEY T2050 - Stroller Topmark - Free user manual and instructions
Find the device manual for free RILEY T2050 Topmark in PDF.
| Brand | Topmark |
| Model | RILEY T2050 |
| Product type | Tandem stroller |
| Number of seats | 2 |
| Maximum child weight | 15 kg per seat |
| Age range | From birth to approximately 4 years |
| Maximum basket weight | 2 kg |
| Maximum weight of canopy back pocket | 1 kg |
| Restraint system | 5-point harness |
| Backrest adjustment | 3 positions (upright to reclined) |
| Front wheels | Swivel with lock |
| Brake | Foot brake on rear axle |
| Canopy | Front and rear canopy included |
| Rain cover | Included |
| Tray | Removable, included |
| Folding | Folding mechanism with button and levers |
| Materials | Fabric, plastic, metal |
| Care | Clean with soapy water, air dry |
| Warranty | 2 years |
| Manufacturer | Top Mark BV, Netherlands |
Frequently Asked Questions - RILEY T2050 Topmark
User questions about RILEY T2050 Topmark
0 question about this device. Answer the ones you know or ask your own.
Ask a new question about this device
Download the instructions for your Stroller in PDF format for free! Find your manual RILEY T2050 - Topmark and take your electronic device back in hand. On this page are published all the documents necessary for the use of your device. RILEY T2050 by Topmark.
USER MANUAL RILEY T2050 Topmark
natural_image
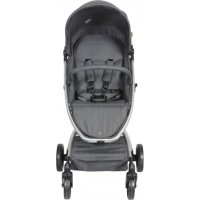
Exterior view of a two-tier baby stroller with black wheels and gray canopy (no text or symbols visible)RILEY
6-48

15 kg
T2050
Gebruiksaanwijzing
Instrucon for use
Gebrauchsanleitung
Mode d'emploi
text_image
Safety warning illustration showing pictograms of human and pedestrian crossing behaviors with directional arrowsnatural_image
Close-up of a hand holding a mechanical component, possibly a tool or device (no visible text or symbols)MONTEREN
VOETENSTEUN BEVESTIGEN
natural_image
Close-up of hands holding a metal frame with arrows indicating movement or assembly (no text or symbols visible)natural_image
Close-up of a hand connecting a cable to a motor stroller (no visible text or symbols)natural_image
Close-up of a hand adjusting a large tire component (no visible text or symbols)(g.a) (g.b)

natural_image
Close-up of a mechanical assembly with a valve and tire, showing no visible text or symbolsnatural_image
Close-up of a hand holding a tool near a vehicle chassis, with an upward arrow indicating motion (no text or symbols)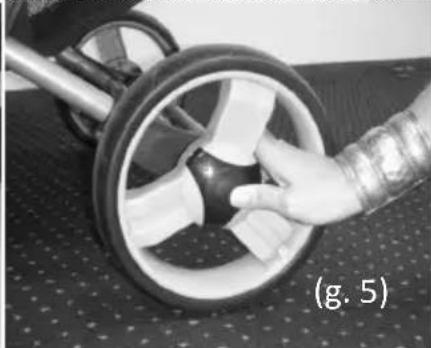
natural_image
Close-up of a hand adjusting a stroller wheel on a dotted mat (no text or symbols visible)MONTEREN
KAPPEN BEVESTIGEN
natural_image
Close-up of a person adjusting a dark jacket inside a car compartment, with an arrow indicating the part (no visible text or symbols)NL
VOORKAP
natural_image
Close-up of a baby stroller with hand adjusting seat, showing black arrows pointing to fabric (no text or symbols visible)KAPPOSITIE AANPASSEN
U kunt de kap in de gewenste posie trekken of duwen (g. 8).

natural_image
Close-up of a person's seatbelt with a handle and arrow indicating direction (no text or symbols)VOORBLAD BEVESTIGEN
natural_image
Close-up of a hand adjusting a black belt buckle, no visible text or symbolsnatural_image
Close-up of a baby stroller with hand adjusting the basket (no visible text or symbols)(Fig. 12)
NL
REMMEN
natural_image
Close-up of a person's arm holding a bicycle seatbelt, labeled (Fig. 13) at bottom (no other text or symbols visible)(Fig. 13)
VOORWIELZWENKING IN- OF UITSCHAKELEN
natural_image
Close-up of a person using a small wheeled scooter with wheels and a foot (no visible text or symbols)(Fig. 14)
natural_image
Person standing beside a baby stroller (no visible text or symbols)(Fig. 16)
ATTENTIE
natural_image
Black and white photo of a stroller with visible wheels and handle, labeled (1) in corner (no text or symbols on device)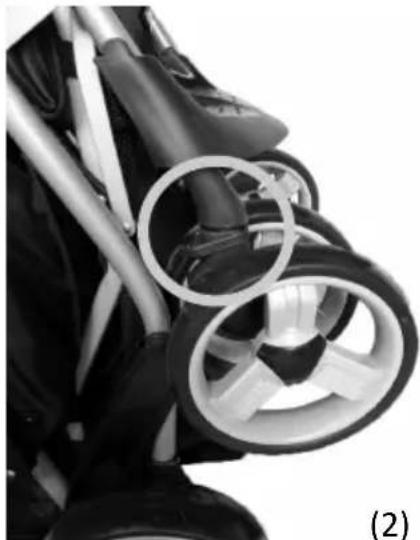
natural_image
Close-up of a stroller with visible wheel and hose, no text or symbols present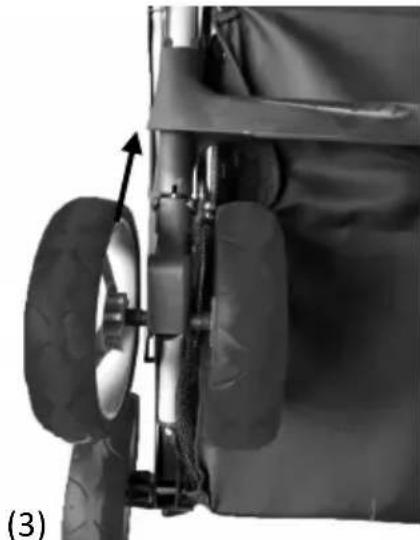
natural_image
Close-up of a mechanical component with visible tire and wheel assembly (no text or symbols)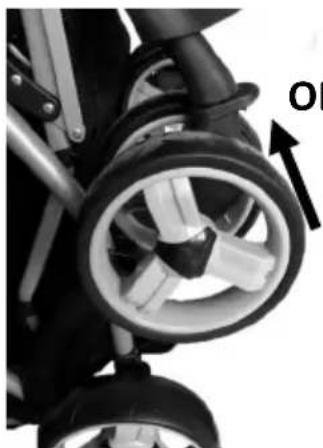
natural_image
Close-up of a stroller with visible wheel and wheels, no text or symbols presentONJUIST ONJUIST
LET OP!
natural_image
Close-up of an aircraft landing gear with visible tires and structural components (no text or symbols)IN GEBRUIK NEMEN
GEBRUIK VAN DE 5-PUNTSVEILIGHEIDSGORDEL
GEBRUIK ALTIJD DE KRUISGORDEL IN COMBINATIE MET DE
HEUPGORDEL.
natural_image
Diagram showing two mechanical joint configurations with directional arrows indicating movement or force (no text or symbols present)VASTMAKEN
REGENSCHERM
natural_image
Black and white photo of a baby stroller with transparent cover and plastic wrap, no visible text or symbolsVERZORING EN ONDERHOUD
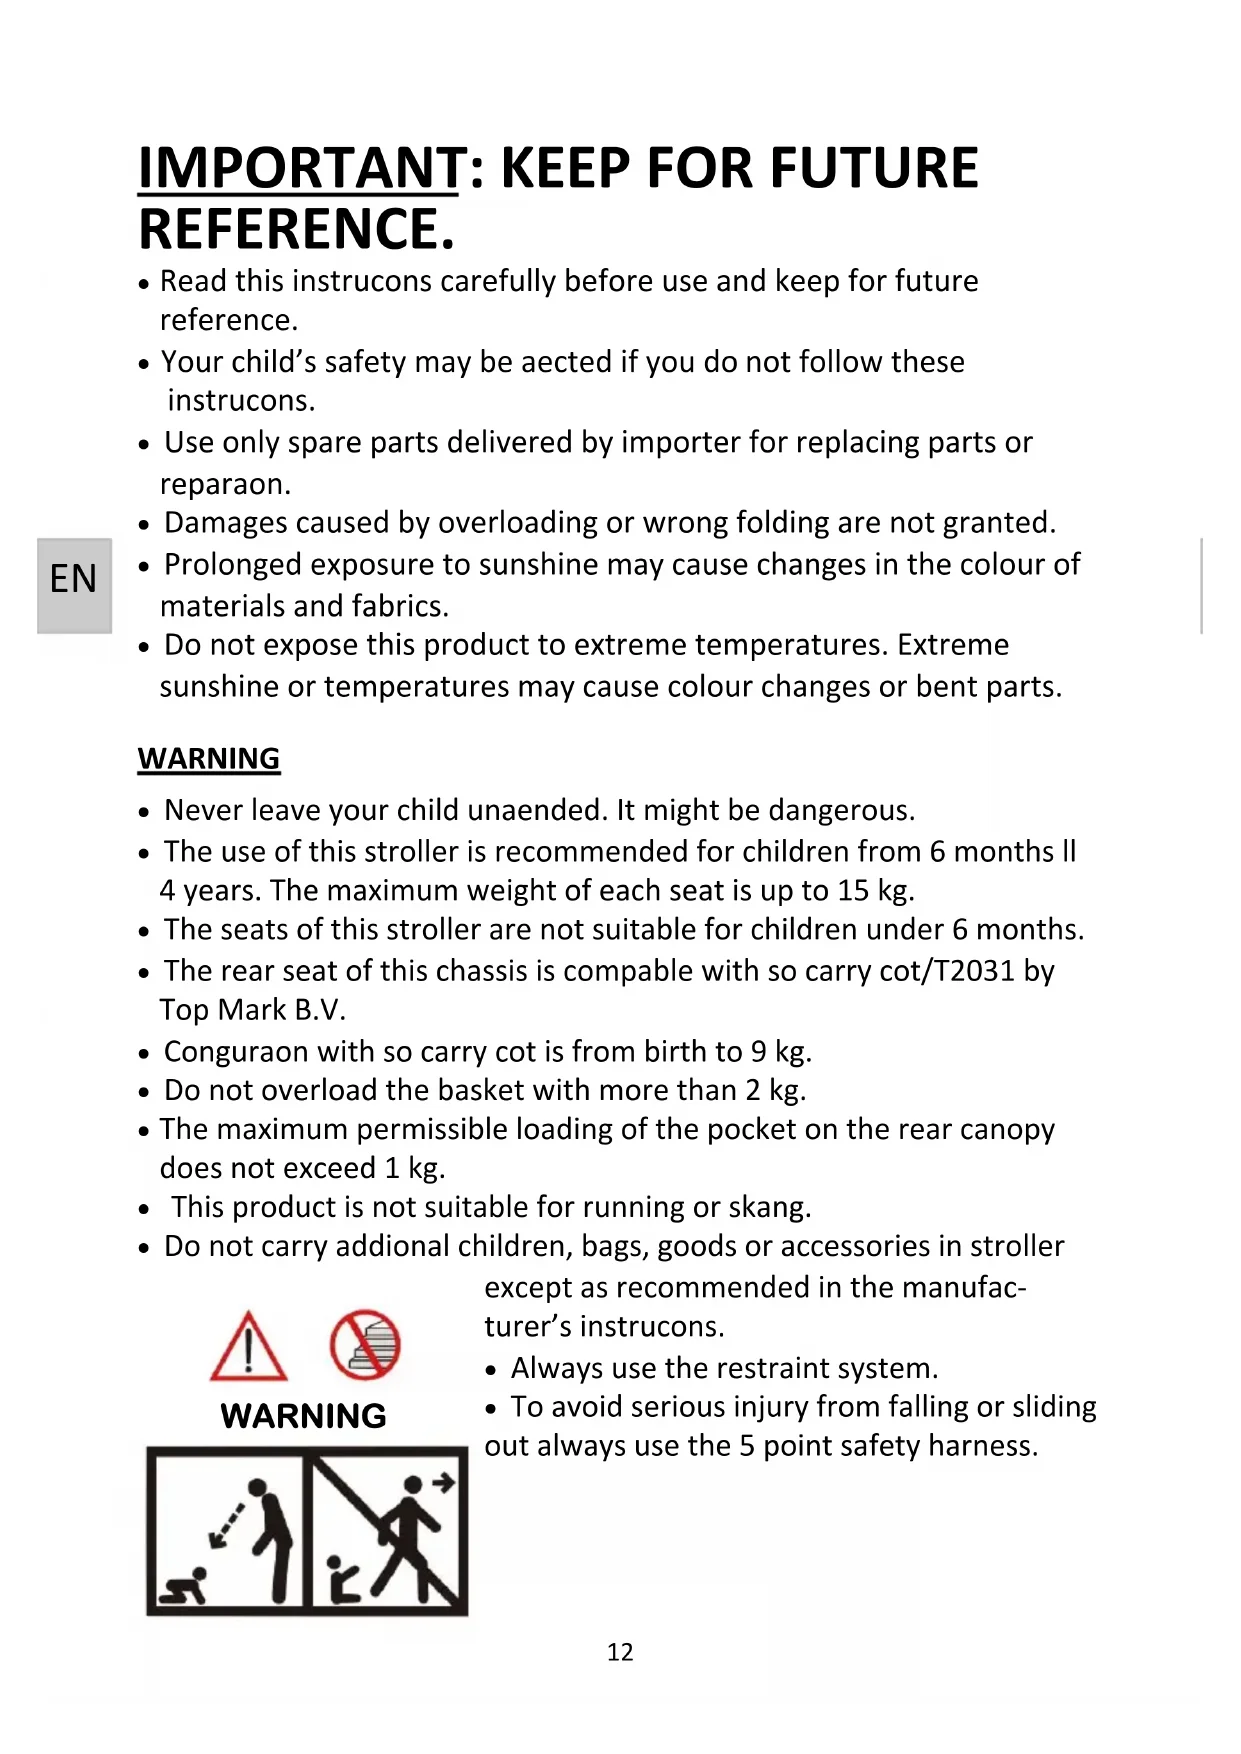
IMPORTANT: KEEP FOR FUTURE REFERENCE.
- Read this instrucons carefully before use and keep for future reference.
- Your child's safety may be aected if you do not follow these instrucons.
- Use only spare parts delivered by importer for replacing parts or reparaon.
- Damages caused by overloading or wrong folding are not granted.
- Prolonged exposure to sunshine may cause changes in the colour of materials and fabrics.
- Do not expose this product to extreme temperatures. Extreme sunshine or temperatures may cause colour changes or bent parts.
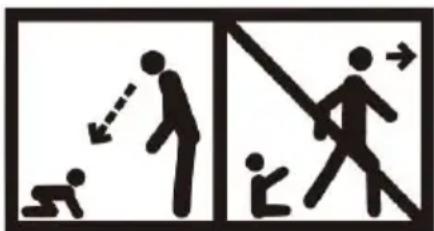
WARNING
- Never leave your child unaended. It might be dangerous.
- The use of this stroller is recommended for children from 6 months II 4 years. The maximum weight of each seat is up to 15 kg.
- The seats of this stroller are not suitable for children under 6 months.
- The rear seat of this chassis is compatible with so carry cot/T2031 by Top Mark B.V.
- Conguraon with so carry cot is from birth to 9 kg.
- Do not overload the basket with more than 2 kg.
- The maximum permissible loading of the pocket on the rear canopy does not exceed 1 kg.
- This product is not suitable for running or skang.
- Do not carry additional children, bags, goods or accessories in stroller


WARNING
text_image
Diagram illustrating human walking and deflection rules with labeled figures and directional arrowsexcept as recommended in the manufacturer's instrucons.
• Always use the restraint system.
- To avoid serious injury from falling or sliding out always use the 5 point safety harness.
• Always use the crotch strap in combinaon with the waist belt.
- This vehicle has been designed for maximum of 1 child per seat.
- Do not allow more than 2 children, as stroller may become unstable.
- Any load aached to the handle aects the stability of the stroller, the stroller may become unstable and p over and can injure your child.
- Pay special aenon when manoeuvring the stroller up or down the pavement, it is best to do it backwards.
- Be aware of the risk of open re and other sources for strong heat, such as electric bar res, gas res... in the vicinity of the stroller.
- Avoid hot liquids, power cables and other possible dangers may come within range of a child.
- Do not use this stroller if any parts are broken, torn or missing.
- Ensure stroller is completely erected and check all locking devices are engaged before placing child in stroller.
- Before making adjustments to stroller ensure that child's body is clear of any moving parts.
- To avoid injury ensure that your child is kept away when unfolding and folding this product.
- Do not use on stairs or escalators, fold stroller and carry.
- Put on all the brakes whenever you park the stroller.
- Do not let your child play with this product.
- Do not allow child to stand on seat or footrest.
- Parking device shall be engaged when placing and removing the children.
- Do not allow objects on top of canopy as this stroller may become unstable.
- Keep plasc rain cover away from children to avoid suocaon.
Do not use the rain cover if the stroller is not ed with the hoods or sun canopies to prevent the risk of suocaon. To prevent the risk of suocaon, never leave the stroller with child in it under the sun, with the rain cover ed to it.
- Do not use accessories or replacement parts other than the ones recommended by instrucon manual.
- Accessories which are not approved by the manufacturer shall not be used.
- Only replacement parts supplied or recommend by the manufacturer/distributor shall be used.
- Never put stroller near steps or stairs.
- Keep this product away from children when not in use.
ASSEMBLING
Check if following spare parts are in the box:
• 1 chassis with basket
• 2 sets of front wheels
2 rear wheels
- 1 axle
- 2 canopies
- 1 rain cover
Note that the fabric paerns, colour pictures and stroller accessories on the stroller in this instrucon manual may vary from that of the product that you have purchased.
If one or more of the above menoned spare parts are missing or broken, please contact the store where you bought the product, before using.
WARNING: Please keep all packaging material away from babies and children, to prevent suocaon.
text_image
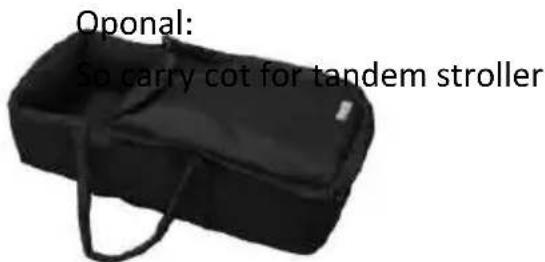
Oponal: So carry cot for tandem strollerWARNING: When using the stroller with the oponal carrycot for tandem stroller put the rear seat in the lying posion. Aach the buckles of the so carry cot onto the buckles in the rear seat. The head of the carry cot lays near the push bar.
TO UNPACK STROLLER
A. Remove stroller from the box.
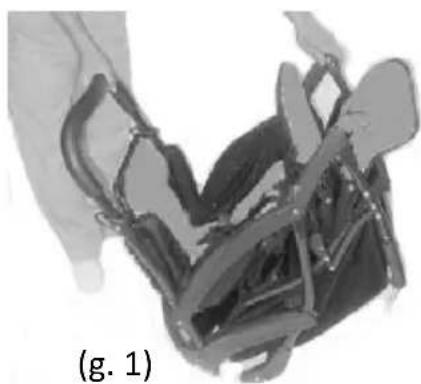
B. Open stroller unl locking latches on both sides have locked into place (g. 1).
WARNING: make sure that all locking latches have locked before using the stroller.
natural_image
Close-up of a hand holding a mechanical component, possibly a tool or device (no visible text or symbols)ASSEMBLING
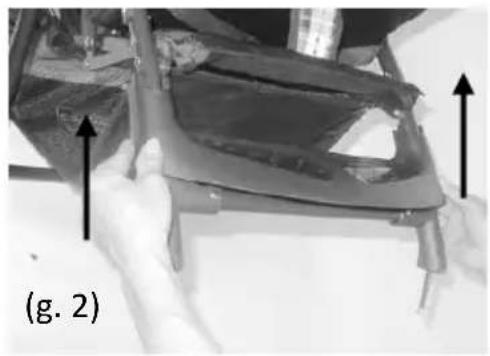
TO ATTACH FOOTREST
A. Lay stroller on its back so handle is on the oor. B. Snap footrest onto leg tubes as shown (g. 2).
natural_image
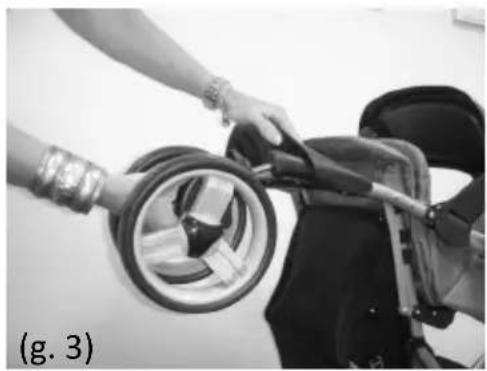
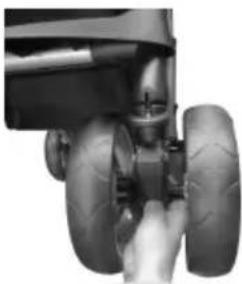
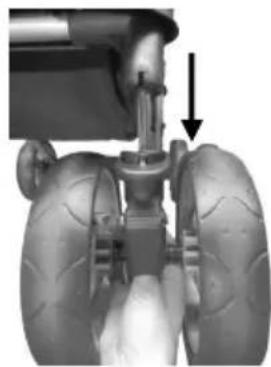
Close-up of hands installing or adjusting a mechanical component with arrows indicating upward movement (no text or symbols visible)TO ASSEMBLE FRONT WHEELS
A. Line up boom of front leg with the wheel assembly.
The swivel lock faces up (g. 3).
B. Push wheel assembly on unl it locks in place. Repeat for other wheel.
Pull rmly on each wheel assembly to be sure the wheel assemblies are securely aached.
natural_image
Person holding a car charger with hoses, no visible text or symbolsTO RE ASSEMBLE FRONT WHEELS
First remove the child(ren) from the stroller. Li back the stroller on the rear wheel and push bar. In the opening of the front wheel block you feel a small part(g.a); push it down with your thumb or at side of screw driver and pull of the front wheel (g.b).
natural_image
Close-up of a landing gear with visible tires and a hand adjusting the wheel (no text or symbols)(g.a) (g.b)
natural_image
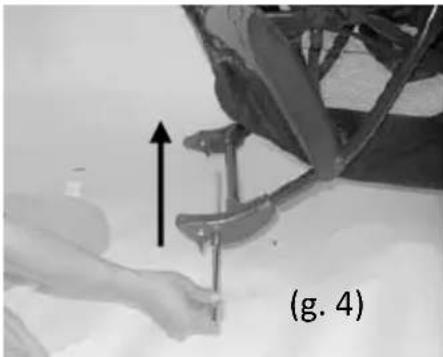
Close-up of an aircraft landing gear with visible tire and valve components (no text or symbols)TO ASSEMBLE REAR AXLE AND REAR WHEELS
A. Insert axle through the rear axle/brake housing as shown (g. 4).
B. Slide wheel on axle. Wheel will lock onto axle. Repeat for other side.
Pull rmly on each wheel to be sure the wheel assemblies are securely
natural_image
Close-up of hands using a tool to adjust or install a mechanical component, with an upward arrow indicating motion (no text or symbols visible)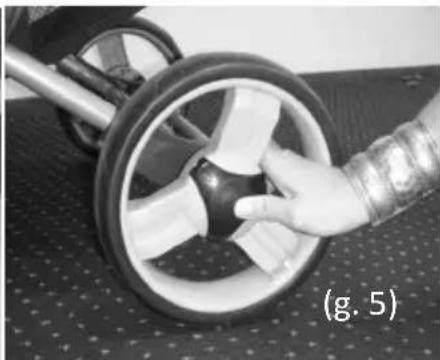
natural_image
Close-up of a hand adjusting a stroller wheel on a perforated surface (no text or symbols visible)aached. To unlock the rear wheel press on the wheel cap in the middle of the rear wheel (g. 5).
ASSEMBLING
TO ATTACH CANOPIES
Before aaching the canopies, rst disnguish the front canopy from the rear canopy. The rear canopy will have a ap enclosure and a lile bag with a zipper, the front canopy will not have this.
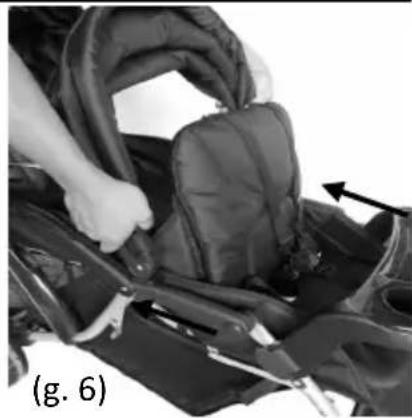
FRONT CANOPY
The front canopy aaches to the brackets located at the rear of the front seat armrest. Slide both canopy brackets, at the same me, onto the stroller canopy brackets unl snapped in place (g. 6).
REAR CANOPY
The rear canopy aaches to the brackets located at the intersecon of the handle tube and the rear seat armrest. Slide both canopy brackets, at the same me, onto the stroller canopy brackets unl snapped in place. The rear canopy ap enclosure snaps to the top of the rear seat (g. 7).
TO ADJUST CANOPIES
Pull or push canopy to desired posion (g. 8).
TO ATTACH CHILD'S TRAY
Aach the child's tray onto the front frame leg tubes as shown (g. 9).
Close the locking latch by pressing inward. Pull to release.
WARNING: Always secure your child with the seat belt. The child's tray is not a restraint device. DO NOT li the stroller by the child's tray. Use care when aaching the child's tray on the stroller with a child in the stroller.
natural_image
Person adjusting a dark jacket inside a vehicle seat, with an arrow indicating the seat area (no text or symbols visible)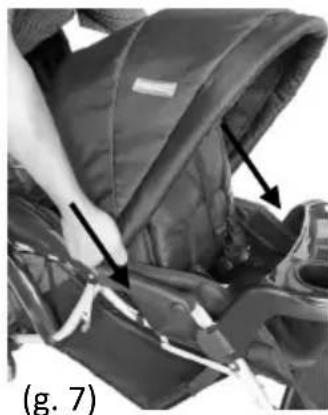
natural_image
Close-up of a person adjusting a dark jacket with arrows pointing to the seat area (no text or symbols visible)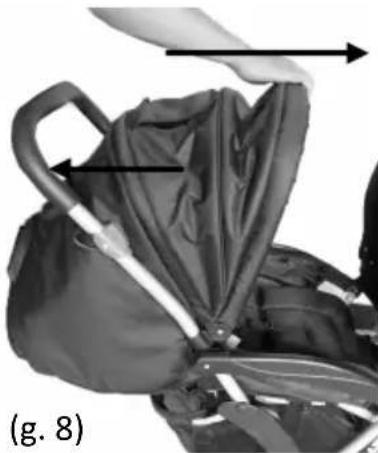
natural_image
Close-up of a person's stroller with a handle and arrow indicating motion (no text or symbols)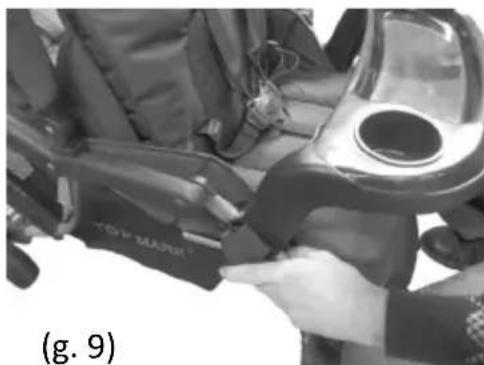
natural_image
Close-up of a person adjusting a motorcycle seatbelt, no visible text or symbolsUSING
TO ADJUST SEAT BACK
To adjust your seat in either the upright, or recline posion, pull up on the metal bar at back of seat and adjust to desired posion (g. 12). The seat has 3 posions.
WARNING: Fabric caught in the latches may prevent them from locking. When returning seat to upright posion, check the side of the seat where locking latches are located to make sure fabric is not caught.
natural_image
Close-up of a baby stroller with hand adjusting the seat (no visible text or symbols)(Fig. 12)
EN
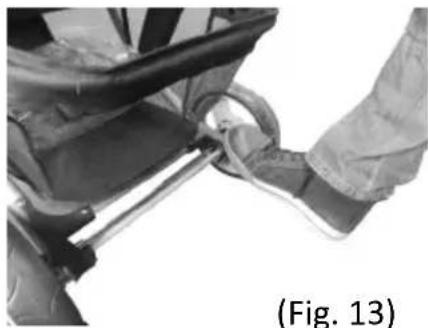
BRAKES
To park the stroller, step on the single braking bar to brake both rear wheels at the same me (g. 13). To disengage, raise the single braking bar with the toe of your shoe.
WARNING: The parking devise shall be engaged engaged during the placing and removing the children.
natural_image
Close-up of a person's seatbelt being adjusted for a weight, labeled (Fig. 13) (no text or symbols on the diagram itself)(Fig. 13)
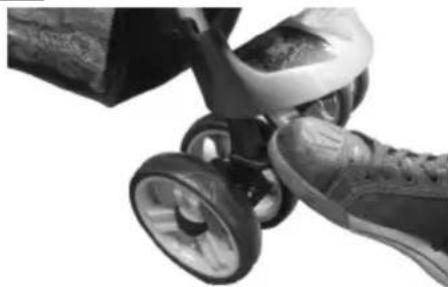
TO CHANGE TO SWIVEL OR NON-SWIVEL WHEELS
Front swivel wheels lock for use on uneven surfaces such as grass, gravel or sand. Before locking swivels, rst push stroller forward to ensure the front wheels are correctly posioned.
Step 1.
Pull lever up for non-swivel (locked) (g. 14).
Step 2.
Push lever down to swivel (unlocked).
natural_image
Close-up of a sneaker pushing a two-wheeled cart (no visible text or symbols)(Fig. 14)
WARNING:
When pung a child or children in the stroller it is important to avoid possible pping back of the stroller due to weight imbalance. When using the stroller with only one child, place the child in the front seat. When using the stroller with two children, place the heavier child in the front seat. When removing the children, remove the child in the rear seat rst.
USING
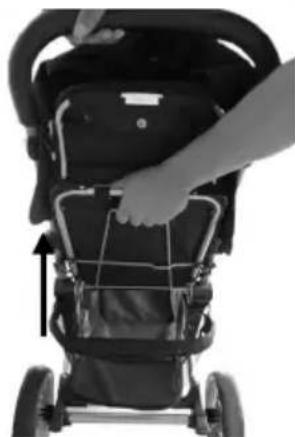
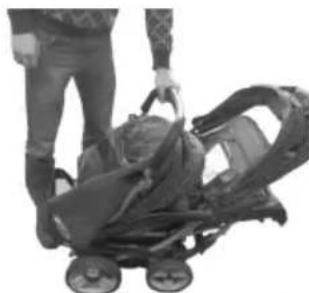
TO FOLD STROLLER
Before folding the stroller, fold the canopies, put on the brakes and turn the front wheels forwards.
Standing behind the stroller and push down the buon on the right side handle and pull up plasc lever both sides simultaneously (g. 15).
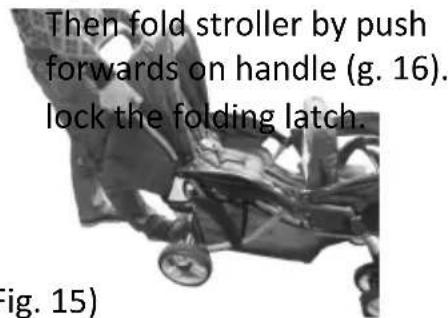
text_image
Then fold stroller by push forwards on handle (g. 16). lock the folding latch. Fig. 15)(Fig. 15)
natural_image
Person standing beside a stroller with a person standing beside it (no visible text or symbols)(Fig. 16)
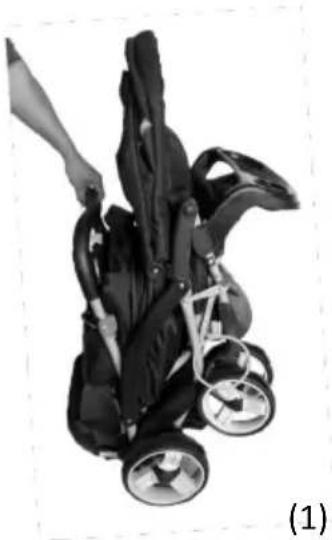
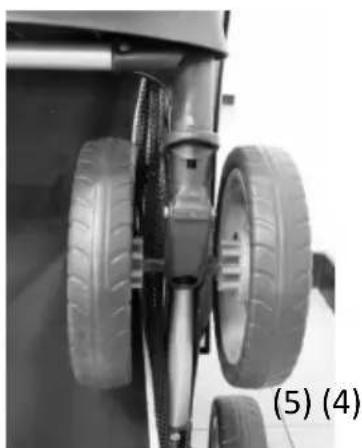
ATTENTION
When folding the stroller pay aenon to put front wheels in right posion (see pictures below)!
When you have folded the stroller, you have to fasten the swivel system of the front wheels as shown op pictures as 1, 2, and 3 (pay aenon on posion of the wheels).
natural_image
Black and white photo of a stroller with visible wheels and handle, labeled (1) in corner (no text or symbols on device)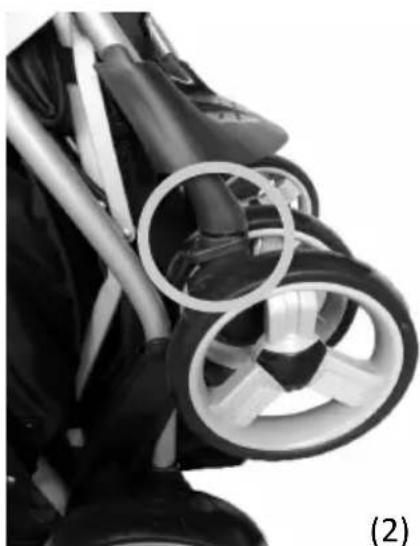
natural_image
Close-up of a stroller with visible mechanical components and rings (no text or symbols)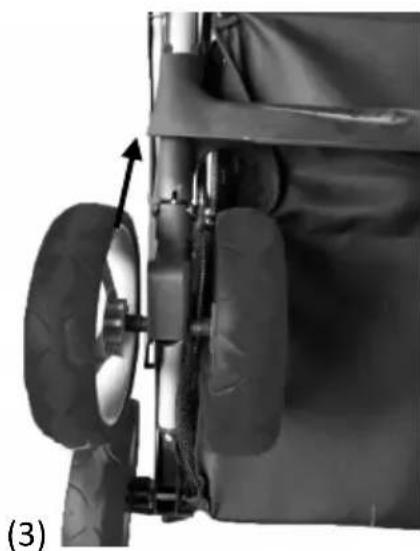
natural_image
Close-up of a mechanical component with visible gears and a curved arrow indicating motion (no text or symbols)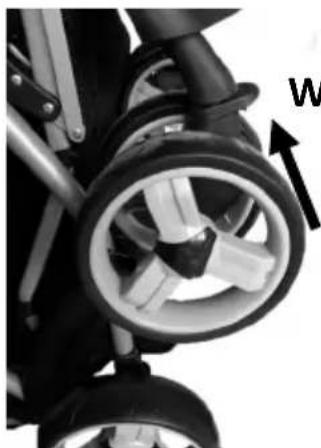
natural_image
Close-up of a stroller with visible wheel and wheels, no text or symbols presentWRONG
ATTENTION!
The pictures 4 and 5 are the WRONG posion of locking swivel lever of front wheels, when you have folded the stroller.
WRONG
natural_image
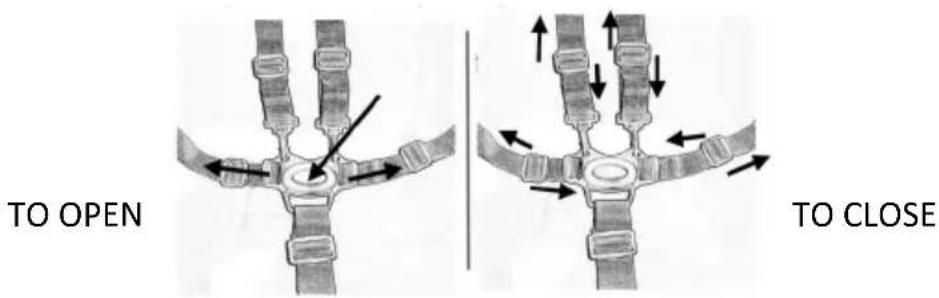
Close-up of an aircraft landing gear with visible tires and structural components (no text or symbols)USING
USING 5-POINT SAFETYBELT
ALWAYS USE THE CROTCH STRAP WITH WAIST BELTS.
Ensure shoulder straps are clipped to hip safety belts.
Lock buckle parts of hip belts together into the cross belt (belt between the legs) unl secure click is heard.
Adjust shoulder, hip and crotch belt in right length to t your child.
To release belt just press the buon.
text_image
TO OPEN TO CLOSEEN
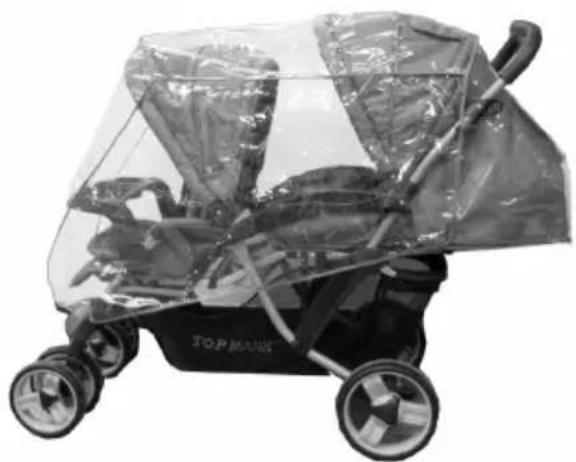
RAINCOVER
RAIN COVER ASSEMBLY
Put rain cover on the stroller and make sure it has been xed by Velcro.
WARNING: Be extremely careful when using the rain cover.
Store away from children when not in use.
To be used under adult's supervision.
Do not use the rain cover if the stroller is not ed with the hood or
sun canopy to prevent the risk of suocaon. To prevent the risk of suocaon, never leave the stroller with child in it under the sun, with the rain covered to it. To prevent your child from over-heang, always remove the rain cover when indoor or in warm environments.
natural_image
Black and white photo of a baby stroller with transparent cover and metal bands (no text or symbols visible)CARE AND MAINTENANCE
To prolong the life of your nursery product, keep it clean and do not leave in the direct sunlight for extended periods of me.
Check the wheels regularly for wear and make sure that there is no dust and sand between the axles and wheels.
Removable fabric covers and trims may be cleaned using warm water with a household soap or a mild detergent. Allow it to dry fully, preferably away from direct sunlight.
Do not allow the stroller to come in contact with salt water, this causes the forma-on of rust.
EN
Helpful hints
If the wheels squeak, use a silicon based spray ensuring it penetrates the wheel and axles assembly.
Do not dry clean or use bleach.
Do not machine wash, tumble or spin dry, unless the care labelling on the product permits these methods.
Non removable fabric covers and trims may be cleaned using a damp sponge with soap or mild detergent. Allow it to dry completely before folding or storing it away. In some climates the covers and trims may be aected by mould and mildew. To help prevent this occurring, do not fold or store the product if it is damp or wet. Always store the product in a well venlated area.
Always check parts regularly for ghtness of screws, nuts and other fasteners, ghten if required. To maintain the safety of your nursery product, seek prompt repairs for bent, torn, worn or broken parts.
Use only parts and accessories approved by the supplier.

text_image
Image displaying five distinct symbols: a hand holding a magnifying glass, an asterisk, crossed-out circle, and an octagon.GUARANTEE
We grant 2 year guarantee on this product commencing on the date of purchase. Within the guarantee period we will eliminate, free of charge, any defects in the appliance resulting from faults in materials or workmanship, either by repairing or replacing the complete product.
This guarantee does not cover: damage due to improper use, normal wear or use as well as defects that have a negligible effect on the value or operation of the product.
Damages caused by overloading or wrong folding are not granted.
To obtain service within the guarantee period, hand in the complete product with your sales receipt to the store where the product has been bought.
The warranty applies only to the rst owner and is not transferable.
Top Mark BV
Postbus 308
8200 AH Lelystad
NETHERLANDS
consument@topmark.nl
www.topmark.nl
EN 1888
text_image
Diagram illustrating human walking and deflection rules with labeled figures and directional arrowsnatural_image
Black rectangular pouch with handles, no visible text or symbolsOponal lieferbar:
natural_image
Close-up of a hand holding a mechanical component, labeled (Abb. 1) at bottom (no other text or symbols visible)MONTAGE
natural_image
Close-up of hands assembling a mechanical component with arrows indicating assembly direction (no text or symbols)natural_image
Close-up of a person using a fuel pump device on a vehicle (no visible text or symbols)ENTFERNEN DER VORDERRÄDER
natural_image
Close-up of an aircraft landing gear with visible treads and a base (no text or symbols)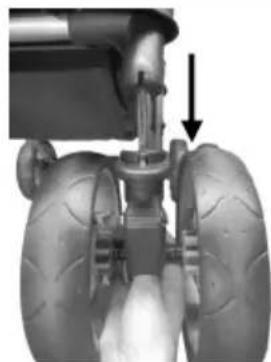
natural_image
Close-up of a mechanical assembly with a valve and tire, showing motion direction (no text or symbols visible)natural_image
Close-up of a hand using a tool to adjust or install a vehicle component, with an upward arrow indicating motion (no text or symbols visible)
natural_image
Close-up of a hand cleaning a stroller wheel (no text or symbols visible)MONTAGE
BEFESTIGEN DER VERDECKE
natural_image
Person adjusting a dark jacket inside a vehicle chassis, with an arrow indicating the part (no text or symbols visible)DE
HINTERVERDECK
natural_image
Close-up of a baby stroller with hand adjusting the seat area, labeled (Abb. 7) (no text or symbols on the device itself)natural_image
Close-up of a stroller with a handle and fabric, showing a white object above it (no text or symbols visible)natural_image
Close-up of a person's seatbelt being adjusted, showing the seatbelt and seat cover (no text or symbols visible)natural_image
Close-up of a child's stroller with hand adjusting the seat (no visible text or symbols)(Abb. 12)
BREMSEN
natural_image
Close-up of a person's seatbelt being adjusted, showing mechanical components and a hand adjusting the seat (no text or symbols visible)DE
natural_image
Close-up of a children's stroller with wheels and a shoe, labeled (Abb. 14) at bottom (no other text or symbols)natural_image
Person standing beside a stroller with a person standing nearby (no visible text or symbols)ACHTUNG
natural_image
Black and white photo of a stroller with four wheels and a hand adjusting the body (no text or symbols visible)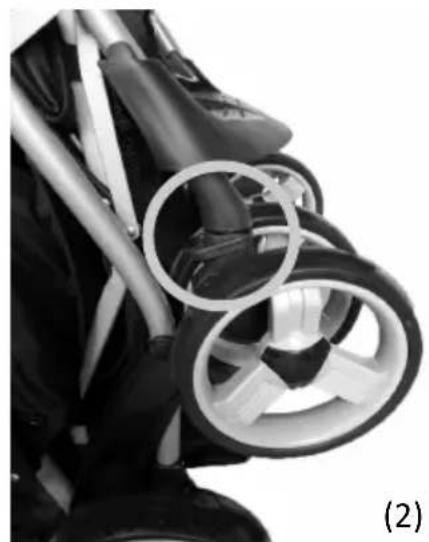
natural_image
Close-up of a stroller with visible wheel rim and black body (no text or symbols)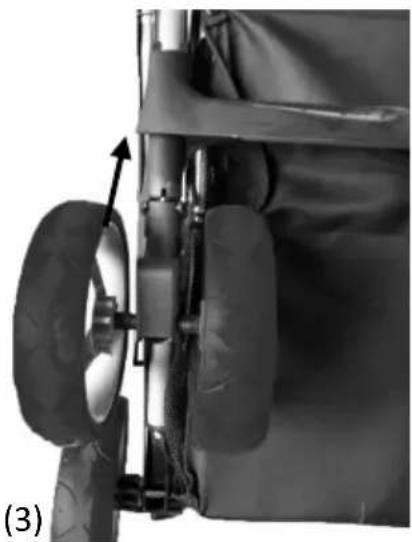
natural_image
Close-up of an aircraft fuselage showing landing gear and wheel (no text or symbols visible)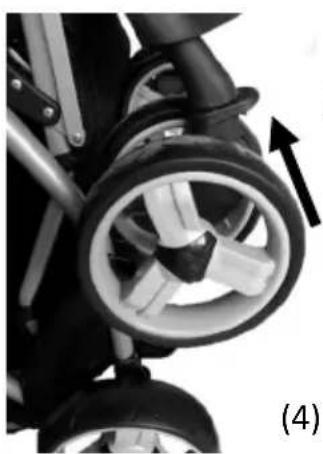
natural_image
Close-up of a stroller with visible wheel and wheels, no text or symbols presentFALSCH
ACHTUNG!
natural_image
Close-up of an aircraft landing gear with large tires and attached suspension components (no text or symbols visible)GEBRAUCH
natural_image
Diagram showing two mechanical joint configurations with directional arrows indicating movement or force (no text or labels)SCHLIESSEN
DE
REGENSCHUTZ
natural_image
Black and white photo of a baby stroller with transparent plastic cover, no visible text or symbolsPFLEGE
text_image
Image displaying five distinct symbols: a hand holding a magnifying glass, an asterisk, crossed-out circle, and a rectangle.GARANTIE
text_image
Safety warning illustration showing two scenarios: one with a person walking away and another with a person running away, both with directional arrows indicating movement.natural_image
Close-up of a hand holding a mechanical component, possibly a tool or device (no visible text or symbols)MONTAGE
FIXATION DU REPOSE-PIED
natural_image
Close-up of hands assembling a mechanical component with arrows indicating upward movement (no text or symbols visible)MONTAGE DES ROUES AVANT
natural_image
Close-up of a hand adjusting a car fuel hose with a circular component (no visible text or symbols)SUPPRIMER DES ROUES AVANT
natural_image
Close-up of a hand adjusting a small wheeled vehicle wheel (no visible text or symbols)(g.a) (g.b)

natural_image
Close-up of an aircraft landing gear with visible tire tracks and a mechanical component, no text or symbols present.MONTAGE DE L'AXE ARRIERE ET ROUES ARRIERE
natural_image
Close-up of a hand using a tool to adjust or install a mechanical component, with an upward arrow indicating motion (no text or symbols visible)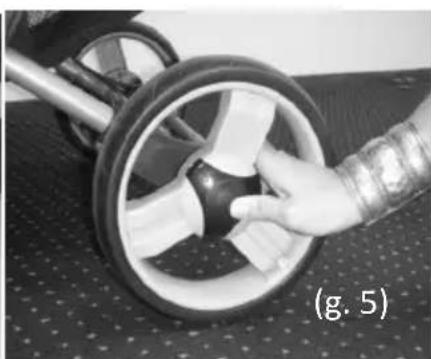
natural_image
Close-up of a hand adjusting a stroller wheel on a dotted mat (no text or symbols visible)MONTAGE
MONTAGE DE LES CAPOTES.
natural_image
Close-up of a person adjusting a black athletic jacket inside a vehicle (no visible text or symbols)CAPOTE ARRIÈRE
natural_image
Close-up of a baby stroller with hand adjusting seat, showing black arrows pointing to the seat area (no text or symbols visible)RÉGLAGE DES CAPOTES
natural_image
Close-up of a person's stroller with a handle and arrow indicating motion (no text or symbols)FIXATION DE LA TABLETTE
natural_image
Close-up of a motorcycle seatbelt being adjusted for a tool, no visible text or symbolsUTILISATION
RÉGLAGE DU DOSSIER
natural_image
Close-up of a baby stroller with hand adjusting the basket (no visible text or symbols)(Fig. 12)
UTILISATION DES FREINS
natural_image
Close-up of a person's seatbelt being adjusted, showing the grip and seat (no text or symbols visible)(Fig. 13)
natural_image
Close-up of a sneaker pushing a stroller with visible wheels and legs (no text or symbols)(Fig. 14)
natural_image
Black-and-white photo of a person pushing a stroller (no visible text or symbols)(Fig. 15)
natural_image
Person standing beside a baby stroller (no visible text or symbols)(Fig. 16)
natural_image
Black stroller with two wheels and a handle, labeled (1) in corner (no text or symbols on device)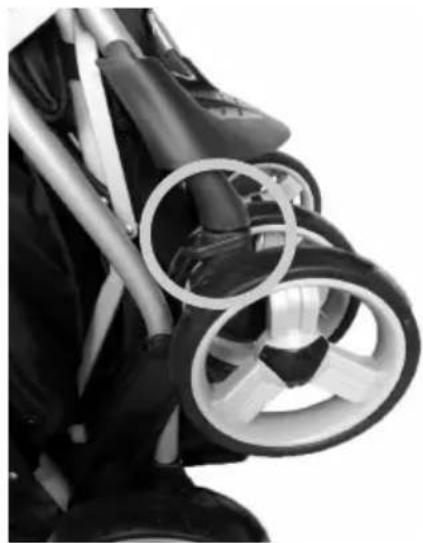
natural_image
Close-up of a stroller with metallic rings and a circular ring, no visible text or symbols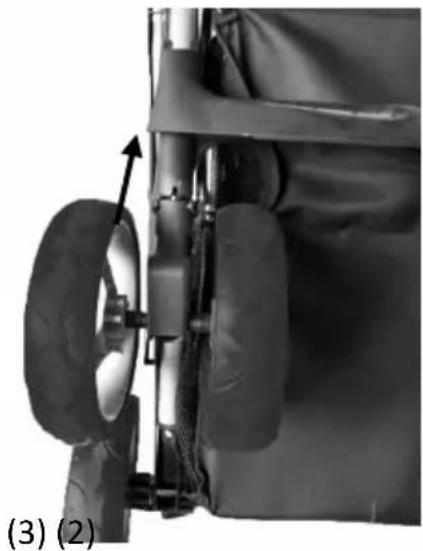
natural_image
Close-up of a mechanical component with visible gears and a directional arrow, labeled (3) (2) at bottom left (no text or symbols on the main subject)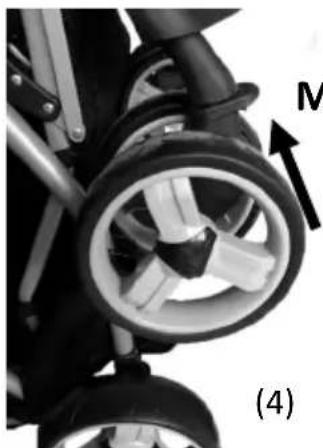
natural_image
Close-up of a stroller with visible wheels and a labeled arrow (M), no text or symbols present.MAL
ATTENTION!
natural_image
Close-up of an aircraft landing gear with visible tires and suspension components (no text or symbols)UTILISATION
natural_image
Diagram showing two mechanical joint configurations with arrows indicating movement or force direction (no text or symbols present)POUR FERMER
l'HABILLAGE DE PLUIE
ASSEMBLAGE DE l'HABILLAGE DE PLUIE
natural_image
Black and white photo of a baby stroller with transparent cover and metal straps (no text or symbols visible)SOIN ET ENTRETIEN
natural_image
Black rectangular object with a handle and side panel, resembling a medical or cosmetic device (no text or symbols visible)Opcional:
natural_image
Close-up of a hand holding a mechanical component, possibly a tool or device (no visible text or symbols)INSTALACION
MONTAJE EL REPOSAPIÉS
natural_image
Close-up of hands installing or adjusting a mechanical component with arrows indicating direction (no text or symbols visible)MONTAJE LAS RUEDAS DELANTERAS
natural_image
Close-up of a hand adjusting a car fuel hose on a scooter (no visible text or symbols)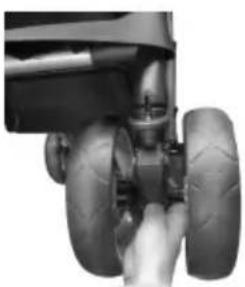
natural_image
Close-up of a small aircraft fuselage with large tires, no visible text or symbols(g.a) (g.b)

natural_image
Close-up of an aircraft landing gear with visible tire and valve assembly (no text or symbols)MONTAJE EL EJE TRASERO Y LAS RUEDAS TRASERAS
natural_image
Close-up of a hand using a tool to adjust or install a mechanical component, with an upward arrow indicating motion (no text or symbols visible)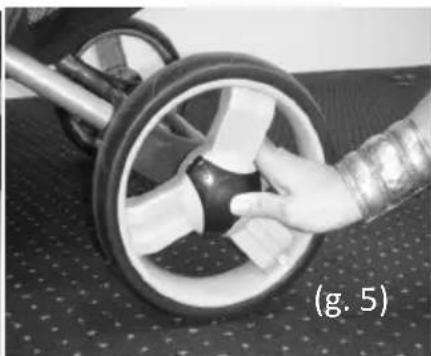
natural_image
Close-up of a hand adjusting a stroller wheel on a patterned mat (no text or symbols visible)INSTALACION
MONTAJE LAS CAPOTAS
natural_image
Person adjusting a dark jacket inside a vehicle seat, with an arrow indicating the motion (no text or symbols visible)CAPOTA TRASERA
natural_image
Close-up of a person adjusting a dark jacket with arrows pointing to the seat area (no text or symbols visible)natural_image
Close-up of a person's seatbelt with a handle and arrow indicating direction (no text or symbols)MONTAJE LA BANDEJA DELANTERA
natural_image
Close-up of a hand adjusting a device component, possibly a camera or steering wheel (no visible text or symbols)USO
AJUSTAR EL RESPALDO
natural_image
Close-up of a baby stroller with hand adjusting the basket (no visible text or symbols)(Fig. 12)
FRENOS
natural_image
Close-up of a person adjusting a bicycle seatbelt, labeled as Fig. 13 (no text or symbols on the diagram itself)(Fig. 13)
ACTIVAR O DESACTIVAR EL MECANISMO
BASCULANTE DE LAS RUEDAS DELANTERAS
natural_image
Person pushing a stroller in a vehicle (no visible text or symbols)natural_image
Person standing beside a baby stroller, no visible text or symbols(Fig. 16)
ATENCIÓN!
natural_image
Black stroller with two wheels and a handle, labeled (1) in corner (no text or symbols on device)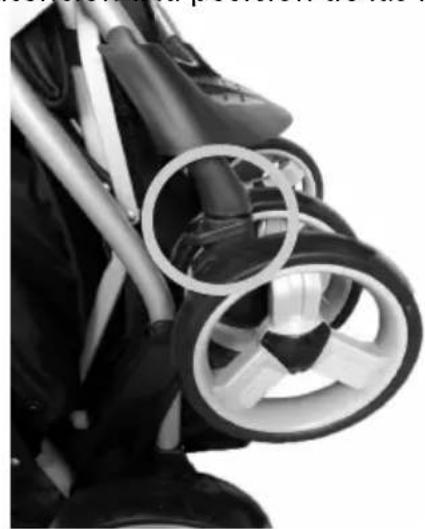
natural_image
Close-up of a stroller with visible wheel rim and black plastic casing (no text or symbols)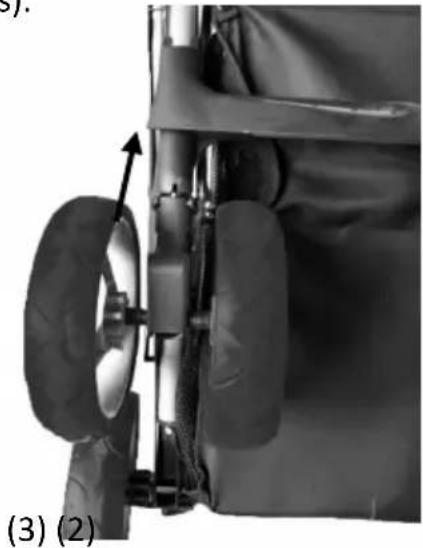
natural_image
Close-up of a mechanical component with visible gears and a curved arrow indicating motion (no text or symbols)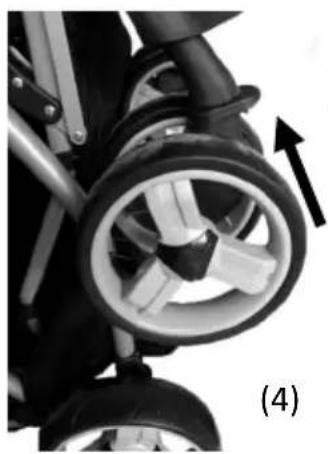
natural_image
Close-up of a stroller with visible wheel and black arrow indicating motion (no text or symbols)ERROR
ATENCIÓN!
natural_image
Close-up of an aircraft landing gear with large tires, labeled (5) in the corner (no text or symbols on the main subject)natural_image
Diagram showing two mechanical or structural configurations with directional arrows indicating movement or force (no text or symbols present)PARA CERRAR