Jay - Stroller Topmark - Free user manual and instructions
Find the device manual for free Jay Topmark in PDF.
| Product type | Stroller (buggy) |
| Brand | Topmark |
| Model | Jay |
| Recommended age | 6 months to 4 years |
| Maximum supported weight | 15 kg |
| Basket capacity | 4 kg |
| Standard | EN 1888 |
| Warranty | 2 years |
| Braking system | Foot brake lever |
| Front wheels | Swivel with lock |
| Rain cover | Included |
| Safety belt | 5-point system (shoulders, abdomen, crotch) |
| Folding | Compact mechanism with clasp and safety lever |
| Cleaning | Warm water and mild soap, air dry completely |
| Wheel maintenance | Silicone spray if squeaking |
| Chassis materials | Metal |
| Fabric materials | Textile |
| Included accessories | Chassis, bassinet, canopy, rear wheels (2), swivel wheels (2), rain cover, armrest |
Frequently Asked Questions - Jay Topmark
User questions about Jay Topmark
0 question about this device. Answer the ones you know or ask your own.
Ask a new question about this device
Download the instructions for your Stroller in PDF format for free! Find your manual Jay - Topmark and take your electronic device back in hand. On this page are published all the documents necessary for the use of your device. Jay by Topmark.
USER MANUAL Jay Topmark
natural_image
Black and white photo of a baby stroller with four wheels and a wide canopy (no text or symbols visible)JAY
6-48

15 kg
T6090
Gebruiksaanwijzing
Instruction for use
Gebrauchsanleitung
Mode d'emploi
text_image
Diagram illustrating human posture and movement, showing a person bending forward while standing on the ground and moving away.natural_image
Mechanical component diagram with labeled parts A and B (no text or symbols beyond labels)VOORWIEL MONTAGE/ DEMONTAGE
natural_image
Close-up of hands using a tool to adjust a tire component, with an arrow indicating the motion (no text or symbols present)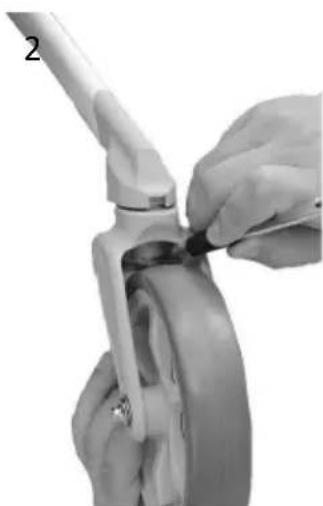
natural_image
Close-up of hands using pliers to adjust a mechanical component (no visible text or symbols)ACHTERWIEL MONTAGE/ DEMONTAGE
natural_image
Mechanical assembly diagram showing hands operating a wheel and connecting a tool, labeled A and B (no text or symbols present)MONTEREN
VOORBEUGEL MONTAGE
natural_image
Close-up of hands using a tool to lift a metal bracket with a perforated plate (no text or symbols visible)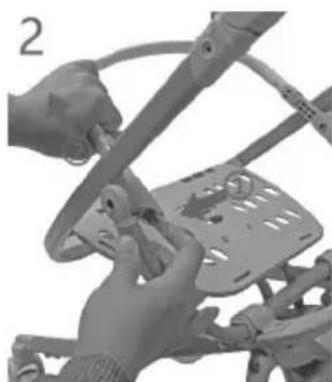
natural_image
Close-up of hands assembling a mechanical component with a curved bracket (no visible text or symbols)NL
WAARSCHUWING:
natural_image
Black and white photo of a baby stroller with transparent cover, no visible text or symbolsIN GEBRUIK NEMEN
VERSTELLEN
A. Rugleuning
natural_image
Person assembling a backpack with a strap (no visible text or symbols)NL
B. Beensteun
natural_image
Close-up of a mechanical component with red arrows indicating movement or force direction (no visible text or symbols)INKLAPPEN VAN DE BUGGY
natural_image
Close-up of a person using a stroller to lift a seatbelt, labeled with parts ① and ② (no text or symbols on the diagram itself)
natural_image
Illustration of a stroller with wheels and a curved arrow indicating rotation (no text or symbols)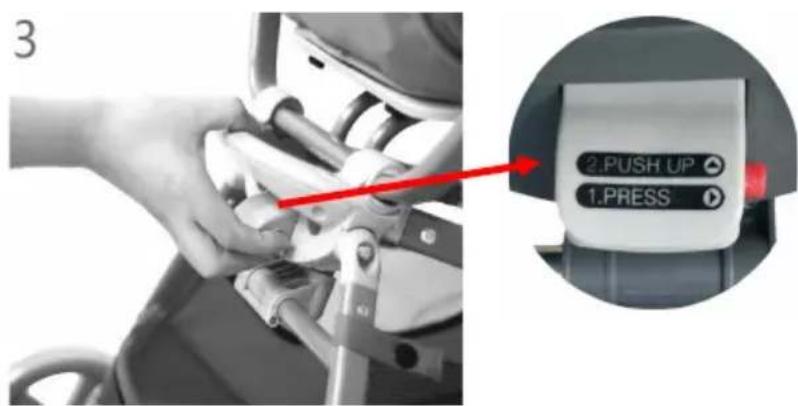
text_image
3 2.PUSH UP 1.PRESSnatural_image
Hand holding a wheeled cart with wheels, no visible text or symbolsIN GEBRUIK NEMEN
FUNCTIES
A. Rem functie
natural_image
Illustration of a two-wheeled vehicle with wheels and a handle (no text or symbols)natural_image
Close-up of a white wheeled bicycle with two directional arrows indicating motion (no text or symbols)GEBRUIK VAN DE 5-PUNTS VEILIGHEIDSGORDEL
WAARSCHUWING: GEBRUIK ALTIJD DE VEILIGHEIDSGORDEL IN COMBINATIE MET HET TUSSENBEENSTUK.
natural_image
Close-up of a mechanical component with a circular connector and white tape, no visible text or symbols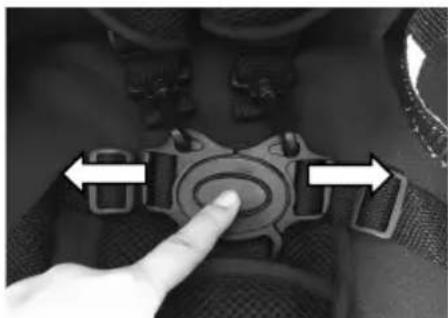
natural_image
Close-up of a car seatbelt with a finger pointing to the button (no text or symbols visible)VERZORING EN ONDERHOUD
text_image
Image displaying five distinct symbols: a hand gesture, crossed-out triangle, crossed-out circle, and crossed-out square.GARANTIE
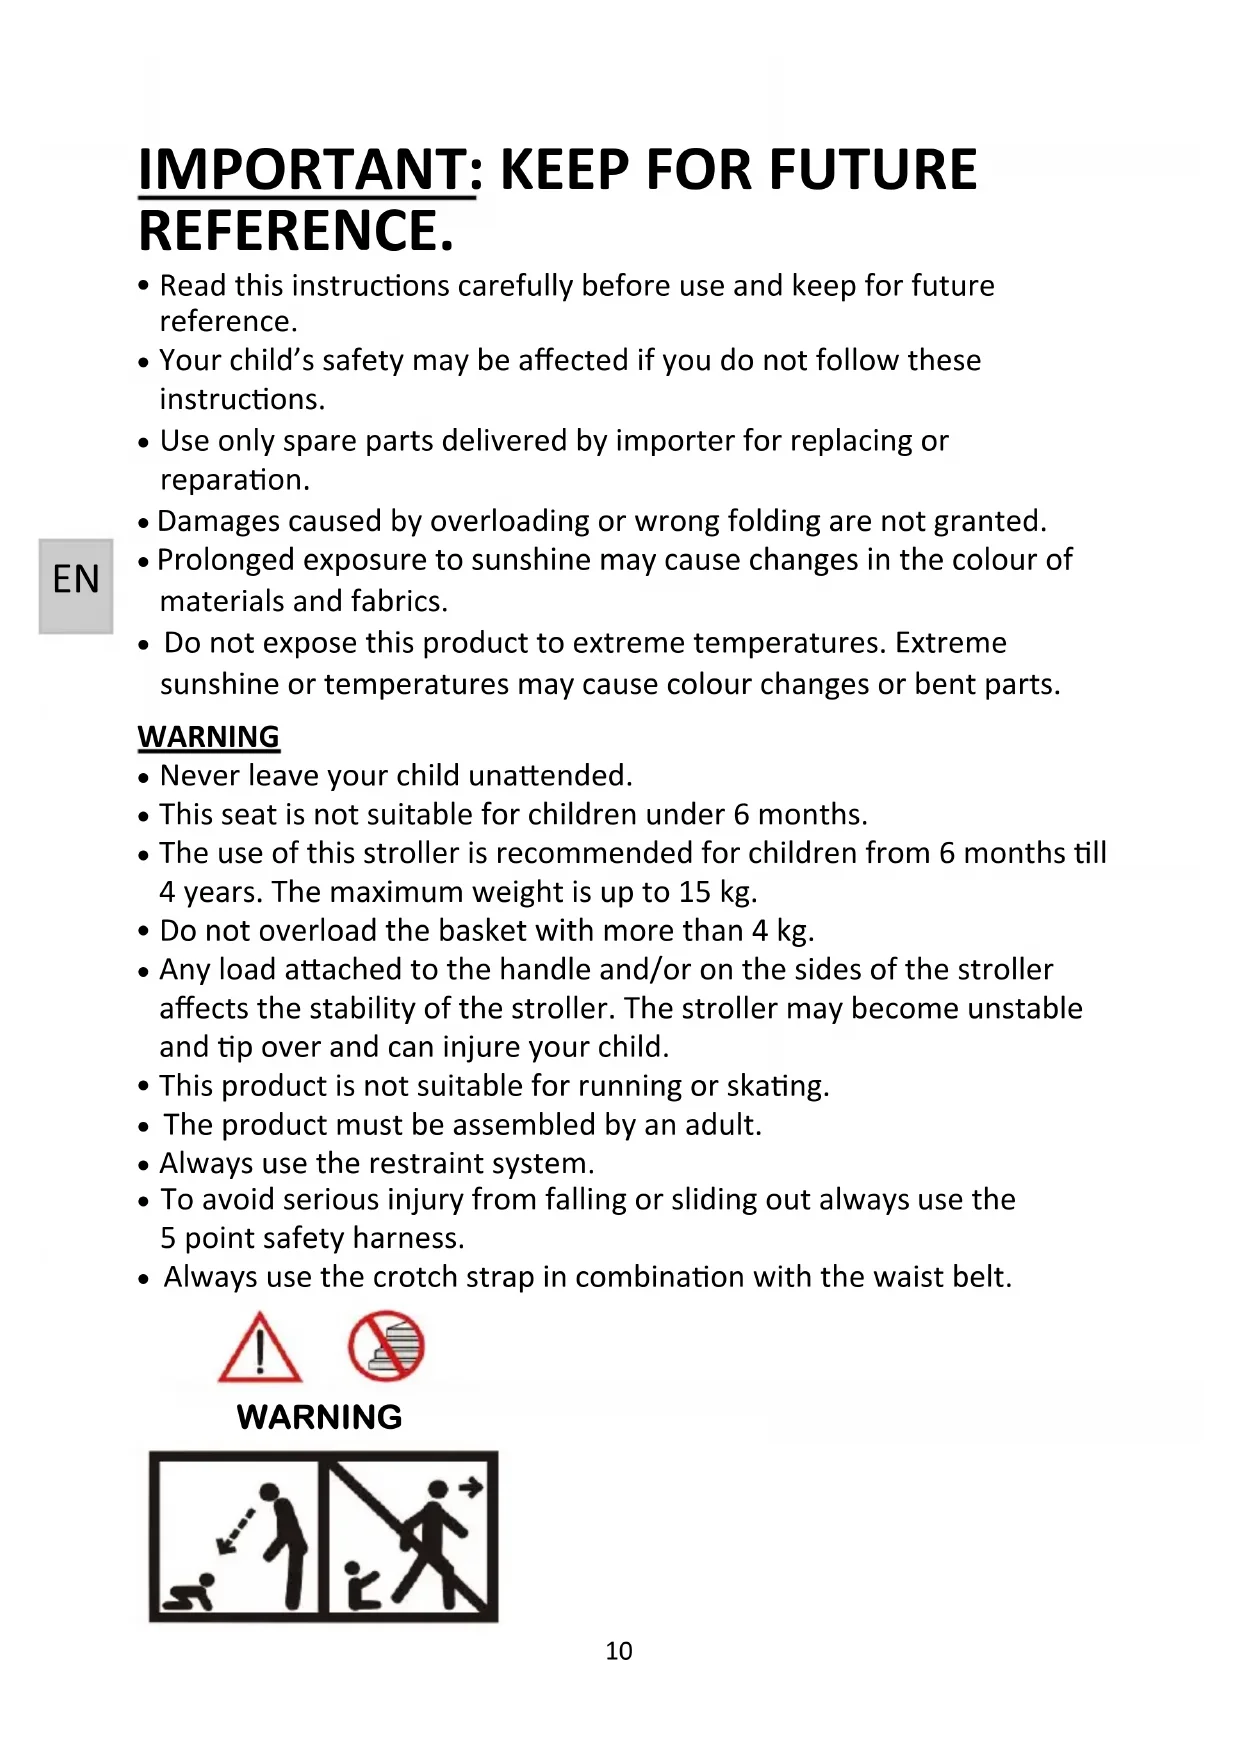
IMPORTANT: KEEP FOR FUTURE REFERENCE.
- Read this instructions carefully before use and keep for future reference.
- Your child's safety may be affected if you do not follow these instructions.
- Use only spare parts delivered by importer for replacing or reparation.
- Damages caused by overloading or wrong folding are not granted.
- Prolonged exposure to sunshine may cause changes in the colour of materials and fabrics.
- Do not expose this product to extreme temperatures. Extreme sunshine or temperatures may cause colour changes or bent parts.
WARNING
- Never leave your child unattended.
- This seat is not suitable for children under 6 months.
- The use of this stroller is recommended for children from 6 months till 4 years. The maximum weight is up to 15 kg.
- Do not overload the basket with more than 4 kg.
- Any load attached to the handle and/or on the sides of the stroller affects the stability of the stroller. The stroller may become unstable and tip over and can injure your child.
- This product is not suitable for running or skating.
- The product must be assembled by an adult.
- Always use the restraint system.
- To avoid serious injury from falling or sliding out always use the 5 point safety harness.
• Always use the crotch strap in combination with the waist belt.

WARNING
text_image
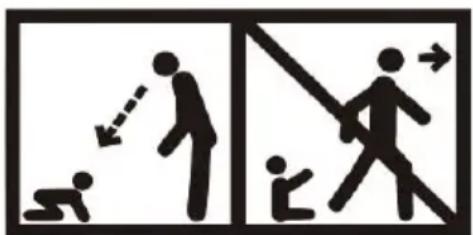
Safety warning illustration showing pictograms of human and child walking with directional arrows indicating movement or safety.- This stroller is designed for one child only.
- Pay special attention when manoeuvring the stroller up or down the pavement, it is best to do it backwards.
- Be aware of the risk of open fire and other sources for strong heat, such as electric bar fires, gas fires... in the vicinity of the stroller.
- Avoid hot liquids, power cables and other possible dangers may come within range of a child.
- Do not use this stroller if any parts are broken, torn or missing.
- Ensure that all the locking devices are engaged before use.
- Before making adjustments to stroller ensure that child's body is clear of any moving parts.
- To avoid injury ensure that your child is kept away when unfolding and folding this product.
- Do not use on stairs or escalators, fold stroller and carry.
- Put on all the brakes whenever you park the stroller.
• Always apply the brakes when ever the stroller is stationary.
- Do not let your child play with this product.
- Do not allow child to stand on seat or footrest.
- Do not allow more children, as stroller may become unstable.
- The parking device shall be engaged during the loading and unloading of children.
- Do not allow objects on top of canopy as this stroller may become unstable.
- Keep plastic rain cover away from children to avoid suffocation. Do not use the rain cover if the stroller is not fitted with the hood or sun canopy to prevent the risk of suffocation. To prevent the risk of suffocation, never leave the stroller with child in it under the sun, with the rain cover fitted to it.
- Do not use accessories or replacement parts other than the ones recommended by instruction manual.
- Do not use accessories which are not approved by the manufacturer.
- Only replacement parts supplied or recommended by the manufacturer/distributor shall be used.
- Never put stroller near steps or stairs.
ASSEMBLING
Check if following spare parts are in the box:
• 1 stroller frame with 1 basket and canopy
- 2 rear wheels
• 2 swivel front wheels
- Rain cover
- Front bumper bar
Note that the fabric patterns, colour pictures and stroller accessories on the stroller in this instruction manual may vary from that of the product that you have purchased.
If one or more of the above mentioned spare parts are missing or broken, please contact the store where you bought the product, before using.
EN
WARNING:
Please keep all packaging material away from babies and children, to prevent suffocation.
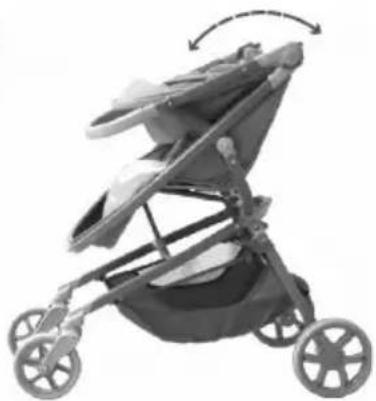
TO OPEN STROLLER
Open the latch (A). Then lift up the handle bar and fling the stroller to open it (B).
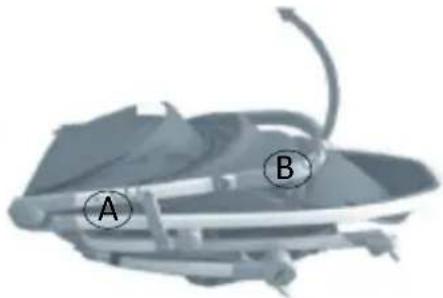
natural_image
Mechanical component diagram with labeled parts A and B, no readable text or symbols beyond labelsFRONT WHEEL ASSEMBLY/ DISASSEMBLY
Plug the wheel bearing into the wheel housing (1). Press the small (metal) detach button above the front wheel to release the front wheel (2).

natural_image
Illustration of hands using a tool to adjust a tire, showing the process with an arrow indicating direction (no text or symbols present)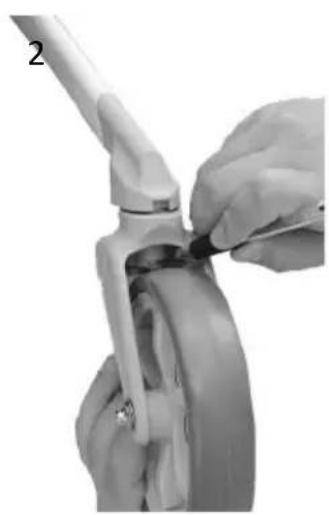
natural_image
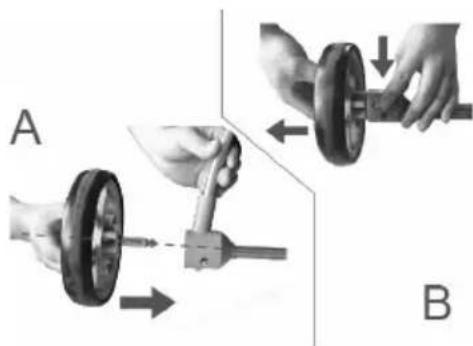
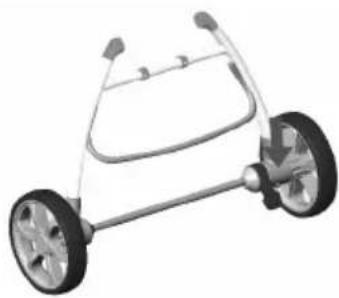
Close-up of hands performing a medical procedure on a wrist (no visible text or symbols)REAR WHEEL ASSEMBLY/ DISASSEMBLY
Plug the rear wheel into wheel housing (A). Press the rear wheel detach button and pull the wheel out in order to detach the rear wheel (B).
natural_image
Mechanical assembly diagram showing hands operating a wheel and connecting a shaft, labeled A and B (no text or symbols present)ASSEMBLING
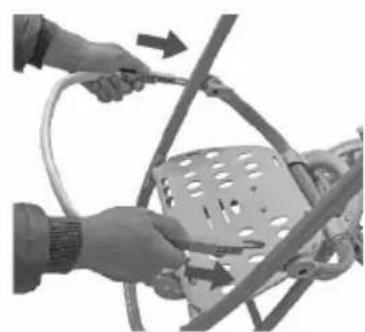
FRONT BUMPER BAR ASSEMBLY
Slide bumper in to the slot until you hear a click sound (1).
Press down the button and then pull off bumper bar (2).
1
natural_image
Close-up of hands holding a cable with a directional arrow indicating motion (no text or symbols visible)
natural_image
Close-up of hands assembling a mechanical component with a curved bracket and mounting bracket (no visible text or symbols)EN
WARNING:
Always secure your child with the seat belt. The front bumper is not a restraint device. DO NOT lift the stroller by the bumper. Use care when attaching the bumper on the stroller with a child in the stroller.
RAIN COVER ASSEMBLY
Put rain cover on the stroller and make sure it has been fixed by Velcro.
WARNING:
Be extremely careful when using the rain cover.
Store away from children when not in use.
To be used under adult's supervision.
Do not use the rain cover if the stroller is not fitted with the hood or sun canopy to prevent the risk of suffocation.
To prevent the risk of suffocation, never leave the stroller with child in it under the sun, with the rain cover fitted to it.
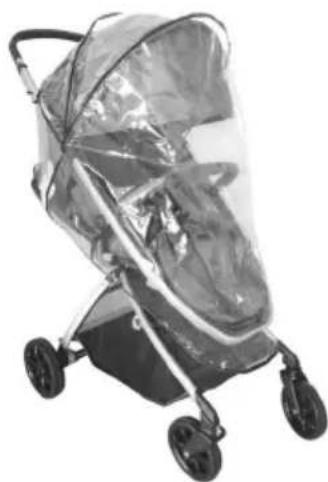
natural_image
Exterior view of a baby stroller with transparent cover and wheels (no text or symbols visible)To prevent your child from overheating, always remove the rain cover when indoor or in warm environments.
USING
ADJUSTMENTS
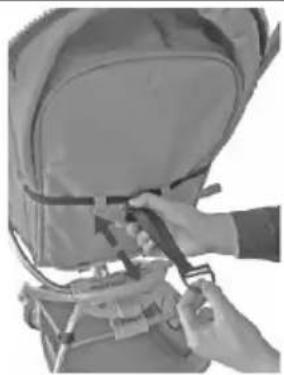
A. Backrest
Squeeze and slide the button, and pull the D ring to adjust the backrest.
natural_image
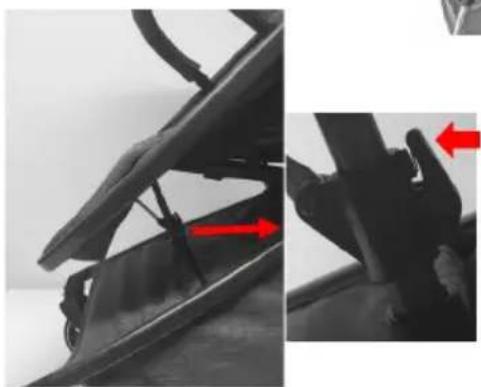
Person assembling a backpack with a strap (no visible text or symbols)B. Leg rest
Press the release button and close the footrest.
natural_image
Close-up of a black mechanical component with red directional arrows indicating movement or force (no text or symbols visible)Lift the folding latch (1) and push the handle bar forwards (2).
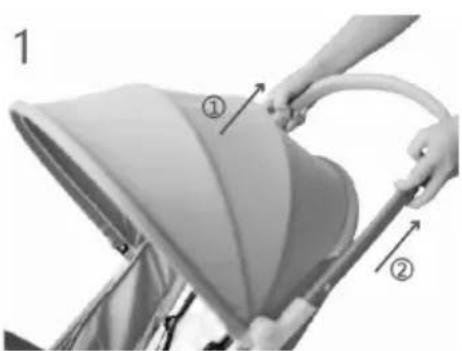
natural_image
Close-up of a person using a stroller to lift a seatbelt, labeled with parts ① and ② (no text or symbols on the diagram itself)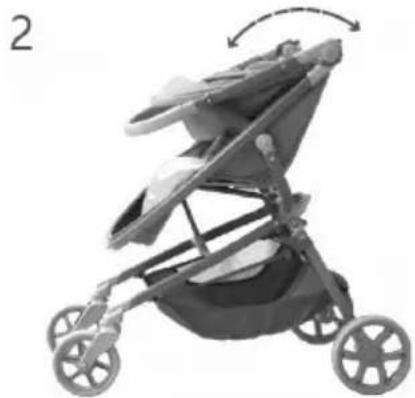
natural_image
Black and white photo of a stroller with wheels and a curved arrow indicating rotation (no text or symbols)
text_image
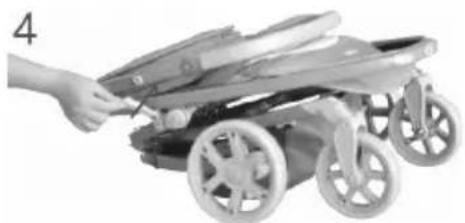
3 2.PUSH UP 1.PRESSPress with one hand the red second lock button and lift up the folding button(3). Meanwhile, with other hand pull to fold the stroller.
Close the latch to lock the stroller (4).
natural_image
Child's hand holding a stroller with wheels, no visible text or symbolsUSING
FUNCTIONS
A. Brake function
Step down on the brake button to engage brake mechanism (1).
Lift up the brake button to unlock the brake (2).
natural_image
Illustration of a two-wheeled toy car with wheels and a handle (no text or symbols)WARNING: The parking device shall be engaged when placing and removing the children.
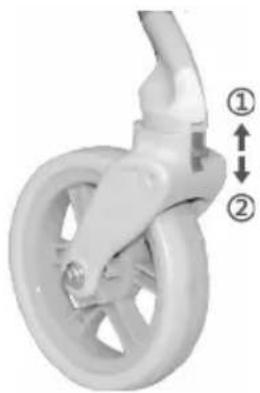
B. Front swivel wheels
Push the button up to lock the swivel wheel (1). Push down to release the swivel wheel (2).
natural_image
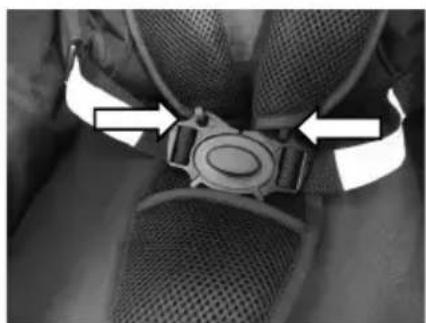
Close-up of a white children's wheeled bicycle with two directional arrows indicating motion (no text or symbols)USING 5-POINT SAFETYBELT
WARNING: ALWAYS USE THE CROTCH STRAP WITH SAFETY BELTS.
Ensure shoulder straps are clipped to hip safety belts.
Lock buckle parts of hip belts together into the cross belt (belt between the legs) until secure click is heard.
Adjust shoulder, hip and crotch belt in right length to fit your child.
To release belt just press the button.
TO CLOSE TO OPEN
natural_image
Close-up of a mechanical component with a belt buckle and mesh mesh (no visible text or symbols)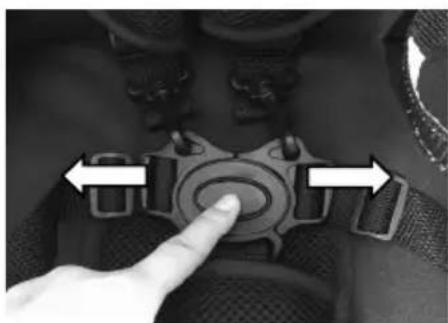
natural_image
Close-up of a hand pressing a button on a car interior (no visible text or symbols)CARE AND MAINTENANCE
To prolong the life of your nursery product, keep it clean and do not leave in the direct sunlight for extended periods of time.
Check the wheels regularly for wear and make sure that there is no dust and sand between the axles and wheels.
Removable fabric covers and trims may be cleaned using warm water with a household soap or a mild detergent. Allow it to dry fully, preferably away from direct sunlight.
Do not allow the stroller to come in contact with salt water, this causes the formation of rust.
EN
Helpful hints
If the wheels squeak, use a silicon based spray ensuring it penetrates the wheel and axles assembly.
Do not dry clean or use bleach.
Do not machine wash, tumble or spin dry, unless the care labeling on the product permits these methods.
Non removable fabric covers and trims may be cleaned using a damp sponge with soap or mild detergent. Allow it to dry completely before folding or storing it away. In some climates the covers and trims may be affected by mould and mildew. To help prevent this occurring, do not fold or store the product if it is damp or wet. Always store the product in a well ventilated area.
Always check parts regularly for tightness of screws, nuts and other fasteners, tighten if required. To maintain the safety of your nursery product, seek prompt repairs for bent, torn, worn or broken parts.
Use only part and accessories approved by the supplier.

text_image
Image displaying five distinct symbols: a hand holding a magnifying glass, an asterisk, an exclamation mark, a crossed-out circle, and a square.GUARANTEE
We grant 2 years guarantee on this product commencing on the date of purchase. Within the guarantee period we will eliminate, free of charge, any defects in the appliance resulting from faults in materials or workmanship, either by repairing or replacing the complete product.
This guarantee does not cover: damage due to improper use, normal wear or use as well as defects that have a negligible effect on the value or operation of the product.
Damages caused by overloading or wrong folding are not granted.
To obtain service within the guarantee period, hand in the complete product with your sales receipt to the store where the product has been bought.
The warranty applies only to the first owner and is not transferable.
Top Mark BV
Postbus 308
8200 AH Lelystad
NETHERLANDS
service@topmark.nl
www.topmark.nl
EN 1888
text_image
Safety warning illustration showing pictograms of human walking and deflection with arrows indicating movementnatural_image
Mechanical component diagram with labeled parts A and B, no readable text or symbols beyond labelsMONTAGE/ DEMONTAGE VORDERRÄDER
natural_image
Illustration of hands using a tool to adjust a tire component, with an arrow indicating the motion (no text or symbols present)MONTAGE/ DEMONTAGE HINTERRÄDER
natural_image
Close-up of hands holding a cable with a directional arrow indicating motion (no text or symbols visible)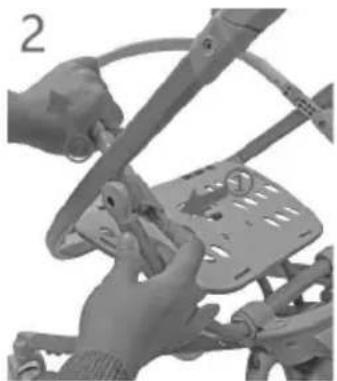
natural_image
Close-up of hands assembling a mechanical component with a curved bracket (no visible text or symbols)ACHTUNG:
natural_image
Black and white photo of a baby stroller with transparent cover, no visible text or symbolsGEBRAUCH
EINSTELLUNGEN
A. Rückenlehne
natural_image
Person assembling a backpack with a strap (no visible text or symbols)B. Beinstütze
natural_image
Close-up of a mechanical component with red arrows indicating movement or force direction (no visible text or symbols)ZUSAMMENKLAPPEN DES BUGGYS
natural_image
Close-up of a person using a canopy cover device, showing part numbered 1 and 2 (no text or symbols on the diagram itself)
natural_image
Side view of a baby stroller with wheels and a curved arrow indicating rotation (no text or symbols)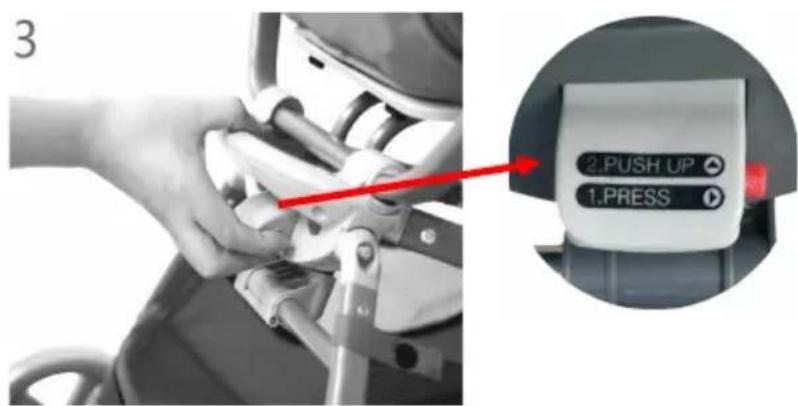
text_image
3 2.PUSH UP 1.PRESSnatural_image
Child's hand holding a small wheeled cart with wheels, no visible text or symbolsGEBRAUCH
FUNKTION
A. Bremsen
natural_image
Illustration of a two-wheeled toy car with wheels and a handle (no text or symbols)natural_image
Close-up of a white wheeled bicycle with two directional arrows indicating movement (no text or symbols)DE
natural_image
Close-up of a car seatbelt buckle with white arrows indicating movement or adjustment (no text or symbols visible)
natural_image
Close-up of a hand pressing a button on a car seatbelt (no text or symbols visible)PFLEGE
text_image
Image displaying five distinct symbols: a hand holding a magnifying glass, an asterisk, an exclamation mark, a crossed-out circle, and a square.GARANTIE
text_image
Diagram illustrating human walking and movement with labeled actions: one to push a person, the other to walk away with a diagonal arrow.natural_image
Mechanical component diagram with labeled parts A and B (no text or symbols beyond labels)MONTAGE/ DÉMONTAGE DES ROUES AVANT
natural_image
Close-up of hands using a tool to adjust a tire wheel (no text or symbols visible)
natural_image
Close-up of hands using a tool to adjust or install a mechanical component (no visible text or symbols)MONTAGE/ DÉMONTAGE DES ROUES ARRIÈRE
natural_image
Mechanical assembly diagram showing hands operating a wheel and rotating a shaft, labeled A and B (no text or symbols present)MONTAGE
MONTAGE ACCOUDOIR
natural_image
Close-up of hands using a cable to lift a metal frame (no text or symbols visible)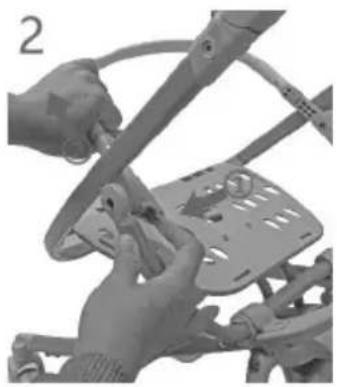
natural_image
Close-up of hands installing or adjusting a mechanical component with a bracket (no visible text or symbols)AVERTISSEMENT:
natural_image
Black and white photo of a baby stroller with transparent cover, no visible text or symbolsUTILISATION
RÉGLAGES
A. Dossier
natural_image
Person assembling a backpack with a strap (no visible text or symbols)B. Repose-jambes
natural_image
Close-up of a bicycle seatbelt mechanism with red directional arrows indicating movement or force (no text or symbols visible)RABATTRE LE BUGGY
natural_image
Illustration of a person assembling a car seatbelt with labeled parts (① and ②), no text or symbols present.
natural_image
Side view of a baby stroller with wheels and a curved arrow indicating rotation (no text or symbols)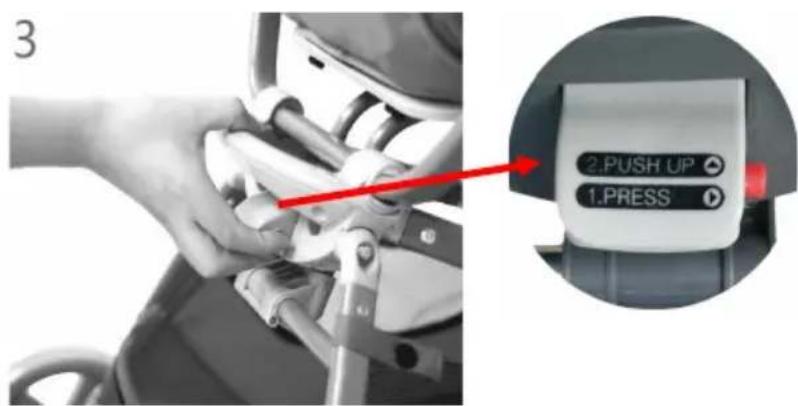
text_image
3 2.PUSH UP 1.PRESSnatural_image
Hand holding a wheeled toy car with wheels and a handle (no visible text or symbols)UTILISATION
FONCTIONS
natural_image
Illustration of a two-wheeled toy car with wheels and a handle (no text or symbols)natural_image
Close-up of a white children's stroller with two directional arrows indicating movement (no text or symbols)UTILISATION DE LA CEINTURE À 5 POINTS
ATTENTION: UTILISEZ TOUJOURS LA CEINTURE. NE JAMAIS UTILISER L'ENTREJAMBE SANS LA CEINTURE DE MAINTIEN.
natural_image
Close-up of a mechanical component with a circular connector and two directional arrows indicating motion (no text or symbols)
natural_image
Close-up of a hand pressing a button on a car seatbelt (no text or symbols visible)SOIN ET ENTRETIEN
text_image
Safety warning illustration showing pictograms of human and child walking with a diagonal barrier, indicating incorrect safety rules.natural_image
Mechanical component diagram with labeled parts A and B, no readable text or symbols presentES
COLOCAR/ DESMONTAJE LAS RUEDAS DELANTERAS
natural_image
Close-up of hands using a tool to adjust or install a mechanical component (no visible text or symbols)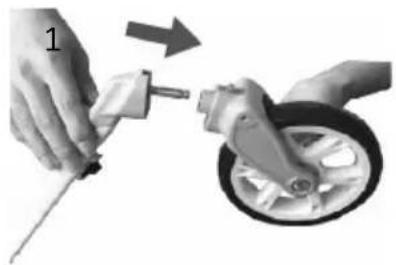
natural_image
Close-up of hands using a tool to adjust or install a tire component, with no visible text or symbols.natural_image
Mechanical assembly diagram showing two steps of a wheel drive mechanism (no text or labels)INSTALACION
COLOCAR APOYABRAZOS
Deslice parachoques en la ranura (1).
natural_image
Close-up of hands using a tool to lift a metal bracket with a perforated plate (no text or symbols visible)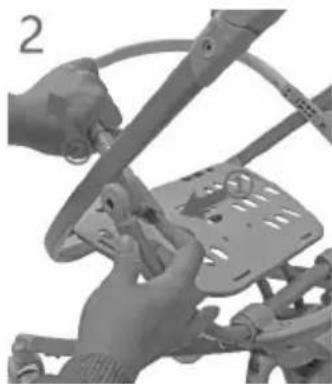
natural_image
Close-up of hands assembling a mechanical component with a curved bracket and mounting bracket (no visible text or symbols)ADVERTENCIA:
natural_image
Black and white photo of a baby stroller with transparent cover, no visible text or symbolsnatural_image
Person assembling a backpack with tools (no visible text or symbols)B. Apoyapiernas
natural_image
Close-up of a mechanical component with red arrows indicating a step or adjustment, no visible text or symbols.natural_image
Illustration of a person assembling a baby stroller with labeled parts (no text or symbols present)2
natural_image
Side view of a baby stroller with wheels and a curved arrow indicating rotation (no text or symbols)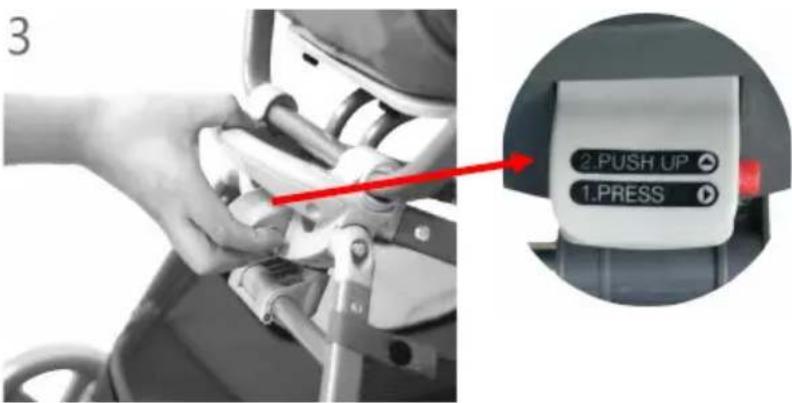
text_image
3 2.PUSH UP 1.PRESSnatural_image
Child's hand holding a toy car with wheels, no visible text or symbolsUSO
FUNCIONES
A. Función de freno
natural_image
Illustration of a two-wheeled toy car with wheels and a handle (no text or symbols)natural_image
Close-up of a white wheeled bicycle with two directional arrows indicating motion (no text or symbols)natural_image
Close-up of a car seatbelt buckle with white arrows indicating fastening (no text or symbols visible)