
FFA 1504 LX - Fridge FAGOR - Free user manual and instructions
Find the device manual for free FFA 1504 LX FAGOR in PDF.
| Product type | Combined refrigerator with freezer compartment |
| Brand | Fagor |
| Model | FFA 1504 LX |
| Climate class | ST (ambient temperatures from 1 to 38 °C) |
| Power supply | 220-240 V, grounded outlet |
| Refrigerator capacity | Not specified (estimated ~100 L for a standard model) |
| Freezer capacity | Not specified (small volume compartment) |
| Dimensions (H x W x D) | Not specified (estimated ~85 x 60 x 60 cm) |
| Weight | Not specified (estimated ~35 kg) |
| Refrigerant | Isobutane (R600a), flammable but eco-friendly gas |
| Refrigerator defrost | Automatic (cycle defrost) |
| Freezer defrost | Manual (defrost when frost reaches 4 mm) |
| Interior light | Replaceable bulb (standard power) |
| Reversible door | Yes, reversible on both sides |
| Thermostat | Adjustable from 0 (off) to 5, recommended position 2-3 |
| Coldest zone | Location indicated by a symbol, temperature ~1 °C |
| Temperature indicator | Displays 'OK' if cold zone ~4 °C |
| Cleaning | Warm water and baking soda, do not use abrasive detergent |
| Normal noises | Gas bubbling, compressor hum, expansion cracking |
| Child safety | Latch destruction when discarding to prevent entrapment |
| Grounding | Mandatory, grounded outlet |
| Spare parts | Certified original, intervention by approved professional |
| Warranty | Not specified (Fagor standard) |
Frequently Asked Questions - FFA 1504 LX FAGOR
User questions about FFA 1504 LX FAGOR
0 question about this device. Answer the ones you know or ask your own.
Ask a new question about this device
Download the instructions for your Fridge in PDF format for free! Find your manual FFA 1504 LX - FAGOR and take your electronic device back in hand. On this page are published all the documents necessary for the use of your device. FFA 1504 LX by FAGOR.
USER MANUAL FFA 1504 LX FAGOR
16^ a 32^
1
16^ a 43^
CONEXION ELECTRICA
73/23, 93/68, 89/336, 96/57, 92/31, 94/62
73/23, 93/68, 89/336, 96/57, 92/31, 94/62
- Safety instructions 02
1 / INSTALLING YOUR APPLIANCE
- Electrical connection 03
Before connecting your appliance 03 - Environmental protection 03
Recycling 03
Description of your appliance 04 - Reversing the door opening direction 04
2 / HOW TO USE YOUR APPLIANCE
- Using the refrigerator compartment 05
- Using the freezer * or ice box compartment ** (depending on the model) 06
· Food safety 06
3 / ONGOING MAINTENANCE OF YOUR APPLIANCE
Defrosting 07
- Cleaning your appliance 07
- Changing the light bulb 07
4 / PARTICULAR MESSAGES, INCIDENTS
- Operating problems 08
5/ AFTER-SALES SERVICE 09
This appliance has been designed for preserving and freezing food, preserving deep-frozen food and producing ice cubes. Any other use would be inappropriate.
Your appliance must be installed in accordance with the instructions in this manual; faulty installation could result in damage to the appliance.
For any problems regarding the appliance's operation, please always only contact the approved After-Sales Service centres or a suitably qualified professional.
Disconnect your appliance prior to performing any maintenance operation. Unplug it; do not pull on the power cable.
If this freezer is replacing another one with a catch, spring, lock or other closing system, remember to destroy the closing mechanism or, better still, remove the door from your old appliance to avoid anyone becoming trapped inside (children playing, animals, etc.).
Once you have unpacked the appliance, ensure that it is not damaged. If it is, any damage must be notified to the retailer witching 24 hours of delivery. The materials used for the packaging are 100% recyclable (cardboard, PE bubble wrap, EPS, etc.). Keep these materials out of children's reach..

Caution:
Your appliance's refrigeration circuit is filled with isobutane refrigerant (R600a), a natural, non-polluting gas that is, however, inflammable. Ensure that none of the components in your appliance's refrigeration circuit is damaged during transport or installation. If you detect any damage, keep your appliance away from flames and any sources of ignition and ventilate the room in which it is located.
For your appliance to operate optimally, install it away from any heat sources and ensure that air can circulate well all around it (see "Installing your appliance").

Warning:
Before installing your appliance please carefully read the safety instructions in order to avoid some minor inconveniences.
Install the appliance in a dry, well-ventilated room, away from any heat source. Leave a minimum distance of 10cm between the top of your appliance and any unit above it. If your installation does not permit this, leave 5cm between the top of the casing and any kitchen unit fixed to the wall and a gap of 2.5cm on each side of the appliance.
If your appliance must be installed next to another refrigerator or freezer, do not attach the two appliances together to avoid condensation forming on the outside.
Your appliance's climate class is shown on the identification plate. It determines the ambient temperature range for which the refrigeration unit has been designed to ensure that the appliance will operate correctly.
Climate class Ambient temperatures
| N | 16° to 32° |
| ST | 1 |
| T | 16° to 43° |
ELECTRICAL CONNECTION
Socket characteristics: 220-240V with Earth.
Do not use extension leads or adaptors.
The cable must not be in contact with the compressor.
Do not trap the cable under the appliance.
The appliance's electrical installation is provided with an Earth. For your safety's sake, connect the appliance to a socket fitted with an efficient Earth (in accordance with the prevailing electrical installation safety regulations).
The manufacturer declines any responsibility for any damage caused through lack of Earthing.

BEFORE CONNECTION
- Clean the inside of your appliance with warm water and bicarbonate of soda. Rinse and dry thoroughly.
- Wait 2 hours before switching on to ensure that the oil in the compressor has stabilized.
ENVIRONMENTAL PROTECTION
This appliance contains no refrigerant gases harmful to the ozone layer in its refrigeration circuit and its insulation materials. It must not be disposed of with normal urban waste and scrap metal in order to avoid damage to the refrigeration circuit, particularly at the rear of the appliance. Contact your local town hall for information on the collection of this type of appliance.
RECYCLING
The packaging materials for your appliance are made from recyclable materials. Participate in recycling them and thereby contributing to protecting the environment by disposing of them in the municipal containers provided for this purpose.
Your appliance also contains many recyclable materials. It is therefore marked with this logo to inform you that worn-out appliances should not be mixed in with other waste. The recycling that your manufacturer arranges can then be done in optimum conditions in accordance with European Directive 2002/9/EEC regarding waste electrical and electronic equipment. Please contact your local town hall or your dealer for the worn-out appliances collection points nearest to your home. We thank you for collaborating in protecting the environment.
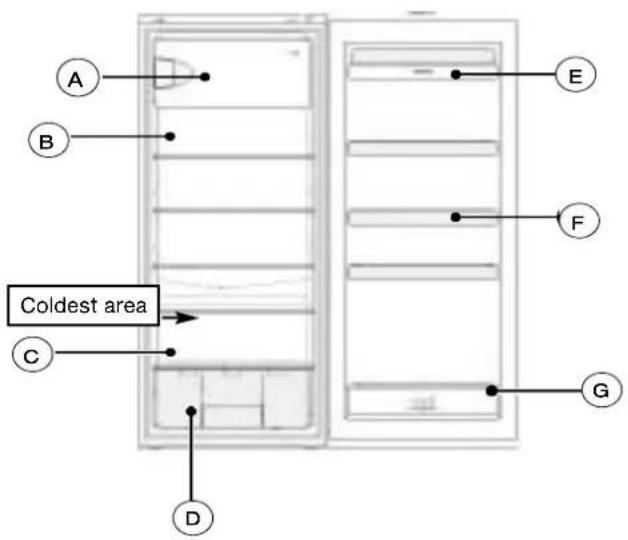
DESCRIPTION OF YOUR APPLIANCE (depending on the model)
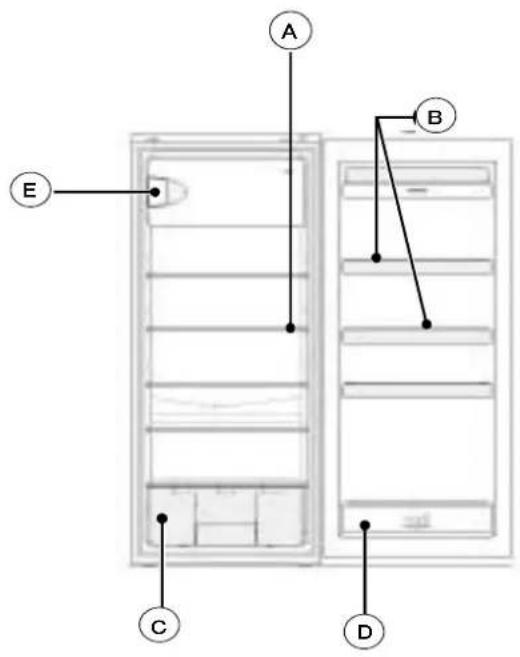
A Thermostat
B Door shelves
Vegetable compartment
D Bottle shelf
E Freezer *or ice box *compartment
The appliance consists of 2 compartments: the lower compartment for refrigerating and preserving fresh food and an upper compartment for preserving frozen food for a maximum of 2 weeks or an upper compartment for preserving frozen food, freezing fresh food and producing ice cubes.
REVERSING THE DIRECTION THE DOORS OPEN
You can alter the direction in which the doors open if you wish:
The appliance must always be disconnected from the power supply when changing the direction the doors open.
- Gently tilt the appliance backwards and wedge it in this position.
- Remove the pin from the lower hinge and then remove the door. Remove the lower hinge and fit it on the opposite side.
- Unscrew the upper hinge and fit this on the opposite side.
- Take the plastic guide off the hinge pin for the upper hinge and press it into the opposite hole after removing the hole cover, which is subsequently placed over the hole you have just created.
- Slide the door onto the pin for the upper hinge and close it.
- Insert the pin for the lower hinge and screw it down tightly.
- If your appliance is fitted with a vertical handle, ensure that you move it over to the opposite side.
You can also change the direction the ice box door opens:
- Partially open the door of the ice box compartment.
- Unscrew the door's lower hinge pin and remove the door.
- Unscrew the door catch and fit it on the other side.
- Move the guide for the door's upper hinge pin to the opposite hole.
- Fit the door in the guide and hold it while screwing in the lower hinge pin.
FITTING THE DOOR HANDLES (depending on the model)
The handles are located inside the refrigerator. Fit the handles on the doors, positioning them opposite the respective holes and fasten them with the screws provided as shown in the diagram below. Once the handles are in place, insert the screw covers supplied in the spaces provided for this purpose

REMOVING THE REMOVABLE TOP (depending on the model)
To install your appliance under a worktop, you may need to remove its top.
The appliance must always be disconnected when you proceed to remove the removable top.
- Remove the two screws at the back of the top.
- Free the top by lifting it at the back and sliding it gently forwards.
USING THE REFRIGERATOR COMPARTMENT
USING THE ICE BOX COMPARTMENT \* (depending on the model)
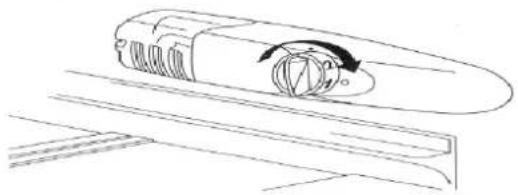
The thermostat in the refrigerator controls the temperature. To set it, you must turn the knurled wheel inside the refrigerator on the right-hand side. When set to position 0, the appliance is OFF. We recommend that you select a middle position: 2 or 3.

Advice:
- Do not put hot food or unsealed liquids into the refrigerator.
- NEVER introduce volatile, inflammable or explosive fluids such as alcohol, acetone or petrol because of the risk of explosion.
- It is advisable to wrap meat and fish to avoid odours.
- Leave sufficient space between the foodstuffs to enable air to circulate correctly between them. Similarly, when storing them, avoid putting food items in contact with each other.
- Do not place food items in contact with the cold wall at the back of the refrigerator. The shelves have a stop to avoid this.
The door should not be left open any longer than necessary.
USING THE FREEZER COMPARTMENT (depending on the model)
This compartment enables you to preserve frozen food, freeze fresh produce and to produce ice cubes.
Do not freeze too large an amount of food at one time; the faster the food is frozen, the longer it preserves its qualities. Similarly, ensure that your food items are well wrapped before freezing them so that they retain all their flavour and do not spoil other items.
The preservation times for frozen and deep-frozen foods depends on the type of food concerned. Please refer to the instructions on the packaging. Do not place bottles or cans in the ice box. They may split when their contents freeze. Highly carbonated drinks may even explode! NEVER keep lemonade, fruit juice, beer, wine, champagne, etc. in the freezer - ice box compartment.
This compartment enables you to store frozen food items for a maximum of 2 weeks and to produce ice cubes.
FOOD SAFETY
(dependently on the model)

Explanation of the coldest area by means of signs.

The symbol opposite indicates the location of the coldest area in your refrigerator, whose temperature is ≤ +4^ .
You will store here meat, poultry, fish, cooked meats, prepared dishes, ready-made salads, egg or cream-based dishes and pastries, fresh pasta, pastry, pizza/quiches, fresh produce and raw milk cheese, ready-to-use vegetables sold in plastic bags and, in general, any fresh produce whose consume-by date is associated with storage at a temperature of ≤ 4^ C.
Temperature indicator:

Adjust your thermostat

Correct temperature
The temperature indicator enables you to check that your refrigerator is working correctly.
The indicator displays "OK" when the coldest area reaches an average temperature of ± 4^ (4 hours after being switched on). If the temperature is above +4^ , the indicator remains black. The user must then lower the temperature of the refrigerator by adjusting the thermostat.

Warning:
Opening the refrigerator's door for a prolonged period causes the refrigerator's internal temperature to rise. To measure the temperature correctly, the temperature indicator must be read within 30 seconds. Similarly, it should also be taken into account that the temperature is nor completely uniform throughout the compartment, for which reason there are appropriate areas for each type of foodstuff.
Freezing fresh foodstuffs or storing frozen foods
B Dairy products, cheese
C Meat, cooked meats, fish
D Fruit and vegetables
E Drinks, butter and eggs
FCondiments
G Drinks
DEFROSTING
Your refrigerator has an automatic defrosting system. The appliance's rear surface becomes covered with frost when the compressor is working and defrosts when the compressor is off. When the frost melts, the water evaporates by itself.
The * or ** compartment must always be defrosted when the layer of frost is approximately 4mm thick. In any case, this compartment must be defrosted at least once a year.
For defrosting, you can use a plastic scraper or any plastic tool but never anything metallic or an electrical appliance.

Disconnect your refrigerator before proceeding to defrost it.
- Pack your frozen food in a freezer bag and keep it cool.
- Leave the door open and sponge away the melt water as it forms.
- To accelerate the defrosting process, you can place a bowl of hot water in the compartment and close the door.
- Once defrosting is complete, proceed to clean your appliance.
CLEANING AND MAINTENANCE

Switch off your refrigerator before proceeding to clean it.
We recommend that you clean and disinfect your appliance regularly
- Clean the interior with water and bicarbonate of soda using a sponge or a dishcloth to prevent any bad smells occurring.
- Never, under any circumstances, use solvents or abrasive detergents because these could damage the interior of your appliance. Also do not put any of the interior's accessories in the dishwasher.
- We recommend that you dust the back of the appliance with a cloth once a year because if it is dirty, your refrigerator's output reduces and its consumption increases.
CHANGING THE LIGHT BULB
Disconnect your appliance before proceeding to change the light bulb.
- Remove the grill. The bulb is behind the thermostat panel.
- Remove the bulb by unscrewing it counter-clockwise.
- Insert a new bulb of the same power as its predecessor.
- Replace the grill, reconnect the appliance and switch it on.
OPERATING PROBLEMS
There are some noises that it is quite normal for a refrigerator to make:
- The refrigerant gas can produce a gurgling sound as it travels through the circuits.
- The compressor may produce a buzzing noise, which can be more noticeable during start-up.
- The "cracking" noise produced by expansion and contraction of the materials used.
| PROBLEM | SOLUTION |
| The appliance does not work. | Check that the plug is correctly connected, that the fuse hasn't blown or that the circuit-breaker has not jumped. |
| The refrigerator vibrates or is noisy. | Check that it is level. Adjust the feet. |
| The refrigerator gets too cold or not cold enough. | Check the position of the thermostat and set it to a more suitable temperature. |
| The refrigerator's bulb does not light. | Check the bulb and replace it if necessary. If the problem persists, check that your appliance is connected. |
| The compressor does not start after a change in the temperature. | This is normal; the compressor will restart after a certain time. |
| There is water on the floor or on the shelves. | The hole for draining away the defrosting water must be blocked. Unblock it with a knitting needle. |
TECHNICAL ASSISTANCE DEPARTMENT
If you have already performed the indicated checks and your problem still persists, DO NOT ATTEMPT TO MAKE ANY REPAIRS YOURSELF. Contact your nearest Technical Assistance Department.

THIS APPLIANCE COMPLIES WITH EEC DIRECTIVES
73/23, 93/68, 89/336, 96/57, 92/31, 94/62
Any work on your appliance must be performed by a Brandt-accredited qualified professional.
When you call, please mention the complete reference for your machine (model, type, serial number): this information is provided on your guarantee certificate and the information plate on your appliance.
ORIGINAL SPARE PARTS: when any maintenance work is being performed, ask that only certified original spare parts be used.
1/INSTALLATIE VAN HET APPARAAT
DIT APPARAAT VOLDOET AAN DE CEE RICHTLIJNEN 73/23, 93/68, 89/336, 96/57, 92/31, 94/62

- CONEXION ELECTRICA
- / INSTALLING YOUR APPLIANCE
- / HOW TO USE YOUR APPLIANCE
- / ONGOING MAINTENANCE OF YOUR APPLIANCE
- / PARTICULAR MESSAGES, INCIDENTS
- Caution:
- Warning:
- ELECTRICAL CONNECTION
- BEFORE CONNECTION
- ENVIRONMENTAL PROTECTION
- RECYCLING
- DESCRIPTION OF YOUR APPLIANCE (depending on the model)
- REVERSING THE DIRECTION THE DOORS OPEN
- FITTING THE DOOR HANDLES (depending on the model)
- REMOVING THE REMOVABLE TOP (depending on the model)
- USING THE REFRIGERATOR COMPARTMENT
- USING THE ICE BOX COMPARTMENT \* (depending on the model)
- USING THE FREEZER COMPARTMENT (depending on the model)
- FOOD SAFETY
- DEFROSTING
- CLEANING AND MAINTENANCE
- CHANGING THE LIGHT BULB
- OPERATING PROBLEMS
- TECHNICAL ASSISTANCE DEPARTMENT
- 1/INSTALLATIE VAN HET APPARAAT
Brand : FAGOR
Model : FFA 1504 LX
Category : Fridge