MC 4460 BT - Hi-fi system AEG - Free user manual and instructions
Find the device manual for free MC 4460 BT AEG in PDF.

| Brand | AEG |
| Model | MC 4460 BT |
| Product type | Stereo hi-fi system with CD/MP3 player, FM radio, Bluetooth and AUX input |
| Color | Black (estimation) |
| Net weight | 4.4 kg |
| Power supply | 230 V ~ 50 Hz, 35 W |
| Protection class | II |
| Radio frequency band | FM 87.5 – 108.0 MHz |
| CD playback | Audio CD and MP3 CD, track skip, forward/backward search, repeat one track or entire disc, random play, track programming |
| USB playback | Front USB port, MP3 file playback |
| Bluetooth | Audio streaming, default PIN code: 0000 |
| AUX input | 3.5 mm stereo jack |
| Headphone output | 3.5 mm jack, disables speakers |
| Speakers | Provided passive speakers (SPEAKER R/L connections) |
| Remote control | Infrared, range 5 m, AAA batteries (not included) |
| Mounting | On stand or wall mount (fixings not provided, drill required) |
| Display | LCD screen with frequency, track, mode, etc. |
| Laser safety | Class 1 laser, integrated safety switches |
| Maintenance | Clean with a dry cloth, do not use chemical products |
| Repairability | Do not open the casing; entrust any repair to a qualified technician; in case of damage, contact customer service or an authorized workshop |
Frequently Asked Questions - MC 4460 BT AEG
User questions about MC 4460 BT AEG
0 question about this device. Answer the ones you know or ask your own.
Ask a new question about this device
Download the instructions for your Hi-fi system in PDF format for free! Find your manual MC 4460 BT - AEG and take your electronic device back in hand. On this page are published all the documents necessary for the use of your device. MC 4460 BT by AEG.
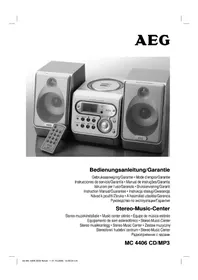
USER MANUAL MC 4460 BT AEG
natural_image
Three AEG brand washing machines shown from different angles (no visible text or labels on the devices themselves)CE
AEG
Overview of the Components

4 Deutsch
Bedienungsanleitung
natural_image
Three views of a computer monitor showing internal components and cable connectors (no text or labels)natural_image
Diagram of a computer motherboard with connectors and ventilation slots (no text or labels)Taste REP/RAN (20/29)
natural_image
Line drawing of three views of a computer monitor with labeled ports and connectors (no text or symbols present)Français 11
▶ Iibouton (Lecture/Pause) (16/25)
REP/RAN (20/29) bouton
natural_image
Diagram of three views of a computer monitor with labeled ports and connectors (no text or symbols present)natural_image
Diagram of three views of a computer monitor with labeled ports and connectors (no text or symbols present)natural_image
Diagram of a computer monitor rear panel with an open screen and indicator lights, no text or symbols present.TASTO REP/RAN (20/29)
Thank you for choosing our product. We hope you will enjoy using the appliance.
Symbols in these Instructions for Use
L Important information for your safety is specially marked. It is essential to comply with these instructions in order to avoid accidents and prevent damage to the machine: These symbols may be found on the device and shall indicate the following:

WARNING:
Warns of dangers for your health and indicates potential risks of injury.

CAUTION:
Indicates potential dangers for the device or other objects.

NOTE:
Highlights tips and information for you.
General Safety Guidelines
Before using this device, carefully read this user manual and keep it together with the Warranty Certificate, cashier receipt and if possible, the original package inclusive its interior packing. If you hand on the device to any third person, include the user manual as well.
- To avoid the risk of fire or electric shock, you should not expose the device to rain or humidity. Do not use the device near water (e.g. bathroom, swimming pool, humid cellars).
- Do not use the unit in extremely hot, cold, dusty, or damp places.
- The unit is designed solely for private use and its intended purpose. This unit is not designed for commercial use.
- Make sure that the power cable is not bent, pinched, or comes into contact with heat sources.
• Make sure that the power cable is not a tripping hazard. - Never touch the mains plug or the cord with wet hands.
- Always connect the unit to a properly installed plug socket. Be sure the device voltage corresponds to the grid voltage.
• The mains plug must always be easily accessible.
• Always install batteries in the correct direction.
- Avoid covering the device's vent openings.
- This appliance shall not be exposed to dripping or splashing water and that no object filled with liquids such as vases shall be placed on apparatus.
- Open sources of fire, such as e.g. burning candles may not be placed onto the unit.
- Never open the device's case. Improper repairs can cause severe danger to the user. If the device or particularly the power cord is damaged, don't use the device any further and have it repaired by a qualified specialist. Check the 5 power cord regularly for damages.
- To avoid any danger, a damaged power cord must be replaced only by the producer, its customer service or a similarly qualified person with an equal cord.
- If the device won't be used over an extended period of time, disconnect the power cord and remove the batteries.
These symbols may be found on the device and shall indicate the following:
The lightning symbol warns the user of dangerously high voltages inside the case.

The exclamation mark symbol points to important instruction or maintenance remarks in the accompanying guidelines.

Devices with this symbol work with a "Class 1 laser" for scanning the CD. The integrated safety switches shall prevent the user from getting exposed to dangerous laser light not visible to him when the CD tray is opened.
These safety switches shall not be bridged nor manipulated in any case, otherwise there is a danger of them exposing themselves to the laser light.
Children and disabled persons
For the safety of your children, keep any packing parts (plastic bags, cartilage, Styrofoam etc.) out of their reach.

WARNING!
Don't let small children play with foils for danger of suffocation!
This device is not intended for use by persons (including children) with reduced physical, sensory or mental capabilities, or lack of experience and/or knowledge unless they have been given supervision or instructions concerning the use of the device by a person responsible for their safety.
Supervise children to ensure they do not play with the device.
Special safety Guidelines
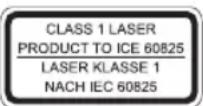
This device works with a class 1 laser.
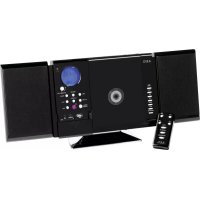
Overview of the Components
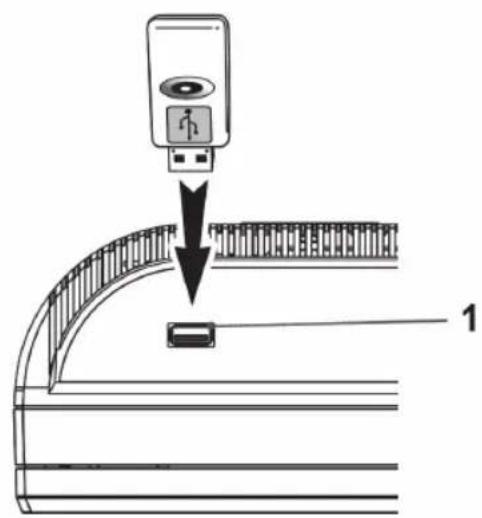
1 USB Connection
^e CD tray
IR sensor for the remote control
Bluetooth indicator lamp
Standby indicator lamp
26 English
6 LCD display
7 I/ ⏻ button (Standby/Operation)
8 FM MODE button (stereo/mono)
9 TUNING control
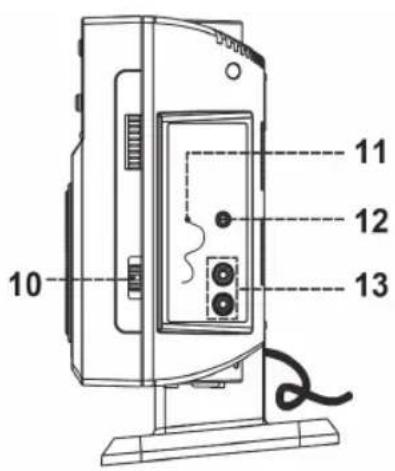
10 Operating mode switch (CD/USB; Radio; Bluetooth/AUX)
11 FM ANT dipole antenna
12 AUX IN connection
13 SPEAKER R/L loudspeaker connections
14 Headset connection
15 ∧ Volume buttons
16 <</buttons (Search run backwards/forwards)
17 button (replay/pause)
18 FOLDER UP button (album upwards)
19 FUNKTION bunction select button
20 ▲ (opening/closing) CD tray
21 REP/RAN button ( playback/shuffle playback)
22 PROG (Programming of the title playback)
23 ■ Stop button
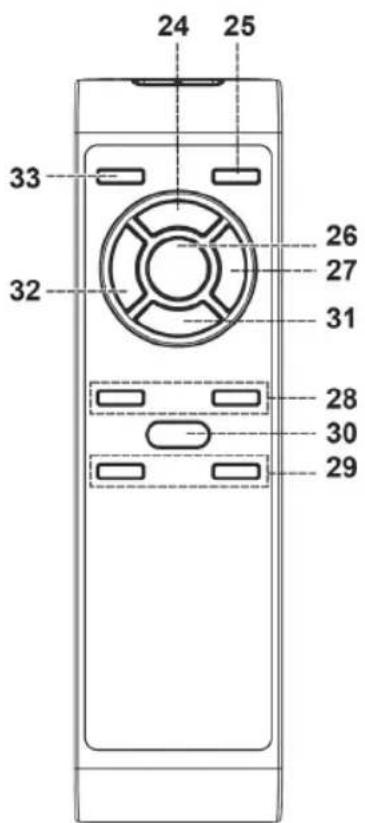
24 Programming button
25 FUNKTION Function selection button
26 button (replay/pause)
27 ▶buttons (Search forward)
28 Folder Image buttons (upwards/downwards album)
29 VOL +/- Volume buttons
30 REP/RAN button (Playback/shuffle playback)
31 Stop button
32 Buttons (search run backwards)
33 I/O button (Standby/Operation)
Wall mounting

natural_image
Three views of a computer monitor showing internal components and cable connectors (no text or labels)
- Align the drill template horizontally and mark the holes required for the wall mounting.
• Drill the mounting holes (6 mm in diameter).
- Push the plastic anchors into the boreholes
- Screw in the fastening screws up to ca. 4 - 5 mm.
• Hang the device and the loudspeakers into the screws.
Assembly of the feet
natural_image
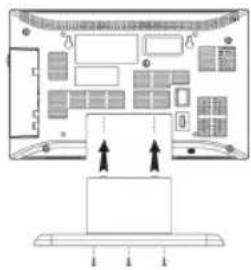
Diagram of a computer monitor rear panel with an open screen and two arrows pointing to the front panel (no text or symbols present)- Push the enclosed feet into the device and into the loud-speakers.
- Screw in the fastening screws (Picture)
Putting the device into operation/Implementation
- Carefully read the operating instructions before the commissioning.
- Select a suitable location for the device and the loud-speakers. Ensure an even and non-slip surface.
• Take care to provide sufficient ventilation for the device. - Connect the loudspeakers to the intended connections (13).
Power supply
- Plug the mains plug into the properly installed wall socket, 230 V, 50 Hz.
- Ensure that the mains voltage corresponds with the type plate.
Batteries of the remote control (not included in the scope of delivery)
- Open the battery compartment on the rear side of the remote control.
- Insert 2 batteries of the type "AAA" 1.5 V. Ensure the correct polarity (Illustration bottom of battery compartment).
- If you do not use the remote control for a longer period of time, remove the batteries.
WARNING:
Do not expose the batteries to any high heat input such as direct sunlight, for example. There is a risk of explosion.
△ CAUTION:
- Unequal batteries or new and spent batteries may not be used together.
- Batteries must not be disposed off in the household wate. Please dispose of spent batteries at the appropriate collection points or return them to the distributor.
Transport lock CD tray
- Open the CD tray (2) by pressing the button (19).
- Remove the transport lock from the CD player, if present, before commissioning.
- Close the CD tray by pressing ▲e button (19).
General operation
i NOTE:
You will find some buttons on both the device and the remote control. Identical buttons will have the same functions.
Infrared remote control
Use the remote control to operate the device from a distance of up to 5 m. Ensure a clear view between the device and the remote control. In case of a reduced range, replace the batteries.
I/O (7/32)
This buttons lets you switch the device into standby mode. If you press the button again, the device will turn on.
//Vol-/Vol+ (14/28)
Use this button to adjust the volume to your individual needs.
ΩHeadset connection (13)
Here you will plug a headset into the device with a 3.5 mm jack plug. The loudspeaker output will be turned off when operating a headset.
USB connection (1)
This device has been developed according to the latest state of the technical developments in the USB field. The large number of different USB storage media of any kind that are offered nowadays do unfortunately not guarantee that a full compatibility with all the USB storage media is ensured. It is for this reason in rare cases that it can result in problems when replaying USB storage media. This is not an error function of the device.
To start the USB replay, proceed as follows:
- Turn the device on.
- Slide the operating mode switch (10) to the position "CD/USB".
- Connect a USB storage medium.
- Press FUNKTION button (18/24) to read in the data from the USB storage medium.
- Press the ▶ button (16/25) to start the replay.
For more operating options please refer to the chapter Pla ing CDs/MP3.
Listening to radio
To restart the radio replay, proceed as follows:
- Turn the device on.
- Slide the operating mode switch (10) to the "FM" position.
- Set the desired station with the TUNING regulator. The frequency will thereby be shown in the LCD display (6).
- The notification (stereo) will be shown in the LCD display during optimal reception. Reposition the antenna in case of bad radio reception. Should the radio reception be disturbed by static, you can reset the replay with the FM mode button (8).
Playing CDs/MP3
Replay of a CD
To play back an audio CD, please proceed as follows:
- Turn the device on.
- Slide the operating mode switch (10) to the "CD/USB" position.
- Open the CD tray (2) by pressing the button.
- Insert a CD into the device with the label on top. Ensure that the CD locks in on the centring taper.
qs. Close the CD tray (2) by pressing the button.
When the CD is inserted, the total number of the CD titles will be displayed. The display will also show you whether it pertains to an audio CD or an MP3 CD. If you press the button (replay/pause) (16/25), the replay will start.
If you have inserted an MP3-CD that has a folder structure, you may change the folders to select your music by pressing the FOLDER (17/27) button.
to remove a CD, please proceed as follows:
• Press the stop button (22/30).
Open the CD tray (2) by pressing ▲ button.
• Carefully remove the CD from the centring taper.
• Close the CD tray.
of i NOTE:
If you insert a CD upside down or if it is not readable, then the display will read "—" and "no".
The replay of self-produced CD's can not be guaranteed due to different burn programs and storage media.
Description of the CD buttons
▶ II button (Replay/Pause) (16/25) By pressing this button during the replay you may stop the replay. If you press the button again, the replay will continue.
<</buttons (Search run forward/backwards) (15/26)
With these buttons you can affect the music replay in the CD/USB mode.
28 English
You can use the button to skip a title and to change to the next title. To do this, please proceed as follows:
- Press the button briefly.
- By pressing down and holding the button, the music search is activated. The title is not changed but is wound forward in fast forward mode.
With the button you wil proceed as follows:
- Pressing it 1x drücken will change it to the start of the current title.
• By pressing it 2x, it will change to the previous title. - Pressing it 1x and holding it down will activate the music search run backwards.
REP/RAN (20/29) button
This button enables you to set different options of music replay. To do this, proceed as follows:
- Pressing 1x will repeat the current title until the function deactivated.
- Pressing 2 x will replay the entire CD until the function is deactivated.
- Pressing 3 x will activate the random replay of the music titles.
If the button is pressed again, the function is deactivated again. The replay will run in the normal mode.
When replaying an MP3-CD you may select the folder in one of the upper settings with the FOLDER (17/27) button during the replay, for which the settings shall be adopted.
Programmed playback
Allows the programming of any desired order of selections. To program the order of selections, please proceed as follows:
- Insert a music medium (Audio – CD / MP3 - CD/ USB stick)
- Press the PROG button (21/23). "P01" will appear in the display. The "Memory" notification will also appear.
- Now select the desired title on the remote control with the ◀/▶(26/31) buttons.
- Press the PROG (21/23) button again. "P02" will appear in the display.
- Select another title.
• Proceed the same way with the further programming.
• You will start the playback with the button (16/25).
To erase the programming, press the button (22/30) twice.
The "Memory" notification will go out.
Bluetooth Streaming/AUX
To playback music through the Bluetooth or AUX, please proceed as follows:
Slide the operating mode switch (10) to the Bluetooth/AUX position.
- Pair your music output device with Bluetooth with the device. The Bluetooth password of the device is "0000". You may alternately connect the music output source by using a 3.5 mm jstereo jack plug with the AUX terminal (11) of the device.
Select the desired music titles.
- Start the playback.
i NOTE:
Before you start the replay, ensure a moderate output volume of the music source and of the device. Adjust the volume later on.
Troubleshooting
| Symptoms Cause | Solution | |
| CD can not be played back. | CD has not been inserted correctly. | Ensure that the CD has been inserted correctly. |
| CD skips during the playback. | CD is dirty. Clean | the CD with a soft, dry towel. |
| No audio signal during Bluetooth playback. | Device not paired correctly. | Perform the pairing one more time. |
| Device out of range. | Reduce the range. | |
| No playback of music. | No error noticeable. | Contact Customer Service. |
| No playback from the USB stick. | USB stick not compatible. | Replace the USB stick with a different one. |
| Bad radio reception. | Unfavorable reception position | Change the direction of the antenna or reposition the device |
| Switch to MONO operation |
Cleaning and maintenance
To clean the device, please proceed as follows:
- Separate the device from the mains.
- Wipe the outer surfaces of the device with a dry towel without any cleaning additives.
Technical Specifications
Model ...... MC 4460 BT
Power supply 230 V, 50 Hz
Power Consumption....35 W
Protection class ....II
Net weight 4.4 kg
Frequency range radio....VHF/FM 87.5 \~ 108.0 MHz
The right to make technical and design modifications in the course of continuous product development remains reserved.
This device has been tested according to all relevant current CE guidelines, such as electromagnetic compatibility and low voltage directives, and has been constructed in accordance with the latest safety regulations.
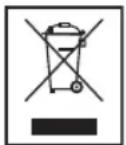
Disposal
Meaning of the "Wheelie Bin" Symbol
Take care of our environment, do not dispose of electrical appliances via the household waste.
Dispose of obsolete or defective electrical appliances via municipal collection points.
Please help to avoid potential environmental and health impacts through improper waste disposal.
You contribute to recycling and other forms of utilization of old electric and electronic appliances.
Your municipality provides you with information about collecting points.