
MC 4469 DAB Plus - Hi-Fi System AEG - Free user manual and instructions
Find the device manual for free MC 4469 DAB Plus AEG in PDF.
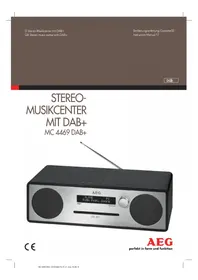


| Product Type | Micro Hi-Fi System |
| Brand | AEG |
| Model | MC 4469 DAB Plus |
| Radio Tuner | DAB+ and FM (RDS) |
| CD Player | Yes (CD, CD-R, CD-RW) |
| Bluetooth | Yes, wireless streaming |
| USB Port | Yes, for MP3 playback |
| AUX Input | Yes, 3.5 mm |
| Dimensions (W x H x D) | Approx. 300 x 200 x 150 mm |
| Weight | Approx. 5 kg |
| Power Output (RMS) | 30 W (2 x 15 W) |
| Power Supply | AC 230 V, 50 Hz |
| Remote Control | Included |
| Preset Radio Stations | 20 DAB+ / 20 FM |
| Clock / Alarm | Yes, dual alarm |
| Headphone Jack | Yes, 3.5 mm |
| Display | LCD with backlight |
| Maintenance | Wipe with soft, dry cloth; no solvents |
| Safety | Do not expose to moisture; unplug during storms |
| Spare Parts / Repairability | Contact AEG customer support |
Frequently Asked Questions - MC 4469 DAB Plus AEG
User questions about MC 4469 DAB Plus AEG
0 question about this device. Answer the ones you know or ask your own.
Ask a new question about this device
Download the instructions for your Hi-Fi System in PDF format for free! Find your manual MC 4469 DAB Plus - AEG and take your electronic device back in hand. On this page are published all the documents necessary for the use of your device. MC 4469 DAB Plus by AEG.
USER MANUAL MC 4469 DAB Plus AEG
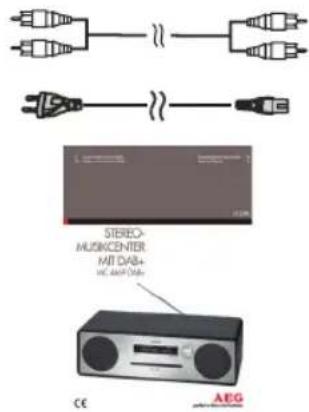
Remote control

RCA cable
AC power cord
User manual
i NOTE:
Options: All stations | Strong stations only
Thank you for purchasing the DAB radio with FM, Bluetooth and CD player.
We recommend that you spend some time reading this instruction manual in order that you fully understand all the operational features it offers. You will also find troubleshooting to help you resolve any issues.
Read all the safety instructions carefully before use and keep this instruction manual for future reference.
Symbols in these Instructions for Use
Important information for your safety is specially marked. It is essential to comply with these instructions in order to avoid accidents and prevent damage to the machine:

WARNING:
Warns of dangers for your health and indicates potential risks of injury.

CAUTION:
Indicates potential dangers for the appliance or other objects.

NOTE: Highlights tips and information for you.
Table of Contents
Safety Instructions....17
Unpacking....19
Overview of the Components / Delivery Scope....19
Operating Your Remote Control 21
Connections....22
ECO-Power / Standby Feature 23
Basic Operation....23
Setting the Clock and the Date....23
Setting the Sleep Timer....23
Setting the On / Off Timer 24
Sound Quality 24
Bluetooth Operation....24
AUDIO IN / AUX Operation 25
DAB Operation....25
FM Operation....26
CD Operation 27
Using USB 27
Maintenance 28
Troubleshooting....28
Technical Data....29
Disposal....29
Safety Instructions
- Read all the instructions carefully before using the appliance and keep them for future reference.
- Retain the manual. If you pass the appliance to a third party, these operating instructions must also be handed over.
- Check that the voltage indicated on the rating label corresponds to your mains voltage.
Damage
- Check the appliance for any damage after unpacking.
- Do not continue to operate the appliance if you are in any doubt about it working normally, or it is damaged in any way - switch off, withdraw the mains plug and consult your dealer.
Location of the Appliance
- The appliance must be placed on a flat, stable surface and should not be subjected to vibrations.
- Do not place the appliance on sloped or unstable surfaces, as it may fall off or tip over.
- The mains socket must be located near the appliance and should be easily accessible.
Temperature
- Avoid extreme temperatures, either hot or cold. Place the appliance away from heat sources, such as radiators or gas/electric ovens.
- Avoid exposure to direct sunlight and other heat sources.
Naked Flames
Never place hot objects or open flame sources, such as lighted candles, on or close to the appliance.
Moisture
- To reduce the risk of fire, electric shock, or product damage, do not expose this appliance to rain, moisture, dripping, or splashing. No objects filled with liquids, such as vases, should be placed on the appliance.
- If any liquid has been spilled into the appliance, it can cause serious damage. Immediately switch off the appliance, withdraw the mains plug, and consult your dealer.
Ventilation
- To prevent the risk of electric shock or fire hazard due to overheating, ensure that curtains and other materials do not obstruct the ventilation vents.
- Do not install or place this appliance in a bookcase, built-in cabinet, or in another confined space. Ensure the appliance is well ventilated.
Safety
- Always disconnect the appliance from the mains supply before connecting or disconnecting other devices or moving the appliance.
- Unplug the appliance from the mains socket before a thunderstorm.
Mains Cable
- Make sure the appliance or the stand of the appliance is not resting on top of the mains cable, as the weight of the appliance may damage the cable and create a safety hazard.
- If the mains cable is damaged it must be replaced by the manufacturer, its service agent or similarly qualified persons in order to avoid a hazard.
Earphones
- Listening to loud sounds for prolonged periods of time may permanently damage your hearing.
- Before putting on earphones turn the volume down, then put the earphones on and slowly increase the volume until you reach a comfortable listening level.
Interference
- Do not place the appliance on or near devices which may cause electromagnetic interference. If you do, it may adversely affect the operating performance of the appliance, and cause a distorted picture or sound.
Standby
- The ON / STANDBY button on the remote control does not switch off the appliance completely. The appliance will continue to draw electricity from the mains supply while in standby mode. In the interests of safety and to avoid unnecessary energy consumption, never leave the appliance in standby mode while unattended for long periods of time, e.g. overnight, while on holiday or while out of the house. Switch it off and disconnect the mains plug from the mains socket.
Batteries

CAUTION:
- Batteries used in the remote control for this appliance are easily swallowed by young children and this is dangerous.
- Keep loose batteries away from young children and make sure that the battery holder tray is secure in the remote control. Seek medical advice if you believe a cell has been swallowed.
- Dispose of batteries correctly by following the guidance in this manual.
Supervision

WARNING:
- Children should be supervised to ensure that they do not play with the appliance and the remote control.
- Never let anyone, especially children, push anything into the holes, slots, or any other openings in the case - this could result in a fatal electric shock.
Class 1 Laser Product
- This appliance utilises a laser. Use of controls, adjustments, or performance of procedures other than those specified herein may result in hazardous radiation exposure.

- Before moving the appliance, ensure the disc tray is empty. • Always remove the disc when the appliance is not in use.
- Failure to do so will risk severely damaging the disc and the appliance.
- Do not stack appliances. Heat from other appliances may affect the performance of the appliance.


The lightning flash with arrowhead symbol, within an equilateral triangle, is intended to alert the user to the presence of uninsulated “dangerous voltage” within the appliance’s enclosure that may be of sufficient magnitude to constitute a risk of electric shock.

The exclamation point within an equilateral triangle is intended to alert the user to the presence of important operating and maintenance (servicing) instructions in the manual accompanying the appliance.
Service
- To reduce the risk of electric shock, do not remove any screws. The appliance does not contain user-serviceable parts. Leave all maintenance work to qualified personnel.
- Do not open any fixed covers as this may expose dangerous voltages.
Maintenance
- Ensure to unplug the appliance from the mains socket before cleaning.
- Do not use any type of abrasive pad or abrasive cleaning solutions as these may damage the surface of the appliance.
- Do not use liquids to clean the appliance.
Unpacking
Remove all packaging from the appliance. Retain the packaging. If you dispose of it please do so according to local regulations.
The following items are included:
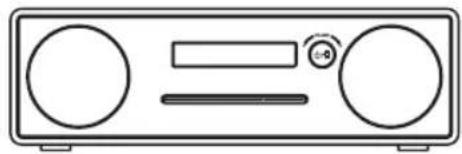
Main unit
Remote Control

RCA cable
AC Power Cord

Instruction Manual

Overview of the Components / Delivery Scope
Front View
1 Remote sensor
2 Display
3 Standby indicator
4 Disc door
5 ⏻/→
- Press and hold for power on and power off.
- Briefly press to change the source after power on.
6 VOL+/VOL-
Rotate to increase and decrease the volume level.
Top View
7
- Press to select previous track in USB and CD.
- Press to display channel list in DAB.
- Press to move up on the menu screen in DAB and FM.
- Press for fine tuning in FM.
8
- Press to select next track in USB and CD.
- Press to display channel list in DAB.
- Press to move down on the menu screen in DAB and FM.
- Press for fine tuning in FM.
9 PAIR
Press and hold the button to activate the pairing function in BT and / or disconnect the existing paired BT device.
10
- Press to play and pause in CD, USB and BT. • To select or skip to subsequent menu in DAB and FM.
11 ▲
- Press to eject or load a disc in CD mode.
- Press to display the menu in DAB and FM.
Rear View
12 USB socket for music playback 13 USB socket for charging mobile devices only (5 V---1 A) 14 AUDIO input 15 📤 Earphone 16 AUX IN Cinch sockets (R / L) 17 Power switch 18 AC\~ input 19 DAB / FM antenna
Remote Control
1
Switch the appliance between ON and STANDBY mode.
2 INTRO / AMS
- Press to start scanning of all tracks in CD and USB mode.
- Press to automatically search for a channel in FM mode. During searching, press again to stop.
3 REPEAT
Press to select a repeat playback mode in CD and USB mode.
4 EQ
Press to select sound characteristics: CLASS / POP / ROCK / JAZZ / NORMAL.
5 BASS +/-
Press to adjust the BASS after pressing the USER button.
6 USER
Press to adjust the bass and treble level.
7 MENU
Press to display the menu in DAB and FM.
8 PAIR
Press and hold to activate the pairing function in BT and / or disconnect the existing paired BT device.
9
- Press and hold for fast backward in CD and USB.
- Press to select the previous track in CD and USB.
- Press to display channel list in DAB.
- Press to move up on the menu screen in DAB and FM.
- Press for fine tuning in FM.
10 MO / ST
Press to set stereo or mono sound mode.
11 P +/-
- Press to skip to the beginning of a current / previous / subsequent album.
- Press to select previous / next radio station in FM and DAB.
- Press and hold for manual tuning in FM.
12 0-9 Numeric keys
13 INFO
- Press to turn on/off the ID3 information in CD and USB.
- Press to view information in DAB and FM.
14
Press to eject or load a disc in CD mode.
15 SLEEP
Press to set the sleep timer.
16 CD / USB / DAB/FM / BT / AUDIO/AUX
Press to select the corresponding audio mode (CD / USB / DAB / FM / BT / AUDIO / AUX).
17 RANDOM
Press to play tracks randomly in CD and USB mode.
18 TREBLE +/-
Press to adjust the TREBLE after pressing the USER button.
19 PROGRAM
Press to program in CD, USB, DAB and FM mode.
20 DIM
Press to select different levels of brightness for the display.
21
- Press to play / pause in BT, CD and USB mode.
- To select or skip to a subsequent menu in DAB and FM mode.
22
- Press and hold for fast forward in CD and USB mode.
- Press to select the next track in CD and USB mode.
- Press to display channel list in DAB mode.
- Press to move down on the menu screen in DAB and FM mode.
- Press for fine tuning in FM mode.
23
Press to stop playing in CD and USB mode.
24
Press to mute or unmute the sound.
25 CLOCK
Press and hold to set clock in standby mode.
26 V+/-
Press to increase / decrease the volume level.
27 TIMER
- Press to set the timer on / off in standby mode.
- Press to turn on / off the timer function when activated.
- Press and hold for timer settings in standby mode.
28 DISPLAY
Press to display the clock in power on mode.
Operating the Remote Control
- Press and slide the back cover to open the battery compartment of the remote control.
- Insert two AAA size batteries (not included). Make sure the
(+) and (−) ends of the batteries match the (+) and (−) connectors indicated in the battery compartment.
- Close the battery compartment cover.
![graph TD A["Input"] --> B["Processing Unit"] B --> C["Output"]](/content/2026/06/1307381/images/44dd4f6e1c4e8f60fd28b9c8d211c869c86c0236bf2673d94e2b8aaae1773d7a.jpg)
Handling the Batteries

WARNING:
The batteries shall not be exposed to excessive heat such as sunshine, fire or the like. Danger of explosion!

CAUTION:
- Improper or incorrect use of batteries may cause corrosion or battery leakage, which could cause fire, personal injury or damage to property.
- Install the batteries correctly by following the polarity (+ and -) indications in the battery compartment.

CAUTION:
- When the batteries are exhausted, the remote control will not function.
- Only use the battery type indicated in this manual.
- Do not dispose of the used battery as domestic waste. Dispose them in accordance with local regulations.
Handling the Remote Control

WARNING:
Be aware of your fingernails when removing the battery cover and the batteries.
- Do not drop the remote control.
- Do not allow anything to impact the remote control.
- Do not spill water or any liquid on the remote control.
- Do not place the remote control on a wet object.
- Do not place the remote control under direct sunlight or near sources of excessive heat.
- Batteries can leak battery acid. If the device is out of use for a long period of time, remove the batteries.
Remote Control Operation Range
Point the remote control at the appliance no more than 5 metres from the remote control sensor and within 60° horizontally and 20° vertically of the front of the appliance. The operating distance may vary depending on the brightness of the room.

NOTE:
- Make sure that there is no obstacle between the remote sensor of the appliance and remote control. If you install the appliance on a TV stand, etc., the remote control range may decrease depending on the thickness or colour of the glass of the TV stand.
- Do not expose the infrared remote sensor to direct sunlight or other strong light, such as inverter fluorescent light.
Connections
AC Power Connection

CAUTION:
- Risk of product damage! Ensure that the power supply voltage corresponds to the voltage printed on the rating label on the back or on the underside of the appliance.
- Before connecting the AC power cable, ensure that you have completed all other connections.
- Connect the small end of the AC socket at the back of the appliance and insert the plug of the AC power cable into a standard AC wall outlet.
- Be sure to unplug the power cable from the outlet when the appliance is not in use for an extended period of time.
- The MAINS plug or an appliance coupler is used as the disconnect device, the disconnect device shall remain readily operable.

Analogue Inputs Connection
Connecting DVD player / TV outputs to analogue input of the appliance.
- Use an RCA audio cable (supplied) to connect the DVD player / TV audio outputs with the AUX IN (L/R) socket of the appliance.

Connecting DVD player / TV outputs to analogue input of the appliance.
- Use a line-in audio cable (3.5 mm) (not supplied) to connect the DVD player / TV outputs with the AUDIO input socket from the sound board. You can also connect an external audio device headphone socket to this AUDIO IN socket at the appliance, such as MP3 player, iPod® or iPhone®, etc.

Headphones Connection
Connect your headphones to the headphones socket at the rear of the appliance.

NOTE:
- Be sure to turn down the volume before connecting or putting on headphones.
- Excessive sound pressure from earphones and headphones can cause hearing loss.
ECO-Power / Standby Feature
This appliance features an ECO Power / Standby mode. Press the ON / STANDBY button on the remote control or on the appliance to enter standby mode. The clock will be displayed. If you want the clock to disappear during standby mode, you can press the DIM button on the remote control.
Basic Operation
Switching the Appliance On
Press and hold the ⏻/→ button on the front of the appliance or on the remote control to turn the appliance on.
Selecting Modes
Press the ⏻/→ button on the appliance repeatedly to select DAB, FM, USB, BLUETOOTH, AUDIO, AUX, or CD. You can also press the shortcut keys on the remote control (DAB/FM, USB, BT, AUDIO/AUX, or CD) to select your desired mode.

NOTE:
If there is no audio signal, the appliance will switch off automatically within 19 minutes to save energy (except in FM mode). In AUDIO mode, the time is 4 hours.
Setting the Clock and the Date
Setting the Clock Manually
- Set the appliance to standby mode.
- Press and hold the CLOCK button on the remote control.
- Input the date, hour, and minutes using the numeric keys on the remote control.
- Press the CLOCK button to confirm the setting.
Display the Clock
In DAB or FM mode, press the DISPLAY button on the remote control.
Setting the Sleep Timer
Use the sleep timer in play mode to turn off the appliance after a certain number of minutes. By setting the sleep timer, you can fall asleep with music and know that your appliance will turn off by itself rather than playing music all night.
To set the sleep timer, press the SLEEP button on the remote control repeatedly. It changes the number of minutes shown on the display in this sequence:

After setting the number of minutes for the sleep timer, the display will return to the previous display.
The appliance is now set to turn off after the number of minutes you have set.
Checking the Sleep Timer
When the SLEEP button on the remote control is pressed once, the remaining sleep time is displayed. Wait for a second until the display returns to the original display.
Canceling the Sleep Timer
Press the SLEEP button repeatedly on the remote control until "SLEEP:OFF" is displayed.
Turning off the appliance also cancels the sleep timer.
Setting the On/Off Timer
You can use the on/off timer to make the appliance automatically turn on and off at a certain time every day from standby.
The clock must be set correctly for the timer to operate correctly.
- Set the appliance to the standby mode.
- Press the TIMER button to call the on/off timer function.
- Press and hold the TIMER button for timer setting. Select the audio source by using the ▶▶I/1◀ buttons. Then input the time for timer on with the numeric keys on the remote control. Set afterwards the volume with the ▶▶I/1◀ buttons. Now enter the time for timer off with the numeric keys on the remote control.

NOTE:
You need for all steps to press the TIMER button for confirmation and to go to the next step. If there is no operation within 10 seconds, it will exit the setting automatically.

NOTE:
If the selected source is BUZZER, then the TIMER OFF setting is not available.
Sound Quality
Adjusting the Volume
To increase or decrease the volume, rotate the VOL+/- button on the appliance or press the V +/- buttons on the remote control.
- If you want to mute the sound, press the button on the remote control. Press the button again or press the VOL+/- button to return to normal listening.

NOTE:
If you adjust the volume above 26, then power off and power on again. The volume will be automatically restored to the factory setting.
Adjusting the Bass
Press the USER button on the remote control, and then press the BASS +/- buttons on the remote control to increase / decrease the bass.
Adjusting the Treble
Press the USER button on the remote control, and then press the TREBLE +/- buttons on the remote control to increase or decrease the treble.
Preset the Equalizer
You can select sound characteristics such as CLASS / POP / ROCK / JAZZ / NORMAL by pressing the EQ button.
Bluetooth Operation
You can listen to tracks from a media device if it is connected to the appliance via Bluetooth.
You need to pair your Bluetooth device with this appliance before you connect it for the first time.

NOTE:
In order to avoid interferences, deactivate Wi-Fi on your device (Smartphone, tablet, etc.) when playing music using Bluetooth.
Pair Bluetooth-enabled Devices

NOTE:
- The operational range between this appliance and a Bluetooth device is approximately 10 meters (without any object between the Bluetooth device and the appliance).
- Before you connect a Bluetooth device to this appliance, ensure that you know the capabilities of the device.
- Any obstacle between this appliance and the Bluetooth device can reduce the operational range.
- If the signal strength is weak, your Bluetooth device may disconnect, but it will reenter automatically into pairing mode.
- During ON mode, press the BT button on the remote control to select Bluetooth mode, or change the source to BT by briefly pressing the button on the appliance. If the appliance is not paired to any Bluetooth device, the system automatically enters pairing mode, or you need to press and hold the PAIR button to start pairing.
- Activate the Bluetooth function on your device and select the search mode. "AEG MC 4469" will appear on your Bluetooth device.
- To disconnect the Bluetooth function, switch to another function on the appliance or disable the function from your Bluetooth device.

NOTE:
- If there is already an existing connection, press the PAIR button to re-activate the pairing mode. The existing connection will be interrupted.
- The appliance will also be disconnected when your device is moved beyond the operational range.
- If you want to reconnect your device to this appliance, place it within the operational range.
- If the device is moved beyond the operational range, when it is brought back, check if the device is still connected to the appliance.
NOTE:
- If the connection is lost, follow the above instructions to pair your device again to the appliance.
Listen to music from Bluetooth device
- If the connected Bluetooth device supports Advanced Audio Distribution Profile (A2DP), you can listen to music stored on the device through this appliance.
- If the device also supports Audio Video Remote Control Profile (AVRCP), you can use the remote control of the appliance to play music stored on the device.
- Pair your device with this appliance.
- Play music via your device (if it supports A2DP).
- Use supplied remote control to control playback (if it supports AVRCP).
- To pause / resume playback, press the ▶ button.
- To skip to a track, press the ▶▶ or ◀◀ buttons.
AUDIO IN / AUX Operation
- Press the AUDIO button on the remote control or press the button on the appliance to select the AUDIO mode. Pressing the button twice activates the AUX mode.
- Operate your audio device directly for playback features.
- Press the VOL +/- button to adjust the volume to your desired level.
DAB Operation
DAB radio mode receives DAB / DAB+ digital radio and displays information about the station and the program / track as broadcast.
1. Scanning for Stations
The first time you use the appliance, or if the station list is empty, the radio automatically performs a full scan to see what stations are available. You may also need to start a scan manually to update the list of stations for one of the following reasons:
- New stations may become available from time to time.
- Stations close or can no longer be received (In the station list, invalid stations are indicated with a question mark in front of their name).
- If reception was not good after the original scan (for example the antenna was not up), this may result in an empty or incomplete list of available stations.
- If you have poor reception of some stations causing the audio to break up, you may wish to list only stations with good signal strength.
Full Scan
Select MENU > Full scan
Once a scan is complete, the radio returns to playing the previously selected station or first station on the station list.
Removing of stations that are listed but not available
Select MENU > Prune
This removes all invalid stations, indicated in the station list with a “?” in front of the station name.
2. Selecting Stations
Changing a station
Use the ▶▶/I◀◀ button to scroll through the Station List and press the ▶▶ button to change a station.
The Now playing screen is displayed with the new station details.
Some stations are secondary services associated with a Primary channel and only available at certain times. Any station that has associated secondary services is indicated with a double chevron pointing to the right. The secondary service station stations are always listed next to their primary station rather than the normal is indicated with a double chevron pointing left. In the Station List is secondary alphabetical order.
3. Presets
The appliance has 40 preset memory locations for DAB.
Storing a station in a preset memory location
Press and hold the PROGRAM button for about 3 to 5 seconds until the display shows "Preset # Stored". Presets (1-40) are displayed as either "Empty" or with the currently stored station name.
Use the ▶▶/◀◀ button to choose a preset memory, then press the ▶▶ button to store the currently playing station. After confirming the preset station is stored, the display reverts to the Now Playing screen.
Recalling a Preset Station
Press the PROGRAM button briefly (the display will show "Preset Recall"). Select one of the listed preset stations using the ▶▶I/I◀◀ button and press the ▶II button to choose the displayed preset station.
4. Manual Tune
As well as the normal method of scanning, you can also manually tune to a particular channel / frequency. This can be useful for adjusting your antenna to achieve the best possible reception and scanning a particular channel to update the station list.
Manual Tuning
Press MENU > Manual tune, then use the ▶▶/I◀◀ button to display a particular channel / frequency and press the ▶II button to tune to that channel / frequency. The display shows a live indication of the received signal strength on the selected frequency. Adjustments to your antenna will be manifested in the received signal strength displayed.
i NOTE:
The slightly larger rectangle indicates the audio quality threshold. If the signal strength, as indicated by the solid rectangles, falls below this threshold, the audio quality will deteriorate. At the same time, the appliance scans for any DAB stations on the selected frequency and updates the station list with any new stations found. To listen to any stations found, return to the Now Playing screen and select the required station from the station list as normal.
5. Now Playing Information
While a station is playing, the screen shows its name and DLS (Dynamic Label Segment) information broadcast by the station such as program name, track title, and contact details.
Long DLS info, over 16 characters, scrolls across the display.
Viewing Further Information
Press the INFO button.
Each time you press the INFO button, the next set of information is displayed, cycling through: DLS text, DL Plus information (this is only displayed if broadcast by the station), signal strength, program type, ensemble name, channel number / frequency, signal error rate, bit rate, codec / DAB variant, time and date.
Note:
DL Plus presents additional information that can be broadcast by stations and stored temporarily on your radio. To return to the default Now playing screen at any time, press and hold the INFO button.
6. Other Settings
Dynamic range compression (DRC)
This function reduces the difference between the loudest and quietest audio signal being broadcast.
Effectively, this makes quiet sounds comparatively louder and loud sounds comparatively quieter.
Note:
DRC only works if it is enabled by the broadcaster for a specific station.
Changing the DRC Setting
Select MENU > DRC > off | low | high.
FM Operation
FM radio mode receives analogue radio from the FM band and displays RDS (Radio Data System) information about the station and show (where broadcast).
1. Selecting Stations
The first time you select FM radio, the appliance is set to the lowest frequency in the FM band.
Scanning for a station in FM mode
Press the AMS button. The appliance scans up through the frequencies of the FM band, showing the current frequency and the text "Scanning..." on the screen display.
A scan stops when a signal is found. The appliance can be set to stop at each station or only at stations with a strong signal (for details see Scan settings on the next page).
Alternatively, you can use the ▶▶/▲ buttons to tune, in 50 kHz steps.
2. Presets
The appliance has 40 preset memory locations for FM, which work in the same way as DAB mode presets, as described earlier in Presets on previous page.
3. Now Playing Information
While FM radio is playing, the screen shows its frequency, or if RDS information is available, station name and any further "Radio Text" information.
If no information is available just the frequency and a No Radio Text message is shown.
Viewing further information about the broadcast
Press the INFO button.
Each time you press the INFO button the next set of information is displayed, cycling through:
RDS Radio Text, program type, frequency, mono/stereo, time and date.
Returning to the default Now Playing screen
Press and hold the INFO button.
4. Other Settings
Scan Setting
By default, FM scans stop at any available station (ALL stations). This may result in poor quality audio from weak stations.
Stations). This may result in poor quality audio from weak stations.
Changing the scan setting to stop only at stations with good signal strength
Select MENU > Scan setting, then Strong stations only.
Select MENU > Scan setting, then Strong stations only.
The asterisk indicates "Strong stations only" is the currently set value.
The asterisk indicates "Strong stations only" is the currently set value.
Select MENU > Audio setting. By default, all stereo stations are reproduced in stereo. For weak stations, this may result in poor quality audio. The audio quality can be improved using mono.
Select MENU > Audio setting. By default, all stereo stations are reproduced in stereo. For weak stations, this may result in poor quality audio. The audio quality can be improved using mono.
Options: Stereo allowed | Forced mono
Playing Weak Stations in Mono
Select MENU > Audio setting > Forced mono.
NOTE:
The asterisk indicates "Stereo allowed" is the currently set value.
CD Operation
Compatible Disc Types
| Disc Types Recorded Content | |
| CD-R (CD Recordable – Audio / MP3 / WMA) | AUDIO / MP3 / WMA |
| CD-RW (CD-Rewritable – Audio / MP3 / WMA) | AUDIO / MP3 / WMA |
| AUDIO-CD (Compact Disc Digital Audio) | AUDIO |
NOTE:
Some recorded files may not be able to be played due to the type and format of disc or condition of the recording.
CD Playing
- Press repeatedly the ⏻/→ button on the top of the appliance until "CD" is displayed or press the CD button on the remote control to select CD function.
- Insert the disc into the disc door, the appliance will read the disc and play it automatically.
- Press the button to eject the disc.
NOTE:
If in stop mode, press the ▶|| button to start playing the disc.
- Press the ▶ button to pause the playback.
- To resume playback, press the ▶ button again.
- Press the button on the remote control to stop the disc playing.
i NOTE:
While the CD is playing the current track number and the elapsed time will be displayed.
Skipping Search or Search and Play
- Press the ◀◀ button once or more to skip backward one or more tracks on the disc.
- Press the button once or more to skip forward one or more tracks on the disc.
- Press and hold the ◀◀ button on the remote control to search backward for the track position that you want to start playing from.
- Press and hold the button on the remote control to search forward for the track position that you want to start playing from.
Playing Repeatedly
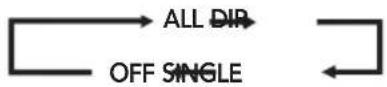
For CD disc, SINGLE and ALL repeat playback can be set by repeatedly pressing the REPEAT button on the remote control.
Playing Random
For CD disc, random playback can be set by pressing the RANDOM button on the remote control.
Program
When playing back music, press the ■ button on the remote control, then press the PROGRAM button and the following information will be displayed on the screen: P01 T001.
You can choose tracks using the numeric keys on the remote control to store them as P01, P02, etc. During this process, press the PROGRAM button to move to the next track setting.
After finishing the settings, press the ▶ button to finalize.
During program playback, the numeric keys on the remote control are disabled. You can only use the ▶▶1 /1 buttons to change tracks.
Change the source or press the ■ button twice to clear the program setting.

NOTE: The maximum number of tracks is 20.
Using USB
Connect a USB mass storage device (including USB flash memory, USB flash players, or memory cards) to this appliance to enjoy the stored music on the device through the powerful speakers of this appliance.
- Insert the USB device's plug into the ⇔ port at the rear of the appliance.
- Press the button repeatedly on the top of the appliance or press the USB button on the remote control to select the USB function.
- The music stored on the device will be played back automatically.
Repeated Playback
For USB devices, ONE and ALL repeat play can be set by repeatedly pressing the REPEAT button on the remote control.

Random Playback
For music files on the USB device, random playback can be set by pressing the RANDOM button on the remote control.
Program
When playing music, press the ■ button on the remote control. Then press the PROGRAM button and the following information will be displayed on the screen: P01 T001.
You can choose a track by using the numeric keys on the remote control to store it as P01, P02, etc. During this process, press the PROGRAM button to move to the next track setting.
After the setting is finished, press the ▶|| button to finalize.
During program playback, the numeric keys on the remote control are invalid. You can only press the ▶▶/I◀ buttons to change the track.
To delete the program setting, change the source or press the ■ button twice.

NOTE: The maximum track count is 20.
Devices with a USB Cable
- Insert one plug of the USB cable (not supplied) into the port at the rear of the appliance.
- Insert the other plug of the USB cable into the USB output terminal of the USB device.

USB Charging (5 V == 1 A socket only)
You can plug a USB cable (not supplied) into the 5 V / 1 A USB socket to charge a mobile device. The output voltage and current are 5 V / 1000 mA.

NOTE:
If the USB device is corrupted, this appliance will not be able to detect and play the music stored on it. Format the USB mass storage device and restore the music on the device with a computer.
Maintenance
Cleaning the Appliance

WARNING:
Ensure the appliance is fully unplugged from the mains socket before cleaning.
- To clean the appliance, wipe the case with a slightly moist, lint-free cloth.
- Do not use any cleaning fluids containing alcohol, ammonia or abrasives.
- Do not spray an aerosol at or near the appliance.
Handling CDs
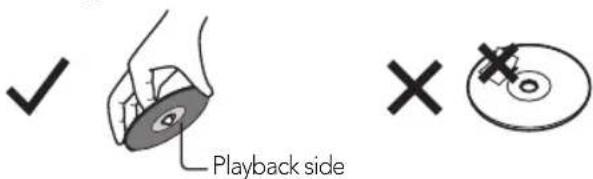
- Do not touch the playback side of the CD.
- Do not attach paper or tape to the CD.
Cleaning CDs

Fingerprints and dust on the CD can cause picture and sound deterioration. Wipe the CD from the centre outwards with a soft cloth. Always keep the CD clean.
- If you cannot wipe off the dust with a soft cloth, wipe the CD lightly with a slightly moistened cloth and finish with a dry cloth.
- Do not use any type of solvent such as thinner, benzine, commercially available cleaners or antistatic spray. They may damage the CD.
Storing Discs
Do not store CD in places subjected to direct sunlight or near heat sources.
- Do not store CD in places subjected to moisture and dust such as a bathroom or near a humidifier.
- Store CDs vertically in their cases. Stacking discs or placing objects on CDs outside of their cases may cause warping.
Troubleshooting
No Power
- Ensure that the mains cable is connected securely.
- Ensure that the appliance is switched on.
The remote control does not function correctly
- Use the remote control near to the appliance.
- Point the remote control towards the remote control sensor at the appliance.
- Replace the batteries in the remote control with new ones.
- Remove any obstacles between the remote control and the appliance.
Loud Hum or Noise
- The plugs and sockets are dirty. Wipe them with a cloth slightly moistened with an appropriate non-abrasive cleaning solution.
The appliance does not respond when pressing any of the buttons
- The appliance may freeze up during use. Switch off and then pull the mains plug of the appliance out of the mains socket to reset it.
No Sound Output
- Make sure that the appliance is not muted. Press the button or V+ button to resume normal listening.
- Ensure that the audio setting of the input source (e.g. TV, game console, DVD player, etc.) is set to PCM mode.
The Bluetooth name of this appliance cannot be found on the Bluetooth device for Bluetooth pairing
- Ensure that the appliance is switched on.
- Ensure that the Bluetooth function is activated on your Bluetooth device.
- The appliance has a Bluetooth function that can receive a signal within 10 metres.
CD inserted, but the appliance doesn't start playback
- Ensure that the CD label is facing up.
- Ensure that the CD is clean.
- PAUSE mode may be activated, deactivate it.
- The CD may be damaged or dirty. Check and clean the CD.
The CD Skips
- Ensure the appliance is on a secure location. Vibrations or jarring can cause the CD to skip.
FM Reception
- Ensure the FM telescopic antenna is fully extended.
- Electrical interference in your home can cause poor reception. Move the appliance away from them (especially those with motors and transformers).
The appliance switches off automatically during playback.
Increase the volume level on your input source player like DVD player / TV, etc.
Interferences in Speakers
Check that there is no mobile phone near the appliance.
Technical Data
Model: MC 4469 DAB+ Power Supply: 200-240 V~ 50/60 Hz Power Consumption:....22 Watt Power Consumption (standby mode):....< 1 Watt Power Output: 2 x 15 Watt Protection Class:....II Speaker Impedance: 8 Ohm USB Socket: 5V=1A output S/N (A Weight): ≥ 65 dB THD (1kHz, 1W): 0.5% Frequency Response: 40 Hz~20 kHz DAB Frequency range: 174-240 MHz FM Frequency range: 87.5-108 MHz Dimensions: 396 x 120 x 205 mm Bluetooth version: V3.0 Work range:......approx. 10 metres Transmission frequency: 2.402~2.480 GHz Protocols: A2DP/AVRCP
The right to make technical and design modifications in the course of continuous product development remains reserved.
This device has been tested according to all relevant current CE guidelines, such as electromagnetic compatibility and low voltage directives, and has been constructed in accordance with the latest safety regulations.
Disposal
Meaning of the "Dustbin" Symbol

Protect our environment: do not dispose of electrical equipment in the domestic waste.
Please return any electrical equipment that you will no longer use to the collection points provided for their disposal.
This helps avoid the potential effects of incorrect disposal on the environment and human health.
This will contribute to the recycling and other forms of re-utilisation of electrical and electronic equipment.
Information concerning where the equipment can be disposed of can be obtained from your local authority.
WARRANTY CARD
warranty card · garantiekaart · carte de garantie · scheda di garanzia · tarjeta de garantía · cartão de garantia · garantikort · karta gwarancyjna · záruční list · kartica jamstva · carte de garanție · Гаранционна карта · záručný list · garancijski list · garanciajegy · гарантійний формуляр · Гарантийный талон ·
بطاقة ضمان
MC 4469 DAB+
24 months warranty according to warranty declaration
Date of purchase, dealer stamp, signature
ETV
www.etv.de
ETV
AEG is a registered trademark used under license from AB Electrolux (publ)


- I NOTE
- SYMBOLS IN THESE INSTRUCTIONS FOR USE
- WARNING
- CAUTION
- TABLE OF CONTENTS
- SAFETY INSTRUCTIONS
- DAMAGE
- LOCATION OF THE APPLIANCE
- TEMPERATURE
- NAKED FLAMES
- MOISTURE
- VENTILATION
- SAFETY
- MAINS CABLE
- EARPHONES
- INTERFERENCE
- STANDBY
- BATTERIES
- SUPERVISION
- CLASS 1 LASER PRODUCT
- SERVICE
- MAINTENANCE
- UNPACKING
- OVERVIEW OF THE COMPONENTS / DELIVERY SCOPE
- PAIR
- ▲
- OPERATING THE REMOTE CONTROL
- HANDLING THE BATTERIES
- HANDLING THE REMOTE CONTROL
- REMOTE CONTROL OPERATION RANGE
- NOTE
- CONNECTIONS
- AC POWER CONNECTION
- ANALOGUE INPUTS CONNECTION
- HEADPHONES CONNECTION
- ECO-POWER / STANDBY FEATURE
- BASIC OPERATION
- SWITCHING THE APPLIANCE ON
- SELECTING MODES
- SETTING THE CLOCK AND THE DATE
- SETTING THE CLOCK MANUALLY
- DISPLAY THE CLOCK
- SETTING THE SLEEP TIMER
- CHECKING THE SLEEP TIMER
- CANCELING THE SLEEP TIMER
- SETTING THE ON/OFF TIMER
- SOUND QUALITY
- ADJUSTING THE VOLUME
- ADJUSTING THE BASS
- ADJUSTING THE TREBLE
- PRESET THE EQUALIZER
- BLUETOOTH OPERATION
- PAIR BLUETOOTH-ENABLED DEVICES
- LISTEN TO MUSIC FROM BLUETOOTH DEVICE
- AUDIO IN / AUX OPERATION
- DAB OPERATION
- SCANNING FOR STATIONS
- FULL SCAN
- REMOVING OF STATIONS THAT ARE LISTED BUT NOT AVAILABLE
- SELECTING STATIONS
- CHANGING A STATION
- PRESETS
- STORING A STATION IN A PRESET MEMORY LOCATION
- RECALLING A PRESET STATION
- MANUAL TUNE
- MANUAL TUNING
- NOW PLAYING INFORMATION
- VIEWING FURTHER INFORMATION
- OTHER SETTINGS
- CHANGING THE DRC SETTING
- FM OPERATION
- SCANNING FOR A STATION IN FM MODE
- VIEWING FURTHER INFORMATION ABOUT THE BROADCAST
- RETURNING TO THE DEFAULT NOW PLAYING SCREEN
- SCAN SETTING
- SELECT MENU > SCAN SETTING, THEN STRONG STATIONS ONLY
- THE ASTERISK INDICATES "STRONG STATIONS ONLY" IS THE CURRENTLY SET VALUE
- SELECT MENU > AUDIO SETTING. BY DEFAULT, ALL STEREO STATIONS ARE REPRODUCED IN STEREO. FOR WEAK STATIONS, THIS MAY RESULT IN POOR QUALITY AUDIO. THE AUDIO QUALITY CAN BE IMPROVED USING MONO
- PLAYING WEAK STATIONS IN MONO
- CD OPERATION
- CD PLAYING
- SKIPPING SEARCH OR SEARCH AND PLAY
- PLAYING REPEATEDLY
- PLAYING RANDOM
- PROGRAM
- USING USB
- REPEATED PLAYBACK
- RANDOM PLAYBACK
- DEVICES WITH A USB CABLE
- CLEANING THE APPLIANCE
- HANDLING CDS
- CLEANING CDS
- STORING DISCS
- TROUBLESHOOTING
- NO POWER
- THE REMOTE CONTROL DOES NOT FUNCTION CORRECTLY
- LOUD HUM OR NOISE
- THE APPLIANCE DOES NOT RESPOND WHEN PRESSING ANY OF THE BUTTONS
- NO SOUND OUTPUT
- THE BLUETOOTH NAME OF THIS APPLIANCE CANNOT BE FOUND ON THE BLUETOOTH DEVICE FOR BLUETOOTH PAIRING
- CD INSERTED, BUT THE APPLIANCE DOESN'T START PLAYBACK
- THE CD SKIPS
- FM RECEPTION
- THE APPLIANCE SWITCHES OFF AUTOMATICALLY DURING PLAYBACK
- INTERFERENCES IN SPEAKERS
- TECHNICAL DATA
- DISPOSAL
- MEANING OF THE "DUSTBIN" SYMBOL
- WARRANTY CARD
- MC 4469 DAB
Brand : AEG
Model : MC 4469 DAB Plus
Category : Hi-Fi System