
Conspiracy - Hi-fi system SAMSON - Free user manual and instructions
Find the device manual for free Conspiracy SAMSON in PDF.
| Product Type | MIDI Control Surface |
| Brand | Samson |
| Model | Conspiracy |
| Trigger Pads | 25 backlit velocity-sensitive pads with aftertouch |
| Assignable Faders | 6 faders + 1 crossfader |
| Endless Encoders | 14 encoders |
| Backlit Buttons | 17 assignable buttons |
| XY Touch Pad | Yes, two-way control |
| Display | Backlit LCD |
| Connection | MIDI over USB |
| Power Supply | USB Bus |
| Presets | 20 slots |
| Dimensions (approx.) | 350 x 250 x 50 mm |
| Weight (approx.) | 1.5 kg |
| Included Accessories | USB Cable |
| Safety | Follow warnings: do not expose to water, use a dry cloth for cleaning, disconnect during thunderstorms |
| Maintenance | Clean with a dry cloth, do not block ventilation openings |
| Service | Contact Samson (1-800-3SAMSON) to obtain an RA number before return |
| General Information | Residential or commercial use, FCC Class B compliant |
Frequently Asked Questions - Conspiracy SAMSON
User questions about Conspiracy SAMSON
0 question about this device. Answer the ones you know or ask your own.
Ask a new question about this device
Download the instructions for your Hi-fi system in PDF format for free! Find your manual Conspiracy - SAMSON and take your electronic device back in hand. On this page are published all the documents necessary for the use of your device. Conspiracy by SAMSON.
USER MANUAL Conspiracy SAMSON
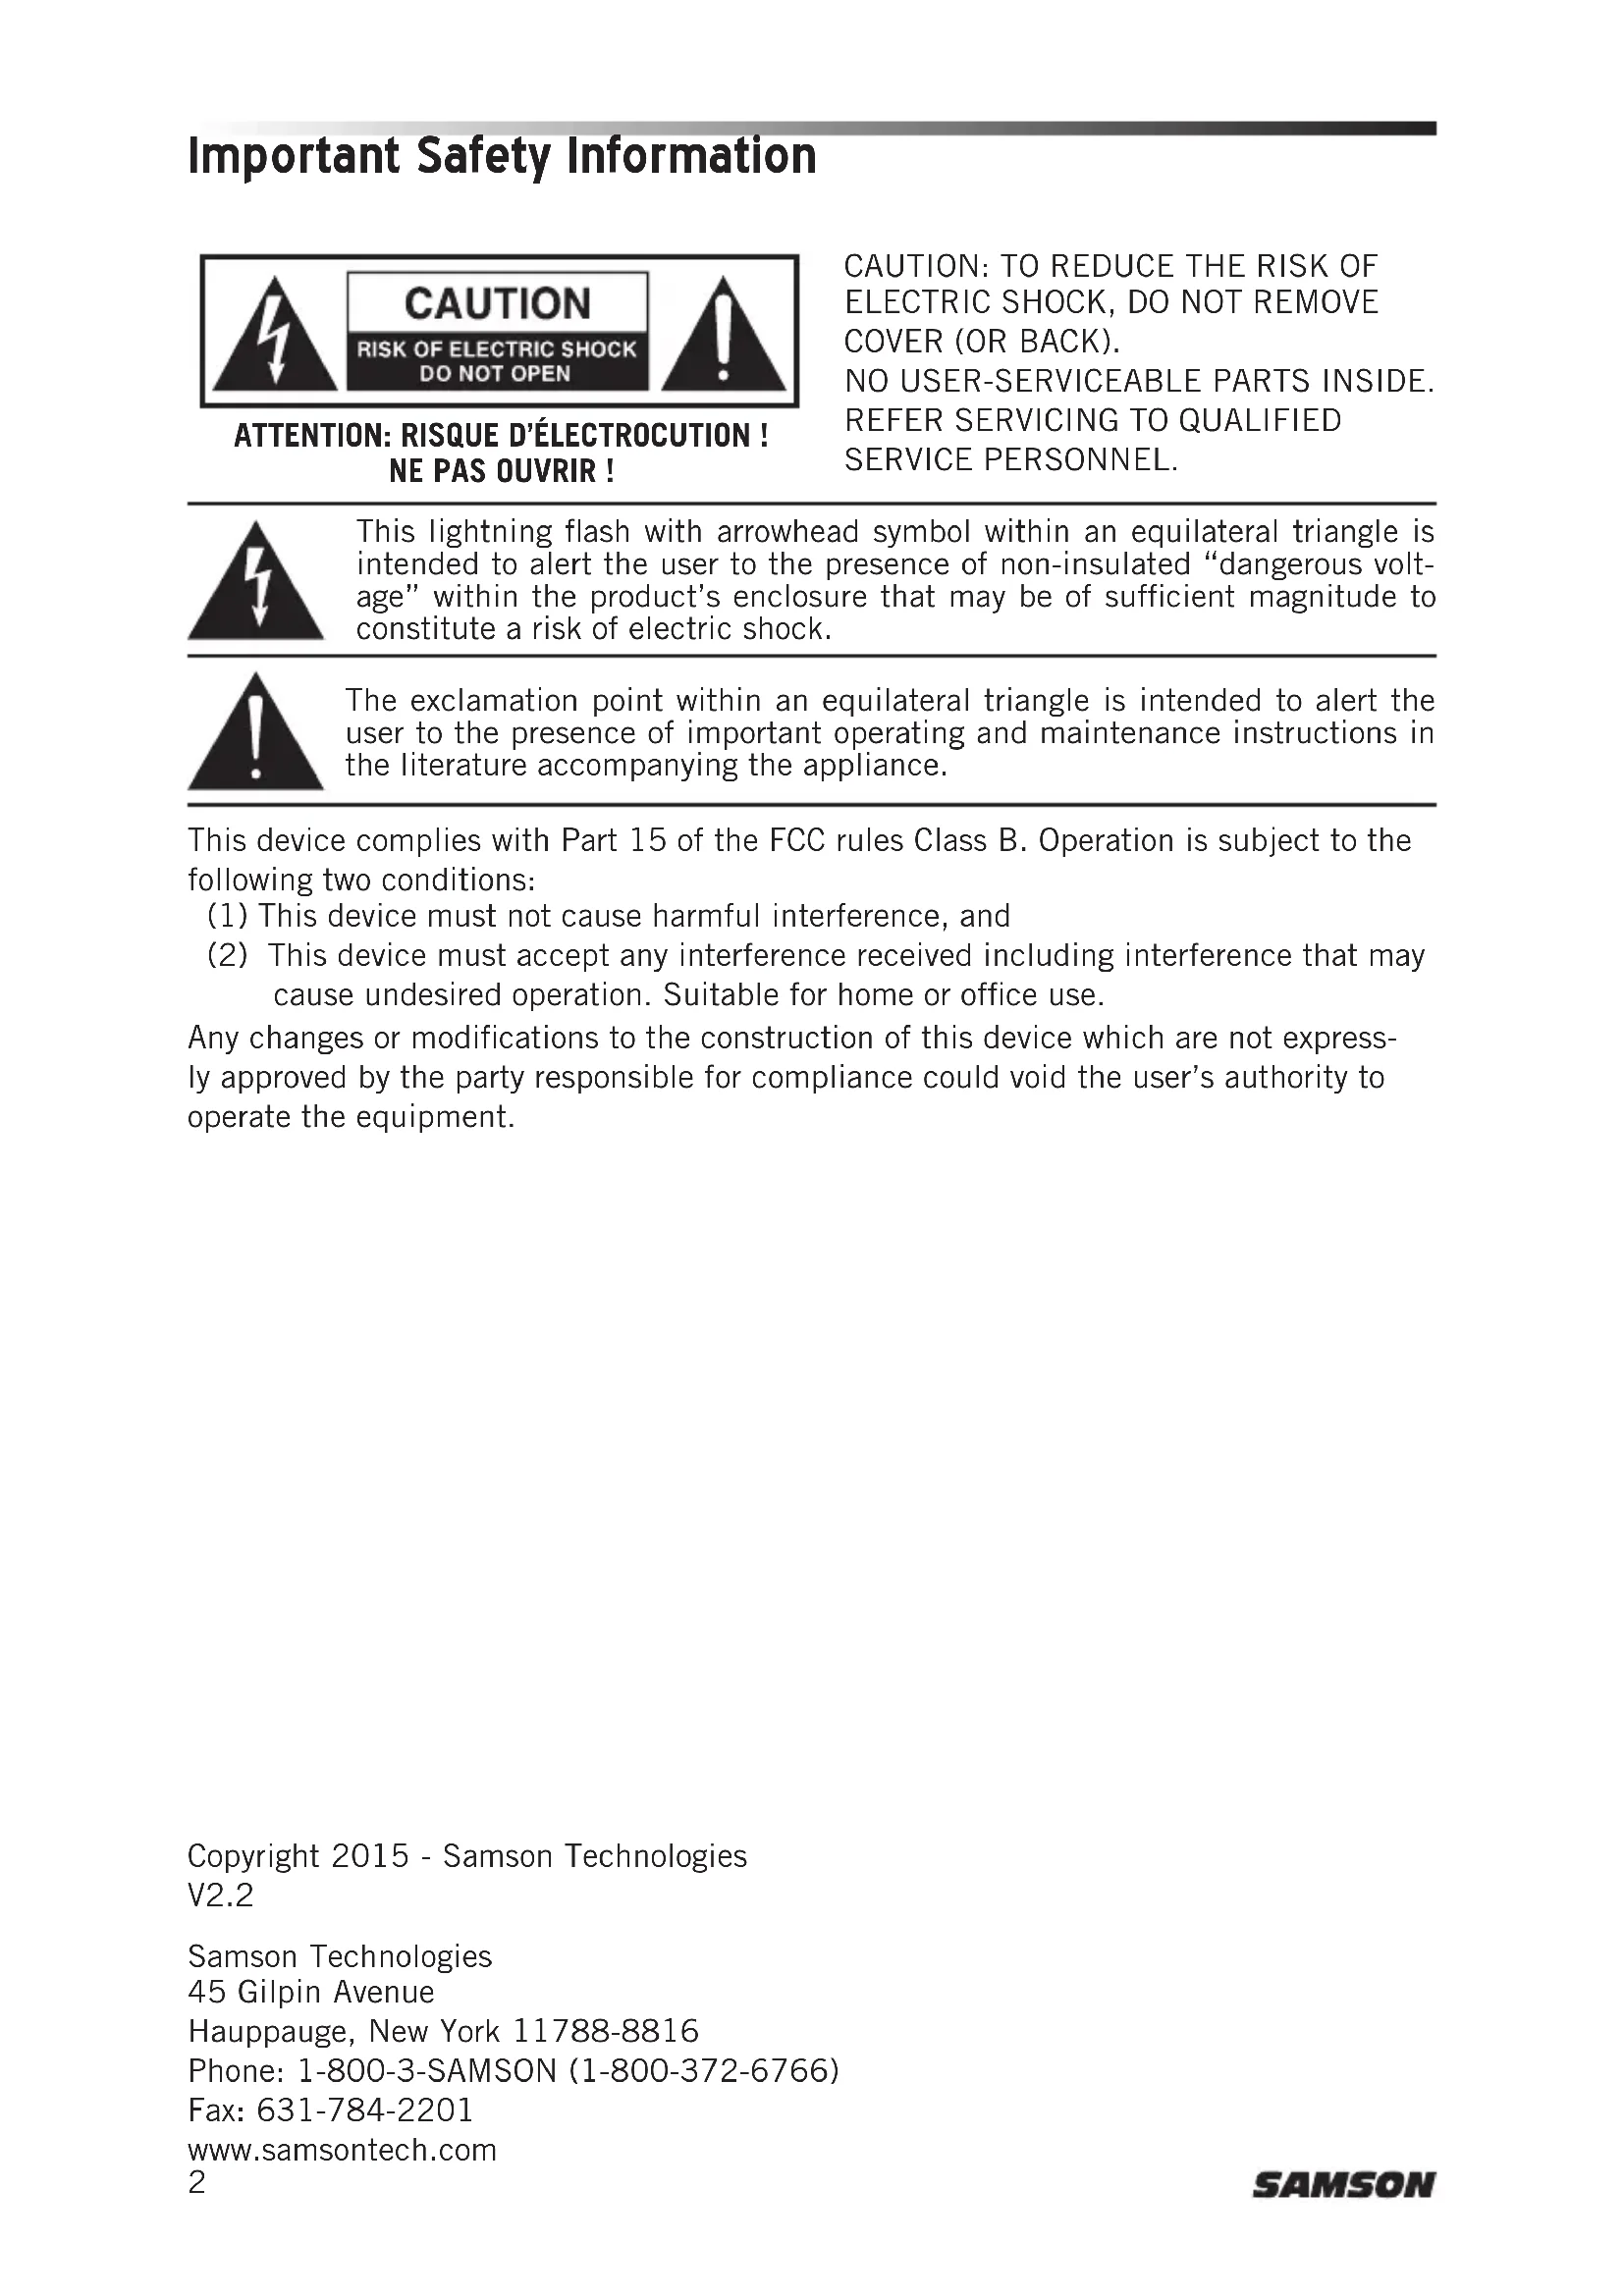
ATTENTION: RISQUE D'ÉLECTROCUTION!
NE PAS OUVRIR!
CAUTION: TO REDUCE THE RISK OF ELECTRIC SHOCK, DO NOT REMOVE COVER (OR BACK).
NO USER-SERVICEABLE PARTS INSIDE.
REFER SERVICING TO QUALIFIED SERVICE PERSONNEL.

This lightning flash with arrowhead symbol within an equilateral triangle is intended to alert the user to the presence of non-insulated "dangerous voltage" within the product's enclosure that may be of sufficient magnitude to constitute a risk of electric shock.

The exclamation point within an equilateral triangle is intended to alert the user to the presence of important operating and maintenance instructions in the literature accompanying the appliance.
This device complies with Part 15 of the FCC rules Class B. Operation is subject to the following two conditions:
(1) This device must not cause harmful interference, and
(2) This device must accept any interference received including interference that may cause undesired operation. Suitable for home or office use.
Any changes or modifications to the construction of this device which are not expressly approved by the party responsible for compliance could void the user's authority to operate the equipment.
Copyright 2015 - Samson Technologies
V2.2
Samson Technologies
45 Gilpin Avenue
Hauppauge, New York 11788-8816
Phone: 1-800-3-SAMSON (1-800-372-6766)
Fax: 631-784-2201
www.samsontech.com
Important Safety Information

- Read these instructions.
- Keep these instructions.
- Heed all warnings.
- Follow all instructions.
- Do not use this apparatus near water.
- Clean only with dry cloth.
- Do not block any ventilation openings. Install in accordance with the manufacturer's instructions.
- Do not install near any heat sources such as radiators, heat registers, stoves, or other apparatus (including amplifiers) that produce heat.
- Only use attachments/accessories specified by the manufacturer.
- Use only with the cart, stand, tripod, bracket, or table specified by the manufacturer, or sold with the apparatus. When a cart is used, use caution when moving the cart/apparatus combination to avoid injury from tip-over.
- Unplug the apparatus during lightning storms, or when unused for long periods of time.
- Refer all servicing to qualified personnel. Service is required when the apparatus has been damaged in any way, such as power supply cord or plug is damaged, liquid has been spilled or objects have fallen into the apparatus has been exposed to rain or moisture, does not operate normally, or has been dropped.
- This appliance shall not be exposed to dripping or splashing water and that no object filled with liquid such as vases shall be placed on the apparatus.
- Caution-to prevent electrical shock, match wide blade plug wide slot fully insert.
- Please keep a good ventilation environment around the entire unit.
- Always unplug cables by gripping the plug firmly, not by pulling on the cable.

If you want to dispose this product, do not mix it with general household waste. There is a separate collection system for used electronic products in accordance with legislation that requires proper treatment, recovery and recycling. Private household in the 28 member states of the EU, in Switzerland and
Norway may return their used electronic products free of charge to designated collection facilities or to a retailer (if you purchase a similar new one).
For Countries not mentioned above, please contact your local authorities for a correct method of disposal.
By doing so you will ensure that your disposed product undergoes the necessary treatment, recovery and recycling and thus prevent potential negative effects on the environment and human health.
Conspiracy Control Surface 3
Introduction
Thank you for purchasing the Samson Conspiracy MIDI control surface! The Conspiracy gives you the performance and production control to easily integrate with Windows or Mac digital production workstations.
The Conspiracy is a full-featured control surface with 25 trigger pads, six faders, 14 endless encoders, and 17 assignable buttons. For expanded control the controller has an XY-Touch pad, crossfader, backlit display, and 20 presets which provide access to additional layers of control.
In these pages, you'll find a detailed description of the features of the Conspiracy MIDI control surface, as well as a guided tour of its control panel, and instructions for setup and use. You'll also find information on how to register your product online so that you can receive online technical support, and so that we can send you updated information about this and other Samson products in the future.
We recommend you record your serial number in the space provided below, for future reference.
Serial number:
Date of purchase:
With proper care and maintenance, your Samson Conspiracy will operate trouble-free for many years. Should your controller ever require servicing, a Return Authorization (RA) number must be obtained before shipping your unit to Samson. Without this number, the unit will not be accepted. Please call Samson at 1-800-3SAMSON (1-800-372-6766) for an RA number prior to shipping your unit. Please retain the original packing materials and, if possible, return the unit in its original carton. If your Conspiracy was purchased outside of the United States, contact your local distributor for warranty details and service information.
Features
The Samson Conspiracy utilizes state-of-the-art technology and is engineered to the finest detail. Here are some of its main features:
- 25 velocity-sensitive, backlit trigger pads with aftertouch
- Six assignable sliders and DJ style crossfader
14 endless encoders
17 backlit buttons can be assigned as note or continuous controllers - XY-Touch pad for hands-on control
- Backlit LCD display provides real-time feedback
- Compact design, perfect for live performance and studio applications
- Adjustable pad sensitivity and velocity curve
- USB bus powered
Quick Start
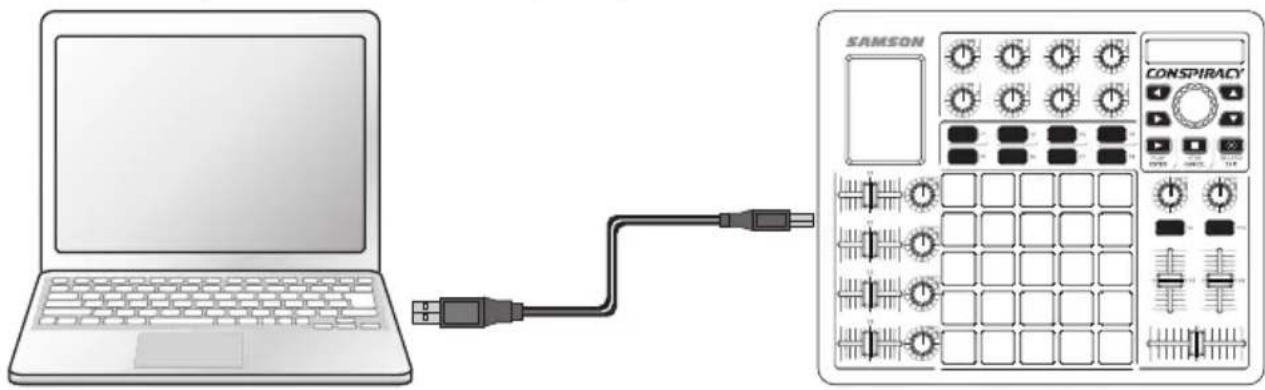
Computer Samson Conspiracy
- Connect the Conspiracy to your computer using the supplied USB cable. The unit will receive power and transmit MIDI data via the USB connection. Note: If the Conspiracy is connected to a non-powered USB hub, it may not receive enough power to turn on. It is recommended that you connect the Conspiracy directly to your computer or to a powered USB hub.
- Launch your DAW or virtual instrument software.
- Set the Conspiracy as the MIDI Input and MIDI Output device. Note: In some software applications it may be necessary to set the Conspiracy as the Remote Controller. Please consult the documentation included with the software.
Front Panel Controls and Functions
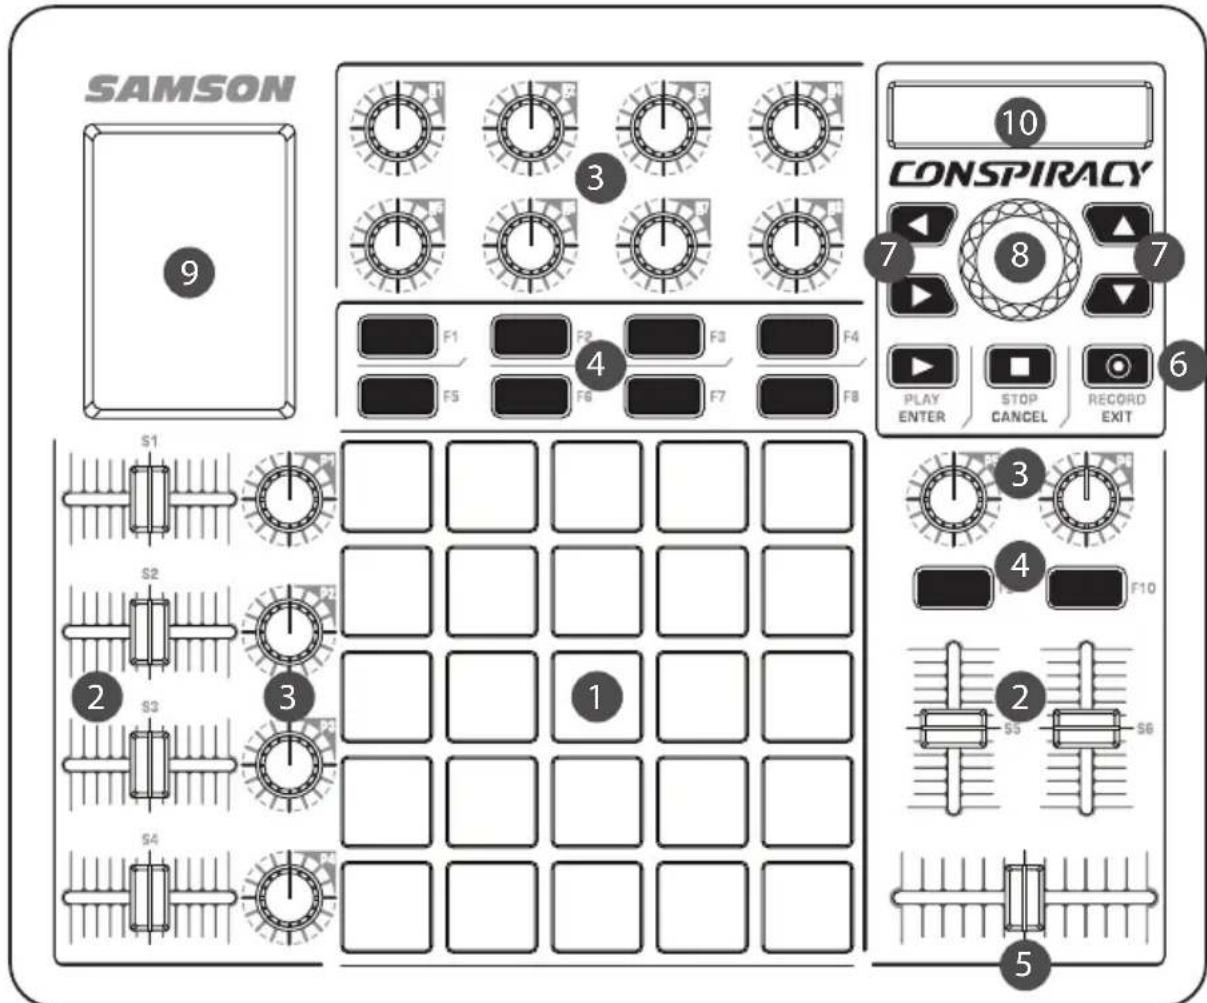
- Trigger Pads - The grid of 25 velocity-sensitive, three color backlit trigger pads can be assigned to send MIDI note or control information, and can be set as either toggle or momentary style buttons.
- Assignable Sliders - The six sliders (S1-S6) send continuous control data.
- Assignable Encoders - The 14 endless encoders (P1-P6 & E1-E8) send continuous control data.
- Function Buttons - The ten function buttons (F1-F10) can be used to send MIDI note or control information, and can be set as either toggle or momentary style buttons.
- Crossfader - This assignable fader sends continuous control data to the DAW.
- Transport Buttons - The buttons send MIDI continuous control data and are intended to control play, stop, and record. They also function as Enter, Cancel, and Exit buttons within the Preset, Edit, and Global menus.
- Arrow Buttons - The four backlit buttons can be used to send MIDI note or control information, and can be set as either toggle or momentary style buttons.
- Data Knob - Pressing the button enters the menu and confirms selections. Rotate the encoder to cycle through available menu options.
- XY-Touch Pad - Transmits two continuous control messages by moving across the horizontal and vertical axes.
- Display - The backlit LCD displays the current setup information, performance data, and adjustable parameters.
Display Features
The Conspiracy features a backlit LCD screen that displays MIDI performance information when operating the controller.
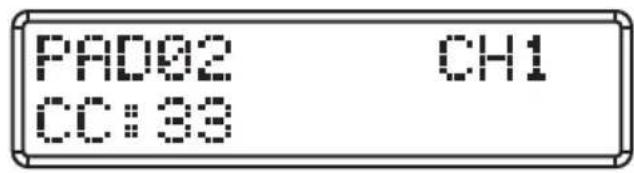
Trigger Pads
Trigger pads can be assigned to send note or continuous control (CC) messages when pressed. When set to Note, the display will show the pad number, MIDI channel, note name and velocity. If set to CC, it will display CC value transmitted.

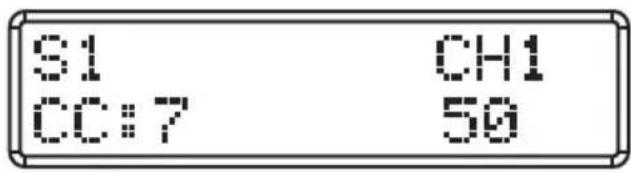
Buffers and Encoders
Slides and encoders are controls that output a range of values when moved. The display will show the active control, the MIDI channel, CC number, and value transmitted.
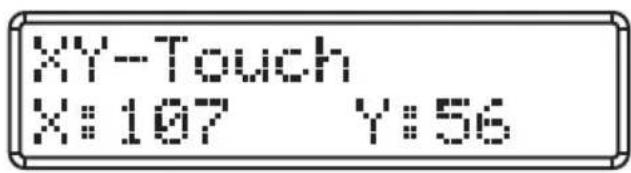
XY-Touch Pad
The XY-Touch Pad outputs different CC values when you slide your finger along vertical and horizontal axis. The display shows the X (horizontal) and Y (vertical) output value.
Preset
In performance mode, you can turn the Data knob to see the Current Preset number and name.

Modes
The Conspiracy has four main operation modes: Performance Mode, Preset Mode, Edit Mode and Global Mode.
Preset Mode - In this mode, you can load, copy, name and reset the 20 available presets. A preset stores information on the assignments for the sliders, knobs, and buttons. Using the presets allows you to quickly load the settings for specific applications without having to reprogram the unit every time. Refer to the section on Preset Mode (p. 9) for more details.
Edit Mode - In this mode, you can access and assign all of the features of the Conspiracy. This allows you to customize the settings to match your needs. Refer to the section on Edit Mode (p. 10) for details.
Global Mode - In this mode, you can adjust parameters that affect the overall function of the controller. In the Global mode you can perform a MIDI Reset to stop any stuck notes, set the Global MIDI channel, Pad Sensitivity, and Pad Velocity Curves. Refer to the section on Global Mode (p. 12) for details.
Performance Mode - In this mode, the controller transmits note and continuous controller information via the USB output. Refer to the section on Performance Mode (p. 14) for details.
Preset Mode
The Conspiracy features 20 preset locations where you can store and edit different configurations for the control surface. When the controller is powered on, the first Preset will be loaded. In Preset Mode you can LOAD, COPY, NAME, and RESET a preset.
To access the Preset Mode, press the DATA knob to enter the Menu, rotate the DATA knob until the screen reads: 1.PRESET MODE, and press the DATA knob or PLAY/ENTER button. Rotate the DATA knob to recall the different functions in Preset Mode.
To cancel any selection, press the STOP/CANCEL button.
To exit the menus and return to the Performance mode, press the RECORD/EXIT button. This will also cancel any changes not confirmed.
1. LOAD PRESET
- In the PRESET MODE, rotate the DATA knob until the screen reads: 1.LOAD PRESET.
- Press the DATA knob or PLAY/ENTER to enter the LOAD PRESET sub-menu.
- Rotate the DATA knob to incrementally step through all of the available presets. Press the DATA knob or PLAY/ENTER button to set the new preset.
- Press the RECORD/EXIT button to return to the Performance mode.
2. COPY PRESET
- In the PRESET MODE, rotate the DATA knob until the screen reads: 2.COPY PRESET.
- Press the DATA knob or PLAY/ENTER to enter the COPY PRESET sub-menu.
- Rotate the DATA knob to incrementally step through all of the available presets. Press the DATA knob or PLAY/ENTER button to select the preset to copy.
- Select the destination number by rotating the DATA knob. Press the DATA knob or PLAY/ENTER button to confirm the selection.
- Press the RECORD/EXIT button to return to the Performance mode.
3. NAME PRESET
- In the PRESET MODE, rotate the DATA knob until the screen reads: 3.NAME PRESET
- Press the DATA knob or PLAY/ENTER to enter the NAME PRESET sub-menu.
- Rotate the DATA knob to change the characters. Press the left and right arrow to move between characters.
- Press the DATA knob or PLAY/ENTER button to save the updated name.
- Press the RECORD/EXIT button to return to the Performance mode.
4. RESET PRESET
- Rotate the DATA knob until the screen reads: 4.RESET PRESET
- Press the DATA knob or PLAY/ENTER to enter the RESET PRESET sub-menu.
- Press the DATA knob or PLAY/ENTER button to reset the preset to its default settings.
- Press the RECORD/EXIT button to return to the Performance mode.
Edit Mode
Edit Mode enables you to modify to how the pads, knobs, faders, buttons and X/Y touch pad operate. In the Edit Mode, the Conspiracy will stop transmitting MIDI data, and you can make adjustments to the current preset settings.
To access the Edit Mode:
- Press the DATA knob to enter the Menu
- Rotate the DATA knob until the screen reads: 2.EDIT MODE, and press the DATA knob or PLAY/ ENTER button. The display will read: 1. SELECT CONTROL.
- Press or move a controller to select the controller to modify, and press the DATA knob to access the editable parameters.
- Rotate the DATA knob to navigate between parameters.
- Press the DATA knob or PLAY/ENTER button to access a parameter.
- Rotate the DATA knob to adjust a parameter.
- Press the DATA knob or the PLAY button to accept the change.
EDIT MODE: 2.EDIT EXIT
To exit the Edit Mode, rotate the Data knob until the screen reads:
Press the Data knob to confirm
Once a control has been selected:
To cancel a selection, press the STOP/CANCEL button.
To exit the Edit mode and return to the Performance mode, press the RECORD/EXIT button. This will also cancel any changes not confirmed.
Edit Mode Parameters
Available Parameters
| Controller Parameter Selection | ||
| Trigger Pad | Type (Note/CC) Note, Control Change | |
| Number Note or CC | Number (0-127) | |
| Mode Momentary, Toggle | ||
| MIDI Channel 1-16, Global | ||
| LED Color Red, Green, Blue | ||
| Aftertouch On/Off | ||
| Knobs/Faders | CC Number 0-127 | |
| MIDI Channel 1-16, Global | ||
| Min 0-127 | ||
| Max 0-127 | ||
| F Buttons | Type (Note/CC) Note, Control Change | |
| Number Note or CC | Number (0-127) | |
| Mode Momentary, Toggle | ||
| MIDI Channel 1-16, Global | ||
| LED Color Red, Green | ||
| Arrow Buttons/Transport Controls | Type (Note/CC) Note, Control Change | |
| Number Note or CC | Number (0-127) | |
| Mode Momentary, Toggle | ||
| MIDI Channel 1-16, Global | ||
| X/Y Pad | CC Number 0-127 | |
| X: Horizontal Settings | MIDI Channel 1-16, Global | |
| Y: Vertical Settings | Min 0-127 | |
| Max 0-127 | ||
Global Mode
In Global Mode you make adjustments to how the Conspiracy will operate. The changes made in the Global mode are for the overall settings of the controller. To access the Global Mode, press the DATA knob to enter the Menu, rotate the DATA knob until the screen reads: 3.GLOBAL MODE, and press the DATA knob or PLAY/ENTER button. Rotate the DATA knob to recall the different functions in Global Mode.
To cancel any selection, press the STOP/CANCEL button. To exit the menus and return to the Performance mode, press the RECORD/EXIT button. This will also cancel any changes not confirmed.
1. MIDI RESET
During a performance, if a note is stuck on, the MIDI reset will send a panic command to all ports and channels of external sound, causing the device to terminate the sound. To execute the MIDI RESET:
- From the GLOBAL MODE rotate the Data knob to select 1.MIDI RESET.
- Press the Data knob or PLAY/ENTER button to access the MIDI RESET function.
- Press the Data knob or PLAY/ENTER button to transmit the reset message.
2. Global Channel
The Global Channel is the master MIDI channel for transmission and reception. Any or all of the controls can be set to a specific MIDI channel or to the Global Channel within the Edit Mode. If a control is set to the Global Channel it will transmit information on the assigned Global Channel. To change the Global Channel:
- From the GLOBAL MODE rotate the Data knob to select 2.GLOBAL CHANNEL.
- Press the Data knob or PLAY/ENTER button to access the Global Channel function.
- Rotate the Data knob to select the desired Global MIDI Channel.
- Press the Data knob or PLAY/ENTER button to set the Global MIDI Channel.
3. Pad Sensitivity
The Pad Sensitivity adjusts how the sensitive the pads when pressed. Setting the Pad Sensitivity to HEAVY allows you to hit the pad harder to achieve a higher velocity. Setting the Pad Sensitivity to LIGHT allows you to hit the pad lighter and still output a high velocity, this is useful if you want a consistent velocity from the pads even if you hit the pads softly. To adjust the Pad Sensitivity:
- From the GLOBAL MODE rotate the Data knob to select 3.PAD SENSITIVITY.
- Press the Data knob or PLAY/ENTER button to access the Pad Sensitivity function.
- Rotate the Data knob to select the desired Pad Sensitivity setting.
- Press the Data knob or PLAY/ENTER button to set the Pad Sensitivity.
Global Mode
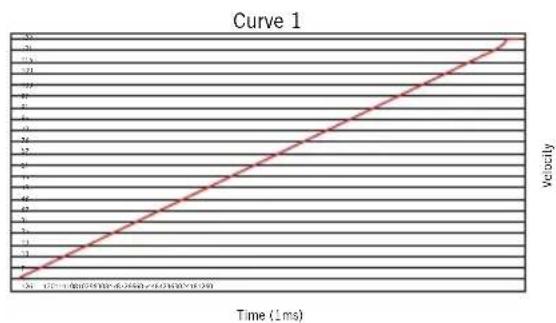
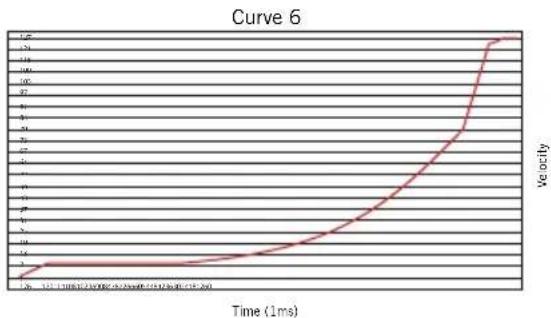
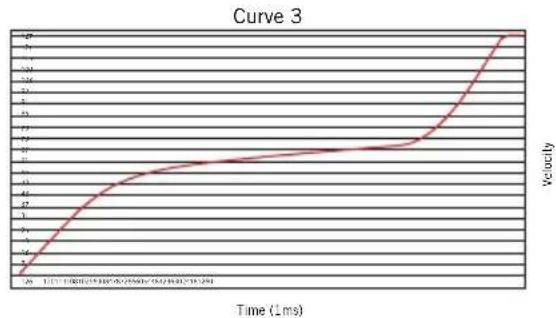
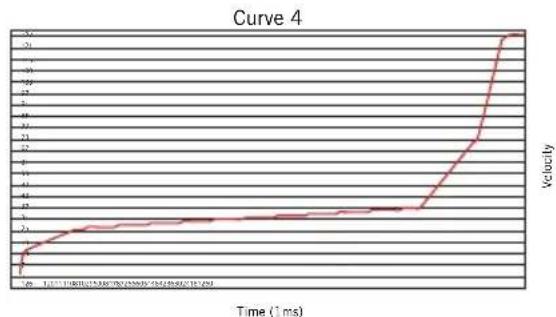
4. Velocity Curve
The Pad Velocity Curve adjusts how the pads velocity output versus the input. The pad velocity curve allows you to obtain the best performance and control of the pads based on your playing technique. The Pad Velocity Curve adjustments allow you achieve a higher velocity number even if you hit the pad softly, or limit the maximum velocity number even if you hit the pads very hard. To set the pad Velocity Curve:
- From the GLOBAL MODE rotate the Data knob to select 4.VELOCITY CURVE.
- Press the Data knob or PLAY/ENTER button to access the Pad Sensitivity function.
- Rotate the Data knob to select the desired Pad Sensitivity setting.
- Press the Data knob or PLAY/ENTER button to set the Pad Sensitivity.


Performance Mode
Trigger Pads
The Conspiracy has 25 backlit (red, green, or blue), velocity-sensitive trigger pads with aftertouch. These pads can be used as drum pads, notes, or as trigger buttons for clip-launching software. When you strike the pad, its note MIDI information will be shown on the display. When you press a pad, and continue to press it, the pad will send a channel aftertouch message depending on how hard you press the pad. The trigger pad parameters can be adjusted in the Edit Mode. The pads are numbered 01-25, from the top left of the grid, to the bottom right.
Encoders
The Conspiracy has 14 encoders. Six of the encoders (P1-P6) are paired with sliders to be used as channel pan controls. When you rotate the knob of an encoder, the encoder number, MIDI channel, and continuous control (cc) data will be shown in the display. Typically, rotating the knob clockwise will increase the value, and counter-clockwise will decrease the value (ranging 0-127). You can change the direction of the data sent by the encoder by adjusting the MIN and MAX settings in the Edit Mode.
Sliders
The Conspiracy has six sliders that are arranged as channel volume controls. There is also a crossfader style slider that can be used with DJ software. The S1-S8 sliders control the volume for channels 1-8, and S9 controls the master volume. When you move a slider encoder, the slider number, MIDI channel, and continuous controller (cc) data will be shown in the display. Typically, moving the slider up (or to the right) will increase the value, and moving the slider down (or to the left) will decrease the value (ranging 0-127). You can change the direction of the data sent by the slider by adjusting the MIN and MAX settings in the Edit Mode.
Function Buttons
There are 17 backlit buttons on the Conspiracy, arranged as function buttons (F1-F10), transport buttons (Play, Stop, Record) and arrow buttons. The buttons can be defined as note type, which send note messages when pressed, or continuous controller (CC) type, which send control messages when pressed.
The buttons can also be set to Toggle (press the button to send an on message, and press the button again to send the off message) or they can be set to Momentary (when the button is pressed the button sends the initial on command, and when released will send an off command). If the button is a note type, press the button to send note on message and release the button to send a note off message.
The button number, MIDI channel and value will be shown in the display. The function of each button is assignable and can be adjusted in the Edit Mode.
XY-Touch Pad
The XY-Touch pad can be assigned to send two different MIDI continuous controller (CC) values based on the direction you slide your finger (vertically or horizontally). When you slide your finger along the pad, the CC value for the X- and Y-axis is shown on the display. The default CC messages will increase when you slide your finger to the right on the X-axis, and up on the Y-axis. You can change the direction of the data sent by the slider by adjusting the MIN and MAX settings in the Edit Mode.
Specifications
Display Custom backlit LCD
Presets 20
Trigger Pads 25 (velocity sensitive)
Touch Pad 2 Axis Pad with vertical and horizontal messages
Transport Controls 3 (Play, Stop, Record)
Faders 6
Crossfader 1
Encoders 14
Function Buttons 14
MIDI MIDI over USB
Power USB Bus Power
AccessoriesUSBCable
Dimensions 10.62" x 8.89" x 1.57"
270mm x 226mm x 40mm
Weight 1.7lb
772g
ATTENTION: RISQUE D'ÉLECTROCUTION!
NE PAS OUVRIR!
ATTENTION:POUR REDUIRE LE RISQUE D'ELECROCUTION,NE PAS OUVRIR LE CAPOT (OU LA FACE ARRIERE). NE CONTIENT AUCUNE PIECE QUE L'UTILISATEUR PEUT ENTRETENIR. CONFIER L'ENTRETIEN A DU PERSONNEL D'ENTRETIEN QUALIFIE.

Edit Mode (Mode Edition)
2. Global Channel (Canal global)
Dimensions 10,62" x 8,89" x 1,57"
270 mm x 226 mm x 40 mm
Poids 1,7 Ib
772g

ATTENTION: RISQUE D'LECTROCUTION! NE PAS OUVRIR!
EDIT MODE: 2.EDIT EXIT
Pulse la perilla Data para confirmar
270mm x 226mm x 40mm
Peso 1,7lb
772g


- Important Safety Information
- Introduction
- Features
- Quick Start
- Front Panel Controls and Functions
- Display Features
- Trigger Pads
- Buffers and Encoders
- XY-Touch Pad
- Preset
- Modes
- Preset Mode
- LOAD PRESET
- COPY PRESET
- NAME PRESET
- RESET PRESET
- Edit Mode
- Once a control has been selected:
- Edit Mode Parameters
- Global Mode
- MIDI RESET
- Global Channel
- Pad Sensitivity
- Velocity Curve
- Performance Mode
- Encoders
- Sliders
- Function Buttons
- Specifications
- Edit Mode (Mode Edition)
- Global Channel (Canal global)
Brand : SAMSON
Model : Conspiracy
Category : Hi-fi system