
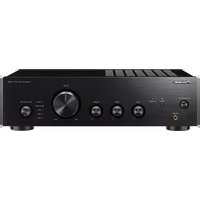
HTP070 - AV receiver PIONEER - Free user manual and instructions
Find the device manual for free HTP070 PIONEER in PDF.
| Product Type | Audio-video receiver |
| Brand | Pioneer |
| Model | HTP070 |
| Audio Channels | 5.1 channels (up to 8 speakers in full configuration) |
| Power Supply | 230 V or 120 V depending on region (see rear panel) |
| Power Consumption | Not specified |
| Connectivity | HDMI (with ARC), digital and analog audio inputs, FM/AM |
| Main Features | Dolby Digital/DTS surround sound, Sound Retriever, multiple listening modes, radio tuner with presets |
| Auto Power Down Function | Yes, adjustable (can be disabled) |
| Remote Control | Yes, with batteries (alkaline recommended) |
| Ventilation | Clearance: 20 cm above, 10 cm rear and sides |
| Operating Temperature | +5 °C to +35 °C, relative humidity < 85% |
| Safety | Do not expose to water, do not obstruct ventilation slots, unplug during extended absence |
| Maintenance and Cleaning | Unplug before cleaning, use a dry cloth, avoid moisture |
| Operating Environment | Domestic, avoid direct sunlight and heat sources |
| General Information | Detailed manual on included CD-ROM; downloadable from Pioneer website |
| Country of Manufacture | Japan (Pioneer Corporation) |
Frequently Asked Questions - HTP070 PIONEER
User questions about HTP070 PIONEER
0 question about this device. Answer the ones you know or ask your own.
Ask a new question about this device
Download the instructions for your AV receiver in PDF format for free! Find your manual HTP070 - PIONEER and take your electronic device back in hand. On this page are published all the documents necessary for the use of your device. HTP070 by PIONEER.
USER MANUAL HTP070 PIONEER
For detailed descriptions of the receiver, see the "Operating Instructions" provided on the included CD-ROM. The operating instructions can also be downloaded from the Pioneer website (http://www.pioneer.eu). See below for instructions on handling the CD-ROM.
Operating Environment—This CD-ROM can be used with Microsoft® Windows® 95/98/Me/NT/2000/XP/Vista/7 and Apple Mac OS X 10.4. Adobe Reader (version 4.0 or later) is required to read this CD-ROM. Precautions For Use—This CD-ROM is for use with a personal computer. It cannot be used with a DVD player or music CD player. Attempting to play this CD-ROM with a DVD player or music CD player can damage speakers or cause impaired hearing due to the large volume. License—Please agree to the "Terms of Use" indicated below before using this CD-ROM. Do not use if you are unwilling to consent to the terms of its use. Terms of Use—Copyright to data provided on this CD-ROM belongs to PIONEER CORPORATION. Unauthorized transfer, duplication, broadcast, public transmission, translation, sales, lending or other such matters that go beyond the scope of "personal use" or "citation" as defined by Copyright Law may be subject to punitive actions. Permission to use this CD-ROM is granted under license by PIONEER CORPORATION. General Disclaimer—PIONEER CORPORATION does not guarantee the operation of this CD-ROM with respect to personal computers using any of the applicable OS. In addition, PIONEER CORPORATION is not liable for any damages incurred as a result of use of this CD-ROM and is not responsible for any compensation. The names of private corporations, products and other entities described herein are the registered trademarks or trademarks of their respective firms.
- When Using a Mac OS: Place this CD-ROM in a CD drive and then double-click on the CD-ROM icon to start up the application.
IMPORTANT

The lightning flash with arrowhead symbol, within an aquilafera triangle, is intended to alert the user to the presence of uninsulated "dangerous voltage" within the product's enclosure that may be of sufficient magnitude to constitute a risk of electric shock to persons.
CAUTION
RISK OF ELECTRIC SHOCK
DO NOT OPEN
CAUTION:
TO PREVENT THE RISK OF ELECTRIC SHOCK,DO NOT REMOVE COVER OR BACK.NO USER SERVICEABLE PARTS INSIDE. REFER SERVICING TO QUALIFIED SERVICE PERSONNEL.

The exclaimat on point within an equilateral triangle is intended to alert the user to the presence of important operating and maintenance (servicing) instructions in the literature accompanying the appliance.
D3-4-2-1-A1En
Information for users on collection and disposal of old equipment and used batteries
(Symbol examples) for batteries
These symbols on the products, packaging, and/or accompanying documents mean that used electrical and electronic products and batteries should not be mixed with general household waste.
For proper treatment, recovery and recycling of old products and used batteries, please take them to applicable collection points in accordance with your national legislation.
By disposing of these products and batteries correctly, you will help to save valuable resources and prevent any potential negative effects on human health and the environment which could otherwise arise from inappropriate waste handling.
For more information about collection and recycling of old products and batteries, please contact your local municipality, your waste disposal service or the point of sale where you purchased the items.
These symbols are only valid in the European Union.
For countries outside the European Union:
If you wish to discard these items, please contact your local authorities or dealer and ask for the correct method of disposal.
K058a_A1_En
If the AC plug of this unit does not match the AC outlet you want to use, the plug must be removed and appropriate one fitted. Replacement and mounting of an AC plug on the power supply cord of this unit should be performed only by qualified service personnel. If connected to an AC outlet, the cut-off plug can cause severe electrical shock. Make sure it is properly disposed of after removal. The equipment should be disconnected by removing the mains plug from the wall socket when left unused for a long period of time (for example, when on vacation).
D3-4-2-2-1a A1 En
CAUTION
The STANDBY/ON switch on this unit will not completely shut off all power from the AC outlet. Since the power cord serves as the main disconnect device for the unit, you will need to unplug it from the AC outlet to shut down all power. Therefore, make sure the unit has been installed so that the power cord can be easily unplugged from the AC outlet in case of an accident. To avoid fire hazard, the power cord should also be unplugged from the AC outlet when left unused for a long period of time (for example, when on vacation).
D3-4-2-2-2a*A1_EN
This product is for general household purposes. Any failure due to use for other than household purposes (such as long-term use for business purposes in a restaurant or use in a car or ship) and which requires repair will be charged for even during the warranty period.
K041_A1_En
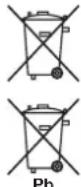
Loading the batteries
The batteries included with the unit are to check initial operations; they may not last over a long period. We recommend using alkaline batteries that have a longer life.
CAUTION
Incorrect use of batteries may result in such hazards as leakage and bursting. Observe the following precautions:
-
Never use new and old batteries together.
-
Insert the plus and minus sides of the batteries properly according to the marks in the battery case.
Batteries with the same shape may have different voltages. Do not use different batteries together.
-
When disposing of used batteries, please comply with governmental regulations or environmental public instruction's rules that apply in your country or area.
-
Do not use or store batteries in direct sunlight or other excessively hot place, such as inside a car or near a heater. This can cause batteries to leak, overheat, explode or catch fire. It can also reduce the life or performance of batteries.
Installing the receiver
- When installing this unit, make sure to put it on a level and stable surface.
Dont install it on the following places:
-on a color TV (the screen may distort)
- near a cassette deck (or close to a device that
gives off a magnetic field). This may interfere with the sound.
-in direct sunlight
-in damp or wet areas
-in extremely hot or cold areas
- in places where there is vibration or other
movement
- in places that are very dusty
- in places that have hot fumes or oils (such as a kitchen)
WARNING:
Do not climb or sit on this unit. Be especially careful when children are around. The unit may be damaged, or may fall over causing injury.
Pioneer is not responsible for any accidents or damage that result from improper installation, misuse or modification of the product, or natural disasters.
Flow of settings on the receiver
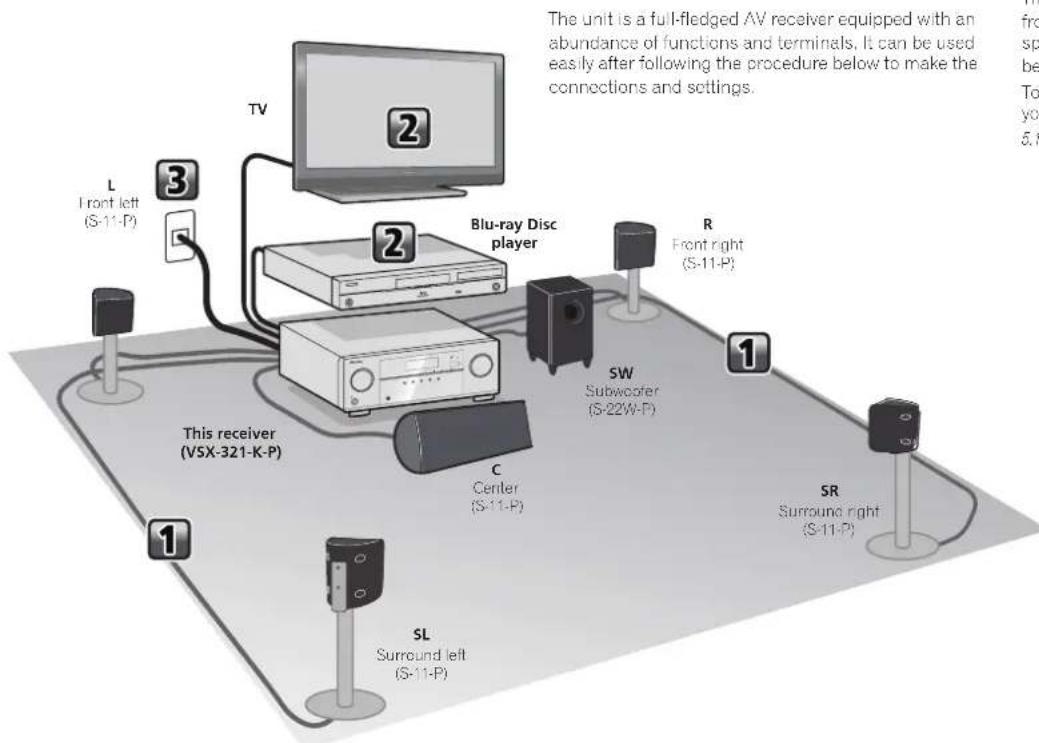
1 Connecting the speakers
2 Connecting a TV and playback component
3 Plugging the receiver
VENTILATION CAUTION
When installing this unit, make sure to leave space around the unit for ventilation to improve heat radiation (at least 20cm at top, 10cm at rear, and 10cm at each side).
WARNING
Slots and openings in the cabinet are provided for ventilation to ensure reliable operation of the product, and to protect it from overheating. To prevent fire hazard, the openings should never be blocked or covered with items (such as newspapers, tablecloths, curtains) or by operating the equipment on thick carpet or a bed.
D3-4-2-1-7b*A1_EN
Placing the speakers
The receiver will work with just two stereo speakers (the front speakers in the diagram) but using at least three speakers is recommended, and a complete setup is best for surround sound.
To achieve the best possible surround sound, install your speakers as shown below.
5.1 channel surround system

- In addition, surround back speakers can also be connected.
Connect the surround back speakers
The subwoofer and surround speakers are not magnetically shielded and so should not be placed near a TV or monitor, as the interaction of magnetic materials can cause distortion of the colors on your TV screen. Devices easily affected by magnetism (magnetic media cards, wrist-watches, video tapes, etc.) should not be placed near the subwoofer and surround speakers.
The front speakers and center speaker furnished in this system are designed for use close to a CRT-based TV or color monitor. However, if color distortion is caused due to the installation, try turning off the power to the CRT-based TV or color monitor for 15 to 30 minutes, then turning on the power again. The self-degaussing function built into the CRT-based TV or color monitor should help ameliorate the effect of the speakers on the image. If color distortion continues to be a problem, separate the speakers farther away from the screen. If magnets or devices emitting magnetic fields are installed nearby, the interactive effect with the speaker system may cause color distortion in a CRT-based TV or color monitor. - Do not attach center speaker and subwoofer to the wall or ceiling, as they may cause injury in the event of a fall.
CAUTION
- Install the center speaker below the TV so that the sound of the center channel is localized at the TV screen.
- When installing the center speaker on top of the TV, be sure to secure it with tape or some other suitable means. Otherwise, the speaker may fall from the TV due to external shocks such as earthquakes, endangering those nearby or damaging the speaker.
1 Connecting the speakers
Make sure you connect the speaker on the right to the right (R) terminal and the speaker on the left to the left (L) terminal. Also make sure the positive and negative (+/-) terminals on the receiver match those on the speakers.
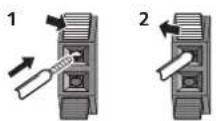
Bare wire connections
1 Push open the tabs and insert exposed wire.
2 Release the tabs.
CAUTION
- These speaker terminals carry HAZARDOUS LIVE voltage. To prevent the risk of electric shock when connecting or disconnecting the speaker cables, disconnect the power cord before touching any uninsulated parts.
Make sure that all the bare speaker wire is twisted together and inserted fully into the speaker terminal. If any of the bare speaker wire touches the back panel it may cause the power to cut off as a safety measure. - Do not connect the supplied subwoofer to any amplifier other than the one supplied with this system. Connection to any other amplifier may result in malfunction or fire.
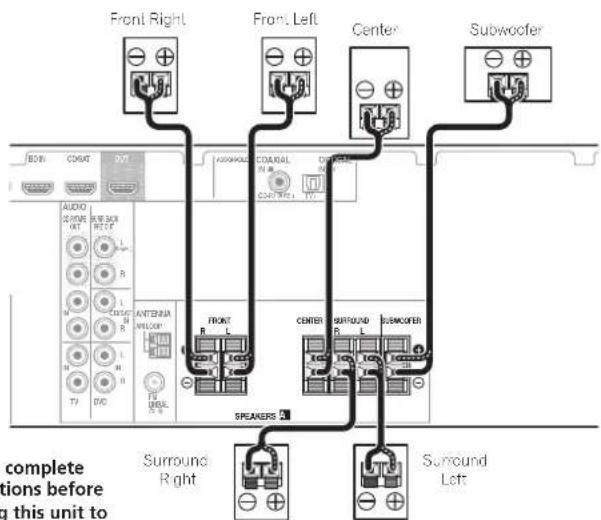
Be sure to complete all connections before connecting this unit to the AC power source.

Connecting a TV and playback component
If you have an HDMI or DVI (with HDCP) equipped component (Blu-ray Disc player, etc.), you can connect it to this receiver using a commercially available HDMI cable.
The following connection/setting is required to listen to the sound of the TV over this receiver.
If the TV does not support the HDMI Audio Return Channel function, connect the receiver and TV with audio cables (as shown).
If the TV supports the HDMI Audio Return Channel function, the sound of the TV is input to the receiver via the
HDMI terminal, so there is no need to connect an audio cable. In this case, set ARC at HDMI Setup to ON.
The ARC function may not operate even with the above connections. If this is the case, connect the receiver and the TV with an audio cable.
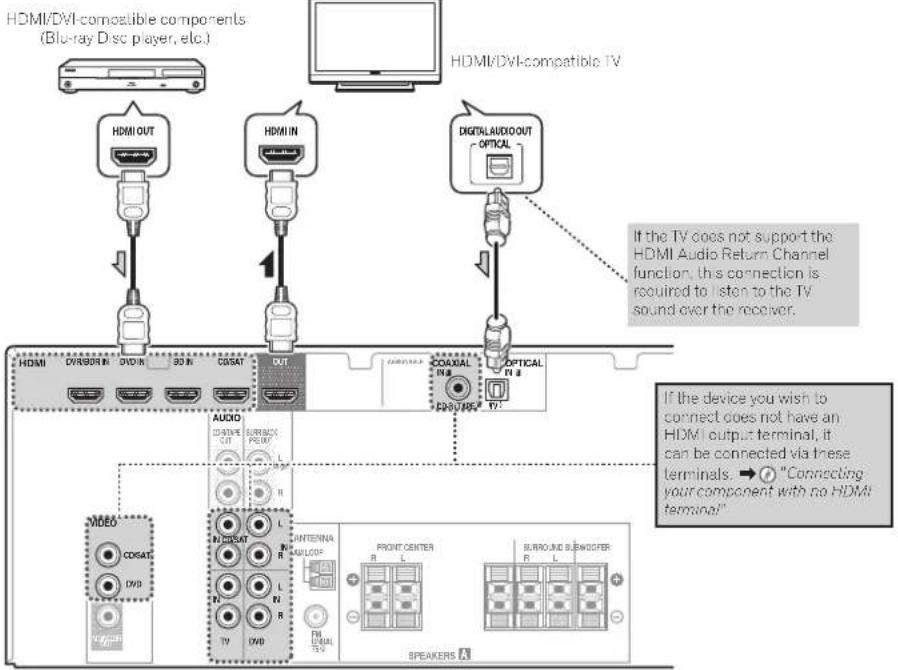
About video outputs connection
This receiver is not loaded with a video converter. When you use HDMI cables for connecting to the input device, the same cables should be used for connecting to the TV.
The signals input from the analog (composite) video input of this unit will not be output from the HDMI OUT.
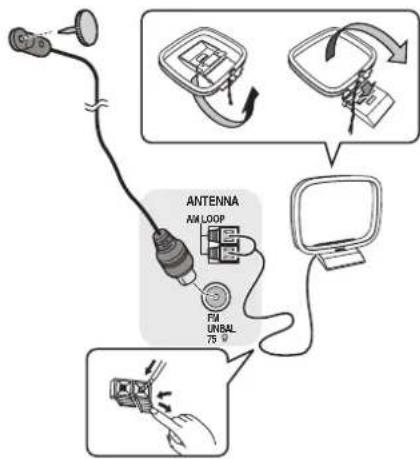
Connecting antennas
Connect FM wire antenna and the AM loop antenna as shown below.

Plugging the receiver
Only plug in after you have connected all your components to this receiver, including the speakers.
1 Plug the supplied power cord into the AC IN socket on the back of the receiver.
2 Plug the other end into a power outlet.
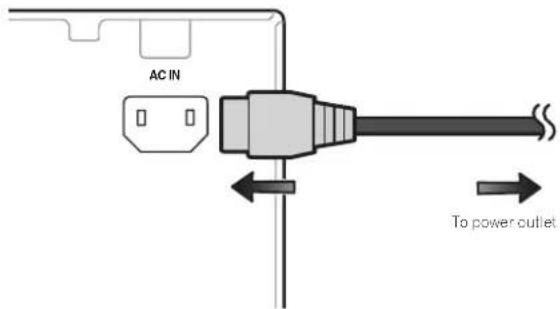
CAUTION
- Handle the power cord by the plug part. Do not pull out the plug by tugging the cord, and never touch the power cord when your hands are wet, as this could cause a short circuit or electric shock. Do not place the unit, a piece of furniture, or other object on the power cord or pinch the cord in any other way. Never make a knot in the cord or tie it with other cables. The power cords should be routed so that they are not likely to be stepped on. A damaged power cord can cause a fire or give you an electric shock. Check the power cord once in a while. If you find it damaged, ask your nearest Pioneer authorized independent service company for a replacement.
- Do not use any power cord other than the one supplied with this unit.
Do not use the supplied power cord for any purpose other than that described below.
The receiver should be disconnected by removing the mains plug from the wall socket when not in regular use, e.g., when on vacation.
Here are the basic instructions for playing a source (such as a Blu-ray Disc) with your home theater system.
The following buttons are not used with this receiver -ADAPTER,PORTABLE
Switch on your system components and receiver.
Start by switching on the playback component (for example a Blu-ray Disc player), your TV, then the receiver (press RECEIVER).
2 Switch the TV input to the input that connects this receiver.
For example, if you connected this receiver to theVIDEO jacks on your TV, make sure that theVIDEO input is now selected.
3 Press input function buttons to select the input function you want to play.
The input of the receiver will switch over, and you will be able to operate other components using the remote control.
The input source can also be selected by using INPUT SELECT button on the remote control, or by using the front panel INPUT SELECTOR dial. In this case, the remote control won't switch operational modes.
- Press SIGNAL SEL to select the audio input signal corresponding to the source component (HDMI, digital or analog).
4 Press AUTO/DIRECT to select 'AUTO SURROUND' and start playback of the source.
If you're playing a Dolby Digital or DTS surround sound Blu-ray/DvD disc, with a digital audio connection, you should hear surround sound. If you're playing a stereo source or if the connection is an analog audio connection, you will only hear sound from the front left/right speakers in the default listening mode.
Listening in Standard surround sound
This receiver provide basic surround sound for stereo and multichannel sources.
- While listening to a source, press ALC/STANDARD repeatedly to select a listening mode.
Listening in Advanced surround sound
The Advanced surround effects can be used for a variety of additional surround sound effects.
- While listening to a source, press ADV SURR repeatedly to select a listening mode.
5 Use MASTER VOLUME + / - to adjust the volume level.
Sound can be switched off by pressing MUTE button.
6 Enjoy a variety of sounds.
- Press S.RETRIEVER to switch the Sound Retriever feature ON or OFF.
- When audio data is removed during the compression process, sound quality often suffers from an uneven sound image. The Sound Retriever feature employs new DSP technology that helps bring CD quality sound back to compressed 2-channel audio by restoring sound pressure and smoothing jagged artifacts left over after compression.
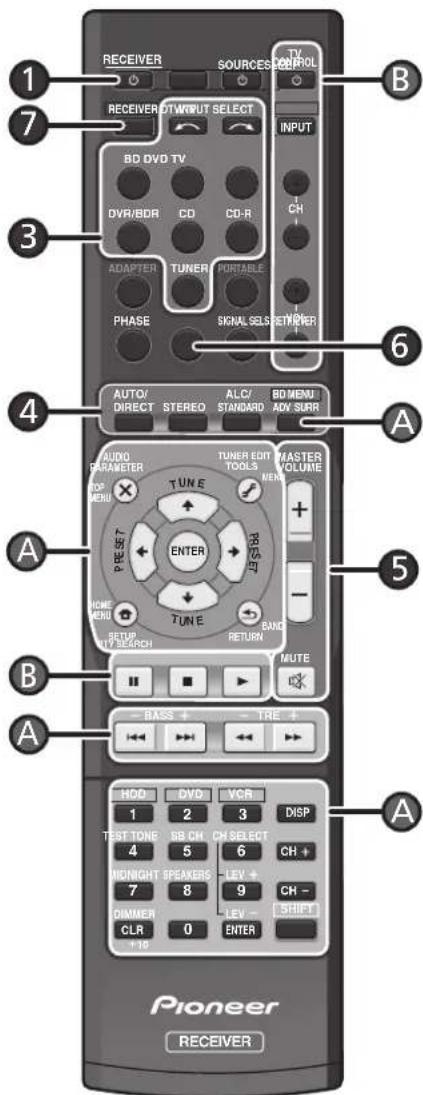
Other remote control functions
The input of the receiver will switch over, and you will be able to operate other components using the remote control. To operate the receiver, first pressRECEIVER (7), then press the appropriate button to operate.
Use the "A" buttons to adjust the settings of this receiver and operate other devices.
- Use the "B" buttons to operate TV. Operations are still possible even after pressing the RECEIVER button.
Listening to the radio
1 Press TUNER to select the tuner.
If necessary, press BAND to change the band (FM or AM).
2 Press TUNE to tune to a station.
- Press and HUNT for about a second. The receiver will start searching for the next station. If you're listening to an FM station but the reception is weak, press BAND to select FM MONO and set the receiver to the mono reception mode.
Saving station presets
If you often listen to a particular radio station, it's convenient to have the receiver store the frequency for easy recall whenever you want to listen to that station.
1 Press TUNER EDIT while receiving a signal from the station you want to store.
The display shows PRESET, then a blinking MEM and station preset.
2 Press PRESET / (or number buttons) to select the station preset you want, then press ENTER.
The preset number stop blinking and the receiver stores the station.
Canceling the Auto Power Down
When this receiver is not used over a period of several hours, it will power down automatically. The automatic power-off timer is set to six hours under factory settings, and the timing can be changed or the power-off function switched off altogether.
The Auto Power Down menu
Listening to station presets
You will need to have some presets stored to do this.
- Press PRESET / (or number buttons) to select the station preset you want.
De receiver installeren
→Emenu Auto Power Down
Discover the benefits of registering your product online at http://www.pioneer.co.uk (or http://www.pioneer.eu).
Download an electronic version of this manual from our website.
© 2012 PIONEER CORPORATION.
All rights reserved.
© 2012 PIONEER CORPORATION.
PIONEER ELECTRONICS (USA) INC.
P.O. BOX 1540, Long Beach, California 90801-1540, U.S.A. TEL: (800) 421-1404
PIONEER ELECTRONICS OF CANADA, INC.
340 Ferrier Street, Unit 2, Markham, Ontario L3R 2Z5, Canada TEL: 1-877-283-5901, 905-479-4411
PIONEER EUROPE NV
Haven 1087, Keetberglaan 1, B-9120 Melsele, Belgium TEL: 03/570.05.11
PIONEER ELECTRONICS ASIACENTRE PTE. LTD.
253 Alexandra Road, #04-01, Singapore 159936 TEL: 65-6472-7555
PIONEER ELECTRONICS AUSTRALIA PTY. LTD.
5 Arco Lane, Heatherton, Victoria, 3202, Australia, TEL: (03) 9586-6300
PIONEER ELECTRONICS DE MEXICO S.A. DE C.V.
Blvd. Manuel Avila Camacho 138 10 piso Col.Lomas de Chapultepec, Mexico, D.F. 11000 TEL: 55-9178-4270
K002 B3 En

- IMPORTANT
- CAUTION
- RISK OF ELECTRIC SHOCK
- DO NOT OPEN
- CAUTION:
- Information for users on collection and disposal of old equipment and used batteries
- Loading the batteries
- Installing the receiver
- WARNING:
- Flow of settings on the receiver
- VENTILATION CAUTION
- WARNING
- Placing the speakers
- Connecting the speakers
- Bare wire connections
- Connecting a TV and playback component
- About video outputs connection
- Connecting antennas
- Plugging the receiver
- Listening in Standard surround sound
- Listening in Advanced surround sound
- Use MASTER VOLUME + / - to adjust the volume level.
- Other remote control functions
- Listening to the radio
- Saving station presets
- Canceling the Auto Power Down
- Listening to station presets
- De receiver installeren
Brand : PIONEER
Model : HTP070
Category : AV receiver