
MD140BT 10007164 - Car radio Auna - Free user manual and instructions
Find the device manual for free MD140BT 10007164 Auna in PDF.

| Product Type | Car Radio |
| Brand | Auna |
| Model | MD140BT 10007164 |
| Dimensions (L x H x D) | 82 mm x 52 mm x 145 mm |
| Power Supply | DC 12 V |
| Output Power | ≥ 16 W x 4 |
| Radio Frequency Band | 87.5 ~ 108 MHz |
| Signal-to-Noise Ratio (Radio) | 40 dB |
| Radio Sensitivity | ≤ 37 dB (S/N = 30 dB) |
| Frequency Response (Player) | 100 Hz - 10 kHz ± 6 dB |
| Distortion (Player) | ≤ 5% at 1 kHz |
| Speaker Impedance | 4 ~ 8 Ohm |
| Main Functions | Radio, Bluetooth, USB, SD/MMC, AUX, RDS, Remote Control |
| Bluetooth Connectivity | Yes, for calls and music |
| RDS Functions | AF, REG, TA, EON, PTY |
| Steering Wheel Controls | Not specified |
| Maintenance and Cleaning | Avoid water, use a dry cloth |
| Safety | Protection fuse, disconnect battery before installation |
| Spare Parts and Repairability | Not specified by manufacturer |
Frequently Asked Questions - MD140BT 10007164 Auna
User questions about MD140BT 10007164 Auna
0 question about this device. Answer the ones you know or ask your own.
Ask a new question about this device
Download the instructions for your Car radio in PDF format for free! Find your manual MD140BT 10007164 - Auna and take your electronic device back in hand. On this page are published all the documents necessary for the use of your device. MD140BT 10007164 by Auna.
USER MANUAL MD140BT 10007164 Auna
Congratulations on purchasing this equipment. Please read this manual carefully and take care of the following hints on installation and use to avoid technical damages. Any failure caused by ignoring the mentioned items and cautions mentioned in the operation and installation instructions are not covered by our warranty and any liability.
Contents
| Technical Data | 11 | |
| Safety Instructions 11 | ||
| Product Description and Controls 13 | ||
| Basic Operations 14 | ||
| Installation and Dismantling 15 | ||
| Connections and Wiring 16 | ||
| BT Operations | 17 | |
| RDS Operations 17 | ||
| Troubleshooting | 18 | |
| Environment Concerns 18 | ||
| Declaration of Conformity 18 | ||
Technical Data
| Item number 10007164 | |
| FM Radio | |
| Frequency scope | 87.5~108 MHz |
| Intermediate Frequency | 10.7 MHz |
| Signal-to-noise ratio | 40 dB |
| Noise-limited sensitivity (S/N = 30 dB) | ≤ 37 dB |
| Music Player | |
| Signal-to-noise ratio | 40 dB |
| Chanel separation at 1 KHz | 30 dB |
| Harmonic distortion at 1 KHz | ≤ 5% |
| Frequenzbereich | 100 Hz – 10 KHz ± 6 dB |
| Amplifier | |
| Output | Speaker output |
| Speaker resistance | 4~8 Ohm |
| Maximum output power | ≥ 16 W x 4 |
| Power supply | DC 12 V |
| Dimensions (Length x Height x Depth) | 182 mm (L) x 52 mm (H) x 145 mm (D) |
Installation Cautions
- The said product is powered via 12V and before installation, please check to ensure the voltage of the automobile is correct;
In the wiring process, tear down the battery's negative connecting wires so as to avoid electric shock or personnel injury due to short-circuit;
Try not to connect wires over or near any hot surface, especially those wires connected to the engine accessories; - It is forbidden to dismantle the power cable of the said product and meanwhile, use such cable to power other products of different model. Over-current is likely to lead to fire disaster;
- Replace old fuse with a new one with the same specifications;
Install the said product with supplied screws; - Bundle wires and cables together or via tapes when installation is completed;
- Do not use the said product in a rainy, damp or dusty environment;
- Do not install the said product in a location that vibrates or is hard to secure;
- Try not to block any ventilation or radiation openings.
General Instructions
- Do not modify or dismantle the said product on your own so as not to trigger any accidental events, fire hazard and electric shock;
- For the sake of driving safety, try to keep the volume down;
While washing the automobile, necessary caution must be exercise as electric short-circuit or other hazards could be set off if any water is splashed over the said product (including the speakers); - Wiring and installation are required to be performed by professionals. As skills and experience are essential while installing the said product and connecting relevant wires and cables, it is strongly suggested to contact relevant dealers for installation.
- If detected any abnormality, please stop using the said product immediately. Otherwise, such product could be damaged more seriously. For details, contact the corresponding professional technicians.
- As the said product consists of numerous precision components, any attempt to dismantle or adjust any component is strictly restricted. When maintenance is needed, please send such product to the locations as appointed by the company for maintenance.
Precaution
- The said product is powered by means of a 12V AC accumulator which is grounded via the negative electrode;
- Please connect as per the wiring diagram so as to avoid any device damage;
- Before connection, strip off the insulation layer long as 5mm on both ends of the wires;
- Do not power on until connection is finished;
- Insulate any exposed live part in order to prevent short-circuit with the automobile chassis.
- Bundle all the wires and cables so as to prevent any terminals making contact with any metal object;

ATTENTION:
As for any automobile equipped with computer or satellite navigation system, the information stored could be totally erased when the battery terminal is pulled off.
Attention when connecting speakers
- Do not use any grounded speakers;
- The power of the speaker in use must exceed 40W as it is required to accept maximum output power of the amplifier;
- The speaker has resistance ranging between 4~8ohm. Any resistance not covered by such range could affect output power and even damage the speaker or the said product;
- The speaker wires should be approximately 30mm away from the antenna and antenna extension cable;
- Please follow the diagrams to connect correctly so as to safeguard either the speaker or the said product.
Product Description and Controls
Front Panel Buttons
1 Front panel detaching button
2 BT MIC
3 Band switch/Automatic station locking/Answer the phone
4 Previous track/rewind station selector
5 Display
6 Power button/ Volume knob/Tone select/RDS/8 color illumination
7 Next track/rewind station selector
8 Function mode/Hang up/PTY
9.9.USB slot
0 AUX-IN slot
11 IR
12 Number(1-6) function buttons
13 SD/MMC slot
14 Reset button

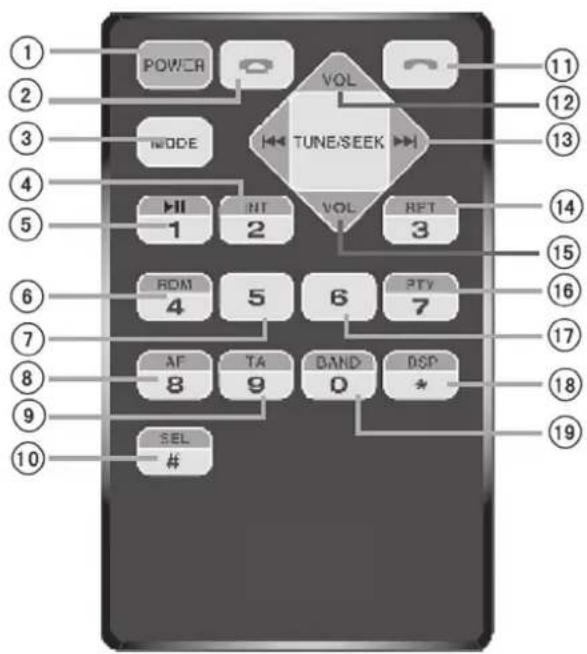
Remote-control Operations
1 Power button
2 Hang-up button
3 Function mode button
4 Digit 2/scan playback button
5 Digit 1/playback suspend button
6 Digit 4/radom playback button
7 Digit 5 button
8 Digit 8 button
9 Digit 9 button
10 Tone selector
11 Pick-up button
12 Volume + button
13 Track selection/station search button
14 Digit 3/repeat playback button
15 Volume - button
16 Digit 7 button
17 Digit 6 button
18 Sound effect selector
19 Digit 0/waveband button
Basic Operations
Front Panel Buttons:
Front panel detaching button (1)
Press to remove the front panel for savekeeping.
BT Mic (2)
The voice enters into the microphone through it during the BT call.
Band switch/Automatic station locking/Answer the phone (3)
In radio mode, short press to band switch: F1-F2-F3. In radio mode, press and hold this button to scan radio channels automatically and save to the three FM bands. After scanning, the player will browse and play once automatically. You can select respective band and channel to listen to. Connected the BT, short press this button to answer the call when a call in.
Previous track/rewind station selector (4)
While playing back MP3, press to jump to the previous tracks, press and hold such button to rewind. In the radio mode, press to automatically search stations backwards, press and hold such button to manually search stations backwards.
Display (5)
Display radio frequency or current operation status.
Power button/Volume knob/Tone selector/RDS function control/8 color illumination (6)
In turn off station, short press to turn on. In turn on station, press and hold to turn off. In radio/MP3 mode, turn this knob to adjust volume. Press this knob repeatedly to shift among CLK/BAS/TRE/BAL/FAD/BL AUTO/AF ON/REG OFF/TA OFF/EON ON/VOL. You can also use such knob to change tone. Press this button to check out what time it is. Press and hold the same button to set up time when the letters light up. Revolve the knob clockwise to adjust minute, anticlockwise to adjust hour.
Next track/station selector (7)
While playing back MP3, press to jump to the next tracks, press and hold such button to fast forward. In the radio mode, press to automatically search stations forwards, press and hold such button to manually search stations forwards.
Function mode/Hang up/PTY button (8)
In turn on station, short press "MODE" button to enter the function select. When BT/USB/SD/MMC are available, press this button to order as follow: radio-USB-SD/MMC-BT-AUX. It will skip the function which is unavailable. When connect the BT, short press to hang up the incoming call.
USB slot (9)
Automatically play back music in the corresponding formats once a memory stick is inserted.
AUX-in port (10)
Receive external audio signals.
Remote-control signal receiving window (11)
Remote commands generated by the remove-control.
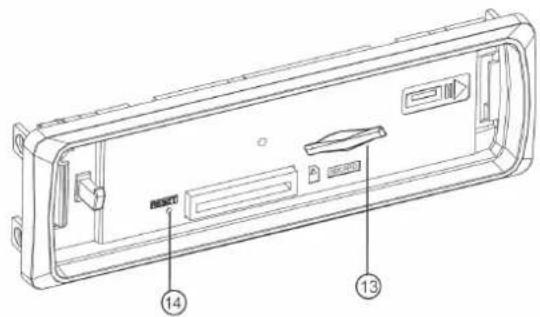
SD/MMC slot (13)
Tracks in relevant formats will be automatically played back once a SD/MMC card is inserted.
Reset button (14)
To reset the system in case of system failure, press such button first and then reboot the system.
Numerical function buttons:
1/
When completed searching radio stations automatically, press this button to listen to available stations, press and hold the same button to save such stations manually; In the MP3 mode, press this button to pause playback, and press the same button again to resume.
2/INT
When completed searching radio stations automatically, press this button to listen to available stations, press and hold the same button to save such stations manually; In the MP3 mode, press this button to browse tracks, and press the same button again to quit.
3/RPT
When completed searching radio stations automatically, press this button to listen to available stations, press and hold the same button to save such stations manually; In the MP3 mode, press this button to enable the function of Single Repeat, and press the same button again to disable such function.
4/RDM
When completed searching radio stations automatically, press this button to listen to available stations, press and hold the same button to save such stations manually; In the MP3 mode, press this button to enable the function of Shuffle, and meanwhile, you can use buttons like and to select tracks randomly. Press the same button again to disable such function.
5/-10
When completed searching radio stations automatically, press this button to listen to available stations, press and hold the same button to save such stations manually; In the MP3 mode, press this button to play back the first 10 tracks.
6/+10
When completed searching radio stations automatically, press this button to listen to available stations, press and hold the same button to save such stations manually; In the MP3 mode, press this button to play back tracks more than 10.
Installation and Dismantling
Installation Diagram
Before installing the main part, place it according to the installation locations and then connect with the corresponding speakers and power-supply; Do not fix the main part unless it performs well.
Install the main part.
Place the holder on the dashboard and then bend certain snapping components by force; Connect with the power
supply cable and speaker wires and then attach the fixing tag to the automobile; Slide the main part into the holder and then tighten the nuts on the fixing tag.
Dismantle the main part
Following loosening those nuts on the fixing tag, insert each dismantling key into the space on either left or right to pull the main part out. Later on, detach the power-supply cable and speaker wires and then the antenna connector.

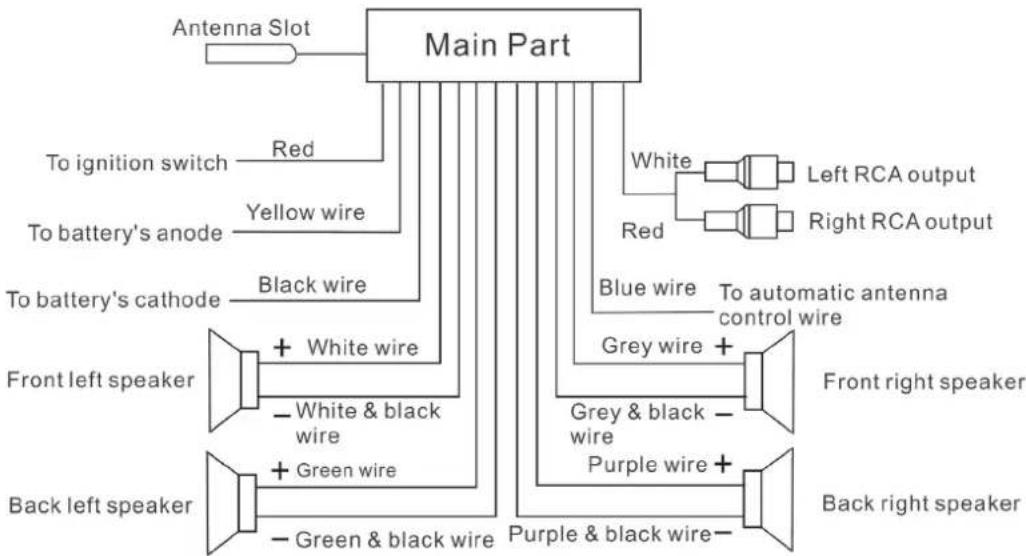
Connections and Wiring
Wiring Diagram
Cautions
The said product is powered by means of a 12VAC accumulator which is grounded via the negative electrode;
- Please connect as per the wiring diagram so as to avoid any device damage;
- Before connection, strip off the insulation layer long as 5mm on both ends of the wires;
- Do not power on until connection is finished;
- Insulate any exposed live part in order to prevent short-circuit with the automobile chassis. Bundle all the wires and cables so as to prevent any terminals making contact with any metal object;
- Important: As for any automobile equipped with computer or satellite navigation system,
Attention when connecting speakers:
- Do not use any grounded speakers;
- The power of the speaker in use must exceed 40W as it is required to accept maximum output power of the amplifier;
- The speaker has resistance ranging between 4~8ohm. Any resistance not covered by such range could affect output power and even damage the speaker or the said product;
- The speaker wires should be approximately 30mm away from the antenna and antenna extension cable; Please follow the diagrams below to connect correctly so as to safeguard either the speaker
- or the said product:
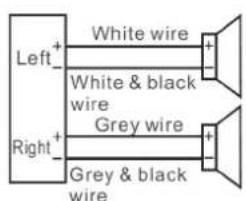
Correct
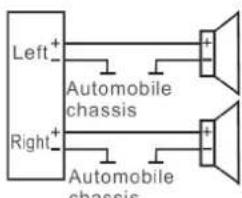
Wrong
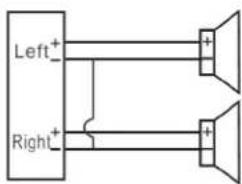
Wrong
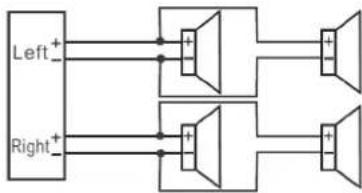
Wrong
BT Operations
Pair with cell phone
First of all, move a cell phone close enough to the said product and then turn on the BT device in such cell phone. Search the said product (code: 0000) for match-up.
Dial via BT
Once connected, press the Mode button to switch to "BTREADY" mode. press to call the last number or directly dial via the numerical keypad on the remote-control (0 9) and then press to call.
Receive calls via BT
Once connected, when there is an incoming call, press on the front panel or on the remote-control to receive such call. To change the call-receiving device, press and hold "2INT" on the front panel to switch among the cell phone and the said product. When conversation is over, press on the front panel or on the remote-control.
Play back music via BT
Once connected, press the Mode button to switch to the Phone mode. Launch a kind of music playback software installed on the cell phone to play music. Under such circumstances, press to select a previous or next track
RDS Operations
AF (Alternative Frequency) function
When the player is turned on for the first time, the system enters RDS (AF) state automatically. To listen to other channels, please turn off RDS (AF) first, and then scan the channels, or else other channels will be unavailable.
In any state, press the SEL button to enter REG OFF state, and then use the VOL knob to select REG ON or REG OFF.
TA (Traffic Announcement) function
In any state, press the SEL button to enter TA OFF state, and then use the VOL knob to select TA ON and play the traffic broadcast automatically.
TA (Traffic Announcement) Volume selection
In any state, press the SEL button to enter TA VOL state, and then use the VOL knob to adjust the TA volume.
EON (Enhanced Other Networks) function
In any state, press the SEL button to enter EON state, and then use the VOL knob to select whether to display the information of other channels.
PTY (Programme Type) function
In any state, press and hold the SEL button to enter part PTY state, and press the SEL button again when the PTY type shows to enter the other PTY state. Then, use the number buttons (1~6) to select the PTY type (note: each number buttons contains three types).
Troubleshooting
| Trouble Cause Solutions | ||
| Unable to turn on The fuse | is broken. Replace the fuse with a new one | having the same specifications. |
| Malfunction The processor | experiences faulty situations due to other reasons. | Shut down and wait for 1 minute before reboot. |
| Press the Reset button for 1~3s. | ||
| No memory The ignition wire and positive power cable are connected incorrectly. | Switch those two wires and then reconnect. | |
| Poor reception The automobile antenna is not pulled out. | Check if the radio automatic control wire, antenna and grounding wire are connected well. | |
| Such antenna is poorly grounded. | ||
| No or weak sound Incorrect | ct connection. Check connection and then rectify. | |
| Place the volume balancer in the middle. | ||
| The speaker is grounded by one end. Connect the speaker to the negative. | ||
The company reserves rights to modify operation instructions and product outer appearance without notification in advance due to continuous product improvement. Illustrations in this manual could differ from the actual product as the printing conditions are restricted.
Any modification not authorized by the company could hinder users from using the said product appropriately.
Environment Concerns

According to the European waste regulation 2002/96/EG this symbol on the product or on its packaging indicates that this product may not be treated as household waste. Instead it should be taken to the appropriate collection point for the recycling of electrical and electronic equipment. by ensuring this product is disposed of correctly, you will help prevent potential negative consequences for the environment and human health, which could otherwise be caused by inappropriate waste handling of this product. For more detailed information about recycling of this product, please contact your local council or your household waste disposal service.
Your product contains batteries covered by the European Directive. 2006/66/EC, which cannot be disposed of with normal household waste. Please check local rules on separate collection of batteries. The correct disposal of batteries helps prevent potentially negative consequences on the environment and human health.
Declaration of Conformity
Manufacturer: CHAL-TEC GmbH, Wallstraße 16, 10179 Berlin.


This product is conform to the following European Directives:
2004/108/EG (EMC)
2011/65/EG (RoHS)
2006/95/EG (LVD)
Chere cliente, cher client,


- Contents
- Technical Data
- Installation Cautions
- General Instructions
- Precaution
- ATTENTION:
- Attention when connecting speakers
- Product Description and Controls
- Front Panel Buttons
- Remote-control Operations
- Basic Operations
- Front Panel Buttons:
- Front panel detaching button (1)
- BT Mic (2)
- Band switch/Automatic station locking/Answer the phone (3)
- Previous track/rewind station selector (4)
- Display (5)
- Power button/Volume knob/Tone selector/RDS function control/8 color illumination (6)
- Next track/station selector (7)
- Function mode/Hang up/PTY button (8)
- USB slot (9)
- AUX-in port (10)
- Remote-control signal receiving window (11)
- SD/MMC slot (13)
- Reset button (14)
- Numerical function buttons:
- 1/
- 2/INT
- 3/RPT
- 4/RDM
- 5/-10
- 6/+10
- Installation and Dismantling
- Installation Diagram
- Install the main part.
- Dismantle the main part
- Connections and Wiring
- Wiring Diagram
- Cautions
- Attention when connecting speakers:
- BT Operations
- Pair with cell phone
- Dial via BT
- Receive calls via BT
- Play back music via BT
- RDS Operations
- AF (Alternative Frequency) function
- TA (Traffic Announcement) function
- TA (Traffic Announcement) Volume selection
- EON (Enhanced Other Networks) function
- PTY (Programme Type) function
- Environment Concerns
- Declaration of Conformity
Brand : Auna
Model : MD140BT 10007164
Category : Car radio