
Aspire One AO521 - Laptop ACER - Free user manual and instructions
Find the device manual for free Aspire One AO521 ACER in PDF.
| Product type | Netbook laptop |
| Brand | Acer |
| Model | Aspire One AO521 |
| Dimensions (L x D x H) | 259 x 184 x 25 mm |
| Weight | 1.1 kg |
| Screen | 10.1 inches, resolution 1024x600 |
| Processor | Intel Atom N450 1.66 GHz |
| RAM Memory | 1 GB DDR2 (expandable to 2 GB) |
| Hard drive | 250 GB SATA 5400 rpm |
| Power supply | AC adapter 65 W |
| Battery | 6-cell Li-ion 4400 mAh, battery life up to 8 hours |
| Connectivity | Wi-Fi 802.11b/g/n, Bluetooth 2.1, Ethernet 10/100 |
| Ports | 3 x USB 2.0, 1 x VGA, 1 x RJ-45, combo audio jack, SD/MMC card reader |
| Webcam | Acer Crystal Eye 0.3 megapixel |
| Operating system | Windows 7 Starter (pre-installed) |
| Main functions | Office work, Internet browsing, multimedia playback, communication (webcam, Wi-Fi, Bluetooth) |
| Care and cleaning | Clean with a soft, dry cloth. Avoid solvents. Do not block ventilation slots. |
| Security | Kensington lock slot, battery lock, BIOS password |
| Spare parts and repairability | Battery, AC adapter, hard drive, memory (accessible). Repair by certified technician recommended. |
| General information | Aspire One series, launched in 2010. Detailed manual available in PDF (300 pages). |
Frequently Asked Questions - Aspire One AO521 ACER
User questions about Aspire One AO521 ACER
0 question about this device. Answer the ones you know or ask your own.
Ask a new question about this device
Download the instructions for your Laptop in PDF format for free! Find your manual Aspire One AO521 - ACER and take your electronic device back in hand. On this page are published all the documents necessary for the use of your device. Aspire One AO521 by ACER.
USER MANUAL Aspire One AO521 ACER
© 2010 All Rights Reserved.
Aspire One Series Quick Guide
Original Issue: 11/2010
Aspire One Series Notebook PC
Model number:
Serial number:
Date of purchase:
Place of purchase:
First things first
We would like to thank you for making an Acer notebook your choice for meeting your mobile computing needs.
Your guides
To help you use your Acer notebook, we have designed a set of guides:
First off, the setup poster helps you get started with setting up your computer.
The Aspire One Series Generic User Guide contains useful information applying to all models in the Aspire One product range. It covers basic topics such as Acer's eRecovery Management, using the keyboard, audio, etc. Please understand that due to its nature, the Generic User Guide as well as the AcerSystem User Guide will occasionally refer to functions or features which are only contained in certain models, but not necessarily in the model you have purchased. Such instances are marked in the text with language such as "only for certain models".
The Quick Guide introduces you to the basic features and functions of your new computer. For more on how your computer can help you to be more productive, please refer to the AcerSystem User Guide, which contains detailed information on such subjects as system utilities, data recovery, expansion options and troubleshooting. In addition it contains warranty information and the general regulations and safety notices for your notebook. It is available in Portable Document Format (PDF) and comes preloaded on your notebook. Follow these steps to access it:
1 Click on Start > All Programs > AcerSystem.
2 Click on AcerSystem User Guide.

Note: Viewing the file requires Adobe Reader. If Adobe Reader is not installed on your computer, clicking on AcerSystem User Guide will run the Adobe Reader setup program first. Follow the instructions on the screen to complete the installation. For instructions on how to use Adobe Reader, access the Help and Support menu.
Your Acer notebook tour
After setting up your computer as illustrated in the setup poster, let us show you around your new Acer notebook.
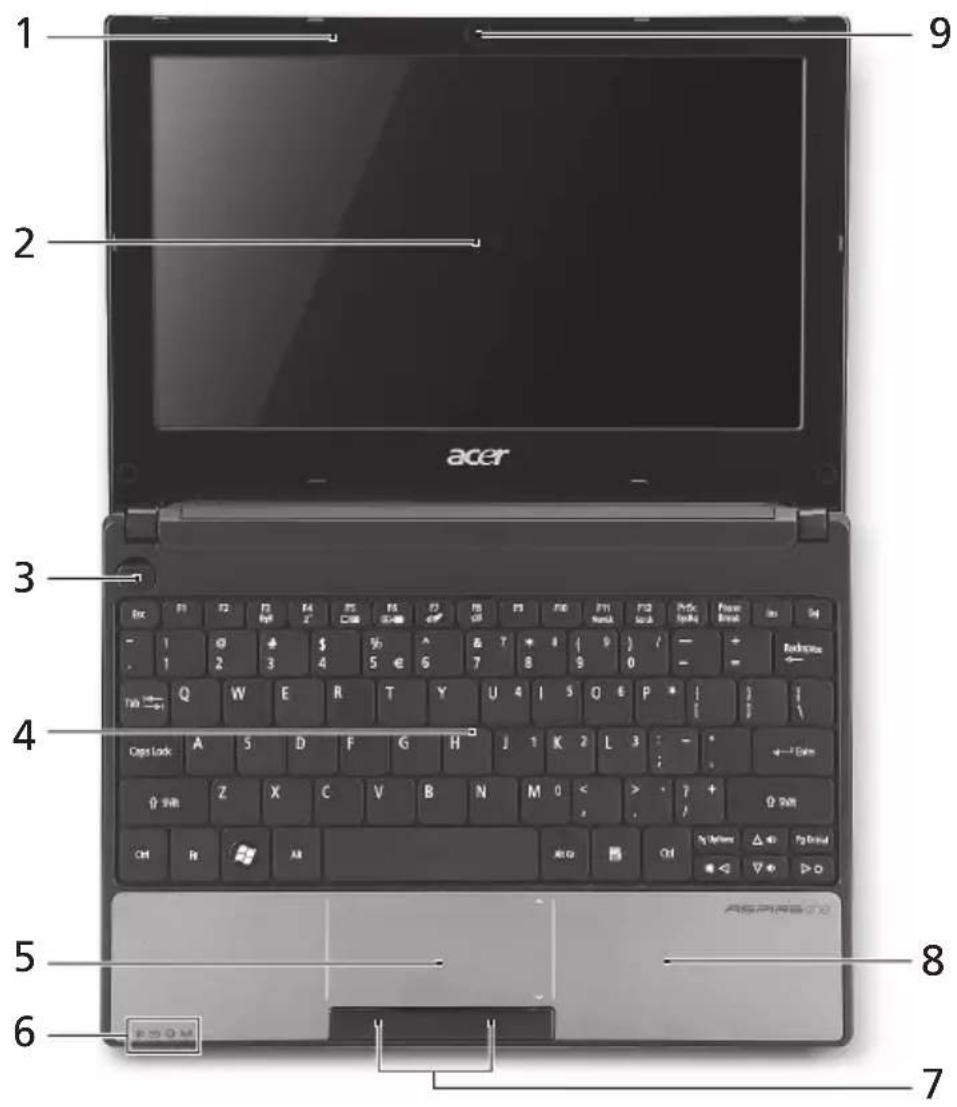
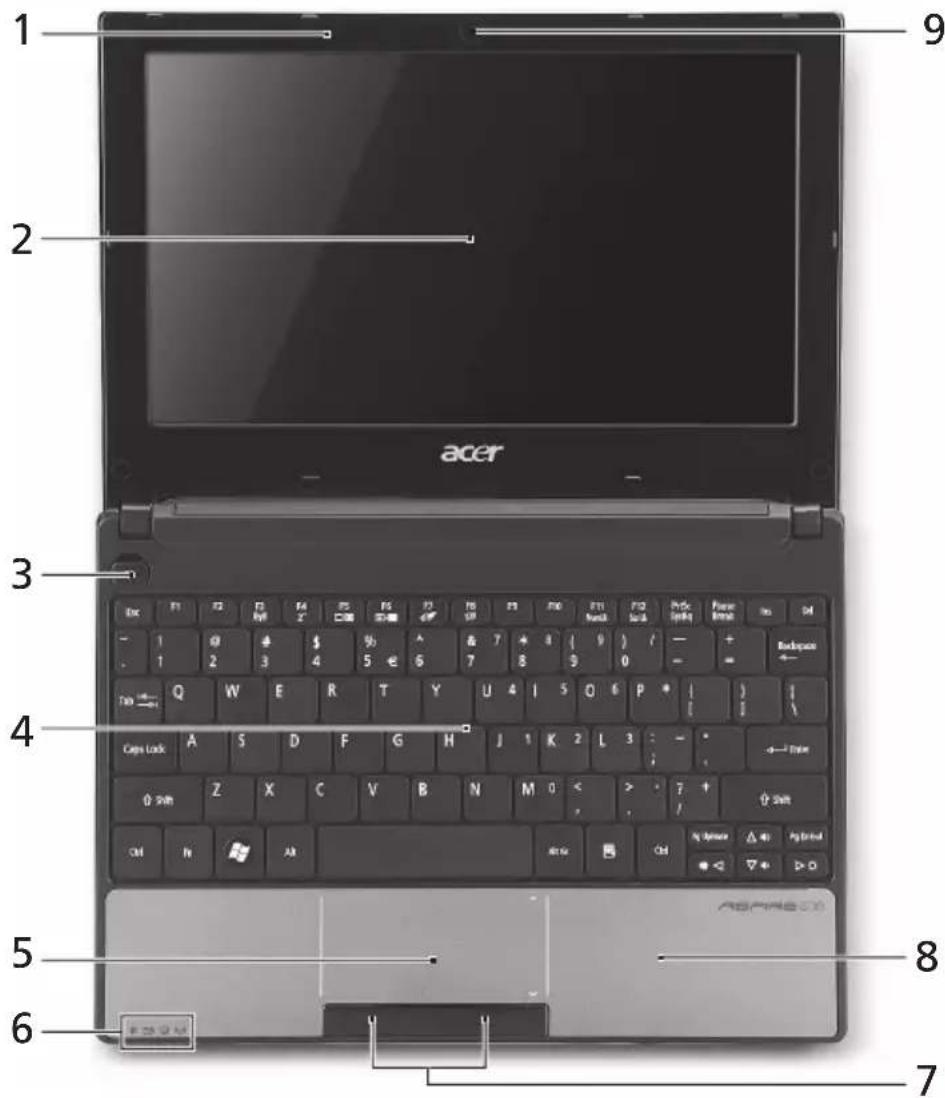
Top view
# Icon Item Description
1 Microphone Internal microphone for sound recording.
2 Display screen Also called Liquid-Crystal Display (LCD), displays computer output (configuration may vary by model).
3 Power button Turns the computer on and off.
| # | Icon | Item | Description |
| 4 | Keyboard For entering data into your computer. | ||
| 5 | Touchpad Touch-sensitive pointing device which functions like a computer mouse. | ||
| 6 | Status indicators1 | Light-Emitting Diodes (LED) that light up to show the status of the computer's functions and components. | |
| 7 | Click buttons (left and right) | The left and right buttons function like the left and right mouse buttons. | |
| 8 | Palmrest Comfortable support area for your hands when you use the computer. | ||
| 9 | Acer Crystal Eye webcam | Web camera for video communication (configuration may vary by model). | |
- The front panel indicators are visible even when the computer cover is closed.
Hotkeys
The computer employs hotkeys or key combinations to access most of the computer's controls like screen brightness and volume output.
To activate hotkeys, press and hold the <Fn> key before pressing the other key in the hotkey combination.
| Hotkey Icon Function Description | ||
| +Fn> + <F3> Communication key | Enables/disables the computer's communication devices. (Communication devices may vary by configuration.) | |
| +Fn> + <F4> Z^2 Sleep | Puts the computer in Sleep mode. | |
| +Fn> + <F5> Display toggle | Switches display output between the display screen, external monitor (if connected) and both. | |
| +Fn> + <F6> Screen blank | Turns the display screen backlight off to save power. Press any key to return. | |
| +Fn> + <F7> Touchpad toggle | Turns the internal touchpad on and off. | |
| +Fn> + <F8> Speaker toggle | Turns the speakers on and off. | |
| +Fn> + <F11> | Num Lock | When Num Lock is on, the embedded keypad is in numeric mode. The keys function as a calculator (complete with the arithmetic operators +, -, *, and /). Use this mode when you need to do a lot of numeric data entry. A better solution would be to connect an external keypad. |
| +Fn> + <F11> only for certain models. | ||
| +Fn> + <F12> | Scroll Lock | When Scroll Lock is on, the screen moves one line up or down when you press the up or down arrow keys respectively. Scroll Lock does not work with some applications. |
| +Fn> + <P | Brightness up Increases the screen brightness. | |
| +Fn> + <R | Brightness down | Decreases the screen brightness. |
| +Fn> + <A | Volume up Increases the sound volume (only for certain models). | |
| +Fn> + <V | Volume down Decreases the sound volume (only for certain models). | |
Using the communication key*
Here you can enable and disable the various wireless connectivity devices on your computer.
Press <Fn> + <F3> to bring up the Launch Manager window panel.
A red toggle indicates the device is off. Click On to enable wireless/Bluetooth connection. Click Off to disable connection.

- Communication devices may vary by model.
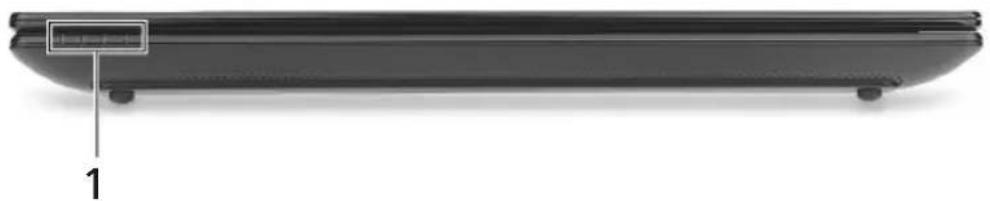
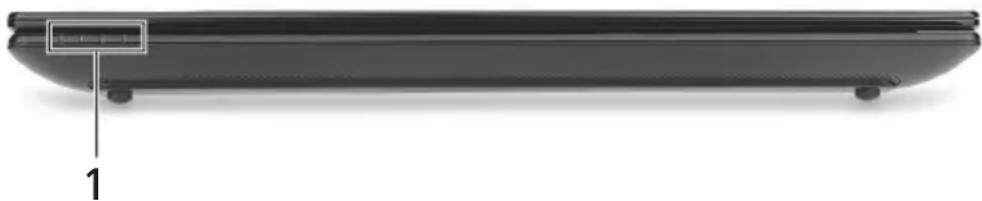
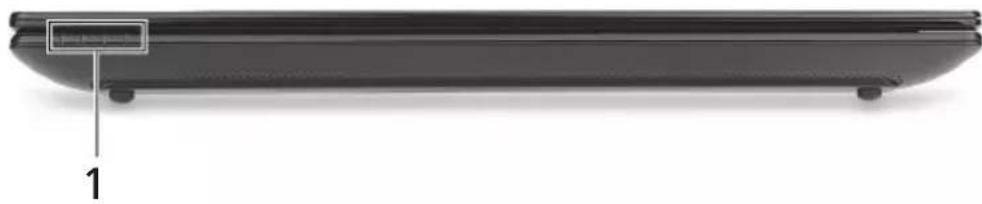
Closed front view
# Icon Item Description
1 Power indicator Indicates the computer's power status.


Battery indicator Indicates the computer's battery status.
- Charging: The light shows amber when the battery is charging.
- Fully charged: The light shows blue when in AC mode.

HDD indicator Indicates when the hard disk drive is active.

Communication indicator
Indicates the status of 3G/Wireless LAN communication
| Blue light on Orange light on Not It | ||
| 3G on / Wi-Fi on | 3G off / Wi-Fi on | 3G off / Wi-Fi off |
| 3G on / Wi-Fi off | ||
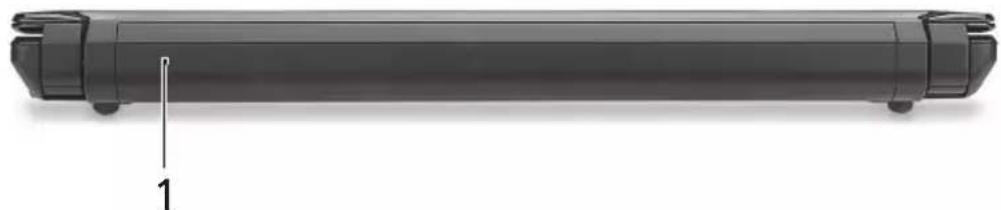
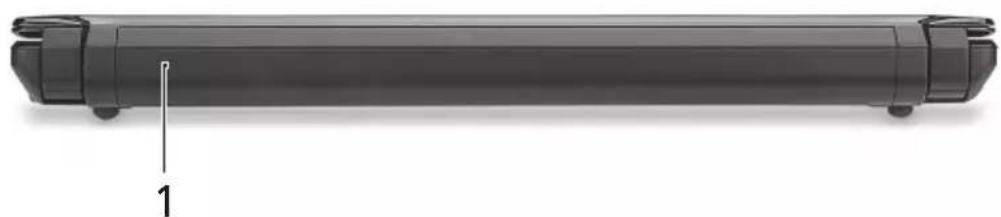
Rear view
#Item Description
1 Battery bay Houses the computer's battery pack.

Note: Your computer may be equipped with a different battery to the one in the picture.
Left view

# Icon Item Description
1 DC in jack Connects to an AC adapter.
2 External displa
(VGA) port
Connects to a display device (e.g.,
external monitor, LCD projector).
3 USB ports Connect to USB devices (e.g., USB mouse,
USB camera).
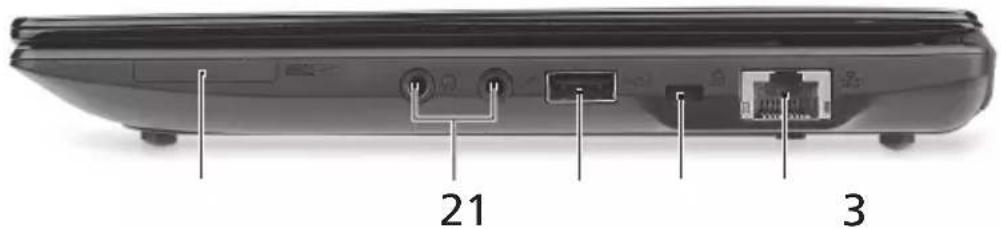
Right view

21
3
# Icon Item Description
| 1 | 2-in-1 card reader | Accepts Secure Digital (SD) and MultiMediaCard (MMC). Note: Push to remove/install the card. Only one card can operate at any given time. |
2 Headphone/speaker/ Connects to audio line-out devices (e.g., speakers, headphones). line-out jack
| 3 | Microphone-in jack Accepts inputs from external microphones. | |
| USB port | Connects to USB devices (e.g., USB mouse, USB camera). | |
4 Kensington lock slot Connects to a Kensington-compatible computer security lock.
5 Ethernet (RJ-45) port Connects to an Ethernet 10/100 based network.
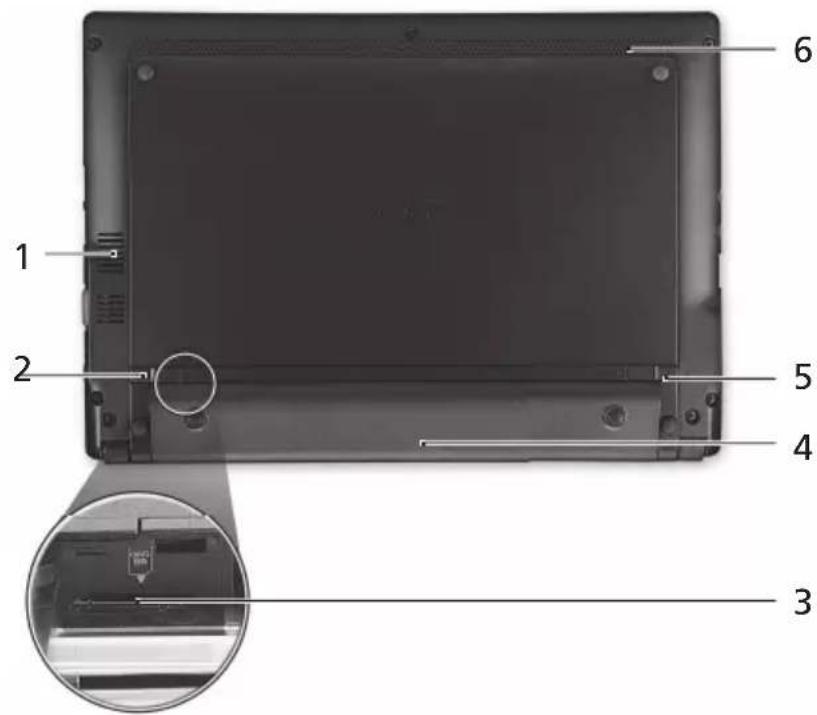
Base view
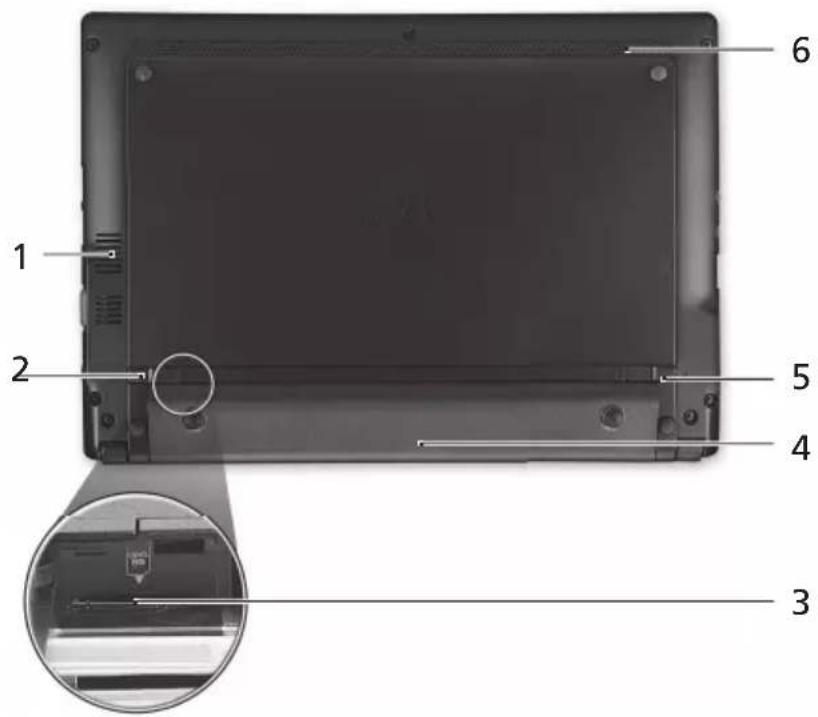
# Icon Item Description
1 Ventilation slots and cooling fan
Enable the computer to stay cool, even after prolonged use. Note: Do not cover or obstruct the opening of the fan.
2 Battery release latch Releases the battery for removal.

3 3G SIM card slot Accepts a 3G SIM card for 3G connectivity (only for certain models).
4 Battery bay Houses the computer's battery pack.
5 Battery lock Locks the battery in position.
6 Speaker Emits audio from your computer.
Environment
Temperature:
-
Operating: 5^ C to 35^ C
Non-operating: -20 °C to 65 °C -
Humidity (non-condensing):
-
Operating: 20% to 80% .
Non-operating: 20% to 80%
Gammu Aspire One
Guide rapide
Tryk pã
Aspire One-serial -barbar PC-dator
Modellnummer:
Seriennummer:
Inkopsdatum:
Inkopsstalle:
Valkommen!
© 2010 Bce npaba coxpanHebl.
KpaTkoe pyKOBOCTBO HOyT6yKOB cepu Aspire One
IepBbI BbInyck: 11/2010
IopTaHbHkOMNbTeP cepn Aspire One
HormepMoJeI:
CepnHbI Homep:
Даразпокурки:
MecTo nokyn:
Bhauane O rnaBHOM
БларпьмВасTo,чToДЯpeшеняСBOUXMOBnIbHbIX BbluNCJIteIbHbIX 3aauBbIbIbpaNNHoyT6yKAcer.
Baши руковскиеВа
Mbl pa3pa6oTaII pI dy pyKOBoIDCTB, KOToPbIe NOMOryT Bam B INCNoJIb3OBaHIn HOyT6yka Acer:
Ipejde Bcero, nJaKaT IJn HaunHaoux... nomOKeT Bam no3HaKOMtbcra C Tem, KaK HAcTpaNBaTb KOMNbIOTeP.
TnnoBoe pykoBODCTBO noIb3ObaTeIa dny cepu Aspire One coJeprKIT
IIOJIe3HyU INHOpMauH, IPIMHeHmYU KO BCEM MoJenM cepn Aspire One.
B HEM ONICbIBaHOTc OCHOBHeI TeMbI, TaKne KaK pa6oTa C KJIaBnATypoN, 3BykOM N T.D. IOnKaIyIcTa, ImeIte B BVNy, YTO TInOBoe pyKOBoCTBO nonb3OBaTeN yNOMaHyToe HIXe AcerSystem User Guide RaJIaHTcO 6Ob6UeHHbIMN, IO3TOMy B HNX INHOra 6byT ONICbIBaTbcRA cyHKuIN nIN CBOIcTBa, peALIN3OBaHHbIe He B KUYIIeHHoB BamM MoJeN, a NlMb B ONpeDeEHHbIX MoJeNx 3ToN cepNN. B Taknx CnyaX B TEKCTe IMeETc NometKa "TOnbKO dJa ONpeDeEHbIX MoJeN".
KpaTkoe pyKOBOCTBO BnDE 3HaKOMNT BAC C OCHOHbIMN XapaKTepNCTKaMNI ΦyHKUIMN BAWeO HOBOrO KOMNbIOTepa. YTo6bl y3HaTB 60JIbWe O TOM, KaK NOBbICNTb IPOyKTINBHOCTb BAWeJ pa60tBI C NOMOUsIO KOMNbIOTepa, Bbl MOKeTe O6paTNTCBK AcerSystem User Guide. 3TO pyKOBOCTBO COePxNT NOpO6HyO INΦopMaUIO O CSCTEmhBIX ΦyHKUAX, BOCCTaHOBNeHIn DaHHbIX, BO3MOXHOCTX PaCUnpeHnI N UcTpaHeHn HEnCnpABHOCTeK. KpOME TOrO, OHO COePxNT rapaHTnHyIO INΦopMaUIO, a TAKKe O6uIe NpeDnucHnI N ppaBnla 6e3OnaCHoCTn Prn pa60Te C BAuIM HoY6yKom. PyKOBOCTBO NoCTabNJaETcR BMeCTe C KOMNbIOTepom, PpeDbapntelbHo 3arpyKeHoe B Hero BΦopMaTe PDF. 7To6bl O6paTNTCBK K Hemy, Bam HaDo CDeNaT CneDyUoue:
1 ⅢeJIKNHTe KHOIIKy

yck > Bce nporpaMMbl > AcerSystem.
2 ΜεηκηνιTe AcerSystem User Guide.

PpmeHne: InI npocMToP faiHa Heo6xOIMO yCTaHOBtB nporpaMy Adobe Acrobat Reader. Ecn nporpamMa Adobe Acrobat Reader He yCTaHOBHeHa Ha BaWe McMbTepe, UeJyOK MbIbIO no AcerSystem User Guide 3anyctnt cnpBa YCTaHOBky nporpamBi Acrobat Reader. CNeyuIte INHCTpyKzmaH Ma 3kpaHe, YTObI 3aBepWITb PPOceCC yCTaHOBKn. 3a INHCTpyKzmaH O TOM, KAK NOpb3OBAtCB nporpAMMo Adobe Acrobat Reader, o6paTInTecb KMHeIO CnpabKa nnoDepkka.
3HaKOMCTBO C HoyT6ykom Acer
Tenepb, KOrda Bbl BbINHnHn HacToPKn, KaK Noka3aHO Ha nkaKe NO yCTaHOBKe, daBaIte No6nXe No3HaKOMMcC BaUIM HOBbIM HOY6yKom Acer.
Budcbepxy

3HaOK 3JeMeHT OnncaHne
3decb MoXHO BKNIOUaTb N OTKNOUaTb pa3NNUHbIe MOyIN 6ecnpoBODHO CB83N, yCTaHOBJIeHHbIe B KOMNbIOTepe.
*Tnbl MoDyIe CBA3N 3aBNCrT OT KOHpyaun CNCTembl.
BnD cpeeni c 3aKpbToi KpbIshko
3HaOK 3IeMeHT OnncaHne
BnaXhoCT (6e3 KOHdeH3aun):
Pa6oTHa:OT20%do80%
3a cbxpanHeH: OTo 20%do 80%
Aspire One seeria
Luhijuhend
| 1 | Havalandırma delikleri ve soğutma fani | Bilgisayarın;zın uzun kullanımlar sonrasi bile,isinmasınsı eighth. bile isinması seventh. eighth. eighth. eighth. eighth. eighth. eighth. eighth. eighth. eighth. eighth. eighth. eighth. eighth. eighth. eighth. eighth. eighth. eighth. eighth. eighth. eighth. eighth. eighth. eighth. eighth. eighth. eighth. eighth. eighth. eighth. eighth. eighth. eighth. eighth. eighth. eighth. eighth. eighth. eighth. eighth. eighth. eighth. eighth. eighth. eighth. eighth. eighth. eighth. eighth. eighth.第八. eighth.第八.第八.第八.第八.第八.第八.第八.第八.第八.第八.第八.第八.第八.第八.第八.第八.第八.第八.第八.第八.第八.第八.第八.第八.第八.第八.第八.第八.第八.第八.第八.第八.第八.第八.第八.第八.第八.第八.第八.第八.第八.第八.第八.第八.第八.第八.第八.第八.第八.第八.8 |
| 2 | Pil Türkiye mandalı | Eskiyen pilleri Türkiye eighth. eighth. eighth.第八.第八.第八.第八.第八.第八.第八.第八.第八.第八.第八.第八.第八.第八.第八.第八.第八.第八.第八.第八.第八.第八.第八.第八.第八.第八.第八.第八.第八.第八.第八.第八.第八.第八.第八.第八.第八.第八.第八.第八.第八.第八.第八.第八.第八.第八.第八.第八.8 |
© 2010 All Rights Reserved.
© 2010 All Rights Reserved.
Aspire One 1
崔允博:11/2010
Aspire One 1
MOJIeI:
- 一元一次不等式组的解法:
| # | Ahaikan | Hangok Seelmy | ||
| 3 | 截至目前,韩语版的完结日期为2019.10.27。 | |||
| 4 | Kufo | 韩语版上一页链接不能被使用。 | ||
| 5 | Turi Park | 韩语版上一页链接不能被使用。 | ||
| 6 | 상품회원1 | 韩语版上的链接不能被使用。 | ||
| 7 | 수름다乗수들(원복일이어드) | 원복과 오는 출구의 채류는 쿬우스의 쿰목고 펙 trunk만 썸고 썸고 썸고 썸고 썸고 썸고 썸고 썸고 썸고 썸고 썸고 썸고 썸고 썸고 썸고 썸고 썸고 썸고 썸고 썸고 썸고 썸고 썸고 썸고 썸고 썸ious 썸ious 썸ious 썸ious 썸ious 썸ious 썸ious 썸ious 썸ious 썸ious 썸ious 썸ious 썸ious 썸ious 썸ious 썸ious 썸ious 썸ious 썸ious 썸ious 썸ious 썸ious 썸ious 썸ious 썸ious 썸iosis 썸iosis 썸iosis 썸iosis 썸iosis 썸iosis 썸iosis 썸iosis 썸iosis 썸iosis 썸iosis 썸iosis 썸iosis 썸iosis 썸iosis 썸iosis 썸iosis 썸iosis 썸iosis 썸iosis 썸iosis 썸iosis 썸iosis 썸iosis 썸iosis 썸ious 썸ious 썸ious 썸ious 썸ious 썸ious 썸ious 썸ious 썸ious 썸ious 썸ious 썸ious 썸ious 썸ious 썸ious 썸ious 썸ious 썸ious 썸ious 썸ious 썸ious 썸ious 썸ious 썸ious 썸ous http://www.kingpost.com/ | 韩语版上的链接不能被使用。 | |
| 8 | 수복曝光图像 | 韩语版上的链接不能被使用。 | ||
| 9 | Acer Crystal Eye 원복 | http://www.kingpost.com/ | http://www.kingpost.com/ | |
- 1.
邯羅如其
Aspire One 1uus uunnnnnaaennnnae nue uuuu uuuuauuuaa aee AcerSystem User Guide 1uauuauuuuuuuuuuuuuuuuuuuuuuuuuuuuuuuuuuuuuuuuuuuuuuuuuuuuuuuuuuuuuuuuuuuuuuuuuuuuuuuuuuuuuuuuuuuuuuuuuuuuuuuuuuuuuuuuuuuuuuuuuuuuuuuuuuuuuuuuuuuuuuuuuuuuuuuuuuuuuuuuuuuuuuuuuuuuuuuuuuuuuUU
nnaa aannnnnnaanennnnnnaanennnnnnnnnnnnnnnnnnnnnnnnnnnnnnnnnnnnnnnnnnnnnnnnnnnnnnnnnnnnnnnnnnnnnnnnnnnnnnnnnnnnnnnnnnnnnnnnnnnnnnnnnnnnnnnnnnnnnnnnnnnnnnnnnnn nn nannnannnannnannnannnannnannnannnannnannnannnannnannnannnannnannnannnannnannnannnannnannnannnannnannnannnannnannnannnannnannnannnannnannnannnannnannnannnannnannnannnannnannnannnannnannnannnannnannnannnannnnnnnnnnnnnnnnnnnnnnnnnnnnnnnnnnnn
1 Start > All Programs > AcerSystem
2 n a AcerSystem User Guide

Nnna: nnnnna Adobe Reader Wai ngw wunwnlwrnne Adobe Reader Iunnawnna nnnnnae AcerSystem User Guide nnnuuunnuuauo Adobe Reader uuuu uuuuuuuuuuuuuuuuuuuuuuuuuuuuuuuuuuuuuuuuuuuuuuuuuuuuuuuuuuuuuuuuuuuuuuuuuuuuuuuuuuuuuuuuuuuuuuuuuuuuuuuuuuuuuuuuuuuuuuuuuuuuuuuuuuuuuuuuuuuuuuuuuuuuuuuuuuuuuuuuuuuuuuuuuuuuuuuuuuuuuuuuuuuuuuuuuuuuuuuuuuuuUU
Bz n nn Acer qnn
Acer lnnaa
JNJJHJH
| # | laon | laon | laon |
| 1 | laon | laon | laon |
| 2 | laon | laon | laon |
| # | ### | ### | ### |
| 3 | |||
| 4 | |||
| 5 | |||
| 6 | Light-Emitting Diode (LED) | ||
| 7 | |||
| 8 | |||
| 9 | |||
| Acer Crystal Eye |
1.
JW
WwW7Jy0000000000000000000000000000000000000000000000000000000000000000
| ### | ### | ### | ### |
| +Fn> + <F3> | (###) | ### | ### |
| +Fn> + <F4> | Z2 | Sleep | ### |
| +Fn> + <F5> | □□ | ### | ### |
| +Fn> + <F6> | # | ### | ### |
| +Fn> + <F7> | # | ### | ### |
| +Fn> + <F8> | # | ### | ### |
nFn> +
aannnnnnaanennnnnnnnnnnnnnnnnnnnnnnnnnnnnnnnnnnnnnnnnnnnnnnnnnnnnnnnnnnnnnnnnnnnnnnnnnnnnnnnnnnnnnnnnnnnnnnnnnnnnnnnnnnnnnnnnnnnnnnnnnnn

aunnnnnaanannnnnnaanennnnnnnnnnnnnnnnnnnnnnnnnnnnnnnnnnnnnnnnnnnnnnnnnnnnnnnnnnnnnnnnnnnnnnnnnnnnnnnnnnnnnnnnnnnnnnnnnnnnnnnnnnnnnnnnnn
1
| # | ### | ### | ### |
| 1 | ### | ### | |
| ### | ### | ### | |
| ### | ### | ### | |
| ### | ### | ### | |
| ### | ### | ### | |
| ### | ### | ### |
J 9
1

HNNN: HNNNHNNNNNNNNNNNNNNNNNNNNNNNNN
2

| # | ### | ### | ### |
| 1 | ### DC-in | ### AC | |
| 2 | W### (VGA) | ### LCD | |
| 3 | W### USB | ### USB |
2
| # | ### | ### | ### |
| 1 | ### | 2-in-1 | Secure Digital (SD) ### MultiMediaCard (MMC). ### |
| ### | |||
| 2 | ### | ### | ### |
| ### | ### | ||
| 3 | ### | USB | USB |
| 4 | ### | Kensington | Kensington |
| 5 | ### | Ethernet (RJ-45) | Ethernet 10/100 |
2
| # | laan | laan | laan |
| 1 | |||
| 2 | |||
| 3 | |||
| 4 | |||
| 5 | |||
| 6 |
2
a
5C 35C
-20°C 65°C
nnaa (naaunnnnnnnnnnnn)
20% 80%
南西区 75% 80%