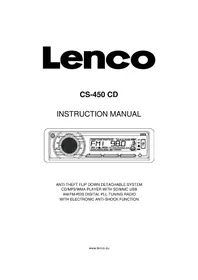
CS450BT - Car stereo LENCO - Free user manual and instructions
Find the device manual for free CS450BT LENCO in PDF.


| Product type | Car radio |
| Brand | Lenco |
| Model | CS450BT |
| Chassis dimensions (W x H x D) | 178 x 50 x 165 mm |
| Power supply | 12 V DC, 10 A fuse |
| Output power | 4 x 25 W (max.) |
| Number of channels | 2 stereo |
| FM frequency range | 87.5 - 108 MHz |
| AM frequency range | 522 - 1620 kHz |
| FM sensitivity | 3 µV (usable) |
| AM sensitivity | 40 dB (usable) |
| Line output (RCA) | 1 pair, max. 1200 mV |
| Playable formats | CD, CD-R, CD-RW, MP3, WMA |
| Compatible media | CD, SD/MMC, USB, AUX (3.5 mm input) |
| RDS functions | TA, AF, PTY, PI, EON |
| Detachable front panel | Yes, with protection case |
| Display | LCD with clock display, RDS, etc. |
| Signal-to-noise ratio | 50 dB (1 kHz) |
| Power consumption | 10 A max. |
| Included accessories | Metal mounting sleeve, removal keys, protection case |
Frequently Asked Questions - CS450BT LENCO
User questions about CS450BT LENCO
0 question about this device. Answer the ones you know or ask your own.
Ask a new question about this device
Download the instructions for your Car stereo in PDF format for free! Find your manual CS450BT - LENCO and take your electronic device back in hand. On this page are published all the documents necessary for the use of your device. CS450BT by LENCO.
USER MANUAL CS450BT LENCO
-
If the car interior is extremely hot, as after being parked in the sun, do not use the player until the car has been driven for a while to cool off the interior.
-
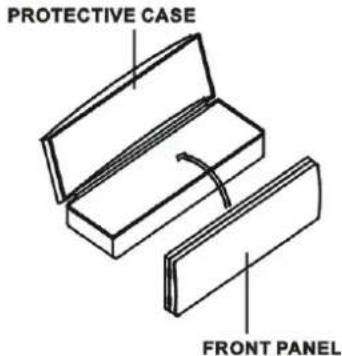
The protective case is to safely keep the front panel.
-
The unit is designed for negative terminal of the battery which is connected to the vehicle metal. Please confirm it before installation.
-
Do not allow the speaker wires to be shorted together when the unit is switched on. Otherwise
it may overload or burn out the power amplifier.
- Do not install the detachable panel before connecting the wire.
WIRES CONNECTION
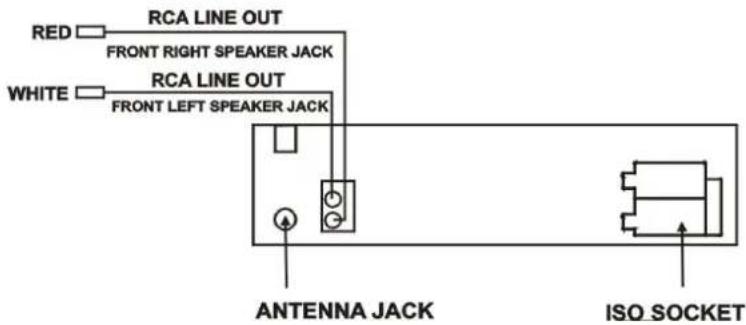
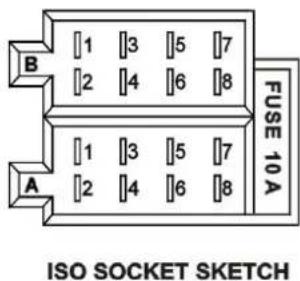
CONNECTOR A
1.
2.
3.
-
Memory +12V
-
Auto Antenna Output
6.
-
12V (To Ignition Key)
-
GROUND
CONNECTOR B
-
Rear Right Speaker (+)
-
Rear Right Speaker (-)
-
Front Right Speaker (+)
-
Front Right Speaker (-)
-
Front Left Speaker (+)
-
Front Left Speaker (-)
-
Rear Left Speaker (+)
-
Rear Left Speaker (-)
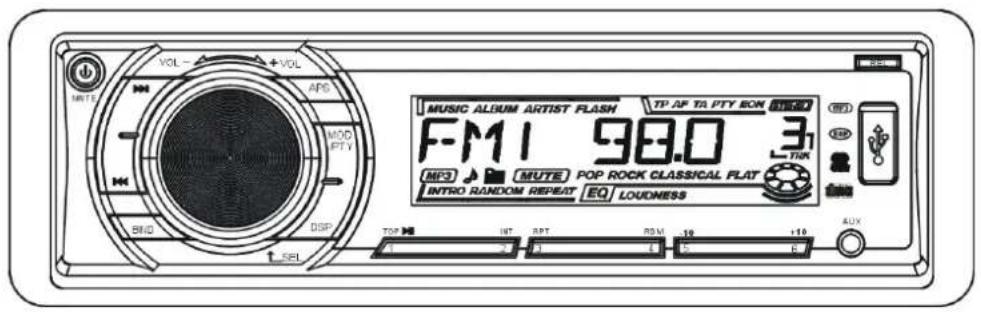
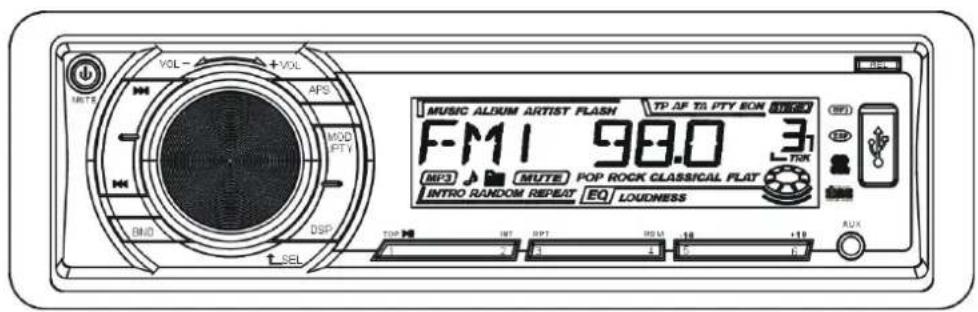
LOCATION AND FUNCTION OF CONTROLS
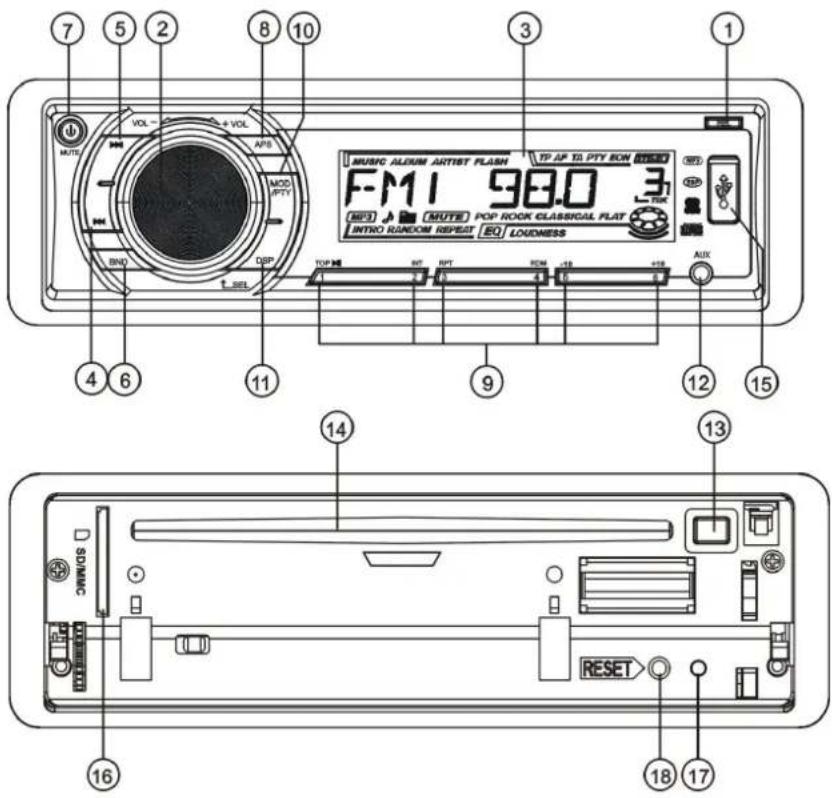
1. REL BUTTON
Press the REL button to fold down the front control panel.
Then a disc can be inserted into the disc slot or ejected by pressing the EJ button.
After flipping down the front panel, push it leftwards, then pull the right side of the panel outwards to remove it from the unit chassis.
2. SEL BUTTON (Select) AND VOL KNOB
A) Press the SEL button briefly, it is activated as selecting each mode of E. VOL.
-> VOLUME ->BASS ->TREBLE -> BALANCE -> FADER ->
When selecting a desired audio mode, rotate the VOL knob to adjust the audio effect.
In each mode, the waiting time is about 5 seconds, and the time waiting time is over, it returns to the last display mode of tuner or CDP mode.
The control mode of E.VOL is operated with following numeric display.
- VOL: (MIN)00, 01,.....46, 47(MAX).
- BASS/TRE: -07, -06,...,00,...+06,+07
- BAL: 0LR9, 1LR9, ..., 9LR9,..., 9LR1, 9LR0
- FAD: 0FR9,1FR9, ..., 9FR9,..., 9FR1, 9FR0
B) When pressed longer 2 seconds, it is activated as cyclical mode of following functions for user's selection.
->TA (ON/OFF) ->AF (ON/OFF) ->TA (ALARM/SEEK) ->PI (SOUND/MUTE) ->RETURN (LONG/SHORT) ->MASK(DPI/ALL) ->BEEP (ON/OFF) ->USER SET
(FLAT/CLASSIC/ROCK/POP)->VOL(LAST/DEFA) ->MONO/STEREO(only for FM mode) ->LOUD(ON/OFF)->LOCAL/DX(only for FM mode)->CLK(ON/OFF) ->CLK(12/24)mode.
After selecting the desired mode, rotate the VOL knob to select one setup item of the desired mode.
1) TA ON/OFF
When TA mode is on(TA is displayed on LCD), it will begin to seek TA station and TA SEEK will be displayed on LCD for a while.
When traffic announcement is transmitted:
a) If the unit is in SD, USB or disc mode, it will switch to radio mode temporarily.
b) Temporarily switch over to an EON linked station when EON detects a traffic announcement on that other program, and TP will be displayed on LCD.
c) If volume level is below 20, volume level is raised to 20, and returns to its previous mode and volume level when the traffic announcement is over.
If volume is adjusted during traffic announcement, only the traffic announcement volume is valid.
* TA interruption function:
The current traffic announcement is cancelled by pressing this key. But the TA mode will not be off.
* When TA is on, SEEK, (SCAN), AUTO MEMORY function can be received or saved only when traffic program identification code has been received.
When TA is ON, traffic program identification code is not received during specified time.
2) AF (ON/OFF)
When AF switching mode is selected and the state of AF switching mode is displayed by AF segment in display.
Segment off: AF switching mode off.
Segment on: AF switching mode on, and has RDS information.
Segment flashing: AF switching mode on, but RDS information is not received yet.
When AF switching mode is selected, the radio checks the signal strength of AF all the time. The interval of checking time of each AFs depends on the signal strength of current station, from a few minute for strong station to a few seconds for weak station. Every time that new AF is stronger than current station, it switches
over to that frequency for very short time, and NEW FREQUENCY is displayed for 1-2 second. Because the mute time of AF switching or checking time is very short, it is almost inaudible in case of normal program.
During FM mode, when AF is on, SEEK, (SCAN), AUTO-MEMORY function can only receive and save RDS program.
3) TA SEEK/TA ALARM:
TA SEEK mode: when newly tuned station does not receive TP information for 5 seconds, the radio retunes to next station which has a different PI to the last station, but has the TP information.
When TP information gets lost at the current station for retune time which is set by RETUNE SHORT(90 seconds) or RETUNE LONG(150 seconds), the radio starts to retune to next same PI station. When same PI station does not receive in 1 cyclic search, the radio retunes to next station with TP information.
TA ALARM mode: when this mode is selected, any automatic retune mode is not activated. Only double beep sound(ALARM) will be heard.
When newly tuned station does not have TP information for 5 seconds, beeps are sounded.
When TP information gets lost at the current station for return time, the beep sound will be heard.
When newly tuned station has no RDS signal, PI SEEK is suppressed.
4) PI SOUND/ PI MUTE:
PI SOUND mode: if a car cruises between buildings that could cause reflecting signals, a phenomenon may occur, due to different PI codes being received from the same AF source. when different PI sounds (DIP) are heard occasionally, this will happen for less than 1 second.
PI MUTE mode: under above same situation, a mute sound will be heard for less than 1 second.
5) RETURN L / RETURN S:
The initial time of automatic TA search or PI SEARCH mode is selected.
When PI information is not received for retune interval, the radio starts to retune to next same PI station.
When same PI station does not receive 1 cyclic search, the radio goes to last station and waits for 4-5 minutes until PI code is received.
RETURN L mode: selected as 150 seconds.
RETURN S mode: selected as 90 seconds.
MASK DPI mode: masks only the AF which has different PI.
MASK ALL mode: masks the AF which has different PI and NO RDS signal with high field strength.
7) BEEP ON/BEEP OFF
BEEP ON mode: The beep is generated when any key is pressed.
BEEP OFF mode: The beep sound is disabled..
8)VOL LAST/VOL DEFA
VOL LAST: The radio switches on at the actual volume it had when it was last switched off.
VOL DEFA: After pressing SEL button, AVOL will be displayed. Then you can pre-select a constant switch-on volume by using the VOL knob.
9) CLK ON/OFF
CLK ON: Clock will always show on the display when power off.
CLK OFF: Clock will disappear on the display when power off.
- LCD Display
4&5. TUNE, SEEK, TRACK, SKIP UP / DOWN BUTTONS
a) During RADIO mode:
Press the >>| or |<< button shortly to manual tune up/down for the desired radio station frequency step by step.
Press and hold the >>| or |<< button for longer 0.5 seconds, to automatically tune up/down for the radio station frequency of strong signal.
b) During disc, SD/MMC, USB playback mode:
Press the >>| button briefly to play next track.
Press the |<< button briefly to play the current track from the beginning of it if the playing time is more than 2 seconds.
Press the |<< button briefly to play the previous track if the playing time is less than 2 seconds.
Press the >>| or |<< button and hold to skip forwards or backwards, release to resume normal playback.
6. BAND BUTTON
During radio mode, press the BND button briefly to select the radio broadcasting band you would like to hear. The AM/FM band is toggled cyclically through the tuning bands:
->FM 1->FM 2->FM 3->MW 1->MW 2->.
7. POWER ON/OFF, MUTE BUTTON
When the unit is power off, the unit comes to ON by pressing any button on the front panel (except the OPEN key). It also can turn on the unit to insert a disc, SD/MMC card or USB stick into their slots or socket. When the unit is power on, press and hold the power button, the unit goes into power off mode.
This button serves to switch the MUTED state on/off.
Press this button to suppress the loudspeaker temporarily, and press again to resume listening. The muted state will be also released when the MODE, SEL button is pressed and VOL knob on the front panel is used.
8. APS BUTTON (Auto-storage /Preset scan)
During radio mode:
1) when long pressing for more than 1 second, the radio searches from the current frequency and checks the signal strength level until 6 station are found. And then the 6 stations frequency are preset to the corresponding preset memory numbered bank. The auto-storage operation is implemented in the each selected band.
When the auto-storage operation is finished, the radio execute the Preset Scan.
2) when short pressing, the radio searches for each preset station in the current band and holds at that preset number for 5 seconds with releasing mute, and then search again.
In disc mode, MMC/SD or USB mode, press APS button repeatedly to select TRACK SEARCH, DIRECTORY SEARCH or FIRST CHARACTER SEARCH mode.
In TRACK SEARCH mode, the LCD will display TRK T 000 and flash the biggest digit0 that the MMC/SD card, USB or MP3 disc contain. Rotate the knob to select the number of the flashing digit from 0 \~ 9. Then press SEL button to confirm the number and flash next smaller digit 0. With the same means, select the number of the flashing digit. After finishing selecting the number of all flashing digit, press SEL button to play the track of the selected serial number.
In DIRECTORY SEARCH mode, the LCD will display the root folder(if there is not the root folder, it will find a root folder named ROOT). Then rotate the knob to select your desired folder, Finally press SEL button to play the first track of the folder.
In FIRST CHARACTER SEARCH mode, the LCD will display A- rotate the knob to select file's first character by the order of A\~Z and 0\~9. Then press >>| or |<< button to select one file its first characters is the selected one. Finally press SEL button to play the selected file.
9. PRESET STATION MEMORY AND TOP/>||, INT, RPT, RDM BUTTONS
a) During radio mode:
Go to any preset station by pressing one of the 6 preset station buttons (1-6).
If one of these buttons is pressed for more than 2 seconds, the station currently being listened to will be memorized into the selected preset button.
b) During disc, SD or USB mode:
1) Press the TOP/ >|| button briefly to interrupt the playback of the disc, SD/MMC or USB.
Press again to resume normal playback of the disc, SD/MMC or USB.
Press the TOP/>|| button and hold for approximately 0.5 seconds to play the first track of the disc, SD/MMC or USB.
2) Press the INT button to sample the first 10 seconds part of each track, and the INT ON will be visible on the LCD display.
In the process of INT, press INT button again to stop sampling and to continue playing the current track, and the LCD will display INT OFF.
3) Press the RPT button once to play the current track repeatedly, and the RPT ONE will be visible on the LCD display.
During MP3 disc, SD/MMC or USB mode, press the RPT button twice continuously to play the current folder repeatedly, and the RPT DIR will be visible on the LCD display. In the process of RPT, press RPT button again to stop playing repeatedly mode and the LCD will display RPT OFF.
4) Press the RDM button to play all tracks on disc in random order, and the RDM ON will be visible on the LCD display.
In the process of RDM, press RDM button again to stop playing in random order and the LCD will display RDM OFF.
5) During the normal playback of MP3 disc, SD/MMC, USB:
Press the radio preset button 6 and 5 to move up and down10 tracks at a time.
Press and hold the +10/-10 to select the next or previous folder to be play.
10. MODE AND PTY (PROGRAM TYPE) BUTTON
Press the MODE/PTY button to change among tuner (radio), disc (when a disc is loaded), SD/MMC card (when an SD/MMC card is inserted), USB (when an USB stick is inserted) and AUX mode.
In Radio mode, Press MODE/PTY button longer to select one of the following mode:
POP M--NEWS
While selecting PTY TYPE, its selection is implemented by preset buttons as described in preset key. (press one of the 6 preset buttons shortly and repeatedly to select the PTY TYPE in the preset button) When POP M or NEWS is on, the previous PTY program and PTY word is displayed on LCD.
If there are no keys entered for 2 seconds, previously selected PTY is searched. During 1 loop, if desired PTY is not found, NO PTY is flashed, then return to previous normal radioand PTY icon goes off.
11. DISP BUTTON
Press the DISP button briefly to display time for 5 seconds on the display, and then returns to its previous display unless the button is pressed again.
Press the DISPbutton longer more than 1 second until the clock time flashes, then rotate the VOL knob to adjust time.
12. AUX INPUT JACK
Press the mode button to select auxiliary input playing mode. Then you can connect any matched external audio device to this socket. Use the volume knob to adjust volume.
13. EJECT KEY
In the power on state, the loaded disc can be ejected by pressing the EJ key.
14. CD SLOT
15. USB SOCKET
When needing to play the file in the USB stick, open the plastic cover cap and insert the USB stick into the socket. It will switch to the USB mode automatically, and then play the first file in the USB. When no need to use USB socket, please cover the plastic cover cap.
16. SD/MMC CARD SLOT
When you need to play the file in the SD/MMC card, insert the SD/MMC card into the card slot. It will change into the SD/MMC mode automatically, and then play the first file in the SD/MMC.
Note:
When SD/MMC card and USB stick are both inserted into their slot or socket, the system will change into the USB mode automatically.
17. FLASHING LED
When the front control panel is removed this indicator flashes.
18. RESET BUTTON
Before operating the unit for the first time, or after replacing the car battery or changing the connections. You must reset the unit.
Press this button with a cuspidal object. This operation will erase the clock setting and some stored contents.
CARE FOR USING CD'S:
About CD-R/CD-R/W discs:
In addition to commercially-recorded audio CD's, this unit can play CD-R and CD-R/W discs.
In come cases, particularly when recorded on older CD burners, some CD-R and CD-R/W discs may not play. Also, whenever you are recording a CD for playback in this receiver, it is recommended that you record at 24x or slower speed for CD-R and 4x or slower for CD-R/W to achieve higher signal quality and better playback performance.
- To keep the disc clean:
Do not attach any sticker or adhesive tape on the disc.
Handle the disc by its edge to keep the disc clean and do not touch the surface.
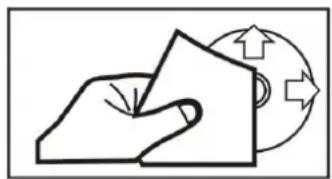
Before playing a disc, wipe it off with a clean, dust-free cleaning cloth.
Wipe the disc outwards from the disc center.
-
When one has already been inserted. Doing so may damage the unit. Insert a disc with labeled surface up, or it will damage the unit.
-
Do not expose the disc to direct sunlight or nearby heat sources such as heating vents, caliduct which can cause the disc to warp.
Do not leave disc in a car if it is parked in direct sunlight as that will lead to a considerable rise in the temperature inside the car.
-
Do not use any secondhand or rented disc, usually, there is glue on the surface of those discs, it will stop the unit working and damage it.
-
Always store the disc in its case for protection. Scratched up discs will produce poor sound performance and cause CD player to skip.
-
In raining day or wet area, the moisture may form on the disc or the optical parts, the playback may not be possible. If moisture forms on the disc, wipe it off with a soft cloth.
If moisture forms on the optical parts of the unit, allow the unit to sit for about one hour with power on..
- Do not use solvents such as benzine or thinners. Commercially available cleaners or anti-static spray will damage the unit.
natural_image
Simple line drawing of a hand holding a sheet of paper with a circular arrow symbol (no text or labels)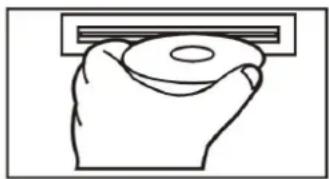
natural_image
Line drawing of a hand holding a circular object with a rectangular object above it (no text or symbols)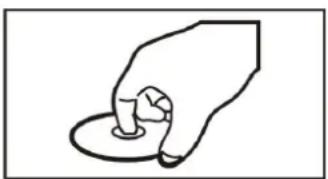
natural_image
Simple line drawing of a hand holding a small object (no text or symbols)TROUBLE SHOOTING
Before using the check list please make all the connections first.
If you still have questions after going through the checklist, please consult your local customer service representative.
| Common Symptoms | Cause | Solution |
| There is no power. | The car ignition is switched off. | If the power supply is properly connected to the car accessory, switch the ignition key to "ON" or "ACC". |
| The fuse has blown. | Replace another fuse according to the wiring diagram. | |
| The CDs cannot be loaded. | Presence of CD disc inside the player | Remove the disc in the player then put a new upward |
| The CDs are loaded only halfway into the CD tray. | The transport screws have not been removed. | Remove the transport screws before using. |
| The device does not work correctly (EJECT, LOAD, PLAY) | Inserting the disc in upside down | Insert the compact disc with the label facing upward |
| The surface of CD is extremely dirty or it is damaged. | Clean the CD or try another CD, if this works correctly, the first CD is properly damaged. | |
| Temperature inside the car is too high. | Cool off until the ambient temperature returns to normal | |
| There is no sound. | The volume control is set too low. | Turn up the volume properly. |
| The device has not been correctly connected. | Check the power and earth connection according to the wiring diagram. | |
| The operation keys do not work | 1.The built-in microcomputer is not operating properly due to noise2.Front panel is not properly fix into its place | 1. Switch the device off and on again. Or press the RESET button to resume the program.2. Reinstall the front panel |
| The sound of the CD player skips | The installation angle is more than 30 degrees | Adjust the installation angle to less than 30 degrees |
| The surface of the road is uneven. | Wait until the road becomes smoother before playing the CD. | |
| The surface of CD is extremely dirty or it is damaged. | Clean the CD or try another CD, if this works correctly, the first CD is properly damaged. | |
| No radio reception. | The antenna cable is not connected. | Insert the antenna cable firmly into the antenna socket of the device. |
| In automatic search mode the radio does not stop at a transmitting station. | The transmission signals are too weak. | Tune in to a radio station manually. |
INSTALLATION METHOD
This is an anti-theft installation method.
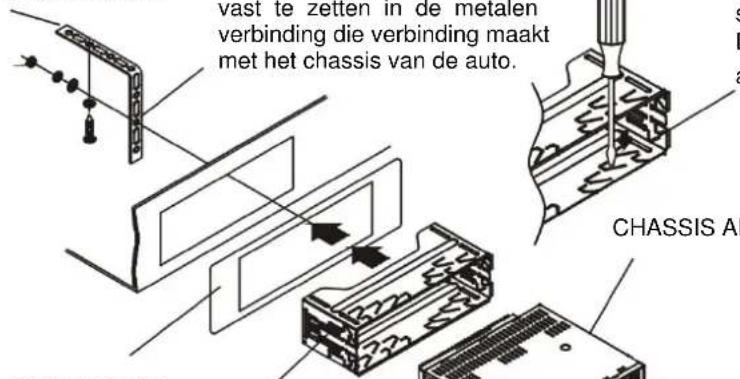
The main unit wears a METAL MOUNTING SLEEVE.
Please connect the wiring, eg, the Power Supply, the Speakers and the Antenna according to the requirements of this Instruction Manual, then install the metal mounting sleeve into the car as per the diagram illustrated below.
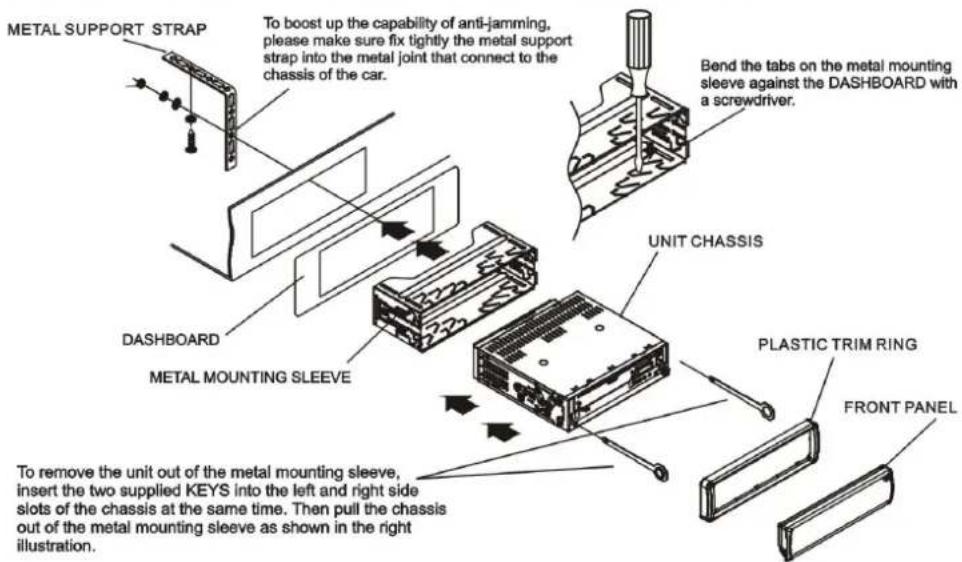
NOTE
Before mounting and operating the CD player, remove the metal mounting sleeve illustrated by the arrows.
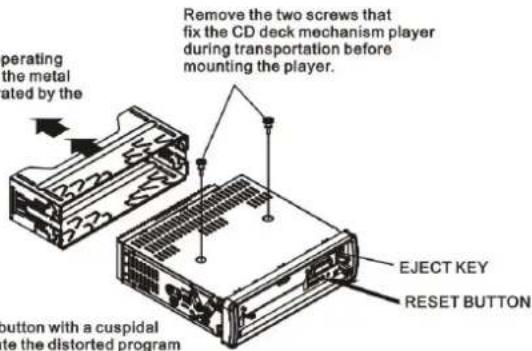
Push this reset button with a cuspidal object to renovate the distorted program once the program is distorted.
SPECIFICATION
GENERAL
Power requirement.....DC 12V.
Current consumption....10A MAX.
POWER OUTPUT.... 25W X 4.
Number of channels....2 STEREO.
Chassis dimensions....178[W] X 50[H] X 165[D].
FM SECTION
Frequency range....87.5MHz -108MHz
Usable sensitivity....3uV.
I.F Frequency....10.7MHz.
AM SECTION
Frequency range....522KHz - 1620KHz
I.F Frequency....450KHz
Usable Sensitivity....40dB
LINE - OUT
Output...... MAX 1200mv
CD/SD or USB PLAYBACK
System....MP3 audio system.
Usable disc.....CD/CD-R/CD-RW/MP3/WMA
Frequency characteristics....20-100Hz ≤ 5dB
10-20KHz ≤ 5dB.
Signal to noise ....50dB [1KHz]
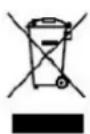
If at any time in the future you should need to dispose of this product please note that: Waste electrical products should not be disposed of with household waste. Please recycle where facilities exist. Check with your local authority or retailer for recycling advice. (Waste Electrical and Electronic Equipment Directive)
Lenco
CS-450CD
BEDIENUNGSANLEITUNG
10. MODE UND PTY (PROGRAMMART)
MANUEL D'INSTRUCTION
SYSTÈME ANTIVOL RABATTABLE DÉTACHABLE
LECTEUR CD/MP3/WMA AVEC SD/MMC ET USB
RADIO RÉGLAGE PLL DIGITAL AM/FM-RDS
AVEC FONCTION ANTICHOC ELECTRONIQUE
PRÉCAUTIONS ET ENTRETIEN
(FLAT/CLASSIC/ROCK/POP)->VOL(LAST/DEFA) ->MONO/STEREO(only for FM mode) ->LOUD(ON/OFF)->LOCAL/DX(only for FMmode)->CLK(ON/OFF) ->CLK(12/24)mode.
natural_image
Simple line drawing of a folded paper or sheet with a circular arrow symbol (no text or labels)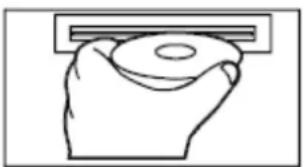
natural_image
Line drawing of a hand holding a circular object with a rectangular frame above it (no text or symbols)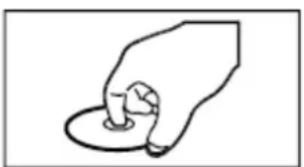
natural_image
Simple line drawing of a hand holding a circular object (no text or symbols)RÉSOLUTION DES PROBLÈMES
natural_image
Technical illustration of two electronic device enclosures with wiring and connectors (no text or symbols)TOUCHE EJECT
BOUTON DE RÉINITIALISATION
CARACTÉRISTIQUES
GÉNÉRALITÉS
Tension d'alimentation....DC 12V.
-> VOLUME ->BASS ->TREBLE -> BALANCE -> FADER ->
Bend the tabs on the metal mounting sleeve against the DASHBOARD with a screwdriver.
VERMOGEN....25W X 4.
Aantal kanalen....2 STEREO.
Afmetingen chassis....178[B] X 50[H] X 165[D].
FM GEDEELTE
Frequentiebereik....87.5MHz -108MHz
AFSPELEN CD/SD of USB
Systeem....P3 audiosysteem.
Ondersteunde discs....CD/CD-R/CD-RW/MP3/WMA
Frequentie-eigenschappen....20-100Hz 5dB
10-20KHz 5dB
Signaal/ruis....50dB [1KHz]

- WIRES CONNECTION
- CONNECTOR A
- CONNECTOR B
- LOCATION AND FUNCTION OF CONTROLS
- REL BUTTON
- SEL BUTTON (Select) AND VOL KNOB
- 1) TA ON/OFF
- 2) AF (ON/OFF)
- 3) TA SEEK/TA ALARM:
- BAND BUTTON
- POWER ON/OFF, MUTE BUTTON
- APS BUTTON (Auto-storage /Preset scan)
- PRESET STATION MEMORY AND TOP/>||, INT, RPT, RDM BUTTONS
- MODE AND PTY (PROGRAM TYPE) BUTTON
- POP M--NEWS
- DISP BUTTON
- AUX INPUT JACK
- EJECT KEY
- CD SLOT
- USB SOCKET
- SD/MMC CARD SLOT
- FLASHING LED
- RESET BUTTON
- CARE FOR USING CD'S:
- TROUBLE SHOOTING
- INSTALLATION METHOD
- NOTE
- SPECIFICATION
- GENERAL
- FM SECTION
- AM SECTION
- LINE - OUT
- CD/SD or USB PLAYBACK
- Lenco
- BEDIENUNGSANLEITUNG
- MODE UND PTY (PROGRAMMART)
- MANUEL D'INSTRUCTION
- PRÉCAUTIONS ET ENTRETIEN
- RÉSOLUTION DES PROBLÈMES
- CARACTÉRISTIQUES
- GÉNÉRALITÉS
- FM GEDEELTE
- AFSPELEN CD/SD of USB
Brand : LENCO
Model : CS450BT
Category : Car stereo