CS351 - Car radio LENCO - Free user manual and instructions
Find the device manual for free CS351 LENCO in PDF.


| Product Type | Car Radio |
| Brand | Lenco |
| Model | CS351 |
| Power Supply | DC 12 Volts, grounded |
| Chassis Dimensions | 178 (L) x 160 (D) x 50 (H) mm |
| Maximum Output Power | 4 x 40 watts |
| Maximum Current | 15 A |
| Signal-to-Noise Ratio | >55 dB |
| Channel Separation | >50 dB |
| Frequency Response | 40 Hz - 18 kHz |
| Radio Bands | FM1/FM2/FM3/AM |
| Supported Audio Formats | MP3, WMA |
| USB Support | Yes (max 500 folders, 999 files) |
| SD/MMC Card Support | Yes |
| Bluetooth Connectivity | Yes (hands-free, A2DP) |
| Auxiliary Input (AUX) | Yes |
| Detachable Front Panel | Yes |
| RDS Function | Yes (PTY, AF, TA, EON) |
| Equalizer | 5 presets: Bass, Treble, Balance, Fader, Subwoofer |
| Remote Control | Optional (IR sensor) |
| Maintenance | Clean contacts with a cotton swab soaked in isopropyl alcohol |
| Safety Precautions | Installation must not interfere with driving; avoid high temperatures and humidity |
Frequently Asked Questions - CS351 LENCO
User questions about CS351 LENCO
0 question about this device. Answer the ones you know or ask your own.
Ask a new question about this device
Download the instructions for your Car radio in PDF format for free! Find your manual CS351 - LENCO and take your electronic device back in hand. On this page are published all the documents necessary for the use of your device. CS351 by LENCO.
USER MANUAL CS351 LENCO
- English 1200
German 22455 - Duttah 46-67
- FFeanbh- 68-889
- S#pandah 90-1100
OWNER'SSWANNUAL Mobile AudioSystem
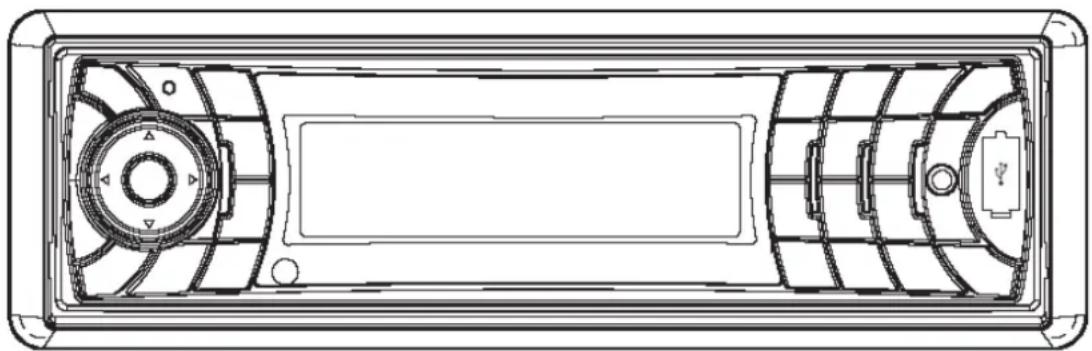
- PRILL SynthesizerStaneoRedico
- Automata Bc MemoryStarlingg
- FRRSS Functional
- USSB & SSOMWCCandblntface
- EBluebodth Hbands-free flunction & A2DA2DFAdvanced (Advanced Audio Distribution Proffle) Stereo Audio TStesssiaioTransmission
- Fddd DownDetachable Detachable
- Auxiliary InputFunction Function
CONTENTS
Installation. 33
DIN Front-Mount (Method A) 3
Installing the unit 3
Removing the unit 4
DIN Rear-Mount
Using the detachable frontpanel.....panel 6. from
Wiring Connection.Connection.........7
ISO connection
Location of keys......of.....8
Basic operation...operation. 9
Switching on/off
Faceplate release
Sound ...adjustment 9
Loudness
Display
Equalization.
Reset function
Mode selection
System setting. 9
Auxiliary input
Radio operation...operation. 10
Selecting the..frequency
Selecting a station
Automatic memory
scanning. 10
Scan
Station storing
RDS (radio
data10 system)
USB play openatly operation. 13
Switching to USB
Selecting .file..43
Pausing playing
Previewing all fil
Repeating the s.
Playing
Selecting
Selecting
Display
directory
tracks
ID3 information
SD/MMC operation....operation 15
IPQDOPERATIONERATION.15 5
Bluetooth operation 16
Preparing
for 7 operation
Pairing 16
Connect
T-menu
theMaking unit
an....outgoin
Transfer
the call between
and the unit
BT reset
.
Bluetooth
audio...18 (A2D
Specification 19
Trouble sthoading 20
Notes:
- Choose the mounting location where the unit will not interfere with the normal driving function of the driver.
- Before finally
the wiring temporarily
all connected
the system work
Use only the parts to ensure proper unauthorized malfunctions.
Consult with installation requires other modifications
Install the unit where driver 's way and passenger if there an emergency stop.
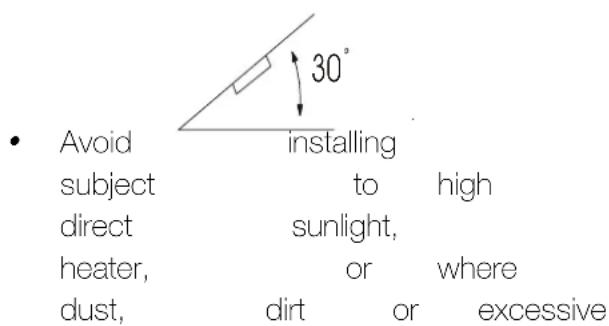
If installation frangel horizontal, the unit optimum performance.
Installation Opening opening if this the unit drilling can be installed saving of the an vehicle opening
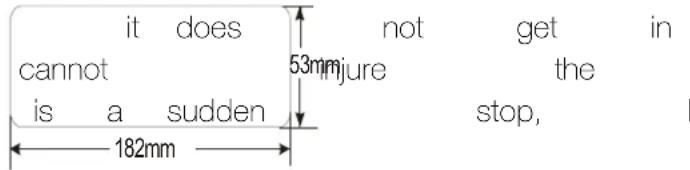
exceeds 30
installing the unit unit not the give its
see sure you test all
then follow these steps
- Make sure the ignitic then d isconnect th e unit vehicle where it would ()
operature Disconnect such as w from hot air, from antenna it would be subject Press libration the release
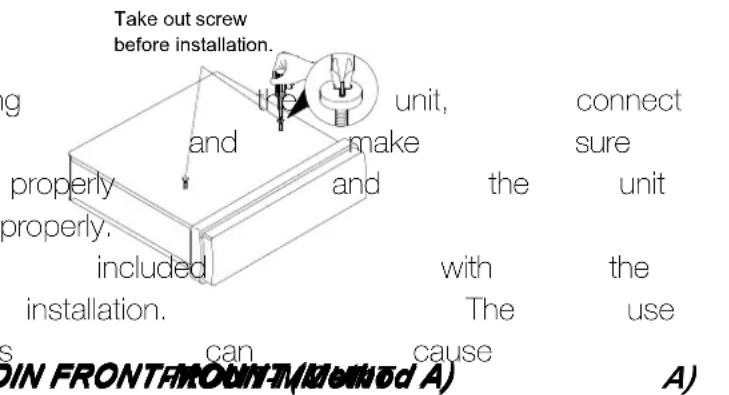
DIN FRONTARONRFIRGARTMOUNT
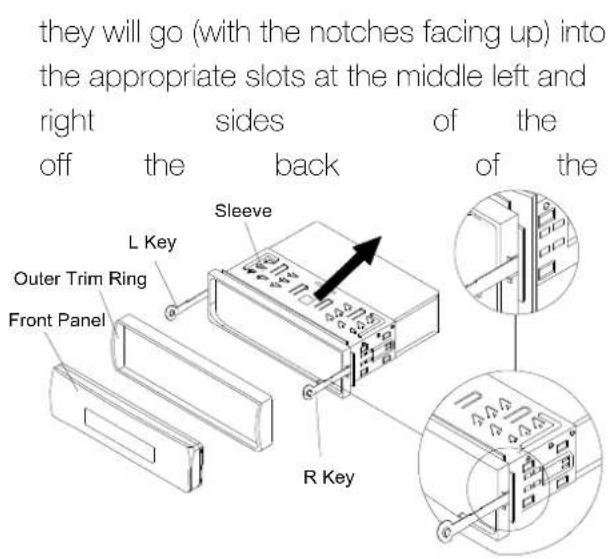
This unit can be propa panel" installed either from "Front (conventional. Lift the topIN of Frthat-mount) or " Rear " (DIN Rear-mount out to remove installation; utilizing threaded 5.screWe twoholes supplied at the of the unit chassis). the For unit details sleeve refer so following illustrated Insert installation the keys methods far
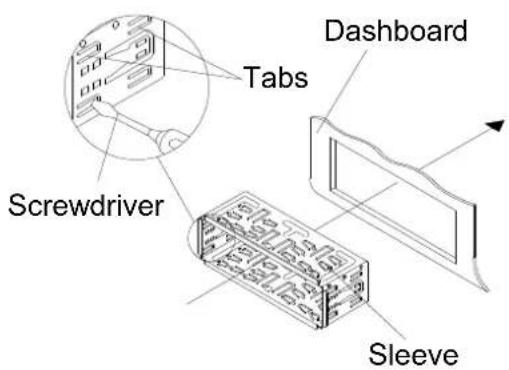
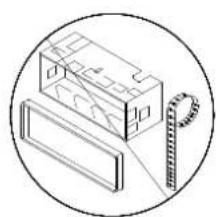
- Mount the sleeve
into the opening
bend open the tabs
sleeve with a screwdriver.
be able to make
which ones will be
open the appropriate
dashboard to secure
- Reconnect the ca battery 's negative the (-) the outer trim ring and panel (see the steps panel " ).
wire harness the and t Careful. Make not sure to pinch ignition ar d isconnect the cable the battery sleeve s negative until it lock
-
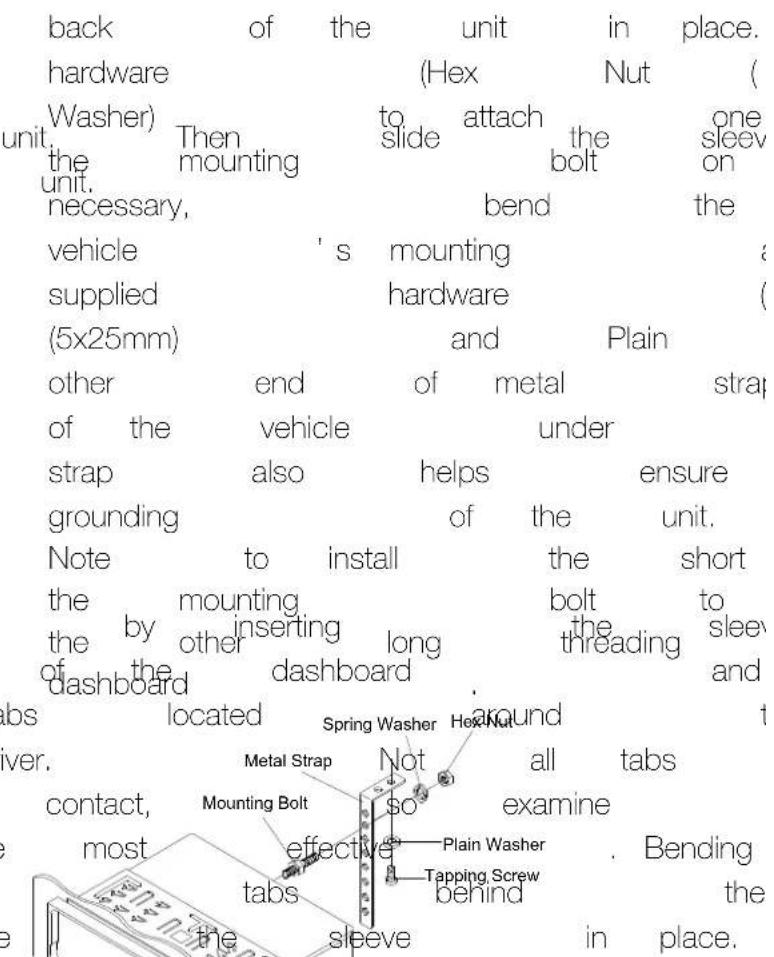
Remove the metal of the unit use attached). supply
-
Press the release panel.
INSTALLATION
-
Lift the top of the outer trim ring then pull it out to remove it.
-
Insert both of slots at the middle unit, then pull the
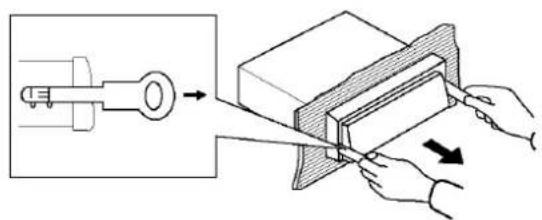
To fasten the unit to the brackets.
Align supplied the screw keys holes into screw and holes right on sides the unit sreews out 5x5mne dashboard.on Note: the outer trim ring strap are not used for
DIN REAR-NRSEURITIDettnbB)
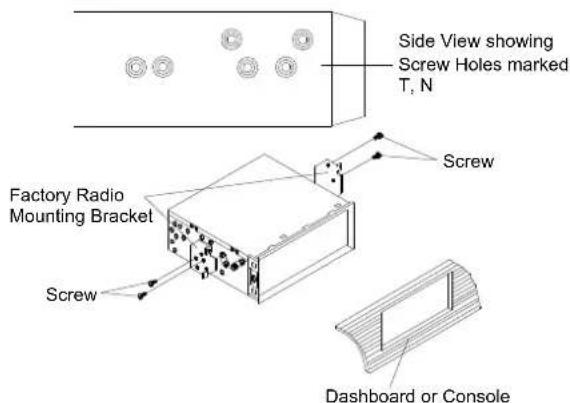
If your vehicle is a Nissan, Toyota, follow
mou n ting instructions.
Use the screw holes marked T (Toyota)
(Nissan) located on both sides of the un
fasten the unit to the factory radio mounting
brackets supplied with your vehicle.
To Detach ttleFrcnttPanell
- Press the release ( ) button, then the front panel will be folded down.
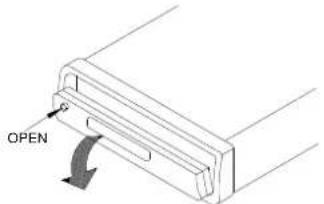
- To remove
the front
little
angle
from
first
pull
out
the
out the left
side.
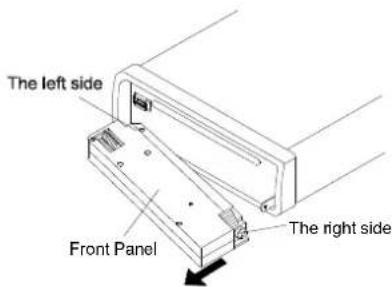
- For
safekeeping,
the
supplied
after being removed.
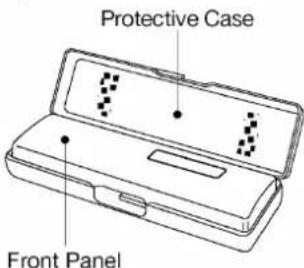
protective
安装
3.
Do
case
touch
the front panel immediately
panel
or on
the
ain
result in
poorelectrical
conta
- If any
dirt
adhered
on
the
contac
removed
with
a
clean
- Do
not
expose
the
temperatures
or
dir
anywhere.
panel Keon
first
ins
the
- Keep position
ther
any
insert
phage,
m = 311
thinner,
touching
the
- Do
not
attempt
panel.
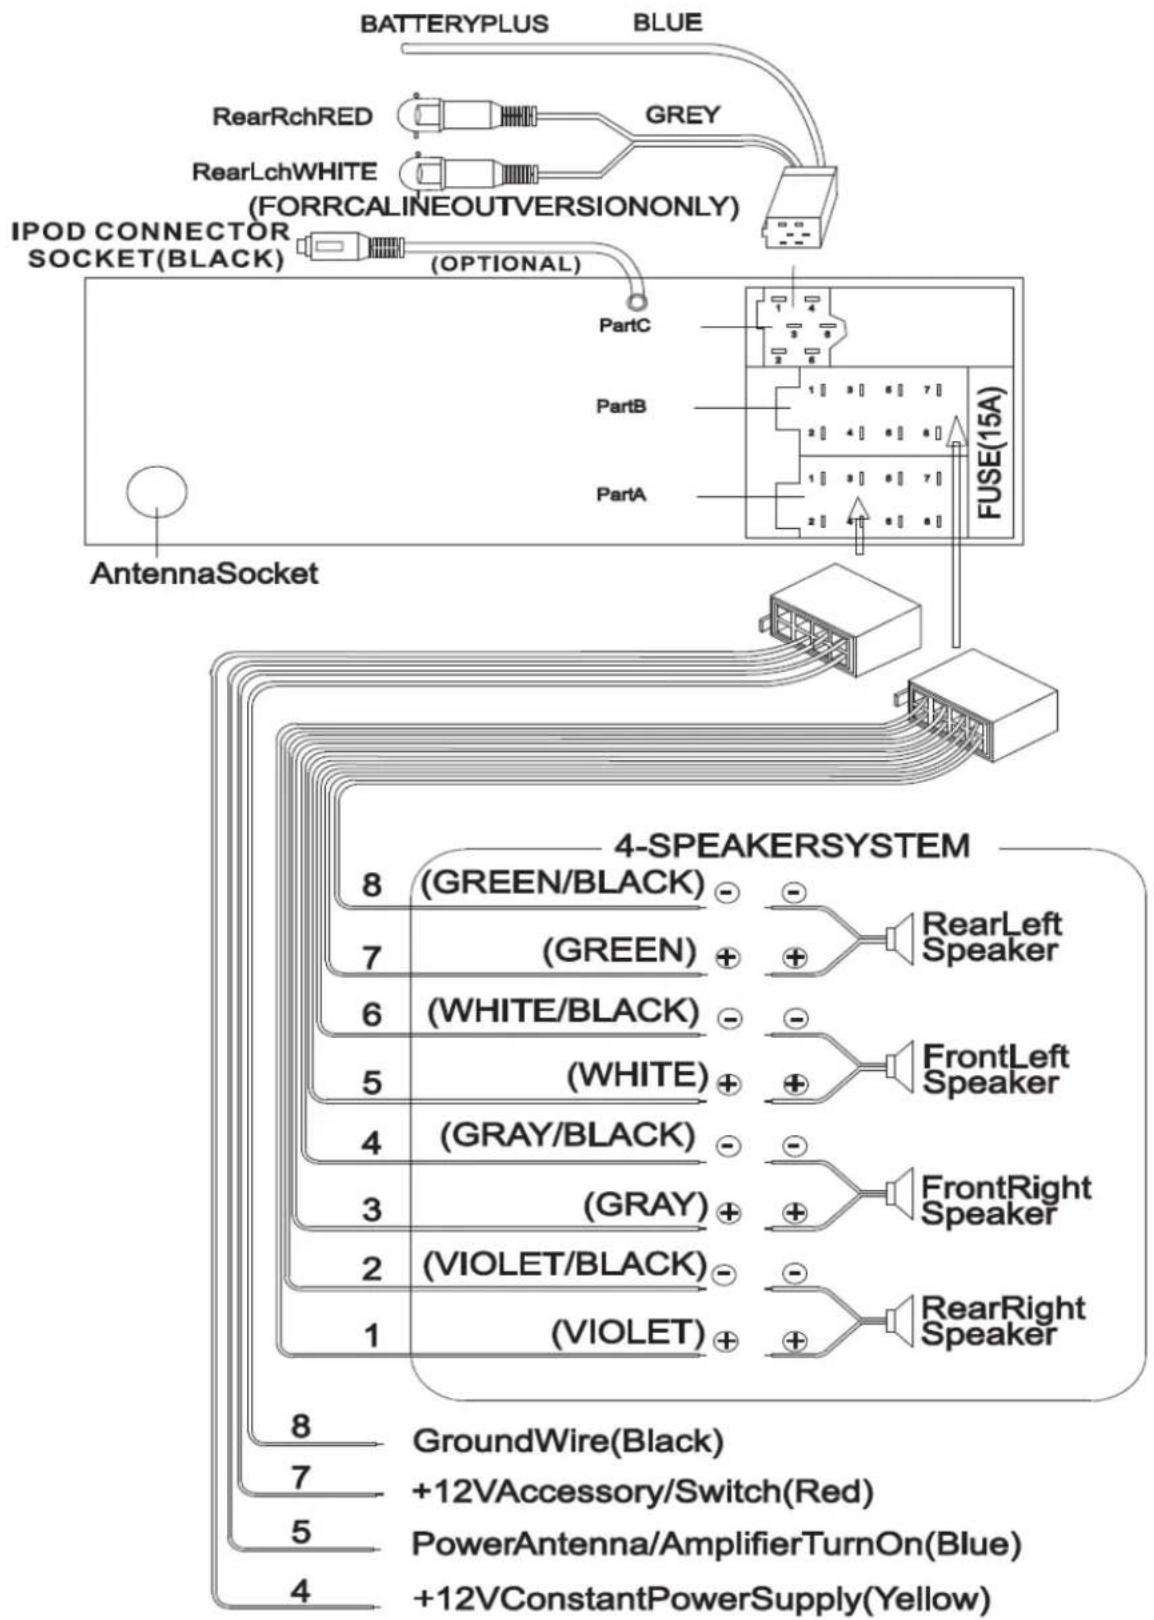
ISO CONNECTION
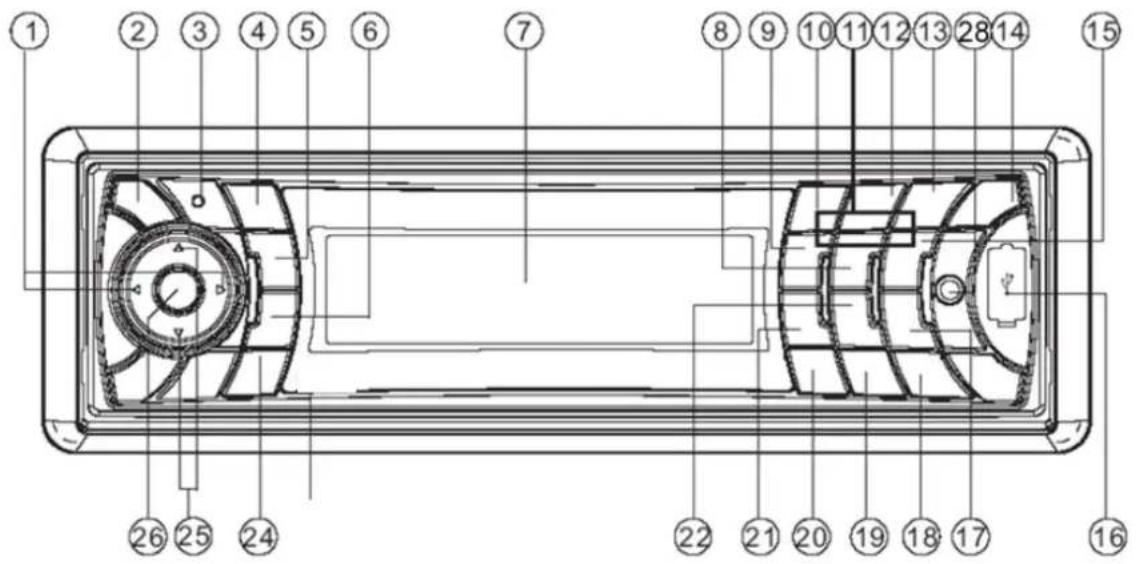
LOCATION DFFKEYS

-
(tune/seek/track down/up buttons)
-
6 DIR+
-
USB interface
-
release button
17.9 PTY 18. SCAN/RE-CON
- Mic
19.0 DSP
-
(pick up)
-
AS/PS/*+/Navi-SCH
5.PAIR/
21.7 AF
- T-MENU
22.8 EQ/TA
-
LCD
-
.reset button 24 (hang up
-
5 DIR-
25.△/ (volume
- 4 SHF
26.SEL/MENU
- 1 PAU
27.SD/MMC
-
1-6 preset
-
AUX IN
-
2 SCN
-
3 RPT
-
/ MUTE
/ BND/LOUD
up/down
interface
OPERATION
| BASIC OPERATION | RESET FUNCTION | FUNCTION | |||||
| SWITCHING ON/OFF THE UNUNIT | RESET | button | (23) | ||||
| P press button (14) to turn on the unit. | either | a ballpoint | pen | ||||
| When the unit is on following press | The PRESS | button | is to | ||||
| button (1 4) to turn the unit off | - Initial | reasons: hold | |||||
| FACEPLATERELEASE RELEASE | i r i n g | is completed. | |||||
| Press button | t 2 All to the detach function | the button: | |||||
| removable faceplate. | - Error symbol | on the dis | |||||
| SOUND ADJUSTMENT ADJUSTMENT | Note: RESET | bRESET (23), | |||||
| Shortly enter AUDIO SETTING | can soaked mode, on the front panel. | yet, please | |||||
| SEL/MENU /MENU desired | MODE SELECTION SELECTION | mode. | |||||
| adjustment following Bass / Treble OF (Exit) | mode Shortly MODE change button MOD in Radio | the (5) | |||||
| Shortly quality hold / (25) | MODE IPOD / (optional), setting sound | Audio | |||||
| continuously. | Press step menu sound to enter quality | ||||||
| Shortly MUTE press the sound, sound. | mode. There are belc adjust. will mute | ||||||
| LOUDNESS Press LOUD UDO button seconds to switch settingloudness and "LOUD" will appear BEEP: on ON/OFF LCD. it for several seconds to turn again the beep release sound function , and "LOUD | Use SEL SEL button (26) or the item you want t | ||||||
| DISPLAY Press DSP DSButton mode. | 2) P-VOL Select | ||||||
| EQUALIZATION Press EQ Q button equalization mode. | P-VOL change The max play vol | ||||||
| turn on the unit. Such | |||||||
| the P-VOL to 4 0. If | |||||||
| small than 4 0 when | |||||||
| time to turn you on | |||||||
| volume and will selecp | des | ||||||
| But are if the volume of value | of value | ||||||
| when you turn off the | |||||||
| FLAT → CLAS → POP | you → RER on DS the OFF unit. | ||||||
| 3) Area: Use You can (25) | |||||||
OPERATION
| set the radio frequency to Europe frequency or USA frequency. | strength finished. | until And into the | one then the | |||
| 4) HOUR 24/12 | are | stored | ||||
| You can select time format to 12 | number or button. | |||||
| 24 hour format. | (1n ProgArea A | itenscanning | When A tond P1~P6 | |||
| change | the radio | press | be | change | to 1 | |
| The time format | station | number you | ||||
| HOUR format automatically. | frequency | to the US | ||||
| change | the radio | SCAN | change | |||
| The time format | press | SCAN | button | (18) | ||
| HOUR format automatically.) | mode, function. the unit | will sca | ||||
| 5) PCLK ON/OFF: | station | and | keep on | |||
| AUXILIARY INPUT | INPUT flash 5 times on LCD). | |||||
| The unit can be connected STATIONSTORING | to a portable | |||||
| audio player AUX IN through(30) | Searched for several MOD | aux a station | ||||
| on the front panel. | for several current | seconds | th | |||
| connection, MOD you can switch | out, number switch button. the mode | station | ||||
| on the front panel | number switch button. the mode | |||||
| AUX IN mode. | ||||||
| RADIO OPERATION OPERATION | RDS (RADIO (RADADA SYSTEM) | |||||
| SELECTINGTHE FREQUENCY&BAND | OPERATIONBAND | |||||
| At radio rBN, | button Setting (END) RDS mode | |||||
| shortly to select | the Pressed Afton band. (21) | |||||
| The reception | band immediately will change to switch | |||||
| following order: | mode. | |||||
| FM1 / FM2 / FM3 / AM | Whenever | RDS is | ||||
| SELECTING STATION | STATION USPTY BUTFON to activate (17) | |||||
| Shortly press / buttons | function. Shortly PTY press for | |||||
| automatic seek | PTY press for | |||||
| seconds until "MANUAL enter PTY" | name name mode | |||||
| the display, the manual program tuning | name mode | |||||
| selected. If both | have you not can | |||||
| pressed for several | they begin | |||||
| return to seek | mode (1) to and begin | |||||
| "AUTO appears 2) Press on PTY and display. (17) | ||||||
| AUTOMATIC MEMORY STORING & MEMBERSGNT | RDS MENU, | |||||
| PROGRAM SCANNING SCANNING △/△ (25) | to select | |||||
| - Automatic memory press storing / button s | ||||||
| Press AS/PS AS/PS button (20) corresponding several item. | ||||||
| seconds "SEARCH There " will are appear below on | ||||||
| the radio will search adjusting from the current | ||||||
| frequency and checks the signal | ||||||
OPERATION
TA / PI / RETURN / MASK / EONTA / TAVOL / REG
TA: SEEK/ALARM
a) TA SEEK mode:
When newly tuned station does not receive TP info seconds, the station which (PI) as
has the TP information.
When TP information current station is set by RETUNE
RETUNE LONG, retune to next W hen PI station one cyclic search to next station
Note: TA SEEKn mode, station can be completely different
the unit searches the field (signal) current station current station
(The higher priority PI.)
b) TA ALARM mode
When this mode automatic
activated. Only double (ALARM) is output. the unit keeps anyhow. (The
than TP.)
When newly tun have TP information beeps come
information gets station for retune sound is output.
When newly RDS signal,
suppressed somewhat. SOUND/MUTE:
While AF switching
C201 station, AF MHz , w hich is non different PI with sam "DIP
If a car cruises for that
nation and forth an to
dio can retunes to oscillation
has can not occurred,
the PI code the same be
the MHz last with station, XXX but rece
PI.
The car gets radio lost has at th
for reduce retune even time this which situation hower escaped the radio from start this to
same perfectly. PI station. In does that not serious catch case
selectable radio as follows:
TP information. changed 981 current to the P1:G201 station because P1:XXX TP station when
strength of the mode:the is - very sound weak, has When no "above" signal different is heard TP 10 once s in than a sound will be heard -PI MUTE mode:
Under selected, above sound mode will be heard
beep sound
RETUNE: So, in this LONG/SHORT mode,
the When current PI information
PI current station for
is set by higher
RETUNE
or RETUNE
radio start 5 seconds, retune
station. When TP
lost at the current
MASK: time, DPI/ALL beep
MASK: DPI mode:
d AF which has Different
PI MASK SEEK ALL, is mode:
which has Different
signal with high field
OPERATION
| EONTA: DX/LO (DISTANCE/LOCAL): The purpose of this key is to reduce unwanted EON TA switching, which EON TA information was received from current station and the radio current station and the radio that EON linked information because located radio is switched again. Listens sound EON TA LOCAL when the radio is filed linked radio does can disturbances. When TA LOGAN "EONTA LO" on numeric indicated EON TA DISTANCE EON TA switch is tried by the information of current station. But TATH mode will not be off. When TA DEUSTANCE selected, display is indicated volume value is 30 for (the identifyingdefault) Broadcast expressed characters AF: switching Frequer Frequency are the list some O current station. iou mode program The regional where AF switching or identification is data information broadcasting | ||||
| TA-VOLUME: volume value is 30 for (theidentifyingdefault) | ||||
| from 0 to 100). | ||||
| REG (RECHRON) : characters | ||||
| REGION ON mode: AF: switching | ||||
| SEEK is implemented AF: Alternative to the station | ||||
| which have all PI codes stations transmitting | ||||
| REGION OFF mode: program The regional in the format of PI TP traffic is Program when AF switching or identification is data implemented. | ||||
| TA: Traffic Information broadcast | ||||
| - Liststeing go TrafficAflumnoocnent it Identification data | ||||
| TA button (22) is operated information as follows: is being | ||||
| When pressed and not held for several |
OPERATION
EON: Enhanced O ther N networks
Information
Broadcasting information on PIAF, TP, TA, etc, relating to networks other than the network used current reception
PTY: Program
Contents
news, light music,
USB PLAYOPERATION
SWITCH TO USB BUSBE MODE
In the front panel
USB interfa@u can
USB driver through
W hen you connect
the interface, the
files or WMA files
start to play MP3
automatically.
I f in other mode, MOD
button (5) to select
SELECTING TRACKSRAOKS
Press/ (1)
previous /next
show ed on display.
Press and old
reverse / forward.
release the button.
PAUSING FPLAAYYINGB
Press PAU PAu button
"Pause " will appear
Press it again to
will disappear.
PREVIEWING ALL TRACKS ING
P reSCN SCn button
seconds of each
on LCD. Press
to file, " Scan will
Press 80 hddton
first several seconds
current folder, and
press it again will exit
REPEATING THE SAMEETRANSOME TRACK
P resRPT RPT button (13)
repeatfor the same file, appear on LCD. Press
Typepeat Code, and S-RPT
Rreans RTd sultton RBT (13)
all spottse filesetc. in the cu
D-RPT 1
will exit this mode.
PLAYING AUMININGCKKSSIN RANBANDOM IN
P reSHF SHF button (9) to in of ranthem unit, orderhere , aird
on ). LCD. an Press again and this" S-SHinterface ” will (disapp
Press a n USBnF drivelbutton 3H5ugl seconds will seavih play the all
folder) the USB randodriver ard
mode.
you can also press M
SELECTING DIRECTORYUP/DOWN DIRECTION
Press DIR* DIRbuttonDIR+ button (8) (15) to select directory
upwaki to the the USB contlne numbeany directory, will function of press DIR- button DIRDIR+ (1) button fast (15).
File start when SELECTING TRACKS RACKS
SeSizhringrackDirectly Direcck
Press AS87BS(NaAsGB)(button ) (20)
(10 one) to timeuse It enter and
direction LCD. "mode
resumie unit play searches and Pa
following direct numeric
M1-M6, MOD (5)TUNNEKEKRTACK
DOWN (8) TUNE/SEER/SEAKARQ (9), 12 pto play first several
fileDSP(0) and Scan ” will the three intro and digits
disappear. cn .[2] will the BND/bDU/ENT wait
button of each for seconds. the the track after few
OPERATION
enter button is not pressed.
Searching DirectoryonFileName Press AESTPES(NnVSSH) button (20
two times. It enters Directory or File The unit searches that have the same inputted by the us
corresponding
Table below
| AS/PS | Mode |
| BND/LOU | ENTER |
| M1 | A, B, C, |
| M2 | R2 E, |
| M3 | G, H, I, 3 |
| M4 | J, K, L, 4 |
| M5 | M, N, O, 5/Di DOWN |
| M6 | P, Q, R, 6/Director |
| MOD | T,U, S,7 |
| TUNE/SEEK/TRACK DOWN | V, W, X, 8 |
| TUNE/SEEK/TRACK UP | Y, Z, SPACE, |
| PUSH SEL | CHARACTER RIGHT |
| DSP | _,-,+,0 |
selected title is again
fSeSazrtrgfrnRoot DirecRrgDirectory
Press ASSESSNewAsset(0) Statchin(20) for
Name timesmode The unit directory and fromdirectories foot
TUNE/SEE#TRACKUP/DOWN button which
er peing icon the turns
(bu) directory). listed D isplay the
directories and son
Seldesired directory
TUNE/SEEK/TRACK UP/DOWN buttons and BND/LUENTDU/ENT
the selected title is
play.
If the selected title
display will show
Victory Use TUNE/SEEK/TRAIDNE/SEEK/TRDUP/DOWN buttons
under UP this directory
title.
- Press BNDIOOUEBTT button
confirm and start
Repeat the above
9 selected title is again
Shift SeSachngnGromCurrent DiGctogpt Direto
Press ASPBS(NivssB) button for four times. The unit searcl from current direc
TUNE/SEEK/TRACK UP/DOWN buttons.
(D-DIR 1
directory). The current displayed for a second
26) to confirm playing file name is
The user can select
in the dirfING/SEEK/TRACK by
UP/DOWN buttons title
'be played BND/1000U(1000s/
display will show button.
UP/DOWN buttons title
'be played BND/1000U(1000s/
display button.
Explain as follows:
- Use the corresponding
select theA to bntacters
to 9,+-.
- PressSEL SButton
entry of each
- PressNOOLOLEMT
to start the title
In case the
directory name, then
characters
button (24)
search.
selected
name,
aaccers
4). The
in the
- Use TUNE/SEEK/TRAINE/SEENSIPLAOAD3 INFORMAURMATION
UP/DOWN
under this
title.
buttons Press ID3
directory
to BDpst all (20)ngs to
(Title, selantist anode
- Press BNDUODUEH
confirm and
Repeat the
button
start the
above
to
the play
steps if the newly
OPERATION
SUPPORT MPP3WWAADDEKODNGWOODE
T he main unit supports MP3/WMA (Windows Media Audio) decoding modes as below.
| Standard | Bit Rate (kbps) | Supports Mode |
| MPEG1 | 32,48,64b0c | Stereo |
| Layer | 128,192,256, 320 | |
| (44.1kHz) | ||
| Windows Media | 64,96,128,192 Audio | |
| (44.1kHz) |
The
USB
solution
- Folder: 500 max.
- File: 999 max.
- Depth of folder:
- Size: 2 GB
assumes
no
responsibility
SD/MMC OPERATION (OPTIONAL)
A ccording 's taeed,the custer will add a SD/MMC the SD/MMC interface the unit.
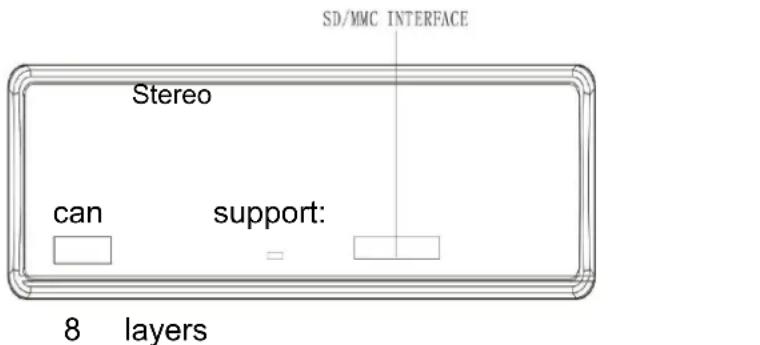
When you insert a SD/MMC interface,
MP3 files or WMA file tocan play only MP3 supports or th The operation disc which the
operat on is not described you can MO brand name select have SD/MMC their own mode. w hen product there are cannot important
SD/MMC player. card , do nc
IPOD operation operation you should Select Category from Category the MP3
Noteote :
T he main unit tocan play only MP3 supports or th standard USB-memory The operation disc which approved by M i crosoft.
USB MP3 player operation is not a standard which means you can brand name
unit tan playMP3 player battery in the player
different models select SD/MMC their own mode. standard. S o our hen product there cannot important support every MPSD/MMC player. card , do no
W hen connecting unit tan playMP3 player there has normal battery in the player
When itIPo the is USB playing, 24) the it category cause will Press △ ▽ / (25) to change
non recha rgeable IPOD operation you shou remove the battery Select Category from Category the MP3
player then connectWhen itPOthe is USR interface. O therwis(24) the it category cause will battery burst. Press △ ▽ / (25) to change
yong Amode,LISTP be/ ARJusr rGENRdriver E from SONG the /US@
SEL button (26) to category.
When in USB playong Amode,LISTPL be/ ARsut ARsut r remove the USB GENrdriver E from SONG the /US@
interface. 26 to category.
CAUTION
W hen there are important BND BNDbntf files in (24 device. Do not connect show it to the main cat
play. B ecause any IPOD) wrong △ Press operation / cause files loss. A song our company to the next
OPERATION
song. Then pressSEL (26) button to play
the selected song.
PAU(Paussc)
When playing a song, press PAA
(10 ) will pause
will resume playing.
RPT (Repeat)(Repeat)
When playing RPT abutteang,
shortly will repeat
" S-RPT " will appear
again to exit this
seconds to repeat
appear on the display.
this mode.
(i)
sure
When
the
use
mobile
Bluetooth,
function.
Bluetooth
(i)laying. For
phone,
some
the Press
different
it a
conversation
that the
the current
phone on
please
anyum ob
album mobile
Press
differregrate.
the
bε
PPT
quality,
NFT distance
1
and the song, display.
unit -
and display .
1
don
it afo
e and
tween
phone
and
PARIINIG
SHF (Shuffle)(Shuffle)
When playing SHF abuttsong,
shortly, after the cur
end, It will play the
in random order,
the display. Press
Press it for 2 seconds
the album and
display Press it again
1) In any mode,
PAIR(MOD)
SHE button
PAIRING
play to
current
catego
2) On S Hthe ” wmpbile appear
it Blustagath
to exiFet thIsP.
instruction to
lay all manua songs
how to or appear
phone
” will on
this ” shoulde
phone,
(3) “GARBTexit
and then
TUNE/TRACK UP/DOWN
When playing
(1) will play the
current category,
the next category.
When playing
press will play
position.
When playing
press will play
When playing
button (1) for
reverse /forward
display will show
1 2 0).
UP/DOWN CARBT
a song, “ 0000 press ”
previous/
BUT when
OK!
next track
can, successful not , enter
be displayed
pan ng 3
(5) WHERE
be songdisplayed
and hold
PAIR
thagain. 3 second,
6) Note: track.
D. press
During seconds Pairing, will
functional playing. during And
the pairinglaying you time PAdR (e.g. pre
button (5) to terminate
BLUETOOTH OPERATION
PRERARIR FOR BLUETOIRETOOTH
OPERATION
OPERATION
- CONNECT
This unit is built-in auto-reconnection function. Every time when you short press button (4), the unit will auto reconnect with the mobile phone paired with the
In the following reconnect
RECON
seconds,
successful
displayed.
manually
button
when
" Conn
The
instruction.
1)
the
phon
NUMmust
unit
to select before).
sel conditions number.
SLONATIONS number.
to
(1)
2)
1
tails
You NtBM:
phone to mode
the
button,
by
for
VED:
reco
you OK! have
the
YOU
Then you
oossing
several
is
will received be
3)
DIALED:
phone
number. i:
wi4)
MissSED: lost,
Unfitted.
reconnection
Display
range,
when Display
Di:
1) If the mobile
the connection
come back
necessary
the mobile
from the
call,
when
it, You can and
m = 311
In y@uito
neethwer
the
answer
out
is an
back 4
2) When
range
incoming
the unit,
audio
reconnection.
you press
the front
3) When
release
will be
ak off.
front
panel,
you
4) If you
has paired
turn on
turn
off
with
mobile
the appear mobile
the button unit,
phrtn, call.
on
on phone
(4) when to
(24)
SB:
answer you
to need reject
reconnection.
6) TALK
(00~20)
T-MENU
When
successful
button
You can
PAIeR,
(6) on coming.
to 6
TALK
will
the
the
set the shortly item
the term. _ front
T. he menu.
ematically.
volume
seisplayed
bluetooth
it is pre
panel main
main keep
to this
100 a
T-MENU
will enter
pressing
button
menu.
the following
the
this
telephone
Dbutton
TALK
will
be be
pvc volume
setdisplayed
ALED
PRE
NUM
/ RECEIVED
MISSED
/ MANUANS
TALK.
OPERATION
Example:
TALK volume MAIN volume
$$ \begin{array}{l} 0 0 = 6 0 \ 0 1 = 6 2 \ 0 2 = 6 4 \ \end{array} $$
$$ \dots \dots \dots \dots \dots \dots \dots \dots \dots \dots $$
$$ 2 0 = 1 0 0 $$
2)
When
not
possible
making
's
to trans
not
being
answered yet.
- BBReset reset
and hold
several
bluetooth
(The
In
BND/LOU
seconds.
information
callinformation from
RECEIVED
BT
AUD
LIST,
- MIIAIKG ANCOUTGONNG CAXLL
1) Making an outgoing
SPEED
DIAL,
DIALED
LIST,
BOOK(Mobile
MIBBIEBOODTH
PhoNcITON)
AUD8T,
(A2DPPHONE)
and
PHONE
BOOK
(SIM
Card)
The please unit
shareport
to
T-MENU
section.
function.
If your
mobil
2) Making
an
outgoing
you
can
A
inputti
ng
the
phone
number
paired manually.
to
play
the
Press
button
(4)
M
reputation
panel on
CALL
will
appear
unit
明Arves
CD.
as U
PAUSE/0
*, #
buttons
to
control enter
the
button phone
(1t
number
you
want
phone,
dial.
the
different (Note:
shortly
press
the button
will
input
[1]
4
character
, press
“+
character
)
(4)
ain
will
call
en
drtn press,
10
choose button
…
track.
(1)
Is up
the
thei ffer
umber.
mobile
Note:
if you
input
defthe
wrong
number
shortly
CLR press
CHURON
(24)
to clear
it. P
S
CLR and
but ho
CLR24)
will
clear
all numeric.
TRANSMER THE CALL BETWEENBETWEEN MOBILE PHONE AND THE PUNTANEDUNIT
During
the
talking
mode,
you
can
and
TRANSFER T-MENSFER
T-MENTH
call
between
(6)
to transfer
the
phone
the
unit.
the
mobile
phone
Note:
1)
you
transfer
the
call
to
mobile
phone,
the
mute
of the
present
mode
will
released
at
same
time.
SPECIFICATION
GENERAL
Power Supply Requirements : DC 12 Volts, Negative Ground
Chassis Dimensions : 178 (W) x 1 60 (D) x 50 (H)
Tone Controls
-
Bass (at 100 Hz) : ± 10 dB
-
Treble (at 10 kHz) : ± 10 dB
Maximum Output Power
- Version Y/Y1/Y2 4x40 watts
Current Drain
- Version Y/Y1/Y2 15 Ampere
Version)
CD PLAYER
Signal to Noise Ratio : More
C channel Separation :More
Frequency Response : 40 Hz
RADIO
For 2 BaBdids
Europe)
FM
Frequency Coverage 87.5 to
IF 10.7 MHz
Sensitivity (S/N=30dB) 4 μ V
Stereo Separation > 25 dB
MW
Frequency Coverage 5 22 to
IF 450 K Hz
Sensitivity (S/N=20dB) 36dBuV
TROUBLESHOOTING
Before going through the checklist, check wiring connection. If any of the problems persist after checklist dealer.
| Symptom | Cause | Cause Solution Solution |
| No power | The car ignition not on. | If the switch power is connected to circuits, but the engine moving, switch to "ACC". |
| The fuse is | blown. | |
| Temperature is too high. | Cool inside off orthe temperature | |
| Condensation. | Leave so, then try again | |
| No sound | Volume is | in minimum |
| Wiring is connected. | ncheck properlywiring | |
| Sound | The installation skipped more than | Adjust angle the is insta 30an degree80 degree. |
| The disc dirty or defective play a disw one. | Cleaxtremely the compa dirty play a disw one. | |
| The operation built-in microcomputer does not operating due to noise. | The reset Front properpanel its place. | |
| The radio not Work. radio automatic selection does not work. | The doestenna connbed. | Insert cable is the not antenna |
| station signals are too weak. | ||
has
SI the is
ace
tilcar return
Ac conrr
tion
bu no
Bluetooth3Btribb. 40
Vorbereitung 40
Pairing 41
EINNAASSSCIAIENIBESGERRATS
4)ZeitformRGRAMMSUGHE
Siennneteitformat2
TA-LAUTSTARKE:Lautstärke30(die
TECGENBSSCEEEDAATENN
ALLGEMEINN
Bekabeling. ekabeling..52
ISOansluiting. 52
Plaatsingwanttoetaen...sen...n..553
Basisbodiening. 54
H 54
Bluetooth audio(A2DP-function)......65
66
Problemen@pbssssen.. 67ssen
Opmerkingen:
Voeding:DC12Volt,NegativeA Harding
ChassisAfmetingen:178(B)x160(D)x50(H)
Toonregeling
-Bass(op100Hz):±10dB
-Treble(op10kHz):±10dB
Maximaalvermogen
-VersieY:4x40watt
Stroomverbruik
-VersieY:15Ampere(max.)
CD-SPELER
19.0ToucheDSP/RE-CCN
4.Touche (decrocher)
- ToucheAS/PS/*/+/Navi-SCH
5.TouchePAIR/MOD
21.7ToucheAF
6.ToucheT-MENU/TRANSFER
22.8ToucheEQ/TA
7.EcranLCD
station identification
différemènes
informationsTP.
LorsquelesinformationsTPresent
pleshiness
sLECTIONNEAUTORADIEMARRERA
Recherobieistatidea
programmationsimilaire,aboude
AF, TP, TA,EONet PTY.
PICoded'identificationdeprogramme
Copermettahidentifles
programmes
PSNomdeservicaduprogramme
Diffusion
s
E MISEBNNPPAAUUEIDELDALEECOTARRE
A ppuyesduuchRAU PAU@our
mettlalectupause"
s'affiche.
App uezineoisuloucheAS/Pass/PS
S MEMOIRE (OPTIONNEL)
CONVERGATION Volumeprincipal 60 = 00
MODEOPERATION
0 1=62
02=64
20 = 100
PABASGERUNNAPPEL
laouchepousaisitecaractere*
pressainteneonfonde
PulsbotPAU PAU papausar,
mostrando séPauseenlapantallaLCD.
Pulsebotordueevparaeanudala
M,N,O,5/directorio
ABAJO
P, Q,R,6/directorio ARRIBA
V, WX,8
YE8PACIO,9
MOVERCARACTERES A LADERECHA
SEURBECONORARRIBA/ABAJO
PulselbotONDIR- DIR+ DIR(15)
paae
econefector
INAR
CHDANARHISTAS
ectan Busquedaddinactadbepiistas -,+,0eustab
Pul sebot8PS(Navi-SCH)20)

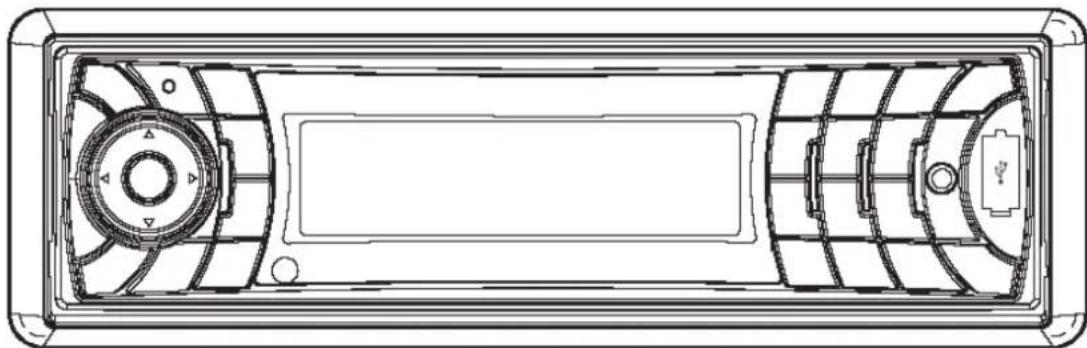
- OWNER'SSWANNUAL Mobile AudioSystem
- CONTENTS
- Notes:
- DIN FRONTARONRFIRGARTMOUNT
- INSTALLATION
- DIN REAR-NRSEURITIDettnbB)
- To Detach ttleFrcnttPanell
- OPERATION
- USB PLAYOPERATION
- SWITCH TO USB BUSBE MODE
- SELECTING TRACKSRAOKS
- PAUSING FPLAAYYINGB
- PREVIEWING ALL TRACKS ING
- REPEATING THE SAMEETRANSOME TRACK
- PLAYING AUMININGCKKSSIN RANBANDOM IN
- SELECTING DIRECTORYUP/DOWN DIRECTION
- SeSizhringrackDirectly Direcck
- M1-M6, MOD (5)TUNNEKEKRTACK
- Searching DirectoryonFileName Press AESTPES(NnVSSH) button (20
- fSeSazrtrgfrnRoot DirecRrgDirectory
- TUNE/SEEK/TRACK UP/DOWN buttons and BND/LUENTDU/ENT
- Victory Use TUNE/SEEK/TRAIDNE/SEEK/TRDUP/DOWN buttons
- Shift SeSachngnGromCurrent DiGctogpt Direto
- TUNE/SEEK/TRACK UP/DOWN buttons.
- - Use TUNE/SEEK/TRAINE/SEENSIPLAOAD3 INFORMAURMATION
- UP/DOWN
- SUPPORT MPP3WWAADDEKODNGWOODE
- SD/MMC OPERATION (OPTIONAL)
- IPOD operation operation you should Select Category from Category the MP3
- Noteote :
- CAUTION
- PAU(Paussc)
- RPT (Repeat)(Repeat)
- PARIINIG
- SHF (Shuffle)(Shuffle)
- TUNE/TRACK UP/DOWN
- BLUETOOTH OPERATION
- - CONNECT
- RECON
- T-MENU
- - BBReset reset
- - MIIAIKG ANCOUTGONNG CAXLL
- MIBBIEBOODTH
- PhoNcITON)
- AUD8T,
- (A2DPPHONE)
- TRANSMER THE CALL BETWEENBETWEEN MOBILE PHONE AND THE PUNTANEDUNIT
- TRANSFER T-MENSFER
- T-MENTH
- SPECIFICATION
- GENERAL
- CD PLAYER
- RADIO
- TROUBLESHOOTING
- Bluetooth3Btribb. 40
- EINNAASSSCIAIENIBESGERRATS
- TECGENBSSCEEEDAATENN
- ALLGEMEINN
- Opmerkingen:
- CD-SPELER
- Recherobieistatidea
- E MISEBNNPPAAUUEIDELDALEECOTARRE
- S MEMOIRE (OPTIONNEL)
- MODEOPERATION
- PABASGERUNNAPPEL
- SEURBECONORARRIBA/ABAJO
- INAR
- CHDANARHISTAS
Brand : LENCO
Model : CS351
Category : Car radio