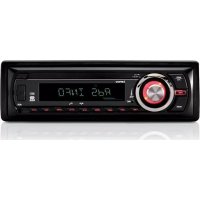
CS430BT - Car stereo LENCO - Free user manual and instructions
Find the device manual for free CS430BT LENCO in PDF.


| Product Type | Bluetooth Car Radio |
| Brand | Lenco |
| Model | CS430BT |
| Dimensions (W x D x H) | 178 x 101.5 x 50 mm |
| Power Supply | DC 12V, negative ground |
| Maximum Power Consumption | 10 A |
| Output Power | 4 x 25 W (at 14.4 V) |
| Number of Channels | 4 (2 stereo channels) |
| Radio Bands | FM (3 presets), MW (2 presets) |
| FM Range | 87.5 – 108 MHz |
| AM (MW) Range | 522 – 1620 kHz |
| RDS Functions | AF, TA, PTY, PI Seek, RETUNE, MASK, REG |
| Bluetooth | Hands-free, pairing with password 0000 |
| Auxiliary Input | AUX 3.5 mm jack |
| USB Port | MP3/WMA playback |
| SD Card Reader | SD card slot |
| Audio Formats | MP3, WMA |
| RCA Line Outputs | Front left/right, rear left/right |
| BT Antenna Output | Yes (white/black wire) |
| Detachable Front Panel | Yes, with RELEASE button |
| Sound Settings | Volume, Bass, Treble, Balance, Fader, Loudness, DSP Presets (Flat/Classic/Rock/Pop) |
| Repeat and Random | RPT (one/album), RDM (random) |
| Clock Function | 12/24h display and setting |
| Standby | Clock displayable in standby (CLK ON/OFF) |
| Fuse | 10 A |
| Maintenance | Wipe with a dry cloth; do not use solvents |
| Recycling | Do not dispose with household waste; take to a recycling center |
Frequently Asked Questions - CS430BT LENCO
User questions about CS430BT LENCO
0 question about this device. Answer the ones you know or ask your own.
Ask a new question about this device
Download the instructions for your Car stereo in PDF format for free! Find your manual CS430BT - LENCO and take your electronic device back in hand. On this page are published all the documents necessary for the use of your device. CS430BT by LENCO.
USER MANUAL CS430BT LENCO
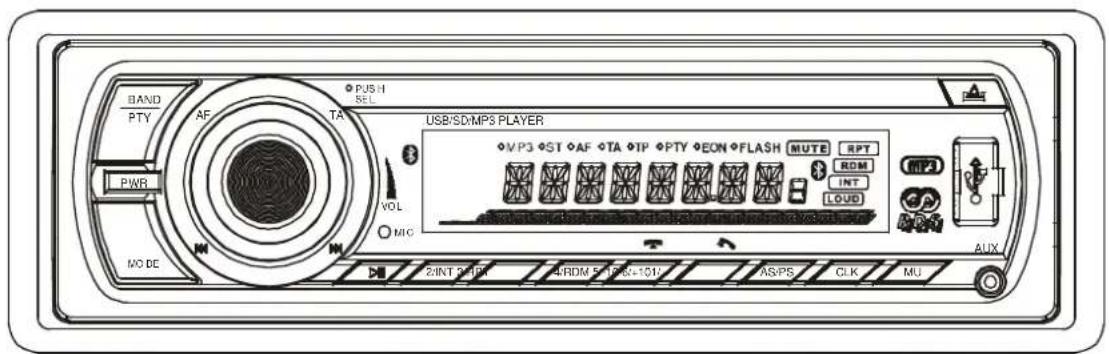
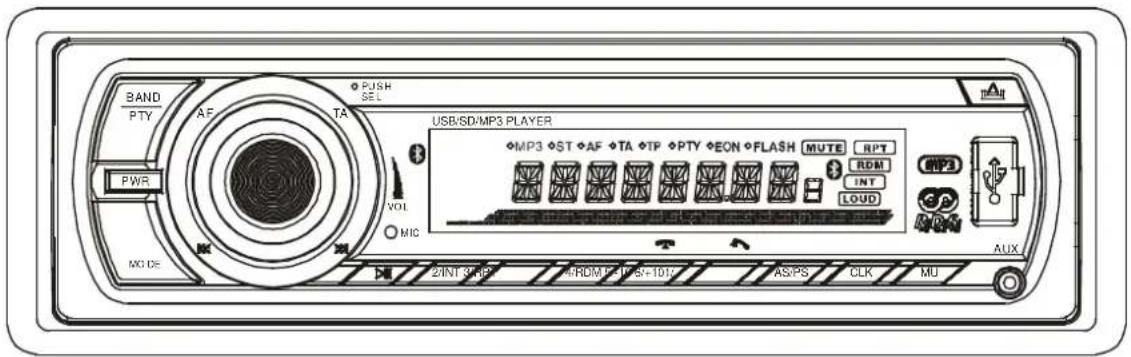
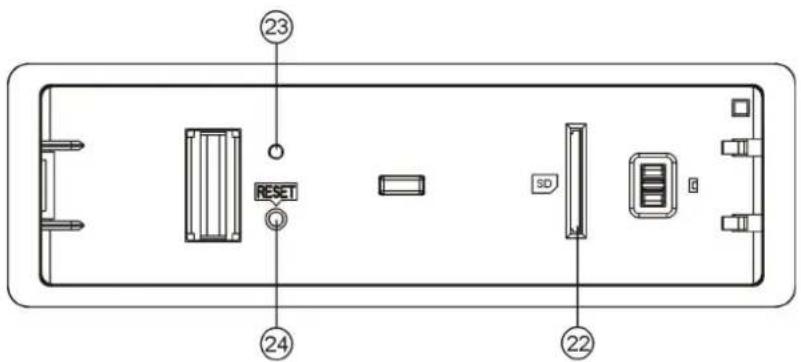
Front Cabinet after removing Front Control Panel
- RELEASE button
- 1/TOP/>|| button
- SEL button
- 2/INT button
- VOL knob
- 3/RPT button
- POWER button
- 4/RDM button
- MU(MUTE) button
- 5/-10/HANG UP button
- LCD
- 6/+10/TEL button
- |<< and >>| buttons
- AUX IN jack
- BAND/PTY button
- USB socket
- MODE button
- Card slot
- CLK(CLOCK) button
- LED indicator
- TA button
- RESET button
- AF button
- BT MIC
- AS/PS button
Common operation:
1. To turn the unit on/off.
When the unit is power Off, it may be switched On by pressing any button except RELEASE button. When the unit is switched On, press and hold POWER button for more than 0.5 second, to switch the power off.
2. To select function mode
Press MODE button to change function mode as follows:
-->RADIO -->USB(after inserting USB stick)-->CARD(after inserting SD card)
-->BT-->AUX-->
When there is no media (USB/CARD), that mode will be skipped.
3. To adjust the volume level
Rotate VOL knob or press + or - button to adjust volume level during playback.
4. To mute or resume sound
Press MUTE or MU button to eliminate or resume sound immediately during playback.
To resume the sound immediately, you can also press SEL, VOL, +, -, -10, +10, TOP, PLAY, >>| and |<< buttons(knob).
5. To set sound mode and menu
1). To set sound mode:
Press SEL button shortly and repeatedly to select mode of VOL(volume), BASS (without preset DSP), TRE(treble)(without preset DSP), BAL(balance) and FAD(fader) in the sequence and circulation. In each mode, the waiting time is about 5 seconds, and when the waiting time is over, it will return to the last display mode.
After selecting a sound mode, use volume control to set level of the selected sound mode.
2). To set menu:
Press SEL button and hold for more than 2 seconds to turn on TA SEEK/TA ALM mode, then press SEL button shortly and repeatedly to select PI SOUND/PI MUTE, RETUNE L/RETUNE S, MASK DPI/MASK ALL, BEEP ON/BEEP OFF, USER SET (FLAT/CLASSIC/ROCK/POP), VOL LAST/VOL DEFA, STEREO/MONO(in RADIO mode), LOUD OFF/LOUD ON, DX/LOCAL (in RADIO mode), CLK ON/CLK OFF, CLK 12/24 mode.
After selecting a desired item, use volume control to set.
(1) TA SEEK/TA ALM:
TA SEEK mode: when newly tuned station does not receive TP information for 5 seconds, the radio returns to next station which has not the same station(PI) as the last station, but has the TP information.
When TP information gets lost at the current station for return time which is set by RETUNE SHORT(90 seconds) or RETUNE LONG(150 seconds), the radio start to return to next same PI station. When same PI station is not received in 1 cyclic search, the radio returns to next station with TP information.
TA ALARM mode: when this mode is selected, any automatic retune mode is not activated.
Only double beep sound(ALARM) is out-put.
When newly tuned station does not have TP information for 5 seconds, beeps are sounded.
When TP information gets lost at the current station for retune time, the beep sound is out-putted.
When newly tuned station has no RDS signal, PI SEEK may be suppressed.
(2) PI SOUND/ PI MUTE:
PI SOUND mode: If a car is cruising between buildings, an oscillation phenomenon may occur, due to different PI codes being received from the same AF.
PI MUTE mode: In above situation, the sound will be muted for less than 1 second.
(3) RETUNE L / RETUNE S:
The initial time of automatic TA search or PI SEARCH mode is selected.
When PI information is not received during retune time, the radio start to retune to next same PI station.
When same PI station is not received during 1 cyclic search, the radio goes to last station and waits for 4-5 minutes until PI code is received.
RETUNE L mode: selected as 150 seconds.
RETUNE S mode: selected as 90 seconds.
(4) MASK DPI/MASK ALL:
MASK DPI mode: masked only the AF which has different PI.
MASK ALL mode: masked the AF which has different PI and NO RDS signal with high field strength.
BEEP ON mode: The beep is generated when any key is pressed.
BEEP OFF mode: The beep sound is disabled.
(6) VOL LAST/VOL DEFA
VOL LAST: The volume level when switching off will be restored with power On.
VOL DEFA: The volume level of the main unit after power on is a constant value.
When selecting VOL DEFA item, press SEL button to display AVOL,
then you can pre-set the constant volume level after power on with VOL control.
(7) CLK ON/OFF
CLK ON: Clock will always show on the display when power is off.
CLK OFF: Clock will disappear from the display when power is off.
- To display and adjust clock
Press CLK button briefly to display time for 5 seconds on the display, and then returns to its previous display unless the button is pressed again.
Press CLK button and hold for more than 1 second until the real time flashes on LCD. Then you can adjust HOUR or MINUTE with volume control.
- To remove front control panel
Press RELEASE button to release front control panel from unit chassis, then you can remove it from unit chassis.
When front control panel is removed, the LED indicator on front cabinet flashes.
- To reset unit
Before operating the unit for the first time, or after replacing the car battery or changing the connections. You must reset the unit.
To reset the unit, remove the front control panel, then press RESET button with a cuspidal object.
This operation will erase clock setting and some stored contents.
RADIO OPERATION:
1. To select radio band
Press BAND or BND button briefly and repeatedly to select a desired radio band in sequence and circulation as follows:
$$ \rightarrow F M 1 \rightarrow F M 2 \rightarrow F M 3 \rightarrow M W 1 \rightarrow M W 2 \rightarrow $$
2. To search for radio station manually or automatically
Press >>| or |<< button briefly to manual tune up/down for your desired radio stations step by step. Press and hold >>| or |<< button for 0.5 seconds, to automatically tune up/down for a radio station of strong signal.
You can also press SCN button on remote control to automatically tune up for a radio station of strong signal.
3. To store current station or turn on a preset one
1) Press one of the 6 number buttons and hold for more than 1 second to store the current station in the preset memory bank of the number button for the current band.
In this way the unit can store 30 preset stations.
2) Press one of the 6 number buttons briefly to turn on the preset station stored in the preset memory bank of the number button for the current band.
* When PTY mode is on, the 6 number buttons are shared as follows:
PTY music group ---- PTY speech group
- POP M, ROCK M
- NEWS, AFFAIRS, INFO
- EASY M, LIGHT M
- SPORT, EDUCATE, DRAMA
- CLASSICS, OTHER M
- CULTURE, SCIENCE, VARIED
- JAZZ, COUNTRY
- WEATHER, FINANCE, CHILDREN
- NATION M, OLDIES
- SOCIAL, RELIGION, PHONE IN
- FOLK M
- TRAVEL, LEISURE, DOCUMENT
4. To scan for each preset station or auto search for the strongest stations
1) When pressing and holding AS/PS or A.P button for more than 1 second, the radio searches from the current frequency and checks the signal strength level until the 6 strongest stations are found. And then the 6 strongest stations are preset to the corresponding preset memory numbered bank. The auto-storage operation is implemented in the each selected band. When the auto-storage operation is finished, the radio executes Preset scan.
2) When pressing AS/PS or A.P button briefly, the radio searches for each preset station in the current band and holds at that preset station for 5 seconds while releasing mute, and then searches again.
5. To search for stations with a PTY (PROGRAM TYPE) program
Press and hold BAND/PTY on main unit or press PTY button on remote control to select one of PTY programs such as: POP M- - NEWS-- off. While selecting POP M or NEWS, pressing one of 6 preset buttons briefly and repeatedly can select your desired PTY program as described in preset buttons.
When turning on a PTY program, the PTY program and PTY word is flashed on LCD.
After selecting a desired PTY program and no operation for 2 seconds, it will search for the station of the PTY program. During 1 loop, if the desired station of the PTY program is not found, PTY NONE is displayed, then returns to previous normal radio and PTY icon disappears.
6. AF [ALTERNATIVE FREQUENCIES] BUTTON
When pressed briefly, AF switching mode is selected and the state of AF switching mode is displayed by AF segment in display.
Segment off: AF switching mode off.
Segment on: AF switching mode on, and has RDS information.
Segment flashing: AF switching mode on, but RDS information is not received yet.
When AF switching mode is selected, the radio checks the signal strength of AF all the time.
The interval of checking time of each AFs depends on the signal strength of the current station, from a few minutes for strong station to a few seconds for weak station.
Every time that new AF is stronger than current station, it switches over to that frequency for a very short time, and the NEW FREQUENCY is displayed for 1-2 seconds.
Because the mute time of AF switching or checking time is very short, it is almost inaudible in case of normal program.
During FM mode, when AF is on, SEEK, (SCAN), AUTO-MEMORY function can only receive and save RDS program.
When pressed long, AF mode is converted to REGION ON/OFF mode.
REG ON:
AF switching or PI SEEK is implemented to the station which have all PI codes are same as current station.(PI CODE is checked when AF CHECK in progress)
REG OFF:
The regional code in the format of PI code is ignored when AF switching or PI SEEK is implemented.(PI CODE and COVERAGE AREA is not checked when AF CHECK in progress)
7. TA [TRAFFIC ANNOUNCEMENT] BUTTON
When pressing the button, TA mode is switch on or off.
When TA mode is on(TA is displayed on LCD), it will begin to seek TA station and TA SEEK will be displayed on LCD for a while.
When traffic announcement is transmitted:
1). If the unit is in SD, USB mode, it will switch to radio mode temporarily.
2). If volume level is below 20, volume level is raised to 20, and returns to its previous mode and volume level when the traffic announcement is over.
If volume is adjusted during traffic announcement, only the traffic announcement volume is valid.
* TA interruption function:
The current traffic announcement is cancelled by pressing this key. But the TA mode will not be off.
* When TA is on, SEEK, (SCAN), AUTO MEMORY function can be received or saved only when traffic program identification code has been received.
USB/Card OPERATION:
- To insert or pull out SD card or USB stick
When needing to playback SD or USB music, remove front control panel or open the cover of USB socket, then insert an SD card or USB stick into the card slot or USB socket. Then the playing mode will be changed into SD or USB mode and display Card or USB on LCD (When SD card and USB stick are both inserted into the slot or socket, the playing mode will be changed into the mode of the latter one), and then play the first track of SD or USB.
- To select next or previous track to play
Press >>| or |<< button to select next or previous track to play.
- To play fast forward or backward
Press and hold >>| or |<< button to play fast forward or backward.
- To play previous or next 10th track
Press 5/-10 or 6/+10 button to play previous or next 10th track.
Press and hold the +10/-10 to select the next or previous folder to be play.
- How to use 1/>||/TOP button
During playback, press 1/>||/TOP button to pause playback. When in pause mode, press 1/>||/TOP button to play again.
Press and hold 1/>||TOP button to select the first track for playback.
- To scan tracks
During playback, press INT button briefly to play the first 10 seconds of each track, press INT button again to cancel INT function and retain playing the track currently selected.
- To repeat track(s)
During playback, press RPT button briefly to play the current track repeatedly, and the LCD will display RPT ONE.
Press RPT button twice to play the tracks in the Album repeatedly, and the LCD will display RPT ABM.
Press RPT button thrice to cancel RPT function, and the LCD will display RPT OFF.
- To play tracks in random
During playback, press RDM button briefly to play all tracks in random. Press it again to cancel RDM function.
- To quickly select a track to play
During playback, press the AS/PS button, it is activated selecting song mode, and the TRK 000 (if the number of tracks is less than 100 and more than 9, it will be TRK 00) will be visible on the LCD display and the hundreds digit 0 that the MP3/WMA disc, SD card or USB contains will flash.
Rotate the VOL knob to select and enter the number on the flashing digit place from 0 to 9.
Then press the AS/PS button to confirm the entered number and the 0 on the tens digit will be flashing.
Rotate the VOL knob to select and enter the number on the flashing digit from 0 to 9.
Then press the AS/PS button to confirm the entered number and the 0 on the units place digit will be flashing.
Rotate the VOL knob to select and enter the number on the flashing digit from 0 to 9.
After finishing enter all the number of the song serial number on the flashing digit, press the SEL button to play the corresponding track.
During playback, press and hold the -10,+10 to select the previous or next folder to be play.
BlueTooth Handfree System:
1. Pairing
Turn on Bluetooth mode of mobile phone, then select the function for Finding Bluetooth Device and enter it. After finishing finding, it will show the name of Bluetooth Device if found, select it and enter it, then it will show an interface that asks you to input password. Input the password 0000 and enter it. then the LCD of the car audio system will display BT READY and BT icon.
2. Connection or disconnection
A) Use mobile phone to do connection or disconnection
1) In connection status, find the paired and connected Bluetooth Device, then press the disconnection button to do disconnection.
2) In disconnection status, find the paired and disconnected Bluetooth Device, then press the connection button to do connection.
B) When powering on (after Acc of the car was switched off), the unit will search for mobile phone, pair and connect. This will take about 10-15 seconds.
Note:
(1) Bluetooth icon appears on LCD only when in connection status.
(2) In connection status: Mobile phone transfers to car audio player whenever a dialling takes place; Mobile phone transfers to car audio player whenever receiving a call.
3. Dialling when in connection status
To make a call simply press the TEL button and enter the number you wish to call using the mobile phone. When your ready to make the call press TEL again, to end the call simply press MUTE/C button.
4. Accept/ Reject/ End Call
A) During ringing, press TEL button to accept the call.
B) During ringing, press CLEAR button to reject the call.
C) During talking, press CLEAR button to end the call.
5. Talking volume level setting
While talking, use volume control to adjust volume level, but this volume level can not be saved.
6. Dialling or receiving calls while the unit is in sleep mode
When the car radio is in standby mode (Acc on and Power off), when dialling or receiving a call, the car radio will power on automatically.
After the call is completed, the radio will revert to standby mode.
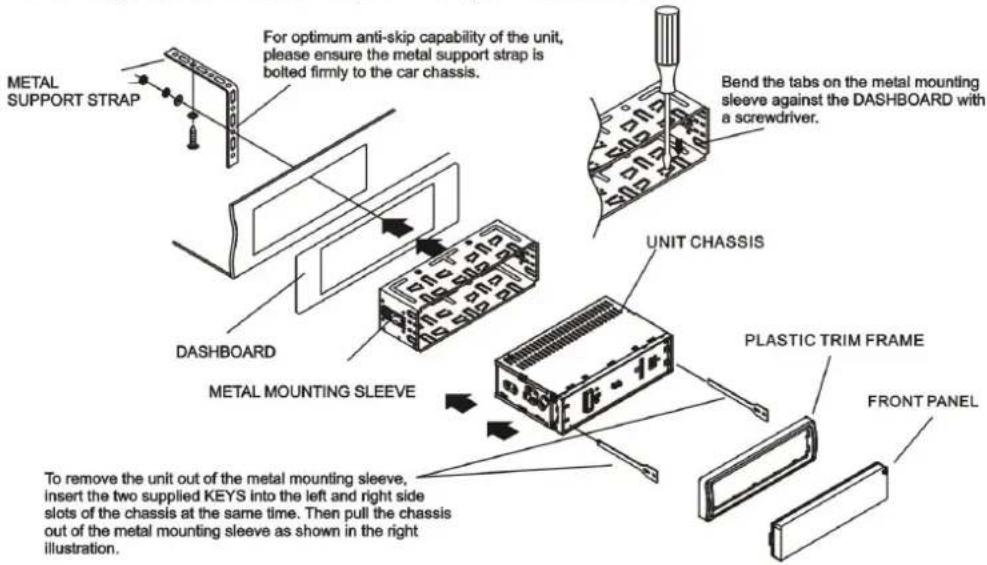
INSTALLATION METHOD
This is an anti-theft installation method.
The main unit has a METAL MOUNTING SLEEVE.
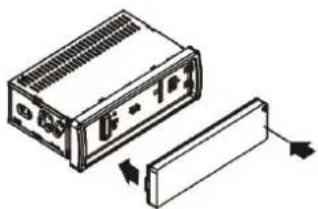
Please connect the wiring, eg, the Power Supply, the Speakers and the Antenna according to the requirements of this Instruction Manual, then install the metal mounting sleeve into the car as per the diagram illustrated below.
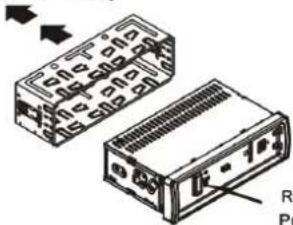
NOTE
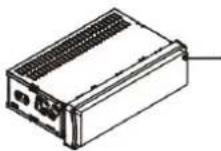
Before mounting and operating the player, remove the metal mounting sleeve illustrated by the arrows.
natural_image
Two electronic component blocks with visible internal structures and mounting holes, no text or symbols present.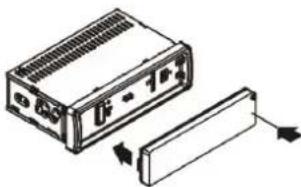
natural_image
Diagram of an electronic device with a box and adjacent panel, showing internal components (no text or symbols)To attach the removable faceplate, insert the left side of the faceplate into the left of the chassis first. Then push the right side of the faceplate into the chassis until you hear it "click".
RESET BUTTON
Push this button with a sharp object to restore any distorted program to normal.
To remove the front panel from the unit chassis, press this key to release the front panel from the unit chassis, then take out from the unit chassis.
WIRES CONNECTION
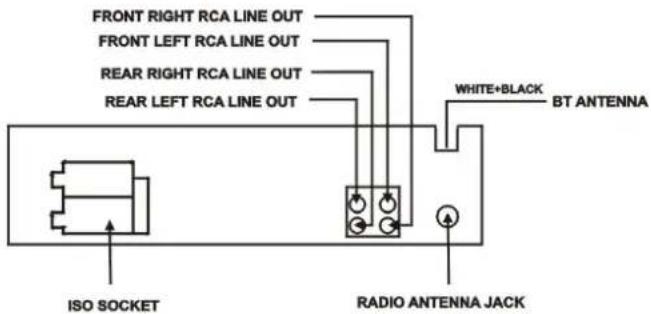
CONNECTOR A
1.
2.
3.
-
Memory +12V
-
Auto Antenna Output
6.
-
12V (To Ignition Key)
-
GROUND
CONNECTOR B
-
Rear Right Speaker (+)
-
Rear Right Speaker (-)
-
Front Right Speaker (+)
-
Front Right Speaker (-)
-
Front Left Speaker (+)
-
Front Left Speaker (-)
-
Rear Left Speaker (+)
-
Rear Left Speaker (-)
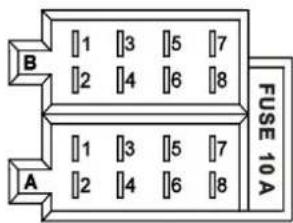
ISO SOCKET SKETCH
SPECIFICATION
GENERAL
Supply Voltage
Current Consumption
Power Output
Number of channels
Unit Dimensions
DC 12V. Negative Ground
Max.10A
4 x 25 W(measured at DC 14.4V)
2 STEREO channels.
178[W] X 101.5[D] X 50[H] mm.
FM SECTION
Frequency range
Effective sensitivity
I.F Frequency
87.5MHz -108MHz
3uV.
10.7MHz.
AM SECTION
Frequency range
Effective sensitivity
I.F Frequency
522KHz - 1620KHz
40dB.
450KHz
RCA LINE OUT
Output
1200mV @ MAX.
SD or USB PLAYBACK
System
Frequency characteristics
MP3 audio system.
20Hz -100Hz <=5dB
10KHz-20KHz <=5dB.
50dB [1KHz].
Signal to noise (SD & USB)
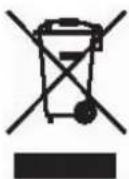
Guidelines for protection of the environment
This appliance should not be put into the domestic garbage at the end of its useful life, but must be disposed of at a central point for recycling of electric and electronic domestic appliances. This symbol on appliance, instruction manual and packaging puts your attention to this important issue. The materials used in this appliance can be recycled. By recycling used domestic appliances you contribute an important push to the protection of our environment. Ask your local authorities for information regarding the point of recollection.
Lenco
CS-430 BT
BENUTZERHANDBUCH
DIGITALES PLL RADIO MIT MW UKW RDS
natural_image
Diagram of an electronic device with a box and adjacent panel, showing internal components (no text or symbols)natural_image
Isometric line drawing of a rectangular electronic device with ventilation grilles and ports (no text or symbols)MANUEL D'INSTRUCTION
RADIO À RÉGLAGE DIGITAL PLL AM/FM-RDS
PTY music group ---- PTY speech group
| 1. POP M, ROCK M | 1. NEWS, AFFAIRS, INFO |
| 2. EASY M, LIGHT M | 2. SPORT, EDUCATE, DRAMA |
| 3. CLASSICS, OTHER M | 3. CULTURE, SCIENCE, VARIED |
| 4. JAZZ, COUNTRY | 4. WEATHER, FINANCE, CHILDREN |
| 5. NATION M, OLDIES | 5. SOCIAL, RELIGION, PHONE IN |
| 6. FOLK M | 6. TRAVEL, LEISURE, DOCUMENT |
natural_image
Diagram of an electronic device with a box and panel, showing internal components and directional arrows (no text or symbols)natural_image
Isometric line drawing of a rectangular electronic device with ventilation slots and ports (no text or symbols)- Rear Right Speaker (+)
- Rear Right Speaker (-)
- Front Right Speaker (+)
- Front Right Speaker (-)
- Front Left Speaker (+)
- Front Left Speaker (-)
- Rear Left Speaker (+)
- Rear Left Speaker (-)
CARACTÉRISTIQUES
GÉNÉRALITÉS
natural_image
Two electronic component blocks with internal circuitry and mounting holes, shown in isometric view (no text or symbols)BOTÓN RESET
natural_image
Diagram of an electronic device with a rectangular panel and a separate box, showing internal components (no text or symbols)natural_image
Line drawing of a rectangular electronic device with internal components and a label pointing to the right side (no text or symbols present)EN BLUETOOTH HANDSFREE-SYSTEEM
BESCHRIJVING VAN BEDIENINGSELEMENTEN OP VOORPANEEL

Voorpaneel
natural_image
Two technical line drawings of electronic components with no visible text or symbols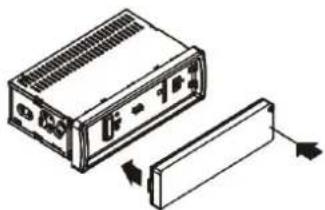
natural_image
Diagram of an electronic device with a rectangular component and a separate rectangular block, showing directional arrows (no text or symbols)RESET-KNOP
natural_image
Isometric line drawing of a rectangular electronic device with internal components and a label pointing to one corner (no text or symbols present)
- Front Cabinet after removing Front Control Panel
- Common operation:
- To turn the unit on/off.
- To select function mode
- To adjust the volume level
- To mute or resume sound
- To set sound mode and menu
- 1). To set sound mode:
- 2). To set menu:
- TA SEEK/TA ALM:
- RADIO OPERATION:
- To select radio band
- To search for radio station manually or automatically
- To store current station or turn on a preset one
- To scan for each preset station or auto search for the strongest stations
- To search for stations with a PTY (PROGRAM TYPE) program
- AF [ALTERNATIVE FREQUENCIES] BUTTON
- TA [TRAFFIC ANNOUNCEMENT] BUTTON
- USB/Card OPERATION:
- BlueTooth Handfree System:
- Pairing
- Connection or disconnection
- Dialling when in connection status
- Accept/ Reject/ End Call
- Talking volume level setting
- Dialling or receiving calls while the unit is in sleep mode
- INSTALLATION METHOD
- NOTE
- CONNECTOR A
- CONNECTOR B
- SPECIFICATION
- GENERAL
- FM SECTION
- AM SECTION
- RCA LINE OUT
- SD or USB PLAYBACK
- Lenco
- CARACTÉRISTIQUES
- GÉNÉRALITÉS
- RESET-KNOP
Brand : LENCO
Model : CS430BT
Category : Car stereo