
Vaporpiu Inox - Steam cleaner DELONGHI - Free user manual and instructions
Find the device manual for free Vaporpiu Inox DELONGHI in PDF.
| Product type | Steam pressure cleaner |
| Brand | DeLonghi |
| Model | Vaporpiu Inox |
| Boiler power | 1500 W |
| Boiler capacity | 1.5 L |
| Maximum steam pressure | 3.5 bar |
| Preparation time | About 15 minutes |
| Cleaning autonomy | About 40 minutes |
| Provided accessories | Flexible hose, two rigid tubes, triangular brush, carpet/floor brush, narrow flat nozzle, small brush, window cleaning squeegee, cloths, iron rest mat (depending on version) |
| Safety | Safety cap, safety valve, automatic thermostat shut-off |
| Power supply | Mains, voltage indicated on the rating plate |
| Warranty | Warranty indicated on the packaging, keep with purchase date |
| Maintenance and cleaning | Use only tap water; do not add detergent; empty the boiler before prolonged storage |
| Spare parts and repairability | Contact an authorized service center; use original spare parts |
| General information | Household appliance; complies with EN 55014 standards; do not direct steam at people, animals, or electrical outlets |
Frequently Asked Questions - Vaporpiu Inox DELONGHI
User questions about Vaporpiu Inox DELONGHI
0 question about this device. Answer the ones you know or ask your own.
Ask a new question about this device
Download the instructions for your Steam cleaner in PDF format for free! Find your manual Vaporpiu Inox - DELONGHI and take your electronic device back in hand. On this page are published all the documents necessary for the use of your device. Vaporpiu Inox by DELONGHI.
USER MANUAL Vaporpiu Inox DELONGHI
Thank you and congratulations on your purchase of our appliance.
All De' Longhi products are the result of highly accurate planning and meticulous technical testing.
We have prepared this manual to help you make the most of your steam cleaner and fully appreciate its superb quality.
We are certain that, if you follow our suggestions, this appliance will give you maximum satisfaction and many years of service.
By using steam power, you will contribute to reduce pollution derived from the dispersion of chemical household detergents into the environment.
This appliance has been designed to obtain greater hygiene of all hard surfaces and upholstery.
It comes equipped with a steam generator iron with high steam output for easy ironing to help you deal with all the ironing requirements of your family - the fast and efficient way to take hard work out of day-to-day household cleaning chores.
COMPONENT DESCRIPTION
-
Steam output control (where provided)
-
Crevicetool
-
Pressure gauge (where provided)
-
Triangular brush
-
Steam generator indicator
-
Two extension tubes
-
On/off indicator
-
Two small brushes for the crevice tool
-
Steam generator switch
-
Cloth for carpet/floor brush and triangular brush
-
On/off switch
-
Carpet/floor brush
-
Sliding hatch
-
Squeegee
-
Safety cap
-
Iron mat (where provided)
-
Bumper
-
Iron (where provided)
-
Flexible hose with handgrip
CONTENTS
Important safety information page 13
Preparing for use page 14
Filling the steam-generator water chamber page 18
Using the steam-generator iron page 18
Step by step diagram page 20
IMPORTANT SAFETY INFORMATION
1) Read these instructions carefully.
2) When in use, the appliance contains pressurized steam: improper use could result in serious hazards. This appliance is intended for domestic use only, and must be used in accordance with the operating instructions contained in this booklet. The manufacturer disclaims all liability for damage deriving from the improper use of the appliance.
3) Always disconnect the appliance from mains when filling up the water chamber or before any maintenance or care operation.
4) Before use, check that the mains voltage corresponds to the voltage indicated in the ratings plate on the bottom part of the appliance.
5) Connect your cleaner only to power outlets with a minimum of 10 amps making sure the outlet is earthed.
6) Do not aim the steam jet at mains outlets, live wires, or other electrified elements, which could result in damage and electric shock.
7) Do not aim the steam jet to the appliance itself.
8) Do not tug at the power cord or the appliance itself, to disconnect from mains.
9) Do not run the appliance over the power cord as this may damage the insulation.
10)NEVER OPEN THE CAP BEFORE ALL THE WATER IN THE CHAMBER HAS BEEN USED. This is indicated by the lack of steam output from the iron or other accessories. To refill, disconnect from mains and wait about 15 min to avoid sudden changes in temperature, then place a cloth over the cap and twist slowly to open, allowing any residual steam to escape.
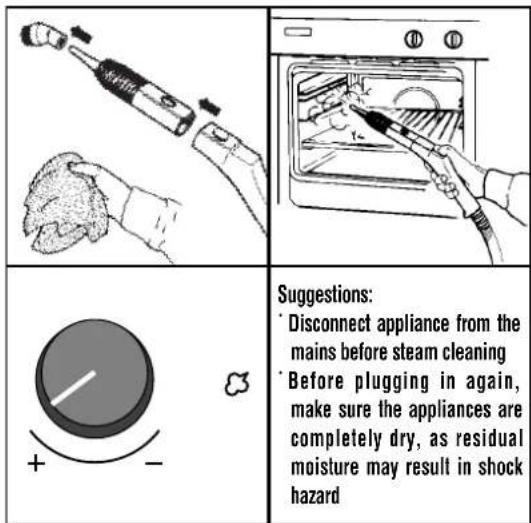
11) Always disconnect all electrically operated appliances (hobs, ovens, refrigerators, hoods, etc) before steam cleaning. Wait until completely dry before reconnecting, as any residual moisture could result in shock hazard.
12) Avoid skin contact with steam. High temperature may cause serious burns. Do not aim the water or steam jet at people or animals and do not use on surfaces or objects with a low resistance to the machine's operating temperature.
13) When using the machine, hold it by its handle only: it contains a steam-generator water chamber whose surface heats up during normal use. Users who are particularly sensitive to heat or suffer from heat-sensitive disorders should take particular care when handling this appliance.
14) Do not add detergents or other cleaning agents to the water in the chamber. Use plain water only.
15) Before storing the machine for long periods, check that there is no water in the water chamber.
16) Do not leave the iron on any flat surface without using the special mat.
17) Do not stand the iron upright.
18)Do not leave the appliance unattended while in operation. Keep it away from the reach of children and persons unfit to use it.
19) Let the iron soleplate cool down before storing the appliance after ironing.
20) Do not attempt to use the machine if it appears to be faulty: Contact your dealer or an authorized Technical Service Centre.
21) If the overheating safety control is activated, the iron and the control panel will stop operating. In this case, the appliance can only be re-activated by qualified service personnel.
22) Do not expose the appliance to rain or moisture. Keep out of direct sunlight.
23) For all repairs, always contact your Dealer and have your appliance serviced at an authorized Technical Service Centre: Always use original spare parts and accessories so as to maintain the appliance in good working order and not invalidate the guarantee.
*This appliance meets all the requirements of the EN 55014 regulations on radio interference.
SAVE THESE INSTRUCTIONS
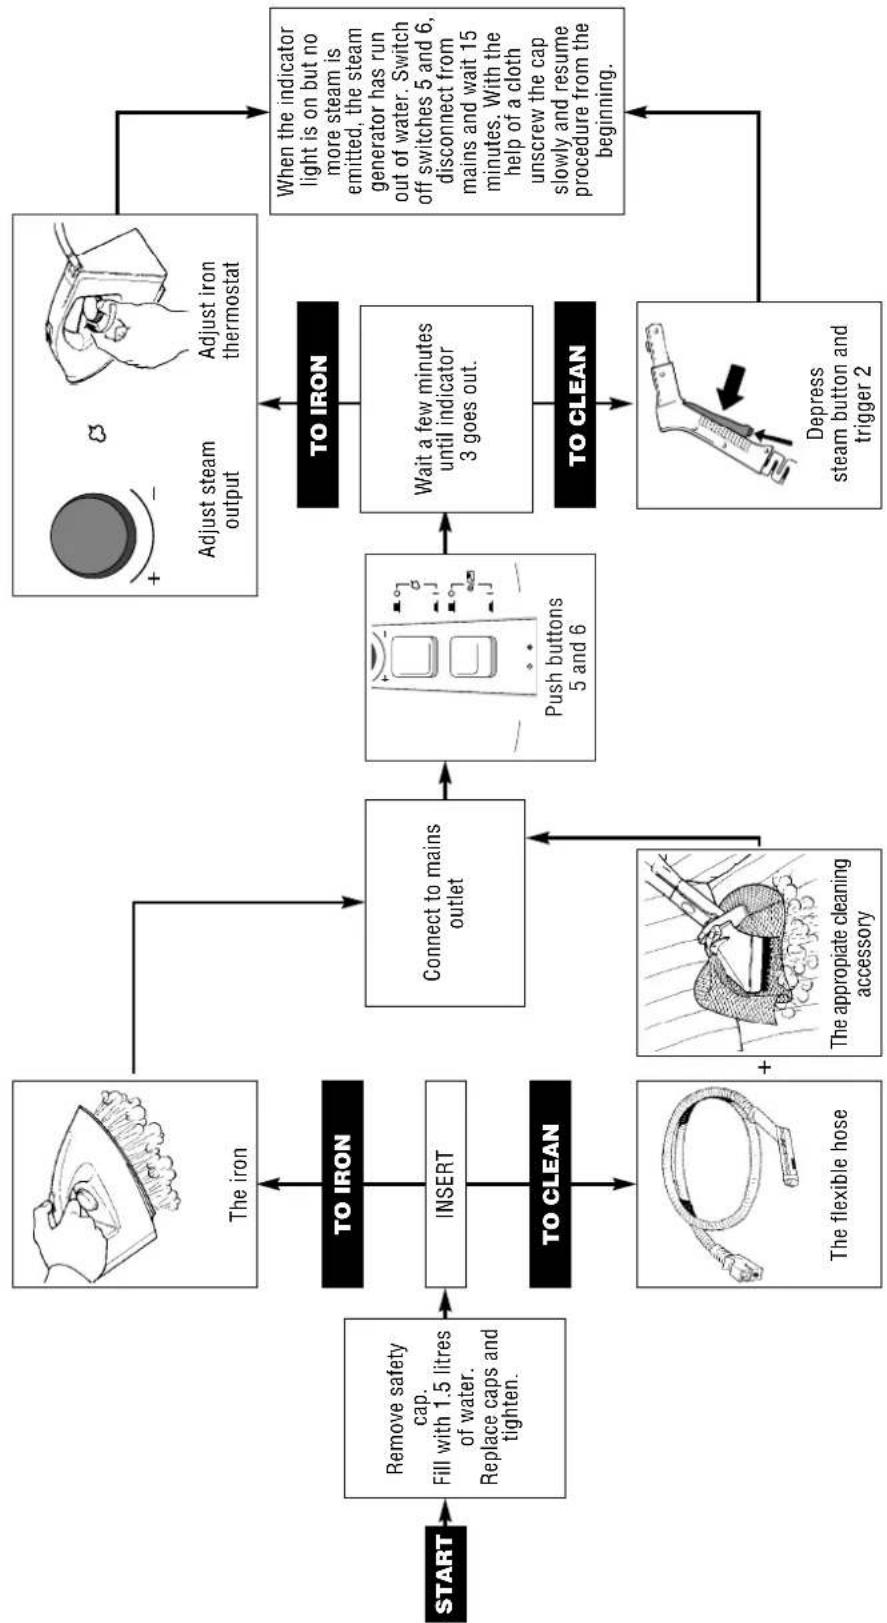
ASSEMBLING AND PREPARED FOR USE
SETTING UP THE STEAM-GENERATOR WATER CHAMBER
Always make sure that the appliance is disconnected from the power mains before you perform any setting-up or maintenance operations.
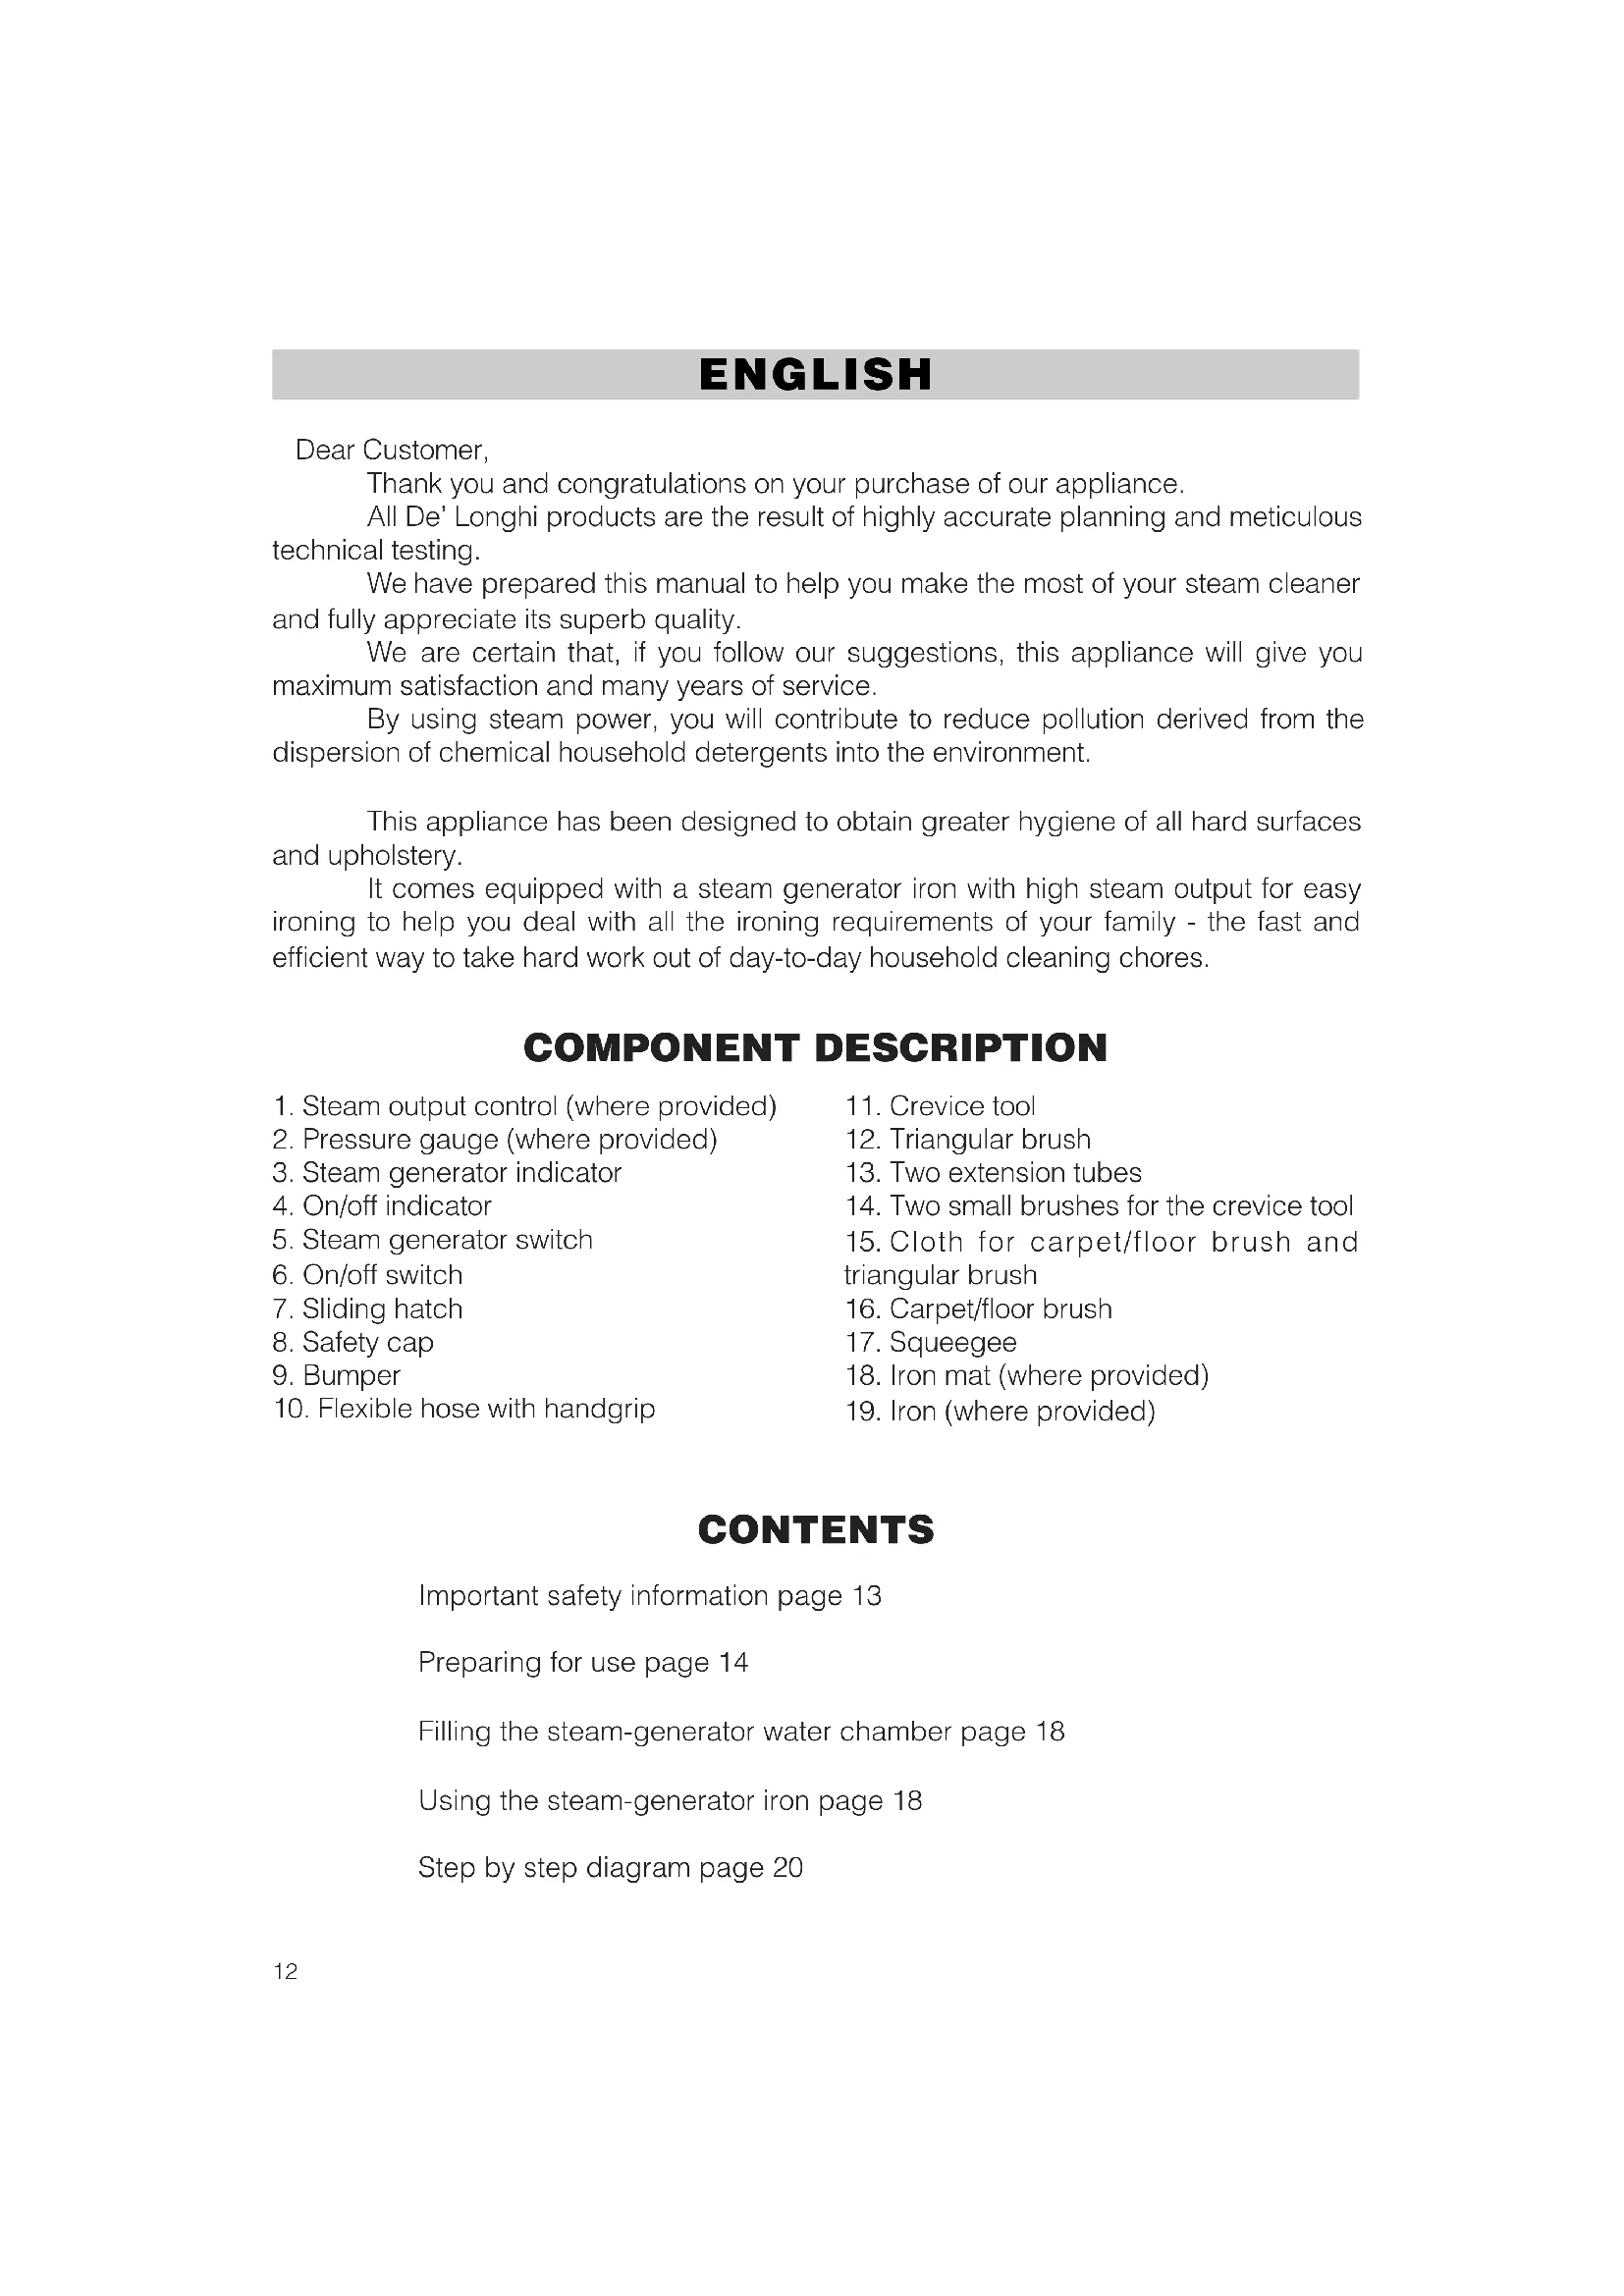
To open the water chamber, twist the cap counterclockwise to unscrew (fig. 1).
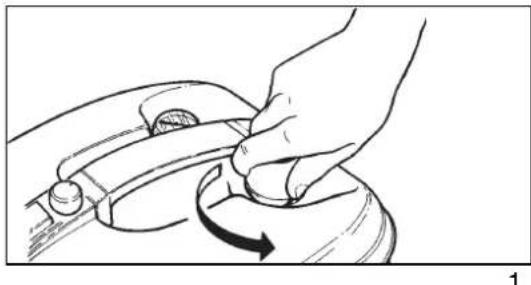
Fill the chamber with no more than 1.5 litres of tap water (a higher level could impair the operation of the machine) (fig. 2).
Reposition the cap and tighten until securely locked.
SAFETY CAP
Your machine is equipped with a safety cap that will turn idly as long as the chamber is pressurized only to engage and unscrew as soon as the pressure abates.
To open the steam generator, proceed as follows:
-
Never open the cap until the water is completely finished.
-
Discharge all steam using the switch on the handgrip or the steam delivery button on the iron.
- Turn the appliance off using the ON/OFF switch and unplug from the mains socket.
- Wait a few minutes (at least 15).
- Place a cloth over the tank cap when opening. Open the cap slowly and carefully to allow residual steam to escape.
FITTING CLEANING TOOLS ONTO THE MACHINE
To fit the flexible hose onto the machine (fig. 3):
- insert the flexible hose into its coupling pressing in until it clicks into place;
- clamp with slight pressure the flap into its housing.
make sure the hose is firmly in place by trying to remove it without pressing the locking button.

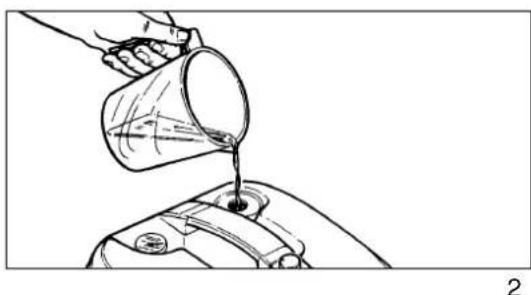
All cleaning tools and accessories are fitted onto one or both extension tubes as required, proceeding as follows:
- firmly grasp the piece onto which to fit the accessory. Push the locking button with the thumb of the same hand.
with your other hand, insert the accessory and slide it in carefully until the locking button pops out (fig. 4).
To remove the accessory, reverse the operation, taking care not to pinch the thumb holding down the button.
SWITCHING THE APPLIANCE ON
Connect the plug to a mains outlet, switch the on/off button (6) to the on position and switch the steam generator on by means of its switch (5). The switch indicators (3 and 4) will come on.
When the steam-generator indicator (3) goes out and the needle on the pressure gauge (2) (where provided) is in the green area, the machine is ready for use. This will take approx. 15 minutes.
While using, the indicator (3) will go on and off. This is completely normal.
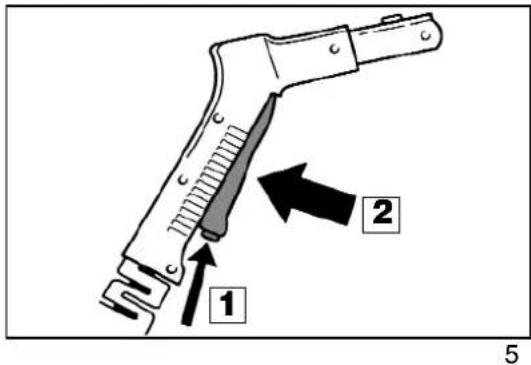
For steam output, press button (1) and then keep trigger (2) depressed (fig. 5). When the trigger (2) on the handgrip is released, steam output will stop immediately.
CLEANING
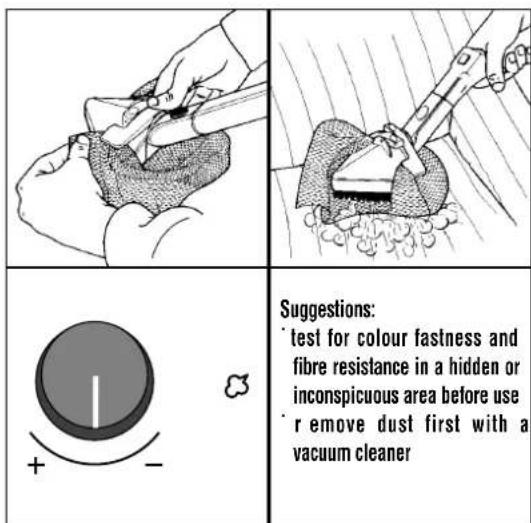
Carpets and rugs
Tools: carpet/floor brush plus cloth accessory fastened with the spring clips. Steam output: medium setting

Armchairs, sofas, cushions, pillows, mattresses, car interiors
Tools: triangular brush plus cloth accessory fastened with the spring clips. Steam output: medium setting
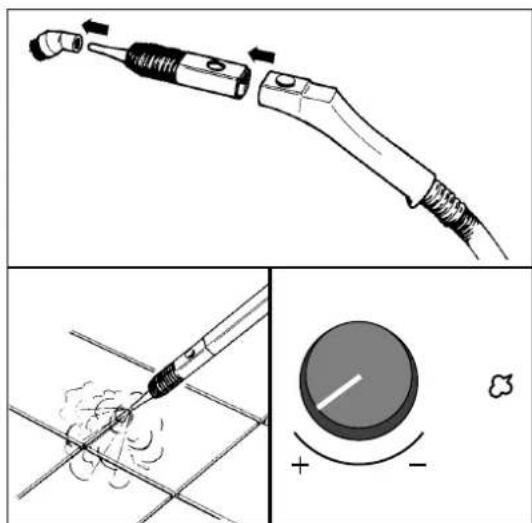
Tile grouting
Tools: crevice tool plus round brush Steam output: maximum setting
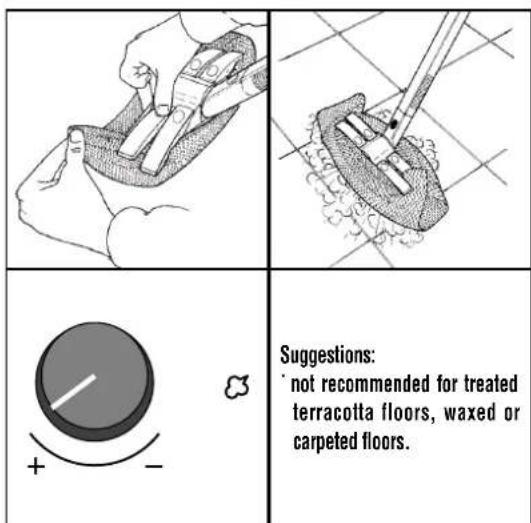
Hard floors
Tools: carpet/floor brush plus cloth accessory fastened with the spring clips Steam output: maximum setting
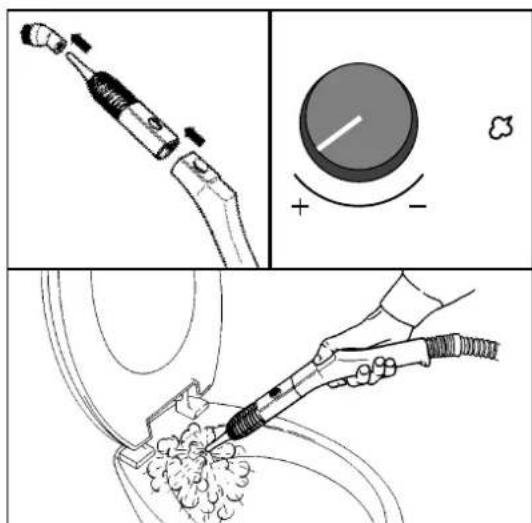
Bathroom ( shower box, fixtures, hand basins, toilets)
Tools: crevice tool plus round brush directly fitted onto flexible hose or extension tube Steam output: maximum setting
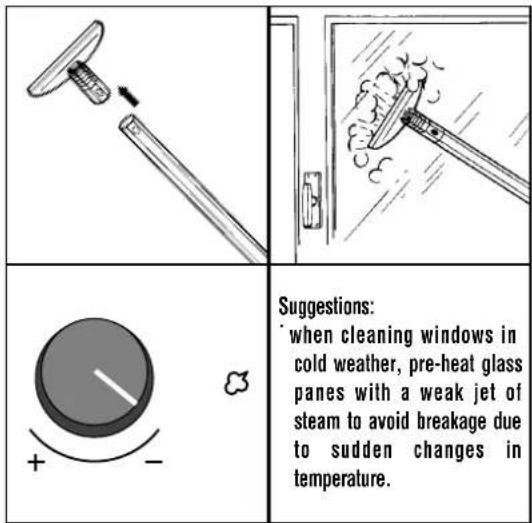
Mirrors, windows and car windows
Tools: extension tube plus squeezegee
Steam output: lowest setting
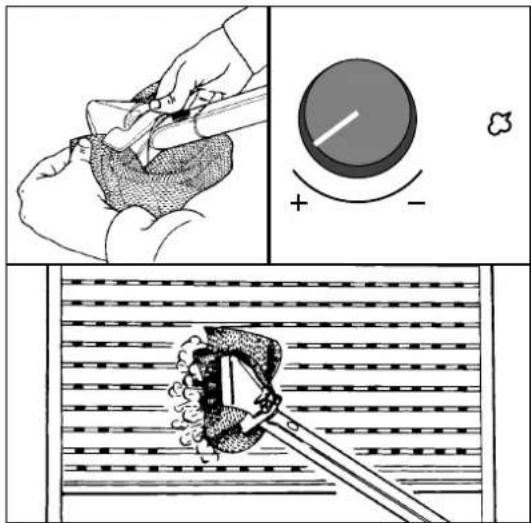
Roller shutters and vertical surfaces
Tools: triangular brush plus cloth accessory fastened with the spring clips
Steam output: maximum setting
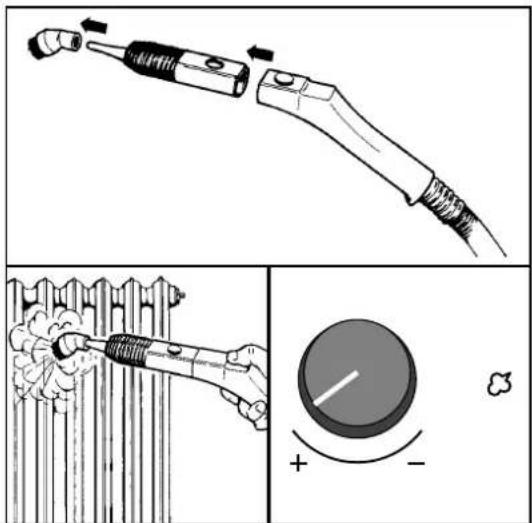
Central heating radiators, shutters, door jambs and hard-to-reach places
Tools: extension tubes, crevice tool plus round brush
Steam output: maximum setting
Ovens, hobs, cookers, refrigerators and other home appliances
Tools: crevice tool plus round brush, then hand-held cloth
Steam output: maximum setting
Car/motorcycle motors and bicycles
Tools: crevice tool
Steam output: maximum setting

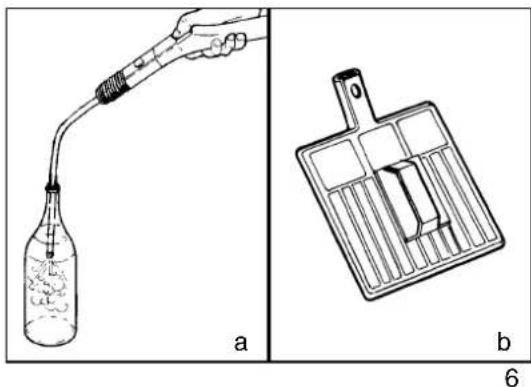
N.B. On request, the machine may be equipped with a special bottle-cleaning nozzle (fig.6a) and wallpaper-removing accessory (fig.6b).
- Place a cloth over the cap before opening. Open slowly and carefully, allowing any residual steam to escape. Refill the tank as described above.
USING THE IRON
(where provided)
To start the steam generator, proceed as described above.
N.B. A professional iron can be supplied with your steam cleaner on request.
SETTING UP THE IRONING SYSTEM
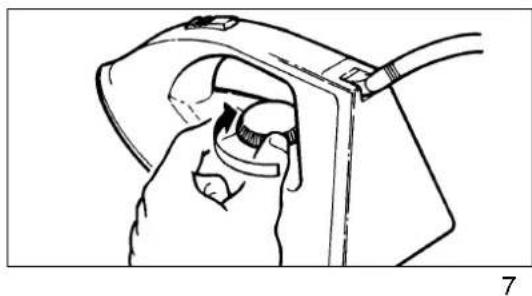
To connect the iron to the machine:
- open the hatch (7) on the appliance;
- fit the iron coupling into its slot, pressing in firmly until the locking button clicks;
make sure the coupling is firmly in place by trying to remove it without pressing the locking button.
To switch the machine on, follow the instructions described above.
Adjust the iron thermostat to the required position (fig. 7).
REFILLING THE WATER CHAMBER
The water chamber can be refilled only when steam output has stopped. Proceed as follows:
- Turn off the machine by depressing the on/off switch and disconnect from the mains.
- Wait several minutes before refilling the chamber so as to avoid sudden changes in temperature.
Wait for the steam generator indicator (3) and iron indicator to go out before you start ironing.
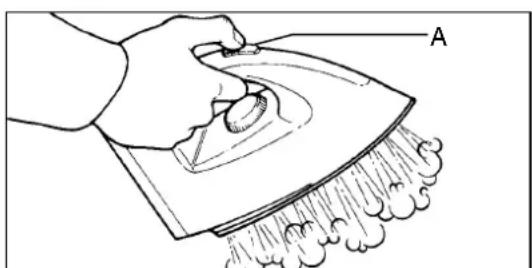
Before using the iron for the first time, it is advisable to direct steam onto a cloth for some seconds to eliminate any impurities that may be inside the iron. To do this, press the "steam output" button (A, fig. 8) on the upper part of the iron.
Adjust the steam control (1) to obtain the quantity of steam required.
ADVICE FOR PERFECT IRONING RESULTS
Adjust steam output to the maximum setting by turning the steam control (1) clockwise. Steam the area to be ironed by pressing the "steam output" button (A, fig. 8) on the iron and holding the iron about 20~cm above the garment.
8
The best technique for perfect ironing is to dampen the garment with steam, then dry-iron for wrinkle-free results.
Remember that very heavy fabrics or difficult creases need more steaming than lightly wrinkled garments, which require only minimum steaming.
DRY IRONING
Switch on only the on/off switch (6), leaving the steam generator switch (5) off. Wait for the indicator light on the iron to go out before ironing.
Fabric guide for perfect results
Acetate - Acrylics - Nylon

DRY-IRON VERY LIGHTLY
Polyester - Rayon

DRY-IRON ON REVERSE OF FABRIC AT LOWEST SETTING
Silk

DRY-IRON ON REVERSE OF FABRIC
Wool- Light cotton- Fine linen

DRY-IRON ON REVERSE OF FABRIC WITH A THIN CLOTH BETWEEN IRON AND FABRIC
Cotton - Fine linen - Starched fabrics

STEAM IRON WHITE AND LIGHT-COLOURED FABRICS ON RIGHT SIDE AND ON REVERSE OF FABRIC FOR DARK COLOURS
Linen

Steam pressure 3.5 bar max
Steam-ready time 15 min.
Cleaning autonomy approx. 40 min.
GUARANTEE
The guarantee certificate is printed on the packaging and must be cut out, filled in, and kept together with a proof of purchase including the date of the sale. You will be requested to produce these documents to the Technical Service in case of repairs.
STEP BY STEP INSTRUCTIONS
FRANÇAIS
Cher Client,
WITTE EN LICHE T KLEUREN AAN BUITENKANT, DONKERE KLEUREN AAN DE BINNEKANT STRIJKEN MET STOOM
Linnen

DONKERE STOFFEN AAN DE BINNEKANT STRIJKEN MET OVERVLOEDIG STOOM
RENDEMENT
Ketelvermogen 1500W
PoaaKaKatakOpouoi toxoi
Aeovap:tpyovik boopto ka navi oTepeouevo 0ra Eikka kIgEaouata