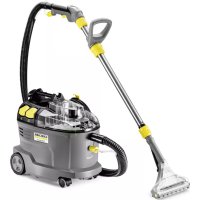
SC 1125 Plus - Steam cleaner Kärcher - Free user manual and instructions
Find the device manual for free SC 1125 Plus Kärcher in PDF.

| Product type | Steam cleaner |
| Brand | Kärcher |
| Model | SC 1125 Plus |
| Supply voltage | 220-240 V |
| Frequency | 50/60 Hz |
| Heating power | 1400 W |
| Iron power | 700 W |
| Max. operating pressure | 0.3 MPa |
| Boiler capacity | 1.2 L |
| Heating time | approx. 8 min |
| Max. steam flow rate | 50 g/min |
| Dimensions (L x W x H) | 390 x 190 x 290 mm |
| Weight (without accessory) | 3.3 kg |
| Protection class | I |
| Degree of protection | IP X4 |
| Included accessories | Steam gun, pencil jet nozzle, round brush, manual nozzle, terry cloth cover, microfiber scouring cloth, turbo steam brush, extension tubes (2), floor nozzle, floor cloth, iron |
| Main functions | Steam cleaning, steam/dry ironing, wallpaper stripper (optional) |
| Safety | Steam lever lock (child safety), pressure switch, dry-run thermostat, safety thermostat, safety closure |
| Maintenance | Rinse boiler after 5 refills, descale according to water hardness, wash accessories at 60°C |
| Spare parts available | Descaling sticks, microfiber cloths, brushes, covers, iron, etc. |
Frequently Asked Questions - SC 1125 Plus Kärcher
User questions about SC 1125 Plus Kärcher
0 question about this device. Answer the ones you know or ask your own.
Ask a new question about this device
Download the instructions for your Steam cleaner in PDF format for free! Find your manual SC 1125 Plus - Kärcher and take your electronic device back in hand. On this page are published all the documents necessary for the use of your device. SC 1125 Plus by Kärcher.
USER MANUAL SC 1125 Plus Kärcher
natural_image
Line drawing of a portable electric vacuum cleaner with control panel and handle (no text or symbols)Register and win! www.kaercher.com
Deutsch 5
English 16
Français 26
Italiano 37
Nederlands 48
Español 59
Português 70
Dansk 81
Norsk 91
Svenska 101
Suomi 112
Ελληνικά 123
Türkçe 134
Русский 144
Magyar 155
Čeština 166
Slovenščina 176
Polski 186
Românește 197
Slovenčina 208
Hrvatski 218
Srpski 228
Български 239
Eesti 250
Latviešu 260
Lietuviškai 271
Українська 281
natural_image
Illustration of an open book with grid-like pages and a curved arrow indicating rotation (no text or symbols)| DE Kurzanleitung | SV Snabbguide | RO Instructiuni pe scurt |
| EN Quick reference | FI Pikaohje | SK Krátky návod |
| FR Instructions abrégées | EL Σύντομες odηγίε | HR Krakte upute |
| IT In sintesi | TR Kisa Kullanım Talimati | SR Kratko uputstvo |
| NL Korte handleiding | RU Краткое руководство | BG Кратко упътване |
| ES Descripción breve | HU Rövid bevezetés | ET Lühijuhend |
| PT Instruções resumidas | CS Stručný návod | LV Îsa lietošanas instrukcija |
| DA Kort brugsanvisning | SL Kratko navodilo | LT Trumpa instrukcija |
| NO Kortveiledning | PL Skrócona instrukcja obsługi | UK Стислий посібник |
text_image
1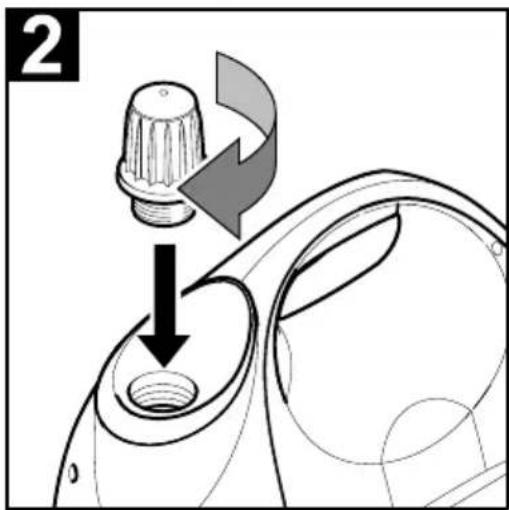
text_image
2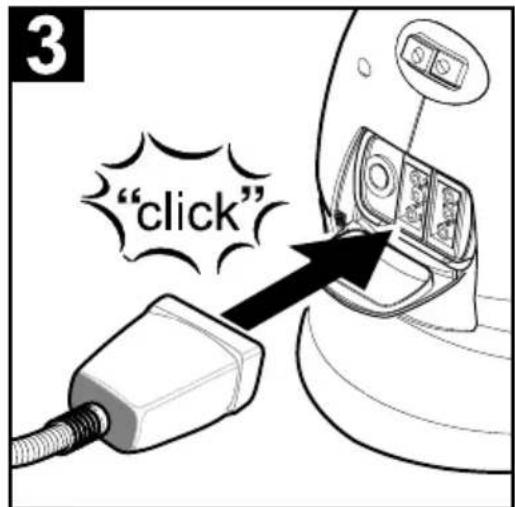
text_image
"click"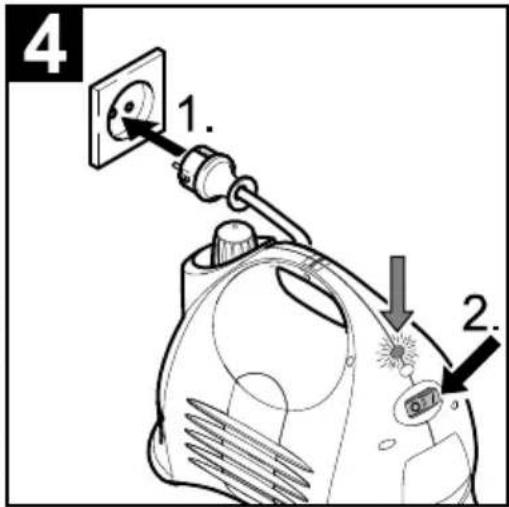
text_image
4 1. 2.
text_image
5 8 min 9.7 9.7
text_image
6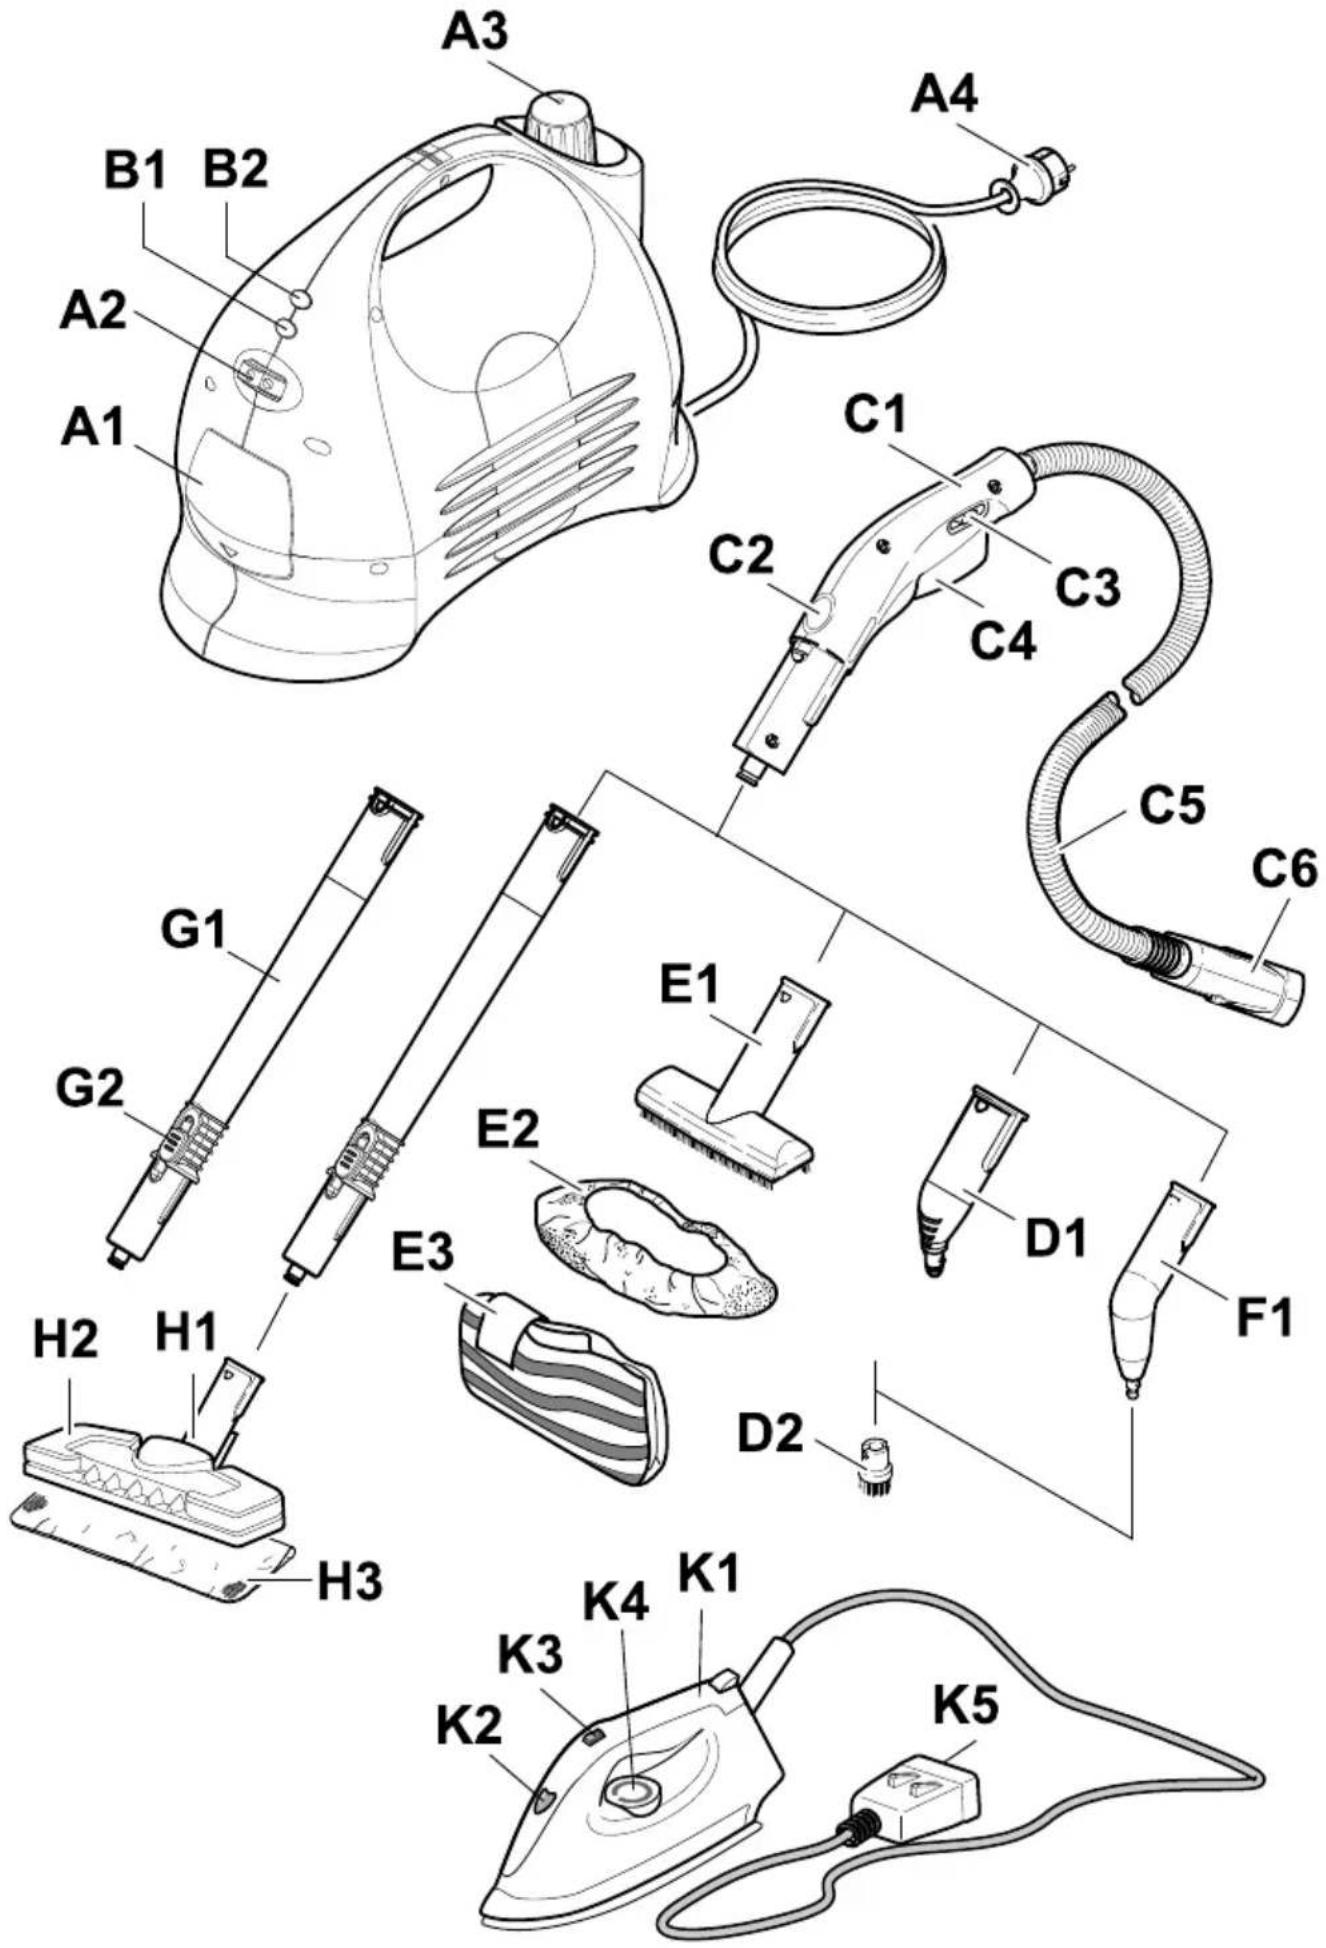
text_image
A3 B1 B2 A2 A1 C1 C2 C3 C4 C5 C6 G1 G2 E1 E2 E3 D1 F1 H2 H1 H3 D2 K3 K4 K1 K2 K5Inhalt
natural_image
Line drawing of an electric vehicle plug with a cable, showing a plug inserted into a socket and a black arrow indicating direction (no text or symbols)text_image
"click" "click"Zubehör trennen
⚠Gefahr
Description of the Appliance EN 6
Safety instructions ..... EN 6
Operation.... EN 8
How to Use the Accessories EN 9
Maintenance and care .... EN 13
Troubleshooting ..... EN 14
Technical specifications . . . EN 15
General information
Dear Customer,

Please read and comply with these original instructions prior to the initial operation of your appliance and store them for later use or subsequent owners.
Proper use
Use the steam cleaner only for private households.
The appliance is intended to be used with steam and can be used with the appropriate accessories as described in these operating instructions. You will not need any detergent. Please adhere to the safety instructions.
Symbols in the operating instructions
⚠️Danger
Immediate danger that can cause severe injury or even death.
⚠ Warning
Possible hazardous situation that could lead to severe injury or even death.
Caution
Possible hazardous situation that could lead to mild injury to persons or damage to property.
Symbols on the machine

Steam
CAUTION - Danger of scalding
Environmental protection

The packaging material can be recy- cled. Please do not place the packag- to the ordinary refuse for disposal, but ge for the proper recycling.

Old appliances contain valuable materials that can be recycled. Please arrange for the proper recycling of old appliances. Please dispose your old appliances using appropriate collection systems.
Notes about the ingredients (REACH)
You will find current information about the ingredients at:
The scope of delivery of your appliance is illustrated on the packaging. Check the contents of the appliance for completeness when unpacking.
In the event of missing accessories or any transport damage, please contact your dealer.
Quick Reference
→ See page 4.
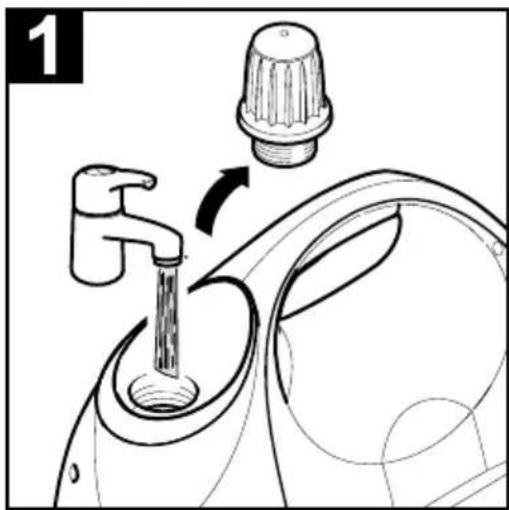
1 Fill the steam cleaner with 1.2 liters of water.
2 Screw in safety cap.
3 Insert the steam plug into the appliance connector.
4 Plug in the main plug.
Turn on the appliance.
The orange indicator light comes on.
5 Wait until the orange indicator lamp goes out.
6 Connect the accessories to the steam gun.
The steam cleaner is ready to use.
Description of the Appliance
→ See page 3.
A1 Appliance connector with cover
A2 Switch - ON/OFF
A3 Safety cap
A4 Power cord
B1 Indicator lamp (red) - lack of water steam boiler
B2 Indicator lamp - heater (ORANGE)
C1 Steam gun
C2 Unlocking button
C3 Steam lever locking (child control) Front – steam lever blocked Middle – reduced steam amount Back – maximum steam amount
C4 Steam lever
C5 Steam hose
C6 Steam plug
D1 Detail nozzle
D2 Round brush
E1 Hand nozzle
E2 Terry cloth cover
E3 Micro-fibre abrasive cloth
F1 Steam turbo brush
G1 Extension tubes (two tubes)
G2 Unlocking button
H1 Floor nozzle
H2 Retaining clip
H3 Floor cleaning cloth
K1 Steam iron
K2 Indicator lamp - steam iron heating
K3 Switch - steam ironing
K4 Temperature controller
K5 Steam plug
Safety instructions
⚠️Danger
■ The appliance may not be used in areas where a risk of explosion is present.
If the appliance is used in hazardous areas the corresponding safety provisions must be observed.
■ Never use the appliance in pools containing water.
■ The device should not be used to clean electrical appliances such as oven, exhaust, micro-wave, televisions, lamps, hair-dryer, electrical heating systems, etc.
- Check the faultless condition of the appliance and the accessories before using it. Otherwise, the appliance must not be used. Please check in particular the power cord, the safety lock, and the steam hose.
If the power cord is damaged, please arrange immediately for the exchange by an authorized customer service or a skilled electrician.
■ Please arrange for the immediate exchange of a damaged steam hose. You may only use a steam hose that is recommended by the manufacturer (see spare parts list for the order number).
■ Never touch the mains plug and the socket with wet hands.
■ Never use the appliance to clean objects containing hazardous substances (e.g. asbestos).
■ Never touch the steam jet from a short distance with your hands and never direct the steam jet to persons or animals (risk of scalds).
⚠ Warning
■ The appliance may only be connected to an electrical supply which has been installed in accordance with IEC 60364.
■ The appliance may only be connected to alternating current. The voltage must correspond with the type plate on the appliance.
In wet rooms, e.g. bathrooms, connect the appliance to sockets with a series connected RCD adapter.
■ Unsuitable extension cables can be hazardous. Only use a splashproof extension cable with a minimum section of 3 × 1 mm^2 .
■ The connection between power cord and extension cable must not lie in water.
If couplings of the power cord or extension cable are replaced the splash protection and the mechanical tightness must be ensured.
■ The operator must use the appliance correctly. When working with the appliance, he must consider the local conditions and pay due care and attention to other persons, in particular children, who are nearby.
This appliance can be used by children aged from 8 years and above and persons with reduced physical, sensory or mental capabilities or lack of experience and knowledge if they have been given supervision or instruction concerning use of the appliance in a safe way and understand the hazards involved. Children shall not play with the appliance. Cleaning and user maintenance shall not be made by children without supervision.
■ Never leave the appliance unattended when it is in operation.
■ Be very careful while cleaning tiled walls with sockets.
Caution
■ Make sure that the power cable or extension cables are not damaged by running over, pinching, dragging or similar. Protect the power cable from heat, oil, and sharp edges.
■ Never fill solvents, solvent-containing liquids or undiluted acids (e.g. detergents, benzene, paint thinner, and acetone) into the water reservoir as these substances affect the materials used on the appliance.
■ The appliance must provide of a stable ground.
■ Use and store the unit only in accordance with the specifications in the description and/or figure.
■ The steam switch must not be locked during the operation.
■ Protect the appliance from rain. Do not store outside.
Safety Devices
Caution
Safety devices protect the user and must not be modified or bypassed.
Pressure controller
The pressure controller keeps the boiler pressure during the operation as constant as possible. The heating is turned off if the maximum operating pressure of 4 bar is reached in the boiler and is reactivated in case of a pressure drop in the boiler due to steam tapping.
Low-water thermostat
When the water in the boiler becomes exhausted, the temperature of the heating increases. The low-water thermostat turns off the heating, and the red low-water indicator lamp lights up. The heating is prevented from being turned on again until the boiler has cooled down or refilled with water.
Safety thermostat
If the boiler thermostat fails and the appliance overheats, then the safety thermostat turns off the appliance.
Please contact your local KÄRCHER customer service to arrange for the reset of the safety thermostat.
Safety lock
The safety lock seals the boiler against the steam pressure that builds up in the boiler. If the pressure controller is defect and the steam pressure in the boiler rises, a pressure control valve in the safety lock opens, and steam is emitted through the lock to the outside.
Please contact your local KÄRCHER customer service before you put the appliance into operation again.
Operation
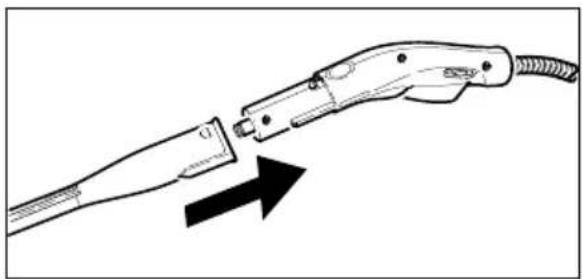
Attaching the Accessories
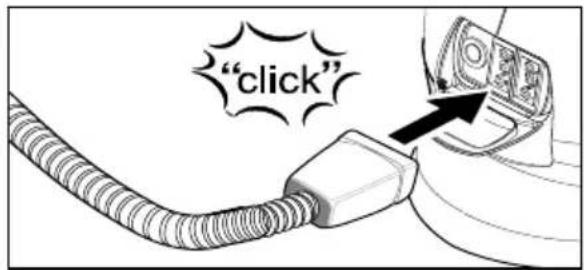
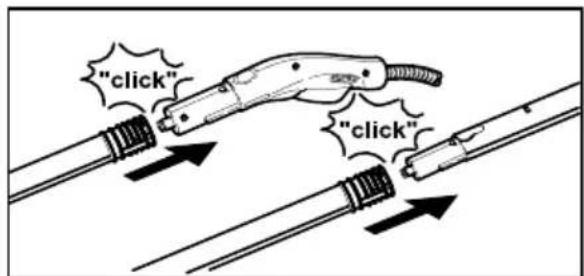
→ Tightly insert the steam plug into the appliance connector. The plug must click into place audibly.
text_image
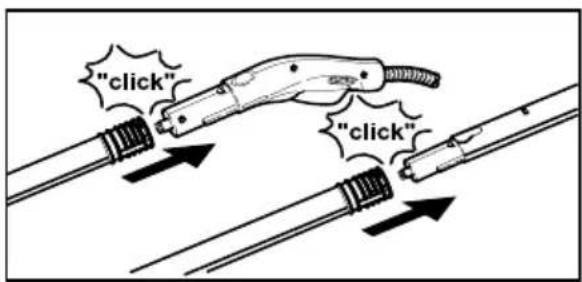
"click"→ Connect the required accessories (see Chapter "Using accessories) to the steam gun. Insert the open end of the accessory on the steam gun and push onto the steam gun until the unlocking button of the steam gun locks into place.
natural_image
Line drawing of a hand holding an electric plug with a cable, showing a black arrow pointing to the plug (no text or symbols present)→ Use the extension pieces if necessary. To do so, connect one or both extension pieces to the steam gun. Insert the required accessories on the free end of the extension piece.
text_image
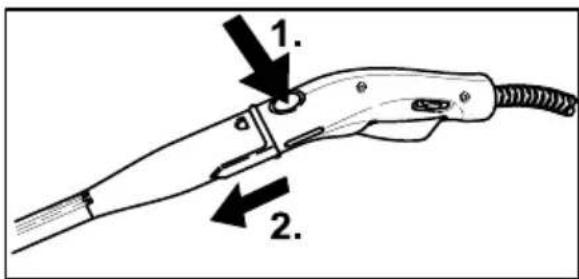
"click" "click"Removing the Accessories
⚠️Danger
Hot water may drip out of the accessory parts while you are detaching them! Never detach accessory parts while steam streams out - risk of scalding!
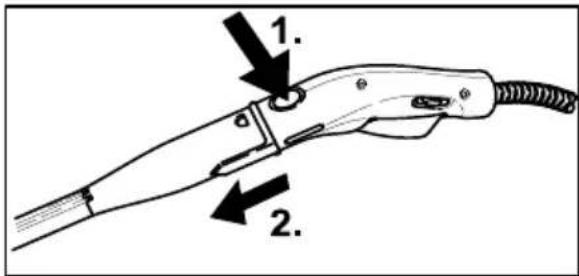
→ Push the lock to the front (steam switch blocked).
→ To detach the accessory parts, press the unlocking button and pull the items apart.
text_image
1. 2.Fill up with water
Note: If you always use usual commercial distilled water it is not necessary to descale the boiler.
Caution
Do not use condensation water from the drier!
Do not fill in detergents or other additives!
→ Remove the safety cap from the device.
→ Empty remaining water from boiler.
→ Fill the boiler with a maximum of 1.2 liters of fresh tap water.
→Note: The boiler can be filled up to 2 cm below the edge of the filler neck. You can cut down the heating-up time by using warm water.
→ Screw the safety cap back onto the device.
Turning on the Appliance
→ Place the unit securely on a firm surface.
Note: Do not carry the unit while cleaning.
Caution
Do not turn the appliance on without water in the boiler. Otherwise, the appliance may overheat (see Help with faults).
→ Insert the mains plug into a socket.
→ Press the ON/OFFswitch to turn on the appliance.
The orange indicator lamp glows.
→ The orange indicator lamp goes out after approximately 8 minutes.
The steam cleaner is ready to use.
→ Push the steam switch lock to the back.
Note: If you push the lock forward, the steam switch cannot be actuated (child control).
→ While operating the steam switch, always direct the steam gun at a separate piece of cloth until the steam is emitted evenly.
Note: The heating of the steam cleaner is turned on in regular intervals during the operation of the appliance in order to maintain the pressure in the boiler at a constant level. When the heating is turned on, the orange indicator lamp (heater) lights up.
Adjusting the Steam Quantity
→ Use the steam switch to regulate the discharged steam.
→ The lock of the steam switch also allows for steam volume regulation.
- Switch in front position: no steam (child control)
- Switch in middle position: reduced steam amount
- Switch in back position: maximum steam amount
Refilling Water
The steam pressure will sink if the boiler is empty. Then the red control light will indicate low water.
To immediately refill water, the remaining steam pressure can be discharged quickly while the control light indicates low water.
Note: The safety lock cannot be opened as long as slight pressure remains in the boiler.
→ Push the steam switch until steam discharge stops. Now, the boiler of the appliance is unpressurized.
⚠️Danger
A residual amount of steam may be emitted when you open the safety lock. Be careful when opening the safety lock, there is a risk of scalding.
→ Remove the safety cap from the device.
→ Press the ON/OFFswitch to turn off the appliance.
⚠️Danger
If the boiler is hot, there is the risk of scalding as the water may splash back during the filling process! Do not fill any detergents or other additives into the boiler!
→ Fill the boiler with a maximum of 1.2 liters of fresh tap water.
→ Screw the safety cap back onto the device.
→ Press the ON/OFFswitch to turn on the appliance.
→ The orange indicator lamp goes out after approximately 8 minutes. The steam cleaner is ready to use.
Turning Off the Appliance
→ Press the ON/OFFswitch to turn off the appliance.
→ Disconnect the mains plug from the socket.
→ Press the cover of the appliance connector to the bottom and disconnect the steam plug from the appliance connector.
How to Use the Accessories
Important application instructions
Cleaning of Textiles
Prior to treatment with the steam cleaner, always check the reaction of the textiles in an inconspicuous location: Steam heavily at first, then let dry and then check for colour or shape changes.
Cleaning of Coated or Lacquered Surfaces
Be careful when you clean kitchen and living room furniture, doors, parquet, lacquered or plastic-coated surfaces. The wax, furniture polish, plastic surfaces or paint can come loose or stains can be created. Therefore, always clean these surfaces with a steamed cloth only.
Caution
Never direct the steam jet at glued edges as the edge band may loosen. Do not use the steam cleaner on unsealed wooden or parquet floors.
Cleaning of Glass
In case of low outside temperatures, especially in the winter, warm up the window pane by slightly steaming the entire glass surface. This will prevent tensions on the surface which might lead to glass breakage.
Caution
Do not direct steam onto the sealed locations of the window frame to prevent damage.
Steam gun
You can use the steam gun without any additional accessories, e.g.:
- to remove odours and wrinkles from hanging clothes by steaming them at a distance of 10 to 20cm .
– to remove dust from plants. Here, keep a distance of 20-40 cm.
– for moist dusting, by briefly steaming the cloth and wiping the furniture with it.
Detail nozzle
The closer this nozzle is to the contaminated area, the higher the cleaning effect, as the temperature and the steam are highest at the nozzle output. Especially suited for cleaning difficult access locations, joints, fittings, drains, sinks, toilets, blinds and heaters. Heavy limescale can be drenched in vinegar prior to steam-cleaning. Let the vinegar penetrate for about 5 minutes.
Round brush
Attach the round brush directly to the detail nozzle. Especially well-suited for hard to access locations, such as fittings or drains.
Caution
Not suited for the cleaning of sensitive surfaces.
Hand nozzle
Pull the terry cloth cover over the hand nozzle. Especially well-suited for small washable areas, shower stalls, mirrors or furniture cloth material.
Micro-fibre abrasive cloth
Pull up the micro-fibre abrasive cloth over the hand nozzle.
Application:
- Removing calcium and soap residues in the bath-room (for e.g shower cabins, tiled walls).
- While cleaning mirrors, we recommend that you polish again using a micro-fibre cloth (micro-fibre set of dusters "Bath", order no. 2.863-171).
Can be washed at 60 °C ; please do not use any soft detergents. Not suitable for drier.
Floor nozzle
Suited for all washable wall and floor coverings, e.g. stone floors, tiles and PVC floors. Work slowly on very dirty surfaces to allow the steam to act on the dirt for a longer period of time.
Note: Detergent residue or care emulsions that are still present on the surfaces to be cleaned, can lead to smears when steam cleaned. However, these will disappear with repeated cleaning procedures.
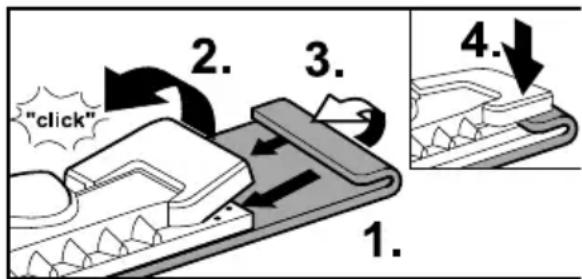
→ Attach the floor cloth to the floor nozzle.
1 Fold the floor cloth the long way and place the floor nozzle on top of it.
2 Open holding clamps.
3 Place the cloth ends into the openings.
4 Close the holding clamps.
text_image
"click" 1. 2. 3. 4.Caution
Do not insert fingers between the clamps.
Steam turbo brush
The steam turbo brush is set swinging by the emitted steam and is suited ideally for the easy cleaning of extreme dirt at places in the kitchen and the bathroom that are difficult to access.
Caution
Using the turbo steam brush for longer periods can lead to circulation problems in the hand caused by hands (finger cramps, cold fingers). Please take a break if that happens.
It is not possible to specify a generally valid operation time, since this depends on several factors:
– Proneness to blood circulation deficiencies (cold, numb fingers).
– A firm grip impedes blood circulation.
– Continuous operation is worse than an operation interrupted by pauses.
In case of regular, long-term operation of the turbo steam brush and in case of repeated occurrence of the symptoms (e.g. cold, numb fingers) please consult a physician.
Steam iron
⚠️Danger
■ The steam iron is not to be used if it has been dropped, if there are visible signs of damage or if it is leaking.
■ Hot steam iron and hot steam escaping! Point out to other people the possible risk of being scalded or burned. Never direct the steam jet at people or animals (risk of scalding). Do not touch any electrical leads or combustible objects with the hot steam iron.
⚠ Warning
- Keep the steam iron and its cord out of reach of children less than 8 years of age when it is energized or cooling down.
■ The steam iron must be used and rested on a stable surface.
Note: We recommend using the Kärcher ironing table with active steam extraction (2.884-933.0). This ironing table has been designed to match your new steam cleaner. It facilitates and, thus, accelerates the ironing process substantially. In any case, you should use an ironing table which is covered with a mesh-type underlay allowing the steam to pass through.
→ Tightly insert the steam plug of the iron into the appliance connector. The plug must click into place audibly.
→ Make sure that there is fresh tap water in the boiler of the steam cleaner.
→ Start-up the steam cleaner according to the description.
→ Wait until the steam cleaner is ready to use.
Steam ironing
All fabrics can be steam ironed. Delicate imprints or fabrics should be ironed on the reverse or according to the manufacturer's specifications.
→ Adjust the temperature control of the steam iron within the notched range ( ·s/MAX ).
→ As soon as the indicator lamp of the heater of the iron switches off, you can start ironing.
Note: The sole plate must be hot to prevent the steam from condensing on the sole plate and dripping onto the garment to be ironed.
→ Press the steam button on the iron to steam iron.
- Steaming at intervals: Press the switch to the front. A steam burst is emitted while the switch is being pressed.
- Continuous steaming: Press the switch to the back. The switch locks and steam is continuously emitted. To release, press the switch to the front.
→ Direct the first burst of steam at the start of the ironing process or after ironing breaks at a separate piece of cloth until the steam is emitted evenly.
→ You can hold the iron in an upright position to apply steam to curtains, dresses, etc.
Dry ironing
Note: Even if you iron without steam, there must be water in the boiler.
→ Adjust the temperature of the iron according to the garment you want to iron.
| • Synthetics |
| •• Wool, silk |
| ••• Cotton, linen |
Note: Please observe the ironing and washing instructions in your garment.
→ As soon as the indicator lamp of the heater of the iron switches off, you can start ironing.
Wallpaper remover (optional)
You can use the wallpaper remover with the steam cleaner to remove paper wallpapers.
→ Place the entire surface of the wallpaper remover along the edge of a strip of wallpaper. Switch on the steam supply and allow the steam to act on the wallpaper until it is completely soaked (approximately 10 seconds).
→ Move the wallpaper remover to the next piece of wallpaper you want to remove. Hold the steam switch pressed while you move the tool. Lift the soaked piece of wallpaper using a flat trowel, and pull it off the wall. Move the wallpaper remover from strip to strip, and pull the wallpaper off in strips.
→ In case of woodchip wallpaper that has been painted several times, the steam may not be able to soak the wallpaper. Thus, we recommend to prepare the wallpaper using a spiked roller before steam is applied.
Textile cleaning nozzle (optional)
Application:
To freshen up hanging textiles, such as jackets or curtains, by means of two functions:
- Defleecing garment using the thread lifter.
– Vaporizing and dewrinking of textiles (also eliminates odours).
If you actuate the steam switch steam is emitted. Direct the first burst of steam at a separate piece of cloth until the steam is emitted evenly.
Window nozzle (optional)
Application:
- Windows, Mirrors
– Glass surfaces on showers
- other glass surfaces
→ Apply steam to the glass surface from a distance of approximately 20 cm until the surface is moistened evenly.
→ The push the lock to the rear to prevent an undesired actuation of the steam switch.
→ Strip the glass surface in straight lines from the top to the bottom using the rubber lip of the window nozzle. Wipe the rubber lip and the bottom edge of the window dry after each strip.
Special accessories
Order number
Micro-fibre cloth set, bath 2.863-171
2 soft floor cloths made of plush velour, 1 abrasive cover for the hand nozzle, 1 polishing cloth for the mirrors and fixtures
Micro-fibre cloth set, kitchen 2.863-172
2 soft floor cloths made of plush velour, 1 soft cover made of plush velour, 1 cloth for the streak-free cleaning of stainless steel surfaces
Mikrofibre cloth set, soft floor 2.863-173 cloth
2 soft floor cloths made of velvet velour
Micro-fibre cloth set, soft cover2.863-174
2 soft covers made of plush velour
Terry-cloth rags 6.369-357
5 floor cloths made of cotton
Terry-cloth covers 6.370-990
5 covers made of cotton
Textile care nozzle 4.130-390
For freshening up clothes and textiles.
Round brush kit 2.863-058
4 round brushes for the detail nozzle
Round brush kit with brass bristles 2.863-061
removal of especially stubborn dirt ideal for insensitive surfaces.
Round brush with scraper 2.863-140
Round brush with two rows of heat-resistant bristles and a scraper. Not suitable for sensitive surfaces.
Wallpaper remover 2.863-062 to remove wallpaper and glue residue
Power nozzle and extension 2.884-282 For the cleaning of difficult to access areas (such as corners) with increased cleaning power.
Decalcifying sticks (9 pieces) 6.295-047
Active ironing board AB 1000 2.884-993 For excellent ironing results with substantial time-saving (only for 230 V)
Steam iron with special steel sole (order no. 2.884-503)
Anti-stick sole plate (order no. 2.860-132)
Maintenance and care
⚠️Danger
Always disconnect the mains plug and allow the steam cleaner to cool down before performing any maintenance work.
Note: If you always use usual commercial distilled water it is not necessary to descale the boiler.
Rinsing the boiler
Rinse the steam cleaner boiler at the latest after 5 boiler fillings.
→ Fill the boiler with water and shake it strongly. This dissolves lime scaling residing on the boiler bottom. → Empty water out.
Descaling the boiler
As limescale builds up on the boiler walls, we recommend to descale the boiler in the following intervals (RF=reservoir fillings):
| Degree of hardness ° dH mmol/l RF | |
| I soft 0-7 0-1,3 55 | |
| II medium 7-14 1,3-2,5 45 | |
| III hard | 14-21 2,5-3,8 35 |
| IV very hard | >21 >3,8 25 |
Note: Please contact your Conservancy Board or the local water supply company to inquire about the hardness of your water.
→ Disconnect the mains plug from the socket.
→ Completely empty the steam boiler.
⚠ Warning
Only use products approved by KÄRCHER to exclude any damages of the appliance.
→ User the KÄRCHER decalcifier sticks (order no. 6.295-047) to decalcify the water. Please follow the dosing instructions on the packaging while using the decalcifying solution.
Caution
Use caution when filling and emptying the steam cleaner. The descaling solution can have an aggressive effect on delicate surfaces.
→ Pour the descaling solution into the boiler and allow it to react for approximately 8 hours.
⚠ Warning
Do not screw the safety lock on the appliance during the decalcifying.
Do not use the steam cleaner as long as there is decalcifying agent in the boiler.
→ Empty the descaling solution after 8 hours. A small amount of the solution will remain in the boiler. Therefore, you should rinse the boiler two to three times with cold water to remove any residues of the descaler.
→ The steam cleaner is now ready for use again.
Care of the Accessories
Note: The floorcloth and the terry cloth cover have been pre-washed and can be used immediately for working with the steam cleaner.
→ You can wash dirty floorcloths and terry cloth covers in the washing machine at 60^ C. Do not use a liquid softener as this would affect the ability of the cloths to pick up dirt. You may tumble dry the cloths.
Troubleshooting
Often, failures have simple causes and you can do the troubleshooting yourself using the following overview. If you are in doubt or if the failure is not listed here please contact the authorized customer service.
⚠️Danger
Always disconnect the mains plug and allow the steam cleaner to cool down before performing any maintenance work.
Repair works may only be performed by the authorized customer service.
Long heating-up time
Steam boiler is decalcified.
→ Descale the steam boiler.
No steam
Red low-water indicator lamp lights up. No water in the steam boiler. Water scarcity thermostat switches off the heating.
→ Turn off the appliance.
→ See "Refilling Water" Page 9
Steam lever cannot be pressed anymore
Steam switch is secured with the lock / child-proof lock.
→ Push the steam switch lock to the back.
Check the steam plug
The steam plug is not completely inserted into the unit plug socket.
→ Tightly insert the steam plug into the appliance connector. The plug must click into place audibly.
After breaks during ironing, water drops will come out of the steam iron.
During longer breaks from ironing, the steam in the steam line can condense.
→ Direct the first burst of steam at a separate piece of cloth.
Steam iron "spits out" water!
→ Set the thermostat to level ….
→ Rinse or decalcify the steam boiler.
Warranty
The warranty terms published by the relevant sales company are applicable in each country. We will repair potential failures of your appliance within the warranty period free of charge, provided that such failure is caused by faulty material or defects in manufacturing. In the event of a warranty claim please contact your dealer or the nearest authorized Customer Service centre. Please submit the proof of purchase. (See address on the reverse)
Spare parts
Use only original KÄRCHER spare parts. You will find a list of spare parts at the end of these operating instructions.
Technical specifications
Electrical connection
| Voltage 220-240 | V |
| 1~50/60 Hz |
Protection class IP X4
Protective class I
Performance data
Heating output 1400 W
Heating output steam iron 700 W
Operating pressure max. 0,3 MPa
Heating time 8 min.
Max. steam quantity 50 g/min
Dimensions
Boiler capacity 1,2 l
Width 190 mm
Length 390 mm
Height 290 mm
Weight (without accessories) 3,3 kg
Subject to technical modifications!
Contenu
natural_image
Diagram of a hand holding an electric plug with a cable, showing a black arrow pointing to the plug (no text or symbols present)text_image
"click" "click"natural_image
Diagram of an electric vehicle plug with a cable, showing a plug inserted into a plug and being inserted into a plug (no text or symbols present)text_image
"click" "click"natural_image
Line drawing of a cable with a plug and connector, showing an arrow pointing to it (no text or symbols present)text_image
"click" "click"A2 Interruptor ON/OFF
natural_image
Line drawing of a hand holding an electric plug with a cable, showing a black arrow pointing to the plug (no text or symbols present)text_image
"click" "click"natural_image
Line drawing of a hand holding an electric vehicle with a cable, showing a right-hand rule to lift a plug (no text or symbols present)text_image
"click" "click"natural_image
Line drawing of a cable being inserted into an electric shaver with a black arrow indicating direction (no text or symbols)text_image
"click" "click"K3 Bryter – dampstryking
K4 Temperaturregulator
K5 Dampplugg
natural_image
Line drawing of a handheld electric shock absorber with an arrow indicating compression action (no text or symbols)→ Benytt forlengerrøret etter behov. Koble da en eller begge forlengelsesrør til damppistolen. Skyv det nødvendige tilbehøret inn på den ledige enden på forlengerrøret.
text_image
"click" "click"Demontere tilbehør
⚠️Fare
Maks. Dampmengde 50 g/min
Mål
Dampkjele 1,2 l
Bredde 190 mm
Lengde 390 mm
Høyde 290 mm
Vekt (uten tilbehør) 3,3 kg
Det tas forbehold om tekniske endringer!
Innehåll
natural_image
Line drawing of a handheld electric shock absorber with a black arrow indicating compression action (no text or symbols)text_image
"click" "click"Ta av tillbehör
⚠️Fara
natural_image
Diagram of a hand holding an electric vehicle with a cable, showing a plug and cable connector (no text or symbols)text_image
"click" "click"Varusteiden irrottaminen
⚠ Vaara
natural_image
Line drawing of a hand holding an electric vehicle with a cable, showing a right-hand rule to lift a cable (no text or symbols present)text_image
"click" "click"natural_image
Line drawing of an electric vehicle plug with a cable, showing a black arrow pointing to the plug (no text or symbols present)text_image
"click" "click"Aksesuarı ayırmak
⚠ Tehlike
natural_image
Line drawing of a cable being inserted into an electric shaver with a black arrow indicating direction (no text or symbols)text_image
"click" "click"natural_image
Line drawing of a hand holding an electric vehicle with a cable, showing a right-hand rule (no text or symbols)text_image
"click" "click"natural_image
Line drawing of a hand holding an electric plug with a cable, showing a black arrow pointing to the plug (no text or symbols present)text_image
"click" "click"K4 Regulator temperature
K5 Parni vtič
Varnostna navodila
⚠️ Nevarnost
natural_image
Diagram of a hand holding an electric vehicle with a cable, showing a plug and cable connector (no text or symbols)text_image
"click" "click"Ločevanje pribora
⚠️ Nevarnost
K4 regulator temperatury
natural_image
Line drawing of a hand holding an electric plug with a cable, showing a black arrow pointing to the plug (no text or symbols present)text_image
"click" "click"Mult stimate client,

natural_image
Line drawing of a handheld electric vehicle with a cable and plug, showing an arrow indicating direction (no text or symbols)text_image
"click" "click"natural_image
Line drawing of a handheld electric shock absorber with a black arrow indicating compression action (no text or symbols)text_image
"click" "click"K4 Regulator temperature
K5 Parni utikač
Sigurnosni napuci
⚠️ Opasnost
natural_image
Line drawing of an electric vehicle's cable with a plug and cable connector, showing a rightward arrow (no text or symbols)text_image
"click" "click"Skidanje pribora
⚠️ Opasnost
K4 Regulator temperature
K5 Parni utikač
Sigurnosne napomene
⚠️ Opasnost
■ Zabranjen je rad u područjima ugroženim eksplozijom.
■ Prilikom upotrebe uređaja u opasnim područjima treba poštovati odgovarajuće sigurnosne propise.
■ Uređaj nemojte koristiti u bazenima u kojima ima vode.
Uređaj se ne sme koristiti za čišćenje električnih aparata i uređaja kao što su npr. klasične i mikrotalasne pećnice, aspiratori, televizori, lampe, fenovi za kosu, električne grejalice i slično.
■ Pre upotrebe proverite da li su uređaj i pribor u ispravnom stanju. Ako stanje nije besprekorno, ne sme se upotrebljavati. Posebno proverite priključni strujni kabl, sigurnosni zatvarač i parno crevo.
Oštećen strujni priključni kabl odmah dajte na zamenu ovlašćenoj servisnoj službi/električaru.
Oštećeno parno crevo odmah zamenite. Sme se upotrebljavati samo parno crevo kojeg je preporučio proizvođač (kataloški broj vidi u spisku rezervnih delova).
■ Mrežni utikač in utičnicu nikada ne dodirujte vlažnim rukama.
■ Parom ne čistite predmete koji sadrže materije štetne po zdravlje (npr. azbest).
■ Mlaz pare na maloj udaljenosti nikada ne dodirujte rukom niti usmeravajte prema ljudima ili životinjama (opasnost od opekotina).
⚠ Upozorenje
■ Uređaj sme da se priključuje samo na električni priključak kojeg je izveo elektroinstalater u skladu sa IEC 60364.
natural_image
Line drawing of a hand holding an electric vehicle with a cable, showing a plug and cable connector (no text or symbols)text_image
"click" "click"Skidanje pribora
⚠️ Opasnost
Pri skidanju delova pribora može kapati vruća voda! Delove pribora ne skidajte dok izlazi para - opasnost od opekotina!
→ Blokadu poluge na paru gurnite prema napred (blokirana poluga za paru).
→ Za odvajanje delova pribora pritisnite taster za deblokiranje i izvucite delove jedan iz drugog.
text_image
1. 2.Punjenje vodom
natural_image
Line drawing of an electric vehicle plug with a cable, showing a plug inserted into a socket and a black arrow indicating direction (no text or symbols)text_image
"click" "click"Lisavarustuse monteerimine
natural_image
Line drawing of a hand holding an electric plug with a cable, showing a black arrow pointing to the plug (no text or symbols present)text_image
"click" "click"natural_image
Line drawing of a hand holding an electric plug with a cable, showing a black arrow pointing to the plug (no text or symbols present)text_image
"click" "click"Pierīču atvienošana
⚠️Bīstami
natural_image
Line drawing of a hand holding an electric vehicle with a cable, showing a plug and cable connector (no text or symbols)text_image
"click" "click"Priedų išmontavimas
⚠️Pavojus
natural_image
Line drawing of a handheld electric vehicle with a cable and plug, showing an arrow pointing to the plug (no text or symbols present)text_image
"click" "click"Від'єднання насадок
⚠️ Обережно!
6975 Creditview Road Unit #2
Mississauga, Ontario L5N 8E9
1-800-465-4980
CH
Kärcher AG
Industriestraße 16
8108 Dällikon
0844 850 863
CZ
Kärcher spol s r.o.
Modletice č.p. 141
251 01 Ríčany u Prahy
0323 606 014
D
Kärcher Cleaning Systems A.E.
31-33, Nikitara str. &
Konstantinoupoleos str.
13671 Acharnes
210-2316 153
H
Kärcher Hungária Kft
Tormásrét ut 2.
2051 Biatorbágy
(023) 530 640
HK
Kärcher Limited
Unit 10, 17/F.
APEC Plaza
49 Hoi Yuen Road
Kwun Tong, Kowloon
(02) 357-5863
|
Kärcher S.p.A.
Via A.Vespucci 19
21013 Gallarate (VA)
848 - 99 88 77
IRL
Karcher Limited
12 Willow Business Park
Nangor Road
Clondalkin Dublin 12
(01) 409 77 77
KOR
Karcher Co. Ltd. (South Korea)
Youngjae B/D, 50-1, 51-1
Sansoo-dong, Mapo-ku
Seoul 121-060
032-465-8000
MAL
Karcher Cleaning Systems Sdn. Bhd.
No. 8, Jalan Serindit 2
Bandar Puchong Jaya
47100 Puchong, Selangor
(03) 5882 1148
MEX
Karcher México, SA de CV
Av. Gustavo Baz No. 29-C
Col. Naucalpan Centro
East Tamaki, Auckland
(09) 274-4603
P
Neoparts - Com. e Ind. Automóvel, S.A.
Av. Infante D. Henrique, Lote 35
1800-218 Lisboa
218558300
PL
Kärcher Sp. zo.o.
UI. Stawowa 140
31-346 Kraków
(012)6397-222
PRC
Kärcher Cleaning Systems Co., Ltd.
Part B, Building 30,
No. 390 Ai Du Road
Shanghai Waigaoquiao 200131
(021) 5046-3579
RO
Karcher Romania s.r.l.
Sos. Odaii Nr. 439
013606 Bucureşti
0372709001
RUS
000 «Керхер»
109147, Москва
5 Toh Guan Road East
01-00 Freight Links
Express Distripark
Singapore 608831
6897-1811
SK
Kärcher Slovakia, s.r.o.
Beniakova 2
94901 Nitra
037 6555 798
TR
Kärcher Servis Ticaret A.S.
9 Eylül Mahallesi
307 Sokak No. 6
Gaziemir / Izmir
(0232) 252-0708
TWN
Karcher Limited
5F/6. No.7
Wu-Chuan 1st Rd
Wu-Ku Industrial Zone
Taipei County
(02) 2299-9626
UA
Kärcher Ukraine
Kilzeva doroga, 9
03191, Kyiv
(044) 594 75 75
UAE
Karcher FZE
Jebel Ali Free Zone
RA 8, XB 1, Jebel Ali, Dubai
(04) 8836-776
USA
Alfred Karcher, Inc
2170 Satellite Blvd
Suite 350
Duluth, GA 30097
678-935-4545;877-527-2437
ZA
Kärcher (Pty.) Limited
144 Kuschke Street
Meadowdale
Edenvale 1614
(011) 574-5360

KARCHER®
www.kaercher.com