SRW 250 A1 - Alarm clock radio SILVERCREST - Free user manual and instructions
Find the device manual for free SRW 250 A1 SILVERCREST in PDF.
| Product Type | Digital alarm clock with dual alarm |
| Brand | SilverCrest |
| Model | SRW 250 A1 |
| Dimensions (W x H x D) | 189 x 92 x 85 mm |
| Weight | Approx. 435 g (without batteries) |
| Power supply | 230 V~ / 50 Hz, 2 AAA batteries (not included) for backup |
| Power consumption | Standby: 1 W max, operation: 2.5 W max |
| Output power | 250 mW |
| Radio frequencies | FM 87,5 - 108 MHz, AM 522 - 1620 kHz |
| Presets | 40 stations (20 FM, 20 AM) |
| Main functions | FM/AM radio, dual alarm (buzzer or radio), snooze, sleep timer, brightness adjustment (manual or automatic via sensor) |
| Display | Digital display with adjustable backlight |
| Operating temperature | 5°C to 35°C |
| Operating humidity | 85% max. relative humidity |
| Care and cleaning | Clean with a clean, dry cloth. Do not use corrosive liquids. Do not open the housing. |
| Safety | Do not open the housing (risk of electric shock). Unplug before cleaning. Use batteries respecting polarity. Keep out of reach of children. |
| Spare parts and repairability | Have repairs done by an authorized technical service. 3-year warranty (excluding batteries). Service: FR 01-71230283, BE 02-7001643, LU 800-24143, CH 044-5118291 |
| General information | Private indoor use. Conforms to EU directives. Manufacturer: TARGA GmbH, Germany. |
Frequently Asked Questions - SRW 250 A1 SILVERCREST
User questions about SRW 250 A1 SILVERCREST
0 question about this device. Answer the ones you know or ask your own.
Ask a new question about this device
Download the instructions for your Alarm clock radio in PDF format for free! Find your manual SRW 250 A1 - SILVERCREST and take your electronic device back in hand. On this page are published all the documents necessary for the use of your device. SRW 250 A1 by SILVERCREST.
USER MANUAL SRW 250 A1 SILVERCREST
User manual and service information
TARGA GMBH
Lange Wende 41
D-59494 Soest
Last Information Update:
08/2012-Ident-No.:SRW 250 A1 082012-1
IAN75536
IAN75536
CH NL
Deutsch 2
Francais. 28
Italiano 54
Nederlands 80
English. 106
Inhalt
Einleitung. 3
Specifications techniques 32
Specifications techniques
Technical specifications 110
Safety Instructions 111
Operating Environment 111
Note on mains disconnection 112
Power cable 113
Batteries 113
Children 114
Copyright 114
Overview 115
Display 117
Before you start. 117
Getting started 118
Switching the Device On/Off 118
Setting the Time 118
Tuning to a Station 120
Automatic Station Search 121
Selecting a Saved Station 121
Setting the Alarm. 122
Enabling the Alarm 123
Switching the alarm off. 124
Sleep Timer 124
Display Brightness 125
Inserting the Backup Batteries 126
Troubleshooting 127
Maintenance/Cleaning 127
Environmental regulations and disposal information .... 128
Declaration of conformity. 129
Warranty and service information 130
Introduction
Thank you for choosing a SilverCrest product. The SilverCrest SRW 250 A1 Alarm Clock Radio features a digital clock with an alarm clock function. It also allows you to listen to radio programmes.
Please read the following pages for instructions on how to use your product.

This symbol indicates important instructions for the safe operation of the device and the protection of the user.

This symbol denotes further information on the topic.
Intended use
This device is a consumer electronics device. It has been designed to receive and play back radio stations. The device can also be used as an alarm clock. It is suitable only for private use, not for industrial or commercial purposes. The device may not be used outdoors or in tropical climates. The manufacturer is not liable for any damage or problems caused by unauthorised modifications.
Please observe the regulations and laws in the country of use.
Please note that country-specific regulations may exist with respect to the frequency bands that can be received. Any information received from frequency bands outside those that are explicitly free for public use may not be used, nor may its contents be forwarded to any third parties.
Package contents
SilverCrest SRW 250 A1 Alarm Clock Radio
This User Manual (not shown)
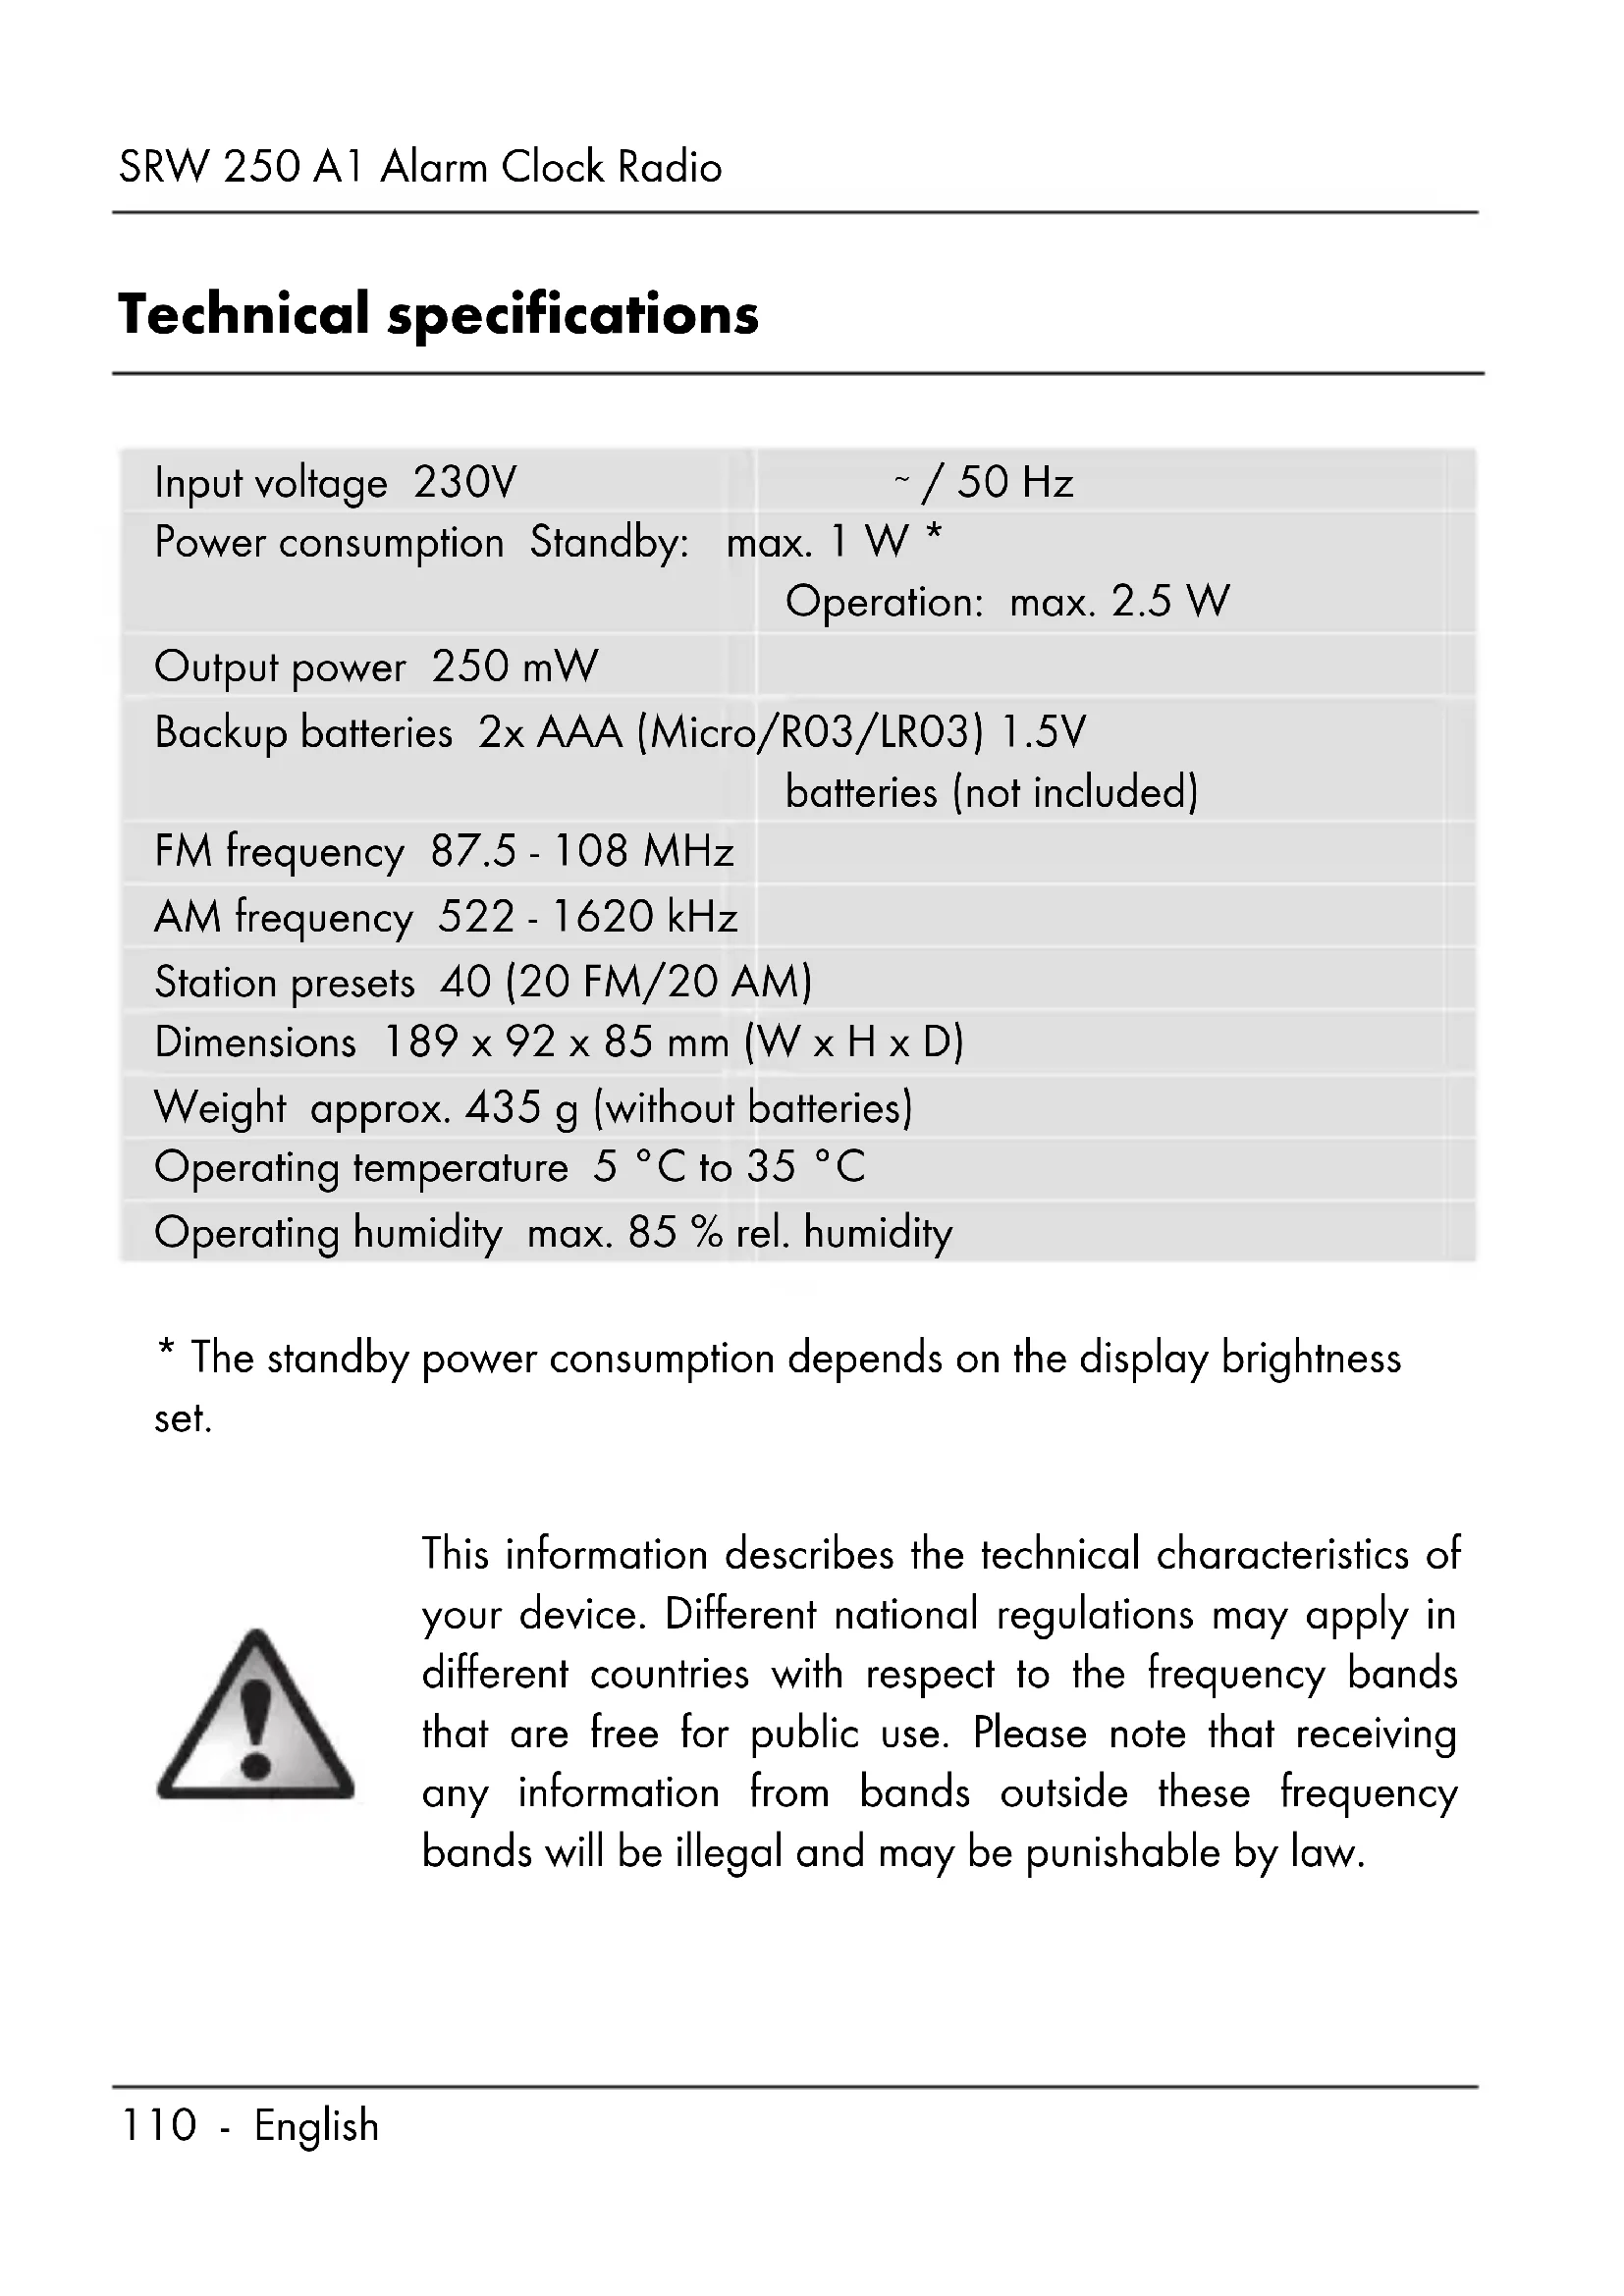
Technical specifications
| Input voltage 230V | ~ / 50 Hz |
| Power consumption Standby: max. 1 W* Operation: max. 2.5 W | |
| Output power 250 mW | |
| Backup batteries 2x AAA (Micro/R03/LR03) 1.5V batteries (not included) | |
| FM frequency 87.5 - 108 MHz | |
| AM frequency 522 - 1620 kHz | |
| Station presets 40 (20 FM/20 AM) | |
| Dimensions 189 x 92 x 85 mm (W x H x D) | |
| Weight approx. 435 g (without batteries) | |
| Operating temperature 5 °C to 35 °C | |
| Operating humidity max. 85 % rel. humidity | |
- The standby power consumption depends on the display brightness set.

This information describes the technical characteristics of your device. Different national regulations may apply in different countries with respect to the frequency bands that are free for public use. Please note that receiving any information from bands outside these frequency bands will be illegal and may be punishable by law.
Safety Instructions
Before you use this device for the first time, please read the following notes in this manual and heed all warnings, even if you are familiar with handling electronic devices. Keep this manual safe for future refe you sell the device or pass it on, it is essential that you also hand over this manual.
Operating Environment
The device is not designed for use in environments with high temperatures or humidity (e.g. bathrooms) or those with above-average levels of dust. Operating temperature and operating humidity: 5^ to 35^ , max. 85% RH.

Always make sure that:
- there is free circulation of air (do not place the device on shelves, on a carpet, on a bed, or anywhere that obstructs the ventilation slots and leave at least 10cm clearance on all sides);
- no direct heat sources (e.g. radiators) can affect the device;
- the device is not exposed to direct sunlight or bright artificial light;
- contact with sprayed and dripping water and aggressive fluids must be avoided and the device should never be operated near water. Never under any circumstances immerse the device in liquid
(do not place any items containing liquids such as drinks, vases, etc. on or near the device);
- the device is never placed near magnetic fields (e.g. speakers);
- no fire hazards (e.g. burning candles) are placed on or near the device;
- no foreign bodies enter the device;
- the device is not subject to major great temperature fluctuations as this can cause condensation and short-circuits;
- the device is not subjected to excessive shocks or vibrations.

Note on mains disconnection
The ON/OFF button [2] located on the top of the device does not fully disconnect the device from the mains. The device still consumes electricity in standby mode. Disconnecting the device completely involves removing the power plug from the wall outlet. For this reason, the device should be positioned such as to enable unobstructed access to the wall outlet so that the power plug can be pulled out immediately in an emergency. To avoid the risk of fire, if the device is not going to be used for an extended period (e.g. during holidays), it should always be disconnected from the power socket. Always disconnect the device from the power supply in stormy conditions.
Never open the housing of the device! Opening the housing could expose you a fatal electric shock.

Power cable
Always hold the power cord by the plug. Never pull on the cable itself and never hold the power cord with wet hands as this may cause a short circuit or electric shock. Do not place the unit itself or any furniture or other devices on the power cord and make sure that the cable does not get trapped. Never tie knots in the cable and do not tie it to other cables. The power cord should be positioned so that nobody can trip over it or be obstructed by it. A damaged power cord can cause a fire or electric shock. Check the power cord from time to time. If it is damaged, contc the nearest authorised service centre or your dealer for a replacement.

Batteries
Insert the batteries with the correct polarity. Refer to the diagram inside the battery compartment. Do not attempt to recharge the batteries and do not throw batteries into a fire. Do not mix battery types (old and new or carbon and alkaline, etc.). Remove the batteries if the device will not be in use for an extended period. Improper use could cause explosions or leaks.
Children
Electrical appliances do not belong in the hands of children! Never allow children use electrical devices unsupervised. Children may not understand that they can be dangerous. Small parts can represent choking hazards. If a battery is swallowed, seek medical help immediately. Keep the packaging materials out of the reach of children. There is a risk of suffocation!
Copyright
All the contents of this user manual are protected by copyright and provided to the reader for information only. Copying data and information without the prior explicit written consent of the author is strictly forbidden. This also applies to any commercial use of the contents and information. All texts and diagrams are up to date as of the date of printing.

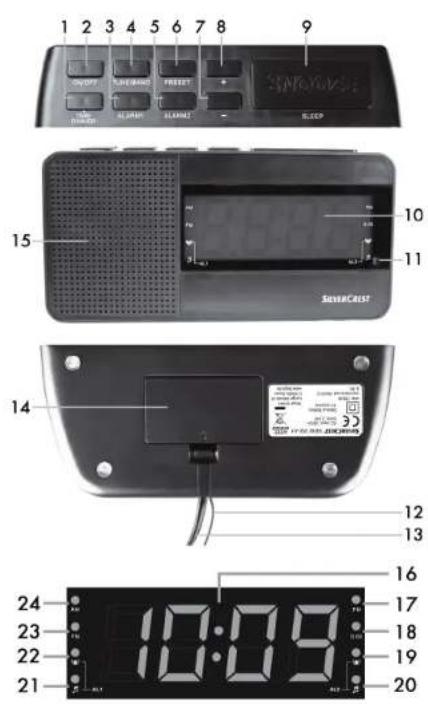
Overview
TIME/DIMMER (time/display brightness)
2 ON/OFF (switch on/off)
3 ALARM1 (to set or enable/disable ALARM1)
4 TUNE/BAND (to select the frequency band, to set the frequency)
5 ALARM2 (to set or enable/disable ALARM2)
6 PRESET (save/load preset station, scan for stations)
7 - (Reduce volume or select an option)
8 + (Increase audio volume or select an option)
9 SNOOZE/SLEEP (delay the alarm for approx. 6 minutes, enable the sleep timer)
10 Display
11 Light sensor
12 Wire antenna
13 Power cable
14 Battery compartment
15 Speaker
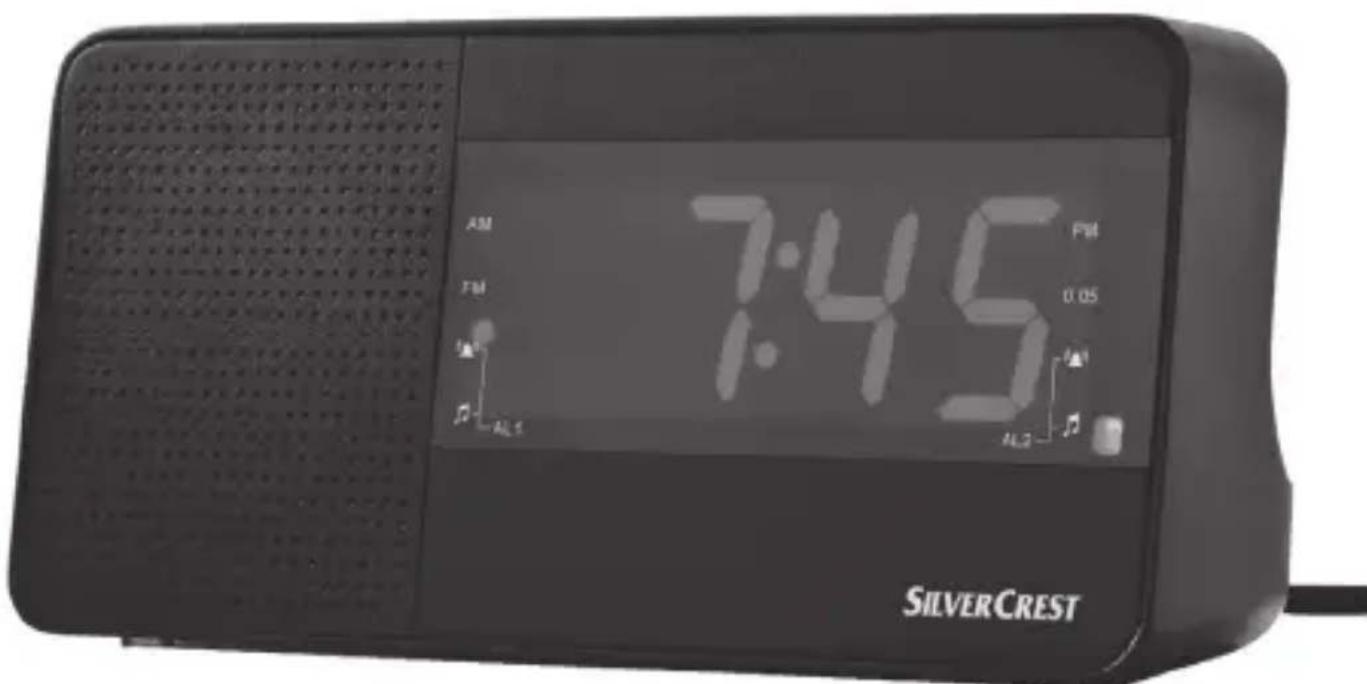
Display
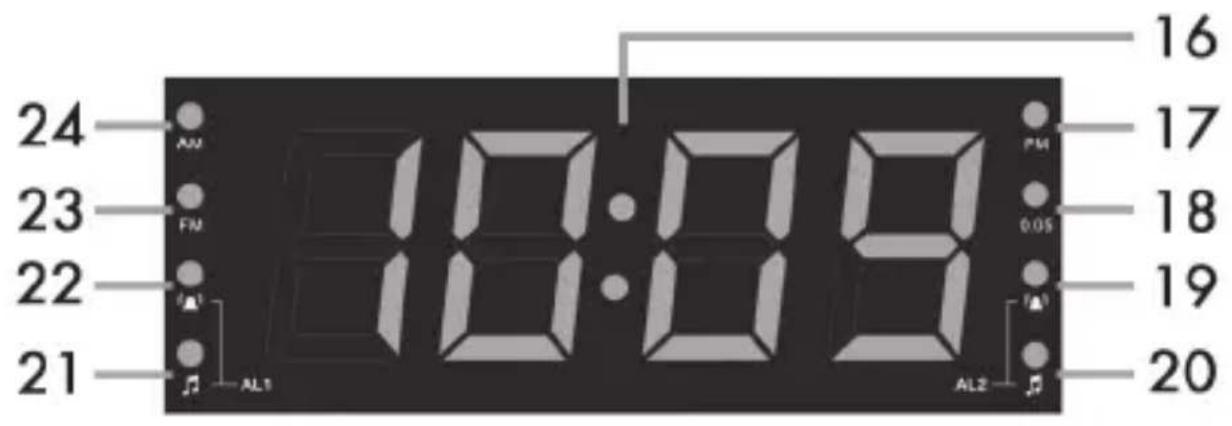
16 Clock/frequency/volume indication
17 PM (for 12 hour mode only)
18 0.05 MHz for FM tuning
19 AL2 - Alarm time enabled with alarm sound
20 AL2 - Alarm time enabled with radio
21 AL1 - Alarm time enabled with radio
22 AL1 - Alarm time enabled with alarm sound
23 FM reception
24 AM reception
Before you start
Position the device on a stable, flat surface and do not place any heavy objects on the device. Next, connect the power plug of the power cord [13] to an easily accessible wall outlet.

You can use backup batteries so you do not have to reprogram all your custom settings if there is a power cut. For more information, please read the "Inserting the Backup Batteries" chapter on page 126.
Getting started
Switching the Device On/Off
To power the device on, press the OFF/ON button [2]. When switched on, the FM LED [23] or the AM LED [24] lights up and the device shc the current frequency for a few seconds and then the time on the display [10].
To power the device off, press the OFF/ON button [2] again. When powered off, the current time is shown on the display [10].
Setting the Time
The time can only be set while the device is powere powered on, press the ON/OFF button [2] to power the device off.
- Press the TIME/DIMMER button [1] until the hour display flashes [10].

When powering the device on for the first device goes into clock setting mode automatically and the hour display flashes[10].
- Press the - [7] or + [8] button to set the hour. You can also press and hold the - [7] or + [8] button.
- Then press the TIME/DIMMER button [1] quickly to set the minutes. The minutes counter flashes on the display [10].
- Press the - [7] or + [8] button to set the minutes. You can also press and hold the - [7] or + [8] button to set the minutes in 10-minute steps.
- Press the TIME/DIMMER button [1] to toggle between 12 and 24 hour mode. "24" or "12" is shown on the display [10].
- You can then the - [7] or + [8] button to change between 12 and 24-hour time mode. To distinguish between morning and afternoon time in 12-hour mode, there is a PM LED [17] on the display.
- Wait until the display [10] shows the set time or press the TIME/DIMMER button [1] briefly.

Please note that you can only set the time while the display is flashing [10]. If no input is made for a few seconds, the display [10] stops flashing and the procedure needs to be repeated.
Tuning to a Station
- Power the device on by pressing the ON/OFF button [2].
- The current frequency is shown briefly on the display [10]. As soon as the current time is shown, you can press the - [7] or + [8] buttons to adjust the volume.
- First, select the frequency band you want by holding the TUNE/BAND button [4]. The current frequency band is shown on the display [10] by means of FM [23] or AM [24] LEDs.
- Briefly press the TUNE/BAND button [4] and then briefly press the - [7] or + [8] button a few times to tune the frequency manually. To search for a station automatically, press and hold the - [7] or + [8] button. The frequency displays in MHz (for FM) and in kHz (for AM). For FM, any frequencies with 0.05 MHz are shown by means of the 0.05 LED [18]. If required, move the wire antenna into a different position or move the device to improve reception.
- You can save a station by pressing and holding the PRESET button [6] for approx. 1-2 seconds.
- "P" flashes on the display [10], followed by a number between 01 and 20.
- Press - [7] or + [8] to select the station preset you want.
- Press the PRESET button [6] again to save the current station to the selected preset.
Automatic Station Search
If you do not want to set the stations manually, you can have the device search for them automatically. Proceed as follows:
- Power the device on by pressing the ON/OFF button [2].
- Press and hold the PRESET button [6] for approx. 4 seconds. The search is started and any stations found are saved automatically.
- Press the PRESET button [6] again to cancel the search.

Please note that a maximum of 20 stations can be saved. If more than 20 stations are found, only the first 20 are saved.
Selecting a Saved Station
- To select a station from a preset, the device has to be powered on. If it is powered off, press the ON/OFF button [2] to power the device on.
- Press the PRESET button [6] briefly. The current station preset (PO1 to P20) selected is shown.
- Press the - [7] or + [8] button to select a different station (preset).
Setting the Alarm
Make sure that the clock has been set correctly (see the page 118 - Setting the Time). You can set two different alarm times (ALARM1 and ALARM2). The alarm time can only be set while the device is powered off. If it is powered on, press the ON/OFF button [2] to power the device off.
- Press and hold the ALARM1 [3] or ALARM2 [5] button until the hour display flashes [10].
- Press the - [7] or + [8] button to set the hour. You can also press and hold the - [7] or + [8] button.
- Press the ALARM1 [3] or the ALARM2 [5] button quickly again to set the minutes. The minutes flash on the display [10].
- Press the - [7] or + [8] button to set the minutes. You can also press and hold the - [7] or + [8] button to set the minutes in 10-minute steps.
- Wait until the display [10] stops flashing or quickly press the ALARM1 [3] or the ALARM2 [5] button.

Please note that you can only set the alarm time while the numbers are flashing on the display [10]. If no input is made for a few seconds, the numbers on the display [10] stop flashing and you will have to repeat the procedure.
Enabling the Alarm
After the you have set the alarm time you want, you can enable the alarm as follows:
- Press the ALARM1 [3] or the ALARM2 [5] button quickly. The AL1 alarm sound LED [22] or the AL2 alarm sound LED [19] lights up on the display [10]. The alarm is now enabled for the set time and with the alarm sound.
- Press the ALARM1 [3] or the ALARM2 [5] button again quickly. The AL1 alarm radio LED [21] or the AL2 radio [20] lights up on the display [10]. The alarm is now enabled for the set time and with the radio.
- To disable the alarm, press the ALARM1 [3] or the ALARM2 [5] button again. While the alarm is disabled, the AL1 alarm sound LED [22], the AL1 radio LED [21], the AL2 alarm sound LED [19] and the AL2 radio LED [20] are off.

In radio alarm mode, the device powers on at the alarm time set and receives the last frequency and frequency band tuned in and the last volume set.
Switching the alarm off
When the alarm starts, you can disable it as follows.
- Press the ON/OFF button [2] to stop the alarm. The alarm is switched off until the next day.
or - Press the SNOOZE/SLEEP button [9] to delay the alarm for approx. 6 minutes. After this period, the alarm starts again.

While SNOOZE is enabled, the corresponding alarm LED [19, 20, 21 or 22] will flash.
Sleep Timer
The sleep timer powers the device off automatically after a set time.
- While the device is powered on or off, press the SNOOZE/SLEEP button [9]. The number "60" appears on the display to indicate that the device will power off automatically after 60 minutes.
- Press the SNOOZE/SLEEP button [9] multiple times to decrease the countdown time shown. Each press of the button reduces the time by 10 minutes.
- If "OFF" is shown on the display [10], the sleep timer is disabled and the device will stay on. You can press the SNOOZE/SLEEP button [9] again to select the delay time from the beginning.

While the sleep timer countdown is running, you can power the device off at any time by pressing the ON/OFF button [2].

Press the SNOOZE/SLEEP button [9] while the sleep timer is enabled to display the remaining time until the unit powers off.
Display Brightness
The display is set to maximum brightness on delivery. To adjust the display brightness, proceed as follows:
- Press the TIME/DIMMER button [1] quickly to dim the display. "L" (LOW) is shown briefly on the display [10].
- Quickly press the TIME/DIMMER button [1] again to dim the display brightness automatically as a function of the ambient lighting. The lightning conditions are measured by the light sensor [11]. "A" (AUTOMATIC) is briefly shown on the display [10].
- Briefly press the TIME/DIMMER button [1] once again to set the display brightness back to maximum. "H" (HIGH) is briefly shown on the display [10].
- Pressing the TIME/DIMMER [1] button again allows you to repeat the display brightness setting in the above sequence.
Inserting the Backup Batteries
To avoid having to adjust the device settings again after a power failure or the device being disconnecting from the mains, you can use backup batteries (not supplied). Proceed as follows:
- Disconnect the device from the mains.
- Open the battery compartment [14] on the bottom of the device.
- Insert two AAA batteries into the battery compartment, making sure the polarity is correct. Note the + and - icons on the batteries and inside the battery compartment (see diagram).
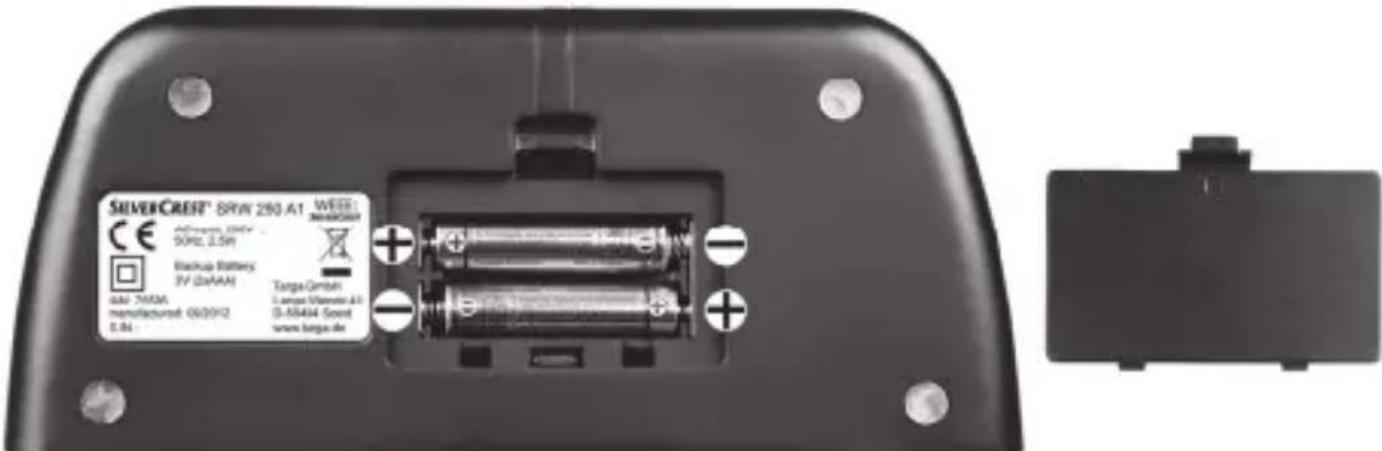
- Close the battery compartment.
- Reconnect the device to the mains.

Remove the batteries when the device is not to be used for an extended period.
Troubleshooting
Device will not switch on.
Power socket defective or fuse blown: check the power socket by connecting a different device.
No sound
If the sound is very low or there is no sound at all, double-check the volume setting (the device needs to be powered on) and, if necessary, increase the volume by pressing the + button [8] several times.
Poor radio reception
Extend the wire aerial [12] fully and change its position if necessary.
Maintenance/Cleaning
The device must be serviced if it has been damaged in any way, for example, if the power plug, power cord or housing is damaged, if liquid or objects have penetrated the device, if the product has been exposed to rain or moisture, if the product does not work normally or if the product has been dropped. If you notice any smoke, unusual noise or strange smells, switch off the device immediately and pull the plug from the wall
outlet. If this occurs, the device should no longer be used and should be inspected by an expert. All servicing work must be carried out by qualified specialist personnel. Never open the housing of the device. Opening the housing can expose you to a lethal electric shock. Only use a clean, dry cloth for cleaning. Never use any aggressive liquids. Do not attempt to open the housing of the device, this could void your warranty.
Environmental regulations and disposal information

Devices marked with this symbol are subject to European Directive 2002/96/EC. All electric and electronic devices must be disposed of separately from household waste at official disposal centres. Proper disposal of old devices prevents damage to the environment or your health. For
further information about proper disposal, contact your local council, recycling centre or the shop where you bought the device.
Respect the environment. Old batteries do not belong in with household waste. They must be handed in to a collection point for waste batteries. Please note that batteries must be disposed of fully discharged at appropriate collection points for old batteries. If disposing of batteries which are not fully discharged, take precautions to prevent short circuits.
Dispose of all packaging in an environmentally-friendly manner. Boxes can be recycled with waste paper collections or handed in to public collection
points. Films and plastics included in the original packaging can be disposed of via your local waste disposal company in an environmentally-friendly way.
Declaration of conformity

This device complies with the basic and other relevant requirements of the EMC Directive 2004/108/EC, the Low-voltage Directive 2006/95/EC, the RoHS II Directive 2011/65/EU and the ErP Directive 2009/125/EC. The corresponding Declaration of Conformity can be found at the end of this User Manual.
Warranty and service information
Warranty of Targa GmbH
This device is sold with three years warranty from the date of Please keep the original receipt in a safe place as proof of purchase. Before using your product for the first time, please read the enclosed documentation or online help. Should any problems arise which cannot be solved in this way, please call our hotline. Please have the article number and, if available, the serial number to hand for all enquiries. If it is not possible to solve the problem on the phone, our hotline support staff will initiate further servicing procedures depending on the fault. Within the warranty period the product will be repaired or replaced free of charge as we deem appropriate. No new warranty period commences if the product is repaired or replaced. Consumables such as batteries, rechargeable batteries and lamps are not covered by the warranty.
Your statutory rights towards the seller are not affected or restricted by this warranty.

Service

Phone: 0207-3650744
E-Mail: service.GB@targa-online.com

Phone: 01-2421583
E-Mail: service.IE@targa-online.com

Phone: 800-62175
E-Mail: service.MT@targa-online.com

Phone: 800 - 92 496
E-Mail: service.CY@targa-online.com

Manufacturer
TARGA
GmbH
Postfach 22 44
D-59482 Soest
www.targa.de
C E
EU-Declaration of Conformity
Adress: Targa GmbH
Lange Wende 41
59494 Soest, Germany
Brand: Silver Crest
Product: clock radio
Model: SRW 250 A1
Identification number: IAN 75536
The product complies with the requirements of the following European directives:
2004/108/EC Electromagnetic Compatibility
2006/95/EC Low Voltage
2009/125/EC Energy Relating Products
2011/65/EU Restriction of the use of certain hazardous
substances in electrical and electronic equipment
Compliance was proved by the application of the following standards:
EMC: EN 55013:2001+A1:2003+A2:2006
EN 55020: 2007
EN 61000-3-2: 2006+A1: 2009+A2: 2009
Safety: EN 60065:2002 + A1:2006 + A11:2008
ERP: Regulation 1275/2008
Power Management as required in COMMISSION REGULATION (EC) No 1275/2008 is not applicable for equipment SilverCrest SRW 250 A1 according chapter 2.d) page 6, because main function of equipment is to show the time and to provide alert function by means of buzzer or optional by receiving FM or AM radio program. This main function is provided permanently.
Rohs: EN 62321: 2009
Year of CE marking: 2012
Soest, 6^th of August 2012
Matthias Klauke, Managing Director