CRL630CD - Alarm clock radio SALORA - Free user manual and instructions
Find the device manual for free CRL630CD SALORA in PDF.

User questions about CRL630CD SALORA
0 question about this device. Answer the ones you know or ask your own.
Ask a new question about this device
Download the instructions for your Alarm clock radio in PDF format for free! Find your manual CRL630CD - SALORA and take your electronic device back in hand. On this page are published all the documents necessary for the use of your device. CRL630CD by SALORA.
USER MANUAL CRL630CD SALORA
To ensure that this device provides you with long-term satisfaction and enjoyment, please observe the following instructions.
This device is designed for the playback of audio signals. Any other use is expressly prohibited.
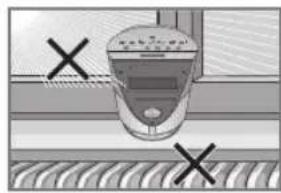
Protect the device and the CDs from rain, moisture (dripping or splashing water), sand and heat, e.g. from heating units.
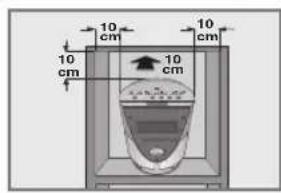
Make sure there is adequate ventilation when positioning the device. There must be a free space of at least 10cm behind the device. Do not place objects on the ventilation slots.
Do not place any vessels such as vases on the device. Vessels may spill fluid on the electrical components, thus presenting a safety risk. Do not place any naked flames such as burning candles on the device.
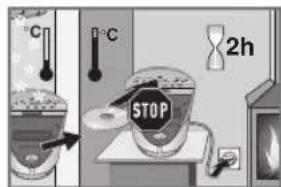
Bringing the device in from the cold can cause condensation on the CD lens, which prevents it from playing. Give the device time to warm up.
The CD part contains self-lubricating bearings, which must not be oiled or greased.
Never open the device casing under any circumstances. Warranty claims are excluded for damage resulting from improper handling.
Thunderstorms are a danger to all electrical devices. Even if the device is switched off, it can be damaged by a lightning strike to the mains. Always remove the mains plug during an electrical storm.
Do not use any cleaning agent, as this may damage the casing. Clean the device with a clean, moist leather cloth.
Please note when deciding where to put the device that furniture surfaces are covered by various types of lacquer and plastic, most of which contain chemical additives. These may cause corrosion to the feet of the device, thus resulting in stains on the surface of the furniture which can be difficult or impossible to remove.
General instructions for laser devices
You will find a symbol similar to the one shown here on the bottom of the device.
CLASS 1 LASER PRODUCT means that the laser is designed in such a way as to ensure that the maximum permissible emission value cannot be exceeded under any circumstances.
If operating devices or methods other than those specified here are employed, it may lead to dangerous exposure to emissions.
Invisible laser radiation is emitted if the CD compartment is opened and the safety locking mechanism is shorted. Do not expose yourself to this radiation.
OVERVIEW
Controls
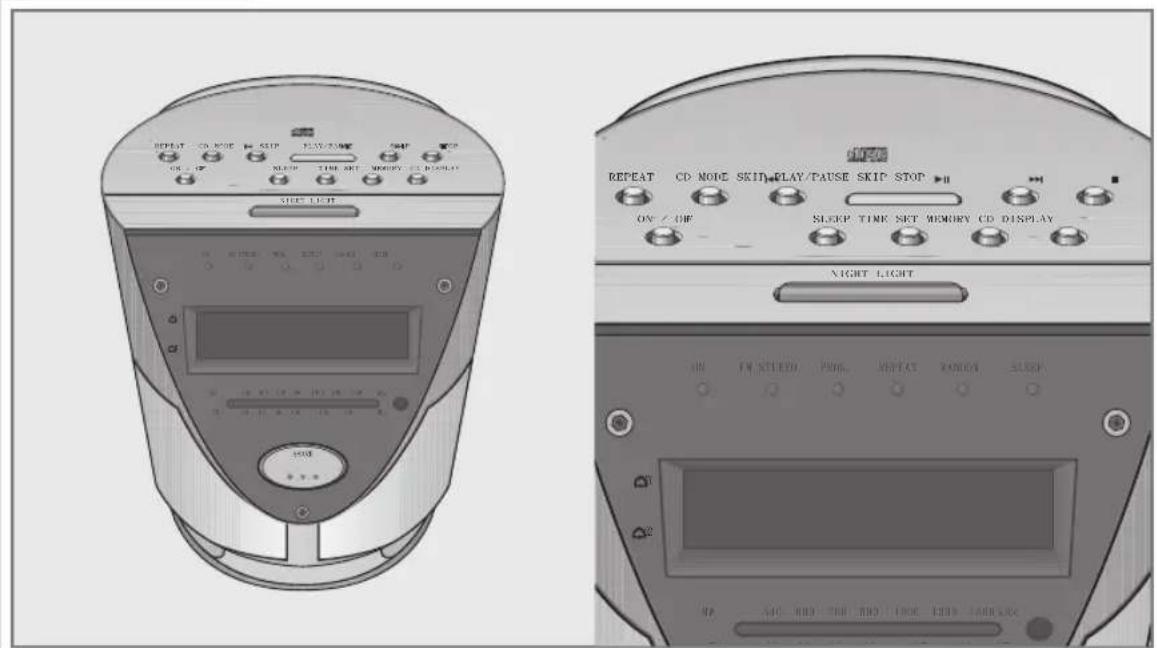
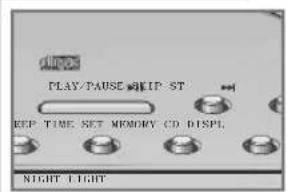
Controls on the top
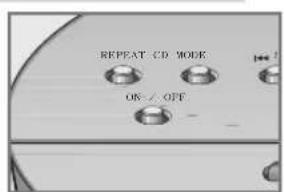
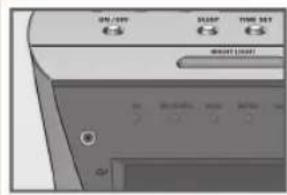
ON/OFF
REPEAT
CD MODE

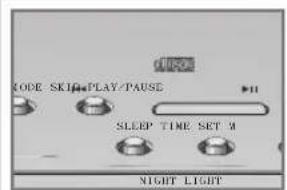
SKIP
PLAY/PAUSE
SKIP
Switches the device to and from standby mode.
Repeats a track or the whole CD.
Plays back CD tracks in random order; switches between playing back a track memory and normal playback.
Sets minutes (in conjunction with TIME SET). In CD mode: selects the track played previously when pressed briefly. If held down searches for a previous passage.
In alarm mode: sets the alarm time (minutes).
Starts CD playback.
Pauses playback.
Sets hours (in conjunction with TIME SET). In CD mode: selects the next track. If held down searches for the next passage.
In alarm mode: sets the alarm time (hours).
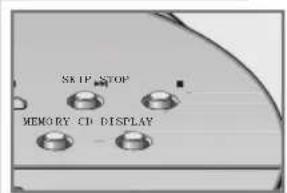
OVERVIEW
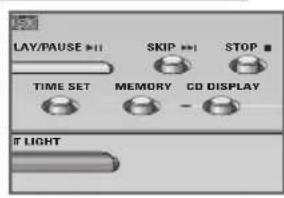
STOP
Ends CD playback.
Deletes the track memory for the CD.
CD DISPLAY
Briefly switches the display during CD playback from the time to the track number.
MEMORY
Saves a track memory.
TIME SET
Activates the time setting.
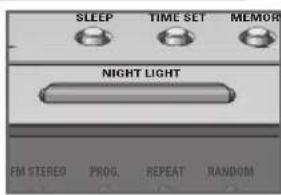
SLEEP
Press briefly displays the current switch-off time.
Press repeatedly: shortens the remaining time until the device switches off.
NIGHT LIGHT
Switches night illumination (on the bottom of the device) on and off in two brightness levels.
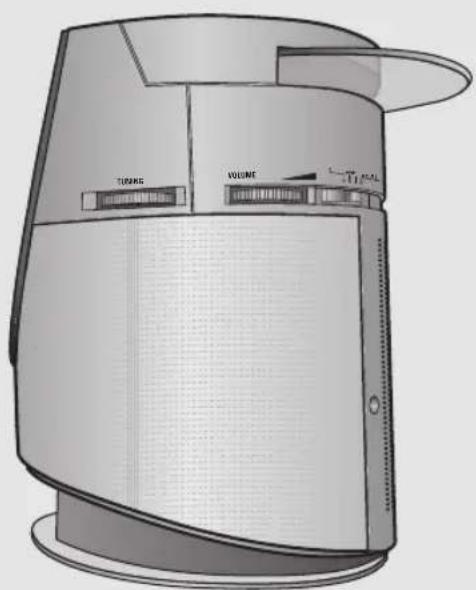
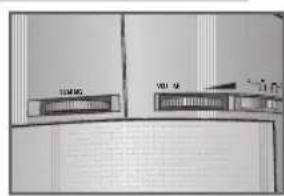
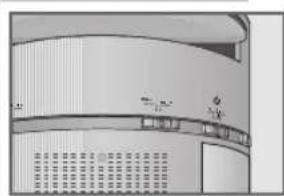
Controls on the sides
TUNING
For tuning to radio stations (on the right side of the device).
VOLUME
Adjusts the volume (on the right side of the device).
CD MW FM FM STEREO
mode.
Switches between CD and radio
Switches between the FM (VHF) and MW (medium wave) wavebands. Switches between FM stereo and mc reception, right side of the device.
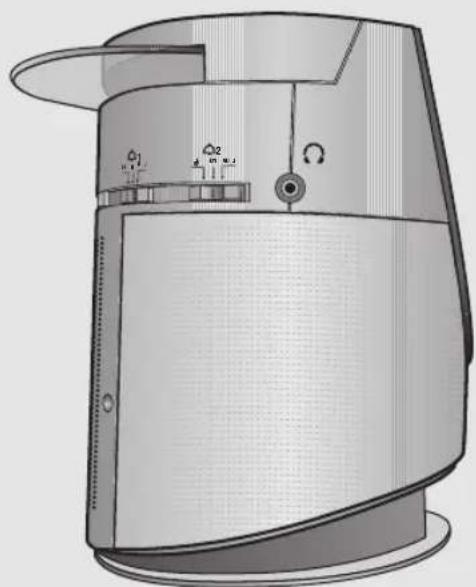
OVERVIEW
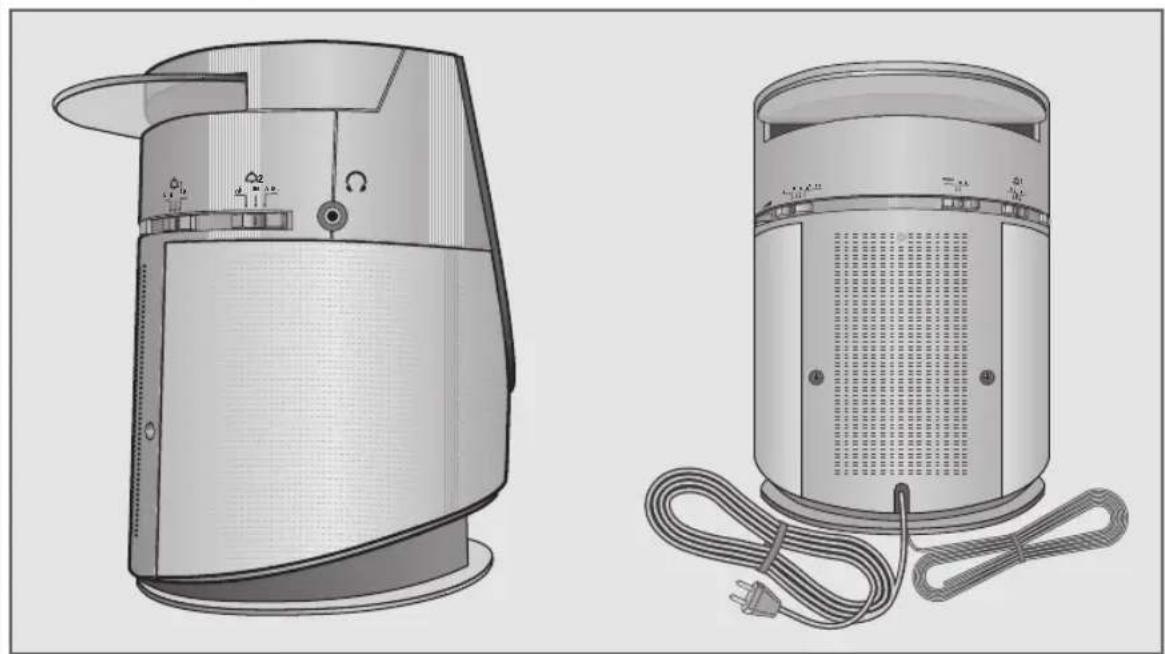

Headphones socket (3.5 mm stereo jack).
Playback via the headphones in stereo, left side of the device.
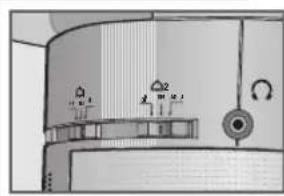
1 Activates the alarm time setting and the alarm
OFF ON ADJ function for alarm time 1.
- Ends the alarm setting for alarm time 1, left side of the device.
2 Activates the alarm time setting and the alarm
OFF ON ADJ function for alarm time 2.
- Ends the alarm setting for alarm time 2, left side of the device.
Controls on the back
BUZZER MUSIC Switches between signal tone alarm or alarm with
radio or CD.
Power cord.
~Wire antenna for FM reception.
Controls on the front
SNOOZE Interrupts the alarm function.
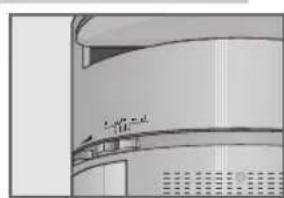
Controls on the bottom
Battery compartment for 9 V back-up battery.
OVERVIEW
The display

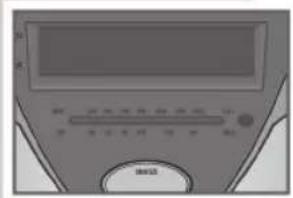
00:00
Shows the time or the alarm time. In CD mode: briefly shows the complete number of tracks or the current track number (in conjunction with CD DISPLAY ).
LED. Indicates that the alarm setting is activated with alarm time 1.
LED. Indicates that the alarm setting is activated with alarm time 2.
MW 540-1600 kHz Tuning scale for the MW and FM wavebands. FM 88-108 MHz
Note:
The device is equipped with an auto-dimmer, i.e. the brightness of the display adapts automatically to the lighting in the room by means of a sensor. The sensor is located on the front of the device.
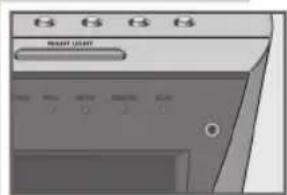
LEDs
ON
FM STEREO
PROG.
REPEAT
RANDOM
SLEEP
Lights up when the device is switched on.
Lights up when a stereo channel is received.
Flashes while a CD track memory is being saved. Lights up during CD track memory playback.
Flashes when a single track is repeated. Lights up when the whole CD is repeated
Lights up when the tracks on the CD are played back in random order.
Flashes while the switch-off time is being set. Lights up when the sleep timer is active.
POWER SUPPLY
Mains operation
Note:
Check that the mains voltage on the type plate (on the bottom of the device) corresponds to your local mains supply.
If this is not the case, contact your specialist dealer.
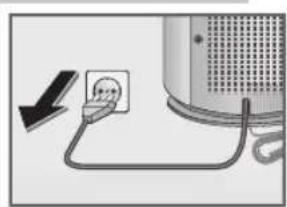
1 Plug the mains cable into the wall socket.
Caution:
The only way to disconnect the device from the mains supply is to pull out the plug.
Inserting the back-up battery
During mains operation, the back-up battery ensures that stored settings are not lost in the case of a power failure or when the device is briefly disconnected from the mains.
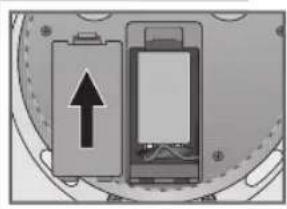
1 Open the battery compartment on the bottom of the device by pressing the catch marked with an arrow on the drawing and lifting up the cover.
2 Before inserting the battery (9 V, 6LF 22) into the cable connection compartment, note the polarity of the battery.
3 Insert the battery.
4 Replace the cover of the battery compartment and click the catch into place.
Note:
Remove the back-up battery when it is flat or when you know that the device will not be used for a long period of time.
Environmental note:
Batteries, including those which contain no heavy metal, may not be disposed of with household waste. Please dispose of used batteries in an environmentally sound manner. Find out about the legal regulations which apply in your area.
POWER SUPPLY
Additional information for units sold in the UK.
Units sold in the UK are suitable for operation from a 240V ac, 50Hz mains supply.
The range of multi-system receivers is built to work in most European countries. However, the mains plug and socket system for the UK differs from many European countries.
This appliance has been supplied with a fitted, non-removable, approved converter plug for use in the UK. This converter plug is fitted with a 5A rated fuse.
In case this appliance is supplied with a moulded 2-pin Euro plug only, which is unsuitable for UK operation, this must be cut off and immediately disposed of. An approved 13A, 3-pin UK plug should then be fitted by a qualified electrician.
Note:
The severed Euro plug must be destroyed to avoid a possible shock hazard should it be inserted into a socket elsewhere.
If a non-rewireable 3-pin plug or a rewireable 13A (BS1363) 3-pin plug is used, it must be fitted with a 5A ASTA or BSI approved BS1362 fuse. If any other type of plug is used it must be protected by a 5A fuse either in the plug, or at the distribution board. If this type of plug becomes defective, ensure that the fuse is removed before disposal, to eliminate potential shock hazard.
If it is necessary to change the fuse in the non-rewireable plug, the correct type and rating (5A ASTA or BSI approved BS1362) must be used and the fuse cover must be refitted. If the fuse cover is lost or damaged, the lead and plug must not be used until a replacement is obtained. Replacement fuse covers should be obtained from your dealer.
Important:
The wires in the mains lead are colour coded in accordance with the following code:
BLUE - NEUTRAL
BROWN-LIVE
As the colours of the wires in the mains lead of your appliance may not correspond with the coloured marking identifying terminals in your plug, proceed as follows:
Connect the BLUE coloured wire to plug terminal marked with the letter "N" or coloured black.
Connect the BROWN coloured wire to the plug terminal marked with the letter "L" or coloured red.
In no circumstance must any of the wires be connected to the terminal marked with the letter "E", earth symbol "m", coloured green, or green & yellow.
Replacement mains lead sets can be obtained from your local dealer, or by contacting Grundig Consumer Relations (01788 570088)
Moulded 3-pin lead set, suitable for UK use:
Ref: Leadset UK 8290-991-224
Moulded 2-pin Euro lead set, not suitable for UK use:
Ref: Leadset Euro 8290-991-316
SETTINGS
Setting the clock
When the device is switched on for the first time, 0:00 appears in the display to indicate that the time must be set. The same applies if the device has been disconnected from the mains and no back-up battery is inserted.
1 Set the sliding switches for the alarm function> 1 OFF ON ADJ< and 2 OFF ON ADJ to OFF.
2 Press TIME SET and hold it down. Display: the time flashes.
3 Press SKIP briefly to set the hours step-by-step or hold it down to run through the minutes quickly.
4 Press SKIP ^次 briefly to set the minutes step-by-step or hold it down to run through the minutes quickly.
Note:
When the minute display changes from 59 to 00 , this does not affect the hour display.
5 Release TIME SET to conclude the setting.
- Display: the current time.
Setting the alarm times
With this device you can set two alarm times.
1 Set the sliding switch 1 OFF ON ADJ( (left side of the device) to ADJ.
- Display: the last alarm time set flashes.
2 Press SKIP I (top of the device) briefly to set the hours step-by-step or hold down to run through the hours continuously.
3 Press SKIP (top of the device) briefly to set the minutes step-by-step or hold down to run through the hours continuously.
4 To end the setting set the sliding switch 1 OFF ON ADJ (on the left side of the device) to ON.
- Display: the LED 1 glows, i.e. the alarm setting with alarm time 1 is activated.
5 To set alarm time 2, repeat steps 1 to 4 with the sliding switch 2 OFF ON ADJ (left side of the device).
- Display: the LED 2 glows, i.e. the alarm setting with alarm time 2 is set.
OPERATION
General functions
Switching on and off
1 Press ON/OFF to switch on the device from standby mode. - The ON LED glows.
2 Press ON/OFF to switch the device to standby mode. - The ON LED goes out.
Selecting the input source
1 Select the input source with CD MW FM FM STEREO (right side of the device).
Adjusting the volume
1 Adjust the volume with VOLUME (right side of the device).
Listening with headphones
1 Connect the headphones to the socket (0 3.5 mm) (left side of the device). - This automatically switches off the loudspeakers.
Radio operation
For the best FM (VHF) reception, it is sufficient to direct the wire antenna. The radio has a built-in rod antenna for MW reception. Turn the device around to direct the antenna.
Selecting the radio input source
1 Set the sliding switch CD MW FM FM STEREO (right side of the device) to MW, FM or FM STEREO.
Tuning radio stations
1 Select the frequency band (FM or MW) with CD MW FM FM STEREO (right side of the device).
2 Set the desired radio station with TUNING (right side of the device).
Stereo/mono reception
If the sliding switch CD MW FM FM STEREO (on the right side of the device) is set to FM STEREO, the device can receive FM stereo stations. If this is the case, the FM STEREO LED glows. However, if the signal from the FM stereo station is weak, you can improve the sound quality by switching to mono reception.
1 Use the sliding switch CD MW FM FM STEREO (right side of the device) to switch from FM STEREO to FM, i.e. mono. - The FM STEREO LED goes out.
2 Use the sliding switch CD MW FM FM STEREO (on the right side of the device) to switch from FM to FM STEREO, i.e. stereo.

OPERATION
CD mode
The device is suitable for audio CDs (CD-DA), CD-Rs and CD-RWs with audio data. Only use CD-DAs which bear the logo shown here. Always keep the CD compartment closed to prevent dust from collecting on the laser optics. Do not attach adhesive labels to CDs. Keep the surfaces of CDs clean.
When burning CD-R and CD-RWs with audio files, various problems may arise which could lead to interference in playback. This can be caused by faulty software or hardware settings or by the CD being used. Should such problems arise, contact the customer services of your CD burner or software manufacturer or look for relevant information, for example, on the Internet. When you are making audio CDs, observe all legal guidelines and ensure that the copyright of third parties is not infringed.
Selecting the CD input source
1 Switch on the device with ON/OFF.
2 Set the sliding switch CD MW FM FM STEREO (right side of the device) to CD.
3 Open the CD compartment by lifting the lid up carefully.
4 Insert a CD in the compartment with its label facing upwards.
5 Close the lid of the CD compartment carefully.
The device reads the content of the CD. The total number of tracks appears briefly in the display e.g. 44 , then the time is displayed constantly.
CD playback
1 Press PLAY/PAUSE II to start playback.
- Playback begins with the first track.
- Display: initially the first track number and the time is displayed constantly.
-Playback stops at the end of the CD.
2 Use PLAY/PAUSE II to switch to playback pause.
- Display: the current track number flashes and then the time is displayed constantly.
3 Press PLAY/PAUSE II* to resume playback.
4 Press » STOP « to end playback.
Displaying CD information
1 During playback, when playback is paused or stopped, press CD DISPLAY to display CD information.
- Display: briefly, the current track, the current track flashing or the total number of tracks, then the time is displayed constantly.
Repeating the current track
Press SKIPbriely during playback.
The track is repeated from the beginning.
OPERATION
Selecting another track
1 During playback, keep pressing SKIP or SKIP until the number of the track you want to hear appears in the display. - Playback of the selected track starts automatically.
Searching for a passage within a track
1 During playback, press SKIP or SKIP and hold it down until you find the passage you want to hear.
- If SKIP I or I SKIP are released, playback starts.
Note:
During the search the volume is reduced.
Calling up the Repeat function
The repeat functions enable you to repeat a single track or the whole CD.
1 To repeat a track press REPEAT ^ once.
- The REPEAT LED flashes, the current track is repeated constantly.
2 To repeat all tracks on the CD press REPEAT × again.
- The REPEAT « LED glows. The entire CD is repeated constantly.
3 To cancel this function, press REPEAT again.
Playing back tracks in random order
1 Press to select the CD MODE function.
2 Press PLAY/PAUSE II < to start playback.
- The »RANDOM ● « LED glows.
- The tracks on the CD are played back in random order.
3 To cancel this function, press CD MODE
- The »RANDOM ● « LED goes out.
- The tracks are played back in numerical order.
Creating a track memory
This function enables you to store up to 20 tracks on the current CD in a certain order and then play them back in that sequence. The same track may be stored more than once.
1 Place a CD in the CD compartment.
2 When the CD is in the STOP position, select the function with MEMORY.
- Display: P 0 1 , the PROG. LED flashes.
3 Select the track with SKIP or SKIP.
- Display: e.g. «03« (for the first selected track) and the «PROG. ● « LEDs flash.
OPERATION
4 Press MEMORY to save the track. Display: P02, the PROG. LED flashes.
Note: Repeat steps 3 and 4 to program more tracks.
5 To start playback of the track memory, press PLAY/PAUSE II. Playback begins with the first programmed track.
Note:
When creating a track memory, if no button is pushed for more than 10 seconds, the system will end the procedure automatically. You then have to start the procedure again from the beginning.
Changing from the track memory to normal playback
1 To end playback of the track memory press STOP
2 Press CD MODE - The PROG. LED goes out.
3 Press PLAY/PAUSE II. - Normal playback begins at the start of the CD.
Note: The track memory remains stored when you start normal playback.
Changing from normal playback to the track memory
1 Press STOP to end normal playback.
2 Press CD MODE twice.
- The PROG. « LED glows.
3 Press PLAY/PAUSE II. -Playback begins with the first programmed track.
Changing the track selection
1 To replace a stored track, keep pressing MEMORY until its memory position appears in the display.
2 Press SKIP or SKIP to select the new track number.
3 Press MEMORY to store the new track.
Adding tracks
1 To add a track, press MEMORY repeatedly until the next free memory position e.g. P\& B appears.
2 Press SKIP or SKIP to select the desired track number.
3 Press MEMORY to store the desired track.
OPERATION
Deleting the track memory
1 Press MEMORY when the CD is in the stop position.
- The PROG. LED goes out.
Note:
The track memory is also deleted,
- If the CD compartment is opened,
- If the sliding switch CD MW FM FM STEREO (right side of the device) is set to MW, FM or FM STEREO,
If you pull out the mains cable.
Alarm mode
Selecting the alarm times
1 Set the sliding switch 1 OFF ON ADJ or 2 OFF ON ADJ (left side of the device) to ON.
- Display: The 1 or 2 LED glows;
or
Activate both alarm times by setting the sliding switches 1 OFF ON ADJ and 2 OFF ON ADJ (left side of the device) to ON.
- Display: The 1 and 2 LEDs glow.
Displaying the alarm times
1 Set the sliding switch 1 OFF ON ADJ or 2 OFF ON ADJ (left side of the device) to ADJ.
- Display: the alarm time most recently set (1 or 2), flashes.
Note:
The sliding switches 1 OFF ON ADJ and 2 OFF ON ADJ (left side of the device) should not both be set to ADJ, as then the alarm times cannot be displayed and also cannot be set.
Alarm with signal tone
1 Set the sliding switch BUZZER MUSIC to BUZZER.
2 Set the sliding switch 1 OFF ON ADJ or 2 OFF ON ADJ (left side of the device) to 0N .
3 Press ON/OFF to switch the device to standby mode.
- The ON LED goes out.
- The device switches on at the set alarm times with the alarm signal (alarm duration 90 minutes).
OPERATION
Alarm with radio station
1 Set the sliding switch BUZZER MUSIC to MUSIC.
2 Set the sliding switch 1 OFF ON ADJ or 2 OFF ON ADJ (left side of the device) to ON.
-Display:The 1 ororLEDglows.
3 Select the frequency band (FM or MW) with CD MW FM FM STEREO (right side of the device) .
4 Set the desired radio station with » TUNING« (right side of the device).
5 Set the desired alarm volume with VOLUME (right side of the device).
6 Press ON/OFF to switch the device to standby mode.
-
The «ON ● « LED goes out.
-
The device switches the radio on at the set times (alarm duration 90 minutes).
Alarm with CD
1 Set the sliding switch BUZZER MUSIC to MUSIC.
2 Set the sliding switch 1 OFF ON ADJ or 2 OFF ON ADJ (left side of the device) to 0N
-Display:The 1 ororLED glows.
3 Set the sliding switch CD MW FM FM STEREO (right side of the device) to CD.
4 Insert a CD into the CD compartment and set the desired alarm volume with VOLUME (right side of the device).
5 Press ON/OFF to switch the device to standby mode.
- The ON LED goes out.
- The device switches CD playback on at the set times (alarm duration 90 minutes).
Alarm with track memory
1 Repeat steps 1 to 4 of the previous section.
2 Start playback with PLAY/PAUSE II and then press STOP
3 Press ON/OFF to switch the device to standby mode.
- The ON « LED goes out.
- The device switches CD playback with the stored track memory on at the set times (alarm duration 90 minutes).
OPERATION
Interrupting the alarm
1 During the alarm, press SNOOZE (at the front of the device).
- The alarm signal (signal tone, radio station or CD) stops.
- The alarm goes on again at 6-minute intervals (alarm duration 90 minutes).
Cancelling the alarm for the day
Press ON/OFF (on the top of the device) while the alarm is sounding.
- The alarm signal (signal tone, radio station or CD) stops.
- The alarm times set are retained for the next day.
Activating and deactivating the alarm
1 To switch off the alarm function set 1 OFF ON ADJ or 2 OFF ON ADJ (left side of the device) to 0FF .
- Display: The 1 or 2 LEDs go out.
- The set alarm times are saved.
2 To switch on the alarm function, switch 1 OFF ON ADJ or 2 OFF ON ADJ (left side of the device) from 0FF to 0N
-Display:The 1 or 2 LEDs glow.
OPERATION
Timer mode
The device possesses a sleep timer, which switches it off in radio mode or CD mode at a preset time. It is possible to set the switch-off time in 30 minute steps up to 90 minutes.
Setting the sleep timer
1 To set the desired switch off time, press SLEEP repeatedly.
-Display: 0 60 or 30 (off,90,60 or 30 minutes).
- The SLEEP LED flashes.
- After a short time, if selected, the radio switches on and the radio station selected can be heard.
- The SLEEP LED glows.
- After the selected switch-off time has elapsed, the device switches off automatically
or
1 To set the desired switch off time, press SLEEP repeatedly.
-Display: , 30 , 60 or 30 (Off,90,60 or 30 minutes).
- The «SLEEP ● « LED flashes.
2 If CD mode has been selected, start playback with PLAY/PAUSE II<.
- The SLEEP « LED glows.
- After the selected switch-off time has elapsed, the device switches off automatically.
Displaying the switch-off time remaining
1 Press SLEEP briefly.
-Display:briefly, the switch-off time remaining.
Switching off the sleep timer
1 To switch off the sleep timer before the set time, press ON/OFF.
The device switches to stand-by mode.
CE
INFORMATION
Technical data
This device is noise-suppressed according to the applicable EU directives. This product fulfils the European directives 89/336/EEC, 73/23/EEC and 93/68/EEC.
This device conforms to the safety regulation DIN EN 60065 (VDE 0860) and therefore the international safety regulation IEC 60065.
The type plate is located on the bottom of the device.
Technical data
Power supply:
Mains operation: 230V 50Hz
Back-up battery 1 × 9V , 6LF 22
Max. power consumption: < 4W (operation), < 3W (standby)
Output: DIN 45324, 10% THD 2 × 1.5 W
Radio unit:
Frequency band FM 87.5...108.0 MHz
MW 520 ... 1610 kHz
CD unit:
Frequency response 20Hz ... 20 kHz
Noise voltage ratio ≥ 6.5 dB
Dimensions and weight: W × H × L 144 × 194 × 181 mm
Weight approx. 1.7kg
Technical and design modifications reserved.
INFORMATION
Troubleshooting
If a fault occurs, first refer to this information before you take the device for repair.
If you are unable to rectify the fault using the information given here, contact your local dealer or service specialist.
Under no circumstances should you attempt to repair the device yourself, as this would invalidate the guarantee.
| PROBLEM | POSSIBLE CAUSE | REMEDY |
| GENERAL INFORMATION No sound | Volume is set too low or headphones are connected, mains cable is not correctly connected | Increase the volume, unplug headphones Connect the mains cable properly |
| The device does not respond to button commands | Static electrical discharge | Switch off device, disconnect mains cable and plug it in again after a few seconds |
| RADIO Poor radio reception | Weak radio antenna signal Interference from electrical devices such as televisions, video recorders, computers, neon lamps, thermostats or motors | FM (VHF): redirect the wire antenna Switch from stereo to mono reception MW: turn whole device Keep radio recorder away from electrical devices |
| CD Playback will not start | The CD is damaged or dirty | Replace or clean the CD |
| The CD player skips tracks | A stored track memory is being played The RANDOM function is activated | Switch to normal playback or delete the track memory Switch off the RANDOM function |
| CD-Rs or CD-RWs are not being played back, or being played back incorrectly | Faulty software or hardware settings for burning, or the CD being used is faulty | Check the components of your CD burner/burner software or change the CD you are using |
CLOCK RADIO WITH CD
CRL630CD
0 S
NEDERLANDS