
CR627USB - Alarm Clock SALORA - Free user manual and instructions
Find the device manual for free CR627USB SALORA in PDF.

| Product type | Clock radio |
| Brand | Salora |
| Model | CR627USB |
| Mains power | AC 100-240 V ~ 50/60 Hz |
| Backup batteries | 2 AAA/LR03 batteries (not included) |
| FM frequency range | 87.5 – 108 MHz |
| Number of radio presets | 10 stations |
| USB port | Yes, 5V / 1000mA for charging |
| Snooze function | Yes, repeat after 9 minutes |
| Sleep function | Yes, timers from 5 to 120 minutes |
| Brightness dimmer | Yes, two levels (high and low) |
| Alarm type | Buzzer or radio, two independent alarms |
| Display | LED, hours and minutes |
| Antenna | Telescopic antenna |
| Cleaning | Unplug before cleaning, use a dry cloth |
| Operating temperature | Indoor domestic use, non-tropical |
| Used batteries | Do not dispose of with household waste, recycle |
| Protection rating | Do not expose to moisture, dripping or splashing |
Frequently Asked Questions - CR627USB SALORA
User questions about CR627USB SALORA
0 question about this device. Answer the ones you know or ask your own.
Ask a new question about this device
Download the instructions for your Alarm Clock in PDF format for free! Find your manual CR627USB - SALORA and take your electronic device back in hand. On this page are published all the documents necessary for the use of your device. CR627USB by SALORA.
USER MANUAL CR627USB SALORA
natural_image
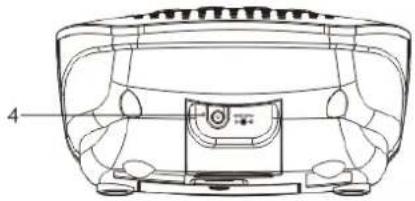
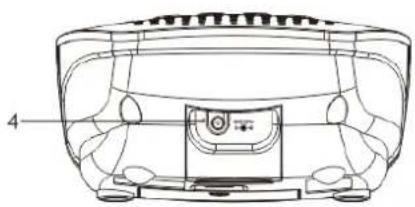
Technical line drawing of a device rear view with labeled component 4 (no text or symbols beyond label)- Display
- Témoin alarme 1 / Témoin buzzer alarme 1 / Témoin radio alarme 1
- USB oplaad poort
- Jack DC5V
- Témoin alarme 2 / Témoin buzzer alarme 2 / Témoin radio alarme 2
- VOLUME + / ALARM 2 knop
- VOLUME - / ALARM 1 knop
- ⏻ Bouton POWER ON/OFF/ALARM OFF
- Bouton SNOOZE / Bouton SLEEP / Bouton DIMMER
- Bouton HOUR/TUNING
- Bouton MINUTE/TUNING
- Bouton TIME / MEMORY
- Adaptateur AC (pas représenté)
Alimentation
natural_image
Technical line drawing of a car front panel with no visible text or symbolsPlease read the instruction carefully before operating the unit.
Location of Control
natural_image
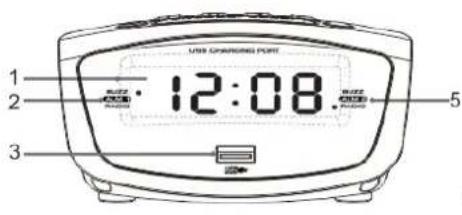
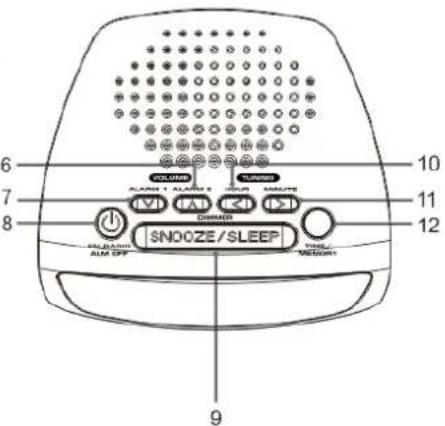
Technical line drawing of a mechanical component with labeled part 4 (no text or symbols beyond label)- Display
- AL 1 Indicator / AL 1 buzzer Indicator / AL 1 radio Indicator
- USB Charging Port
- DC5V Jack
- AL 2 Indicator / AL 2 buzzer Indicator / AL 2 radio Indicator
- VOLUME + / ALARM 2 button
- VOLUME - / ALARM 1 button
- ⏻ ON/OFF button
- SNOOZE button/ SLEEP button/ Dimmer button
- TUNING ◀ button / HOUR button
- TUNING ▶ button / MINUTE button
- TIME / MEMORY button
- AC Adaptor (Not Shown)
Power Supply
Mains supply
Insert the AC adaptor into a AC 100-240V\~50/60Hz mains outlet and the other end of the cord into the DC 5V jack (4) on the back of the unit.
Battery back up
The clock time and alarm (if set) can be maintained during a power failure by 2 x AAA/ LR03 batteries (not supplied).
Once the power is restored, check the time to make sure it is accurate and re-set if necessary.
Inserting the Batteries
- Open the battery compartment at the bottom of the unit by pressing on the catch and removing the cover.
- Insert 2 x AAA/ LR03 batteries (preferably alkaline batteries) into the battery compartment, following the polarity as shown on the diagram inside the compartment.
- Replace the battery compartment cover.
Setting the clock and alarm
Setting the clock
- Press and hold the TIME (12) button and the hour/minute digits will flash.
- Use the HOUR (10) button to set the hours.
- Use the MINUTE (11) button to set the minutes.
- Press the TIME (12) button again to confirm the clock time setting and the hour / minute digits will become solid.
Setting the alarm
Before setting the alarm time, make sure the clock has been set.
- The unit remains in the standby mode.
- Press and hold ALARM 1 (7) / ALARM 2 (6) button for 2 seconds and the hour / minute digits will flash.
- Press the HOUR (10) button to set the hours.
- Press the MIN (11) button to set the minutes.
- The unit will then return to the clock time display after 5 seconds.
Using the alarm function
This unit allows you to wake up by buzzer or radio.
-
The unit remains in the standby mode.
-
To adjust the alarm time, follow the steps in "Setting the clock and alarm".
-
To select the buzzer or radio mode for ALARM 1, press the ALARM 1 (7) button repeatedly. The corresponding AL1 buzzer Indicator (2) or AL1 radio Indicator (2) will light up on the LED display.
-
To select the buzzer or radio mode for ALARM 2, press the ALARM 2 (6) button repeatedly. The corresponding AL2 buzzer Indicator (5) or AL2 radio Indicator (6) will light up on the LED display.
-
When the preset alarm time is reached, the alarm will sound in the selected alarm buzzer mode or radio will sound in the selected alarm radio mode.
-
To stop the alarm, press the ⏻ON/OFF (8) button. The alarm will sound again at the same time the next day.
-
To disable the alarm function, press the ALARM 1 (7) or ALARM 2 (7) button repeatedly until the selected buzzer indicator or radio indicator disappears.
Note: While the buzzer alarm volume is fixed and cannot be adjusted, the radio alarm volume can be adjusted to your desired level using the VOLUME buttons (6) (7). To select a radio station to wake up to, see the section on "USING THE RADIO".
Snooze function
When the alarm sounds, press the SNOOZE (9) button to stop the alarm temporarily. The "ALARM 1 indicator (2)" or "ALARM 2 indicator (5)" will continue to flash and the alarm will sound again after 9 minutes. To cancel the SNOOZE function and repeat the alarm the next day, press the ⏻ ON/OFF (7) button.
Sleep Function
With this function, you can listen to the radio for up to 120 minutes, after which it will turn off automatically.
- When the unit is switched on, press the SLEEP (9) button repeatedly to select the duration: 120, 90, 60, 45, 30, 15, 05 minutes or OFF.
- When the preset sleep duration elapses, the radio turns off automatically. If you would like to know the remaining playing time, press SLEEP (9) button once.
- To cancel the sleep function before the end of the set time, press the ⏻ON/OFF (7) button to turn off the radio immediately.
Using the Radio
- Press the ⏻ ON/OFF (7) to turn on the radio.
- Press and hold one of the
buttons (10) (11) to start automatic tuning up/down. Release the button when the unit is receiving a station you would like to listen to. For manual fine-tuning, you can press it briefly to adjust the frequency step by step. - Press the ⏻ON/OFF (7) button to turn off the radio.
For optimum reception
Extend and position the FM antenna to achieve optimum reception.
Preset radio stations
You can store up to 10 stations.
- Use the
buttons (5) (8) to search for a station. Press and hold the MEMORY button to store the station and a number to be assigned for the preset will be flash. - Press the
buttons to change the number. - Press the
button again to confirm the setting.

Listening to a preset station
While listening to the radio, press the MEMORY button to select a preset station.
The current time is always displayed. When you change to Radio mode, the frequency will be displayed for 5 seconds and then the unit will go back to displaying the time.
Dimmer Control
In clock mode, repeatedly press DIMMER to adjust the brightness of display (bright or dim).
USB Charging Function
To charge, connect your USB device like smartphone to the USB port of this clock. Use only with devices that require 5V USB power. USB port provides 1000mA recharging current. Devices requiring more than 1000mA should not be used. Charging time may vary for difference devices. Note:
• Charging function may not be supported for all phones or electronic devices.
- Charging output would be around 80% in radio mode.
Warnings
- This appliance is intended for domestic household use only and should not be used for any other purpose or in any other application, such as for non-domestic use or in a commercial environment.
- The ventilation should not be impeded by covering the ventilation openings with items, such as newspapers, table-cloths, curtains, etc.
• No naked flame sources, such as lighted candles, should be placed on the apparatus. - The apparatus shall not be exposed to dripping or splashing and that no objects filled with liquids, such as vases, shall be placed on the apparatus.
- Ventilation
Allow at least a 10 cm gap all around the product.
• This apparatus is not suitable for use in a tropical climate. - Prior to cleaning or other maintenance, the appliance must be disconnected from the supply mains.
- Batteries (battery pack or batteries installed) shall not be exposed to excessive heat such as sunshine, fire or the like.
• To protect the environment, use local recycling facilities for battery disposal. - Where the MAINS plug or an appliance coupler is used as the disconnect device, the disconnect device shall remain readily operable.
• The marking plate is located on bottom of the enclosure.
Specifications
FM: 87.5-108 MHz
Power supply: AC 100-240V\~50/60Hz
Back-up batteries: 2 X 1.5V "AAA" size batteries or equivalent (not included)

Electrical products should not be disposed of with household waste.
We kindly ask that you use the recycle collection points provided for this purpose.
Consult with your local authorities or dealer for advice on recycling.
We apologise for any inconvenience caused by minor inconsistencies in these instructions, which may occur as a result of product improvement and development.
Albers Trading B.V. | Vareseweg 44 | 3047AV | Rotterdam | The Netherlands


- Alimentation
- Please read the instruction carefully before operating the unit.
- Location of Control
- Power Supply
- Mains supply
- Battery back up
- Inserting the Batteries
- Setting the clock and alarm
- Setting the clock
- Setting the alarm
- Using the alarm function
- Snooze function
- Sleep Function
- Using the Radio
- For optimum reception
- Preset radio stations
- Listening to a preset station
- Dimmer Control
- USB Charging Function
- Warnings
- Specifications
Brand : SALORA
Model : CR627USB
Category : Alarm Clock