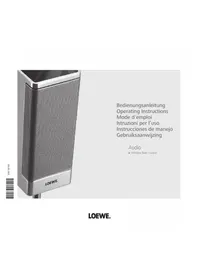
Wireless Rear Sound - Loudspeaker LOEWE - Free user manual and instructions
Find the device manual for free Wireless Rear Sound LOEWE in PDF.


| Product Type | Wireless surround speaker system |
| Brand | Loewe |
| Model | Wireless Rear Sound |
| Dimensions (transmitter module) | 155 x 55 x 28 mm (L x H x D) |
| Dimensions (receiver module) | 330 x 180 x 52.5 mm (L x H x D) |
| Weight (transmitter module) | 0.1 kg |
| Weight (receiver module) | 1.5 kg |
| Power supply | AC 220-240 V, 50 Hz |
| Consumption (transmitter module) | 3 W in operation, < 1 W in standby |
| Consumption (receiver module) | 30 W in operation, < 1.5 W in standby |
| Maximum output power | 2 x 48 W (EIAJ, 1 kHz, 10% THD, 6 Ω) |
| Frequency range | 2.4 GHz |
| Audio inputs | 2 x analog RCA (AUDIO 1 and AUDIO 2) |
| System interface | Loewe Audio-Link (25-pin connector) |
| Main functions | Wireless transmission of audio signals to surround speakers, input sensitivity adjustment (0 dB / -6 dB / -12 dB), automatic or manual connection |
| Operating temperature | 5 °C to 35 °C |
| Operating humidity | 5 % to 90 % |
| Maintenance and cleaning | Clean with a soft, slightly damp, clean cloth, without aggressive products |
| Safety | Do not expose to water, humidity, heat sources; disconnect during storms; do not obstruct ventilation openings; use only Loewe accessories |
| Spare parts and repairability | Contact your Loewe dealer for any repairs; use genuine Loewe parts (ref. Audio-Link adapter cable: 89954.001) |
| General information | 88-page user manual available in several languages; manufacturer: Loewe Opta AG, Kronach, Germany |
Frequently Asked Questions - Wireless Rear Sound LOEWE
User questions about Wireless Rear Sound LOEWE
0 question about this device. Answer the ones you know or ask your own.
Ask a new question about this device
Download the instructions for your Loudspeaker in PDF format for free! Find your manual Wireless Rear Sound - LOEWE and take your electronic device back in hand. On this page are published all the documents necessary for the use of your device. Wireless Rear Sound by LOEWE.
USER MANUAL Wireless Rear Sound LOEWE
■ Wireless Rear I Sound
LOEWE.
Inhalt
Anschließen
Scope of delivery 20
Setting Up 20
Environmental Protection 20
Cardboard Box and Packaging 20
The Unit 20
Remote control batteries 20
For your Safety 21
Use for the intended purpose and ambient conditions 21
Supervision 21
Cleaning....21
About these operating instructions 21
Loewe Audio Link system interface 21
Setting Up 22
Suggested setup 22
Connecting up 23
Cabling Loewe Flat TV (from chassis L2710 onwards) – Transmitter module – Individual Sound 23
Cabling TV sets (other) – Transmitter module – Individual Sound .....24
Cabling TV sets (other) – Transmitter Module 25
Cabling – Receiver module – Surround speakers ......26
Initial Set-up 27
Linking modules with Loewe Flat TV (L2710) 27
Linking modules with other TV sets 28
Setting input sensitivity 28
Troubleshooting 29
LED Status Messages 29
Technical Specifications ....30
General 30
Masthead 30
Transmitter module
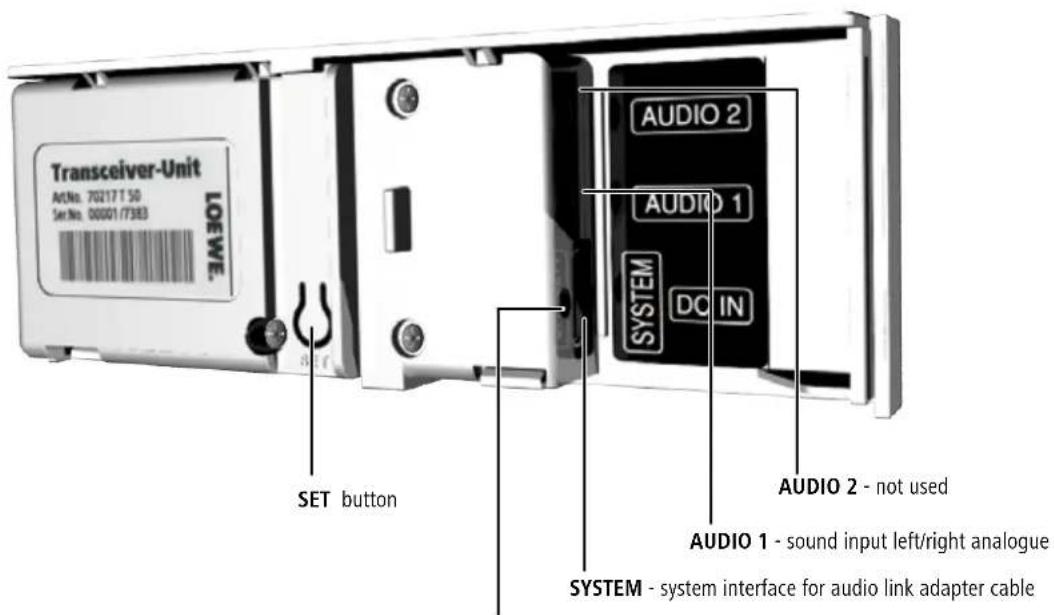
DC IN - power supply connector
Receiver module
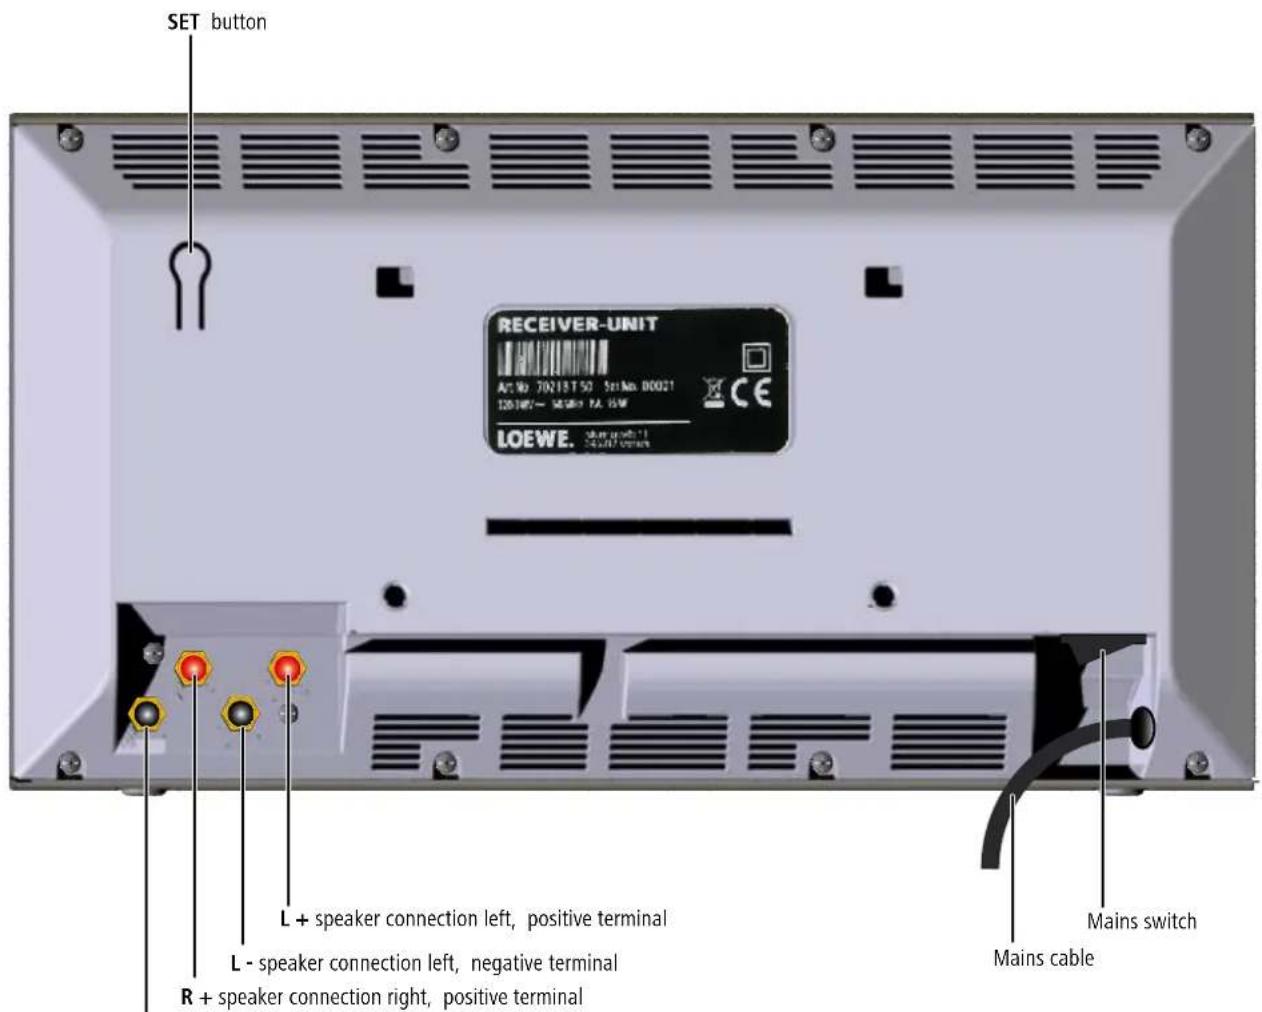
R - speaker connection right, negative terminal
Welcome
Thank you
for choosing a Loewe product. We are happy to welcome you as our customer. At Loewe we combine the highest standards of technology, design and user friendliness. This is equally true of TV, DVD, video, audio and accessories. Neither technology nor design is an end in itself, but both are intended to provide our customers with the best possible audio and visual experience. Our design is not influenced by short-term, fashionable trends. You have, after all, purchased a high-quality piece of equipment which you do not want to tire of tomorrow or the day after.
Scope of delivery
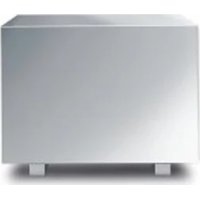
• Wireless Rear I Sound transmitter module
• Wireless Rear I Sound receiver module
• Power supply with country-specific power socket adapters
- Stereo Cinch cable
• Audio link adapter cable
• Installation support
- Wall mount
- Fixing strip
- Two adhesive feet
• These operating instructions
- Assembly instructions
Setting Up
- Please refer to the directions in the assembly instructions.
- Do not set up the unit near strong heat sources or in direct sunlight.
- When setting up in a cupboard or enclosed shelving: Leave at least 2.5 cm of free space around the unit to allow air to circulate freely and to prevent heat accumulation. Do not cover the fan and opening on the back.
- Incorrect voltages can damage the unit. The unit may only be connected to an electricity supply with the voltage and frequency stated on the rating plate and using the enclosed mains cable.
- During thunderstorms, disconnect the mains plug. A voltage surge caused by lightning conducted through the mains could damage the unit.
- During a lengthy absence, the plug should also be disconnected from the mains.
- The mains plug must be easy to reach to ensure that the unit can be disconnected from the mains at any time.
-
Position the mains cable in such a way that it can not be damaged. The mains cable may not be bent or laid across sharp edges, walked on or exposed to any chemicals; the latter applies to the whole unit. A mains cable with damaged insulation can cause electric shocks and represents a fire hazard.
-
When you want to unplug from the mains, do not pull on the cable, but on the housing of the plug. The cables in the mains plug could otherwise be damaged and could cause a short-circuit when being plugged in again.
- If there are other units working in the same frequency range (2.4 GHz), there can be interference (refer to page 29).
Please also read and follow the safety advice on the following pages.
Shipping the unit
The original shipping box and packaging materials should be used in this case. To protect the unit as much as possible, pack it in the same way as it was packed when you originally received it.
Environmental Protection
Cardboard Box and Packaging
In line with national regulations regarding the disposal of packaging materials, we pay a fee to authorised recyclers who collect packaging from dealers. Nevertheless, we recommend that you keep the original cardboard box and the rest of the packaging materials so that the unit can, if necessary, be transported in the safest possible conditions.
The Unit
Important: The EU Directive 2002/96/EC governs the proper return, handling and recycling of used electronic appliances. Old electronic appliances must therefore be disposed of separately. Never dispose of this unit in the normal domestic waste! You can hand in your old unit free of charge at identified collection points or to your dealer if you buy a similar new unit.
Other details about return (also for non-EU countries) are available from your local authorities.
Remote control batteries
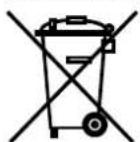
The batteries provided contain no harmful materials such as cadmium, lead or mercury.
Regulations concerning used batteries mean that batteries may no longer be thrown out with the household rubbish. You can dispose of used batteries free of charge at the collection points in commercial outlets. Your dealer will also have a collection point for used batteries.
For your Safety
For your safety, and to avoid unnecessary damage to your unit, please read and follow the safety advice below.
Use for the intended purpose and ambient conditions
This unit is intended exclusively for wireless transmission and playback of audio signals and is designed for home and office use and may not be operated in rooms with high humidity (e.g. bathroom or sauna) or a high concentration of dust (e.g. workshops).
The terms of the warranty only cover normal use of the unit.
If the unit is used outdoors, make sure that it is protected from moisture (rain, drips, spray or dew). High concentrations of moisture and dust lead to creepage current in the unit which can make it dangerous by touching a voltage or can cause a fire.
If you have moved the unit out of the cold into a warm environment, leave it switched off for about an hour to avoid the formation of condensation.
Always switch off your system (Wireless Rear I Sound, TV set and any other components which may be connected) before connecting or disconnecting other devices or speakers.
Protect your unit from:
- Wet conditions and moisture.
• Drips of water and spray. - Knocks and mechanical stress.
• Magnetic and electric fields.
• Cold, heat, direct sunlight and high temperature fluctuations. - Dust.
• Covers that inhibit ventilation.
• Interference with the internal workings of the unit.
Do not place anything filled with a liquid on the unit, such as vases.
The ventilation slits on the back of the unit must not be covered with magazines or rugs. Watch out for curtains here as well.
Use the plug adaptor suitable for your country with the power supply provided (refer to assembly instructions and operating instructions page 24/25).
IMPORTANT: TO AVOID RISK OF ELECTRIC SHOCK, DO NOT REMOVE THE COVER (AND THE BACK OF THE UNIT). THERE ARE NO PARTS INSIDE THE UNIT THAT CAN BE REPAIRED BY THE USER. REPAIRS SHOULD ONLY BE CARRIED OUT BY A LOEWE DEALER.
Only use Original accessories and spare parts from Loewe.
Supervision
Do not allow children to use the unit/TV set unsupervised. Do not allow children to play in the immediate vicinity of the unit/TV set. The unit could be knocked over, moved or pulled off the surface it is on and could hurt somebody.
Cleaning
Only clean your unit with a slightly damp, soft, clean cloth (without any aggressive or scouring cleaning agents).
About these operating instructions
The information in this guide refers to the Loewe product Wireless Rear I Sound.
Unless stated otherwise, the instructions refer to the operating elements on the Assist remote control.
Paragraphs beginning with the ➞ symbol indicate important hints, tips or conditions for perfect operation.
Terms which you will find in the menu or printed on the unit are printed in bold type.
In the functional descriptions, the necessary operating elements are arranged to the left of the text containing the handling instructions.
Loewe Audio Link system interface
In this guide, a difference is made for configuration between the unit configuration "Transmitter module connected to Loewe Flat-TV (from chassis L2710 onwards)" and "Other TV sets". Combining the unit with Loewe Flat TV (from Chassis L2710 onwards) offers advantages that make cabling easier, provides menu-driven start-up and a higher audio quality through the digital system interface.
Setting Up
Suggested setup
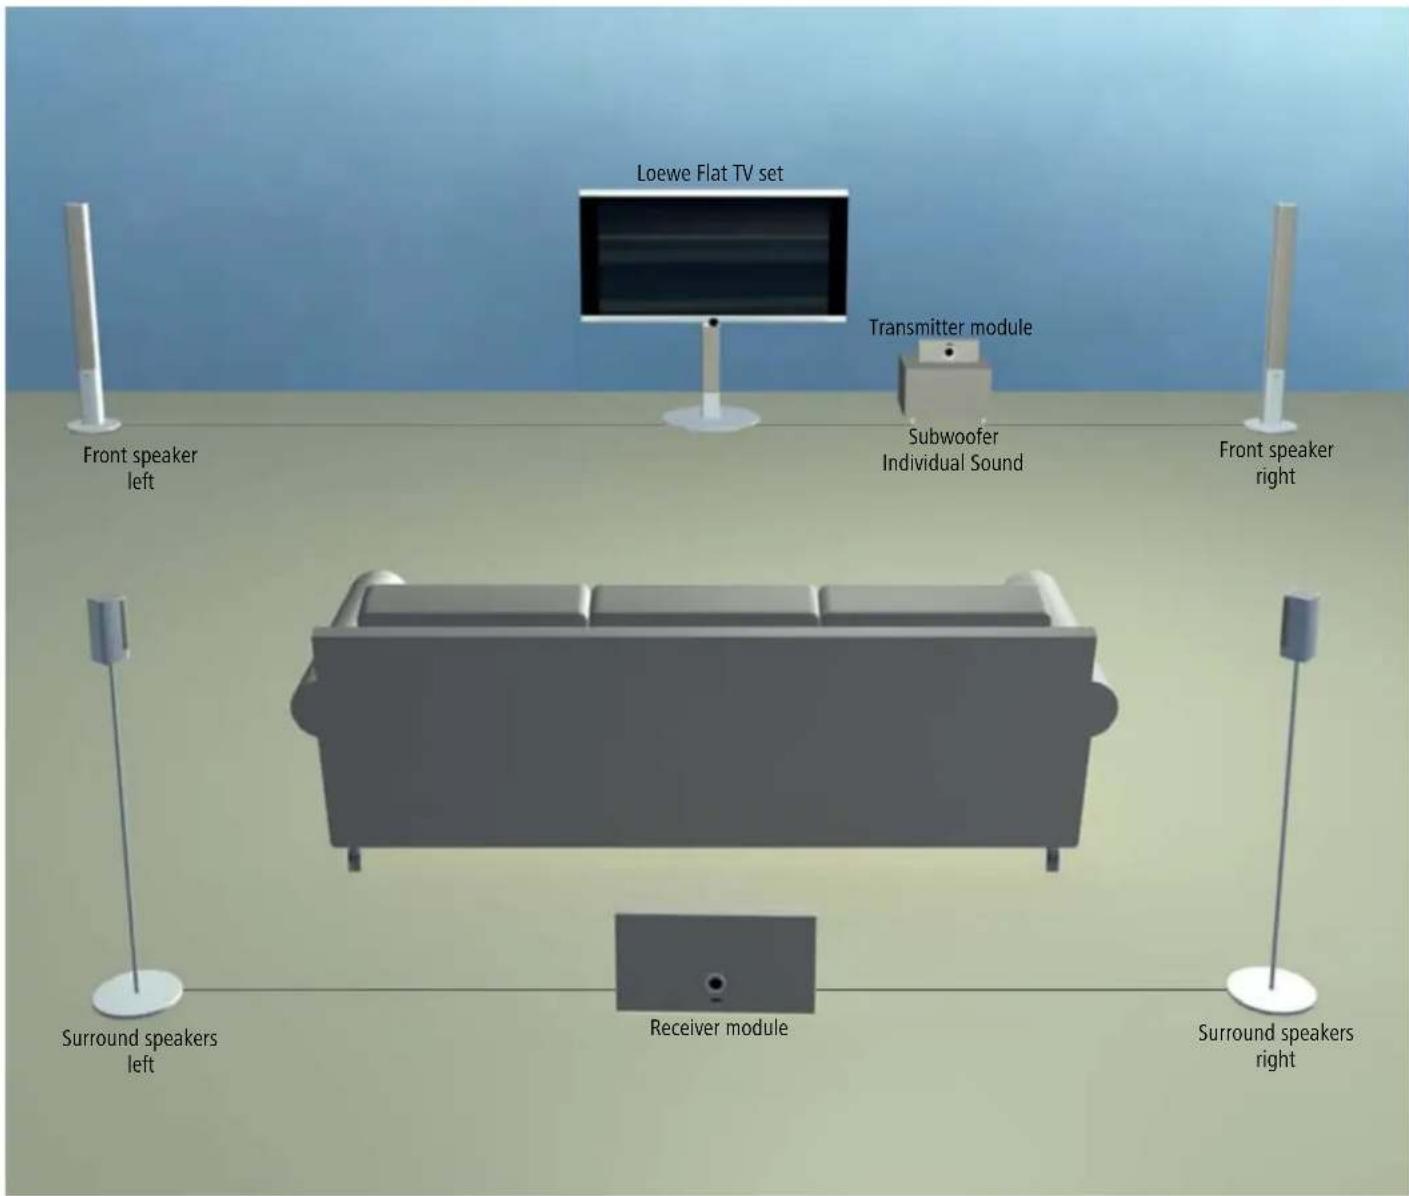
Connecting up
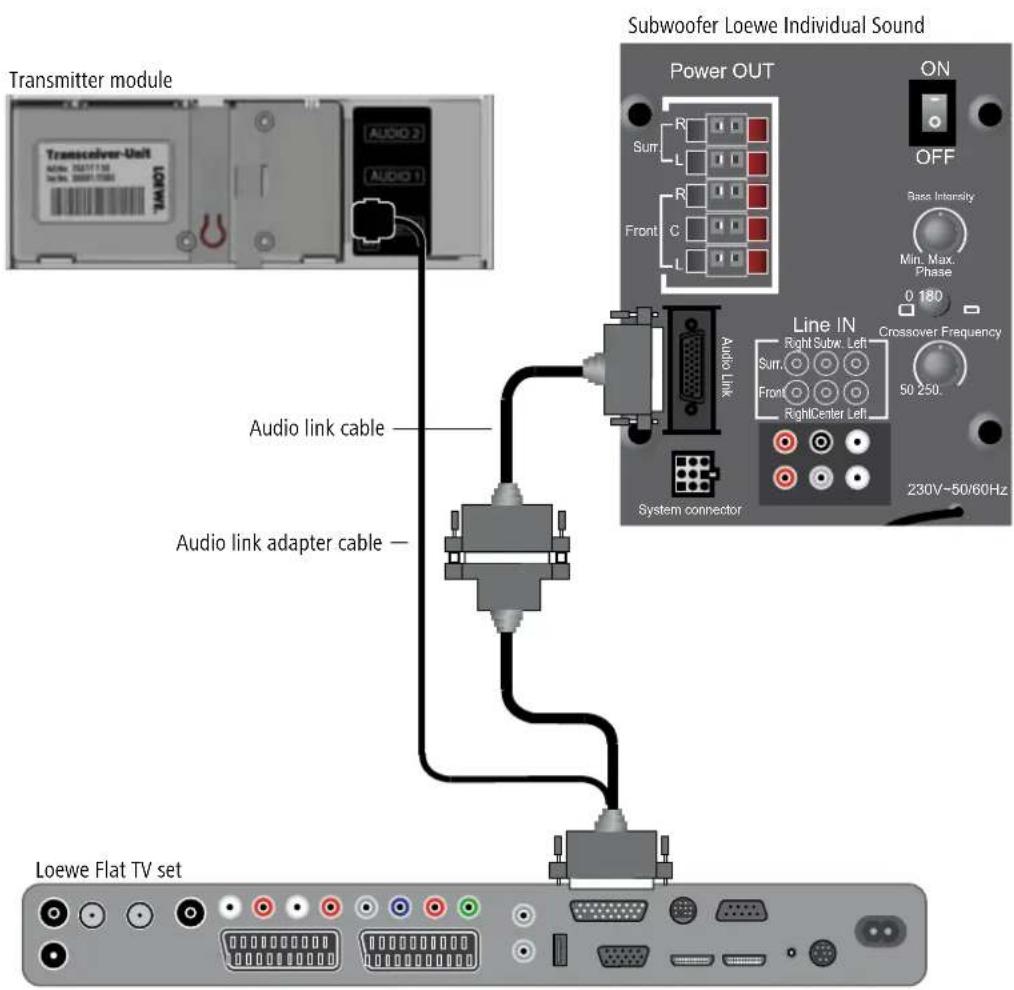
Cabling Loewe Flat TV (from chassis L2710 onwards) – Transmitter module – Individual Sound
- Please refer to the directions in the assembly instructions.
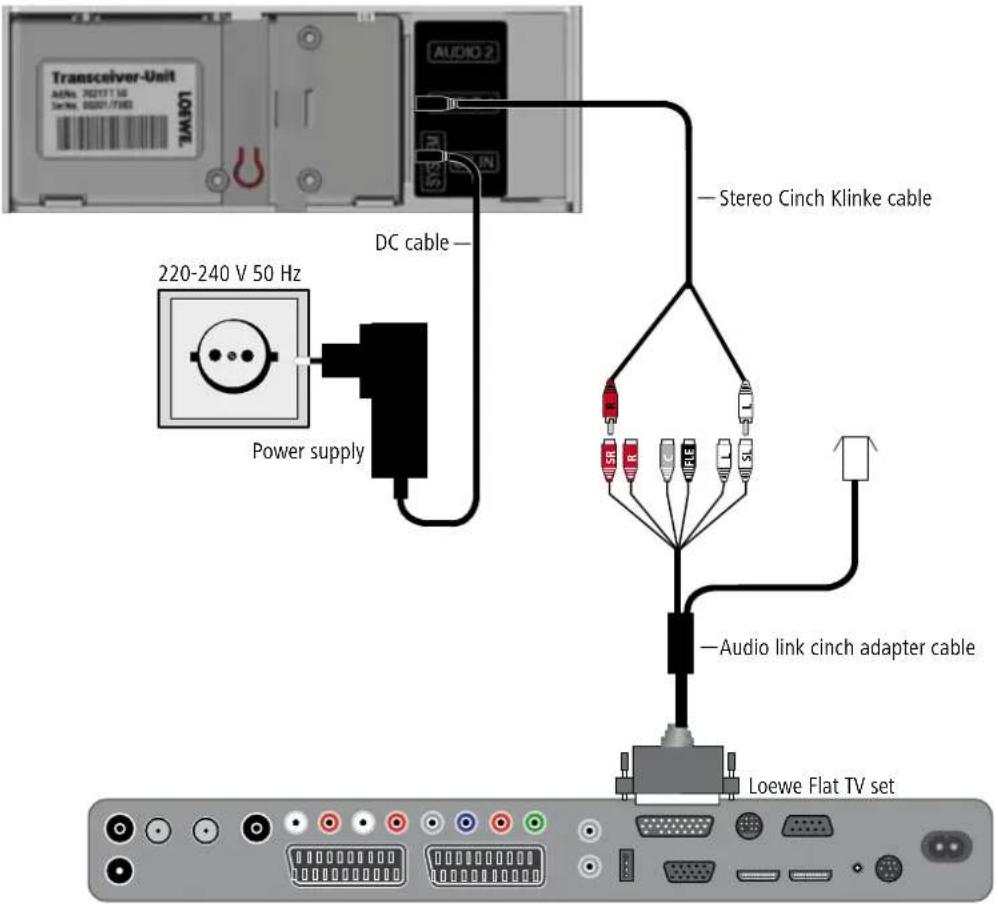
- Plug the 25 pin plug on the audio link adapter cable supplied into the socket AUDIO-LINK on the TV set and into the socket SYSTEM on the transmitter module using the flat plug on the system cable.
- Connect the subwoofer to the audio link cable and to the 25 pin connector on the audio link adapter cable.
Connecting up
Cabling TV sets (other) – Transmitter module – Individual Sound
- Please refer to the directions in the assembly instructions.
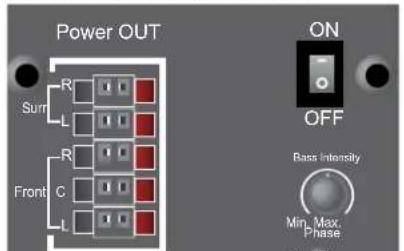
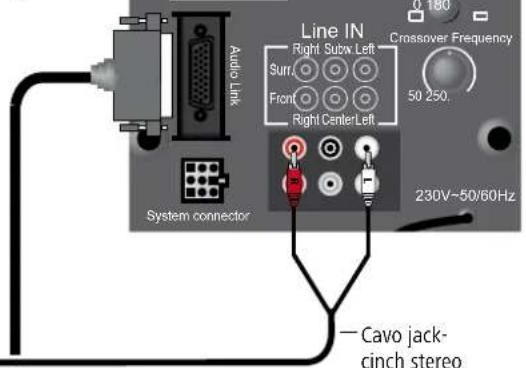
- Plug the stereo Cinch Klinke cable supplied into transmitter module in socket AUDIO 1 and to the subwoofer in the sockets Surr R/L.
- Use the audio link cable to connect the subwoofer to the TV set.
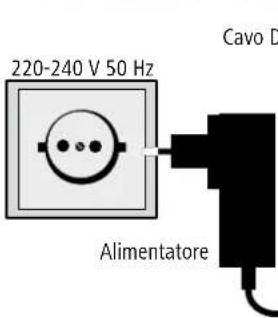
- The power supply provided is to be fitted with the plug adapter suitable for your country. Take the adapter and plug it into the contact strip of the power supply. The adapter can only be plugged on the right way around and is then slightly to one side. Then push it to the middle until it clicks into place.
- Plug the plug of the power supply into the socket DC IN on the transmitter module. Plug the power supply into a 220-240V 50 Hz socket.
Transmitter module
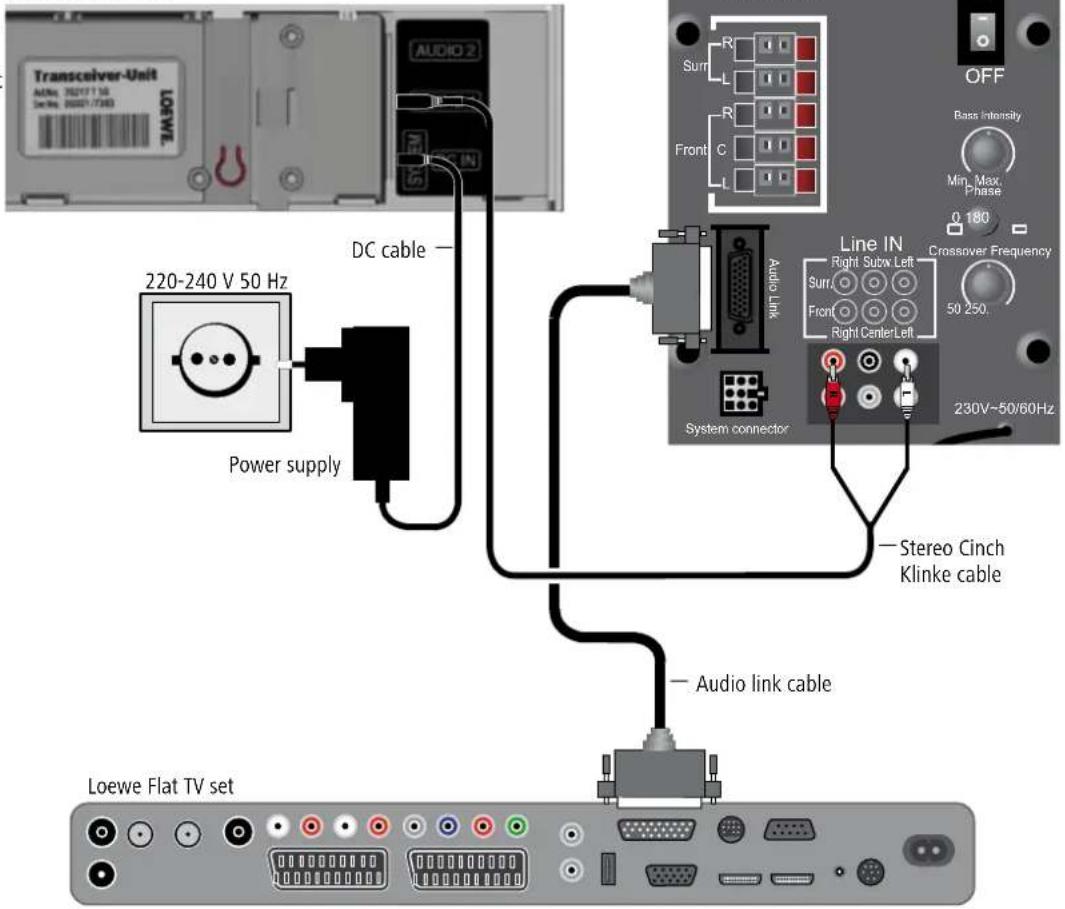
Connecting up
Cabling TV sets (other) – Transmitter Module
- Please refer to the directions in the assembly instructions.
- Plug the Stereo Cinch Klinke cable supplied to the transmitter module using the socket AUDIO 1 and to the TV set (with AC3 module) using the sockets SR/SL of the audio-link cinch adapter cable (can be obtained as an accessory; order No. 89954.001).
- The power supply provided is to be equipped with the plug adapter suitable for your country. Take the adapter and attach it to the contact strip of the power supply. The adapter can only be plugged on the right way around and is then slightly to one side. Then press it to the middle until it clicks into place.
- Plug the plug of the power supply into the socket DC IN on the transmitter module. Plug the power supply into a 220-240V 50 Hz socket.
Transmitter module
Connecting up
Cabling – Receiver module – Surround speakers
- Please refer to the directions in the assembly instructions.
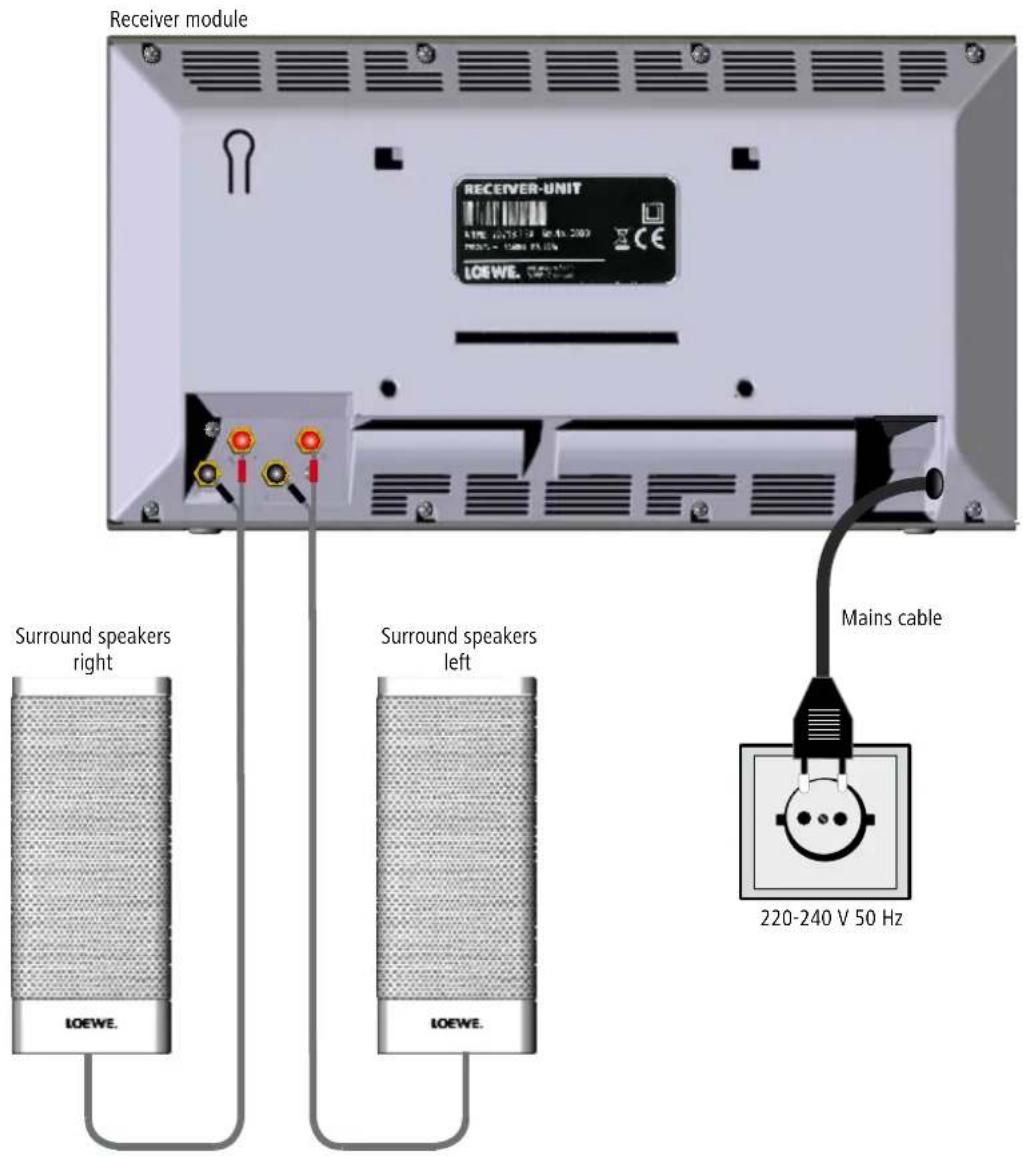
- Connect the surround speakers with the receiver module. Pay attention to the correct polarity of the connecting cables. The connection for the right surround speaker on the receiver module is labelled R+ (red) / R− (black) and for the left surround speaker with L+ (red) / L− (black). Please refer to the respective guide for connecting up the surround speakers.
- Plug the mains cable into a 220-240V 50 Hz wall socket.
Initial Set-up
The transmitter and receiver modules should be linked via the transmission path for start-up for audio transmission to be secured against interference and to prevent other receiver modules in range reproducing their audio signal.
Linking modules with Loewe Flat TV (L2710)
Make sure that the units are set up correctly (page 22). Make the connections as described on page 23.
When combining the unit with a Loewe Flat TV (from chassis L2710 onwards) configuration and linking are menu-driven.

Switch the TV set off and on again using the mains switch.
Set the remote control for TV operation.
Press the on/off button on the remote control to switch the Loewe TV set and the transmitter on.
Switch the mains switch on the receiver module to position "1" (page 19).

Call up the TV menu.
◀ ▶ Select Connections.
▼ Change to the menu line below.
▶ Select Sound components.
OK Select Sound components wizard.
The selection Sound playback via ... appears.
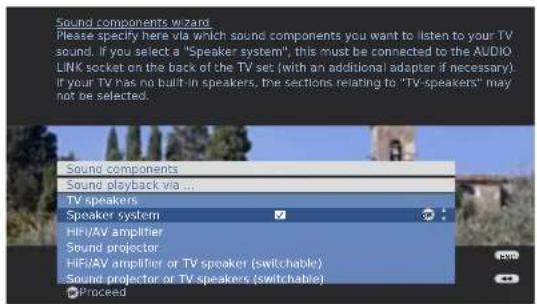
▲▼ Select Speaker system.
Confirm OK.
Select Configuration/modification.
Confirm OK.
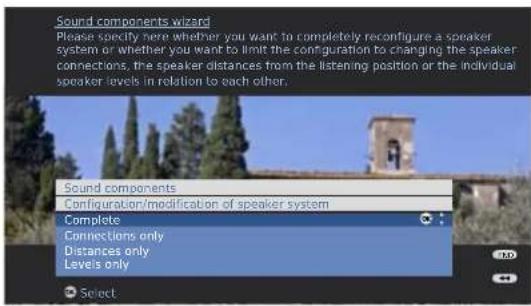

▲▼ Select Complete.
Confirm OK.
Select External speakers.
Confirm OK. The option Connect surround speakers appears.
◀ ▶ Select yes.
Confirm OK. The option Wireless operation of surround speakers appears.
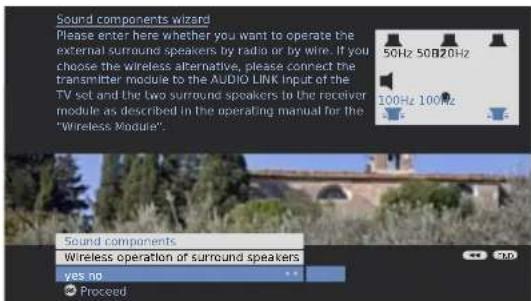
◀ ▶ Select yes.
Confirm OK. The option Start Transmitter - Receiver assignment appears.
Select yes.
Confirm OK. The green LED on the transmitter module flashes quickly.
Now, within the next two minutes, press the SET button on the receiver module for at least 3 seconds (page 19) until the green LED display flashes quickly. Wait until the link is completed.
You will find information on the LED displays on page 29.
Initial Set-up
After you have finished making the link, a message will appear on the screen.
Example 1 - successful link:
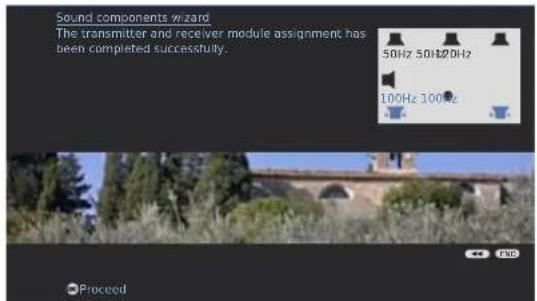
Once the link has been made successfully, the LEDs in the transmitter and receiver module light up green continuously.
Example 2 - unsuccessful link:
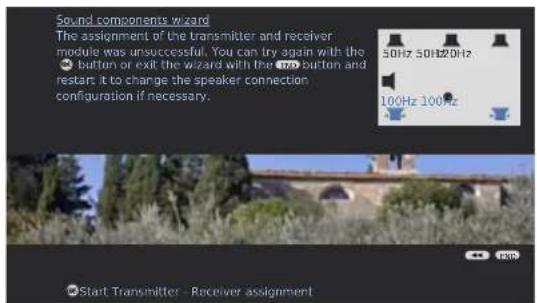
Confirm OK and if necessary make further settings or close menu.
Linking modules with other TV sets
With other TV sets (other chassis than L2710), configuration and connection are done manually. For this purpose, both modules have to be in connection status.
→ Make sure that the units are set up correctly (page 22). Depending on which TV set and accessories you are using, either the connections described on page 24 or 25 are to be made.
Press the SET button on the transmitter module (page 18) for at least 3 seconds.
The green LED on the transmitter module flashes quickly.
Now, within the next two minutes, press the SET button on the receiver module (page 19) for at least 3 seconds until the green LED display flashes quickly. Wait until the link is completed.
Once the link has been made successfully, the LEDs on the transmitter and receiver module light up green continuously.
You will find information on the LED displays on page 29.
For TV sets with AC3 module, in the menu Sound components under sound playback via ... select the option Speaker system.
Setting input sensitivity
You can set the input sensitivity on the transmitter module in three steps to adjust the volume to the input signal.
Briefly press the SET button on the transmitter module (page 18).
The volume can be adjusted by repeatedly pressing the SET button in the sequence 0 dB → -6 dB → -12 dB → 0 dB etc.
Troubleshooting
| Problem Possible Cause Remedy | ||
| Not working at all Mains cable of receiver not plugged in. Plug the mains cable firmly into a 220-240V 50 Hz socket. | ||
| No sound. Faulty connections of input or output cables. Connect the cables properly (page 23-26). If the problem persists, it is possible that the cables are faulty. | ||
| The volume is set at minimum. | Turn up the volume. | |
| The sound is set to mute. | Press or V + on the remote control to activate audio output again and then adjust the volume. | |
| Sound to surround speakers too quiet. Adjust the input sensitivity (page 28). | ||
| The wireless connection is disrupted. Other devices in the vicinity are using the same frequency range. | If possible, change the channels currently set for other WiFi devices in the vicinity. | |
| Turn the devices in different directions to reduce interference to a minimum. | ||
| Switch off other devices that may cause interference. | ||
| The TV set does not recognise the transmitter module while making the link (from chassis L2710 onwards). | The TV set had not been switched off completely. Switch the TV set off and on again using the mains switch. | |
LED Status Messages
| Unit | LED status | Unit status |
| Transmitter module | Red LED: continuously lit up | Standby. |
| Transmitter module | Red LED: flashing slowly | No receiver module found. |
| Transmitter module | Red LED: flashing quickly | Unit is in service mode. |
| Transmitter module | Red LED: flashing every 10 seconds | Unit not in linked mode. |
| Transmitter module | Green LED: continuously lit up | Transmitter on; RF connection made. |
| Transmitter module | Green LED: flashing slowly | RF connection disrupted. |
| Transmitter module | Green LED: flashing quickly | Transmitter module in connection mode. |
| Receiver module | Red LED: continuously lit up | Standby. |
| Receiver module | Red LED: flashing slowly | No transmitter module found. |
| Receiver module | Red LED: flashing quickly | Unit is in service mode. |
| Receiver module | Red LED: flashing every 10 seconds | Unit not in linked mode. |
| Receiver module | Green LED: continuously lit up | RF connection made. |
| Receiver module | Green LED: flashing slowly | RF connection disrupted. |
| Receiver module | Green LED: flashing quickly | Link-up successful. |
Technical Specifications
General
Wireless Rear I Sound Item.No. 67202T00
Power supply AC 220 - 240V, 50 Hz
Operating temperature 5 °C ... 35 °C
Humidity 5% ... 90%
Transmitter module
Power consumption during Operation: 3 W Standby: < 1 W
Frequency range 2.4 GHz
Dimensions (approx.) 155 x 55 x 28 mm (W x H x D)
Weight (approx.) 0.1 kg
Inputs
AUDIO 1 Analogue, 1 V, 10 kOhms, 3.5 mm socket
AUDIO 2 Analogue, 1 V, 10 kOhms, 3.5 mm socket
Receiver module
Power consumption during Operation: 30 W
Standby: < 1,5 W
Dimensions (approx.) 330 x 180 x 52.5 mm (W x H x D)
Weight (approx.) 1.5 kg
Maximum output power (EIAJ) 2 x 48 W (1000 Hz,
10 % harmonic distortion, 6 ohms)
Plug-in power supply unit
Plug-in power supply unit Item No. 33413
Power supply AC 220 - 240V, 50 Hz
Output DC 6 V / 1 A positive terminal inside
Masthead
Loewe Opta GmbH is a public limited company of German law with its Head Office in Kronach.
Industriestrasse 11, 96317 Kronach
Telephone: +49 (0)9261 / 99-0
Fax: +49 (0)9261 / 99-500
E-mail: ccc@loewe.de
Trade Register: Municipal Court Coburg, No. HRB 42243
Issue 12.07. 2 ^nd edition
© Loewe Opta GmbH, Kronach
All rights reserved including translation.
Design and technical specifications are subject to change without notice.

Sommaire
— Individual Sound ....51
Subwoofer Loewe Individual Sound

Collegamento

Conexión
Email loewe@loewe.co.at
AUS
International Dynamics
Australasia Pty Ltd.
129 Palmer Street
Richmond 3121, Victoria, Australia
Tel +61 - 3 - 94 29 08 22
Fax +61 - 3 - 94 29 08 33
Email mail@internationaldynamics.com.au
B NL L
Loewe Opta Benelux NV/SA
Uilenbaan 84
Customer Care Center
Industriestraße 11
Email loewe@maygap.com
F
Loewe Opta France S.A.
13 rue du Dépôt,
Parc del l'Europe, BP 10010
Century Court, Riverside Way
Riverside Business Park, Irvine, Ayrshire
KA11 5DD, UK
Tel +44 - 1294 315 000
Fax +44 - 1294 315 001
Email enquiries@loewe-uk.com
GR
ISSAGOGIKI EMBORIKI ELLADOS S.A
321 Mesogion Av.
152 31 Chalandri-Athens, Hellas
Tel +30 - 210 672 12 00
Fax +30 - 210 674 02 04
Email christina@bose-onkyo.gr
H
Basys Magyarorszagi KFT
Tó park u.9
Hamrun, HMR02, Malta
Tel +356 - 21 - 22 53 81
Fax +356 - 21 - 23 07 35
Email info@doneo.com.mt
MA
SOMARA S.A.
377, Rue Mustapha El Maani
20000 Casablanca, Morocco
Tel +212 - 22 22 03 08
Fax +212 - 22 26 00 06
Email somara@somara.ma
N
CableCom AS
Ostre Kullerod 5
International Dynamics (NZ) Pty Ltd
PO Box 109 317, Newmarket
Auckland, New Zealand
Tel +64 9 379 0179
Fax +64 9 379 0279
Email: enquiries@internationaldynamics.
co.nz
P
Videoacústica
Quinta do Paizinho, Arm. 5
2795-632 Carnaxide, Portugal
Tel +351 - 2 14 24 17 70
Fax +351 - 2 14 18 80 93
Email office@videoacustica.pt
PL
DSV TRADING SA
Plac Kaszubski 8
Email market@dsv.com.pl
RUS
Service Center Loewe
ul. Verkhnaya Maslovka, d. 29
Email service@atc.ru
S
Kjaerulff 1 AB
Ridbanegatan 4, Box 9076
Email Sweden@kjaerulff1.com
SK
BaSys Czech & Slovak s.r.o.
Stará Vajnorská 17/A
831 04 Bratislava, Slovakia
Tel + 421 2 49 10 66 18
Fax + 421 2 49 10 66 33
Email: loewe@basys.sk
SLO
Email mhatipog@enkaygroup.com
ZA
THE SOUNDLAB (PTY) LTD
P.O. Box 31952, Kyalami 1684
Republic of South Africa
Tel +27 - 1 14 66 47 00
Fax +27 - 1 14 66 42 85
Email loewe@mad.co.za
© by Loewe Opta 071116
LOEWE.


- Inhalt
- Anschließen
- For your Safety 21
- Setting Up 22
- Connecting up 23
- Initial Set-up 27
- Troubleshooting 29
- Technical Specifications ....30
- Transmitter module
- Receiver module
- Welcome
- Thank you
- Scope of delivery
- Setting Up
- Shipping the unit
- Environmental Protection
- Cardboard Box and Packaging
- For your Safety
- Use for the intended purpose and ambient conditions
- Supervision
- Cleaning
- About these operating instructions
- Loewe Audio Link system interface
- Suggested setup
- Connecting up
- Cabling Loewe Flat TV (from chassis L2710 onwards) – Transmitter module – Individual Sound
- Cabling TV sets (other) – Transmitter module – Individual Sound
- Cabling TV sets (other) – Transmitter Module
- Cabling – Receiver module – Surround speakers
- Initial Set-up
- Linking modules with Loewe Flat TV (L2710)
- Linking modules with other TV sets
- Setting input sensitivity
- Technical Specifications
- General
- Inputs
- Plug-in power supply unit
- Masthead
- Sommaire
- Collegamento
- Conexión
- AUS
- B NL L
- F
- GR
- H
- MA
- N
- P
- PL
- RUS
- S
- SK
- SLO
- ZA
Brand : LOEWE
Model : Wireless Rear Sound
Category : Loudspeaker