
HR4330 - Air purifier PHILIPS - Free user manual and instructions
Find the device manual for free HR4330 PHILIPS in PDF.
| Brand | Philips |
| Model | HR4330 |
| Product type | Air purifier |
| Maximum recommended area | 50 m² |
| Filtration system | 3 stages: pre-filter, Rota filter, HEPA filter |
| Purification efficiency | Eliminates 99% of suspended particles (allergens, dust, pollen, viruses, bacteria) |
| Fan speeds | 4 positions: off (O), low, normal, turbo |
| Filter saturation indicator | Yes, visual on the device |
| Safety device | Automatic shutoff in case of overheating; grid safety (prevents opening while running and starting without grid) |
| Filter cleaning | Pre-filter and Rota filter washable with water or vacuum cleaner (Rota filter dishwasher safe) |
| Replaceable HEPA filter | Type HR 4920, capacity 3 liters for HR4330 |
| Power supply | Mains power, with cord storage compartment |
| Installation | On floor or wall mount (max distance 10 cm from floor) |
| Recommended maintenance | Clean pre-filter and Rota filter every 2 months; replace HEPA filter according to indicator |
| Continuous use | Recommended in low or normal position to maintain clean air |
Frequently Asked Questions - HR4330 PHILIPS
User questions about HR4330 PHILIPS
0 question about this device. Answer the ones you know or ask your own.
Ask a new question about this device
Download the instructions for your Air purifier in PDF format for free! Find your manual HR4330 - PHILIPS and take your electronic device back in hand. On this page are published all the documents necessary for the use of your device. HR4330 by PHILIPS.
USER MANUAL HR4330 PHILIPS
- Keep pages 3 and 46 open when reading these operating instructions.
Français Page 8
Tia tic oyniecs xpnoewc, avoiTe tic 3 kal 46.
English

Clean airdystem
To prevent respiratory problems, clean air in your home is a basic requirement.
Your Philips Air Cleaner helps you to purify the air effectively by catching up to 99% of the airborne particles.
This includes allergens such as house dust and pollen as well as viruses and bacteria.
None of these particles are useful for the human body.
Some of them are actually very harmful and may cause serious complaints and diseases.
The particles vary in size from 0.1 to 100 micron (1 micron = 0.001 mm).
Additional measures
- In the urban environment: Keep the windows closed during the hours when there is heavy traffic or when factories etc. pollute the air.
Vacuum regularly. It is better to have hard floors instead of carpets. - Furry pets increase respiration problems, so it is best not to keep furry pets.
- Apply special bedding to reduce dust production by matrasses and blankets.
How does the Philips Air Cleaner work?
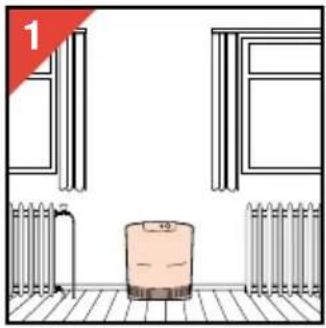
The Air Cleaner takes air from near the floor where particles concentrations are greatest and after cleaning blows it towards the ceiling.
To remove even the smallest particles from the air, the appliance employs a unique 3-stage Air Cleaner filter:
Pre-filter
The Pre-filter catches the larger dust particles floating in the air, such as fluff and hairs.
Rota filter
The rotating disc filter takes out the particles of 2 micron and more (e.g. pollen).
On entering one of the channels of the filter a particle is centrifuged against the side of this channel.
The air will pass through the channel but the particle remains stuck against the channel wall. This unique and patented filter ensures a long life
for the Hepa filters.
Moreover, their overall performance will remain virtually constant over the life of the filters.
Hepa filter
The last filter is the Hepa filter.
This filter takes out all the remaining smaller particles.
The filter is made from glass fibres closely matted such that particles cannot pass through.
Similar filters are used in most hospital operating rooms.
Positioning
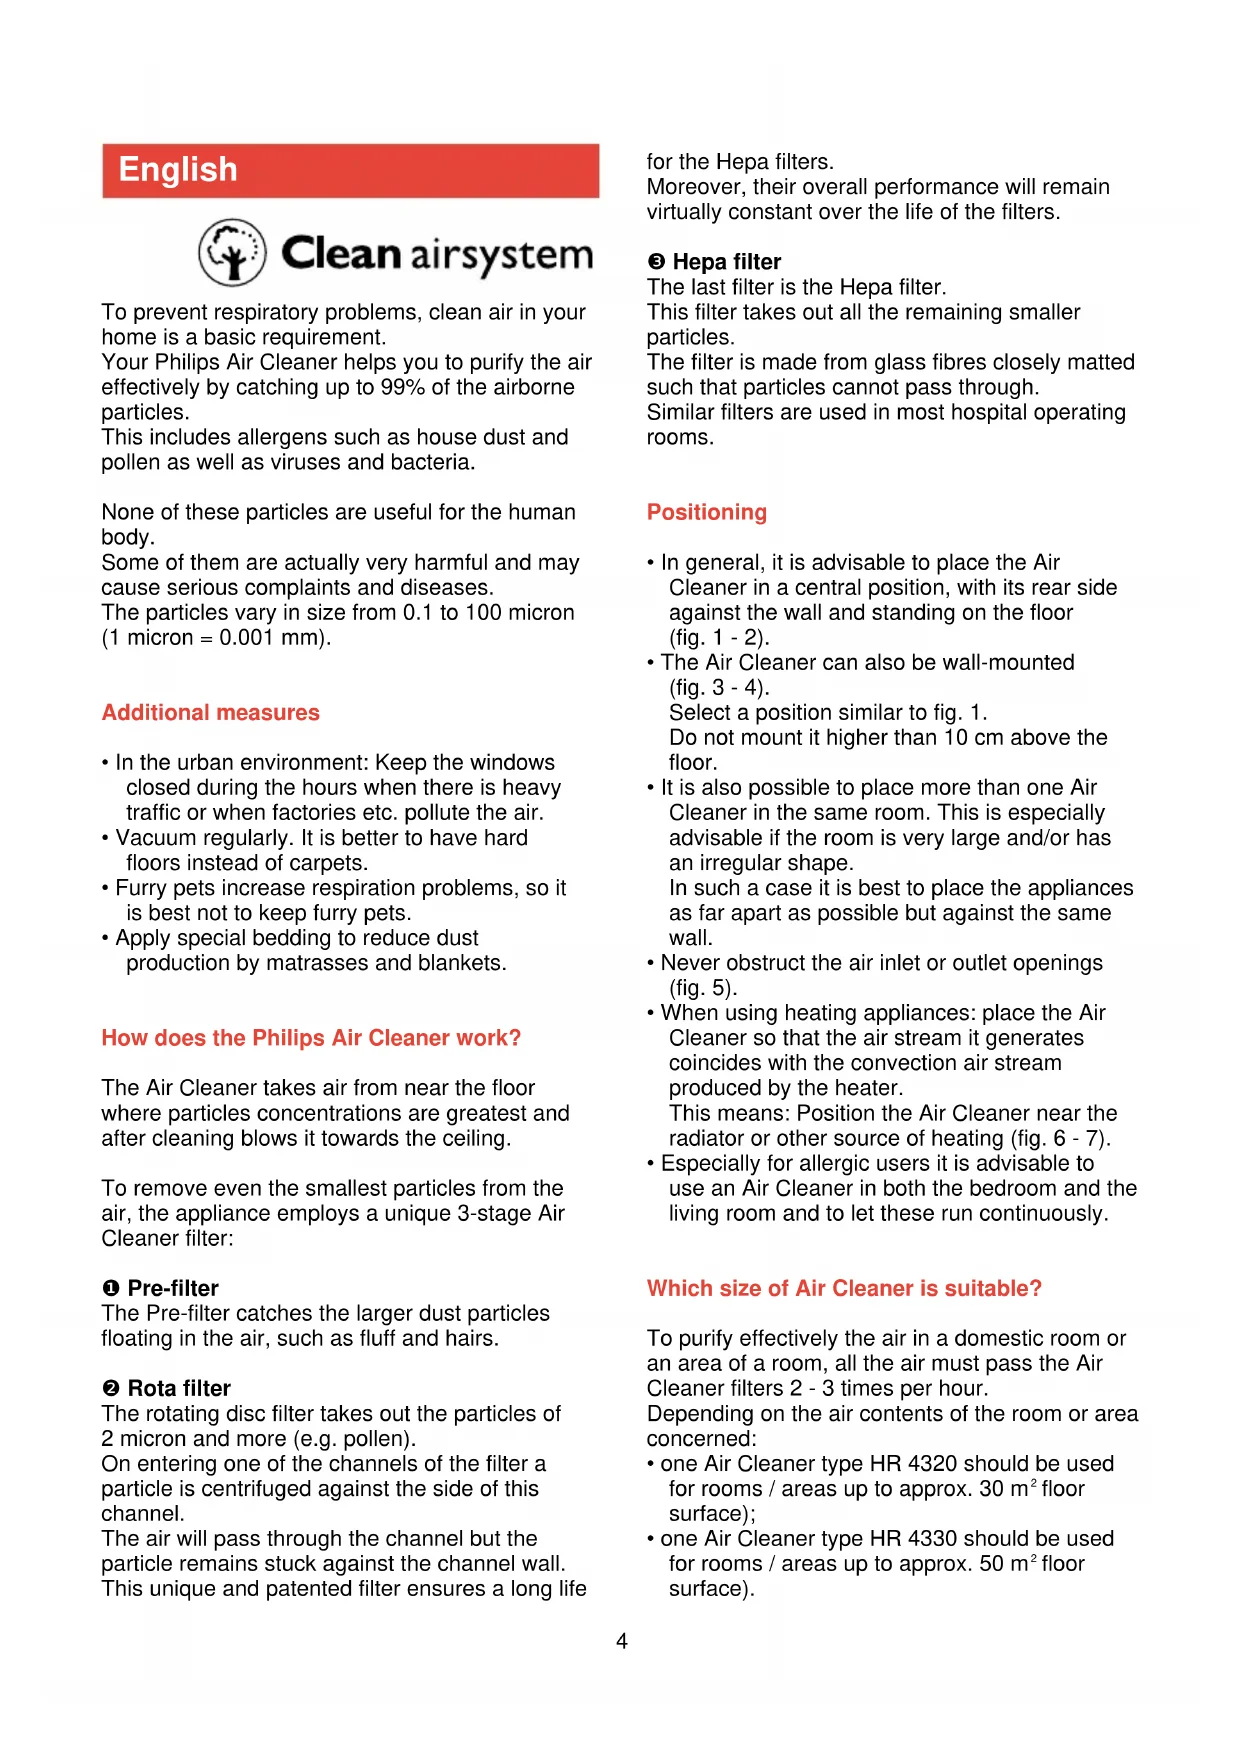
In general, it is advisable to place the Air Cleaner in a central position, with its rear side against the wall and standing on the floor (fig. 1-2).
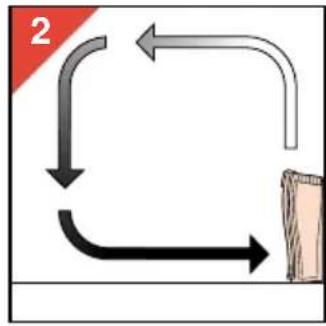
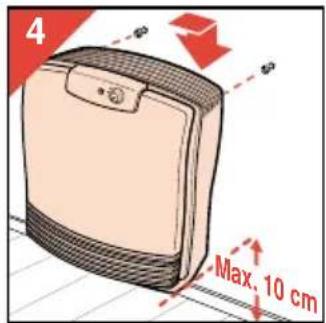
The Air Cleaner can also be wall-mounted (fig. 3-4).
Select a position similar to fig. 1.
Do not mount it higher than 10cm above the floor.
- It is also possible to place more than one Air Cleaner in the same room. This is especially advisable if the room is very large and/or has an irregular shape.
In such a case it is best to place the appliances as far apart as possible but against the same wall.
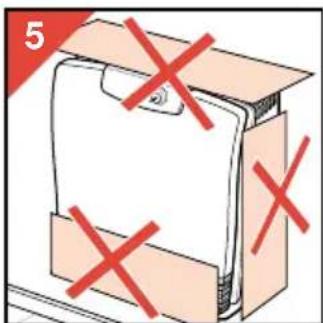
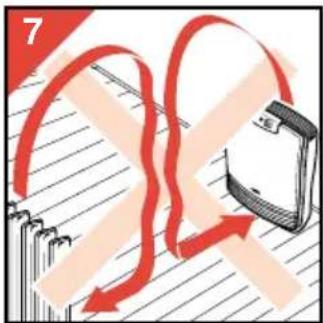
- Never obstruct the air inlet or outlet openings (fig. 5).
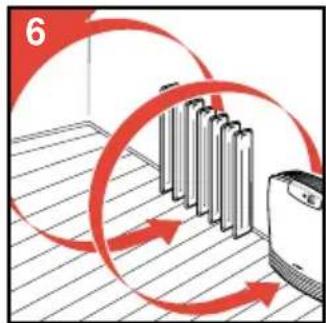
- When using heating appliances: place the Air Cleaner so that the air stream it generates coincides with the convection air stream produced by the heater.
This means: Position the Air Cleaner near the radiator or other source of heating (fig. 6-7).
- Especially for allergic users it is advisable to use an Air Cleaner in both the bedroom and the living room and to let these run continuously.
Which size of Air Cleaner is suitable?
To purify effectively the air in a domestic room or an area of a room, all the air must pass the Air Cleaner filters 2 - 3 times per hour.
Depending on the air contents of the room or area concerned:
- one Air Cleaner type HR 4320 should be used for rooms / areas up to approx. 30m^2 floor surface);
- one Air Cleaner type HR 4330 should be used for rooms / areas up to approx. 50m^2 floor surface).
Important
- Read these instructions in conjunction with the illustrations before using the appliance.
- Do not immerse the appliance in water or other liquids.
- Do not use the appliance outdoors or in a humid environment.
- Always disconnect the appliance from the wall socket before taking off parts and before cleaning.
- The appliance can be cleaned with a damp cloth, if required with some detergent.
- When disassembling: do not touch moving parts. Allow the Rota filter to stop in its own time.
- Use only the original Philips filters.
- Do not obstruct the air inlet and air outlet grilles. Do not place the appliance on a soft surface such as a bed or couch.
- Keep the mains cord away from heated surfaces.
- If the mains cord of this appliance is damaged, it must only be replaced by Philips or their service representative, as special tools and/or parts are required.
- Save these instructions for further reference.
- The appliance has an influence upon the air circulation in the room. In general, it is not advisable to use it near an open hearth fire.
General description (fig. 8)
Air inlets (3)
Pre-filter
Rota filter
Fixing nut for Rota filter
Hepa filters
type HR 4320:2 filters type HR 4330:3 filters
Pilot light "On"
Air outlet
Speed control
O = off
- = low speed
- = normal speed
turbo = high speed
"Filter full" indicator
0 Handle
Cord storage
How to use
- For quick air cleaning, set the speed selector to the "turbo" setting. After approximately half an hour, set the switch to the position for normal speed.
- To maintain clean, fresh air in your room all the time, it is best to run your machine continuously on low or normal speed, depending on room size and the degree to which the air tends to contaminate.
- Clean and replace your filters regularly, especially if the appliance is used in a smoky environment.
How to clean or replace the filters
General advice
- Remove and clean the Pre-filter and the Rota filter at least every two months.
- Remove and replace the Hepa filters as soon as the colour of their undersides corresponds to the darkest grey on the "Filter full" indicator.
- Check the filters right away if the appliance becomes noisier. Clean and/or replace the filters if necessary.
It may be necessary to clean the filters more frequently. This depends on:
- How much the appliance has been used (operation time, speed).
- The condition of the air to be filtered.
Removing the filters
- Set the speed selector to position O(fig. 9).
- Remove the mains plug from the wall socket.
- Remove the front cover (fig. 10).
- Remove the Hepa filters (fig. 11).
- Turn the Hepa filters.
- Compare the colour of their undersides with the colours on the "Filter full" indicator (fig. 12).
- Replace the Hepa filters as soon as the colour of their undersides corresponds to the darkest grey on the "Filter full" indicator (fig. 13).
- Remove the Pre-filter (fig. 14).
- Remove the Rota filter (fig. 15).
To place the filters back reverse this process.
Safety lock
The front cover has a safety lock which prevents you from opening the cover whilst the Air Cleaner is switched on.
The safety lock also prevents you from switching on if the front cover is removed.
Cleaning the Pre-filter and the Rota filter
- Wash (fig. 16) or vacuum clean the Pre-filter. You can remove fluff or hairs e.g. using a soft brush.
- Wash (fig. 17) or vacuum clean the Rota filter. If washed with a detergent, rinse the filters with clean warm water (fig. 18). Allow the filters to air-dry thoroughly (fig. 19) before reassembly. The Rota filter can also be washed in a dishwasher.
Replacement Hepa filters
New Hepa filters are available at your dealer under number HR 4920.
Automatic overheating safety device
To prevent damage and reduce safety risks the overheating safety device switches off the fan motor if it becomes too hot.
To indicate that the appliance is still in switched-on position and connected to the mains, the pilot light will remain on.
If this happens:
- Set the speed selector to position O (= Off).
- Remove the mains plug from the wall socket. (The pilot light goes out.)
- Wait for the motor to cool down (approx. 15 minutes).
- Open the appliance. Check that the filters are not blocked and that nothing is obstructing the airflow.
- Check that the Rota filter can rotate freely if moved by hand (fig. 20).
- Close the appliance. Put the mains plug back into the wall socket and switch on.
If the automatic overheating device is activated repeatedly, it is advisable to take the appliance to your dealer for technical inspection.
Français

Clean airsystem
Festemutter for roterende filter
Hepafiltre
HR 4320:2fentre
HR 4330:3 filtr
F Indikatorlampe "Pá"
Luftutblåsing