
PRWT 1 - Sewing machine BROTHER - Free user manual and instructions
Find the device manual for free PRWT 1 BROTHER in PDF.
| Product type | Sewing and embroidery machine |
| Brand | Brother |
| Model | PRWT 1 |
| Use | Sewing, quilting, embroidery |
| Compatible embroidery frames | Framing frame, quilting, flat, Jumbo |
| Support table | Included for additional support |
| Table attachment | Side supports with hex screws and washers |
| Hex support screws | 4 (with washers) |
| Fixing screws | 4 |
| Included tools | Tightening wrench |
| Documentation | Installation manual included |
| Removing the table | Possible for tubular items, bags, caps |
| Transporting the table | Hold with both hands |
| Safety instructions | Do not lean on the table, do not place heavy objects |
| If a part is missing or damaged | Contact the authorized dealer |
Frequently Asked Questions - PRWT 1 BROTHER
User questions about PRWT 1 BROTHER
0 question about this device. Answer the ones you know or ask your own.
Ask a new question about this device
Download the instructions for your Sewing machine in PDF format for free! Find your manual PRWT 1 - BROTHER and take your electronic device back in hand. On this page are published all the documents necessary for the use of your device. PRWT 1 by BROTHER.
USER MANUAL PRWT 1 BROTHER
natural_image
Line drawing of a 3D rectangular object with a cutout section, resembling a laptop or electronic device (no text or symbols)Table Set Installation Manual
When using the border, quilt, flat or jumbo frame, it is recommended that the table be used for additional support.

Note
- When carrying the table, be sure to hold it with both hands.
●Attach the table to the machine before installing the embroidery frame.
●Do not place heavy objects on top of the installed table or press down on it. - Remove the table from the machine while using embroidery frame that do no need to be used with the table or while embroidering tubular items, bags or caps. The embroidery frames for these types of objects cannot be installed while the table is attached to the machine.
Verifying the package contents
Check that the following parts are included. If any item is missing or damaged, contact your authorized sales representative.
■Included parts
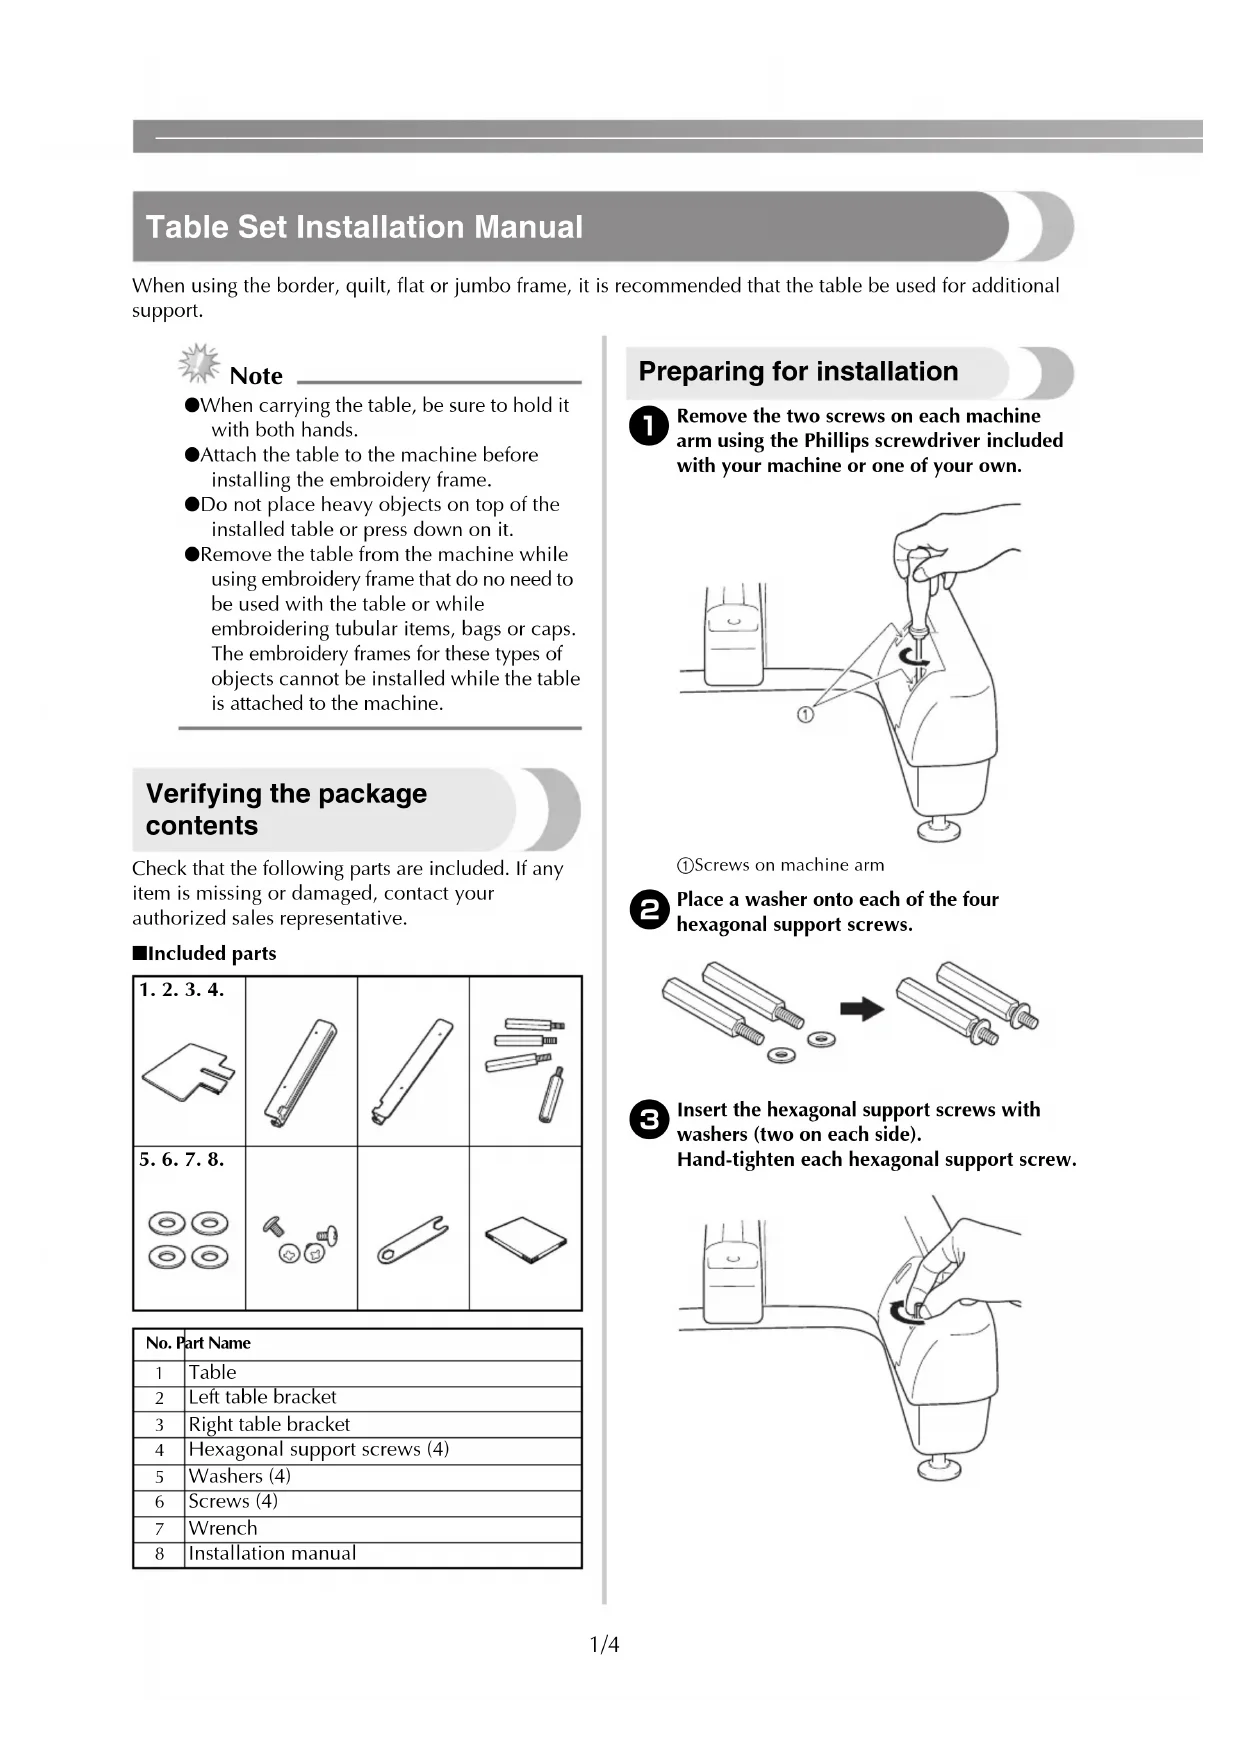
| 1.2.3.4.[IMAGE] | 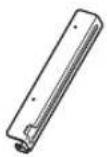 | 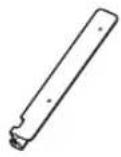 |  |
5.6.7.8.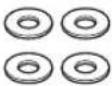 | 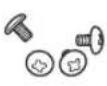 | 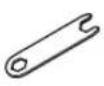 | 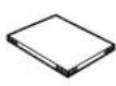 |
| No. | Part Name |
| 1 | Table |
| 2 | Left table bracket |
| 3 | Right table bracket |
| 4 | Hexagonal support screws (4) |
| 5 | Washers (4) |
| 6 | Screws (4) |
| 7 | Wrench |
| 8 | Installation manual |
Preparing for installation
1 Remove the two screws on each machine arm using the Phillips screwdriver included with your machine or one of your own.
①Screws on machine arm
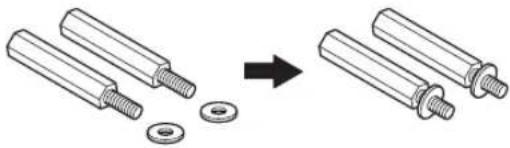
2 Place a washer onto each of the four hexagonal support screws.
natural_image
Diagram showing two cylindrical components being added to a washer, with an arrow indicating the process (no text or symbols present)3 Insert the hexagonal support screws with washers (two on each side). Hand-tighten each hexagonal support screw.
natural_image
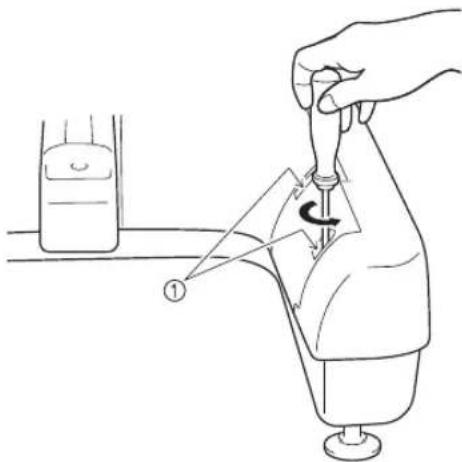
Line drawing of a hand turning a valve with a circular arrow indicating rotation (no text or symbols)4 Using the included wrench, firmly tighten each hexagonal support screw (two on each side).
natural_image
Line drawing of a hand holding a small object with a knob, next to a bottle (no text or symbols)5 Align the holes in the right table bracket with the hexagonal support screws on the right side of the machine.
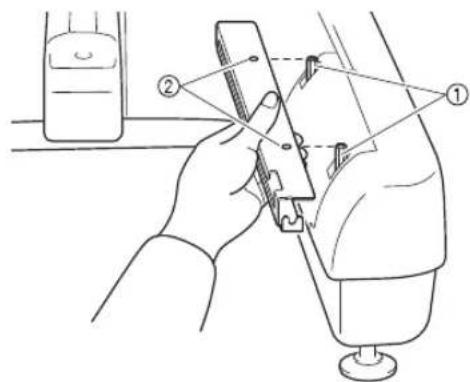
①Hexagonal support screws
②Holes in right table bracket
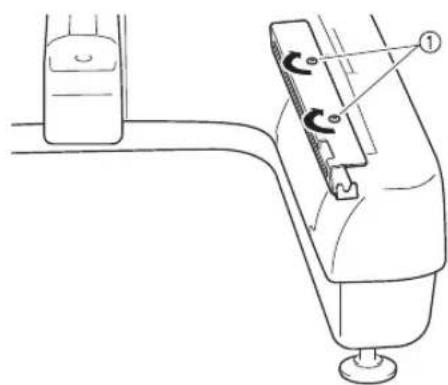
6 Align the right table bracket with the holes in the two hexagonal supports, insert the screws and lightly tighten to hold the bracket in place.
natural_image
Technical line drawing of a mechanical device with a knob and lever mechanism (no text or symbols)①Screws
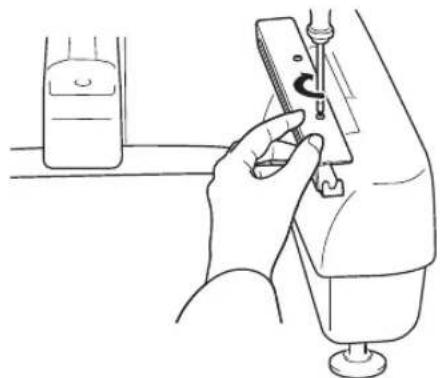
7 Attach the left table bracket following steps ⑤ and ⑥ for the left side.
8 Using the Phillips screwdriver included with your machine or one of your own, firmly tighten all screws.
natural_image
Line drawing of a person using a syringe to measure a bottle (no text or symbols present)The right and left table brackets are installed on the machine.

Memo
●Even if you sew without using the table, you can leave the brackets attached.
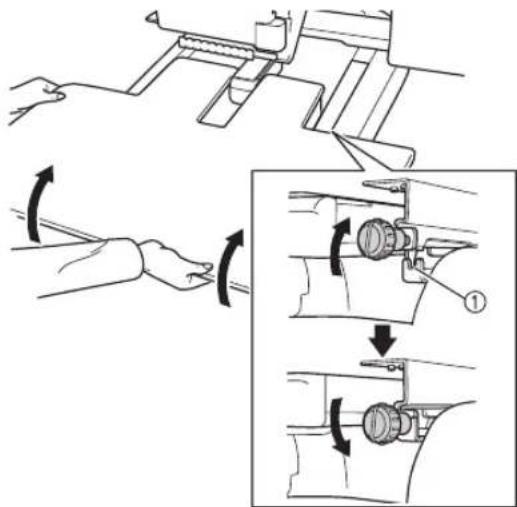
Installing the table
1 Loosen the two thumb screws 5 to 6 turns.

natural_image
Simple line drawing of a rectangular panel with two side connectors and a handle, no text or symbols present.2 Position the table so that the notch at the center aligns with the machine bed, and then place the table flat on the guide plates.
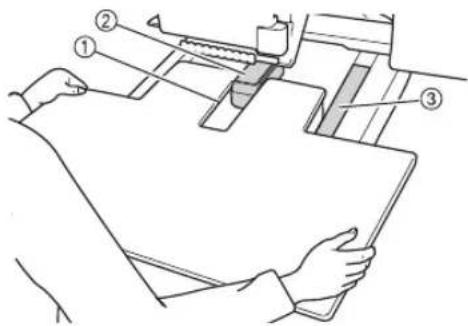
①Notch in table
②Machine bed
③Guide plate
3 Pull the table toward you slowly, until the pins on the mounting brackets (attached on each side to the bottom of the table) fit into the notches in the guide plates.
①Pin
②Notch
4 Slide in the table while supporting it so that it remains level. Push the table in until it lightly touches the machine.
- If the table does not move smoothly, slightly lift it up, and then slide it in.
natural_image
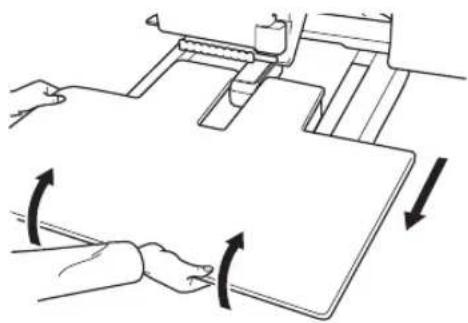
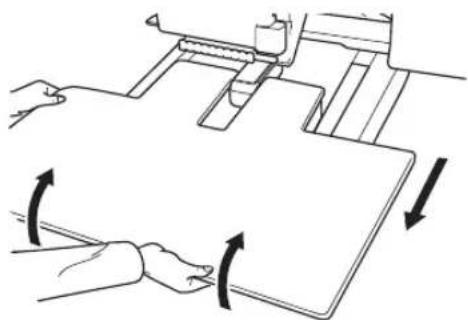
Line drawing of hands operating a mechanical device with an upward arrow indicating motion (no text or symbols)5 While looking below the table, lightly lift it up, and then lower it so that the screw fits into the notch at the front of the guide plate.
①Notch at front
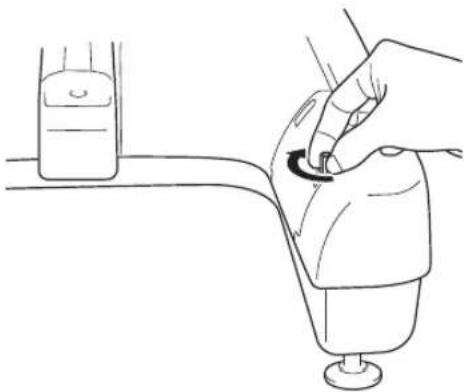
6 Tighten the two thumb screws so that the table is secured.
①Thumb screw
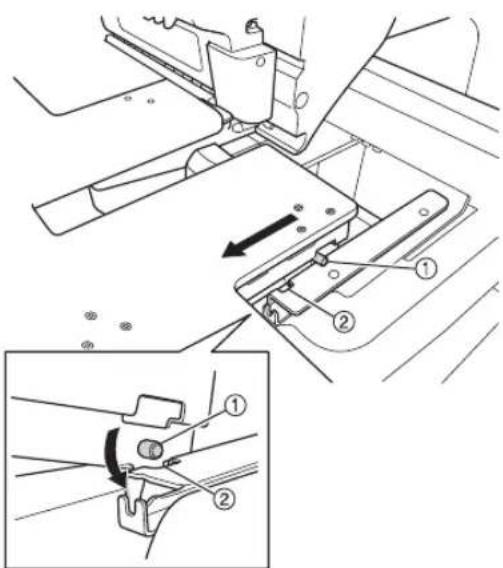
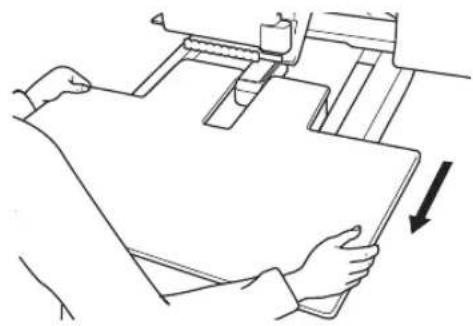
Removing the table
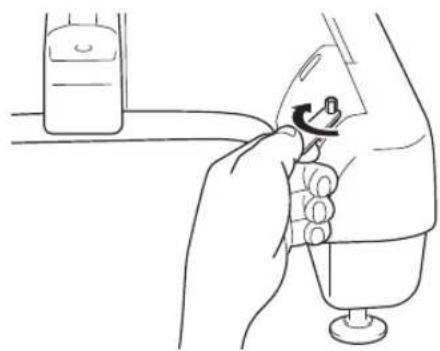
1 Loosen the two thumb screws, lift up the table, and then pull it off toward you.

natural_image
Line drawing of a hand holding a mechanical component with an arrow indicating rotation (no text or symbols present)①Thumb screw

natural_image
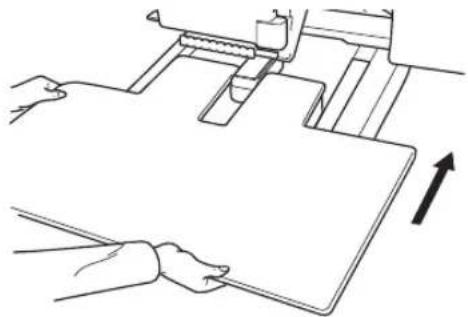
Diagram of a mechanical device with two hands operating a sheet, showing rotational arrows indicating motion (no text or symbols present)2 Carefully pull out the table so that it does not hit the machine.
natural_image
Line drawing of a person holding a sheet of paper with an arrow indicating direction (no text or symbols)3 After the pins on each side reach the notches in the guide plates, raise the table to lift the pins up through the notches.
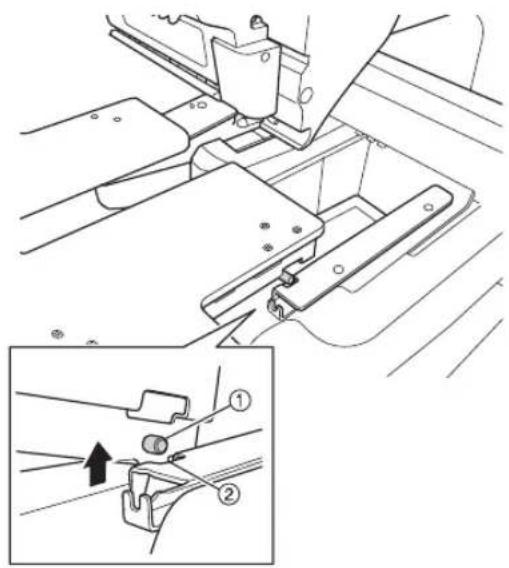
①Pin
②Notch
Remove the table from the machine.
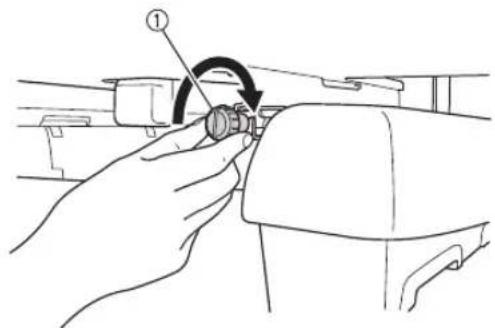
4 Slightly tighten the thumb screws on the table to prevent loss.
natural_image
Diagram showing two cylindrical components being added to a washer, with an arrow indicating the process (no text or symbols present)
natural_image
Line drawing of a hand turning a valve with a circular arrow indicating rotation (no text or symbols)natural_image
Line drawing of a hand holding a small object with a knob, next to a bottle (no text or symbols)①Schrauben
natural_image
Line drawing of a hand inserting a device into a pump bottle, with a small container visible in the background (no text or symbols)natural_image
Technical line drawing of a mechanical component with two hanging pins and a handle (no text or symbols)①Stift
②Kerbe
natural_image
Line drawing of hands operating a mechanical device with an upward arrow indicating motion (no text or symbols)①Kerbe, vorne
①Rändelschraube
natural_image
Line drawing of a hand holding a mechanical component with a circular arrow indicating rotation (no text or symbols)①Rändelschraube

natural_image
Diagram of a mechanical device with two hands operating a flat sheet, showing rotational arrows (no text or symbols)natural_image
Line drawing of a person holding a document with an arrow indicating direction (no text or symbols present)①Stift
②Kerbe
natural_image
Diagram showing two cylindrical components being inserted into a washer, with an arrow indicating the process (no text or symbols present)natural_image
Line drawing of a hand turning a valve with a circular arrow (no text or symbols)natural_image
Line drawing of a hand holding a small object with a knob, next to a bottle (no text or symbols)①Vis
natural_image
Line drawing of a hand inserting a device into a container with a bottle nearby (no text or symbols)natural_image
Simple line drawing of a rectangular object with two vertical supports and a handle, no text or symbols present.①Encoche de la table
②Plateau de la machine
③Guide
①Ergot
②Encoche
natural_image
Line drawing of hands operating a machine with an upward arrow indicating motion (no text or symbols)①Encoche à l'avant
natural_image
Line drawing of a hand holding a mechanical component with an arrow indicating rotation (no text or symbols present)natural_image
Line drawing of a hand holding a mechanical component with an arrow indicating rotation (no text or symbols present)natural_image
Diagram of hands operating a mechanical device with directional arrows indicating motion (no text or symbols)natural_image
Line drawing of a person holding a sheet of paper with an arrow indicating direction (no text or symbols)natural_image
Technical diagram of a mechanical assembly with an inset showing a close-up of a component (no text or symbols present)①Ergot
②Encoche
Retirez la table de la machine.
natural_image
Diagram showing two cylindrical components being inserted into a nut, with an arrow indicating the process (no text or symbols present)natural_image
Line drawing of a hand turning a valve with a rotating knob (no text or symbols)natural_image
Line drawing of a hand holding a small object with a knob, next to a bottle (no text or symbols)①Zeskantige steunschroeven ②Gaten in de rechterbeugel van de tafel
natural_image
Diagram of a hand operating a device with a curved arrow indicating rotation (no text or symbols present)①Schroeven
natural_image
Line drawing of a hand inserting a device into a container with a bottle nearby (no text or symbols)natural_image
Technical line drawing of a mechanical component with two hanging pins and a handle (no text or symbols)①Pen
②Inkeping
natural_image
Line drawing of hands operating a mechanical device with an upward arrow indicating motion (no text or symbols)natural_image
Line drawing of a hand adjusting a mechanical component with an arrow indicating rotation (no text or symbols present)①Duimschroef
natural_image
Line drawing of a hand holding a mechanical component with an arrow indicating rotation (no text or symbols present)①Duimschroef

natural_image
Diagram of a mechanical device with two hands operating a flat surface and directional arrows indicating rotation (no text or symbols)natural_image
Line drawing of a person handling a large sheet of paper with an arrow indicating direction (no text or symbols)natural_image
Technical diagram of a mechanical assembly with an inset showing a close-up of a component (no text or symbols present)natural_image
Diagram showing two cylindrical components being processed, one with a bolt and the other with a washer (no text or symbols present)natural_image
Line drawing of a hand turning a valve with a circular arrow (no text or symbols)natural_image
Line drawing of a hand holding a small object with a knob, next to a bottle (no text or symbols)①Viti
natural_image
Line drawing of a hand using a syringe to measure a bottle (no text or symbols present)natural_image
Simple line drawing of a rectangular object with two vertical supports and a handle, no text or symbols present.①Perno
②Incavo
natural_image
Line drawing of hands operating a mechanical device with an upward arrow indicating motion (no text or symbols)①Incavo frontale
natural_image
Line drawing of a hand holding a mechanical component with an arrow indicating rotation (no text or symbols present)natural_image
Line drawing of a hand holding a mechanical component with an arrow indicating rotation (no text or symbols present)natural_image
Diagram of a mechanical device with rotating arms and directional arrows indicating motion (no text or symbols)natural_image
Line drawing of a person holding a document with an arrow indicating direction (no text or symbols present)natural_image
Technical diagram of a mechanical assembly with an inset showing a close-up of a component (no text or symbols present)natural_image
Diagram showing two cylindrical mechanical components being processed, with one being added to a washer and the other into a housing (no text or symbols present)natural_image
Line drawing of a hand turning a valve with a circular arrow, no text or symbols presentnatural_image
Line drawing of a hand holding a small object with a knob, next to a bottle (no text or symbols)①Tornillos
natural_image
Line drawing of a hand using a sewing machine to press down a bottle (no text or symbols present)natural_image
Simple line drawing of a rectangular object with two vertical supports and a handle, no text or symbols present.①Patilla
②Muesca
natural_image
Line drawing of hands operating a machine with an upward arrow indicating motion (no text or symbols)①Tornillo de mariposa
natural_image
Line drawing of a hand holding a mechanical component with an arrow indicating rotation (no text or symbols present)①Tornillo de mariposa
natural_image
Diagram of a mechanical device with two hands operating a flat surface and directional arrows indicating rotation (no text or symbols)natural_image
Line drawing of a person handling a large sheet of paper with a downward arrow indicating motion (no text or symbols)①Patilla
②Muesca
natural_image
Diagram showing two cylindrical components being processed, one with a washer and the other with a nut, both without any text or symbols.3 Insira os parafusos hexagonais de suporte com as arruelas (dois de cada lado). Aperte manualmente cada parafuso hexagonal de suporte.

natural_image
Line drawing of a hand turning a valve with a circular arrow (no text or symbols)natural_image
Line drawing of a hand holding a small object with a knob, next to a container (no text or symbols)①Parafusos
natural_image
Line drawing of a hand using a syringe to press down a bottle (no text or symbols present)natural_image
Simple line drawing of a flat plate with two side clips and a handle, no text or symbols present.①Recorte na mesa
②Base da máquina
③Chapa de guia
①Pino
②Recorte
natural_image
Line drawing of hands operating a mechanical device with an upward arrow indicating motion (no text or symbols)①Recorte frontal
natural_image
Line drawing of a hand holding a mechanical component with an arrow indicating rotation (no text or symbols present)①Parafuso de aperto manual
Removendo a mesa
natural_image
Line drawing of a hand holding a mechanical component with an arrow indicating rotation (no text or symbols present)①Parafuso de aperto manual

natural_image
Diagram of a mechanical device with rotating arms and directional arrows indicating motion (no text or symbols)natural_image
Line drawing of a person using a mechanical device to press or adjust a sheet (no text or symbols present)①Pino
②Recorte
natural_image
Diagram showing two cylindrical mechanical components being processed, with one being added to a washer and the other into a housing (no text or symbols present)natural_image
Line drawing of a hand holding a small object with a knob, next to a bottle (no text or symbols)natural_image
Technical line drawing of a mechanical device with no visible text or symbols①Винты
natural_image
Line drawing of a hand using a sewing machine to press down a bottle (no text or symbols present)natural_image
Simple line drawing of a rectangular panel with two side connectors and a handle, no text or symbols present.①Выступ
②Плаз
natural_image
Line drawing of hands operating a mechanical device with an upward arrow indicating motion (no text or symbols)natural_image
Line drawing of a hand holding a mechanical component with an arrow indicating rotation (no text or symbols present)① Винт с накаткой
Демонтаж столика
natural_image
Line drawing of a hand holding a mechanical component with a circular arrow indicating rotation (no text or symbols)① Винт с накаткой
natural_image
Diagram of a mechanical device with two hands operating a sheet, showing rotational motion arrows (no text or symbols)natural_image
Line drawing of a person handling a large sheet of paper with an arrow indicating downward motion (no text or symbols)①ミシンの台座のネジ
natural_image
Diagram showing two cylindrical components being inserted into a washer, with an arrow indicating the process (no text or symbols present)natural_image
Line drawing of a hand using a tool to press or install a mechanical component, with no visible text or symbols.natural_image
Line drawing of a hand holding a small object with a curved arrow, next to a container (no text or symbols)①ネジ
natural_image
Line drawing of a hand using a sewing machine to adjust a component (no text or symbols present)natural_image
Simple line drawing of a rectangular object with two vertical clips and a handle, no text or symbols present.①ピン
②切り込み
natural_image
Line drawing of hands operating a mechanical device with an upward arrow indicating motion (no text or symbols)①前方のミゾ
①つまみボルト
テーブルを取り外す
①つまみボルト

natural_image
Diagram showing two hands operating a mechanical device with directional arrows indicating rotation or movement (no text or symbols present)natural_image
Line drawing of a person holding a document with an arrow indicating direction (no text or symbols present)Brand : BROTHER
Model : PRWT 1
Category : Sewing machine