
DO335A - Air Conditioning DOMO - Free user manual and instructions
Find the device manual for free DO335A DOMO in PDF.
| Brand | DOMO |
| Model | DO335A |
| Type | Mobile monoblock air conditioner |
| Operating modes | Auto, Cooling, Dehumidification, Fan |
| Adjustable temperature range | 15°C to 31°C |
| Fan speed | 3 speeds (low, medium, high) |
| Timer | 1 to 12 hours |
| Oscillation | Yes, from 0° to 120° |
| Air exhaust hose length | 1.5 m maximum |
| Power supply | 230 V, 50 Hz (standard estimate) |
| Warranty | 2 years |
| Memory function | Yes, retains settings after power off if plugged in |
| Filter | Washable (warm water max 40°C) |
| Filter maintenance | Every 2 weeks |
| Water drainage | Manual via tap or optional continuous drainage |
| Included accessories | Exhaust hose, connections, remote control, collection container |
| Full tank error code | E4 |
| Rest time before first use | 2 hours in vertical position |
| Maximum ambient temperature for cooling | 35°C |
| Important safety instructions | Do not use near water, gas or flame; do not cover; no extension cord |
Frequently Asked Questions - DO335A DOMO
User questions about DO335A DOMO
0 question about this device. Answer the ones you know or ask your own.
Ask a new question about this device
Download the instructions for your Air Conditioning in PDF format for free! Find your manual DO335A - DOMO and take your electronic device back in hand. On this page are published all the documents necessary for the use of your device. DO335A by DOMO.
USER MANUAL DO335A DOMO
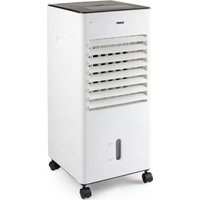
natural_image
White industrial air conditioner unit with ventilation slots and a digital display (no visible text or symbols)GARANTIEVOORWAARDEN
CONDITIONS DE GARANTIE
This appliance has a two year warranty period. During this period the manufacturer is responsible for any failures which are the direct result of construction failure. When these failures occur the appliance will be repaired or replaced if necessary. The warranty will not be valid when the damage to the appliance is caused by wrong use, not following the instructions or repairs executed by a third party. The warranty will only be valid if the warranty application has been completed by the dealer at the time of purchase. All parts, which are subject to wear, are excluded from the warranty.
Type nr. Apparaa
RECYCLING INFORMATIONEN
RECYCLING INFORMATION
The symbol ☒ on the product or on its packaging indicates that this product may not be treated as household waste. Instead it shall be brought to the applicable collection point for recycling of electrical and electronic equipment. By ensuring this product is disposed of correctly, you will help prevent potential negative consequences for the environment and human health, which could otherwise be caused by inappropriate waste handling of this product. For more detailed information about recycling of this product, please contact your local city office, your household waste disposal service of the shop where you purchased the product.
If the supply cord is damaged, it must be replaced by manufacturer of its service agent or a similarly qualified person in order to avoid a hazard.
LEVERING EN UITPAKKEN :
ACCESSOIRES

DISPLAY
natural_image
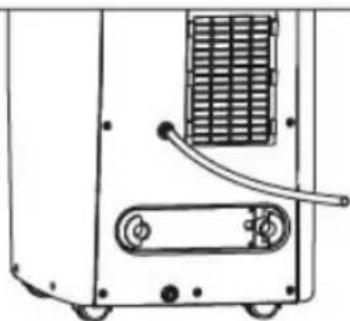
Line drawing of a mechanical device with wheels and a base plate (no text or symbols)2. Permanente drainage
natural_image
Technical line drawing of a mechanical device with no visible text or symbolsONDERHOUD VAN HET TOESTEL

ECRAN
natural_image
Line drawing of a mechanical device with wheels and a base plate (no text or symbols)2. Drainage continu
natural_image
Technical line drawing of a mechanical device with internal components and a curved pipe (no text or symbols)ENTRETIEN DE L'APPAREIL
ZUBEHÖR

DISPLAY
natural_image
Technical line drawing of a mechanical device with mounting base and control panel (no text or symbols)natural_image
Technical line drawing of a mechanical device with no visible text or symbolsWARTUNG DES GERÄTS
When taking the appliance out of the box, check the unit carefully for any damage. If the unit is damage, contact your supplier immediately. Every unit has been carefully checked when leaving the factory.
IMPORTANT: After unpacking, leave the unit off and standing up for at least 2 hours. Not following this procedure can damage the unit.
When you don't want the hot air to get back in to the room, make sure to direct the air exhaust duct outside.
WARNINGS
Never place the unit near any gas appliances, fire or fl ammable liquids
Never hit or shake the unit to prevent damage.
Never cover or obstruct the air inlet and outlet to prevent overheating.
Never spray water or place the unit near water to prevent electric shocks.
IF the supply cord is damaged, it must be replaced by the manufacturer, its service agent or similarly qualified ersons in order to avoid a hazard
Never share the power outlet with other appliances.
Never connect or disconnect hte ower plug with wet hands to avoid electric shocks.
Never put rods or objects into the opening of the unit.
Never use an extension cord.
Do not let children play near the unit.
To defend the compressor, when restarting the unit, it will take at least 3 minutes to work again.
Keep the unit at least 1 meter away from TV or radios to avoid electromagnetic interference.
Do not expose the unit under direct sun light to avoid surface colour fading.
Do not tilt the unit for more than 35^ or upside-down while transporting.
Place the unit on a fl at surface with less than 5^ inclination
The unit operates more efficiently in certain room locations
Empty the condesed drainage pan before putting the unit in storage to prologn the unit lifetime at the end of the season.
Do not use chemical solvents to clean the unit surface to avoid scratching, damaging the surface.
Make sur to cut off the power before sisassembling or installing the air-inlet fence.
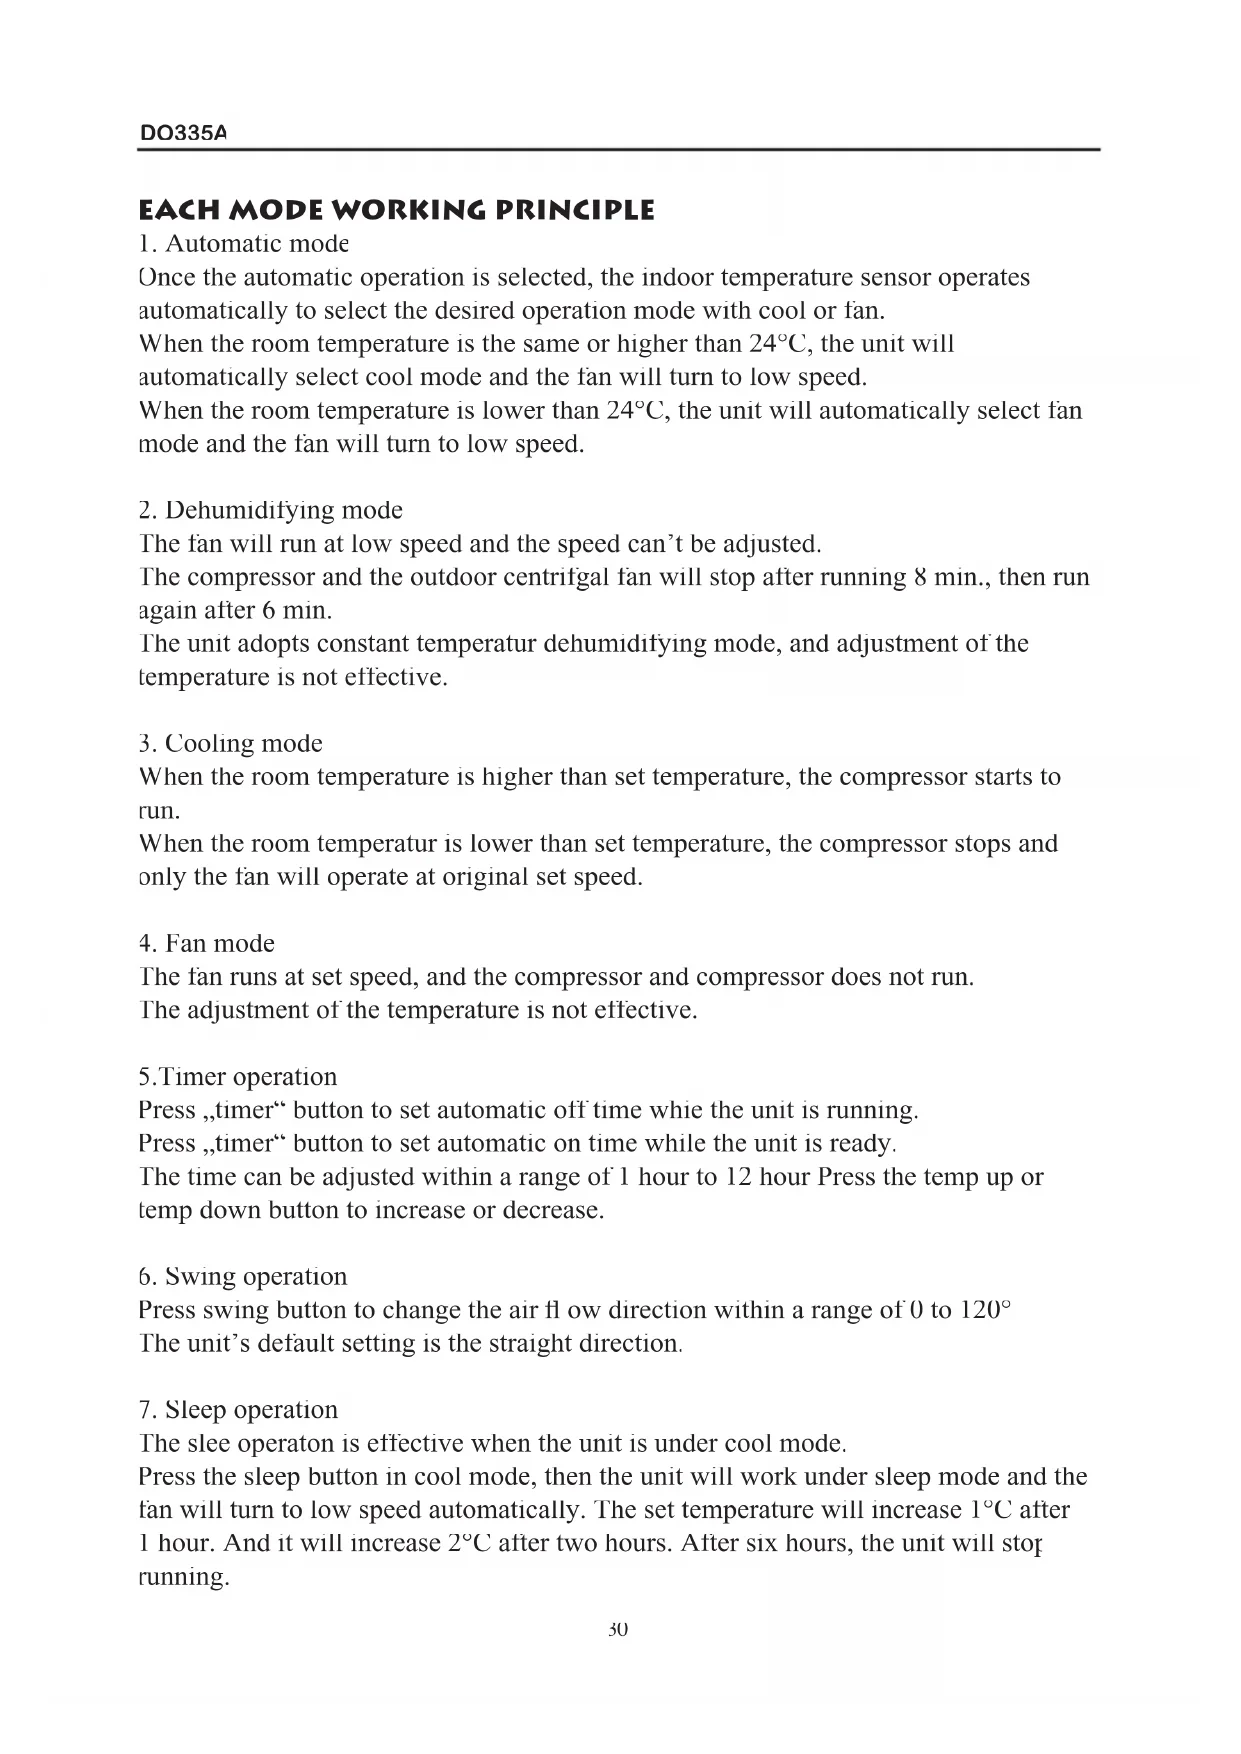
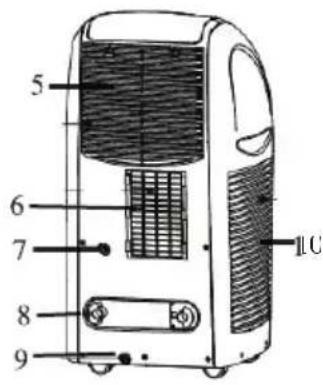
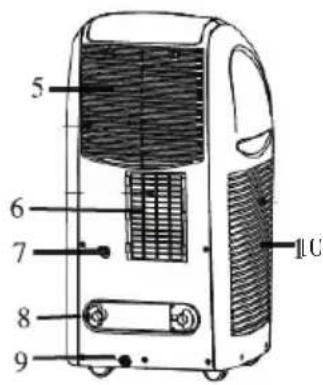
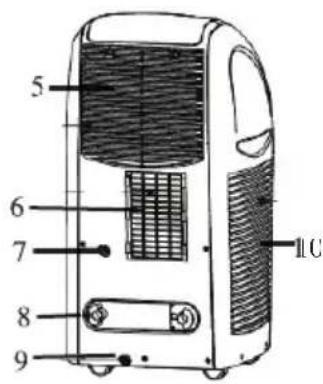
PARTS
- Control panel
- Air discharge
- Nadle
- Caster
- Air inlet grill
- Air exhaust grill
- Continuous drainage hole
- Cord hanger
- Drainage hole
- Air inlet gril
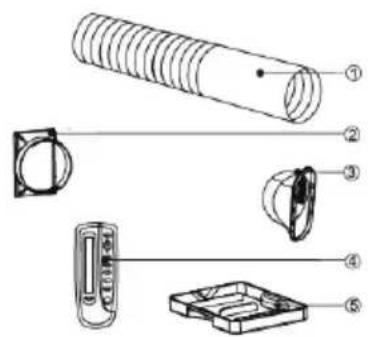
ACCESSORIES
- Air exhaust duct
- Connector of air exhaust duct
- Connector of window
- Remote control
- Drainage box
- Option : window connector
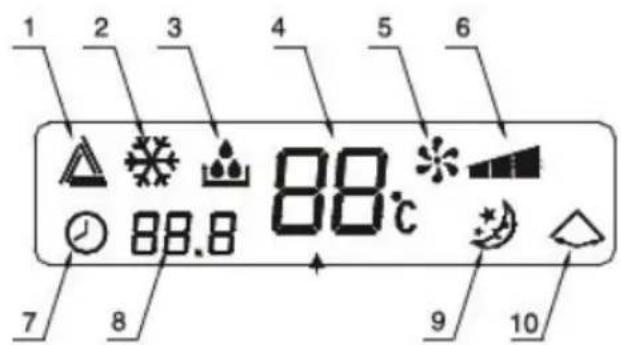
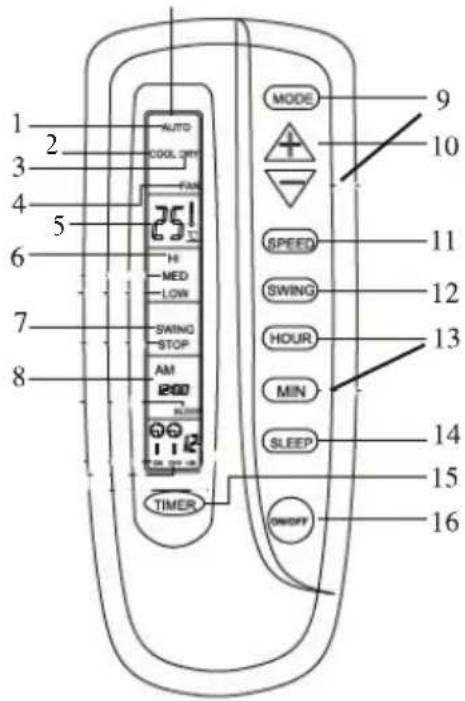
DISPLAY
- Automatic mode indicator
- Cool mode indicator
- Dehumidify mode indicator
- Room temperature indicator
- Fan mode indicator
- Fan speed indicator
- Settle the hour
- Timer indicator
- Sleep mode indicator
- Swing indicator
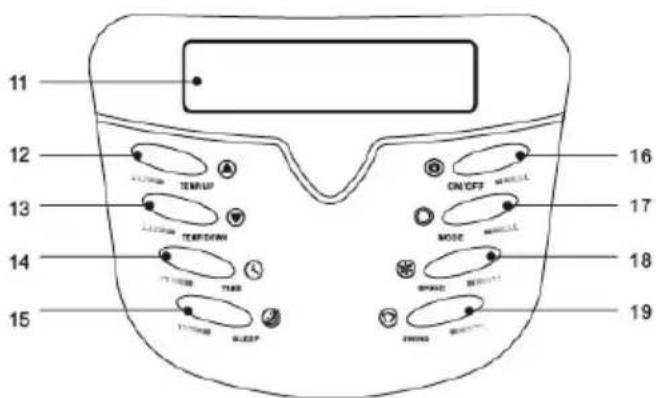
CONTROL PANEL
- LCD window
- Timer/ temperature up button
- Timer/ temperature down button
- Timer button
- Sleep button
- On/off power button
- Mode butoon
- Speed button
- Swing button

REMOTE CONTROL
- Automatic mode indicator
- Cool mode indicator
- Dehumidify mode indicator
- Fan mode indicator
- Room temperature indicator
- High speed indicator
- Swing running indicator
- Clock display
- Mode button
- Timer/ temperature up/down button
- Speed button
- Swing button
- Clock buttons
- Sleep button
- Timer button
- On/off power button
OPERATION
Do not operate in cooling and dehumdifying mode when room temperature exceeds 35^ C.
- Turn on the unit
Plug in, then the unit beeps twice.
Press the „on/off“ button, then the unit is turned on.
The LCD displays the room temperature and operates in Automatic mode.
- select operating mode
Press the „mode“ button to select a desired mode shown below: automatic – cool – dehumidify – fan.
- Adjust temperature
The temperature can be set within a range of 15^ C to 31^ C by 1^ C.
Press the temp up or temp down button to increase or decrease the temperature.
The unit LCD shwos the target temperature for 5 seconds and then displays the room temperature.
- Adjust fan speed
Press the „speed“ button to select a desired fan speed shown below :
Low speed – middle speed – high speed
- Turn off
When ou press „on/ff“ button again, the unit will stop working.
EACH MODE WORKING PRINCIPLE
1. Automatic mode
Once the automatic operation is selected, the indoor temperature sensor operates automatically to select the desired operation mode with cool or fan.
When the room temperature is the same or higher than 24^ C, the unit will automatically select cool mode and the fan will turn to low speed.
When the room temperature is lower than 24^ C, the unit will automatically select fan mode and the fan will turn to low speed.
2. Dehumidifying mode
The fan will run at low speed and the speed can't be adjusted.
The compressor and the outdoor centrifugal fan will stop after running 8 min., then run again after 6 min.
The unit adopts constant temperatur dehumidifying mode, and adjustment of the temperature is not effective.
3. Cooling mode
When the room temperature is higher than set temperature, the compressor starts to run.
When the room temperatur is lower than set temperature, the compressor stops and only the fan will operate at original set speed.
4. Fan mode
The fan runs at set speed, and the compressor and compressor does not run. The adjustment of the temperature is not effective.
5. Timer operation
Press „timer“ button to set automatic off time while the unit is running.
Press „timer“ button to set automatic on time while the unit is ready.
The time can be adjusted within a range of 1 hour to 12 hour Press the temp up or temp down button to increase or decrease.
6. Swing operation
Press swing button to change the air flow direction within a range of 0 to 120^ . The unit's default setting is the straight direction.
7. Sleep operation
The slee operaton is effective when the unit is under cool mode.
Press the sleep button in cool mode, then the unit will work under sleep mode and the fan will turn to low speed automatically. The set temperature will increase 1^ C after 1 hour. And it will increase 2^ C after two hours. After six hours, the unit will stop running.
Notice :
The main control board has memory function, when the unit is ready to run but in stop status, the main control board can memorize the initialization of working mode. When you turn on the unit, it will work as the same enactment of working-mode as last time, no need to reset the working mode again.
REMOTE CONTROL
Insert batteries. Slide the cover open. Place the batteries make sure the direction is correct.
Setting the clock: press the black ready button. On the display 12:00AM is flashing Press the hour and min button to set the current time.
Press the ready button.
How to operate the remote control
The working of the remote control is the same as for the control panel.
AIR EXHAUST DUCT OPERATION
Extend the air exhaust duct by drawing out the twwo ends of the duct.
Screw the air exhaust duct into the connector of air exhaust duct.
Screw the connector of window into the plastic connector.
Connect the connector of air exhaust duct to the unit.
You can use the followin methods to exhaust hot air :
- Exhaust hot air from window. Open the window for a small angle put the plastic pipe outside the window and fi x it on the window
- Exhaust hot air from a door. Open the door to fi t the plastic pie outside
- When stop using the unit, move the air exhaust duct from the unit and store it carefully.
Note :
The air exhaust duct can be extended from 0,5 m to 1,5 m. The unit works more efficiently while the air exhaust duct is shorter
Please make sure the air exhaust duct is not distorted, or heat cannot flow back to increase the units interior temperature. If so the unit will stop running automatically.
Please make sure not to use other exhaust ducts, or extensions on the air exhaust duct.
Otherwise the unit working efficiency will decrease
FILTER CLEANING
Open the air inlet grill, pul the air fi lter from the inlet grill.
Wash the air filter by immersiin it gently into warm water to wash out accumulated dust and lint. If the filter is very dirty, add mild household detergent in the water
Let the filter dry thoroughly
Place the fi lter back in the air inlet grill. Place the grill back in the unit
Note :
Turn off the unit and unplug before cleaning
If the air fi liter is blocked, the airflow volume will decrease. We suggest cleaning the fi liter once very two weeks or more ofeh if necessary
Let the filter dry thoroughly before reinstalling it
HOW TO DRAIN THE CONDENSE WATER
When the unit is running at cool mode, condense water will drain into the water tank. Buzzer will sound when the water tank is full and error code „E4“ will display on the LCD. At the same time cooling sytem stops running automatically and the fan will stop after 3 minutes.
Draining the water tank
Place the drainage box under the drainage hole
Disconnect he stopple drainpipe, then the condensed water will automatically flow out.
When the drainage box gets full, push the stopple drainpipe back into the drainage
hoe, and empty the Repeat above steps

natural_image
Technical line drawing of a mechanical device with mounting base and control panel (no text or symbols)Continuous drainage
This product has a continuous drainage function. If you use this unit frequently, please connect the pipe to the unit properly so that the unit can drain the water successfully
Disconnect the stopple drainpipe, and store it for later use
Connect supplied drain automatically
natural_image
Technical line drawing of a mechanical device with no visible text or symbols, condensed water will flow out
MAINTENANCE
Clean the outise of the unit with a damp cloth. Don't use agressive cleaners, this can damage the unit.
Clean the filters regularly, as discript in this booklet

- GARANTIEVOORWAARDEN
- CONDITIONS DE GARANTIE
- RECYCLING INFORMATIONEN
- RECYCLING INFORMATION
- LEVERING EN UITPAKKEN :
- ACCESSOIRES
- DISPLAY
- Permanente drainage
- ONDERHOUD VAN HET TOESTEL
- ECRAN
- Drainage continu
- ENTRETIEN DE L'APPAREIL
- ZUBEHÖR
- WARTUNG DES GERÄTS
- WARNINGS
- PARTS
- ACCESSORIES
- CONTROL PANEL
- REMOTE CONTROL
- OPERATION
- EACH MODE WORKING PRINCIPLE
- Automatic mode
- Dehumidifying mode
- Cooling mode
- Fan mode
- Timer operation
- Swing operation
- Sleep operation
- Notice :
- AIR EXHAUST DUCT OPERATION
- Note :
- FILTER CLEANING
- MAINTENANCE
Brand : DOMO
Model : DO335A
Category : Air Conditioning