
DO321A - Air Conditioning DOMO - Free user manual and instructions
Find the device manual for free DO321A DOMO in PDF.

| Product type | Portable air conditioner |
| Brand | DOMO |
| Model | DO321A |
| Power supply | 220-240 V |
| Operating modes | Automatic, cooling, dehumidification, fan, sleep |
| Adjustable temperature range | 15 °C to 31 °C in 1 °C increments |
| Fan speeds | Low and high |
| Programmable timer | 1 to 24 hours (automatic on/off) |
| Remote control | Yes, infrared, max range 7 m, AA batteries |
| Air exhaust | Flexible hose with window or wall adapters |
| Water collection tank | Manual drain via bottom opening (code E4 when full) |
| Air filter | Washable, cleaning recommended every 2 weeks |
| Automatic safety function | Shutdown if indoor temperature >43 °C or <15 °C (cooling) / <15 °C (dehumidification) |
| Error codes | E2 (ambient sensor), E3 (evaporation sensor), E4 (tank full) |
| Warranty | 2 years from date of purchase |
| Recycling | Do not dispose with household waste, take to recycling center |
| Dimensions (approx.) | Not specified in the manual |
| Weight (approx.) | Not specified in the manual |
Frequently Asked Questions - DO321A DOMO
User questions about DO321A DOMO
0 question about this device. Answer the ones you know or ask your own.
Ask a new question about this device
Download the instructions for your Air Conditioning in PDF format for free! Find your manual DO321A - DOMO and take your electronic device back in hand. On this page are published all the documents necessary for the use of your device. DO321A by DOMO.
USER MANUAL DO321A DOMO
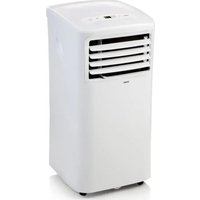
natural_image
White portable air conditioner unit with open lid and wheels (no visible text or symbols)DO-321A
PRODUCT OF LINEA 2000
GARANTIEVOORWAARDEN
CONDITIONS DE GARANTIE
This appliance has a two year warranty period. During this period the manufacturer is responsible for any failures which are the direct result of construction failure. When these failures occur the appliance will be repaired or replaced if necessary. The warranty will not be valid when the damage to the appliance is caused by wrong use, not following the instructions or repairs executed by a third party. The warranty will only be valid if the warranty application has been completed by the dealer at the time of purchase.
Type nr. Apparaat
RECYCLING INFORMATIONEN
RECYCLING INFORMATION
The symbol ☒ on the product or on its packaging indicates that this product may not be treated as household waste. Instead it shall be brought to the applicable collection point for recycling of electrical and electronic equipment. By ensuring this product is disposed of correctly, you will help prevent potential negative consequences for the environment and human health, which could otherwise be caused by inappropriate waste handling of this product. For more detailed information about recycling of this product, please contact your local city office, your household waste disposal service or the shop where you purchased the product.
If the supply cord is damaged, it must be replaced by manufacturer of its service agent or a similarly qualified person in order to avoid a hazard.
LEVERING EN UITPAKKEN

Stand by toets

Timertoets

Slaap toets

Snelheid toets

Menu toets


natural_image
Exploded view diagram of a remote control unit with battery, fan, and display components (no text or labels)INSTALLATIE VAN LUCHTAFVOERSLANG
natural_image
Line drawing of a white industrial air purifier with meshed ductwork and two separate curved components (no text or symbols)
Touche veille

Touche minuterie

Touche sommeil

Touche vitesse

Touche menu

natural_image
Exploded view diagram of a remote control unit with battery, casing, and indicator lights (no text or labels)natural_image
Illustration of a white industrial container with internal grating and two separate gray structures (no text or symbols)
Standby-Taste

Timertaste

Schlafmodus

natural_image
Line drawing of a remote control unit with battery, wheels, and indicator lights (no text or symbols)natural_image
Line drawing of a white industrial air conditioner unit with ventilation grilles and cooling fins (no text or symbols)DELIVERY AND UNPACKING
This manual provides you with useful information for the installation and maintenance of your appliance. A properly installed and maintained air conditioner guarantees you many years of problem-free use.
When you remove the appliance from the box, check thoroughly for transport damages. If there are any damages, get in touch with your supplier immediately. Each appliance is thoroughly checked before leaving the factory.
Important! After unpacking, you must place the appliance in an upright position for a minimum of 2 hours to allow it to rest before using it. Failure to comply with this procedure can damage your appliance. If you do not want warm air to blow into the room you must fit the pipe so that the air outlet pipe is fitted to blow outdoors.
SAFETY REGULATIONS
This appliance has been designed for use with a voltage of 220V-240V. Do not use multiple sockets or extension cables/leads.
Always switch the appliance off and remove the plug from the socket before carrying out maintenance. Never place the appliance in a horizontal position. This can damage the compressor. Use the appliance only in an upright position, on a flat surface.
Preferably, two or more persons should move the appliance.
When you have switched the appliance off, allow it to rest for 3 to 4 minutes before you switch it back on. Always let a qualified person carry out repairs.
Place the plug in an earthed plug socket. Do not remove the earthing. Do not use extension lead and adapter.
This appliance is suitable for domestic use and similar areas such as:
- Kitchen corner for personnel in shops, offices and similar professional places
- Farms
- Hotel and motel rooms and other places with a residential character.
- Guest rooms or similar
Take Care: the appliance should never be used with an external timer or separate remote control. Children or people with any disability or mental impairment should not use this appliance. Also people with limited experience or insufficient knowledge are not permitted to use this appliance unless they have received the necessary instructions for use or are otherwise being supervised by people ensuring their safety. Make sure that children cannot play with the appliance.
PRECAUTIONS
It's best to place your air conditioner next to a window, door or sliding window.
Place it on a flat surface.
Allow 60cm between the wall and the air outlet.
Fix one end of the air outlet pipe to the air outlet on the appliance and lead the other end out through a window, door or hole in the wall.
Make sure that the air inlet and outlet do not become blocked.
In order to prevent interference, install the appliance at least 1 metre away from TV's
or radios.
Keep appliance out of direct sunlight to avoid discolouration of casing. The appliance should not lean more than 35^ , do not place upside down during transport.
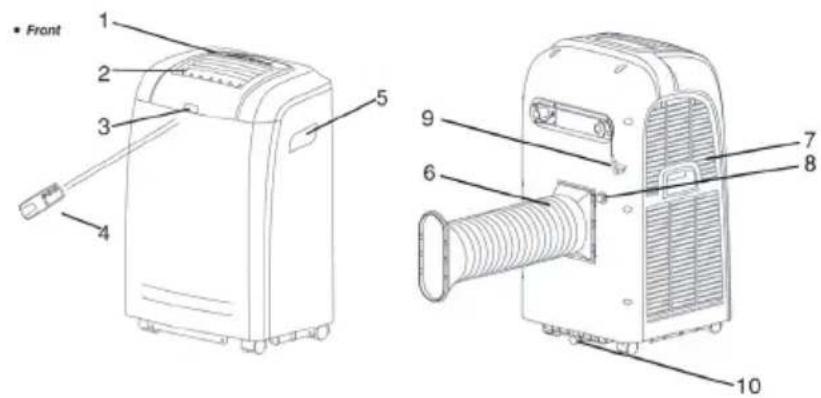
PARTS
- Control panel
- Cold air outlet
- Infrared receptor
- Remote control
- Transport handles
- Air outlet pipe
- Air inlet
- Additional drainage
- Mains supply
- Main drainage
CONTROL PANEL
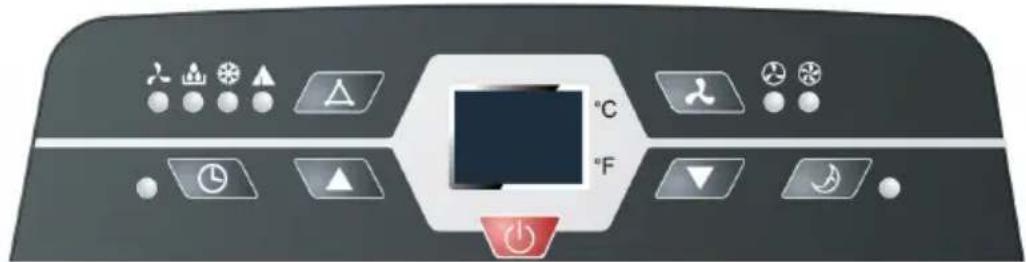

Stand-by button

Speed button

Timer/Temperature up button

Timer button

Mode button

Timer/Temperature down button

Sleep button

low、high Fan speed

Automatic, Cool,
Dehumidify and Fan mode
Plug into mains socket, the appliance will produce a single acoustic signal.
Press the standby button ⏻; the appliance is now switched on. The display shows the room temperature, the appliance will work in automatic mode.
Select Mode
Press on the menu button to choose the mode from the menu below:

Adjust Temperature
The temperature can be set between 15^ C and 31^ C with an interval of 1^ C.
Press once on the + or - button to increase or decrease the temperature by 1°C.
Adjust Ventilation Speed
Press on the ventilation button to adjust the ventilation speed from the menu
below:

Standby
If you press on the standby button a second time the appliance will produce a single acoustic signal then switch off.
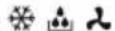
MODES
Automatic Mode
If the function has been selected, the sensor will automatically adjust to the correct mode: for .
If room temperature is higher or equal to 24^ C the appliance will automatically select the cooling function ✦
If the temperature is lower than 24^ C the appliance will automatically switch to adjust to the correct ventilation speed ♦
Dehumidifier Mode
The top ventilator operates at low speed and the rate cannot be adjusted.
The compressor and the bottom ventilator will stop after 8 minutes and switch on again after 6 minutes.
The appliance runs in continuous dehumidifier mode and adjusting the temperature will have no effect.
Cooling Mode ✿
If the room temperature is higher than the selected temperature the compressor will switch on.
If the room temperature is lower than the selected temperature the compressor will switch off and the top ventilator will operate according to the selected temperature.
Ventilator Mode
The top ventilator operates at the selected speed and the compressor and bottom ventilator are switched off.
Adjusting the temperature in this setting will have no effect.
Timer Function Ⓤ
Press on the ‘Timer’ button in order to select the function ‘automatic off’ if the appliance is running. Press on the ‘Time’ button in order to select the function ‘automatic on’ if the appliance is running. The timing can be adjusted from 1 to 24 hours. Press on the ▲ button or the ▼ button in order to increase or decrease the time duration by 1 hour.
Sleep Settings
The sleep setting function is only applicable when the appliance is set to the cooling mode (high speed ventilation) ❖
To activate sleep settings, press on sleep function button making sure appliance is already set to the Cooling (down) Mode.
The top ventilator will switch automatically to low speed. After one hour the selected temperature will increase by 1^ C, and by 2^ C after two hours. After six hours the appliance will automatically switch off.
The control panel has a memory function that stores the mode last used. This memory function remains active for as long as the appliance remains on standby (with the exception of mode).
REMOTE CONTROL
- ⏻ button. For switching the appliance on and off.
- button. Use this to select the desired function.
- button. Select the desired ventilation speed
- ▲ button. For increasing the temperature or adjusting timer.
5.▼ button. For decreasing the temperature or adjusting timer. - button. Activate of deactivate the sleep setting.
- button. Activate or deactivate the automatic timer function.

Placing Battery in the Remote Control
Slide the cover to open at back. Place two AA-batteries in the correct position in the remote control. Slide the cover back into place. Make sure the positive and negative markers correspond with the markings on the remote control.
Do not use old and new batteries together. If you are not going to use the remote control for an extended period remove the batteries. Always dispose of used batteries in
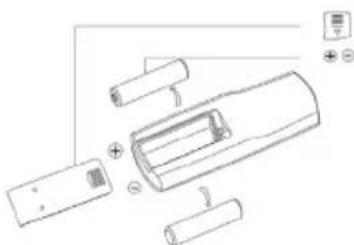
natural_image
Exploded view diagram of a car air conditioner unit with battery pack, wheels, and control panel (no text or labels)a responsible manner, give them to a processing firm or waste processing company. Point the remote control towards the infrared receptor in your appliance. The remote control has a maximum range of 7 metres.
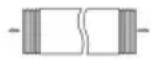
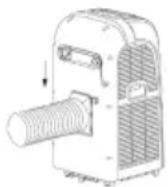
INSTALLING THE AIR OUTLET PIPE
- Air pipe
- Appliance connection adaptor
- Wall fitting for outlet pipe
- Remote control
- Water collection container
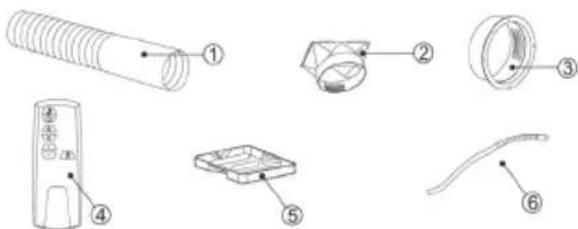
6. Water discharge pipe
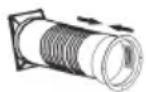
Pull the air outlet pipe apart by pulling on both ends.
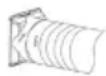
Screw the air outlet pipe to the square-shaped appliance connector.
Screw the other end of the air outlet pipe into the round wall connection fitting.
Connect the square appliance connector to the air conditioner
AUTOMATIC SAFETY FUNCTION
The automatic safety function can switch the appliance off if any of the following takes place:
| Cooling Indoor temperature rises above 43°C | |
| Dehumidify Room temperature is below 15°C |
If your appliance is set to Cool or Dehumidify and the window remains open for a considerable length of time and the relative atmospheric humidity is above 80%, liquid may run out of the water outlet.
Applicability of the Safety Function
If the appliance is restarted immediately after it is switched off the automatic safety function will not allow the appliance to work immediately. Always wait for 3 minutes before restarting the appliance. If you remove the plug from the socket, the appliance rests itself to the original settings. The ‘Timer on’ and ‘Timer off’ settings must be readjusted.
DRAINAGE
The appliance has a receptacle (container) for collecting water for recycling.
When the water level is below the minimum level indicated on the collector the pump for recycling water will not run. When the water level rises above the minimum level the pump will start to recycle. If the water level rises above the maximum level, E4 will be visible on the display to indicate that the collection receptacle is full. You can empty the container by opening the drainage opening at the bottom of the appliance. Make sure that you place a collection container under the opening beforehand.
DO-321A
Remove the plug from the drainage opening. Let all of the water run out and carefully put the plug back into place.
MAINTENANCE
Switch the appliance off before you remove the plug from the socket. Clean the appliance with a soft, dry cloth. If the appliance is very dirty use lukewarm water (colder than 40^ C) to clean it. Never use volatile or abrasive cleaning products. Never spray water onto the outside casing.
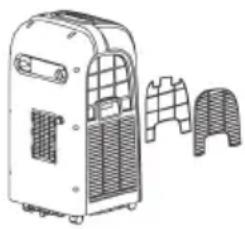
Cleaning the Air Filter
Switch the appliance off and unscrew the grid on the side of the appliance. Push the grid up to remove it. Now you can easily remove the air filter. Wash the filter in a mixture of soap and lukewarm water and allow it to dry carefully before putting it back into place. If the appliance is located/placed in a very dusty place it should be cleaned every two weeks.
natural_image
Line drawing of a white industrial air purifier with internal grating and two separate curved components (no text or symbols)Not Using the Appliance for an Extended Period
Remove both rubber plugs from the drainage openings to remove remaining water. Allow the ventilator to run own its own for another day in order to make sure the appliance is thoroughly dry inside and to prevent mould forming.
Switch the appliance off and remove the plug from the electric socket. Remove the batteries from the remote control. Clean the air filter, dry it and then put it back. Disconnect the air pipe and carefully close the opening.
ERROR MESSAGES
| The appliance does not click on The | The appliance is not plugged in properly to the socket. |
| The fuse in the fuse box is blown | |
| The batteries in the remote control have run out | |
| Always wait for steeds 3 minutes before you restart the appliance | |
| The appliance works only for a short while | The selected temperature is approaching the room temperature |
| Select a lower temperature or wait until the appliance automatically switches on again | |
| The air outlet is blocked |
DO-321A
| The appliance works but does not cool off/down in COOLING mode | A window or door is open |
| There is a heater or heating element switched on | |
| The air filter is dirty | |
| Air or inlet/outlet is blocked | |
| The selected temperature is too high | |
| Water is leaking from the appliance when you move it | Empty the water collection container |
| Place the appliance on a flat horizontal surface | |
| Code E4 is visible on the display | Empty the collection container |
| If this is a regular occurrence, contact a recognised fitter/repair service point | |
| Code E2 The room temperature | sensor is broken and needs to be replaced |
| Code E3 The evaporation sensor | is broken and needs to be replaced |

natural_image
Completely dark image with no visible content, text, or symbols.


- GARANTIEVOORWAARDEN
- CONDITIONS DE GARANTIE
- RECYCLING INFORMATIONEN
- RECYCLING INFORMATION
- LEVERING EN UITPAKKEN
- INSTALLATIE VAN LUCHTAFVOERSLANG
- DELIVERY AND UNPACKING
- SAFETY REGULATIONS
- PRECAUTIONS
- PARTS
- CONTROL PANEL
- Select Mode
- Adjust Temperature
- Adjust Ventilation Speed
- Standby
- MODES
- Automatic Mode
- Dehumidifier Mode
- Cooling Mode ✿
- Ventilator Mode
- Timer Function Ⓤ
- Sleep Settings
- REMOTE CONTROL
- Placing Battery in the Remote Control
- INSTALLING THE AIR OUTLET PIPE
- Water discharge pipe
- AUTOMATIC SAFETY FUNCTION
- Applicability of the Safety Function
- DRAINAGE
- DO-321A
- MAINTENANCE
- Cleaning the Air Filter
- Not Using the Appliance for an Extended Period
Brand : DOMO
Model : DO321A
Category : Air Conditioning