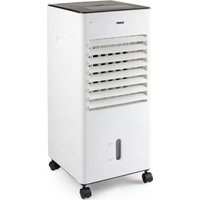
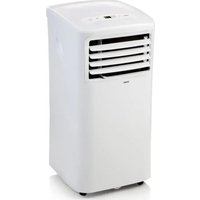
USER MANUAL DO262A DOMO
natural_image
Exterior view of a modern electric air purifier with black and white panels (no text or symbols visible)
GARANTIEVOORWAARDEN
CONDITIONS DE GARANTIE
This appliance has a two year warranty period. During this period the manufacturer is responsible for any failures which are the direct result of construction failure. When these failures occur the appliance will be repaired or replaced if necessary. The warranty will not be valid when the damage to the appliance is caused by wrong use, not following the instructions or repairs executed by a third party. The guarantee is issued with the till receipt. All parts, which are subject to wear, are excluded from the warranty.
ZÁRUKA
natural_image
Symbol of a trash bin crossed with no text or numbers, representing waste sorting or disposal (no text present)
natural_image
Recycling symbol with three chasing arrows forming a triangle (no text or labels)
The symbol on the product or on its packaging indicates that this product may not be treated as household waste. Instead it must be brought to the applicable collection point for recycling of electrical and electronic equipment. By ensuring this product is disposed of correctly, you will help prevent potential negative consequences for the environment and human health, which could otherwise be caused by inappropriate waste handling of this product. For more detailed information about recycling of this
product, please contact your local city office, your household waste disposal service or the shop where you purchased the product.
The packaging is recyclable. Please treat package ecologically.

natural_image
Symbol of a trash bin crossed with two crossed lines, no text or numbers present
natural_image
Recycling symbol with three chasing arrows forming a triangle (no text or labels)
If the supply cord is damaged, it must be replaced by the manufacturer, its service agent or a similarly qualified person in order to avoid a hazard.
From now on, accessories and parts of Domo appliances can also be ordered online from the Domo webshop*:
http://webshop.domo-elektro.be
You can reach the webshop through the Domo website as well: www.domo-elektro.be. The accessories and parts can also still be obtained at the store where you bought the appliance.
LEVERING EN UITPAKKEN :

natural_image
Line drawing of a vehicle chassis with attached electrical components (no text or symbols)
natural_image
Line drawing of a portable air conditioner unit with cooling fins and wheels (no text or symbols)
2. Behuizing
natural_image
Illustration of four hands performing a manual task with arrows indicating motion (no text or symbols present)
FUNCTIETOETSEN
1. PIJLTJESTOETSEN
10. LED DISPLAY TOETS


PANNEAU DE COMMANDE
Touche MODE
natural_image
Diagram of a heating unit with cooling fins and a power plug (no text or labels)
natural_image
Illustration of three hands performing a manual task with arrows indicating motion (no text or symbols present)
BEDIENPANEL
- MODE-Taste
natural_image
Diagram of a car radiator with cooling fins and attached sensors (no text or symbols)
natural_image
Line drawing of a portable air conditioner unit with cooling fins and wheels (no text or symbols)
1. Luftfilter
FUNKTIONSTASTEN
- PFEIL-Tasten
DELIVERY AND UNPACKING
When taking the unit out of the box, please check carefully for transportation damage. If you notice any damage please contact your supplier immediately. Every unit has been checked carefully when leaving the factory.
IMPORTANT : after unpacking, you must leave the unit upright for at least 2 hours before using it. If this procedure isn't followed, you run the risk of damaging your airco.
If you don't want the warm air to stay in the room, you must lead the airoutlet hose to the outside.
SAFETY INSTRUCTIONS
This appliance may be used by children from the age of 8 and up, and also by persons with a physical or sensory limitation, as well as mentally limited persons or persons with a lack of experience and knowledge. But only on the condition that these persons have received the necessary instructions on how to use this appliance in a safe way and know the dangers that can occur by using this appliance.
Children cannot be allowed to play with the appliance. Maintenance and cleaning of the appliance may not be done by children, unless they are older than 8 years old and are under supervision.
Keep the appliance out of reach of children younger than 8 years old.
This appliance is suitable to be used in a household environment and in similar surroundings such as:
- Kitchen for personnel of shops, offices or other similar professional surroundings
- Farms
- Hotel or motel rooms and other surroundings with a residential character
- Guest rooms or similar
Attention: This appliance cannot be used with an external timer.
Never place the unit near a stove, fire or highly inflammable liquids.
Never hit or shake the unit, to prevent damage.
Never cover the air inlet or air outlet, to prevent overheating the unit.
Never splash water on the unit, or place the unit near water, to prevent electrocution.
When the power cord has been damaged it must be replaced by the manufacturer, his after sales service or a qualified person, to prevent accidents.
Never place another appliance on the same electrical circuit as the airco.
Never handle the plug with wet hands.
Never put any foreign objects in the openings of the airco.
Never use an extension cord.
Never let children play near the unit.
When you turn off te unit and want to turn it on immediately afterwards, the compressor will need 3 min.
To start up again.
Always place the unit at least 1m away from TV or radio, to prevent disturbance.
Never place the unit in direct sun light, to prevent discoloration of the airco.
Make sure the angle of the unit is never more than 35^ , when you move the airco. Never place the unit upside down.
Place the unit on a flat, level surface.
Always remove the water from the water tank, when storing the airco. This will keep your airco in optimal condition for a long time.
Never use any chemicals to clean the unit, this will cause damage.
Always make sure to disconnect the unit from the electrical supply before attaching or removing the air inlet grill.
Make sure the airco is always protected against condensation, splashing water, etc. Make sure the airco can't come in contact or be pulled into water or any other liquid. If for some reason the airco will fall in to water or any other liquid, immediately remove the plug form the socket.
Never use the airco in a damp room such as a badroom or a laundry room.
Always turn off the unit completely when not in use.
Always contact a qualified person for repairing the unit. Make sure that the free space around the unit is at least 30 cm.
Never touch the unit with wet hands or bare feed.
Only touch the control panel with your fingers.
Never remove fixed parts from the airco. Never use the
unit when it is not working properly, or when the unit has fallen or has been damaged.
Never use the plug to turn the unit on or off.
Only use unit for it's intended use.
ENERGY TIPS
- Never use the unit it rooms that are bigger than the recommended room size.
- Make sure that the airflow of the unit is not blocked by furniture or other objects.
- Keep curtains closed during the warmest hours of the day.
- Make sure the filters of the airco are always clean.
- Always keep doors and windows closed to keep the cool air inside and the warm air outside.
- Only use the unit within a temperature range of 17°C up to 35°C.
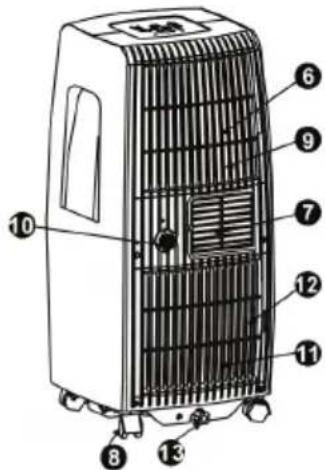
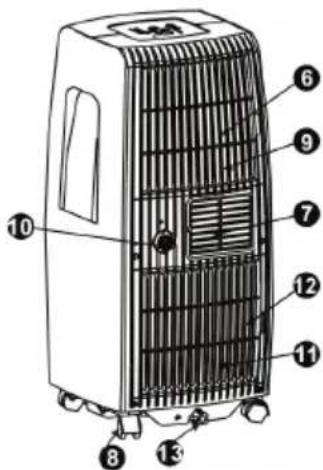
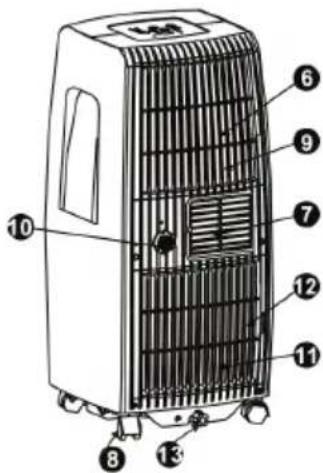
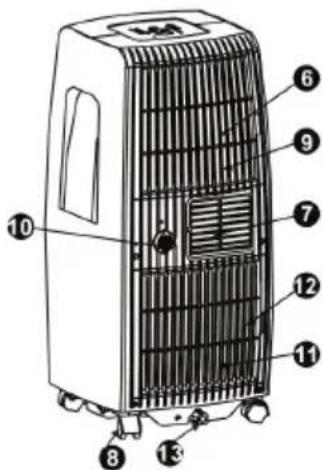
PARTS
- Control panel
- Air outlet
- Handle
- Remote controle detector
- Body
- Air filter
- Air outlet
- Weels
- Air inlet
- Permanent drain connection
- Air inlet
- Air filter
- Bottom drain
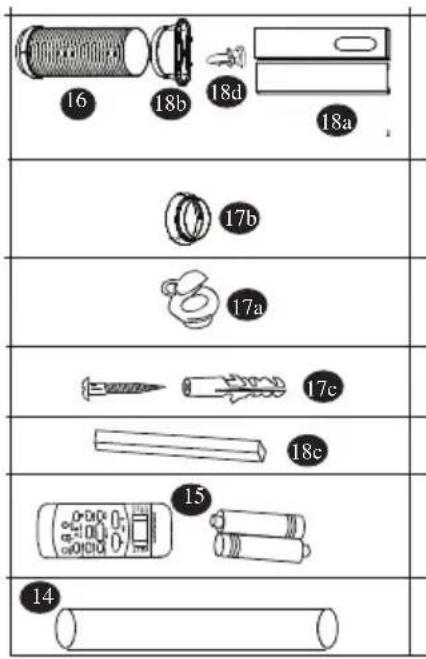
- Drain hose
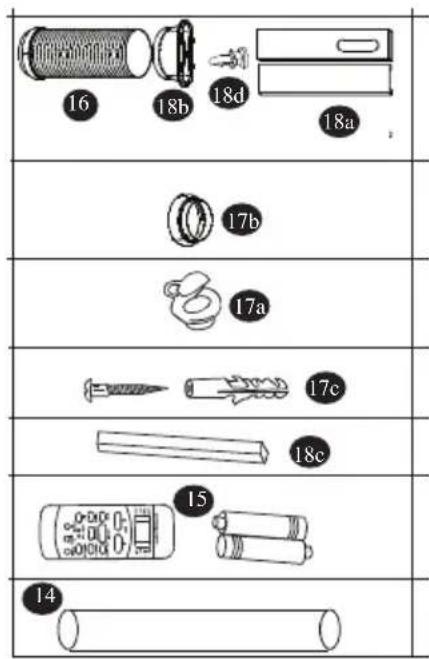
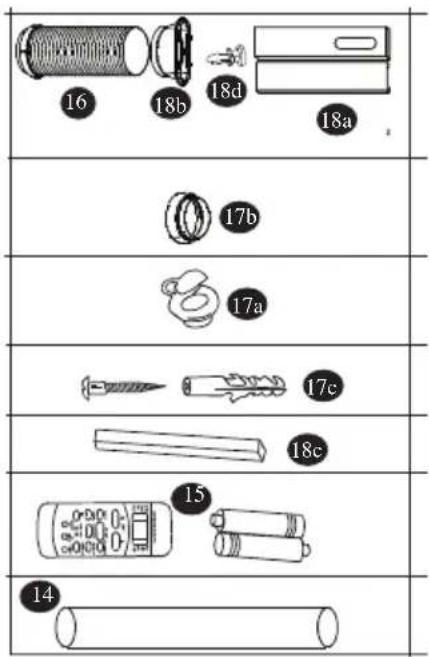
- Remote control
- Air outlet hose
- Wall connection kit
a. Wall adaptor
b. Round ring
- Window connection kit
a. Window adaptor
b. Round ring with small outlet
c. Window seal
d. Bold


CONTROL PANEL
1. MODE- touch
With this touch you can select the desired function. Every time when pressing this touch the function will change: AUTO - COOL - DRY - FAN. The related indication light will turn on on the control panel.

2. SLEEP-touch
You can use this touch for activating the "sleep" mode.
3. Arrow touch
Use these touches to select the temperature or to adjust the timer. When pressing both arrows at the same time you can switch between “C°” or “F°”.
4. ON/OFF touch
To turn the unit of or on.
5. TIMER touch
With this function you can select when the unit must turn on or off.
6. FAN touch
With this touch you can select the fan speed: LOW - HIGH - AUTO. The related indication light will turn on.
7. LED display
Will show het temperature and timer selections. When the “dry or “fan” mode is selected, the display will show the room temperature.
ERROR CODES
Following error codes can be displayed on your airco :
- E1 : the sensor for the room temperature is not working. Turn off the unit and remove the plug from the socket. Wait for 10 sec and plug the unit back in. Turn on the unit. When the error codes repeats, you need to contact the after sales service.
- E2: The sensor of the dehumidifier doesn't work. Turn off the unit and remove the plug from the socket. Wait for 10 sec and plug the unit back in. Turn on the unit. When the error codes repeats, you need to contact the after sales service.
- E4: The display is not functioning properly. Remove the plug from the socket. Wait for 10 seconds. Plug the unit back in. When the error codes repeats,
you need to contact the after sales service.
- P1 : The water tank is full. Connect the drain hose to the bottom drain and remove the water. When the error codes repeats, you need to contact the after sales service.
INSTRUCTIONS OF USE
1. COOL function
Press the “mode” touch until the “cool” indication light turns on.
Use the arrow touches to select the desired room temperature.
Use the “fan” touch to select the desired air speed.
2. DRY function
Press the “mode” touch unit the “dry” indication light turns on.
With the selection you can't select te temperature or fan speed.
Keep windows and doors closed for an optimal dehumidification.
3. AUTO function
When the airco is in the “auto” mode, the airco will automatically make a selection between “cool” or “fan” function, depending on the room temperature and the selected temperature.
The airco will automatically stabilise the room temperature on the selected temperature.
When using the “auto” function, you can’t select the fan speed.
4. FAN function
Press the “mode” touch until the fan indication light will turn on.
Press the “fan” touch to select the air speed.
The temperature can't be selected.
You don't need to attache the air outlet hose.
5. TIMER function
When the unit is on, you press the “timer” touch. The “timer off” indication light will turn on. This indicates that the “auto shut off” is activated. When pressing her “timer” touch again, the “timer on” indication light will turn on. This indicates that the “auto on” function is activated.
Press the arrow buttons to select the time. The max time selection is 24 hours.
After finishing the selection, the time will start to countdown on the display until “auto on” or “auto off”, depending on the selection you made.
You can cancel the timer function at any time by pressing the “on/off” touch.
When the error code E1 or E2 is displayed, the timer selection will be canceled.
6. SLEEP function
When pressing the “sleep” touch, the selected temperature will be elevated with 1 ^
after 30 min. After another 30 min the temperature will increase with another 1°C. The airco will maintain this temperature for 7 hours. After this time, the airco will go back to the original set temperature and the “sleep” function will end.
NOTE : this function can not be selected with the “fan” or “dry” function.
AUTOMATIC RESTART
When the airco will turn off unexpectedly, because of a power failure, the unit will turn back on when the power comes back on. All the settings will remain the same as before the power failure.
NOTE : the unit can only restart after 3 min. So if the power failure is shorter than 3 min the unit will still take up to 3 min to restart.
ADJUSTING THE AIR FLOW
The airflow can be adjusted manually, by turning the ribs of the air outlet in the desired direction.
INSTALLATION
Place the airco on a solid and stable floor, this way you will prevent excessive noise and vibrations. Make sure that the floor is strong enough to support the weight of the appliance.
The appliance has small wheels for easy moving. Make sure only to move the airco over a flat and level surface. Be careful when moving the airco over carpet. Never roll the unit over an object.
Place the unit near an earthed socket.
Never place any object within 30 cm round the airco.
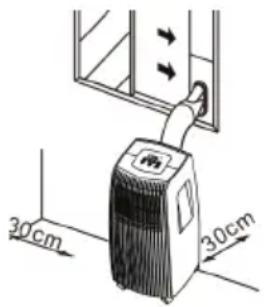
INSTALLATION OF THE WINDOW KIT
The air outlet hose must be used in the “cool” or “auto” mode. During the “fan” or “dry” mode, you don’t need to attach the air outlet hose.

- Place the round ring with small air outlet on the air outlet hose.
- Place the window kit in your window. This can be used horizon-
tally or vertically. Block the window kit on the desired length, with the supplied bold.
- Use the window seal to close up any gaps between the window and the window kit.


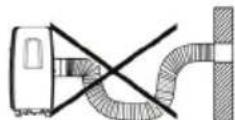
NOTE : Make sure the air outlet hose isn't bend during use.
Make sure there is a free surrounding of at least 50 cm around the outlet.
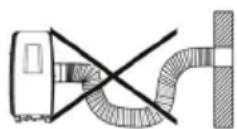
INSTALLATION WALL KIT
The air outlet hose must be used in the “cool” or “auto” mode. During the “fan” or “dry” mode, you don’t need to attach the air outlet hose.
- Make an opening in the wall the size of the wall adaptor.
- Place the wall adaptor in the opening.
- Place the round ring on the air outlet hose.
- Place hose with the round ring on the wall adaptor.
NOTE: Make sure the air outlet hose isn't bend during use.
Make sure there is a free surrounding of at least 50 cm around the outlet.
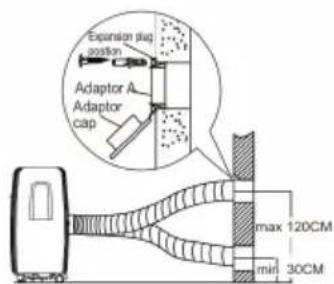

DRAINING
During the "dry" mode you can use a permanent drainage.
- Remove the permanent drain plug.
- Attache the drain hose on the permanent drain.
- Make sure the water is drained in a save and permanent way.

When you don't use the permanent drain, the non recycled condensation water, will be stored in the water tank.

- When the water tank is full a few beep signals will be heard and on the display the code P1 will appear. The “cool” or “dry” mode will end automatically. The fan will continue to operate, this is normal.
- Move the unit over to a place where you can easily drain the water.
- Remove the drain plug at the bottom of your unit and drain the water.
- After fully draining the water tank, place the drain plug back on the drain opening.
- Restart the unit, make sure the error code P1 is no longer displayed. When the code doesn't disappear, try turning

natural_image
Diagram of a heating unit with cooling pipes and a power plug (no text or labels)
off and on the unit a few times. When the error code continues, please contact the after sales service.
NOTE : always make sure to install the drain plug, before turning the unit back on.
CLEANING AND MAINTENANCE
Important :
- Always remove the plug from the socket before cleaning the unit.
- Never use any chemical or abrasive products to clean the unit.
- Never clean the unit with water or any other liquid, this can cause electrocution.
- When the power cord is damaged it must be repaired or replaced by the after
sales surface of the manufacturer or by a qualified person.
1. Air filter
- Clean the air filter at least ever 2 weeks. To make sure the airco can operate in optimal conditions.
- This appliance has 2 filters. Remove both filters by follow the arrows on the back of the unit.
- Clean the air filters in lukewarm water with a bit of detergent. Rinse the filters thoroughly and let them dry.
- Make sure the filters are completely dry before placing the back in to the airco.

natural_image
Line drawing of a portable air conditioner unit with cooling fins and wheels (no text or symbols)
NOTE : the grill and filter are attached to one another, but can be taken apart.
2. Airco body
Use a damp, soft cloth and a bit of mild detergent, to clean the outside of the unit. Make sure the unit is thoroughly dried afterwards.
3. Storing
Before storing the unit for a longer periode of time, please follow the next steps :
- Drain all the water from the appliance.
- Afterwards turn on the unit in the “fan” mode for half a day. Make sure the unit is placed in a heated room. This will dry the unit completely and prevent the forming of mold.
- Turn off the unit, remove the plug from the socket and remove the batteries from the remote control.
- Clean the filters and place them back in the unit.
- Store the unit in a dry, dark place.
POSSIBLE PROBLEMS AND THEIR SOLUTIONS
- The appliance isn't working when pressing the on/off touch.
o The error code P1 is dispaved, drain the water from the airco.
- The room temperature is lower than the selected temperature. Adjust the selected temperature.
- The room is not cool enough.
- The windows and doors aren't closed. Make sure all windows and doors are closed.
There are heat sources in the room. Remove all heat sources if possible.
- The air outlet hose is not connected or blocked. Attache the hose and check if there is no blockage.
o The selected temperature is to high. Adjust the selected temperature.
- The appliance is making to much noise or is causing vibrations.
- The floor is nog level or flat. Place the appliance on the flat and level surface if possible.
- Your appliance makes a gurgling sound
- The sound is produced by the refrigerant in your appliance, this is normal.
REMOTE CONTROL GENERAL
- The remote control will only function within 8 m of the airco. Point the remote in the direction of the airco. The transmission will be confirmed with a beep signal.
- The airco will not react to the remote if the signal is blocked by curtains, doors or other materials.
- Make sure the remote doesn't get wet. Don't expose the remote to direct sunlight or heat.
- When the infrared sensor on the appliance is positioned in direct sunlight it is possible that it won't react to the remote control. Make sure there is no direct sunlight on the infrared sensor.
- When other electrical appliances are reacting to the remote control, remove them further away from the airco or contact your supplier.
- Don't use old and new batteries at the same time in the remote control. Don't use two different types of batteries in the remote control.
- Remove the batteries from the remote, when you won't use it for a longer periode of time. (more than two months)
- Recycle used batteries correctly.
BATTERIES
The remote control works with 2 AAA (R03/LR3) batteries.
Remove the cover of the batterie compartment, by pressing down on it and sliding it out of the remote.
Place the batteries, make sure to follow the indications + and - indicated in the batterie compartment.
Place the cover back on the batterie compartment.
NOTE : When removing the batteries all selections will be deleted.
When placing new batteries you have to reinstall all the selections.

natural_image
Four circular diagrams showing hand manipulation or disassembly steps, with arrows indicating movement direction (no text or symbols present)
FUNCTIONS
These buttons must be used for setting the temperature.
When pressing this button you can select the different functions : cool – fan – dry – auto
This button can be use to cancel all the settings.
To turn the unit on or off.
When pressing this button you can select the desired fan speed.
Use this button if you want the airco to start working at a certain time. Every press of this button will elevate the current time. The max. Timer setting is 24 hours. For canceling the auto on function you keep on pressing the “timer on” button until “0.0” is displayed.
This setting can be used during the night. It will keep a comfortable sleeping temperature and will save energy. This function can be selected with the “cool” and “auto” setting. Cancel this setting by pressing the “on/off”, fan speed, sleep or mode button.
Press this button if you want your airco to shut down at a certain time. You can elevate the current time everytime you press the button. Max timer setting is 24 hours. For canceling the auto on function you keep on pressing the “timer on” button until “0.0” is displayed.
When pressing this button all current settings are locked. When pressing this button, nothing can be changed on the current setting. Press the "lock" button again if you want to cancel the lock. When the "lock" function is set, a small


key symbol will be shown on the display.
10. LCD DISPLAY
This button will clear the display on the airco unit and will turn on the light of the display on the remote.
AUTO mode
Make sure the unit is plugged in.
Press the “mode”-button and select the “auto” mode.
Press the arrow buttons to set the temperature.
Press the "on/off" button to turn the airco on;
NOTE : when selecting the “auto” function, the airco will determine in which setting it will work (airco – fan – dry), depending on the room temperature.
COOL/ FAN mode
Make sure the unit is plugged in.
Press the “mode” button and select desired function (cool or fan).
Press the arrow buttons to select the desired temperature.
Press the “fan speed” button to select the fan speed.
Press the “on/off” button to turn on the airco.
NOTE: when using the “fan” mode, no temperature will be displayed. The room temperature can’t be controlled.
DRY mode
Make sure the unit is plugged in.
Press the “mode” button to select the “dry” function.
Use the arrow buttons to set the desired temperature.
Press the “on/off” button to turn on the airco.
TIMER ON function
Make sure the unit is plugged in.
Press the “timer on” button. The display will show the last setting of the “timer on” mode. Press the “timer on” button again to start setting the delay time you want to airco to start working. Every time you press the timer the delay time will change. Max. delay timer setting is 24 hours.
After setting the timer, it takes about 2 sec. Before the set temperature will be displayed again.
TIMER OFF function
Press the “timer off” button. The display will show the last setting of the “timer off” mode. Press the “timer off” button again to start setting the delay time you want the airco to stop working. Every time you press the timer the delay time will change. Max
to set delay time is 24 hours. After setting the timer, it takes about 2 sec. Before the set temperature will be displayed again.
COMBINED TIMER
This setting can be used to let the airco start at a certain time and stop at a different time.
1. Automatic off-on
a. Press the "timer off" buton.
b. Press the “timer off” button again and set the desired delay time, you want the airco to stop working.
c. Press the "timer on" button
d. Press the “timer on” button again and set the desired delay time, you want the airco to start working.
e. Wait until the display shows the set temperature again.
NOTE : make sure that the set “off” time is urlier than the “on” time.
2. Automatic on-off
a. Press the "timer on" button
b. Press the “timer on” button again and set the desired delay time, you want the airco to start working.
c. Press the "timer off" button
d. Press the “timer off” button agian and set the desired delay time, you want the airco to stop working.
e. Wait unit the display shows the set temperature again.
NOTE : make sure the set “on” time is urlier than the set “off” time.
SLEEP function
When pressing the “sleep” button, the selected temperature will be elevated with 1 °C after 30 min. After another 30 min the temperature will increase with another 1 °C . The airco will maintain this temperature for 7 hours. After this time, the airco will go back to the original set temperature and the “sleep” function will end.
NOTE : this function can not be selected with the “fan” or “dry” function.
ENTREGA Y DESEMBALAJE:
PANEL DE CONTROL
1. Tecla MODE
natural_image
Diagram of a vehicle chassis with wheels and a power plug, no text or symbols present

natural_image
Line drawing of a portable air conditioner unit with cooling fins and wheels (no text or symbols)
1. Filtro de aire
TECLAS DE FUNCIÓN
1. TECLAS DE FLECHA

OVLÁDACÍ PANEL
1. Tlačítko MODE
natural_image
Diagram of a vehicle chassis with wheels and a cable, no text or symbols present
natural_image
Line drawing of a portable air conditioner unit with ventilation grilles and wheels (no text or symbols)
- Vzduchový filtr
natural_image
Illustration of four hand positions showing a tool interacting with a device, with arrows indicating movement direction (no text or symbols present)
FUNKCE
- TLAČÍTKA SE ŠIPKAMI