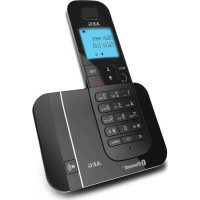
Voxtel M405 - Cordless phone AEG - Free user manual and instructions
Find the device manual for free Voxtel M405 AEG in PDF.
User questions about Voxtel M405 AEG
0 question about this device. Answer the ones you know or ask your own.
Ask a new question about this device
Download the instructions for your Cordless phone in PDF format for free! Find your manual Voxtel M405 - AEG and take your electronic device back in hand. On this page are published all the documents necessary for the use of your device. Voxtel M405 by AEG.
USER MANUAL Voxtel M405 AEG
Thank you for purchasing this product. This product has been designed and assembled with utmost care for you and the environment. This is why we supply this product with a quick installation guide to reduce the number of paper (pages) and therefore save trees to be cut for making this paper. Thank you for supporting us to protect our environment. You can find the full user guide on www.aegtelephones.eu.
2 SAFETY & PRECAUTIONS
When using your telephone, basic safety precautions should always be followed to reduce the risk of fire, electric shock and injury, including the following:
-
Switch off the phone in the vicinity of chemical plants, gas stations and other locations containing explosive objects.
-
When driving, please use the hands free calling device (to be purchased separately) to ensure safety. Please park the car on the roadside for communication except in case of emergency.
- Switch off the phone when boarding an airplane and do not switch the phone on during the flight.
- Be careful when using the mobile phone in the vicinity of devices such as pacemakers, hearing aids and other electro-medical equipment, which may be interfered by the mobile phone.
- Never attempt to disassemble the phone by yourself.
- Do not recharge the phone without battery being installed.
- Charge the phone in well-ventilated environment and keep away from inflammable and highly explosive elements.
-
To avoid demagnetization, keep the handset away from magnetic substances, such as magnetic discs or credit cards.
-
Keep the phone away from liquid. If soaking or erosion occurs, take the battery out and contact the supplier.
- Avoid using the phone in extremely high or low temperature environments. Never leave the phone exposed under direct sunlight, in high humidity or in a dusty environment.
- Do not use liquid or anything wet with strong detergents to clean the handset.
2.1 Medical units
The use of equipment that transmits radio signals, e.g. mobile phones, can interfere with insufficiently protected medical apparatus. Consult a doctor or the manufacturer of the apparatus to determine if it has adequate protection against external radio signals, or if you have any questions. Wherever there are notices to forbid use of mobile phones, you should comply. Hospitals and other health care facilities sometimes use equipment that can be sensitive to external radio signals.
2.2 Pacemaker
Pacemaker manufacturers recommend a distance of at least 15 cm. between a mobile phone and a pacemaker to avoid the risk of interference with the pacemaker. These recommendations are in accordance with independent research and recommendations from Wireless Technology Research. People with pacemakers should:
not carry the unit in a breast pocket
- hold the unit against the ear on the opposite side from the pacemaker to reduce the risk of interference
If you suspect that there is a risk of interference, turn off the unit and move it further away.
2.3 Areas with explosion risk
Always turn off the unit when you are in an area where there is a risk of explosion and follow all signs and instructions. An explosion risk exists in the places that include areas where you are normally requested to turn off your car engine. Within such an area, sparks can cause explosions or fire which can lead to personal injuries or even death.
Turn off the unit at filling stations i.e. near petrol pumps and garages.
Follow the restrictions that are in force on the use of radio equipment near places where fuel is stored and sold, chemical factories and places where blasting is in progress.
Areas with risk for explosion are often – but not always – clearly marked. This also applies to below decks on ships: the transport or storage of chemicals; vehicles that use liquid fuel (such as propane or butane); areas where the air contains chemicals or particles, such as grain, dust or metal powder.
2.4 Emergency calls
Important!
Mobile phones use radio signals and the mobile phone network. This means that connection in all circumstances cannot be guaranteed.
Therefore you should never rely solely on a mobile phone for very important calls such as medical emergencies.
3 BOX CONTENT
In the box you will find:
- 1 mobile handset
- 1 charging cradle
- 1 main power adapter
1 handset back cover - 1 rechargeable batterypack
1 quick start guide
Keep the packing materials in a safe place in case you later need to transport the device.
IMPORTANT
Your handset is not supplied with a SIM card, you will need to insert a SIM card for the handset to work correctly.
4 SET HANDSET LANGUAGE
- Press Menu - and / to select "Settings", then press OK.
- Press to select "Phone settings", then press OK.
- Press to select "Language", then press OK.
- Press / to select your language, press OK to confirm.
5 GETTING TO KNOW
YOUR PHONE
5.1 Keys and parts (see P1)
| # Meaning | ||
| 1 Earpiece | ||
| 2 | Left Soft Key | Perform functions of display text above. |
| 3 | Right Soft Key | Perform functions of display text above. |
| 4 | Up/Down and Enter Key | • Press to adjust receiving volume in talk. • Press to step through names, phone numbers, menus and settings. • Press key to enter or confirm a selection |
| 5 Talk key | • Press to answer a phone call. • Press to enter the calls log • Press to dial a number | |
| 6 | End Call / Power On-Off button | • Press to end or reject a call. • Press to return to the Home Screen / Standby mode. • Press and hold to switch the phone on or off |
| 7 | Direct memory keys M1, M2 and M3 | • Press to dial corresponding direct memory |
| 8 | Number key | • In idle: press to input telephone number. • In edit mode: press to input numbers or letters. |
| 9*Key | • In idle: press to input “*”/“+”/“P”/“W”. • In edit mode: press to input symbols. | |
| 10#Key | • In idle: press to input "#". • In idle: Long press to switch between user profiles. • In edit mode: press to change input method. | |
| 11 | Torch key / Volume Booster | • Long press to turn on/ off the torch. • Short press to enable/ disable volume booster. |
| 12 | Volume key | • Increase or decrease the volume |
| 13 | SOS Key | • Press and hold for 3 sec to start SOS call procedure. |
当
5.2 Display icons and symbols
The default idle screen shows the following information:
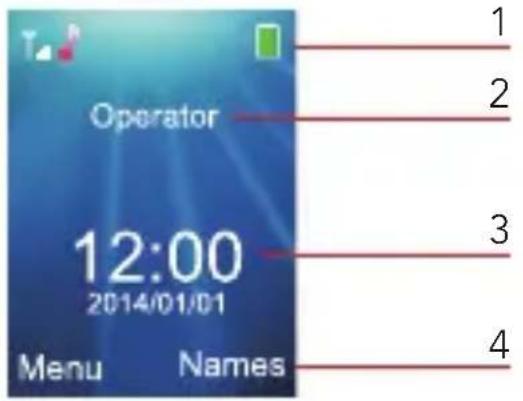
| Meaning | |
| 1 | Phone status symbols |
| 2 | Network operator |
| 3 | Time and date |
| 4 | Soft key functions |
| Left soft key* | From idle mode: opens the main Menu list |
| Right soft key* | From idle mode: opens the Phonebook |
| Radio link On with signal strength when linked. | |
| Battery charge level Internal segments cycle during battery charging. | |
| Call Divert On if call divert is set. | |
| Alarm On if alarm is set. | |
| Ring and Vibrate off | |
| Ring on On if only the ringer is enabled. | |
| Vibrate on On if only the vibrate is enabled. | |
| Vibrate and ring on On if both are enabled. | |
| Vibrate then ring On if vibrate then ring is enabled. |
- The soft keys change to different functions in other modes.
6 INSTALLATION AND SETUP
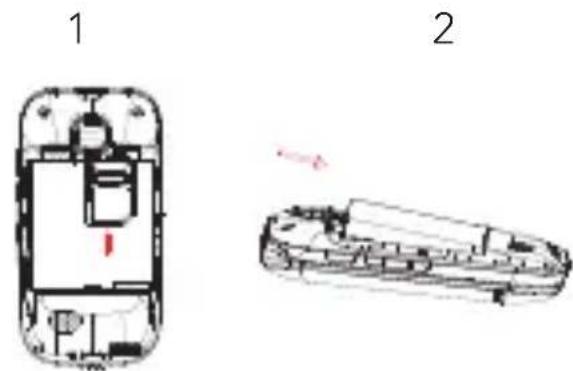
6.1 Install the SIM card and battery
- Switch off the phone, disconnect the power adaptor and remove the battery.
- To remove the back cover, press and slide the backcover down and then lift up.
- Remove the battery by lifting the top in the middle.
- Carefully slide the SIM card into holder with the gold connectors face down and angled corner down right, as shown (1).
- Replace the battery by aligning gold connectors on the battery with those on the phone, and push the
bottom of the battery down until it clicks into place (2).
- Replace the back cover by placing it flat on the back of the handset and pushing up until it clicks into place.
6.2 Charge the battery
Warning:
Use only supplied/approved batteries and chargers. Using others may be dangerous and will invalidate approvals or warranty. A battery must be fitted. Do not charge with the back cover removed.
- Connect the charger lead firmly into the micro-USB socket at side of the handset, or place the handset directly in the charging cradle.
Plug the mains power adapter an AC mains socket. If the handset is turned on, "Charger connected" displays for a few seconds, and the battery symbol bars scroll to
indicate that charging has started. If the handset is turned off, the display shows a battery symbol with the segments cycling to indicate charging has started.
- Charging the battery may take up to 5 hours.
- If "Charger connected" does not display, disconnect and retry. If charging still fails, contact the helpline.
- The battery is fully charged when the bars within the battery symbol are continuously on. Disconnect the charger from the phone and the AC outlet. "Charger removed" displays for a few seconds to indicate the charging has stopped.
6.3 Switching on and off
To switch the phone on and off:
- To switch off, press and hold until the display turns off.
- To switch on, press and hold until the display turns on.
Warning:
Do not switch on when mobile phone use is prohibited or if it may cause interference or danger.
7 MAKING &
ANWSERING CALLS
7.1 To make a call
Ensure the phone is switched on and in service.
Key in the telephone number including area code. (To add prefix ^ 喜 + ^ 喜 press the **key twice quickly)
- Press to dial the number on the display.
- To end calls press the button.
7.2 Last number redial
- In idle mode, press to see the All calls list for each of the dialled, received and missed calls.
- Press / to go to the number you want.
- Press to dial the number.
7.3 To answer a call
- When the phone rings, presto answer it.
7.4 Earpiece volume
- During a call, press to alter the volume.
The volume level displays and stays for future calls.
8 USING THE PHONEBOOK
You can store names and phone numbers in the Internal phone book (up to 300) and in the SIM phone book (SIM dependant, but a maximum of 250).
8.1 To access the phonebook
In idle mode:
- Press Names (Right Soft Key)
OR - Press Menu, select Phonebook, and OK once.
Note:
Indicates entries in the SIM phone book
Indicates entries in the Internal phone book.
8.2 To add a new phonebook entry
- Press Menu, select Phonebook, and OK once.
-
Press Up and select Add new contact from the menu list, and press Enter key.
-
Select store To SIM or To Phone from the menu list, and press OK.
- Enter the name.
- Press then enter the digits for the number.
- Press Options then Save to save the new contact.
Note:
When writing the name, use # to switch cases, between Upper case (ABC), Lower case (abc) or Numerals (123).
8.3 To call a stored number
- Press Names (Right Soft Key) OR
- Press Menu, select Phonebook, and OK once.
- Press to find the name you want, or key the first letter of the name then .
- Press to dial the number.
8.4 To edit (change) a phonebook entry
-
Press Names (Right Soft Key), then to find the entry you want to change.
-
Press Enter key, select the name or number to edit then press Enter.
- Press Options then Save the change(s).
8.5 To delete a phonebook entry
- Press Names (Right Soft Key), then to find the entry you want to change.
- Press Options then / to show Delete.
- Press Enter key, then Yes to confirm the Delete.
9 CALL LOGS
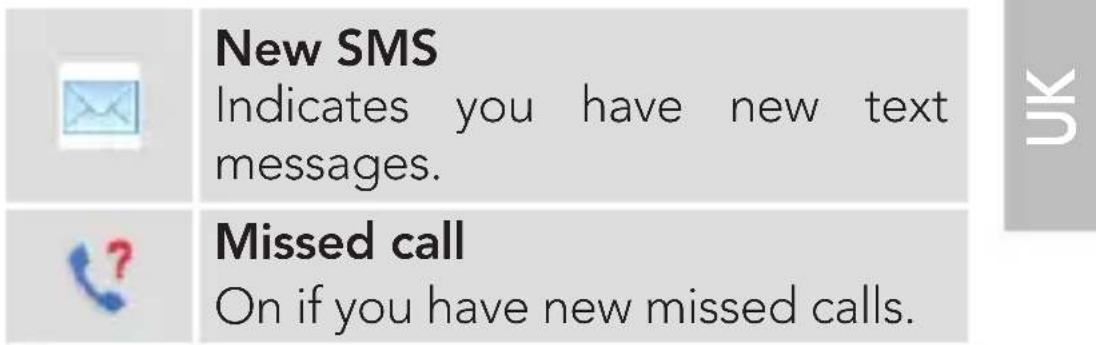
If a call is not answered, 1 missed call(s) and icon displays.
on the display indicates a new missed call in the Call history.
9.1 To view the call log entries
- From the home screen/idle mode press to show the All Calls - a combined list of received calls, dialled calls and missed calls.
OR
View via the Menu and Call center, Select Call center and press OK,
and Select Call history where you can view separate lists for Missed calls, Dialled calls, Received calls, or Delete call logs.
- Press Menu, then to show Call center, and then press OK to open the call logs menu.
- Press / to select the Call history and press OK to show the call logs menu. Select the calls log you wish to view and press OK to show the selected list.
- When in a list, press / to find the call entry you want.
- Press Options to see the following list of options:
| View View details of the selected call. | |
| Call Call the selected number. | |
| Send text message | Send SMS to the number. |
| Save to Phonebook | Save the selected number to your phonebook. |
| Delete Delete the selected number from the log. | |
10 SMS TEXT Messaging
Send and receive text messages.
These are saved in the phone memory (up to 200) or on the SIM card (SIM dependant, but a maximum of 50).
Received SMS are stored in the Inbox and the icon indicates new messages. Also "Unread messages" is displayed.
10.1 To access the SMS menu
- Press Menu to show Messaging.
- Press OK to display the options:
| Write message | to write a new message. |
| Inbox to go to | your inbox to read received texts. |
| Drafts | to view messages in draft. |
| Outbox to go | to your outbox (includes saved drafts). |
| Sent messages | to view the sent messages. |
| SMS Settings | to check or change SMS settings. |
10.2 To write and send a text message
- Press Menu then / to show Messaging.
- Press OK to show Write message
- Press OK again to display a flashing cursor.
Write your message using the digit / letter keys.
Note:
When writing text, use # to switch cases, to Upper case (ABC), Lower case (abc) or Numerals (123).
Note:
Use / to move the cursor,
Clear to delete letters and the * key for symbols or punctuation, or repeated pressing of the 1 key .
- To send, press Options and then select Send to.
- Select Enter number and press OK.
- Enter the full number, including area code.
OR
-
Press / to select Add from Phonebook to choose a number from the phonebook and press OK.
-
Press Options when the number is entered.
- Press Send to send the message.
10.3 To read your messages
- Press Menu then / to show Messaging and OK to select.
- Press to choose Inbox and OK to select it.
- Press to step through the messages.
- Press Options to show a list of options:
| View to read | the message and its date/time. |
| Reply to send | a reply to the message. |
| Call sender to | call the message sender. |
| Forward | to forward the message to other recipient. |
| Delete to delete | the message. |
| Delete all to | delete all the Inbox messages. |
11 SOS BUTTON

During standby mode with the display on, press and hold the SOS button for 3 seconds to
start the emergency call operation.
The phone outputs an emergency siren from the speaker during a countdown, before sending the emergency SMS to any of the five emergency numbers that are programmed.
Then the phone makes a call to the first programmed SOS Number and when the SOS call is answered it will play the SOS recorded voice message.
By default this message is „This is an emergency call to accept press 0''. You can record your own SOS voice message. It is important to inform during your message the receiver need to press „ 0'' to accept the call.
If the first number is busy or out of area, not answered within 1 minute or not press 0'' , it will try the 2nd and then the 3rd, 4th and 5th. If it still does not get through it will repeat the sequence of calls.
Note:
You can use the emergency SOS button even if the key lock is turned on.
Note:
This function only works if the SOS function is turned on, and at least one SOS number exists.
Note:
To setup the SOS function:
- Press Menu to show SOS setting and OK to select.
| On/Off to turn SOS function on or off. | |
| Numbers to program the SOS numbers. | |
| Voice message | to record your own personal SOS message. |
| SOS SMS to edit the SMS that is send out to the SOS numbers | |
12 SETTINGS
12.1 Date and time
- Press Menu then / to show Settings and OK to select.
- Press to choose Phone settings and OK to select it, then select Time and date.
Select the Date and time menu to set:
| Set the displayed date and time. | |
| Format the time and date format used on the display. |
13 PROFILES
Profiles allow quick changes to your phone sounds, and to customise them to suit your situation.
There are 4 preset profiles - General, Silent, Meeting, Outdoor and each profile has settings for incoming call, Alert type, Ring type, Ringtone, Ring volume, Message tone, Message tone volume, Keypad tone, and Keytone volume, Power on tone, Power off tone, Cover open, Cover close and System alert.
13.1 To Activate a Profile
- Press Menu, then / to show Settings and then press OK select Tone settings menu and press OK.
- Press / to go to the Profile you wish to select, and press Options.
| Activate to activate | te corresponding profiles. |
| Customize to custom | tomize each settings. |
| Reset to reset to | default values for the profile settings. |
14 GUARANTEE AND SERVICE
The phone is under warranty for 24 months from the date of purchase shown on your sales receipt. This guarantee does not cover any faults or defects caused by accidents, misuse, fair wear and tear, neglect, lightning, tampering with the equipment, or any attempt at adjustment or repair other than through approved agents.
Please keep your sales receipt; this is your proof of guarantee.
14.1 While the unit is under Guarantee
- Pack up all parts of your photo system, using the original package.
- Return the unit to the shop where you bought it, making sure you take your sales receipt.
- Remember to include the main adapter.
14.2 After the Guarantee has expired
If the unit is no longer under Guarantee, contact us via
www.aegtelephones.eu
15 TECHNICAL DETAILS
| Standard GSM Mobile | |
| Frequency Band | GSM900/DCS1800 |
| Operating | Standby: approx. |
| Time (with fully charged battery) | 200 hours |
| Talking: approx. 4 hours | |
| Charging Time <6 hours | |
| Temperature range | Operating: 0°C to 40°C |
| Storage: -20°C to 60°C | |
| Electrical power | BL-5K Li-ion |
| Handset battery | 3.7V DC, 900mAh |
| Battery Pack | |
| Travel charger GMT-050050C | |
| Input 100-240v | |
| AC 50/60Hz | |
| MAX 0.15A | |
| Output:5.0V | |
| DC:500mA | |
| SAR value Maximum | 0.97W/kg |
*Variation in operation times may occur depending on SIM card, network, and usage settings, usage style and environments.
16 CE DECLARATION
C€0678
This product is in compliance with the essential requirements and other relevant provisions of the R&TTE directive 1999/5/EC.
The Declaration of conformity can be found on: www.aegtelephones.eu
17 DISPOSAL OF THE
DEVICE (ENVIRONMENT)
At the end of the product lifecycle, you should not throw this product into the normal household garbage but bring the product to a collection point for the recycling of electrical and electronic equipment. The symbol on the product, user guide and/or box indicates this. Some of the product materials can be re-used if you bring them to a recycling point. By reusing some parts or raw materials from used products you make an important contribution to the protection of the environment. Please contact your local authorities in case
you need more information on the collection points in your area.
Batteries must be removed before disposing of the device. Dispose of the batteries in an environmental manner according to your country regulations.
18 CLEANING AND CARE
Do not clean any part of your phone with benzene, thinners or other solvent chemicals as this may cause permanent damage which is not covered by the Guarantee.
When necessary, clean it with a damp cloth.
Keep your phone system away from hot, humid conditions or strong sunlight, and do not let it get wet.
1 UNSER EINSATZ FÜR
DIE UMWELT
© 2014 Binatone Electronics International Limited
All rights reserved
Subject to availability. Rights of modification reserved.
AEG is a registered trademark used under license from AB Electrolux (publ)
www.aegtelephones.eu