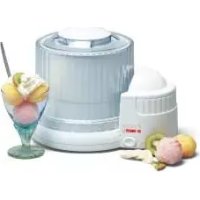
DMEC1072 - Ice machine BESTRON - Free user manual and instructions
Find the device manual for free DMEC1072 BESTRON in PDF.


| Product type | Ice cream maker (sorbet maker) |
| Brand | Bestron |
| Model | DMEC1072 |
| Power | 45 W |
| Supply voltage | 230 V ~ 50 Hz |
| Bowl capacity | Approximately 1 L (estimate) |
| Main functions | Preparation of ice cream, sorbet, frozen yogurt |
| Bowl material | Food-grade plastic |
| Cooling element | To be placed in the freezer before use |
| Included accessories | Bowl, lid, protective lid with filling opening, mixing arm, cooling element |
| Indicative preparation time | 20 to 30 minutes |
| Cleaning and maintenance | Removable parts dishwasher-safe or washable in soapy water; motor unit wiped with a damp cloth |
| Safety | Integrated thermal cut-out; automatic shut-off in case of overheating; do not immerse |
| Warranty | 60 months (5 years) on manufacturing defects |
| After-sales service | Bestron Service (Belgium); contact the dealer or authorized service center |
| Recycling | Do not dispose of with household waste; take to WEEE collection center |
Frequently Asked Questions - DMEC1072 BESTRON
User questions about DMEC1072 BESTRON
0 question about this device. Answer the ones you know or ask your own.
Ask a new question about this device
Download the instructions for your Ice machine in PDF format for free! Find your manual DMEC1072 - BESTRON and take your electronic device back in hand. On this page are published all the documents necessary for the use of your device. DMEC1072 by BESTRON.
USER MANUAL DMEC1072 BESTRON
natural_image
Line drawing of a cylindrical mechanical device with internal ribbed structure and a handle (no text or symbols)EN User's instructions, ice-cream maker
natural_image
Symbolic illustration of a tree above a crossed-out trash bin and a horizontal line below (no text or labels)Milieu
R. Neyman
Quality control
natural_image
Abstract line drawing with intertwined curves and a looped shape (no text or symbols)Eismaschine
natural_image
Symbolic illustration of a tree above a crossed-out trash bin and a horizontal line below (no text or labels)Umwelt
natural_image
Abstract line drawing with intertwined curves and a looped shape (no text or symbols)Sorbetière
Figure 1 Aperçu
natural_image
Symbolic illustration of a tree above a crossed-out trash bin and a horizontal line below (no text or labels)Environnement
• Directive EMC 2004/108/EC
natural_image
Abstract line drawing with intertwined curves and a looped shape (no text or symbols)Ice-cream maker
Congratulations with the purchase of your ice-cream maker. This appliance, one of the products in the Bestron Sweet Dreams range, is ideally suited to all lovers of ice cream – and will be the attraction at every party. You can treat your guests to a delicious and spectacular dessert.
Safety Instructions
General information
- Please read these instructions carefully, and retain them for future reference.
- Use this appliance solely in accordance with these instructions.
- This appliance is not intended for use by persons (including children) with reduced physical, sensory or mental capabilities, or lack of experience and knowledge, unless they have been given supervision or instruction concerning use of the appliance by a person responsible for their safety.
• Children should be supervised to ensure that they do not play with the appliance. - Have any repairs carried out solely by a qualified electrician. Never try to repair the appliance yourself.


Electricity and heat
- Verify that the mains voltage is the same as that indicated on the type plate on the appliance before use.
• Always remove the plug from the socket when the appliance is not in use. - Always remove the plug from the wall socket by pulling on the plug, not the power cord.
- Check the appliance's power cord regularly to make sure it is not damaged. Do not use the appliance if the power cord is damaged. Have a damaged power cord replaced by a qualified service department.
- When using an extension lead always make sure that the entire cable is unwound from the reel.
- Use solely approved extension leads.
- The appliance needs space to allow heat to escape, thereby avoiding the risk of fire. Make sure that the appliance has sufficient space around it, and does not come in contact with flammable materials. The appliance must not be covered.
- Never use the appliance in the vicinity of flammable materials.
- Make sure that the appliance, the power cord and the plug do not come in contact with sources of heat, such as a hot hob or naked flame.
- Make sure that the appliance, the power cord and plug do not come into contact with water.
- The appliance is fitted with a safety thermostat. The thermostat is activated if the motor overheats, and interrupts the power supply until the motor has cooled down again. You will not be able to use the appliance during this period.
Use
- Never use the appliance outdoors.
- Never use the appliance in humid rooms.
- Place the appliance on a flat, stable surface where it cannot fall.
- Do not let the power cord hang over the edge of the draining board, worktop or table.
- Make sure that your hands are dry when you touch the appliance, the power cord or the plug.
- Switch off the appliance and remove the plug from the wall socket in the event of a malfunction during use, and before cleaning the appliance, fitting or removing an accessory, or storing the appliance after use.
- Never leave the appliance unattended when in use.

- Never move the appliance when it is switched on or is still hot. Switch off the appliance, and wait until it has cooled down before you move it.
- Clean the appliance thoroughly after use (see "Cleaning and maintenance").
- Never immerse the appliance, the cord or the plug in water or any other liquid.
- This appliance may not be used through an external timer or by means of a remote control.
PLEASE NOTE
Do not touch the appliance if it has fallen in the water. Remove the plug from the wall socket immediately. Do not use the appliance any more.
Operation
General information
The ice-cream maker is intended only for domestic use, not for professional use.
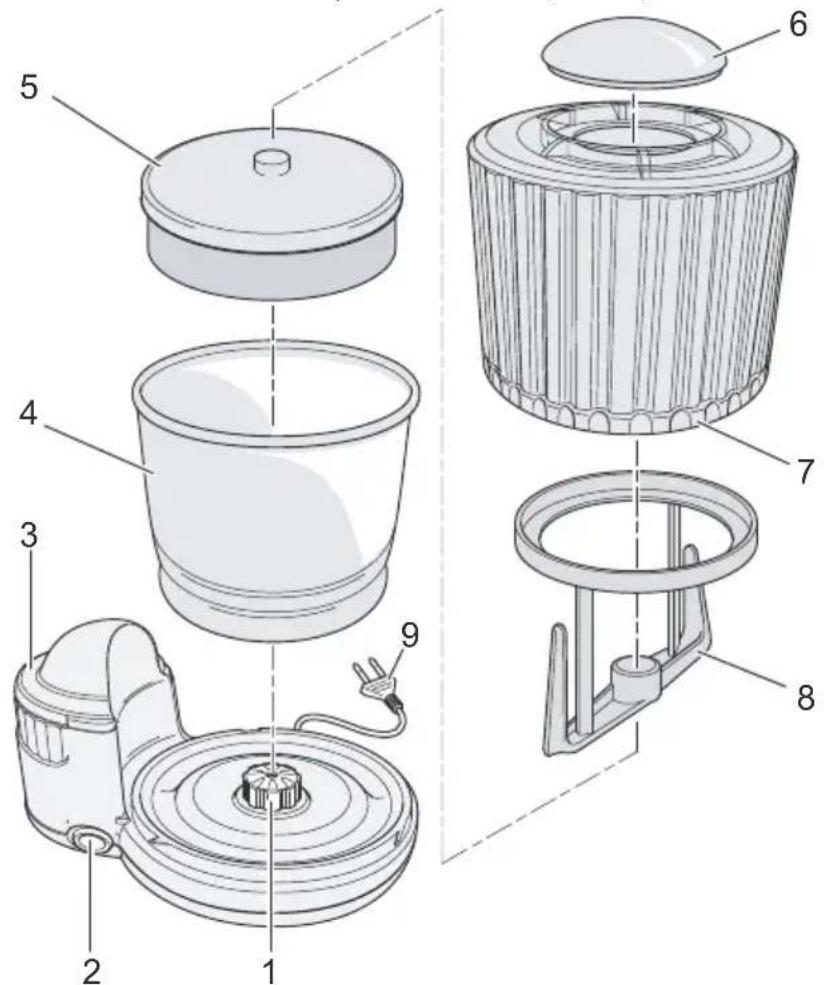
Figure 1 Features
- Motor shaft
- Motor housing
- On/Off switch
- Mixing bowl
-
Cooling element
-
Lid
- Cover with filling opening
- Stirrer
- Power cord with plug
Using for the first time
- Remove the packaging.
- Clean the lid, cover, cooling element, stirrer and mixing bowl to remove any manufacturing residues (see "Cleaning and maintenance").
Use
Preparations
- Make sure that the cooling element is clean and thoroughly dry.
- Wrap the cooling element in plastic film and put it in the coldest section of the deep freezer. The time required to completely freeze the cooling element will depend on the temperature of the deep freezer. The freezing time will be between 6-12 hours at a temperature of -18°C or lower.
- Put the mixing bowl and the stirrer in the deep freezer at least 24 hours before you plan to use the ice-cream maker.
Note Store the cooling element, mixing bowl and stirrer in the deep freezer when they are not in use; you will then be able to prepare ice cream at any time you require.
- For best results, mix the ingredients one day in advance and store the mix in a refrigerator. Allowing the mix to cool overnight will also increase the volume of the ice cream. When there is no time to allow the mix to rest overnight you will need to put the ingredients in a refrigerator at least 20 to 30 minutes before use.
Assembling the ice-cream maker
- Take the cooling element out of the deep freezer, and shake it to verify that the contents are completely frozen. On shaking the element you should not be able to hear the liquid splashing around inside.
Note Use the cooling element immediately after removing it from the deep freezer, otherwise the contents will begin to thaw.
- Put the cooling element in the mixing bowl.
- Fit the mixing bowl to the motor shaft.
- Fit the stirrer to the top of the cooling element in the mixing bowl.
- Place the cover over the mixing bowl, making sure that the three lugs on the inside of the cover are aligned precisely with the slots in the motor unit.
Making ice cream
You can make ice cream using one of the recipes in these user's instructions or your own recipe.
- Make sure the On/Off switch is set to '0' (Off).
- Insert the plug into the plug socket.
- Slide the On/Off switch to 'I' (On).
- Pour the ice-cream mix into the mixing bowl via the filling opening in the cover, and fit the lid to the cover.
- Allow the appliance to run for about 20-30 minutes, or until the ice cream has reached the required consistency.
- When the ice cream is ready slide the On/Off switch to '0' (Off).
- Remove the cover from the motor unit, and carefully remove the stirrer from the mixing bowl.
- Scoop the ice cream from the mixing bowl using a wooden, rubber or plastic spatula. Serve the ice immediately, or store it in an airtight deep-freezer container (see 'Storage').
Notes
- Home-made ice cream has the density of soft ice cream. If you prefer easy-scoop ice cream then store the ice cream in an airtight deep-freezer container in the deep freezer until it has become sufficiently hard.
- Small children and the elderly are not advised to eat ice cream made using raw eggs. In addition, this type of ice cream should not be stored for longer than one week.
Serving and decoration tips
Remove the ice cream from the deep freezer about 10-15 minutes before serving to allow it to soften slightly. In addition, it will then be easier to scoop the ice cream from the deep-freezer container.
Note Sorbet melts more rapidly than ordinary ice cream.
You can give your guests a real treat by decorating the ice cream with, for example:
- whipped cream
- chopped nuts
- fruit in syrup or fresh fruit
• chocolate leaves or grated chocolate - bonbons
- shredded coconut
- ready-to-use sauces, such as chocolate, strawberry, butterscotch, caramel.
Storing ice cream
Ice cream to be stored for a slightly longer period of time (a maximum of two weeks) should be kept in an airtight deep-freezer container. The recommended storage times are:
| Ice cream containing raw ingredients | 1 week |
| Sorbet 1-2 weeks | |
| Ice cream containing semi-cooked ingredients | 2 weeks |
Ingredients
Eggs
Eggs provide for a richer flavour and improved structure. Some recipes require only egg white. Cold egg white is more difficult to beat. Make sure that the egg white is at room temperature (by allowing it to stand for 5 to 10 minutes) before beating. Always use fresh eggs.
Milk
Milk products with a high fat content provide for a creamer ice cream, although this is always a question of individual preference. Every type of milk is suitable. Obviously you can also mix various types of milk to reduce the fat content; for example, when the recipe states 1 cup of milk you can also mix 12 a cup of full milk with 12 a cup of skimmed milk.
Artificial sweeteners
You can use artificial sweeteners instead of the sugar stated in the recipes. Always add artificial sweetener only once the mix has returned to room temperature, since otherwise the sweetener will not dissolve properly.
Replace the sugar stated in the recipes with following quantities of artificial sweetener:
Add alcohol only once the ice cream is almost frozen. Adding alcohol too early will greatly slow down the freezing process.
Fruit
The ripeness and sweetness of the fruit can have a great influence on the flavour of the ice cream. When using more acidic fruit it will be necessary to add more sugar to obtain an agreeable flavour. Conversely, when the fruit is extremely sweet it will be advisable to omit added sugar.
Recipes
Basic recipes
Custard base
One traditional method of making ice cream is based on custard. The egg yolk, sugar, cream and milk used to prepare this type of ice cream give it the well-known flavour of cream ice. Although the quantities of each ingredient used in the recipes can vary, all use the same basic method:
- Heat the cream and milk almost to boiling point in a saucepan.
- Beat the egg yolks and the sugar in a mixing bowl to obtain a thick mix.
- Add the warm cream/milk to the egg yolk/sugar and stir thoroughly until all the sugar has dissolved.
- Pour the mix back into the sauce pan and allow it to simmer, stirring all the time until just below boiling point.
- Remove the saucepan from the heat and cool the mixture as quickly as possible. Add any other ingredients, where relevant.
Cream base
Ice cream prepared using a cream base allows the flavour of the other ingredients to dominate. Using cream gives the other ingredients a fuller flavour. When making ice cream on a cream basis all you need to do is mix the cream with the fruit and other flavourings.
Yoghurt base
A healthy variant of ice cream uses yoghurt instead of cream in the custard base. This gives the ice cream its specific fresh flavour. Home-made yoghurt ice cream can, depending on the other ingredients, have a low fat and sugar content.
Sorbet base
The sorbet base consists of a sugar syrup solution. Sorbet base should be prepared using 1 kg sugar for every 1 l water.
- Bring the water to the boil in a saucepan.
- Add the sugar, stirring all the while, until it has dissolved completely.
- Remove the saucepan from the heat and allow the mixture to cool down completely.
Recipes using custard base
| Special vanilla cream ice | |
| 150 g soft brown sugar3 egg yolks500 ml full milk125 ml whipping cream5 ml vanilla essence | Prepare the custard base (see 'Basic recipes), and add the vanilla essence to the milk/whipping cream mix (which must not be boiling). Allow the mix to cool down completely. Put the mix in a refrigerator until it is cold. Switch on the appliance and pour the mix into the mixing bowl via the filling opening. Allow the appliance to run for about 20-30 minutes until the ice cream has reached the required consistency. |
| Kirsch cream ice | |
| 80 g sugar3 egg yolks400 ml milk100 ml whipping cream 12 cinnamon stick scrapings from 1 vanilla pod15 ml Kirsch25 g blackberries | Heat half of the milk with 1/3 of the sugar, the whipping cream, the cinnamon stick and the vanilla scrapings in a sauce pan. Mix the remainder of the sugar with the egg yolks. Once the milk has almost come to the boil add 1/3 of the milk to the egg-yolkmixture; stir continuously while adding the milk. Pour the egg-yolk mixture into a saucepan and add the remainder of the warm milk. Mix thoroughly. Continue to stir until the mixture thickens. Remove the saucepan from the heat and add the remaining milk, Kirsch, and blackberries. Stir thoroughly. Sieve the mixture, and put it into a refrigerator to cool. Switch on the appliance and pour the mix into the mixing bowl via the filling opening. Allow the appliance to run for about 20-30 minutes until the ice cream has reached the required consistency. |
Recipes using cream base
| Cream ice with pieces of mint chocolate | |
| 75 g soft brown sugar250 ml milk250 ml whipping cream5 ml peppermint essence150 g plain chocolate | Heat the milk and sugar until the sugar has dissolved. Allow the mixture to cool down completely. Add the whipping cream and the peppermint essence to the milk/sugar mixture, stirring all the while. Switch on the appliance and pour the mix into the mixing bowl via the filling opening. Add the pieces of chocolate once the mix begins to thicken. Allow the appliance to run for about 20-30 minutes until the ice cream has reached the required consistency. |
Recipes using yoghurt base
| Yoghurt ice | |
| 500 ml skimmed yoghurt in the flavour of your choice | Switch on the appliance. Take the yoghurt from the refrigerator and pour it into the appliance via the filling opening. Allow the appliance to run for about 20-30 minutes until the mix has attained the consistency of freshly-beaten whipped cream. |
| Pina colada yoghurt ice cream | |
| 60 g light-brown sugar50 g yoghurt30 ml white rum220 g fresh pineapple pieces12 g freshly-ground coconut 12 large, ripe banana juice from 1 lime | Mix all the ingredients in a blender to obtain a smooth mixture. Cool the mixture in a refrigerator. Switch on the appliance and pour the mix into the mixing bowl via the filling opening. Allow the appliance to run for about 20-30 minutes until the ice cream has attained the consistency of freshlybeaten whipped cream. |
Recipes using sorbet base
| Champagne sorbet | |
| 225 ml sugar syrup250 ml champagne or dry,sparkling winejuice from 1 lime | Mix all the ingredients and cool in a refrigerator.Switch on the appliance and pour the mix into themixing bowl via the filling opening. Allow theappliance to run for about 20-30 minutes until theice cream has reached the required consistency. |
| Kiwi sorbet | |
| 225 g sugar250 ml orange juice570 g peeled kiwi | Dissolve the sugar in the orange juice. Puree thekiwi in a blender, and mix into orange juice/sugarmix. Cool the mix in a refrigerator. Switch on theappliance and pour the mix into the mixing bowl viathe filling opening. Allow the appliance to run forabout 20-30 minutes until the ice cream hasreached the required consistency. |

Cleaning and maintenance
Clean the appliance and the loose parts thoroughly after each use:
- Switch off the appliance, and remove the plug from the wall socket.
- Clean the lid, cover, cooling element, stirrer and mixing bowl in hot washing-up solution. Rinse the parts with ample water and dry them thoroughly. These parts can also be cleaned in a dishwasher.
- Clean the motor unit with a damp cloth, if necessary moistened with a couple of drops of washing-up liquid. After cleaning, dry the unit thoroughly.
- Roll up the power cord and store it in the compartment on the base of the appliance.
- Store the appliance.

PLEASE NOTE
- Verify that the appliance is not connected to the power supply when you clean it.
- Never use corrosive or scouring cleaning agents or sharp objects (such as knives or hard brushes) to clean the appliance.
- Do not immerse the appliance in water, or in other liquids.
Technical information
Type: DMEC1072
Output: 45 W
Power supply: 230 V \~50 Hz

natural_image
Symbolic illustration of a tree above a crossed-out recycling bin and a circular icon above it (no text or labels)The environment
Dispose of packaging material, such as plastic and boxes, in the appropriate waste containers.
When this product reaches the end of its useful life do not dispose of it by putting it in a dustbin; hand it in at a collection point for the reuse of electrical and electronic equipment. Please refer to the symbols on the product, the user's instructions or the packaging.
The materials can be re-used as indicated. Your help in the re-use, recycling or other means of making use of old electrical equipment will make an important contribution to the protection of the environment.
Contact your municipality for the address of the appropriate collection point in your neighbourhood.
Guarantee terms
The importer guarantees the appliance against defects caused by manufacturing and/or material faults for 60 months from the date of purchase, subject to the following conditions.
-
No charges will be made for labour costs or materials during the warranty period. Any repairs carried out during the warranty period do not extend the warranty period.
-
The importer automatically becomes the owner of any faulty parts that he replaces or a faulty appliance (in the event of replacement of the appliance).
-
All claims submitted under warranty must be accompanied by the original bill of sale.
-
Claims under warranty must be submitted to the dealer where the appliance was purchased or to the importer.
-
The warranty is issued solely to the first purchaser and cannot be transferred.
-
The warranty does not cover damage caused by:
a. Accidents, incorrect use, wear and/or neglect.
b. Faulty installation and/or use in a manner contravening the prevailing legal, technical or safety regulations.
c. Connection to a mains voltage other than the voltage specified on the type plate.
d. Unauthorized modifications.
e. Repairs carried out by third parties.
f. Careless transport, i.e. without suitable packaging materials or protection.
- No claims may be made under this warranty for:
a. Losses incurred during transport.
b. The removal or changing of the appliance's serial number.
-
The guarantee does not cover power cords, lamps or glass parts.
-
No claims can be submitted under this warranty for damage other than the repair or replacement of faulty parts. The importer can never be held responsible for any consequential loss or damage or any other consequences, resulting either directly or indirectly from the appliance supplied by the importer.
-
In case of claims under guarantee you can contact your dealer where the appliance is purchased. Bestron offers you also the possibility to send the appliance directly to our Service Department. Do not send your appliance without consulting us. The package may be refused and any any costs will be for your account. Please contact the Service Department and they will tell you how to pack and send the appliance.
-
This appliance is not suitable for professional use.
Service
If a fault should occur please contact the BESTRON service department:
THE NETHERLANDS:
BESTRON NEDERLAND BV
BESTRON SERVICE
Moeskampweg 20
5222 AW 's-Hertogenbosch
Tel: +31 (0) 73 - 623 11 21
Fax: +31 (0) 73 - 621 23 96
Email: info@bestron.com
Internet: www.bestron.com
CE Declaration of conformity
This product conforms to the essential requirements of the following EU safety directives:
• EMC Directive 2004/108/EC
• Low Voltage Directive 2006/95/EC
R. Neyman
Quality control
natural_image
Abstract line drawing with intertwined curves and a looped shape (no text or symbols)Gelatiera elettrica
natural_image
Symbolic illustration of a tree above a crossed-out trash bin and a horizontal line below (no text or labels)natural_image
Abstract line drawing with intertwined curves and a looped shape (no text or symbols)Figura 1 Partes del aparato
natural_image
Symbolic illustration of a tree above a recycling bin with no text or labelsMedio ambiente
natural_image
Abstract line drawing with intertwined curves and a looped shape (no text or symbols)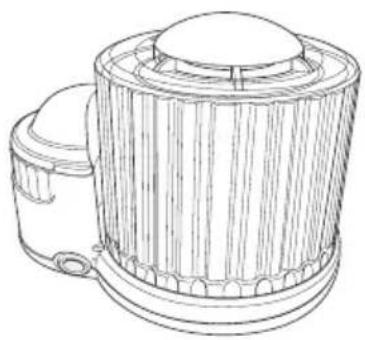
natural_image
Line drawing of a cylindrical mechanical component with a flanged top and side housing (no text or symbols)BESTRON®
DMEC1072
v 090817-03
- Milieu
- Eismaschine
- Umwelt
- Sorbetière
- Environnement
- Ice-cream maker
- Safety Instructions
- General information
- Electricity and heat
- Use
- PLEASE NOTE
- Operation
- Using for the first time
- Preparations
- Assembling the ice-cream maker
- Making ice cream
- Notes
- Serving and decoration tips
- Storing ice cream
- Ingredients
- Eggs
- Milk
- Artificial sweeteners
- Fruit
- Recipes
- Basic recipes
- Custard base
- Cream base
- Yoghurt base
- Sorbet base
- Cleaning and maintenance
- Technical information
- The environment
- Guarantee terms
- Service
- THE NETHERLANDS:
- CE Declaration of conformity
- Gelatiera elettrica
- Medio ambiente
Brand : BESTRON
Model : DMEC1072
Category : Ice machine