STM5400 - Mixer AEG - Free user manual and instructions
Find the device manual for free STM5400 AEG in PDF.
| Product Type | Hand blender (immersion blender with accessories) |
| Brand | AEG |
| Model | STM5400 |
| Power supply | 220-240 V ~ 50/60 Hz |
| Power | 600 W (estimated) |
| Package contents | Motor unit, metal blending shaft, 800 ml measuring jug, whisk, chopper bowl with lid and blade |
| Materials | Metal blending shaft, plastic jug, stainless steel blades |
| Main functions | Blend, chop, whisk, turbo |
| Included accessories | Metal blending shaft, whisk, chopper bowl (mini chopper) with lid and blade |
| Jug capacity | 800 ml |
| Speeds | Normal speed and Turbo function (continuous operation) |
| Maximum continuous operation | 60 seconds |
| Safety | Very sharp blades, do not immerse the motor unit, unplug before assembly/disassembly/cleaning, do not blend paint |
| Cleaning and maintenance | Motor unit: wipe with a damp cloth; accessories: wash under running water, dry vertically; do not use abrasive cleaners |
| Spare parts and repairability | Repair by manufacturer or authorized repairer; no spare parts provided |
| Intended use | Domestic: blend, chop, whisk food |
| General information | 24-page manual available for download |
Frequently Asked Questions - STM5400 AEG
User questions about STM5400 AEG
0 question about this device. Answer the ones you know or ask your own.
Ask a new question about this device
Download the instructions for your Mixer in PDF format for free! Find your manual STM5400 - AEG and take your electronic device back in hand. On this page are published all the documents necessary for the use of your device. STM5400 by AEG.
USER MANUAL STM5400 AEG
natural_image
White and silver robotic brush with a black control panel and 'TURBO' button, no visible text or symbols on the device itself.STICK MIXER EASYCOMPACT STM5xxx
D·GR·NL·F·GB
D Anleitung....3–11
GB Instruction book......17-22
Before using the appliance for the first time, please read the safety advice on page 18.

text_image
A B C J I K F D E H GDG
Teile
natural_image
Medical catheter device with metallic tubing and connector (no text or symbols visible)D
natural_image
Diagram of a piston-cylinder system with liquid and spheres inside a glass (no text or symbols)-
Setzen Sie den Stabmixer tief in den Becher und beginnen Sie den Mixvorgang durch Starten mit normaler Geschwindigkeit. Achten Sie darauf, dass der Becher nicht mehr als 2/3 (600 ml) gefüllt ist. Wenn der Becher nicht verwendet wird, darauf achten, dass der Mixfuß nicht mehr als 2/3 seiner Länge eintaucht. Lassen Sie zum Beenden die Taste los.
-
Εισαγάγετε βαθιά τον αναδευτήρα μέσα στο μικρό δοχείο και ξεκινήστε να ανακατεύετε σε κανονική ταχύτητα. Βεβαιωθείτε ότι το περιεχόμενο του μικρού δοχείου δεν υπερβαίνει τα 2/3 (600 ml) της χωρητικότητάς του. Εάν δεν χρησιμοποιήσετε το μικρό δοχείο, μη βυθίσετε το άκρο για ανακάτεμα περισσότερο από τα 2/3 του μήκους του. Απελευθερώστε το διακόπτη για να σταματήσει.
-
Plaats de staafmixer zo ver mogelijk in de beker en begin met mixen op een normale snelheid. Zorg dat de beker voor maximaal tweederde (600 ml) is gevuld. Als u de beker niet gebruikt, moet u ervoor zorgen dat de mixvoet voor niet meer dan tweederde van de lengte ervan wordt gebruikt. Laat de aan-/uitknop los om het apparaat uit te zetten.
-
Plongez le mixeur plongeant dans le récipient, puis commencer à mixer à vitesse normale. Veillez à ce que le récipient gradué ne soit pas rempli au delà des 2/3 (600 ml) de sa capacité. Si vous utilisez un autre récipient que celui fourni, veillez à ne pas immerger le pied mixeur au delà des 2/3 de sa longueur. Relâcher le bouton pour l'arrêter.

natural_image
Diagram of a mechanical device with a downward arrow indicating force or direction (no text or symbols)-
Verwenden des Mini-Zerkleinerers*. Stellen Sie den Zerkleinerungsbehälter auf eine saubere, ebene Fläche. Bringen Sie die Edelstahlklinge an.
-
Χρήση της μικρής συσκευής τεμαχισμού*. Τοποθετήστε το μπολ τεμαχισμού σε μια καθαρή, επίπεδη επιφάνεια. Τοποθετήστε την ανοξείδωτη λεπίδα στη θέση της.
-
Het gebruik van de minihakker ^* . Plaats de hakkom op een schone, vlakke ondergrond. Bevestig het roestvrijstalen blad.
-
Utilisation du mini-hachoir*. Placer le hachoir sur une surface propre et plane. Mettre le couteau en acier inoxydable en place.

natural_image
Mechanical assembly diagram showing a valve inserted into a housing (no text or symbols visible)-
Geben Sie die Lebensmittel in den Zerkleinerungsbehälter*. Die maximale Zerkleinerungsmenge beträgt 300 g (angezeichnete Maximalhöhe). Schließen Sie den Deckel.
-
Τοποθετήστε το άκρο στο μπολ τεμαχισμού*. Ο όγκος τροφίμων που πρόκειται να τεμαχίσετε δεν πρέπει να υπερβαίνει τα 300 γρ (Υποδεδειγμένο ΑΝΩΤΑΤΟ επίπεδο). Κλείστε το καπάκι.
-
Plaats de ingrediënten in de hakkom*. De hoeveelheid te hakken ingrediënten mag niet meer bedragen dan 300 gram (aangegeven als MAX). Sluit de deksel.
-
Remplir le bol hachoir d'aliments ^* . Le poids des aliments à hacher ne doit pas dépasser 300 g (Quantité maximale). Fermez le couvercle.

text_image
B Anatural_image
Close-up of a metallic medical or laboratory device with a curved tube and connector (no visible text or symbols)D
natural_image
Two objects: a beaker with a lid and a wire whisk, both without any text or symbols.-
Becher und Rührhaken, die vom Kunststoffträger abgenommen wurden, können im Geschirrspüler gereinigt werden.
-
Η κούπα και ο αναδευτήρας που έχουν αποσπαστεί από το πλαστικό δοχείο μπορούν να πλυθούν στο πλυντήριο πιάτων.
-
De uit de kunststof houder verwijderde beker en gardes kunnen in de afwasautomaat worden gereinigd.
-
Le verre-doseur et les fouets (détachés du support en plastique) peuvent être lavés au lave-vaisselle.

natural_image
3D rendered image of a white mechanical device with a handle and shaft (no text or symbols visible)This page is left blank intentionally

text_image
A B C F J I K D E
natural_image
3D rendering of a laboratory mixing bowl with whisk and stand (no text or symbols)
text_image
GGB
Components
A. Normal speed button
B. Turbo button
C. Handheld part
D. Metal mixing foot
E. Knife
F. Power cord
G. Beaker
H. Traditional whisk*
I. Chopper bowl*
J. Chopper bowl lid*
K. Chopper bowl knife*
*depending on model
GB
Read the following instruction carefully before using machine for the first time.
- This appliance is not intended for use by persons (including children) with reduced physical, sensory or mental capabilities, or lack of experience and knowledge, unless they have been given supervision or instruction concerning use of the appliance by a person responsible for their safety.
• Children should be supervised to ensure that they do not play with the appliance. - Do not allow children to use the appliance without supervision.
- The appliance may only be connected to a power supply whose voltage and frequency comply with the specifications on the rating plate!
- Never use or pick up the appliance if – the supply cord is damaged, – the housing is damaged.
- If the appliance or the supply cord is damaged, it must be replaced by the manufacturer, its service agent or similarly qualified person, in order to avoid hazard.
• Always disconnect the appliance from the supply if it is left unattended and before assembling, disassembling or cleaning.
- Never touch the blades or inserts with your hand or any tools while the appliance is plugged in.
- The blades and inserts are very sharp! Danger of injury! Caution when assembling, disassembling after use or when cleaning! Ensure that the appliance is disconnected from the mains supply.
- Care shall be taken when handling the sharp cutting blades, emptying the bowl and during cleaning.
- The appliance cannot be used for chopping ice or blending hard and dry substance, such as nut, candy; except with specific accessories provided with the appliance. Otherwise the blade could be blunt.
- Do not immerse the appliance in water or any other liquid.
- When processing heavy load, do not use the appliance continuously for more than 60 seconds. Allow to cool down before restarting.
- Do not use this appliance to stir paint. Danger, could result in an explosion!
- Never operate chopper accessory without lid.
- This appliance is intended for domestic use only. The manufacturer cannot accept any liability for possible damage caused by improper or incorrect use.
Getting started
GB
natural_image
Medical catheter device with metallic tubing and connector (no visible text or symbols)- Before first use, be sure to clean mixing foot and let dry. Before inserting or removing mixing foot, remove plug from power outlet.
natural_image
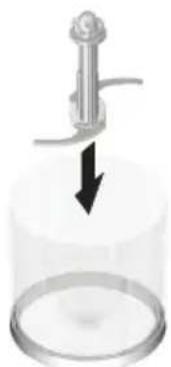
Diagram of a mechanical device with a downward arrow indicating force or direction (no text or symbols)- Using the mini chopper*. Place chopper bowl on a clean, level surface. Put stainless steel blade into place.

text_image
A B- Insert the mixing foot to handheld part, turn clockwise (A) and lock into position. To remove, turn mixing foot counter clockwise (B).

natural_image
Mechanical assembly diagram showing a piston inside a cylinder with a downward arrow indicating force or motion (no text or symbols)- Place food into the chopper bowl ^* . Amount of food to be chopped cannot exceed 300 g (Indicated max level). Close the lid.

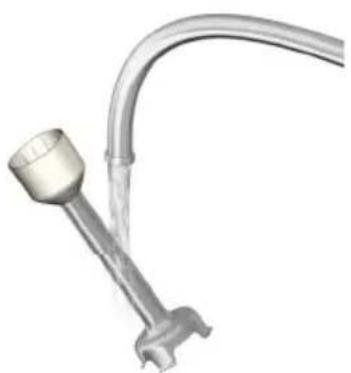
natural_image
Diagram of a mechanical device with spheres inside a container, showing fluid flow direction (no text or symbols)- Insert the stick mixer deep into the beaker, begin mixing by starting at normal speed. Make sure the beaker is no more than 2/3 (600 ml) full. If you do not use the beaker, do not immerse the mixing foot more than 2/3 of its length. Release switch to stop.

text_image
B A- Insert handheld part into the chopper lid, turn clockwise (A) and lock into position. Plug into power outlet and press switch to start. Release to stop. Remove handheld part by turning counter clockwise (B).
Getting started

text_image
A BGB
- Working with the traditional whisk*. To assemble whisk with handheld part, turn handheld part clockwise until tightened. To disassemble, turn counter clockwise.
Cleaning

natural_image
Close-up of a metallic medical or laboratory tool with a curved tube and connector (no visible text or symbols)- Before cleaning, always unplug the appliance. Do not immerse mixing foot in water, just wash under running water (no abrasive cleaner or detergents). Place upright to let dry.

natural_image
Two objects: a beaker with a lid and a wire whisk, both without any text or symbols.- Beaker and whisks detached from the plastic holder can be washed in the dishwasher.

natural_image
3D rendered image of a dental implant or tool component (no text or symbols visible)- Disassemble the handheld part. Wipe with a damp cloth and dry thoroughly. Never immerse in water due to risk of electric shock.
Blending quantities and Processing Times
| Accessory Metal mixing foot and Beaker | ||||
| Recipe Ingredients Quantity | Time Speed | |||
| Pineapple-apricots Smoothie | Pineapple in slices 250 g | 60 sec TurboDried Apricots 40 g | ||
| Yoghurt 300 g | ||||
| Raspberries Smoothie | Frozen raspberries 250 g | 60 sec Turbo | ||
| Banana 1⁄2 pcs | ||||
| Water 100 g | ||||
| Caster sugar 1 Tbs | ||||
| Yoghurt 300 g | ||||
Chopping quantities and Processing Times
| Accessory Mini Chopper | ||||||||
| Ingredients | Quantity | Quality | Time | Quality | Time | Quality | Time | Speed |
| Carrots | 100-200 g | Coarse | -- | Medium | 5-10 sec | Fine | 10-20 sec | Turbo |
| Onions | 100-200 g | 3-5 sec | 10-20 sec | Turbo | ||||
| Almonds | 100-200 g | 3-5 sec | 7-10 sec | 10-20 sec | Turbo | |||
| Meat | 100-200 g | -- | 5 sec | Turbo | ||||
| Ice | 100-200 g | -- | 5 Pulses ON for 3 sec,OFF for 2sec | 10 Pulses ON for 3 sec, OFF for 2 sec | Turbo | |||
Whisking/Whipping quantities and Processing Times
| Accessory Professional double wisk | |||
| Ingredients Quantity | Time | Speed | |
| Cream | 500 g | 50-70 sec | Turbo |
| Egg whites | 4 units | 60 sec | Turbo |
| Note: it is possible to use the Professional Double Whisk for whipping cream in the Beaker, as long as the temperature of the cream is between 4 and 8 Degree Celcius. For whisking eggs, please use a 1,5 Litre bowl. | |||
Troubleshooting
| Problem Possible cause Solution | ||
| The mini chopper* does not work. The chopper lid is not correctly fastened. Make sure the lid and the chopper bowl are properly assembled. | ||
| The mixing foot/traditional whisk* does not work. | The mixing foot/traditional whisk* is not correctly assembled. | Make sure to lock mixing foot/traditional whisk* into position. |
| * depending on model | ||
Disposal
Disposal
Packaging materials
The packaging materials are environmentally friendly and can be recycled. The plastic components are identified by markings, e.g. >PE<, >PS<, etc. Please dispose of the packaging materials in the appropriate container at the community waste disposal facilities.
Old appliance

The symbol — on the product or on its packaging indicates that this product may not be treated as household waste. Instead it shall be handed over to the applicable collection point for the recycling of electrical and electronic equipment. By ensuring this product is disposed of correctly, you will help prevent potential negative consequences
for the environment and human health, which could otherwise be caused by inappropriate waste handling of this product. For more detailed information about recycling of this product, please contact your local city office, your household waste disposal service or the shop where you purchased the product.
This page is left blank intentionally